
EN
DE
FR
HU
RO
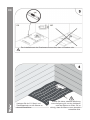
Ergo Black/White Shower tray
INSTRUCTION GUIDE
Ergo Black/White Duschwanne
Montageanleitung
Receveur de douche Ergo Black/White
instructions de montage
Tava de duș Ergo Black/White
instrucțiuni de asamblare
ERGO 120/140
WC00527
WC00528
WC00529
WC00530
Ergo Black/White zuhanytálca
SZERELÉSI ÚTMUTATÓ

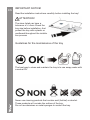
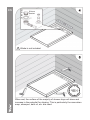
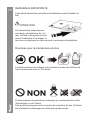
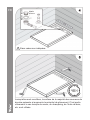
EN IMPORTANT NOTICE!
Read the installation instructions carefully before installing the tray!
ATTENTION!
The sizes listed can have a
tolerance of +/-4mm.Check the
tray size before installation. And
protect the tray with a plastic or
cardboard throughout the installa-
tion process
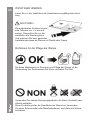
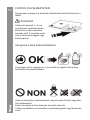
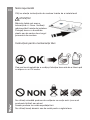
Guidelines for the maintenance of the tray
The best way to clean and maintain the tray is to use soapy water with
a neutral PH.
Never use cleaning products that contain acid (Antikal) or alcohol.
These products will corrode the surface of the tray.
Do not use abrasives or metal sponges to scratch the tray.

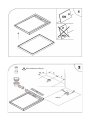
Waste is not included
drain

EN
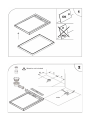
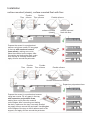
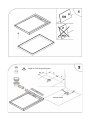
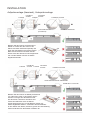
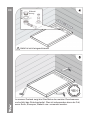
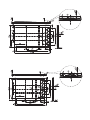
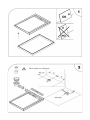
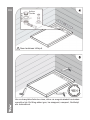
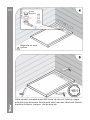
Ensure that the location of the shower tray is rm, level,and clean
Lay a 5:1 sand & cement mix
to help level/support the tray
Ensure level of mix at front is deep
enough to ll the cavity under the tray.
It is essential the front of the tray is fully
supported.

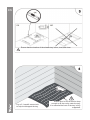
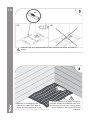
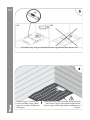
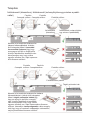
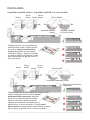
Installation
surface mounted (classic), surface mounted ush with oor
surface mounted
ush with oor
Tiles Tiles
Flexible
silicone
Flexible
silicone Flexible silicone
surface mounted
(classic)
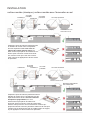
Prepare the screed in a professional
manner using lean mortar. Fill any gaps
in the tray with sand and cement
(lean mortar), making sure not to
place the material on the edges. After
connecting and testing the drain, make
sure the tray is correctly levelled and
apply silicone around the perimeter.
Surface mounted on the oor
Tiles Tiles
Flexible
silicone
Flexible
silicone Flexible silicone
Expansion polyuretane foam
Prepare the screed in a professional manner
using lean mortar. Fill any gaps in the tray
with expansion polyuretane foam,
making sure not to place the material
on the edges. After connecting and testing
the drain, make sure the tray is correctly levelled
any apply silicone around the perimeter. Use tile glue
on the edges of the tray so that it adheres well to the
support, and apply silicone around the perimeter

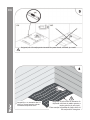
EN Silicone
Sealant
Waste is not included
Shower tray
When wet, the surface of the majority of shower trays will show and
increase in the potential for slipping. This is particularly the case when
soap, shampoo, bath oil, etc. are used.


DE WICHTIGER HINWEIS
Lesen Sie vor der Installation der Duschwanne sorgfältig diese Anlei-
tung
ACHTUNG!
Die aufgelisteten Grössen können
eine Toleranz von +/-4 mm auf-
weisen. Überprüfen Sie vor der
Installation die Wannengrösse.
Und schützen Sie beim gesamten
Installationsprozess die Wanne mit Plastik oder Pappe.
Richtlinien für die Pege der Wanne
Die beste Möglichkeit zur Reinigung und Pege der Wanne ist die
Verwendung von Seifenwasser mit einem neutralen PH-Wert.
Verwenden Sie niemals Reinigungsprodukte, die Säure (Antikalk) oder
Alkohol enthalten.
Diese Produkte greifen die Oberäche der Wanne an. Verwenden
Sie keine Scheuermittel oder Metallschwämme, weil diese die Wanne
zerkratzen.

Abfall ist nicht eingeschlossen
wasserablauf

DE
Der Installationsort der Duschwanne muss fest, eben und sauber sein.
Verlegen Sie ein 5:1 Sand- und
Zementgemisch,um die Wanne zu
ebnen/unterstützen.
Stellen Sie sicher, dass die Mischung
vorne tief genug ist, um den Hohlraum
unter der Wanne zu füllen. Es ist
wichtig, dass die Wanne vorne komplett
unterstützt wird.

INSTALLATION
Aufputzmontage (klassisch), Unterputzmontage
UNTERPUTZMONTAGE
FLIESEN FLIESEN
FLEXIBLES
SILIKON
FLEXIBLES
SILIKON FLEXIBLES SILIKON
AUFPUTZMONTAGE
(KLASSISCH)
Bereiten Sie den Estrich professionell mit
Mörtel vor. Füllen Sie die Lücken in der
Wanne mit Sand und Zement (Mörtel) und
legen Sie das Material nicht auf die Kanten.
Nach dem Anschluss und Testen des Ab-
usses muss die Wanne korrrekt ausgerichtet
sein und die Ränder müssen mit Silikon
abgedichtet werden
AUFPUTZMONTAGE AUF DEM BODEN
FLIESEN FLIESEN
FLEXIBLES
SILIKON FLEXIBLES
SILIKON FLEXIBLES SILIKON
WANNE MIT PU-SCHAUM
Bereiten Sie den Estrich mit Mörtel professionell
vor. Füllen Sie Lücken in der Wanne mit PU-
Schaum und legen Sie das Material nicht
auf die Kanten. Nach dem Anschluss und
Testen des Abusses muss die Wanne
korrekt ausgerichtet sein und die Ränder müssen mit
Silikon abgedichtet werden. Verwenden Sie Fliesenkleber
an den Kanten der Wanne, damit sie gut auf der Unterstützung
haftet und dichten Sie die Ränder mit Silikon ab.

DE Silikondi-
chtung
Abfall ist nicht eingeschlossen
Duschwanne
Im nassen Zustand zeigt die Oberäche der meisten Duschwannen
und erhöht das Rutschpotential. Dies ist insbesondere dann der Fall,
wenn Seife, Shampoo, Badeöl usw. verwendet werden.


FR REMARQUE IMPORTANTE
Lisez attentivement les instructions d’installation avant d’installer le
bac
ATTENTION!
Les dimensions indiquées peu-
vent avoir une tolérance de +/-4
mm. Vériez la dimension du bac
avant l’installation. Et protégez le
bac avec du plastique ou carton durant le processus d’installation
Directives pour la maintenance du bac
La meilleure façon de nettoyer et de maintenir le bac est d’utiliser de
l’eau savonneuse avec un PH neutre.
N’utilisez jamais de produits de nettoyage qui contiennent de l’acide
(Anticalcaire) ou de l’alcool.
Ces produits provoqueront la corrosion de la surface du bac. N’utilisez
pas d’abrasifs ni d’éponges en métal pour gratter le bac.

Eaux usées non indiquées
drainage

FR
Assurez-vous que l’emplacement du bac à douche est solide, à niveau et
propre.
Déposez un mélange 5 pour 1 de
sable & de ciment pour aider à
mettre à niveau/supporter le bac.
Assurez-vous que la mise à niveau du
mélange devant est sufsante pour rem-
plir la cavité sous le bac. Il est essentiel
que le devant du bac soit entièrement
supporté.

INSTALLATION
surface montée (classique), surface montée avec l’évacuation au sol
surface montée avec
l’évacuation au sol
CARREAUX
CARREAUX
CARREAUX
CARREAUX
SILICONE
FLEXIBLE
SILICONE
FLEXIBLE
SILICONE
FLEXIBLE
SILICONE
FLEXIBLE
SILICONE FLEXIBLE
SILICONE FLEXIBLE
surface montée (classique)
Préparez le pavé de manière professionnelle
en utilisant du mortier mince. Remplissez
tous les espacement dans bac avec du
sable et du ciment (mortier mince), en
étant sûr de ne pas placer de matière sur les
bords. Après connexion et test de l’évacua-
tion, assurez-vous que le bac est correcte-
ment à niveau et appliquez du silicone autour
du périmètre.
surface montée au sol
MOUSSE D’EXPANSION
POLYURETHANE
Préparez le pavé de manière professionnelle en
utilisant du mortier mince. Remplissez tous les
espacements dans le bac avec de la mousse
d’expansion polyuréthane, en vous
assurant de ne pas placer de matière sur
les bords. Après connexion et test de l’évacuation,
assurez-vous que le bac est correctement à niveau et ap-
pliquez du silicone autour du périmètre. Utilisez de la colle pour
carreaux sur les bords du bac an qu’il adhère bien au support,
et puis appliquez du silicone autour du périmètre.

FR Mastic
silicone
Eaux usées non indiquées
Bac de douche
Lorsqu’elles sont mouillées, la surface de la majorité des receveurs de
douche présente et augmente le potentiel de glissement. C’est partic-
ulièrement le cas lorsque du savon, du shampoing, de l’huile de bain,
etc. sont utilisés.


HU FONTOS FIGYELMEZTETÉS!
Figyelmesen olvassa el a telepítési utasításokat mielőtt felszerelné a
tálcát!
FIGYELEM!
A felsorolt méretek +/- 4 mm-
es eltéréssel rendelkezhetnek.
Ellenőrizze a tálca méretét a
telepítés előtt. A telepítés során
óvja a tálcát műanyaggal vagy
kartonpapírral
Irányelvek a tálca karbantartásához
A semleges pH-jú szappanos víz használata a legjobb mód a tálca
tisztítására és karbantartására.
Soha ne használjon tisztítószereket, melyek savat (Antikal) vagy alko-
holt tartalmaznak.
Ezek a termékek a tálca felszínén korróziót okoznak.
A tálca súrolásához ne használjon csiszolóanyagokat vagy fémszivac-
sokat.
La page est en cours de chargement...
La page est en cours de chargement...
La page est en cours de chargement...
La page est en cours de chargement...
La page est en cours de chargement...
La page est en cours de chargement...
La page est en cours de chargement...
La page est en cours de chargement...
La page est en cours de chargement...
La page est en cours de chargement...
La page est en cours de chargement...
La page est en cours de chargement...
-
 1
1
-
 2
2
-
 3
3
-
 4
4
-
 5
5
-
 6
6
-
 7
7
-
 8
8
-
 9
9
-
 10
10
-
 11
11
-
 12
12
-
 13
13
-
 14
14
-
 15
15
-
 16
16
-
 17
17
-
 18
18
-
 19
19
-
 20
20
-
 21
21
-
 22
22
-
 23
23
-
 24
24
-
 25
25
-
 26
26
-
 27
27
-
 28
28
-
 29
29
-
 30
30
-
 31
31
-
 32
32


Wellis ERGO 120 Manuel utilisateur
- Taper
- Manuel utilisateur
- Ce manuel convient également à
dans d''autres langues
- English: Wellis ERGO 120 User manual
- Deutsch: Wellis ERGO 120 Benutzerhandbuch
- română: Wellis ERGO 120 Manual de utilizare
Documents connexes


Autres documents
-
Villeroy & Boch 69328 Guide d'installation
-
Breville BARISTA MAX VCF126X01 Le manuel du propriétaire
-
Oursson DH3501D/RD Manuel utilisateur
-
HP PageWide Managed P77740 Multifunction Printer series Mode d'emploi
-
-
Kinderkraft Cruiser Manuel utilisateur