Sorelle Portofino Assembly Instructions
- Catégorie
- Meubles de bébé
- Taper
- Assembly Instructions
Ce manuel convient également à

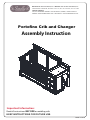
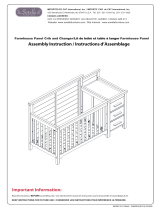
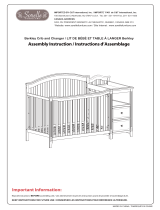
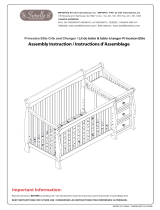
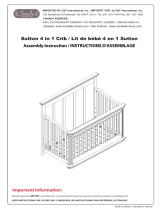
Portofino Crib and Changer
Assembly Instruction
Important Information:
Read all instructions BEFORE assembling crib.
KEEP INSTRUCTIONS FOR FUTURE USE.
Made in China
IMPORTED BY C&T International, Inc. / IMPORTE` PAR de C&T International, Inc.
CANADA ADDRESS:
105 Stonehurst Ct Northvale, NJ 07647 U.S.A.
3453, DU PRESIDENT KENNEDY LAC MEGANTIC, QUEBEC, CANADA G6B 2Y4
Tel, 201- 531-1919 Fax, 201- 531-1920
Website: www.sorellefurniture.com / Site Internet : www.sorellefurniture.com

Page 2
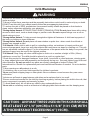
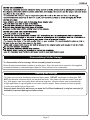
WARNING
*Infants can suffocate on soft bedding. Never add a pillow or comforter. Never place additional padding
under an infant.
*Failure to follow these warnings and the assembly instructions could result in serious injury or death.
DO NOT use this crib if you cannot exactly follow the accompanying instructions.
*To reduce the risk of SIDS, pediatricians recommend healthy infants be placed on their backs to
sleep, unless otherwise advised by your physician.
*Strangulation Hazard: STRINGS CAN CAUSE STRANGULATION! Do not place items with a string
around a child's neck, such as hood strings or pacifier cords. Do not suspend strings over a crib or
attach strings to toys.
*Strangulation Hazard: To help prevent strangulation tighten all fasteners. A child can trap parts of
the body or clothing on loose fasteners.
*Strangulation Hazard: Do not place crib near window or patio door where cords from blinds or
drapes may strangle a child.
*Fall Hazard: When child is able to pull to a standing position, set mattress to lowest position and
remove bumper pads, large toys and other objects that could serve as steps for climbing out. This crib
has an adjustable mattress support. For the convenience of the parent when the baby is very small, the
mattress support may be used in the highest position.
*Fall Hazard: Stop using crib when child begins to climb out or reaches a height of 35in. (89cm),
whichever occurs first. The child should be placed in a youth or regular bed.
*Check this product for damaged hardware, loose joints, loose bolts or other fasteners, missing parts,
or sharp edges before and after assembly and frequently during use. Securely tighten loose bolts and
other fasteners. Do not use crib if any parts are missing, damaged or broken.Contact C&T
International Inc./Sorelle for replacement parts and instructional literature if needed. Do not substitute
parts.
*Follow warnings on all products in a crib.
*If refinishing, use a non-toxic finish specified for children's products.
*Never use plastic shipping bags or other plastic film as mattress covers because they can cause
suffocation.
*Infants can suffocate in gaps between crib sides and a mattress that is too small.
*Ensure a safe environment for the child by checking regularly, before placing the child in the crib, that
every component is properly and securely in place.
*To avoid head injury, do not allow any child to play underneath the crib.
*Never add an accessory such as a bassinet or changing table that extends over the sleeping area.
C
Crib Warnings
AUTION : ANY MATTRESS USED IN THIS CRIB SHALL
BE AT LEAST 27 1/4” (69CM) x 51 5/8” (131 CM) WITH
A THICKNESS NOT EXCEEDING 6” (15CM).
SORELLE

Page 3
SORELLE
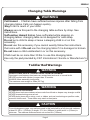
Toddler Bed Warnings
Changing Table Warnings
INFANTS HAVE DIED IN TODDLER BEDS FROM ENTRAPMENT.
Openings in and between bed parts can entrap head and neck of a small child.
NEVER use bed with children younger than 15 months.
ALWAYS follow assembly instructions.
The maximum user weight is 50lbs (22.7kg)
STRANGULATION HAZARD
NEVER place bed near windows where cords from blinds or drapes may strangle a child.
NEVER suspend strings over a bed.
NEVER place items with a string, cord, or ribbon, such as hood strings or pacifier cords,
around a child's neck. These items may catch on bed parts.
ENTRAPMENT HAZARD
To avoid dangerous gaps, any mattress used in this bed shall be a full-size crib mattress
at least 51 5/8 in (1310mm) in length, 27 1/4 in (690mm) in width and 4 in (100mm) in
thickness. The mattress thickness must not exceed 6 in (150mm).
WARNING
!
WARNING
!
CAUTION
!
Always secure this pad to the changing table surface by strap. See
instructions.
Suffocation Hazard Babies have suffocated while sleeping on
changing tables: changing table is not designed for safe sleep.
Do not put a child to sleep or leave a sleeping child in or on this
Do not
Do not
use this accessory if you cannot exactly follow the instructions
that come with it. use the changing table if it is damaged or broken.
Do not leave a child unattended in or on this accessory.
accessory.
Fall Hazard
- Children have suffered serious injuries after falling from
changing tables. Falls can happen quickly.
Stay In arm's reach of your child.
Child must be no more than 30 lbs. to use this changing table.
Use only the pad provided by C&T International / Sorelle or Manufacturer’s
WARNING
!

SORELLE
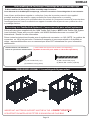
Important: In order to properly assemble the crib, carry out the operations in order specified. Failure to assemble the crib in the manner recommended order
can make the crib hazardous.
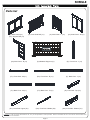
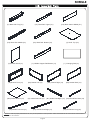
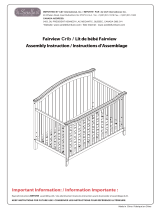
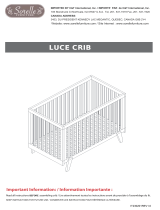
Parts list
4 egaP
(A):
(A1): Support Rail (x1)
Back Side Panel - L (x1) (C1):Side Panel - M (x1)
(C2):Side Panel - R (x1)
Panel (x1) (C):
(B): Front Side Rail (x1)
(E):
(E1): Front Post - M (E2): Front Post - R (x1)(x1)
Front Post - L (x1)
(F): Back Post - L (x1)
(F1): Back Post - M (x1) (F2): Back Post - R (x1) (G): Front Rail -Top (X1)
(G1): Front Rail -Upper (X1) (G2): Front Rail - Middle (X2) (G3): Front Rail - Bottom (X1)
(D): Mattress Support (x1)

SORELLE
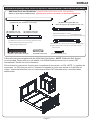
Important: In order to properly assemble the crib, carry out the operations in order specified. Failure to assemble the crib in the manner recommended order
can make the crib hazardous.
5 egaP
(L): Middle Support Rail-Bottom (x1)
(M) Drawer Front (x3)
(O) Outside Post-Left (x1) (O1) Outside Post-Right (x1)
(K) Neutral board (x1) ( I ) Changing Pad (x1)
(M2) Drawer Right (x3) (M3) Drawer Back (x3)
(N1) Inside Post-Right (x1)
(M1) Drawer Left (x3)
(N): Inside Post-Left (x1) (N3) Round Bar-Short (x2)
(O3) Round Bar-Long (x2)
(M4) Drawer Bottom (x3)
(H): Back Rail -Top (X1) (H1): Back Rail -Upper (X1) (H2): Back Panel -Middle (X1)
(H3): Back Rail -Middle (X1) (H4): Back Rail -Bottom (X1) (J): Shelf -Top (X1)

SORELLE
Important: In order to properly assemble the crib, carry out the operations in order specified. Failure to assemble the crib in the manner recommended order
can make the crib hazardous.
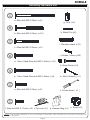
Assembly Hardware Set
6 egaP
m. Allen Wrench ( x1 )
s. Screw driver ( x1 )
j. Screws 25mm (x32)
i. Wooden dowel (x13)
a. Allen bolt M6 X 90mm ( x2)
g. Nuts ( x2)
b. Allen bolt M6 X 65mm ( x16)
c. Allen bolt M6 X 55mm ( x2 )
d. 13mm Head Allen bolt M6 X 40mm ( x13)
e. Allen bolt M6 X 25mm ( x2)
f. Allen bolt M6 X 17mm ( x6)
k. Knob Screw (x3)
h. Metal Pin (x2)
n. Knob (x3)
p. Hamper Bag (x1)
p. 11mm Head Allen bolt M6 X 40mm ( x6)
o.Tip-over (x1)

page 7
SORELLE
A.
B.
C.
D.
.
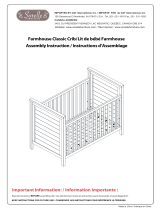
Install Screws (e) into Drawer Sides ( M1&M2 )and align with pilot holes located in the Drawer Back ( M3).Tighten using
Phillips screw driver(s) .
Slide Drawer Bottom ( M4 ) into Grooves located in Drawer sides ( M1&M2
M1&M2
) as well as Drawer Back ( M3 ).
See Figure . 1
Install Screws (e) into Drawer Sides ( M ) and align with pilot holes located in the mounting blocks of Drawer Front ( ).Tighten using
Phillips screw driver(not included) .
Using
E. Repeat for all drawers. Set drawers aside for later use.
Drawer Knob Screw (k) , install one Knob (n) on drawer.
2
1
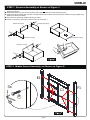
STEP 2 Middle Frame Assembly as Shown on Figure 2.
STEP 1 Drawers Assembly as Shown on Figure 1.
j
j
j
j
Drawer Left (M1)
Drawer Right (M2)
Drawer Back (M3)
Drawer Bottom (M4)
Drawer Front (M)
(n)
(k)
3x
d
px3
m
F1
E1
C1

page 8
SORELLE
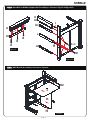
STEP 3 Right Frame Assembly as Shown on Figure 3.
STEP 4 Front Rails Assembly as Shown on Figure4
Figure 3
Figure 4
d
F2
C1
G1
G2
G2
G3
E2
C2
i
bx2
p
(1x)
(3x)

page 9
SORELLE
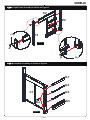
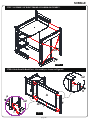
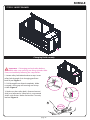
STEP 5 Back Rails & Middle Support Rail Assembly as Shown on Figure 5&Figure 5A.
STEP 6 MDF Boards Assembly as Shown on Figure 6.
Figure 5A :
Figure 5 :
Figure 6:
H
H
H1
H1
H3
L
H4
J
H2
K
i
i
i
h
b
x3
e
ddd
h

page 10
SORELLE
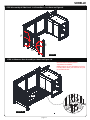
STEP 7 ASSEMBLY OF RIGHT FRAME AS SHOWN ON FIGURE 7.
STEP 8 Back Panel & Back Post - L Assembly as shown on Figure 8.
Figure 8
Figure 7
bx5
e
i
b
A
A1 F
gi
i
a
x2
x2

page 11
SORELLE
STEP 9 Assembly of Side Panel - L & Front Post - L as shown on Figure 9.
STEP 10 Mattress Base Assembly as shown on Figure 10.
Figure 9
Figure 10 :
dx6 E
F
C
Recommended mattress position:
Top position for newborn.
Middle position as your child starts to roll over.
Lowest position when your child can sit or pull
up on his/her knees.
f
(X4)
D
D

page 12
SORELLE
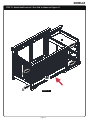
STEP 11 Attach the Front rail - B to Crib as shown on Figure 11.
Figure 11 :
b
b
b
b
B

page 13
SORELLE
STEP 12 Attach the Front rail - Top as shown on Figure 12.
Figure 12 :
Figure 13
c
G
x2
i
STEP 13 Insert the Drawers as shown on Figure 13.

SORELLE
Page 14
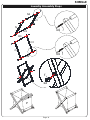
Laundry Assembly Steps
P
N
N1
N3
O
O1
O3
O3
N3
j
j
f
x4
x4
x2

page 15
SORELLE
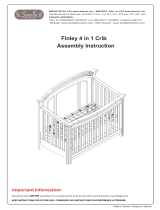
STEP 15 INSERT DRAWER
Changing Pad Assembly
3. Make sure that safety belt is fastened around
child, and adjusted so safety belt is snug around
child’s mid-section. Make sure buckle is securely
latched. Figure 3.
CLICK!
1
2
3
2. Pull through front of pad completely. Make
sure pad is facing up and warnings are always
visible. Figure 2.
Important : If changing pad and safety belt are
assembled, make sure warnings are facing up and visible.
If not, reassemble by following the steps below.
1. Locate safety belt bolted to dresser top. Insert
safety belt through slit in changing pad from
back of pad. Figure 1.

Page 16
To disassemble crib for storage, follow assembly steps in r
Pour démonter le lit de bébé pour entreposage, suivez les instructions d’assemblage dans le sens contraire.
everse.
Store all parts and hardware together in a safe place. Store the instruction manual in the supplied
envelope attached to the mattress suppo
Entreposez toutes les pièces et la quincaillerie dans un endroit sûr. Entreposez le manuel d’instruction dans
l’enveloppe fournie à cette fin et attachée au support de matelas afin de pouvoir vous y référer lors d’un
assemblage ultérieur.
rt assembly for future reference for re-assembly.
SORELLE
Converting to a Toddler Bed (Optional) / Conversion en lit pour enfant (optionnel)
Follow all instructions supplied with the 148# Toddler Rail System. NOTE:148# Toddler Rail System
is not included. Please see your crib retailer, visit WWW.Sorellefurniture.com or contact C&T
International / Sorelle for more information.
Suivre toutes les instructions fournies avec le système de conversion no 148. NOTE : le système de
conversion no 148 n’est pas inclus. Contactez le magasin où vous avez acheté ce lit de bébé ou
visitez : www.sorellefurniture.com ou communiquez avec C&T International Inc. pour information
additionnelle.
Additional Parts and Hardwares
Pièces et quincaillerie additionnelles : (Système de traverses pour adulte no 148 vendu séparément)
( 148# Toddler Rail System Not included, sold separately)
(A) 148 Toddler Rail (1 pc)
IMPORTANT: MATTRESS SUPPORT MUST BE IN THE
LE SUPPORT DU MATELAS DOIT ÊTRE À SON NIVEAU LE PLUS BAS.
LOWEST POSITION
TODDLER BED ASSEMBLY / Assemblage du lit pour enfant
Disassembling Crib For Storage / Démontage du lit pour entreposage
(A) Côté de lit 148 (1 pièce) (a) Boulon M6 x 50mm (4 pièces)
(a) M6 x 50mm Bolt (4 pcs)

Page 17
SORELLE
Follow all instructions supplied with the 234# Adult Rail System. NOTE: 234# Adult Rail System
is not included. Please see your crib retailer, visit WWW.Sorellefurniture.com or contact C&T
International / Sorelle for more information.
Suivre toutes les instructions fournies avec le système de conversion no 234. NOTE : le système de
conversion no 234 n’est pas inclus. Contactez le magasin où vous avez acheté ce lit de bébé ou
visitez : www.sorellefurniture.com ou communiquez avec C&T International Inc. pourinformation
additionnelle.
(A) Bed Rail (x2) Côté de lit no 215 (x2) (D) Mattress Support Bar (x3)
Barre de support de matelas no 215 (x3)
Fullsize Bed and Changer Table Conversion (Optional) / CONVERSION EN LIT POUR ADULTE (OPTIONNEL)
Additional Parts and Hardwares
Pièces et quincaillerie additionnelles (Système de traverses pour adulte no 234 vendu séparément)
( 234# Adult Rail System Not included, sold separately)
(c) Wood Screw ( x12)
(W) Additional Right - Front Leg
For Adult bed (x1)
(w) Patte additionnelle avant droite pour lit d’adulte (x1)
(Y) Additional Left -Rear Leg
For Changer Table Alone (x1)
(Y) Patte additionnelle arrière gauche pour
table à langer seulement (x1) (Z) Additional Left - Front
(Z) Patte additionnelle avant gauche pour table à langer
seulement (x1)
Leg
For Changer Table Alone(x1)
(B) Adaptor-Left (x2)
(B) Adaptateurs-L(x2) (B) Adaptateurs-R(x2)
(C) Adaptor-Right (x2)
(a) M6 x 40mm Allen bolt (x8) (b) Wood Dowel (x8)

SORELLE
Page 17
AU
BE A
A THI
Disassembling Crib for Storage
To disassemble crib for storage, follow assembly steps in reverse.
Store all parts and hardware together in a safe place. Store the instruction manual in the supplied
envelope attached to mattress support base for future reference for reassembly.
To clean, use only mild household soap and warm water. DO NOT use bleach or detergent. DO
NOT use abrasive cleaners which can scratch the finish. Use clean soft cloths to wash, rinse and
dry. With proper care, the quality finish will last a long time. Wood surfaces may be treated with
a light application of a good grade of non-toxic furniture polish. Read contents on back of polish
to make sure polish will not harm unit.
Store all parts from Crib, which are not used for Full Size Headboard, in original carton(s) (if
available) to prevent damage and allow reuse.
Cleaning and Storage
-
 1
1
-
 2
2
-
 3
3
-
 4
4
-
 5
5
-
 6
6
-
 7
7
-
 8
8
-
 9
9
-
 10
10
-
 11
11
-
 12
12
-
 13
13
-
 14
14
-
 15
15
-
 16
16
-
 17
17
-
 18
18


Sorelle Portofino Assembly Instructions
- Catégorie
- Meubles de bébé
- Taper
- Assembly Instructions
- Ce manuel convient également à
dans d''autres langues
- English: Sorelle Portofino
Documents connexes
-
 Sorelle Farmhouse Crib & Changer Assembly Instructions
-
 Sorelle Berkley Crib & Changer Assembly Instructions
-
 Sorelle Princeton Elite Crib & Changer Assembly Instructions
-
 Sorelle Sutton Crib Assembly Instructions
-
 Sorelle Fairview Crib Assembly Instructions
-
 Sorelle Berkley Crib Assembly Instructions
-
 Sorelle Farmhouse Classic Crib Assembly Instructions
-
 Sorelle Finley Elite Crib Assembly Instructions
-
 Sorelle Providence Crib Assembly Instructions
-
 Sorelle Luce Crib Assembly Instructions


