

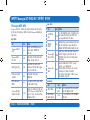
ENGLISH
BAHASA INDONESIA
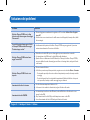
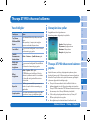
Certification/Compliance/Warranty
Limitation of Liability
DEUTSCH
ESPAÑOL
ITALIANO
РУССКИЙ
FRANÇAIS
PORTUGUÊS
TÜRKÇE
中國語


User Guide I English I Page 1
ENBIDEESFRITPTTR
Pусский
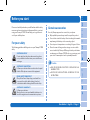
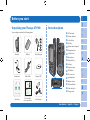
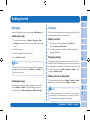
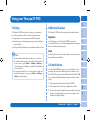
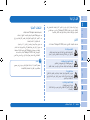
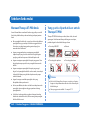
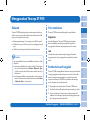
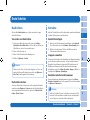
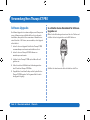
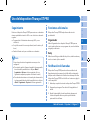
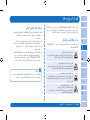
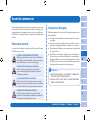
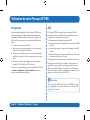
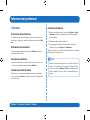
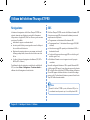
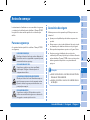
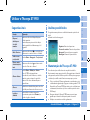
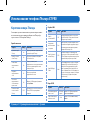
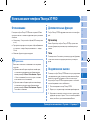
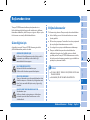
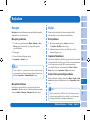
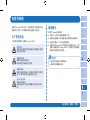
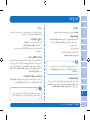
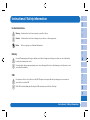
Before you start
Please read carefully and make yourself familiar with the safety
measures and user instructions in this manual before you start
using your Thuraya XT-PRO. This will help you to get the most
out of your satellite phone.
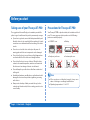
For your safety
The following guidelines will help you to use your Thuraya XT-PRO
safely.
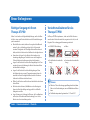
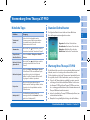
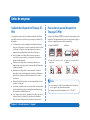
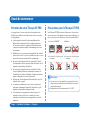
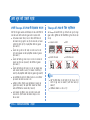
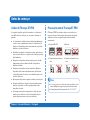
SWITCH ON SAFELY
Do not switch on the phone where wireless phone
use is prohibited or when it may cause interference
or danger.
SWITCH OFF IN HOSPITALS
Follow any restrictions that are advised in a hospital.
Switch o the phone near medical equipment.
ROAD SAFETY COMES FIRST
Obey all local laws. Always keep your hands free
to operate the vehicle while driving. Your rst
consideration while driving should be road safety.
SWITCH OFF IN AIRCRAFT
Follow any restrictions.
Wireless devices can cause harmful interference to
aircraft’s navigation and communication systems.
Genuine accessories
Use only Thuraya approved accessories for your phone.
●Only qualied personnel may install or repair this product.
●Do not short-circuit the battery. Short-circuiting the terminals
may damage the battery or the connecting object.
●Do not expose to temperatures exceeding 90 degrees Celsius.
●Please be aware of dangers when using accessories which
are not certied by Thuraya. Diering electrical specications
can damage your Thuraya XT-PRO, such accessories may void
your device’s warranty and can be potentially harmful.
●RISK OF EXPLOSION IF BATTERY IS REPLACED BY AN
INCORRECT TYPE.
●DISPOSE OF USED BATTERIES ACCORDING TO THE
INSTRUCTIONS.
Caution

Page 2 I User Guide I English
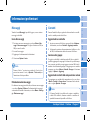
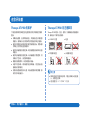
Before you start
Taking care of your Thuraya XT-PRO
The suggestions below will help you to maintain your satellite
phone in good condition and to protect your warranty coverage.
●If your device gets wet, remove the battery immediately and
allow the device to dry completely before replacing it. Liquids
or moisture can contain minerals that can damage electronic
circuits.
●Do not use or store the device in dusty or dirty areas. Its
moving parts and electronic components can be damaged.
●Do not store the device in very hot areas. High temperatures
can shorten the life of the device and damage batteries.
●Do not store the device in very cold areas. When the device
returns to its normal temperature, moisture can form inside
the device and can damage electronic circuit boards.
●Do not attempt to open the device other than as instructed
in this guide.
●Unauthorized antennas, modications, or attachments could
damage the device and may violate regulations governing
radio devices.
●Always create a backup of data you want to keep (such as
contacts and calendar notes) before sending your device to a
service facility.
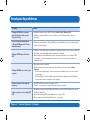
Precautions for Thuraya XT-PRO
Your Thuraya XT-PRO is splash resistant, dust resistant and shock
proof. To ensure proper protection, make sure the following
parts are assembled properly:
●USB/UDC cover
●Battery
●Earphone jack cover
●Antenna jack cover
●If these parts are not attached properly, it may cause
water or dust ingress resulting in a malfunction.
●Operating temperature is -10 to 55 °C.
Note

User Guide I English I Page 3
ENBIDEESFRITPTTR
Pусский
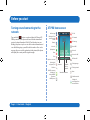
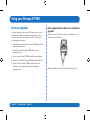
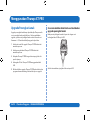
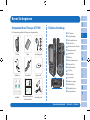
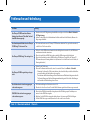
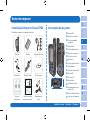
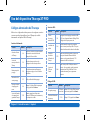
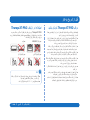
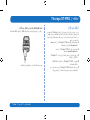
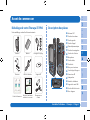
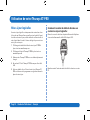
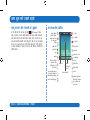
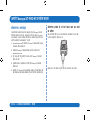
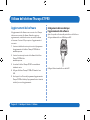
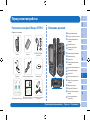
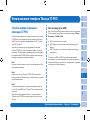
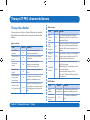
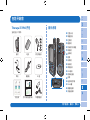
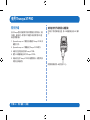
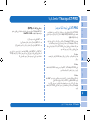
Unpacking your Thuraya XT-PRO
Your package contains the following items:
Handset Battery Travel Charger
Earphones Data Cable Support-CD
Infosheet User Guide &
Accessory Sheet Car Charger
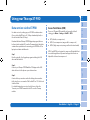
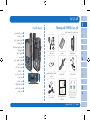
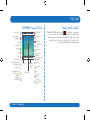
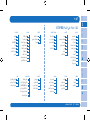
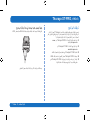
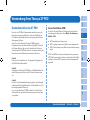
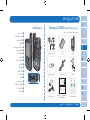
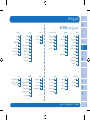
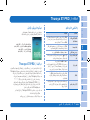
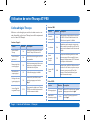
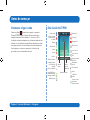
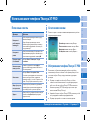
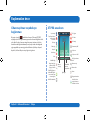
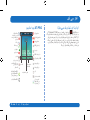
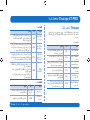
Parts description
1
2
11
3
9
4
10
6
7
15
13
12
16
14
8
5
1817
1 SAT antenna
2 Volume buttons
3 Left soft key
4 Call key
5 Alphanumeric keypad
6 Navigation keys
7 Selection key
8 Microphone
9 Right soft key
: End key
; Earphone jack
< SOS button
= RF connector
> Speakerphone
? Battery release
@ SIM card holder
A Data cable jack
B Charger jack
Before you start

Page 4 I User Guide I English
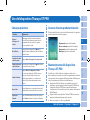
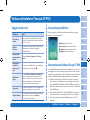
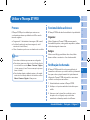
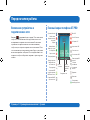
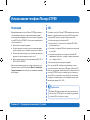
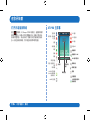
Turning on and connecting to the
network
Press and hold for two seconds and when the Thuraya XT-
PRO is powered on, the phone will search for the network and
acquire location information. If the SAT and location icons are
ashing, the phone is yet to receive the location information and
once the ashing stops, you will be able to make a call or send a
message. Upon successful registration to the network, the phone
will display the country and the signal strength.
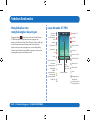
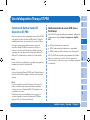
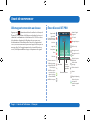
XT-PRO home screen
Status bar
Network information
Available
soft key
functions
Active call Unread SMS
Satellite signal SOS call
Voice mail + SMS
Roaming SOS message
Earphone connected
Tracking message
Call divert
Alarm
Speakerphone
Mute
Voice mail
Weak signal. Point
antenna towards
satellite
SOS activated
Silent
SMS inbox full
Ciphering (call
encryption) is o
Tracking activated
GmPRS connecting
(blinking icon
during a GmPRS
connection) Schedule reminder
GmPRS paused Sending and
receiving data from
an external device
Before you start

User Guide I English I Page 5
ENBIDEESFRITPTTR
Pусский
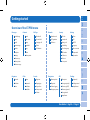
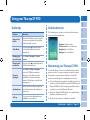
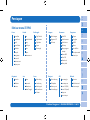
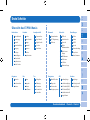
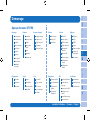
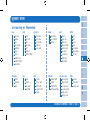
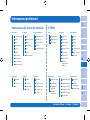
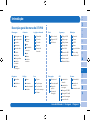
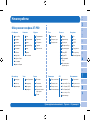
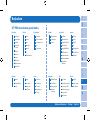
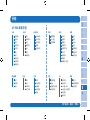
Overview of the XT-PRO menu
Getting started
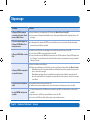
Messages
1 New Message
2 Inbox
3 Drafts
4 Sent messages
5 Outbox
6 Templates
7 Settings
8 Info message
9 Memory status
10 Delete messages
Contacts
1 Search
2 Add contact
3 Group
4 Speed dial
5 Copy
6 Delete
7 Memory status
Settings
1 Phone
2 Call
3 GmPRS
4 Language
5 Data connection
6 Setup wizard
7 My numbers
Call logs
1 Missed calls
2 Received calls
3 Outgoing calls
4 Delete
5 Call duration
Organizer
1 Calendar
2 Calculator
3 Notes
Network
1 Network mode
2 SAT registration
3 Preference
Tracking
1 Recipient(s)
2 Tracking interval
3 Output format
Clock
1 Alarm
2 Stopwatch
3 World time
4 Time/Date
Navigation
1 Current position
2 Waypoints
3 Position logging
4 Navigation systems
Sounds
1 Ringtones
2 Ringing type
3 Keypad tone
4 Startup sound
5 Volume
Security
1 PIN code
2 Security code
3 Barring code
4 Fixed dialing
5 Closed user group
6 IMEI number
7 S/W version
8 Soft reset
9 Factory reset
SOS
1 Call recipient
2 Message recipient(s)
3 SOS message (SMS)
4 SOS message (email)
5 Message interval
6 Output format

Page 6 I User Guide I English
Calls
Making a call
To make a call, enter a phone number using the keypad or
choose a saved contact and then press the Call key.
Receiving a call
To receive a call, press the Call key or any key on the keypad.
During a call
During a call, you can mute the call or put the call on hold from
the Options menu.
Swapping calls
While receiving an incoming call during an already active call,
select Swap. This will allow you to connect with up to 6 users.
Conference calls
1 During an active call, go to Options > New call. The rst call
is automatically put on hold.
2 Call the other user’s phone number.
3 To add the rst user into the conference call, go to Options
> Conference.
You can include up to 6 users in the conference call by repeating
steps 1 to 3.
During a conference call, you may choose to speak with
a user in private. Select the user and go to Options
> Private, and then all other calls are put on hold
automatically.
Note
Getting started

User Guide I English I Page 7
ENBIDEESFRITPTTR
Pусский
Messages
Easily read, create and send messages using the Messages menu.
Sending messages
1 To send a new message, go to Menu > Messages > New
message and you may choose to send an SMS, SMS to email,
or Fax.
2 Enter the message.
3 Add the information of the recipient(s).
4 Select Options > Send.
Press the * key for symbol entry, the # key for switching
between numbers and text, and Options > AutoText for
predictive text entry.
Note
Deleting messages
Delete messages one at a time by selecting the message and
going to Options > Delete. To delete all the messages in a
selected folder, go to Menu > Messages > Delete messages.
Contacts
The Contacts menu helps you to manage your address book by
saving and editing contacts on your phone.
Adding a contact
1 Enter a phone number and press the Selection key.
Or go to Contacts > Add contact.
2 Select the storing location (phone or SIM card) and phone
number information.
Managing Groups
An easy way to manage contacts in your contact list is to add
them to a Group. This will allow you to set specic ringtones for
evey Group and to send SMSs to all members of a Group. To add
a contact to a Group, go to Menu > Contacts > Group > Select
the group > Options > Add.
Adding contacts to Speed dial
To add a contact to Speed dial, go to Menu > Contacts > Speed
dial. Select the desired key and select Options > Assign.
From the Contacts menu, you can also copy contacts
between the SIM and phone, delete contacts, and check
how much memory is available on the phone.
Note
Getting started

Page 8 I User Guide I English
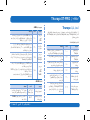
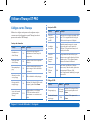
Thuraya Short Codes
Use these short codes to access some common services that are
available on the Thuraya network (accessible only with Thuraya
SIM cards).
Call services:
Service Number Description
Thuraya
Customer Care
100
Contact a Thuraya Customer Care
representative 24 hours a day
Thuraya
Voicemail Service
123
Access your voicemail and
voicemail settings
Prepaid main
menu
150
Access the prepaid main menu to
recharge and nd out your phone
number
Prepaid account
information
151
Prepaid credit balance and validity
Prepaid scratch
card rell
160
Enter 160 [scratch card PIN code]
then press the Call key
Thuraya Free Test
Call Service
11112
Allows you to check if your Thuraya
XT-PRO is in working condition and
if the subscription is valid
SMS services:
Service Number Description
SMS
Rell
Service
150
Rell your prepaid account by sending an
SMS to 150 in the following format: #14-digit
scratch card PIN code#
Satellite
locator
1300
From the navigation menu nd your current
position and send it by SMS to 1300 to obtain
location information of the satellite.
Thuraya
Call Me
Back
Service
1755
Send a free notication to another person
to call you back. Send the number in the
following format to 1755: #destination phone
number#
Twitter
SMS
Services
1888
Send “start” by SMS to 1888 to activate the service.
Once activated you can send tweets by sending
an SMS to 1888.
Send “Follow [username]” to follow new accounts.
USSD codes:
Service Number Description
Prepaid rell *150*scratch
card#
Enter *150* scratch card PIN code#
then press the Call key
Prepaid billing
enquiry
*151#
Enter *151# then press the Call key
Using your Thuraya XT-PRO

User Guide I English I Page 9
ENBIDEESFRITPTTR
Pусский
Data services via the XT-PRO
Use data services by setting up your XT-PRO as a data modem.
Choose either GmPRS (up to 60/15 kbps download/upload) or
Circuit Switched Data (9.6 kbps):
Download the latest Thuraya XT-PRO Upgrader program (this can
be found on the included CD or on the Thuraya website), which also
contains the required driver for connecting your XT-PRO to a PC or
laptop to use data in satellite mode.
Step 1
Run the setup le - the Upgrader program including the USB
driver will be installed.
Step 2
Connect your Thuraya XT-PRO with the PC/laptop via the USB
data cable and set the phone up as a data modem.
Step 3
Create a dial-up connection and in the dial-up phone number
eld, enter the access number *99# for GmPRS or 1722 for Circuit
Switched Data.
For detailed instructions on step 2 and 3 please refer to the
'Connect your XT-PRO' manual on the CD or on the Thuraya
website.
Access Point Name (APN)
There are 3 Thuraya APNs available, to change the default
setting, go to Menu > Settings > GmPRS > APN:
●GET (default, no compression)
●GETLC (low compression, images will be compressed)
●GETHC (high compression, images will not be downloaded)
GETLC and GETHC are designed to compress all http trac that
is routed through them. Any emails and apps that do not use
http will be delivered uncompressed.
Using your Thuraya XT-PRO

Page 10 I User Guide I English
Navigation
The navigation feature on your Thuraya XT-PRO is a powerful
tool that allows you to use location information in various ways.
It supports GPS, BeiDou and Glonass for maximum accuracy and
exibility.
●Find your current coordinates.
●Enter waypoints to navigate to a specic position using the
electronic compass.
●Log your position on a map at a preset interval ranging from
once every second to once an hour.
●Choose the navigation system you wish to use (GPS, GPS and
BeiDou, GPS and Glonass).
To use the built-in compass and see the GPS sensitivity, go to
Menu > Navigation > Current position and use the left/right
navigation keys.
SOS
The Thuraya XT-PRO allows you to make an SOS call and/or send
SOS messages to pre-determined recipients at the press of a
button.
●Program an SOS call recipient
●Program up to 10 SOS message recipients (SMS and email)
●Include separate SOS messages for SMS recipients and email
recipients
●Choose frequency of outgoing SOS Messages (every 3
minutes to every 24 hours)
●Change the format in which your coordinates will be received
Once SOS has been set up and at least one of either SOS Call
or SOS Message are checkmarked, press the SOS button on the
side of the XT-PRO to activate (the SOS icon will be shown in the
status bar as per your conguration). To deactivate, press the
right soft key ‘Stop SOS’ from the home screen.
Activate SOS even when the XT-PRO is switched off by
pressing and holding the SOS button for 3 seconds.
Note
Using your Thuraya XT-PRO

User Guide I English I Page 11
ENBIDEESFRITPTTR
Pусский
Using your Thuraya XT-PRO
Tracking
The Thuraya XT-PRO can be used to send your coordinates to
pre-dened numbers via SMS or email at regular intervals.
●Program up to 10 message recipients (SMS and email)
●Choose frequency of outgoing messages (every 3 minutes to
every 24 hours)
●Change the format in which your coordinates will be received
How to activate and deactivate tracking once it is set up:
●To activate, either long press the right soft key from the
home screen or go to Menu > Tracking > Options >
Start tracking (the Tracking icon will then start blinking
in the status bar)
●To deactivate while in use, short press the right soft
key from the home screen or go to Menu > Tracking >
Options > Stop tracking
Note
Additional features
The Thuraya XT-PRO includes a variety of productivity features:
Organizer
Use the Organizer of your Thuraya XT-PRO for a range of
convenient features such as scheduling appointments, using the
built-in calculator and writing notes.
Clock
Use the Clock menu to set the date and time, set alarms, and use
the stopwatch and world time.
Call notication
Your Thuraya XT-PRO allows you to receive a notication of an
incoming call even if your satellite signal is too weak to receive
the call itself. This is particularly useful when the Thuraya XT-PRO
is in your pocket with the antenna stowed and only has a weak
signal:
1 Fully extend the antenna of your Thuraya XT-PRO.
2 Ensure that you have direct line of sight to the satellite.
3 As soon as the signal strength is strong enough, the warning
disappears from the display. You can now accept the call as
usual by pressing the Call key.

Page 12 I User Guide I English
Software upgrades
A software upgrade is only required if Thuraya releases a newer
software version. Before performing an upgrade please check
your current software version under Security > S/W version to
see if an upgrade is required.
1 Download and install the latest Thuraya XT-PRO upgrader le
from www.thuraya.com.
2 Download the latest Thuraya XT-PRO software from
www.thuraya.com.
3 Power on your Thuraya XT-PRO with a fully charged battery.
4 Connect the PC and the Thuraya XT-PRO using the USB cable.
5 Double click the Thuraya XT-PRO upgrader icon on the
desktop and the program will guide you through the
upgrade process.
Using your Thuraya XT-PRO
How to plug the data cable in case of software
upgrade:
Open the cover at the bottom of the phone and rmly connect
the USB cable to the UDC jack.
Afterwards attach the other side of the data cable to your PC.

User Guide I English I Page 13
ENBIDEESFRITPTTR
Pусский
Useful tips
Function Operation
Keypad Lock/
Unlock
Press and hold the # key to lock the keypad.
To unlock press the right soft key followed
by the # key within 3 seconds.
Silent Mode
Long pressing the key from the home
screen will switch between Silent and
Normal mode.
Checking your
current location
Go to Menu > Navigation > Current
position.
Changing text
input mode
Long press of the key will switch between
AutoText and Normal mode.
Changing
languages
Go to Menu > Settings > Language.
In case the XT-PRO is in an unknown
language, go to the Menu, and on the
keypad, press the number 9 and then
number 4. This will take you directly to the
Language menu.
Speakerphone
While in an active call, long pressing the #
key will switch between the speakerphone
and receiver.
Call logs
To see your recently called numbers press
the Call key (or go to call logs).
Using your Thuraya XT-PRO
Default shortcuts
The following menus can be accessed directly from the home
screen using the navigation keys:
Organizer: Press the up key
Contact search: Press the down key
Navigation: Press the left key
Messages: Press the right key
Maintaining your Thuraya XT-PRO
Your satellite phone needs to be in optimal working condition
when you need it. To ensure your phone is prepared, a regular
Thuraya phone test provides you with peace of mind that
ensures your satellite phone is working when it is needed:
●Test your Thuraya phone regularly, especially if you have not
used it for some time: dial the free number 11 11 2 from your
Thuraya XT-PRO to test if it is working properly (this number
can only be accessed from Thuraya SIM cards).
●Charge the Thuraya XT-PRO’s battery once a month to have
the phone ready when you need it.
●Check your subscription or credit balance regularly.

Page 14 I User Guide I English
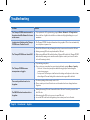
Problem Solution
The Thuraya XT-PRO cannot connect to
the network and ‘No Network’ is shown
on the screen.
●Try to update the SAT registration by going to Menu > Network > SAT registration.
●Ensure the line of sight to the satellite is not obstructed by high buildings, trees, and
mountains.
Location icon is ashing or the Thuraya
XT-PRO shows ‘Position too old’.
●The Thuraya XT-PRO’s location information is being updated. This is done automatically
once the phone is powered on.
The Thuraya XT-PRO shows ‘Insert SIM’.
●Check if the SIM card is dirty or damaged, and try to remove and reinsert the SIM card.
●Entering a wrong PUK code may deactivate the SIM card.
●When using a dierent SIM card (other than a Thuraya SIM card) in the Thuraya XT-PRO
while abroad, roaming service must be enabled (please contact your Service Provider
to check if roaming is active).
The Thuraya XT-PRO becomes
unresponsive or sluggish.
●Try restarting your phone.
●Do a reset in case your phone has a persistent problem by going to Menu > Security.
-Soft reset: You can reset your phone without losing your personal settings like
contacts or messages.
-Factory reset: The factory reset will restore the settings on the phone to be as it was
when shipped. Personal settings like contacts and messages will be deleted.
The security code has been lost or
forgotten.
●The factory setting of the security code is 0000.
●Please contact your Service Provider in case the number has been changed and was
forgotten.
The PIN/PUK codes have been lost or
forgotten.
●Entering the wrong PIN code 3 times will lock the SIM card. To unlock, you must enter
the PUK code.
●After entering the PUK code, you can set a new PIN code.
●In case the PUK code has been forgotten, please contact your Service Provider.
Troubleshooting

I
ENBIDEESFRITPTTR
Pусский
Thuraya XT-PRO
Thuraya XT-PRO
Thuraya
Thuraya
Thuraya XT-PRO

I
Thuraya XT-PRO
Thuraya XT-PRO
Thuraya XT-PRO
USB/UDC

I
ENBIDEESFRITPTTR
Pусский
1
2
11
3
9
4
10
6
7
15
13
12
16
14
8
5
1817
1
2
3
4
5
6
7
8
9
:
;
SOS <
=
>
?
SIM @
A
B
La page charge ...
La page charge ...
La page charge ...
La page charge ...
La page charge ...
La page charge ...
La page charge ...
La page charge ...
La page charge ...
La page charge ...
La page charge ...
La page charge ...
La page charge ...
La page charge ...
La page charge ...
La page charge ...
La page charge ...
La page charge ...
La page charge ...
La page charge ...
La page charge ...
La page charge ...
La page charge ...
La page charge ...
La page charge ...
La page charge ...
La page charge ...
La page charge ...
La page charge ...
La page charge ...
La page charge ...
La page charge ...
La page charge ...
La page charge ...
La page charge ...
La page charge ...
La page charge ...
La page charge ...
La page charge ...
La page charge ...
La page charge ...
La page charge ...
La page charge ...
La page charge ...
La page charge ...
La page charge ...
La page charge ...
La page charge ...
La page charge ...
La page charge ...
La page charge ...
La page charge ...
La page charge ...
La page charge ...
La page charge ...
La page charge ...
La page charge ...
La page charge ...
La page charge ...
La page charge ...
La page charge ...
La page charge ...
La page charge ...
La page charge ...
La page charge ...
La page charge ...
La page charge ...
La page charge ...
La page charge ...
La page charge ...
La page charge ...
La page charge ...
La page charge ...
La page charge ...
La page charge ...
La page charge ...
La page charge ...
La page charge ...
La page charge ...
La page charge ...
La page charge ...
La page charge ...
La page charge ...
La page charge ...
La page charge ...
La page charge ...
La page charge ...
La page charge ...
La page charge ...
La page charge ...
La page charge ...
La page charge ...
La page charge ...
La page charge ...
La page charge ...
La page charge ...
La page charge ...
La page charge ...
La page charge ...
La page charge ...
La page charge ...
La page charge ...
La page charge ...
La page charge ...
La page charge ...
La page charge ...
La page charge ...
La page charge ...
La page charge ...
La page charge ...
La page charge ...
La page charge ...
La page charge ...
La page charge ...
La page charge ...
La page charge ...
La page charge ...
La page charge ...
La page charge ...
La page charge ...
La page charge ...
La page charge ...
La page charge ...
La page charge ...
La page charge ...
La page charge ...
La page charge ...
La page charge ...
La page charge ...
La page charge ...
La page charge ...
La page charge ...
La page charge ...
La page charge ...
La page charge ...
La page charge ...
La page charge ...
La page charge ...
La page charge ...
La page charge ...
La page charge ...
La page charge ...
La page charge ...
La page charge ...
La page charge ...
La page charge ...
La page charge ...
La page charge ...
La page charge ...
La page charge ...
La page charge ...
La page charge ...
La page charge ...
La page charge ...
La page charge ...
La page charge ...
La page charge ...
La page charge ...
La page charge ...
La page charge ...
La page charge ...
La page charge ...
La page charge ...
La page charge ...
La page charge ...
La page charge ...
La page charge ...
La page charge ...
La page charge ...
La page charge ...
La page charge ...
La page charge ...
La page charge ...
La page charge ...
La page charge ...
La page charge ...
La page charge ...
La page charge ...
La page charge ...
La page charge ...
La page charge ...
La page charge ...
La page charge ...
La page charge ...
La page charge ...
La page charge ...
La page charge ...
La page charge ...
La page charge ...
La page charge ...
-
 1
1
-
 2
2
-
 3
3
-
 4
4
-
 5
5
-
 6
6
-
 7
7
-
 8
8
-
 9
9
-
 10
10
-
 11
11
-
 12
12
-
 13
13
-
 14
14
-
 15
15
-
 16
16
-
 17
17
-
 18
18
-
 19
19
-
 20
20
-
 21
21
-
 22
22
-
 23
23
-
 24
24
-
 25
25
-
 26
26
-
 27
27
-
 28
28
-
 29
29
-
 30
30
-
 31
31
-
 32
32
-
 33
33
-
 34
34
-
 35
35
-
 36
36
-
 37
37
-
 38
38
-
 39
39
-
 40
40
-
 41
41
-
 42
42
-
 43
43
-
 44
44
-
 45
45
-
 46
46
-
 47
47
-
 48
48
-
 49
49
-
 50
50
-
 51
51
-
 52
52
-
 53
53
-
 54
54
-
 55
55
-
 56
56
-
 57
57
-
 58
58
-
 59
59
-
 60
60
-
 61
61
-
 62
62
-
 63
63
-
 64
64
-
 65
65
-
 66
66
-
 67
67
-
 68
68
-
 69
69
-
 70
70
-
 71
71
-
 72
72
-
 73
73
-
 74
74
-
 75
75
-
 76
76
-
 77
77
-
 78
78
-
 79
79
-
 80
80
-
 81
81
-
 82
82
-
 83
83
-
 84
84
-
 85
85
-
 86
86
-
 87
87
-
 88
88
-
 89
89
-
 90
90
-
 91
91
-
 92
92
-
 93
93
-
 94
94
-
 95
95
-
 96
96
-
 97
97
-
 98
98
-
 99
99
-
 100
100
-
 101
101
-
 102
102
-
 103
103
-
 104
104
-
 105
105
-
 106
106
-
 107
107
-
 108
108
-
 109
109
-
 110
110
-
 111
111
-
 112
112
-
 113
113
-
 114
114
-
 115
115
-
 116
116
-
 117
117
-
 118
118
-
 119
119
-
 120
120
-
 121
121
-
 122
122
-
 123
123
-
 124
124
-
 125
125
-
 126
126
-
 127
127
-
 128
128
-
 129
129
-
 130
130
-
 131
131
-
 132
132
-
 133
133
-
 134
134
-
 135
135
-
 136
136
-
 137
137
-
 138
138
-
 139
139
-
 140
140
-
 141
141
-
 142
142
-
 143
143
-
 144
144
-
 145
145
-
 146
146
-
 147
147
-
 148
148
-
 149
149
-
 150
150
-
 151
151
-
 152
152
-
 153
153
-
 154
154
-
 155
155
-
 156
156
-
 157
157
-
 158
158
-
 159
159
-
 160
160
-
 161
161
-
 162
162
-
 163
163
-
 164
164
-
 165
165
-
 166
166
-
 167
167
-
 168
168
-
 169
169
-
 170
170
-
 171
171
-
 172
172
-
 173
173
-
 174
174
-
 175
175
-
 176
176
-
 177
177
-
 178
178
-
 179
179
-
 180
180
-
 181
181
-
 182
182
-
 183
183
-
 184
184
-
 185
185
-
 186
186
-
 187
187
-
 188
188
-
 189
189
-
 190
190
-
 191
191
-
 192
192
-
 193
193
-
 194
194
-
 195
195
-
 196
196
-
 197
197
-
 198
198
-
 199
199
-
 200
200
-
 201
201
-
 202
202
-
 203
203
-
 204
204
-
 205
205
-
 206
206
-
 207
207
-
 208
208
-
 209
209
-
 210
210


dans d''autres langues
- italiano: Thuraya XT-PRO Manuale utente
- português: Thuraya XT-PRO Manual do usuário
- Türkçe: Thuraya XT-PRO Kullanım kılavuzu
