
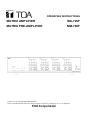
OPERATING INSTRUCTIONS
MATRIX AMPLIFIER
MA-725F
MATRIX PRE-AMPLIFIER
MM-700F
ThankyouforpurchasingTOA'sMatrixAmplifier.
Pleasecarefullyfollowtheinstructionsinthismanualtoensurelong,troublefreeuseofyourequipment.
TOA Corporation

2
TABLE OF CONTENTS
1. IMPORTANT SAFETY INSTRUCTIONS 3
2. SAFETY PRECAUTIONS 4
3. GENERAL DESCRIPTION 7
4. FEATURES 7
5. HANDLING PRECAUTIONS 8
6. INSTALLATION PRECAUTIONSS 8
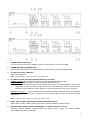
7. NOMENCLATURE AND FUNCTIONS 9
[Front] 9
[Rear] 10
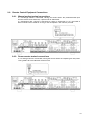
8. CONNECTION EXAMPLES 14
9. CONNECTION 16
9.1.
Removable Terminal Plug Connection 16
9.2.
How to Connect Input Signals 17
9.3.
Speaker Output Signal Connections 17
9.4.
MOH Output Connections 18
9.5.
LINE Output Connections 18
9.6.
Remote Control Equipment Connections 19
10. MUTING FUNCTIONS 20
10.1.
Manual Mute 20
10.2.
Auto Mute 21
10.3.
Priority Mix 22
11. OPERATION 22
11.1
Input Selections 22
11.2
EQ Preset Selection 23
11.3
Using the WP-700 Remote Controller 27
12. RACK MOUNTING BRACKET ATTACHMENT 28
13. PROTECTION 28
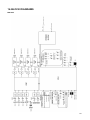
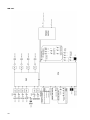
14. BLOCK DIAGRAMS 29
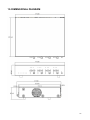
15. DIMENSIONAL DIAGRAM 31
16. SPECIFICATIONS 32

3
1. IMPORTANT SAFETY INSTRUCTIONS
• Readtheseinstructions.
• Keeptheseinstructions.
• Heedallwarnings.
• Followallinstructions.
• Donotusethisapparatusnearwater.
• Cleanonlywithdrycloth.
• Donotblockanyventilationopenings.Installinaccordancewiththemanufacturer'sinstructions.
• Do not install near any heat sources such as radiators, heat registers, stoves, or other apparatus
(includingamplifiers)thatproduceheat.
• Donotdefeatthesafetypurposeofthepolarizedorgroundingtypeplug.Apolarizedplughastwoblades
withonewiderthantheother.Agroundingtypeplughastwobladesandathirdgroundingprong.The
widebladeorthethirdprongareprovidedforyoursafety.Iftheprovidedplugdoesnotfitintoyouroutlet,
consultanelectricianforreplacementoftheobsoleteoutlet.
• Protect the power cord from being walked on or pinched particularly at plugs,
conveniencereceptacles,andthepointwheretheyexitfromtheapparatus.
• Onlyuseattachments/accessoriesspecifiedbythemanufacturer.
• Useonlywiththecart,stand,tripod,bracket,ortablespecifiedbythemanufacturer,
or sold with the apparatus. When a cart is used, use caution when moving the
cart/apparatuscombinationtoavoidinjuryfromtipover.
• Unplugthisapparatusduringlightningstormsorwhenunusedforlongperiodsoftime.
• Refer allservicing to qualified service personnel. Servicing is required when the apparatus has been
damagedinanyway,suchaspowersupplycordorplugisdamaged,liquidhasbeenspilledorobjects
havefallenintotheapparatus,theapparatushasbeenexposedtorainormoisture,doesnotoperate
normally,orhasbeendropped.
INSTRUCTIONS ESSENTIELLES POUR LA SÉCURITÉ
• Lirecesinstructions.
• Conservercesinstructionspourréférenceultérieure.
• Respectertouslesavertissements.
• Suivretouteslesinstructions.
• Nepasutilisercetappareilàproximitéd'eau.
• Nettoyeruniquementàl'aided'unchiffonsec.
• Nepasobstruerlesorificesdeventilation.Installerconformémentauxinstructionsdufabricant.
• Nepasinstalleràproximitédesourcesdechaleurtellesquedesradiateurs,desregistresthermiques,
deschaudièresoud'autresappareils(notammentdesamplificateurs)produisantdelachaleur.
• Nepascontournerlafonctiondesécuritédelafichepolariséeoudemiseàlaterre.Unefichepolarisée
est équipée de deux broches, dont l'une est plus large que l'autre. Une fiche de mise à la terre est
équipée dedeuxbroches etd'une troisième pourlamise àla terre.Cette dernière,la plus large,est
prévueàdesfinsdesécurité.Silafichefournienepeutêtreinséréedanslapriseélectriquesouhaitée,
consulterunélectricienpourfaireremplacercettedernière.
• Protéger lecordond'alimentation pouréviterqu'il ne soitpiétiné oupincé, notamment au niveau des
fiches,desprisesdecourantoudesonpointdesortiedel'appareil.
• Utiliseruniquementlesaccessoiresspécifiésparlefabricant.
• Utiliseruniquementaveclechariot,support,trépied,lapattedemontageoulatable
spécifiés par le fabricant ou vendus avec l'appareil. En cas d'utilisation d'un
chariot,manipulerlacombinaisonchariot/appareilpouréviterlesblessuresduesàun
renversement.
• Débranchercetappareilpendantlesoragesainsiquelorsqu'ilresteinutilisépendant
unepériodeprolongée.
• Lamaintenancedel'appareildoitêtreconfiéeàuntechnicienaprèsventequalifié.
Unemaintenances'avèrenécessairesil'appareilestendommagé(auniveauducordond'alimentation
oudelafiche),aétémouilléparunliquide,unobjetesttombéàl'intérieur,s'ilaétéexposéàlapluieou
l'humidité,s'ilnefonctionnepasnormalementous'ilesttombé.

4
2. SAFETY PRECAUTIONS
• Beforeinstallationoruse,besuretocarefullyreadalltheinstructionsinthissectionforcorrectandsafe
operation.
• Besuretofollowalltheprecautionaryinstructionsinthissection,whichcontainimportantwarnings
and/orcautionsregardingsafety.
• Afterreading,keepthismanualhandyforfuturereference.
Safety Symbol and Message Conventions
Safetysymbolsandmessagesdescribedbelowareusedinthismanualtopreventbodilyinjuryandproperty
damagewhichcouldresultfrommishandling.Beforeoperatingyourproduct,readthismanualfirstand
understandthesafetysymbolsandmessagessoyouarethoroughlyawareofthepotentialsafetyhazards.
When Installing the Unit
•
Do not expose the unit to rain or an environment
whereitmaybesplashedbywaterorotherliquids,as
doingsomayresultinfireorelectricshock.
•
Use the unit only with the voltage specified on the
unit. Using a voltage higher than that which is
specifiedmayresultinfireorelectricshock.
•
Do not cut, kink, otherwise damage nor modify the
powersupplycord.Inaddition,avoidusingthepower
cord in close proximity to heaters, and never place
heavyobjectsincludingtheunititself–onthepower
cord,asdoingsomayresultinfireorelectricshock.
•
Externalwiringconnectedtotheterminalsmarked
with…requiresinstallationbyaninstructedperson.
•
Theapparatusshallbeconnectedtoamainssocket
outletwithaprotectiveearthingconnection.
When the Unit is in Use
•
Shouldthefollowingirregularitybefoundduringuse,
immediatelyswitchoffthepower,disconnectthe
powersupplyplugfromtheACoutletandcontact
yournearestTOAdealer.Makenofurtherattemptto
operatetheunitinthisconditionasthismaycause
fireorelectricshock.

5
•
Ifyoudetectsmokeorastrangesmellcomingfrom
theunit.
•
Ifwateroranymetallicobjectgetsintotheunit.
•
Iftheunitfalls,ortheunitcasebreaks.
•
Ifthepowersupplycordisdamaged(exposureofthe
core,disconnection,etc.)
•
Ifitismalfunctioning(notonesounds.)
•
Topreventafireorelectricshock,neveropennor
removetheunitcaseastherearehighvoltage
componentsinsidetheunit.Referallservicingsuch
asmodificationinsidetheunittoqualifiedservice
personnel.
•
Donotplacecups,bowls,orothercontainersofliquid
ormetallicobjectsontopoftheunit.Ifthey
accidentallyspillintotheunit,thismaycauseafireor
electricshock.
•
Donotinsertnordropmetallicobjectsorflammable
materialsintheventilationslotsoftheunit'scover,as
thismayresultinfireorelectricshock.
•
Donottouchaplugduringthunderandlightning,as
thismayresultinelectricshock.
When Installing the Unit
•
Neverpluginnorremovethepowersupplyplugwith
wethands,asdoingsomaycauseelectricshock.
•
Whenunpluggingthepowersupplycord,besureto
graspthepowersupply plug;never pullonthe cord
itself.Operatingtheunitwithadamagedpowersupply
cordmaycauseafireorelectricshock.
•
When moving the unit,besure to remove its power
supplycordfromthewalloutlet.Movingtheunitwith
the power cord connected to the outlet may cause
damagetothepowercord,resultinginfireorelectric
shock. When removing the power cord, be sure to
holditsplugtopull.
•
Avoidinstallingtheunitinhumidordustylocations,in
locations exposed to the direct sunlight, near the
heaters, or in locations generating sooty smoke or
steamasdoingotherwisemayresultinfireorelectric
shock.
•
To avoid electric shocks, be sure to switch off the
unit'spowerwhenconnectingspeakers.
•
Theunitisdesignedexclusivelytobemountedinan
equipment rack. Be sure to follow the instructions
belowwhenrackmountingtheunit.Failuretodoso
maycauseafireorpersonalinjury.
•
Installtheequipmentrackonastable,hardfloor.Fixit
with anchor bolts or take other arrangements to
preventitfromfallingdown.
•
Besuretousethescrewswithadiameterofover5
mm(0.2")andlengthofover12mm(0.47")tomount
theunit.
•
When connecting the unit's power cord to an AC
outlet, use the AC outlet with current capacity
allowabletotheunit.
When the Unit is in Use
•
Makesuretosetalloutputlevelcontrolsto0position
beforepowerisswitchedon.
•
Loudnoiseproducedwhenpowerisswitchedonwith
anyofthosecontrolssettothepositionotherthan0
positioncanimpairhearing.
•
Donotoperatetheunitforanextendedperiodoftime
with the sound distorting. Doing so may cause the
connectedspeakerstoheat,resultinginafire.
•
ContactyourTOAdealerastothecleaning.Ifdustis
allowedtoaccumulateintheunitoveralongperiodof
time,afireordamagetotheunitmayresult.
•
Ifdustaccumulatesonthepowersupplyplugorinthe
wallACoutlet,afiremayresult.Cleanitperiodically.
Inaddition,insertthepluginthewalloutletsecurely.
•
Turnoffthisunit'spowerswitch,andunplugthepower
supply plug from the AC outlet for safety purposes
whencleaningorleavingtheunitunusedfor10days
ormore.Doingotherwisemaycauseafireorelectric
shock.
The lighting flash with arrowhead symbol,
within an equilateral triangle, is intended to
alert the user to the presence of uninsulated
"dangerous voltage" within the product's
enclosurethatmaybeofsufficientmagnitude
toconstituteariskofelectricshocktopersons.
CONSEILS DE SÉCURITÉ
• Avantl'installationoul'utilisation,lireattentivementl'ensembledesinstructionsdecettesectionpourun
fonctionnementcorrectetsûr.
• Veilleràrespecterlesprécautionsrecommandéesdanscettesection,laquellecontientdesmisesen
garde
• et/ouprécautionsimportantesenmatièredesécurité.
• Aprèslecture,conservercemanuelàportéedemainpourconsultationultérieur
e.

6
Symboles de sécurité et conventions
Lessymbolesetmessagesdesécuritédécritscidessoussontutilisésdanscettenoticepourprévenirtout
dommagecorporeloumatérielpouvantrésulterd'unemauvaiseutilisation.Lireattentivementcettenotice
pour comprendre parfaitement les symboles et messages de sécurité afin de prévenir tout risque éventuel.
Lors de l'installation de l'appareil
•
Nepasexposerl'appareilàlapluieetleprotégerde
tout contact avec de l'eau ou d'autres liquids afin
d'éviterunincendieouuneelectrocution.
•
Utilisez l'appareil uniquement avec la tension
spécifiée sur le chargeur. L'utilisation d'une tension
supérieureàcellespécifiéepeutêtreàl'origined'un
incendieoud'uneelectrocution.
•
Nepascouper,entortiller,modifierouendommagerle
cordon d'alimentation. En outre, éviter d'utiliser le
cordond'alimentationàproximitéd'unradiateuretne
jamais placer d'objets lourds (y compris l'appareil
luimême) sur le cordon d'alimentation, car ceci
présenteunrisquéd'incendieoud'électrocution.
•
Lescâblesexternesbranchésauxbornesmarquées
de .… doivent être installé par un technicien
spécialementformé.
•
L'appareildoitêtrebranchéàuneprised'alimentation
avecmiseàlaterredeprotection.
Pendant l'utilisation de l'appareil
•
En cas de survenue des irrégularités suivantes
pendant l'utilisation, couper immédiatement
l'alimentation, débrancher la fiche du cordon
d'alimentation de l'adaptateur secteur de la prise
secteur et contacter le représentant TOA le plus
proche.Nepasessayerpasd'utiliserl'appareildans
cesconditionssouspeinedeprovoquerunincendie
ouuneélectrocution.
•
Détectiondefuméeoud'uneodeurinhabituelle
émanantdel'appareil.
•
Pénétrationd'eauoud'unobjetmétalliquedans
l'appareil.
•
Chuteouendommagementdel'appareil
•
Dégradationducordond'alimentation(âmeducâble
dénudée,déconnexionetc.).
•
Dysfonctionnement(absencedetonalité).
•
Pourempêcherunincendieouuneélectrocution,ne
jamaisouvrirnineretirerleboîtierdel'appareil,en
raisondelapréswencedepiècesàhautetension.
Touteslesopérationsdemaintenance,notamment
lesmodificationsapportéesàl'intérieurdela
machine,doiventêtreréaliséesparuntechnicien
qualifié.
•
Nepasplacerdetasses,bolsouautresrecipients
remplisdeliquidesoud'objetsmétalliquesaudessus
del'appareil.S'ilsserépandentparaccidentsur
l'appareil,ilspeuventprovoquerunincendieouune
électrocution.
•
Nepasinsérernilaissertomberd'objetsmétalliques
oudematériauxinflammablesdansleséventsde
ventilationducapotdel'appareilsouspeinede
provoquerunincendieouuneélectrocution.
•
Nepastoucherlaficheducordond'alimentation
pendantunorageRisqued'électrocut.
Lors de l'installation de l'appareil
•
Nejamaisbrancher,nidébrancherlaficheducordon
d'alimentationaveclesmainsmouillées.Risque
d'électrocution.
•
Pourdébrancherlecordond'alimentation,veilleràle
parsafiche;nejamaistirerdirectementlecordon.
Utiliserl'appareilavecuncordond'alimentation
endommagépeutprésenterunrisqued'incendieou
d'électrocution.
•
Lorsdudéplacementdel'appareil,veilleràretirerla

7
ficheducordond'alimentationdel'adaptateursecteur
delaprisemurale.Silechargeurestdéplacéavecle
cordond'alimentationbranchédanslaprise,ce
dernierrisqued'êtreendommagé,cequiprésenteun
risqued'incendieoud'électrocution.Pourretirerle
cordond'alimentation,letirerparlaprise.
•
Éviterd'installerl'appareildansunendroithumideou
poussiéreux,enpleinsoleil,àproximitéd'un
radiateur,oudansunendroitdégageantdelafumée
noireoudelavapeursouspeinedeprovoquerun
incendieouuneélectrocution.
•
Pouréviterleschocsélectriques,veilleràdébrancher
l'appareilavantdeconnecterleshautparleurs.
•
Cetappareildoituniquementêtremontédansunbâti.
Veilleràsuivrelesinstructionscidessouslorsdu
montageenbâti.
Risqued'incendieoudeblessurecorporelle.
•
Installerlebâtisurunsolstable.
Lefixeràl'aidedeboulonsd'ancrageoud'unautre
dispositifpourl'empêcherdetomber.
•
Lorsdumontagedel'appareil,veilleràutilizerunevis
deplusde5mm(0,2")dediamètreetdeplusde
12mm(0,47")delongueur.
•
Pourbrancherlecordond'alimentationàuneprise
CA,vérifierl'intensitémaximaledel'appareil.
Pendant l'utilisation de l'appareil
•
Mettretouteslescommandesduniveausortieen
position0avantquel'alimentationnesoitrestituée.Si
l'appareilestmissoustensionalorsqueces
commandesnesontpasenposition0,unbruitfortau
pointdedégraderl'auditionrisqued'êtreémis.
•
Nepasutiliserl'appareilpendantunepériode
prolongéesilesonestdistordu.Leshautparleurs
branchésrisquentdesurchaufferetdeprovoquerun
incendie.
•
Pournettoyerl'appareil,contactervotrerevendeur
TOA.L'accumulationdepoussièrependantune
périodeprolongéepeutentraînerunincendieouune
dégradationdel'appareil.
•
L'accumulationdepoussièresurlaficheducordon
d'alimentationoudanslaprisesecteurprésenteun
risqued'incendie.Lesnettoyerrégulièrement.Par
ailleurs,insérercomplètementlafichedanslaprise
murale.
•
Parmesuredesécurité,lorsdunettoyageoulorsque
l'appareil n'estpas utilisépendant 10jours ou plus,
couper l'alimentation, et débrancher la fiche du
cordon d'alimentation de l'adaptateur secteur de la
prisesecteurRisqued'incendieoud'électrocution.
L'éclairaccompagnéd'unsymbole
représentantunepointedeflècheàl'intérieur
d'untriangleéquilatéralavertitl'utilisateurdela
présenced'une"tensiondangereuse"à
l'intérieurdel'enceintedutéléviseur,dontla
magnitudepeutêtresuffisantepourconstituer
unrisquedechocélectriquepourles
personnes
3. GENERAL DESCRIPTION
TOA's MA725F matrix amplifier and MM700F is allinone solution for multichannel or multizone
applicationscombined6x4audiomatrix,DSPand4chClassDamplifier(*)intoonechassis.Itisequipped
with 4 independent line inputs, 2 MIC/LINE priority inputs. Each output has independent DSP preset
adjustment alsocomes with inputsource matrix selection. Itfeatures ahigh powerhandling(250Wx4 @
70V/100V)(*)andvariousinputscapabilities.Itswiderangeofapplicationsincludegeneraloremergency
announcementandbackgroundmusicplayingatrestaurants,pubs,retailstores,schools,officesandetc.
(*)MA725Fonly
4. FEATURES
• 4stereosumminglineinputswithmatrixroutingto4amplifieroutputs.
• Eachlineinputhasinputleveladjustmentandassignrestrictionsettingforeachoutputtopreventwrong
routingselection.
• 2priorityMIC/LINEinputswithdifferentprioritylevelforpagingorotherprerecordedsourcecanoverride
theselectedlineinputonassignedoutputchannels.
• Eachpriorityinputalsohasinputlevel,mutesensitivityandmuteholdtimeadjustments.
• Eachoutputchannelisequippedwith250WClassDamplifierat70V/100Voutputvoltageselectablewith
independentDSPpresetselectionand50HzHPFfortheprotectionofconnectedspeakers.(*)
• SelectableDSPpresetselectionsincludegeneralEQs,likeLoudnesscurves,TOAspeakerEQsand
crossoversettingstobeusedwithsubwoofers.
• Eachoutputchannelalsohasauxiliarylineoutputtodelivertheaudiotoothersystem.
• Thismatrixdoesn’tneedanyGUIornetworkconnectionforsetupatsite.(Maintenancepurposeonly)
• Optionalwallmountremotecontrol,WP700canbeconnectedviaCAT5straightLANcabletocontrol
lineinputselectionsandoutputvolumeofeachoutput.

8
• ClassDamplifierhasalotofprotectionfeaturesagainstovercurrent,hightemperatureandshortcircuit
ofspeakerlinesateachoutputchannelindividually.(*)
• PowersupplywithPowerFactorCorrectionforreducedpowerconsumptionandworldwideoperating
range.(*)
(*)MA725Fonly
5. HANDLING PRECAUTIONS
• Keeptheinputcableawayfromtheoutputcable.Ifinstalledclosetoeachother,oscillationcouldoccur.
• Toavoidunitfailures,neverconnectoutputsof2ormorechannelsinparallel.
• Onlyconnectspeakerswithanimpedanceequaltoorgreaterthanthosespecified.Connectingspeakers
withasmallerimpedancethanspecifiedcouldcausedamagetotheunit.
• Installtheunitinlocationswherethetemperatureisbetween–10°Cand+40°C(14°Fand104°F)andthe
moistureislessthan90%RH(nodewcondensationmustbeformed).
• Toclean,besuretofirstturnoffthisunit'spowerswitch,thenwipewithadrycloth.Whentheunitgets
verydirty,useaclothdampedinaneutralcleanser.Neverusebenzene,thinner,alcohol,or
chemicallytreatedcleaningclothbecausesuchvolatileliquidscoulddeformordiscolortheunit.
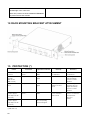
6. INSTALLATION PRECAUTIONS
• Whenmountingtheunitinanequipmentrack,theinsideoftherackmustbesufficientlyventilated.
Toachievesufficientventilation,removeallpanelsontherearoftherack.
• Whenmountingtheunitintherack,alsomountaPerforatedPanellargerthan1Uinsize
(1)atthetopandthebottomoftherack,and
(2)aboveandbelowevery5units.
*1Usize=44.5mmor1.75"(referencesize)
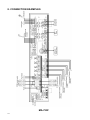
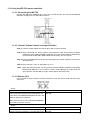
7. NOMENCLATURE AND FUNCTIONS
[Front]

9
1 POWER SIWITCH [ON /OFF]
Pressthisswitchtoturnontheamplifier,presstheswitchagaintoturnofftheamplifier.
2. POWER INDICATOR [POWER] (Blue)
Duringthepoweronprocesstheindicatorflashes,afteramplifierisready,theindicatorlights.
3. CH1 OUTPUT LEVEL CONTROL
AdjustCH1outputlevel
Note:ThefunctionalityofCH2,CH3,CH4isthesameasCH1.
4. CH1 SIGNAL, PEAK, PROTECT INDICATOR (Green, Red, Red)
SIGNALIndicator:Whenoutputlevelexceeds36dBV,theSIGNALindicatorlights.
PEAKIndicator:Lightsredwhenanoutputsignalclips(distortionoccurs).
Note:
When the Peak indicator lights, turn the output level control (3) counterclockwise until its light
extinguishesordecreasetheinputsignalleveloftheconnectedexternaldevice.Operatingthe
unitwhilethePeakindicatorremainslightsmaycausetheprotectioncircuitrytobeactivated.
PROTECTIndicator(*): Lightsorblinkswhentheprotectioncircuitryisactivated.(Seep.27;Protection
Operation List.) When the power is switched on, this indicator lights for about 2 seconds and then
extinguishes.
Note: ThefunctionalityofCH2,CH3,CH4isthesameasCH1.
5. LINE 1, LINE 2, LINE 3, LINE 4 INPUT SIGNAL INDICATOR (Green)
WhenLINE1,LINE2,LINE3,LINE4inputsignalisexceed47dBV,theindicatorlights.
6. PRIORITY INPUT SIGNAL INDICATOR [PRIORITY 1, PRIORITY 2] (Green, Green)
PRIORITY INPUT SIGNAL1 Indicator: When the priority input 1 signal (14) exceed 36dBV
(line)/86dBV(mic)theindicatorlights.

10
PRIORITY INPUT SIGNAL2 Indicator: When the priority input 2 signal (14) exceed 36dBV
(line)/86dBV(mic),theindicatorlights.
7. CH1 PRIORITY INDICATOR [PRIORITY1, PRIORITY2] (Green, Green)
PRIORITY1Indicator:WhenPRIORITY1isactivatedandassignedtoCH1output,theindicatorlights.
PRIORITY2Indicator:WhenPRIORITY2isactivatedandassignedtoCH1output,theindicatorrights.
Note: 1. WhenPRIORITYMIX1+2switchisturnedonandactivated,thesetwoindicatorlightatthesametime.
2.ThefunctionalityofCH2,CH3,CH4isthesameasCH1.
8. CH1 PRIORITY INDICATOR [REMOTE] (Yellow)
WhenremotecontrolpanelWP700isconnectedtoCH1ofREMOTETERMINALS,theindicatorlights.
Atthistime,bothoutputlevelandinputsourceselectioncouldbechangedbyconnectedWP700.
Note: 1. WhenWP700isconnected,CH1OUTPUTLEVELCONTROL(3)andCH1INPUTSELECTSWITCH(5)
onthefrontpanelaredefeatedandcontrolledbyWP700.
2. WhenWP700isdisconnected,theoutputlevelgoesbacktothesettingofCH1OUTPUTLEVEL
CONTROL(3)
3. ThefunctionalityofCH2,CH3,CH4isthesameasCH1.
9. CH1 INPUT SELECT SWITCH 1 - 4
SelectfromLINE14inputsastheinputsourceforamplifierCH1output.Selectagainontheprevious
selectedinputturnsofftheselectionofinputsource.
Note: ThefunctionalityofCH2,CH3,CH4isthesameasCH1.
10. CH1 INPUT SELECT INDICATOR [1, 2, 3, 4] (Green)
TheledwilllightwithrespecttotheinputselectbytheINPUTSELECTSWITCH(5)otherchannelwhich
isnotselectedwillturnoff.
Note: ThefunctionalityofCH2,CH3,CH4isthesameasCH1.
(*) MA-725F only
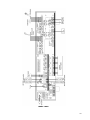
[Rear]

11
11. AC inlet
Connectthesuppliedpowercordtothisinlet.Thesocketoutletshouldbeinstalledneartheequipment
andtheplug(disconnecteddevice)shallbeeasilyaccessible.
12. Functional ground terminal [SIGNAL GND]
Hum noise may be generated when external equipment is connected to the unit. Connecting this
terminaltothefunctionalgroundterminaloftheexternalequipmentmayreducethehumnoise.
13. LINE 1, LINE 2, LINE 3, LINE 4 INPUT TERMINAL
10kΩ,–10dB*,unbalancedRCAJack(UpperandlowerofRCAinputsignalismixed)
Connectmusicsourceequipment:e.g:CDplayers.
14. LINE 1, LINE 2, LINE 3, LINE 4 INPUT LEVEL CONTROL
Adjusttheinputlevel(sensitivity)ofLINE1,LINE2,LINE3,LINE4.
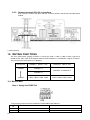
15. ASSIGNMENT RESTRICTION DIP SWITCHES (LINE 1, LINE 2, LINE 3, LINE 4)
AssignrestrictionLINE1,LINE2,LINE3,LINE4toCH1,CH2,CH3,CH4outputs.
LINE1ASSIGNMENTRESTRICTIONS:
SwitchNo.
ON OFF
1 LINE1can’tbeassignedtoCH1 LINE1canbeassignedtoCH1
2 LINE1can’tbeassignedtoCH2 LINE1canbeassignedtoCH2
3 LINE1can’tbeassignedtoCH3 LINE1canbeassignedtoCH3
4 LINE1can’tbeassignedtoCH4 LINE1canbeassignedtoCH4
Note:1)
ThefunctionalityforLINE2,LINE3,LINE4isthesameasLINE1.
2) When the assignment restriction is set, both INPUT SELECT SWITCH (10) or connected
WP700,arenotallowedtoselecttherestrictedchannel.
16. MIC/LINE input terminal (PRIORITY 1, PRIORITY 2)
MIC:2.2K,–60dB*/LINE:2.2K,–10dB*,electronicallybalancedinputsof3pinremovableterminal
blocktype.
Connectmicrophoneorlinelevelmusicsourceequipment.MIC/LINEgaincouldbefromthePRIORITY
FUNCTIONALDIPSWITCH(20)#6.
17. MIC/LINE input level control (PRIORITY 1, PRIORITY 2)
Adjusttheinputlevel(sensitivity)oftheMIC/LINE
18. Manual mute terminal
Openvoltage:DC3.3V,Shortcurrent:<5mA
1) When(+),()shorted:TheselectedLINE1,LINE2,LINE3,LINE4inputsignaltoCH1,CH2,CH3,
CH4outputwillbemuted,andswitchtothepagechannel(1st~4thswitchof(20))thathavebeen
assignedbyPRIORITY1,PRIORITY2inputs.
2) When(+),()opened:CH1,CH2,CH3,CH4outputwillgraduallyrecoveredfromtheprevious
assignedLINE1,LINE2,LINE3,LINE4signal.TherecoverytimeiscontrolledbytheHOLDTIME
control(19).

12
19. MUTE SENSE control (PRIORITY 1, PRIORITY 2)
Adjustthethreshold(sensitivity)ofthemutefunctionofthePRIORITY1,PRIORITY2inputs.Inother
words,ifPRIORITY1,PRIORITY2inputsignalexceedthethresholdthatsetbyMUTESENSE,itwill
mutetheLINE1,LINE2,LINE3,LINE4signaltoCH1,CH2,CH3,CH4outputs.Rotateclockwisewill
raisethesensitivity,counterclockwisewilllowerthesensitivity.
20. HOLD TIME control (PRIORITY 1, PRIORITY 2)
AdjusttherecoverytimeoftheLINE1,LINE2,LINE3,LINE4toCH1,CH2,CH3,CH4outputs.Rotate
clockwise will increase the recovery time (maximum 10sec), counterclockwise will decrease the
recoverytime(minimum50ms)
21. PRIORITY FUNCTIONAL DIP SWITCH (PRIORITY 1, PRIORITY 2)
ControlthefunctionalityofthePRIORITY1andPRIORITY2
SwitchNo.
ON OFF
1 PRIORITY1/2canbeswitchedtoCH1output PRIORITY1/2cannotbeswitchedtoCH1output
2 PRIORITY1/2canbeswitchedtoCH2output PRIORITY1/2cannotbeswitchedtoCH2output
3 PRIORITY1/2canbeswitchedtoCH3output PRIORITY1/2cannotbeswitchedtoCH3output
4 PRIORITY1/2canbeswitchedtoCH4output PRIORITY1/2cannotbeswitchedtoCH4output
5 ThemutefunctioniscontrolledbythePRIORITY
1/2inputsignalormanualmute(16)
The mute function is only controlled by the
manualmute(16)
6 PRIORITY1/2inputgainswitchtoMIClevel PRIORITY1/2inputgainswitchtoLINElevel
22. PRIORITY MIX1+2 switch
ControltheinputmodeofthePRIORITY1/2
ON OFF
PRIORITY1andPRIORITY2willbemixedandoutput
to CH1, CH2, CH3, CH4 when mute activated. The
PRIORITY FUNCTIONAL DIP SWITCH (20), MUTE
SENSE control (18), HOLD TIME control (19) will be
followedbyPRIORITY1’ssetting
The PRIORITY 1 has the higher priority level than
PRIORITY 2. When There is mute function activated.
UnitwilloutputPRIORITY1’sinputfirst.
23. EQ BANKS and PRESETS SELECTION
The2bitDIPswitchselectthebankofrespecttothe16EQpresets.Total4banks.
The4bitrotaryswitchselects16EQpresetsfromeachbanks.
Note:ThefunctionalityofCH2,CH3,CH4isthesameasCH1.
Pleaseseepage23,"11.2EQpresetselections"formoredetails.
24. HPF SWITCH (*)
ControltheactivationofHPF(HighPassfilter)onoutputs.
ON OFF
TheCH1,CH2,CH3,CH4willhas50Hz,12dB/oct.high
passfilteronoutput.Thisisusefultoprotectthespeaker
when thetransformer of thedistributespeakercouldn’t
handlelowfrequency.
The output frequency response is flat from 20Hz to
20kHz.
25. REMOTE TERMINALS (CH1, CH2, CH3, CH4 remote controls)
RJ45connector,useforconnectingtheremotemoduleWP700.
AfterconnectingWP700couldprovidethefollowingfunctionality:
1) SwitchtheinputsourceLINE1,LINE2,LINE3,LINE4toCH1,CH2,CH3,CH4outputs.
2) Adjustthevolumeofconnectedchannel.
Note:WhentheWP700isconnected,theOUTPUTLEVELCONTROL(3)onfrontpanelandINPUT
SELECTSWITCH(10)won’tbefunctional.ItmeansthistwofunctionwillfollowWP700setting.Also,
theREMOTEINDICATOR(8)willlight.

13
26. REMOTE LINK SWITCH (CH1-2, CH3-4)
CH12:
ON OFF
CH1,CH2couldcontroltheCH1andCH2’svolumeand
input selection by one WP700 at the same time. The
REMOTEINDICATORonCH1andCH2willlightatthe
sametime.
Note: Only connect to CH1’s REMOTE TERMINAL to
presentremotelinkfunction
CH1,CH2’svolumeiscontrolledseparatedbytwo
WP700.
CH34:
ON OFF
CH3,CH4couldcontroltheCH1andCH2’svolumeand
input selection by one WP700 at the same time. The
REMOTEINDICATORon CH3and CH4willlight at the
sametime.
Note: Only connect to CH3’s REMOTE TERMINAL to
presentremotelinkfunction
CH3,CH4’svolumeiscontrolledseparatedbytwo
WP700.
27. 70V/100V OUTPUT MODE SWITCH (*)
Adjusttheamplifieroutputmode
70V 100V
Maximumoutputwillbesetto70Vrms
(maximumloadimpedance=20ohm)
Maximumoutputwillbesetto100Vrms
(maximumloadimpedance=40ohm)
28. POWER REMOTE TERMINAL
Openvoltage:3.3V,Shortedcurrent:<1mA
WhenACmainsisconnectedto(11)andPOWERSWITCH(1)isinONposition,shortedwillturnoffthe
poweramplifierandalloftheindicationforpowersaving.Openwillinnormaloperation.
29. LAN PORT
RJ4510/100MEthernetconnection.
Maintenancepurposeonlyforfactory.
30. LINE OUTPUT TERMINAL (CH1, CH2, CH3, CH4) (*)
600Ω,0dB*,RCAconnector.
Auxiliarylineleveloutput(justbeforetheamplifierinput).
31. MOH OUTPUT TERMINAL
600Ω,0dB*,transformerisolatedbalancedoutput,removableterminalblocktype.
LINE4inputisassignedtothisoutput.
Note:
1.TheMOHoutputlevelisnotaffectedbytheinputlevelcontroloftheLINE4.
2.MOHoutputdoesn’thaveMUTEfunctionality.
3.MOHoutputdoesn’thaveEQfunctionality.
32. MOH OUTPUT INPUT LEVEL CONTROL
AdjusttheinputleveloftheMOHOUTPUT.
33. SPEAKER OUTPUT TERMINAL (CH1, CH2, CH3, CH4)
MA725F:
70V/100Voutput (selectby the70V/100V OUTPUTMODESWITCH (26)),removableterminal block
type.Connecttospeaker.
MM700F:
600Ω,0dB*,removableterminalblocktype.Lineleveloutput.
*0dB=1Vrms
(*) MA-725F only

14
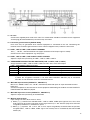
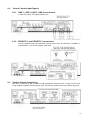
8. CONNECTION EXAMPLES
MA-725F

15
MM-700F

16
9. CONNECTION
9.1. Removable Terminal Plug Connection
Cautions
• Besuretouseshieldedcablesforaudiosignallines.
• Avoidsolderingcableconductor,ascontactresistancemayincreasewhenthecableistightenedand
thesolderiscrushed,possiblyresultinginanexcessiveriseinjointtemperatures.
• UsecablesofAWG12–24.
Cable end treatment
Connector connections
Step 1. Loosentheterminalscrew,theninsertthecable.
Step 2. Retightentheterminalscrew.(Pullonthecabletoensureitissecurelyconnected.)
Tip
Recommendedslottedscrewdrivertype:Screwdriverwithbladethatis3mm(0.12")inwidth.

17
9.2. How to Connect Input Signals
9.2.1. LINE 1, LINE 2, LINE 3, LINE 4 connections
LandRlinesignalsaremixedinsidetheunit.
9.2.2. PRIORITY 1 and PRIORITY 2 connections
UsethesuppliedSmalltyperemovableterminalplug(5pins)forconnection.PRIORITY1
andPRIORITY2canbesettoMICorLINEinput.
9.3. Speaker Output Connections
Theunitcanoperatedat70Vor100VlinehighimpdedancespeakersClass2wiringmaybeused.
Usingsuppliedremovableterminalplug(2pins),connectthespeakerlinetoeachspeakerterminals.

18
9.3.1. High-impdedance 70V line speaker connections (*)
9.3.2. High-impdedance 100V line speaker connections (*)
9.4. MOH Output Connections
Usethesuppliedremovableterminalplug(3pins)forconnection.
9.5. LINE output connections
Auxiliarylineleveloutputforzoneexpansion.

19
9.6. Remote Control Equipment Connections
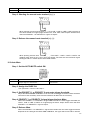
9.6.1. Manual muting terminal connections
If a novoltage contact is connected, closing the contact allows the predetermined input
channelvolumetobereducedbyapresetlevelofattenuation.
Ifa microphonewitha contactis connectedasshownin Connection (p.12), theaudioof
otherchannelswillbemutedforaslongasthemicrophone’stalkswitchispressed.
9.6.2. Power remote terminal connections
Ifanovoltagecontactisconnected,closingthecontactallowstheamplifiergoesintopower
savingmode.Alloftheindicationwillbeturnoff.

20
9.6.3. Remote terminals (RJ-45) connections
Eachchannel’svolumeandinputselectioncouldberemotelyadjustedbyWP700remote
module.
(*)MA725Fonly
10. MUTING FUNCTIONS
Theunit’spriority/mute(paging)functionsis tomutetheLINE1,LINE2,LINE3,LINE4signalthat
routedtoCH1,CH2,CH3,CH4’soutputsandthenroutePRIORITY1orPRIORITY2signalstooutputs.
Theprioritylevelofeachinputsisasfollowing:
Prioritylevel PRIORITY MIX1+2:OFF PRIORITY MIX1+2:ON
HIGHER
LOWER
PRIORITY1
PRIORITY1/PRIORITY2
PRIORITY2
LINE1,LINE2,LINE3,LINE4 LINE1,LINE2,LINE3,LINE4
10.1 Manual Mute
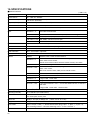
Step 1. Assign the PAGE CH:
AssignpagingchannelfromthePRIORITYFUNCTIONALDIPSWITCH.
Switch
No.
ON:DOWN OFF:UP
1 PRIORITY1/2canbeswitchedtoCH1output PRIORITY1/2cannotbeswitchedtoCH1output
2 PRIORITY1/2canbeswitchedtoCH2output PRIORITY1/2cannotbeswitchedtoCH2output
La page charge ...
La page charge ...
La page charge ...
La page charge ...
La page charge ...
La page charge ...
La page charge ...
La page charge ...
La page charge ...
La page charge ...
La page charge ...
La page charge ...
La page charge ...
La page charge ...
-
 1
1
-
 2
2
-
 3
3
-
 4
4
-
 5
5
-
 6
6
-
 7
7
-
 8
8
-
 9
9
-
 10
10
-
 11
11
-
 12
12
-
 13
13
-
 14
14
-
 15
15
-
 16
16
-
 17
17
-
 18
18
-
 19
19
-
 20
20
-
 21
21
-
 22
22
-
 23
23
-
 24
24
-
 25
25
-
 26
26
-
 27
27
-
 28
28
-
 29
29
-
 30
30
-
 31
31
-
 32
32
-
 33
33
-
 34
34


TOA MA-725F Manuel utilisateur
- Taper
- Manuel utilisateur
- Ce manuel convient également à
dans d''autres langues
- English: TOA MA-725F User manual
Documents connexes
-
TOA BG-2480D Manuel utilisateur
-
TOA A-230 HV Specification Data
-
-
-
Optimus A-5006 Manuel utilisateur
-
TOA DA-250D CU Manuel utilisateur
-
-
Optimus DM-1300 Fiche technique
-
-
Autres documents
-
Sony XM-6ES Manuel utilisateur
-
Adastra 952.996 Mode d'emploi
-
-
LD Systems AM 8 Manuel utilisateur
-
Episode ESA-70V2CH-500W Guide d'installation
-
Yamaha n12 Le manuel du propriétaire
-
-
Denon DN-X400 Le manuel du propriétaire
-
Pioneer DJM-2000 Manuel utilisateur
-