Shark V2940C Cordless Floor And Carpet Sweeper Manuel utilisateur
- Taper
- Manuel utilisateur

V2940C
OWNER’S GUIDE
MANUEL DU PROPRIÉTAIRE
www.sharkclean.com

2TOLL FREE: 1-800-798-7398
1 Read and follow all label, operational and
marking instructions.
2 Use ONLY as described in this manual.
Use only manufacturer’s recommended
attachments.
3 DO NOT allow to be used as a toy. Close
attention is necessary when used by or near
children.
4 DO NOT use for any purpose other than
described in this user’s guide.
5 DO NOT use with damaged cord or plug.
Do not use the cordless floor and carpet
sweeper if it has been dropped, damaged,
left outdoors, or dropped in water. Return it
to EURO-PRO Operating LLC for examination,
repair or adjustment.
6 DO NOT abuse the charger cord. Never carry
the charger or base by the cord or yank to
disconnect from an outlet; instead grasp the
charger and pull to disconnect.
7 Keep the charger cord away from heated
surfaces.
IMPORTANT SAFETY INSTRUCTIONS
For Household Use Only
8 DO NOT use the charger with an extension
cord. Plug the charger directly into an
electrical outlet. Use charger only in a
standard electrical outlet.
9 DO NOT attempt to use the charger with
any other product or attempt to charge this
product with another charger. Use only
the charger model KA12D090020023U
supplied with this cordless floor and
carpet sweeper.
10 DO NOT charge this unit outdoors.
11 DO NOT use outdoors or on wet surfaces.
12 DO NOT handle plug or appliance with wet
hands.
13 Use only on dry, indoor surfaces.
14 DO NOT put any object into openings. Do
not use with brush roll blocked; keep free of
fiber, lint, hair and anything that may prevent
the brush roll from working.
15 Keep hair, loose clothing, fingers and all parts
of body away from openings and moving
parts.
16 DO NOT pick up anything that is burning or
smoking, such as cigarettes, matches or hot
ashes.
17 DO NOT use to pick up flammable or
combustible liquids such as gasoline or use
in areas where they may be present.
18 DO NOT attempt to change accessories while
the unit is running.
19 DO NOT use the cordless floor and carpet
sweeper without the dust container in place.
20 Use extra care when cleaning on stairs.
READ ALL INSTRUCTIONS BEFORE USING
YOUR SHARK® CORDLESS FLOOR AND CARPET
SWEEPER.
WHEN USING YOUR SHARK CORDLESS
FLOOR AND CARPET SWEEPER, BASIC
SAFETY PRECAUTIONS SHOULD ALWAYS BE
OBSERVED, INCLUDING THE FOLLOWING:
WARNING: TO REDUCE THE RISK
OF FIRE, ELECTRIC SHOCK OR INJURY:

3www.sharkclean.com
TO MAXIMIZE THE LIFE OF YOUR
NI-CD BATTERIES:
1 Charge for 20 hours before initial use. Failure
to do so will reduce the product’s battery life
significantly.
2 After first use, discharge the unit fully and then
recharge for 16 hours.
3 For best battery performance, remove the
charging adapter from the unit after the
charging period has completed.
4 Do not store the unit with the charging
adapter attached and plugged in.
5 For maximum battery life, only recharge the unit
when the batteries are close to fully discharged.
It is best to fully discharge the batteries at least
once a month.
6 DO NOT store in areas of high temperature or
humidity.
7 After 3 months of non-use, the product should
be fully discharged and then recharged to
maximize battery power.
8 Ni-Cd batteries have a long useful life but at
some time they will need to be replaced. To
purchase replacement batteries, visit www.
sharkclean.com.
NOTE: The power button must be in the “Off”
position in order to charge the unit. If the
charging indicator does not light, press the
power button once.
SAVE THESE INSTRUCTIONS
21 Store the cordless floor and carpet sweeper
indoors. Store after use to prevent accidents.
22 Leaks from battery cells can occur under
extreme conditions. If the liquid gets on
the skin - wash immediately with soap and
water. If the liquid gets into the eyes, flush
them immediately with clean water for a
minimum of 10 minutes and seek medical
attention.
23 This product includes rechargeable nickel
cadmium batteries. Batteries must be
recycled or disposed of properly. Do not
incinerate the batteries or expose to high
temperatures as they may explode.
24 The cordless floor and carpet sweeper must
be disconnected from the power supply when
removing the battery.
25 To reduce the risk of electrical shock, do not
put the charger and sweeper body in water
or other liquid. Do not place or store the
appliance where it can fall or be pulled into a
tub or sink.

4TOLL FREE: 1-800-798-7398
Quick Start 5
Assembly 6
Charging Your Cordless Floor & Carpet Sweeper
7
Using Your Cordless Floor & Carpet Sweeper 7
Emptying the Dust Container 8
Maintenance 9
Troubleshooting Guide 10
Ordering Replacement Parts 10
Warranty and Registration 11
Thank you
for purchasing
the Shark®
Cordless
Floor and Carpet
Sweeper
CONTENTS

5www.sharkclean.com
English
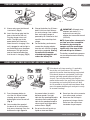
CLEAN
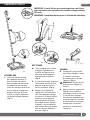
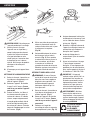
2 Pull back on the handle and
press lightly on the body of the
unit with your foot to engage
the steering. (Fig. 2)
3 Using your foot, press the
power button and push the unit
forward over the surface you
wish to clean. (Fig. 3)
4 Press the speed button on the
right with your foot to change
the speeds. One light indicates
the speed optimized to clean
bare floors and two lights
indicate the speed optimized to
clean carpets and larger debris
on bare floors. (Fig. 4)
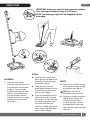
IMPORTANT: Before you can start using your new cordless
floor and carpet sweeper, charge it for 20 hours.
NOTE: The charging adapter will be shipped inside the
packaging.
ASSEMBLE
1 Insert the lower handle
extension tube (the shortest of
the three tubes) into the lower
handle (a). Then assemble
the other two extension tubes
and insert the assembly into
the lower handle extension
tube (b). Now attach the upper
handle to the top extension
tube. (Fig. 1)
EMPTY
5 When you’re finished cleaning,
pull the dust container straight
out from the side. (Fig. 5)
NOTE: Be careful not to
accidentally turn the unit on.
6 Empty dust container contents.
(Fig. 6) If desired, you may
rinse with water to clean
the dust container - but dry
thoroughly before replacing.
When finished, replace the dust
container.
Fig. 1
Fig. 2
Fig. 3
Fig. 4 Fig. 6
QUICK START
Fig. 5
b
a

6TOLL FREE: 1-800-798-7398
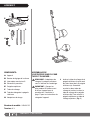
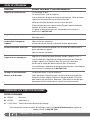
ASSEMBLY OF YOUR FLOOR
AND CARPET SWEEPER:
NOTE: The charging adapter
and lower handle will be
shipped inside the packaging.
IMPORTANT: Charge the
batteries for 20 hours before
using the unit for the first time.
See page 7 for instructions on
charging your unit.
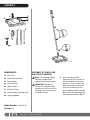
COMPONENTS:
A Main Unit
B Speed Control Button
C Power Button
D Dust Container
E Upper Handle
F Extension Tubes
G Lower Handle Extension Tube
H Charging Adapter
Fig. 1
Model Number: V2940C 32
Voltage: 6 V
E
A
ASSEMBLY
F G
I
H
1 Insert the lower handle
extension tube (the shortest of
the three tubes) into the lower
handle (a). Then assemble the
other two extension tubes and
insert the assembly into the
lower handle extension tube (b).
Now attach the upper handle to
the top extension tube. (Fig. 1)
BC
D
b
a

7www.sharkclean.com
English
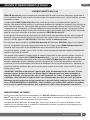
If the brush roll stops moving, it’s probably
due to the anti-jam feature. This feature
protects the motor from becoming overheated.
If the brush becomes overloaded, it will stop
turning and both speed indicator lights will
stay on. Turn off your unit by pressing the
power button once. See page 9 for instructions
on removing or cleaning the brush roll. Wait
for 10 seconds to let your unit cool down. Now
press the power button again and you’re ready
to resume cleaning!
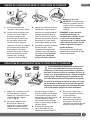
1 Always make sure that the unit
is turned off. (Fig. 2)
2 Insert the charger plug into the
hole on the back of the unit.
Plug the charger into a wall
outlet. The light next to the
power button will illuminate
when the unit is charging. If the
unit is plugged in and the light is
not illuminated, press the power
button once. The light should
now be illuminated indicating
that the unit is charging. (Fig. 3)
CHARGING YOUR CORDLESS FLOOR AND CARPET SWEEPER
3 Charge the battery for 20 hours
before initial use and 16 hours
for each recharge. Your cordless
floor and carpet sweeper is
powered by Ni-Cd batteries that
need this time to build up their
charge.
4 For best battery performance,
remove the charging adapter
from the unit after the charging
period has completed. Storing
the unit with the adapter
attached and plugged in will
reduce the battery life.
IMPORTANT: Although many
adaptors look similar, it’s
important to use only the
adaptor that came with the unit
(XA2940).
NOTE: If you notice a decrease in
run time over time, recondition
the batteries by running the
sweeper until the sound drops
significantly, then turn off the
unit and charge for 20 hours.
This battery reconditioning process
can also be performed as monthly
maintenance.
4 Do not use the unit on concrete,
tar or other rough surfaces.
5 Do not use the unit to pick
up pieces of string or fabrics.
Do not use the unit to clean
tasseled or frayed carpets.
1 Press the power button to
start the unit. When finished
cleaning, press the power
button again to turn the unit off.
(Fig. 4)
2 You can adjust the speed of
the brush roll to suit the floors
that you are cleaning. Press the
button on the right (opposite
USING YOUR CORDLESS FLOOR AND CARPET SWEEPER
the power button) to switch
between speeds. One light
indicates the speed optimized to
clean bare floors and two lights
indicate the speed optimized to
clean carpets and larger debris
on bare floors. (Fig. 5)
3 Do not use the unit to pick up
liquids or clean wet floors.
Fig. 4 Fig. 5
FLOOR CARPET
Fig. 2
Fig. 3
OFF

8TOLL FREE: 1-800-798-7398
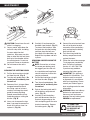
1 To achieve the best
performance, empty the dust
container after each use. Pull
the dust container straight out
from the side. (Fig. 6)
NOTE: Be careful not to
accidentally turn the unit on.
2 Empty dust container contents.
(Fig. 7) If desired, you may rinse
with water to clean the dust
container - but dry thoroughly
before replacing.
3 Re-insert the dust container into
the unit. (Fig. 8)
EMPTYING THE DUST CONTAINER
Fig. 6 Fig. 7 Fig. 8

9www.sharkclean.com
English
CAUTION: Do not clean the unit
while it is charging.
1 Once a month, wipe down the
unit with a dry cloth, including
the area under the dust
container. Wipe away any hair,
fiber or other dirt that may have
built up in the chamber and on
the rotating brush. Do not use
any harsh cleaner or chemicals.
2 Do not immerse the unit in
water.
CLEANING THE ROTATING BRUSH
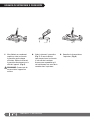
1 Pull the dust container straight
out from the side. (Fig. 6)
2 Turn the unit upside down. Be
careful not to accidently turn
the unit on!
3 Remove all hair, string or fibers
wrapped around the brush
bar. Using a pair of scissors,
carefully cut along the raised
guide to remove anything
wound around the brush bar.
Avoid damaging or cutting the
bristles. (Fig. 9)
4 Use a coin to remove the trap
door if you need to remove the
brush roll to either clean it or
replace it. (Fig. 10)
MAINTENANCE
5 Carefully lift and remove the
brushbar from the belt. (Fig. 11)
To reinsert the brushbar, slide
the brush bar into the bushing
and then place the belt over
the ridges of the brushbar cap.
Replace the trap door and lock
in place.
REMOVING AND REPLACING THE
BATTERY
NOTE: If uncertain as to how
to remove your battery pack,
we suggest you take the unit
to a reputable small appliance
service technician to have this
service performed.
1 Pull the dust container straight
out from the side. (Fig. 6)
2 Turn the unit upside down. Be
careful not to accidently turn
the unit on!
3 Push in the locking tab and lift
off the battery compartment
cover. (Fig. 12)
4 Carefully lift out the battery
pack and disconnect the wire
terminals by pressing on the
latch and pulling apart the wire
terminal connectors. Remove
the battery pack. (Fig. 13)
5 Connect the wire terminal from
the unit to the wire terminal
connector of the new battery
pack and replace the battery
pack into the unit.
6 Tuck the wiring inside the
battery compartment and
replace the cover.
7 Follow the instructions on page
7 to charge your new battery
pack. Please call customer
service at 1-800-798-7398
if you have any problems
removing the battery pack.
IMPORTANT This appliance
contains Ni-Cd batteries. The
batteries must be recycled
or disposed of in accordance
with local regulations. Please
consult your Yellow Pages or
local recycling center for more
information.
WARNING: Never use ordinary
batteries for replacement as
these may leak and cause
damage. Use only battery pack
XB2940 for replacement.
Fig. 9
Fig. 12
Fig. 13
Ni-Cd BATTERY
MUST BE RECYCLED
OR DISPOSED OF
PROPERLY
Fig.10
Fig. 11

10 TOLL FREE: 1-800-798-7398
PROBLEM
The unit will not operate
The unit will not pick up
Dust is escaping from the unit
The rotating brush will not
pick up
The unit will not charge
Runtime has decreased over
time
POSSIBLE REASONS AND SUGGESTED SOLUTION
Batteries need to be recharged.
Batteries are dead and need to be replaced.
There is no power in the electrical outlet supplying the charging adapter. Try to
charge using a different outlet.
Ensure the wire terminal connectors on the battery pack are securely attached.
Clear any obstruction from the rotating brush. Turn unit off for 10 seconds, and
then restart.
If the unit still doesn’t work, call Customer Service at 1-800-798-7398.
Empty the dust container.
Recharge the battery.
Empty the dust container.
Ensure that the dust container is properly in place.
Check for and remove any excessive material on the brush roll or in the
bottom of the unit.
Empty the dust container.
Press the power button once to turn the unit “OFF”.
There is no power in the electrical outlet supplying the charging adapter.
Try to charge using a different outlet.
Ensure the wire terminal connectors on the battery pack are securely attached.
Charging adapter may not be working. Call Customer Service at
1-800-798-7398.
Batteries are dead and need to be replaced.
Run the sweeper until the sound drops significantly, then turn off the unit
and charge for 20 hours to recondition the batteries.
Note: This battery reconditioning process can also be performed as monthly
maintenance.
REPLACEMENT PARTS
A XB2940 Battery Pack
B XA2940 AC Adapter
C 1121FK-2940 Brush Bar Replacement Kit
To order any of the above replacement parts, go to www.sharkclean.com or call 1-800-798-7398.
ORDERING REPLACEMENT PARTS
TROUBLESHOOTING GUIDE

11www.sharkclean.com
English
WARRANTY & PRODUCT REGISTRATION
EURO-PRO ONE-YEAR (1) LIMITED WARRANTY
EURO-PRO Operating LLC warrants this product to be free from material defects and workmanship for a
period of one (1) year from the date of purchase when utilized for normal household use, subject to the following
conditions, exclusions and exceptions.
The liability of EURO-PRO Operating LLC is limited solely to the cost of the repair or replacement of the unit at
our option. This Limited Warranty does not cover normal wear of parts and does not apply to any unit that has
been tampered with or used for commercial purposes. This Limited Warranty does not cover damage caused
by misuse, abuse, negligent handling or damage due to faulty packaging or mishandling in transit. This Limited
Warranty does not cover damage or defects caused by or resulting from damages from shipping or repairs,
service or alteration to the product or any of its parts, which have been performed by a repair person not
authorized by EURO-PRO Operating LLC.
If your appliance fails to operate properly while in use under normal household conditions within the warranty
period, you may return the complete appliance and accessories with proof of purchase and date, freight prepaid.
For customer service support, call 1-800-798-7398 or visit our website at www.sharkclean.com.
If the appliance is found by EURO-PRO Operating LLC to be defective, in EURO-PRO Operating LLC’s sole
discretion, we will repair or replace it free of charge. Proof of purchase date and a check made payable to EURO-
PRO Operating LLC in the amount of $19.95 to cover the cost of return shipping and handling must be included.*
Non-durable parts including, without limitation, filters, brushes and electrical parts which normally require
replacement are specifically excluded from warranty.
This Limited Warranty is extended to the original purchaser of the unit and excludes all other legal, implied and/
or conventional warranties. The responsibility of EURO-PRO Operating LLC if any, is limited to the specific
obligations expressly assumed by it under the terms of this Limited Warranty. In no event is EURO-PRO
Operating LLC liable for incidental or consequential damages to anyone of any nature whatsoever. Some states
do not permit the exclusion or limitation of incidental or consequential damages, so the above may not apply to
you.
This Limited Warranty gives you specific legal rights, and you may also have other rights which vary from state to
state or province to province.
*IMPORTANT: Carefully pack item to avoid damage in shipping. Be sure to include proof of purchase date
and to attach a tag to item before packing including your name, complete address and phone number
with a note giving purchase information, model number and what you believe is the problem with the
item. We recommend you insure the package (as damage in shipping is not covered by your warranty).
Mark the outside of your package “ATTENTION CUSTOMER SERVICE”. We are constantly striving to
i
mprove our products, therefore the specifications contained herein are subject to change without notice.
PRODUCT REGISTRATION
Please visit www.sharkclean.com or call 1-800-798-7398 to register your new Shark® product within ten (10)
days of purchase. You will be asked to provide the store name, date of purchase and model number along with your
name and address.
The registration will enable us to contact you in the unlikely event of a product safety notification. By registering
you acknowledge to have read and understood the instructions for use, and warnings set forth in the accompanying
instructions.

12 SANS FRAIS : 1-800-798-7398
MESURES DE SÉCURITÉ IMPORTANTES
Pour usage domestique seulement
LISEZ TOUTES LES INSTRUCTIONS AVANT
D’UTILISER VOTRE ASPIRATEUR SHARKMD SANS FIL
POUR TAPIS ET PLANCHER.
LORS DE L’UTILISATION DE VOTRE ASPIRATEUR
SHARK SANS FIL POUR TAPIS ET PLANCHER, IL
FAUT RESPECTER DES PRÉCAUTIONS DE SÉCURITÉ
ÉLÉMENTAIRES, DONT LES SUIVANTES :
AVERTISSEMENT :
POUR RÉDUIRE LES RISQUES D’INCENDIE,
DE CHOC ÉLECTRIQUE OU DE BLESSURE :
1 Lisez et suivez les consignes d’utilisation
figurant sur toute étiquette ou inscription.
2 Utilisez l’appareil UNIQUEMENT de la façon
décrite dans ce manuel. N’utilisez que les
accessoires recommandés par le fabricant.
3 Cet appareil n’est pas un jouet; il NE DOIT
PAS être utilisé pour jouer. Une surveillance
étroite est nécessaire lorsque l’appareil est
utilisé par un enfant ou à proximité d’un
enfant.
4 NE PAS utiliser cet appareil pour un usage
autre que ceux décrits dans ce guide.
5 NE PAS utiliser l’appareil si la fiche ou
le cordon est endommagé. N’utilisez pas
l’aspirateur sans fil pour tapis et plancher
s’il a été échappé, endommagé, rangé à
l’extérieur ou immergé dans l’eau. Retournez
l’appareil à EURO-PRO Operating LLC pour
vérification, réparation ou réglage.
6 PRENDRE SOIN du cordon du chargeur. Ne
transportez jamais le chargeur ou sa base en
les tenant par le cordon. Ne les débranchez
jamais de l’alimentation électrique en tirant
sur le cordon. Agrippez plutôt le chargeur et
tirez dessus pour le débrancher.
7 Éloignez le cordon du chargeur de toute
surface chauffée.
8 NE PAS utiliser une rallonge avec le
chargeur. Branchez le chargeur directement
dans une prise électrique. Ne branchez le
chargeur que dans une prise électrique
standard de 120 V, 60 Hz.
9 NE PAS utiliser le chargeur avec un autre
produit et ne pas charger cet appareil avec
un autre chargeur. Utilisez uniquement le
modèle de chargeur KA12D090020023U
fourni avec cet aspirateur sans fil pour
tapis et plancher.
10 NE PAS charger cet appareil à l’extérieur.
11 NE PAS utiliser l’appareil à l’extérieur ou sur
des surfaces mouillées.
12 NE PAS manipuler la fiche ou l’appareil si les
mains sont mouillées.
13 Utilisez l’appareil uniquement à l’intérieur,
sur des surfaces sèches.
14 NE PAS pinsérer des objets dans les
ouvertures. N’utilisez pas l’appareil si le
rouleau de la brosse est bloqué; assurez-
vous que le rouleau est exempt de fibres,
de peluche et de cheveux qui pourraient
l’empêcher de fonctionner.
15 Éloigner les cheveux, les vêtements amples,
les doigts et toute partie du corps des
ouvertures et des pièces mobiles.
16 NE PAS aspirer d’objets brûlants ou fumants
tels que des cigarettes, des allumettes ou de
la cendre.
17 NE PAS utiliser l’aspirateur pour aspirer des
liquides inflammables ou combustibles tels
que le carburant; ne pas utiliser l’appareil
dans des endroits où de tels liquides sont
présents.
18 NE PAS tenter de changer d’accessoire
pendant que l’appareil est en marche.

13www.sharkclean.com
Francais
CONSERVEZ CES INSTRUCTIONS
POUR PROLONGER LA DURÉE DE VIE DE
VOS PILES NI-CAD :
1 Chargez l’appareil pendant 20 heures
avant la première utilisation. Sinon, vous
réduirez la durée de vie des piles de façon
importante.
2 Après la première utilisation, déchargez
entièrement l’appareil, puis rechargez-le
pendant 16 heures.
3 Pour obtenir le meilleur rendement de
votre bloc-piles, retirez l’adaptateur
de chargement de l’appareil lorsque le
chargement est complété.
4 Ne rangez pas l’appareil avec son
adaptateur de charge attaché et branché.
5 Pour optimiser la durée de vie de la pile,
rechargez l’appareil uniquement lorsque
le bloc-piles est presque entièrement
déchargé. Il est recommandé de décharger
entièrement les piles au moins une fois par
mois.
6 NE PAS ranger l’appareil dans un endroit
humide ou à température élevée.
7 Après une période de trois mois sans
utilisation, l’appareil doit être entièrement
déchargé et rechargé afin d’optimiser la
puissance des piles.
8 Les piles Ni-Cd ont une longue durée de vie
utile. Cependant, il arrive qu’elles doivent
être remplacées. Pour acheter des piles
de rechange, visitez le site Web www.
sharkclean.com.
REMARQUE : L’interrupteur marche/arrêt doit
être à « Off » pour charger l’appareil. Si le
témoin de charge ne s’allume pas, appuyez
une fois sur l’interrupteur.
19 NE PAS utiliser l’aspirateur sans fil pour tapis
et plancher sans son réservoir à poussière en
place.
20 Soyez très prudent lors du nettoyage d’un
escalier.
21 Rangez l’aspirateur sans fil pour tapis et
plancher à l’intérieur. Rangez-le après l’avoir
utilisé afin d’éviter les accidents.
22 Une fuite des éléments de la pile pourrait
survenir lors de conditions extrêmes. Si ce
liquide composite de 20 à 35 % d’une solution
d’hydroxyde de potassium touche votre peau,
lavez-vous immédiatement avec de l’eau et
du savon ou neutralisez la zone touchée avec
un acide doux, comme du jus de citron ou du
vinaigre. Si le liquide pénètre vos yeux, rincez-
les immédiatement à l’eau propre pendant
au moins dix minutes et obtenez des soins
médicaux.
23 Cet appareil comprend des piles rechargeables
au cadmium-nickel. Les piles doivent être
recyclées ou éliminées correctement.
N’incinérez pas les piles et ne les exposez
pas à des températures élevées, car elles
pourraient exploser.
24 L’aspirateur sans fil pour tapis et plancher doit
être débranché de l’alimentation électrique
avant le retrait de la pile.
25 Pour séduire le risque d’électrocution,
n’immergez pas le chargeur ni l’aspirateur
dans l’eau ou dans un autre liquide. Ne rangez
pas et n’entreposez pas l’appareil dans un
endroit où il pourrait tomber ou glisser dans le
bain ou un évier.

14 SANS FRAIS : 1-800-798-7398
Démarrage rapide
15
Assemblage 16
Charge de votre aspirateur sans fil pour tapis et plancher 17
Utilisation de votre aspirateur sans fil pour tapis et plancher 17
Vidange du réservoir à poussière 18
Entretien 19
Guide de dépannage 20
Commande de pièces de rechange 20
Garantie et enregistrement 21
Merci d’avoir
acheté
l’aspirateur
SharkMD sans
fil pour tapis et
plancher.
CONTENU

15www.sharkclean.com
Francais
NETTOYAGE
2 Tirez la poignée vers l’arrière
et appuyez légèrement sur
le boîtier de l’appareil avec
votre pied afin d’engager le
mécanisme de manœuvre.
(Fig. 2)
3 À l’aide de votre pied, enfoncez
l’interrupteur marche/arrêt et
poussez l’aspirateur vers la
surface à nettoyer. (Fig. 3)
4 Appuyez sur le bouton de
réglage de la vitesse à droite
avec votre pied pour changer
les vitesses. Un témoin allumé
indique la vitesse optimale
pour nettoyer des planchers
nus et deux témoins allumés
indiquent la vitesse optimale
pour nettoyer des tapis ou des
sols nus couverts de débris
plus gros. (Fig. 4)
ASSEMBLAGE
1 Insérez le tube de rallonge
de la poignée inférieure (le
plus court des trois tubes)
dans la poignée inférieure (a).
Assemblez ensuite les deux
tubes de rallonge et insérez-les
dans le tube de rallonge de la
poignée inférieure (b). Fixez
ensuite la poignée supérieure
au tube de rallonge supérieur.
(Fig. 1)
VIDANGE
5 Lorsque vous avez terminé
votre tâche ménagère, retirez
le réservoir à poussière
directement par le côté de
l’appareil. (Fig. 5)
REMARQUE : Prenez soin de
ne pas mettre l’appareil en
marche.
6 Videz le réservoir à poussière.
(Fig. 6) Si vous le désirez,
vous pouvez rincer le réservoir
à l’eau afin de le nettoyer.
Assurez-vous cependant qu’il
soit entièrement sec avant de
le remettre dans l’aspirateur.
Lorsque cela est terminé,
remettez le réservoir dans
l’aspirateur.
Fig. 1
Fig. 2
Fig. 3
Fig. 4 Fig. 6
Fig. 5
b
a
IMPORTANT : Avant d’utiliser votre nouvel aspirateur sans fil pour
tapis et plancher pour la première fois, veuillez le charger pendant
20 heures.
REMARQUE : L’adaptateur de charge est à l’intérieur de l’emballage.
DÉMARRAGE RAPIDE

16 SANS FRAIS : 1-800-798-7398
ASSEMBLAGE DE
L’ASPIRATEUR SANS FIL POUR
TAPIS ET PLANCHER :
REMARQUE : L’adaptateur de
charge et la poignée inférieure
sont à l’intérieur de l’emballage.
IMPORTANT : Chargez les
piles pendant 20 heures avant
d’utiliser l’appareil pour la
première fois. Consultez la
page 17 pour les instructions de
charge de l’appareil.
COMPONENTS:
A Appareil
B Bouton de réglage de la vitesse
C Interrupteur marche/arrêt
D Réservoir à poussière
E Poignée supérieure
F Tubes de rallonge
G Tube de rallonge de la poignée
inférieure
H Adaptateur de charge
Numéro de modèle : V2940C 32
Tension : 6 V
ASSEMBLY
1 Insérez le tube de rallonge de la
poignée inférieure (le plus court
des trois tubes) dans la poignée
inférieure (a). Assemblez
ensuite les deux tubes de
rallonge et insérez-les dans le
tube de rallonge de la poignée
inférieure (b). Fixez ensuite la
poignée supérieure au tube de
rallonge supérieur. (Fig. 1)
Fig. 1
E
A
F G
I
H
BC
D
b
a

17www.sharkclean.com
Francais
L’arrêt automatique du mouvement du rouleau de la
brosse est probablement causé par le mécanisme
antiblocage. Le mécanisme permet d’éviter la surchauffe
du moteur. Si la brosse rotative se surcharge, elle cesse de
tourner et les deux témoins de vitesse s’allument en continu,
en même temps. Éteignez l’appareil en appuyant une fois
sur l’interrupteur marche-arrêt. Consultez les instructions
de retrait et de nettoyage du rouleau de la brosse à la page
19. Attendez dix secondes pour laisser refroidir l’appareil.
Maintenant, appuyez de nouveau sur l’interrupteur marche-
arrêt et vous pouvez continuer vos tâches ménagères!
1 Assurez-vous toujours que
l’appareil est hors tension. (Fig. 2)
2 Insérez la prise du chargeur dans
l’orifice à l’arrière de l’appareil.
Branchez le chargeur à une
prise électrique. Le témoin près
de l’interrupteur marche/arrêt
s’allume lorsque la charge de
l’appareil est en cours. Si l’appareil
est branché et que le témoin est
éteint, appuyez l’interrupteur
marche/arrêt une fois. Le témoin
devrait maintenant être allumé,
indiquant que la charge de
l’appareil est en cours. (Fig. 3)
CHARGE DE L’ASPIRATEUR SANS FIL POUR TAPIS ET PLANCHER
3 Chargez la pile pendant 20 heures
avant d’utiliser l’appareil pour la
première fois; chaque période de
recharge subséquente dure 16
heures. Votre aspirateur sans fil
pour tapis et plancher est alimenté
par des piles Ni-Cd, qui doivent
être chargées pendant ce temps.
4 Pour obtenir le meilleur rendement
de votre bloc-piles, retirez
l’adaptateur de chargement de
l’appareil lorsque le chargement
est complété. Le fait de ranger
l’appareil avec l’adaptateur
attaché et branché réduira la
durée de vie de la pile.
IMPORTANT : Bien que plusieurs
adaptateurs semblent similaires,
il importe d’utiliser uniquement
l’adaptateur fourni avec l’appareil
(XA2940).
REMARQUE : Si vous constatez
une diminution du temps de
fonctionnement, remettez les piles
en état en faisant fonctionner
l’aspirateur jusqu’à ce que le volume
sonore diminue fortement. Ensuite,
éteignez l’appareil et chargez-le
pendant 20 heures.
Cette remise en état des piles peut
également être réalisée dans le cadre
d’un entretien mensuel.
4 N’utilisez pas l’appareil sur le
ciment, le goudron ou d’autres
surfaces rugueuses.
5 N’utilisez pas l’appareil pour
aspirer des morceaux de tissu
et des ficelles. N’utilisez pas
l’aspirateur pour nettoyer des tapis
effilochés ou ornés de franges.
1 Appuyez sur l’interrupteur marche/
arrêt pour démarrer l’appareil.
Appuyez sur l’interrupteur marche/
arrêt pour éteindre l’appareil
(« OFF »). (Fig. 4)
2 Vous pouvez régler la vitesse
du rouleau de la brosse en
fonction de la surface à nettoyer.
Appuyez sur le bouton à droite
(le bouton opposé à l’interrupteur
UTILISATION DE L’ASPIRATEUR SANS FIL POUR TAPIS ET PLANCHER
marche-arrêt) pour changer la
vitesse. Un témoin allumé indique
la vitesse optimale pour nettoyer
des planchers nus et deux témoins
allumés indiquent la vitesse
optimale pour nettoyer des tapis
ou des sols nus couverts de débris
plus gros. (Fig. 5)
3 N’utilisez pas l’appareil pour
aspirer des liquides ni pour
nettoyer des planchers mouillés.
Fig. 4 Fig. 5
FLOOR CARPET
Fig. 2
OFF
Fig. 3

18 SANS FRAIS : 1-800-798-7398
1 Afin d’obtenir un rendement
supérieur, videz le réservoir
à poussière après chaque
utilisation. Retirez le réservoir
à poussière directement par le
côté de l’appareil. (Fig. 6)
REMARQUE : Prenez soin de
ne pas mettre l’appareil en
marche.
2 Videz le réservoir à poussière.
(Fig. 7) Si vous le désirez,
vous pouvez rincer le réservoir
à l’eau afin de le nettoyer.
Assurez-vous cependant qu’il
soit entièrement sec avant de le
remettre dans l’aspirateur.
3 Remettez le réservoir dans
l’aspirateur. (Fig. 8)
VIDANGE DU RÉSERVOIR À POUSSIÈRE
Fig. 6 Fig. 7 Fig. 8

19www.sharkclean.com
Francais
MISE EN GARDE : Ne nettoyez pas
l’appareil pendant qu’il se charge.
1 Une fois par mois, essuyez
l’appareil avec un linge doux, y
compris le dessous du réservoir
à poussière. Retirez tout cheveu
ainsi que toute fibre ou autre
saleté ayant pu s’accumuler dans
le réceptacle ou sur la brosse
rotative. N’utilisez pas de produits
chimiques ni de nettoyants
puissants.
2 N’immergez pas cet appareil dans
l’eau.
NETTOYAGE DE LA BROSSE ROTATIVE
1 Retirez le réservoir à poussière en
tirant dessus, directement par le
côté de l’appareil. (Fig. 6)
2 Retournez l’appareil, de manière
à ce qu’il soit à l’envers. Prenez
soin de ne pas mettre l’appareil
en marche!
3 Enlevez les ficelles, les fibres et
les cheveux enroulés autour du
rouleau de la brosse. À l’aide de
ciseaux, coupez soigneusement
le long du guide surélevé afin de
retirer tout objet enroulé autour
du rouleau de la brosse. Évitez de
couper et d’endommager les soies
de la brosse. (Fig. 9)
ENTRETIEN
4 Utiliser une pièce de monnaie pour
enlever le couvercle d’accès du
rouleau afin de retirer celui-ci pour
le nettoyer ou le remplacer.
(Fig. 10)
5 Soulevez délicatement le rouleau
de la brosse et retirez-le de la
courroie. (Fig. 11) Pour remettre
le rouleau de la brosse, glissez-le
dans le manchon, puis insérez
la courroie sur les arêtes du
capuchon du rouleau de la brosse.
Remettez en place et verrouillez le
couvercle d’accès du rouleau.
RETIRER ET REMPLACER LA PILE
REMARQUE : Si vous n’êtes pas
certain de la façon de retirer votre
bloc-piles, nous vous suggérons
d’apporter votre aspirateur à un
technicien de petits appareils
électriques réputé afin qu’il le
fasse pour vous.
1 Retirez le réservoir à poussière en
tirant dessus, directement par le
côté de l’appareil. (Fig. 6)
2 Retournez l’appareil, de manière
à ce qu’il soit à l’envers. Prenez
soin de ne pas mettre l’appareil
en marche!
3 Enfoncez sur l’onglet de
verrouillage et retirez le couvercle
du compartiment à piles. (Fig. 12)
4 Soulevez doucement le bloc-piles
et débranchez les bornes en tirant
sur les câbles des bornes. Retirez
le bloc-pile. (Fig. 13)
5 Branchez le câble de la borne de
l’appareil au câble de la borne du
nouveau bloc-pile. Replacez le
bloc-piles dans l’appareil.
6 Insérez le câblage dans le
compartiment à piles et remettez
le couvercle.
7 Suivez les instructions à la page
17 pour charger le nouveau
bloc-piles. Si vous éprouvez des
problèmes lors du retrait du bloc-
piles, veuillez appeler le Service à
la clientèle au 1-800-798-7398.
IMPORTANT : Cet appareil
contient un bloc-piles Ni-Cd. Les
piles doivent être recyclées ou
éliminées correctement selon la
réglementation locale. Veuillez
consulter les Pages jaunes ou
votre centre de recyclage local
pour plus de renseignements.
AVERTISSEMENT : N’utilisez
jamais de piles ordinaires en
remplacement : elles pourraient
couler et endommager l’appareil.
Utilisez uniquement le bloc-piles
de rechange XB2940.
Fig. 9
Fig. 12
Fig. 13
LA PILE Ni-Cd DOIT
ÊTRE RECYCLÉE
OU ÉLIMINÉE
CORRECTEMENT
Fig.10
Fig. 11

20 SANS FRAIS : 1-800-798-7398
PROBLÈME
L’appareil ne fonctionne pas
L’appareil n’aspire pas
La poussière s’échappe de
l’appareil
La brosse rotative n’aspire pas
L’appareil ne se recharge pas
Le temps de fonctionnement
diminue au fil du temps
RAISONS POSSIBLES ET SOLUTION SUGGÉRÉE
Il faut recharger les piles.
Les piles sont usées; il faut les remplacer.
La prise alimentant l’adaptateur de charge ne fonctionne pas. Tentez de charger
l’appareil en le branchant dans une autre prise électrique.
Vérifiez que les câbles des bornes sont bien fixés au bloc-piles.
Enlevez tout objet obstruant la brosse rotative. Éteignez l’appareil pendant dix
secondes, puis allumez-le de nouveau.
Si l’appareil ne fonctionne toujours pas, communiquez avec le service à la
clientèle au1 1-800-798-7398.
Videz le réservoir à poussière.
Recharger la pile.
Videz le réservoir à poussière.
Assurez-vous que le réservoir à poussière est bien logé en place.
Retirez toute accumulation de débris sur le rouleau de la brosse dans la
partie inférieure de l’appareil.
Videz le réservoir à poussière.
Appuyez sur le bouton d’alimentation pour éteindre l’appareil (« OFF »).
La prise alimentant l’adaptateur de charge ne fonctionne pas. Tentez de
charger l’appareil en le branchant dans une autre prise électrique.
Vérifiez que les câbles des bornes sont bien fixés au bloc-piles.
Il est possible que l’adaptateur de charge ne fonctionne pas. Communiquez
avec le service à la clientèle au 1-800-798-7398.
Les piles sont usées; il faut les remplacer.
Faites fonctionner l’aspirateur jusqu’à ce que le volume sonore diminue
fortement. Ensuite, éteignez l’appareil et chargez-le pendant 20 heures
pour remettre les piles en état. Remarque : Cette remise en état des piles
peut également être réalisée dans le cadre d’un entretien mensuel.
PIÈCES DE RECHANGE
A XB2940 Bloc-piles
B XA2940 Adaptateur c.a.
C 1121FK-2940 Trousse de rouleau de brosse de rechange
Pour commander l’une de ces pièces de rechange, visitez le site www.sharkclean.com ou appelez le
numéro suivant : 1-800-798-7398.
COMMANDER DES PIÈCES DE RECHANGE
GUIDE DE DÉPANNAGE
La page est en cours de chargement...
La page est en cours de chargement...
La page est en cours de chargement...
La page est en cours de chargement...
-
 1
1
-
 2
2
-
 3
3
-
 4
4
-
 5
5
-
 6
6
-
 7
7
-
 8
8
-
 9
9
-
 10
10
-
 11
11
-
 12
12
-
 13
13
-
 14
14
-
 15
15
-
 16
16
-
 17
17
-
 18
18
-
 19
19
-
 20
20
-
 21
21
-
 22
22
-
 23
23
-
 24
24


Shark V2940C Cordless Floor And Carpet Sweeper Manuel utilisateur
- Taper
- Manuel utilisateur
dans d''autres langues
Documents connexes
-
Shark V2930 Le manuel du propriétaire
-
Shark SV780 Le manuel du propriétaire
-
-
-
-
-
Shark NV370 Manuel utilisateur
-
-
-
 Euro-Pro V1725E Le manuel du propriétaire
