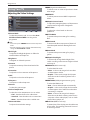
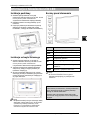
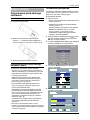
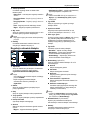
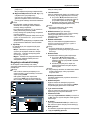
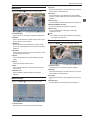
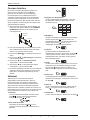
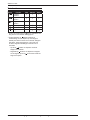
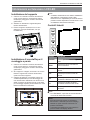
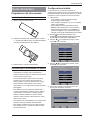
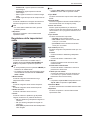
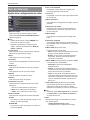
Haier LE32A650CF Manuel utilisateur
- Catégorie
- Téléviseurs LCD
- Taper
- Manuel utilisateur
Ce manuel convient également à

LED Backlit Flat TV
INSTRUCTION MANUAL
LE32A650CF
LE32F600C
Please read this manual carefully before operating the TV, and keep it for
future reference.


LED Backlit Flat TV Instruction Manual EN-1
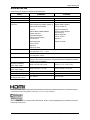
Safety Warnings . . . . . . . . . . . . . . . . . . . . 2
Welcome . . . . . . . . . . . . . . . . . . . . . . . . . . . . . . . . . 2
Important Information . . . . . . . . . . . . . . . . . . . . 2
About Your LED LCD TV . . . . . . . . . . . . .5
Installing the Stand . . . . . . . . . . . . . . . . . . . . . . . 5
Installing a Wall-Mount Bracket. . . . . . . . . . . . 5
Side Control . . . . . . . . . . . . . . . . . . . . . . . . . . . . . . 5
Rear Terminals . . . . . . . . . . . . . . . . . . . . . . . . . . . . 6
Making Connections . . . . . . . . . . . . . . . . . . . . . . 7
Connecting to Antenna/Cable . . . . . . . . . . 7
Connecting an External A/V Device . . . . . 7
Connecting a PC . . . . . . . . . . . . . . . . . . . . . . . 7
Connecting Headphones. . . . . . . . . . . . . . . 7
Connecting a Digital Audio System . . . . . 7
Using Your Remote Control . . . . . . . . . . . . . . . 8
Getting Started . . . . . . . . . . . . . . . . . . . .9
Preparing Your Remote Control . . . . . . . . . . . 9
Installing the Batteries . . . . . . . . . . . . . . . . . 9
Remote Control and Battery Cautions. . . 9
Initial Setup. . . . . . . . . . . . . . . . . . . . . . . . . . . . . . . 9
Understanding the Basics . . . . . . . . . . . . . . . . 11
Turning the TV On or Off . . . . . . . . . . . . . . 11
Selecting the Input Source . . . . . . . . . . . . 11
Selecting a Channel . . . . . . . . . . . . . . . . . . . 11
Using Favourite List . . . . . . . . . . . . . . . . . . . 11
Adjusting the Volume . . . . . . . . . . . . . . . . . 11
Displaying Channel Information . . . . . . . 11
Navigating the On-Screen Menu. . . . . . . 11
Using Your TV . . . . . . . . . . . . . . . . . . . . .12
Adjusting the Video Settings . . . . . . . . . . . . . 12
Adjusting the Audio Settings . . . . . . . . . . . . . 13
Adjusting the Channel Settings. . . . . . . . . . . 14
Adjusting the TV Settings . . . . . . . . . . . . . . . . 15
Adjusting Lock Settings . . . . . . . . . . . . . . . . . . 17
Other Features . . . . . . . . . . . . . . . . . . . 18
USB Media Player . . . . . . . . . . . . . . . . . . . . . . . . 18
Thumbnail/List Mode . . . . . . . . . . . . . . . . . 18
Photo Mode . . . . . . . . . . . . . . . . . . . . . . . . . . 19
Music Mode . . . . . . . . . . . . . . . . . . . . . . . . . . 19
Video Mode . . . . . . . . . . . . . . . . . . . . . . . . . . 19
Button Function . . . . . . . . . . . . . . . . . . . . . . 20
USB Media Supported File Format . . . . . 21
Common Interface. . . . . . . . . . . . . . . . . . . . . . . 22
Teletext . . . . . . . . . . . . . . . . . . . . . . . . . . . . . . . . . 22
Using USB Device for Recording. . . . . . . . . . 23
Timeshift (DTV only) . . . . . . . . . . . . . . . . . . 23
Recording (DTV only) . . . . . . . . . . . . . . . . . 23
Reference Section . . . . . . . . . . . . . . . . 24
Troubleshooting. . . . . . . . . . . . . . . . . . . . . . . . . 24
Specification . . . . . . . . . . . . . . . . . . . . . . . . . . . . 25
Appendix. . . . . . . . . . . . . . . . . . . . . . . . . . . . . . . . 26
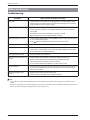
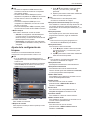
Contents

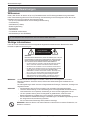
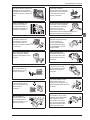
Safety Warnings
EN-2 LED Backlit Flat TV Instruction Manual
Welcome
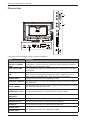
Thank you for choosing this 32” LED Backlit Flat TV. This manual will help you to set up and begin using your TV.
Firstly, check the package contents before installing your new TV.
• 32” LED Backlit Flat TV
• Remote control
• AAA battery x 2
• Instruction manual
• Quick start guide
• Warranty card
• TV stand and screws
• AC power cord (LE32F600C only)
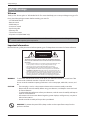
Important Information
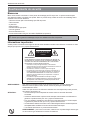
Read the following safety instructions before operating your TV. Keep these instructions for future reference.
Safety Warnings
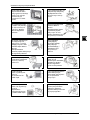
When you open the box of LE32A650CF, take out the TV stand first to prevent it from falling off the top
cushion while unpacking the components.
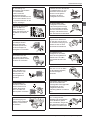
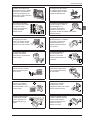
WARNING
RISK OF ELECTRIC SHOCK
DO NOT OPEN
WARNING
TO REDUCE THE RISK OF ELECTRIC SHOCK, DO NOT REMOVE COVER (OR
BACK). NO USER SERVICEABLE PARTS INSIDE. REFER TO QUALIFIED SERVICE
PERSONNEL.
• To avoid electric hazards, it is strongly suggested that the back cover
not be opened, as there is no any accessory inside the casing.
• If necessary, please contact authorized after-sales services.
• The lightning flash with arrowhead symbol within an equilateral
triangle is intended to alert the user to the presence of uninsulated
DANGEROUS VOLTAGE within the product’s enclosure that may be of
sufficient magnitude to constitute a risk of electrical shock to persons.
• The exclamation point within an equilateral triangle is intended to alert
the user to the presence of important operating and maintenance
(servicing) instructions in the literature accompanying the appliance.
WARNING: To avoid fires and electrical hazards, never place your television receiver in a humid area. Take
care to avoid accidental scratches or impacts on the screen.
Do not cover the ventilation openings with items such as newspaper, table cloth, curtains, and
etc.
CAUTION: • The main plug is used as a disconnection device and must remain readily accessible.
• Please read this manual carefully before using your television, and keep this manual to hand
for future reference.
• To achieve the best performance from your television, read this manual carefully and keep to
hand for future reference.
• Information in the Instruction Manual regarding screen displays and figures may vary due to
technical innovations.
• Unauthorised disassembly of this product is prohibited.
WARNING: To prevent the spread of fire, keep candles or other open flames away from this
product at all times.
!
!

Safety Warnings
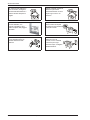
LED Backlit Flat TV Instruction Manual EN-3
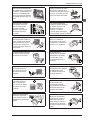
EN
The product should be tightly
secured to table/wall in
accordance with the
installation instructions to
prevent injury or damage
caused by dropping.
To avoid fire hazards, do not
connect multiple sockets in
parallel and do not connect
multiple plugs to the same
socket.
Do not position the
product close to water or
oil (e.g. cooking oil or
lubricating oil), as this
may cause a fire hazard.
To avoid electric shocks or fire
hazards, unauthorised
disassembly of the television is
prohibited. Contact an
authorised after-sales service
provider if technical servicing is required.
Do not use damaged or
worn electrical plugs and
keep cables away from
heat sources to avoid
electric shocks and fire
hazards.
Disconnect the product
from the power supply and
contact an authorised
after-sales service provider
if the product starts to
make abnormal sounds.
To avoid collapsing, the
product must be placed on a
solid and stable surface.
To avoid explosions and
fire hazards, don't use or
store inflammable
materials near the product.
To avoid fire hazards,
keep the product away
from transformers or
heat sources.
To avoid electric shocks,
the antenna of the product
should be away from
electrical cables.
To avoid fire hazards, do
not use this product in
direct sunlight or close
to heat sources.
Always make sure that the
television is firmly plugged in,
as a poor electrical connection
might cause a fire.
Unplug the power
supply and antenna of
the product during a
rainstorm and
particularly during a
thunderstorm.
Before cleaning the
product, unplug the
television, and use soft
fabric, not chemicals. Make
sure that no water comes
into contact with the product.

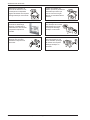
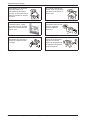
Safety Warnings
EN-4 LED Backlit Flat TV Instruction Manual
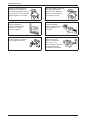
To avoid electric shocks or fire
hazards, disconnect the
television from the power
supply and the antenna during
a rainstorm or thunderstorm.
When an antenna is used,
measures should be taken to
prevent water from flowing
down through the cable and
into the television.
To reduce the risk of fire or
electric shock, do not place
the product in a humid area
or expose it to rain or
moisture.
The plug and electric
cable must be kept clean
to avoid electric shocks
or fire hazards.
Never touch the plug with
wet hands, as this might
cause electric shocks.
To avoid electric shocks or
fire hazards, if you are not
using the television for
long periods of time,
disconnect it from the
power supply.

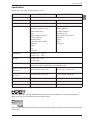
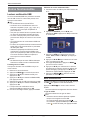
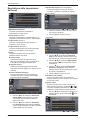
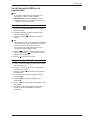
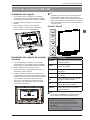
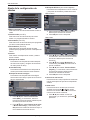
About Your LED LCD TV
LED Backlit Flat TV Instruction Manual EN-5
EN
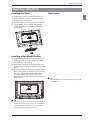
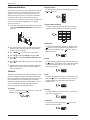
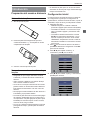
Installing the Stand
1. Carefully place your TV screen face-down on a
cushioned, clean surface to protect the screen
from damages and scratches.
2. Carefully align the stand to the bottom of the TV.
3. Secure the stand to the TV with the provided
screws. (3 screws for LE32F600C, 4 screws for
LE32A650CF)
Installing a Wall-Mount Bracket
1. Carefully place your TV screen face-down on a
cushioned, clean surface to protect the screen
from damages and scratches.
2. If the stand is attached, remove the screws that
secure the stand to the TV screen, then remove the
stand.
3. Attach the wall-mount bracket (sold separately) to
the mounting holes on the back of your TV using
the screws supplied with the bracket. See the
instructions that came with the wall-mount
bracket for information about how to correctly
hang your TV.
NoteNote
• Contact technical assistance when installing the wall
mount bracket. Haier Electronics is not responsible for
any damage to the product or injury to yourself or
others if you install the TV on your own.
Side Control
NoteNote
• For LE32A650CF, the side control panel is on the right
side of the TV.
About Your LED LCD TV

About Your LED LCD TV
EN-6 LED Backlit Flat TV Instruction Manual
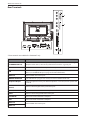
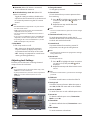
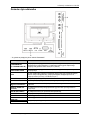
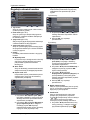
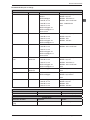
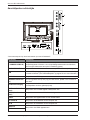
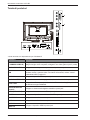
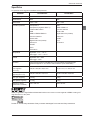
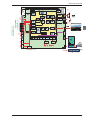
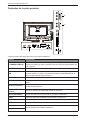
Rear Terminals
* These terminals are available for LE32A650CF only.
Connector Descriptions
COMPONENT IN
(Y COMMON CVBS IN)
Connect the video cables for a component or composite device. When connecting a
composite video source, connect the yellow video wire to the Y (green) jack.
YPbPr/CVBS AUDIO Connect the audio cables for a component or composite device.
USB
Insert a USB storage device to the USB port to view photos, listen to music or watch
videos. (See “USB Media Player” on page 18 for more information.)
HDMI 2 IN Connect HDMI device to this jack.
COMMON INTERFACE If you subscribe to a pay per view service, insert the CI module to this slot.
Headphone Output
Connect headphones to this jack. When headphones are inserted, the TV speakers will
be muted.
DIGITAL AUDIO OUT
(Coaxial)
Connect a coaxial digital audio system to this jack.
ANT IN (AIR/CABLE) Connect an antenna or cable TV to this jack.
SCART Connect a device using SCART cable to this jack.
PC AUDIO IN Connect the audio cable from a computer.
PC IN Connect the video cable from a computer.
HDMI 3 IN
Connect HDMI device to this jack.
HDMI 1 IN
*
*
3
*

About Your LED LCD TV
LED Backlit Flat TV Instruction Manual EN-7
EN
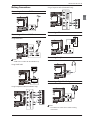
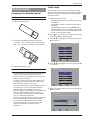
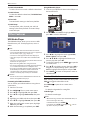
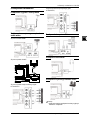
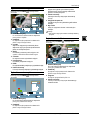
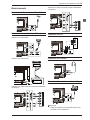
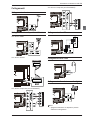
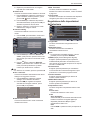
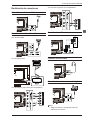
Making Connections
Connecting to Antenna/Cable
Connecting an External A/V Device
Using HDMI cable
NoteNote
• HDMI 3 IN is available for LE32A650CF only.
Using SCART cable
Using Component cable (LE32A650CF only)
Using Composite cable (LE32A650CF only)
Connecting a PC
Connecting Headphones
Connecting a Digital Audio System
NoteNote
• Turn off the TV and the device before making
connections.
3
SCART
COMPONENT OUT
LR
YP
B
P
R
COMPOSITE OUT
LR
VIDEO
RGB
AUDIO
(L/R)
PC

About Your LED LCD TV
EN-8 LED Backlit Flat TV Instruction Manual
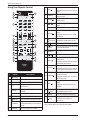
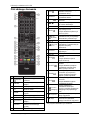
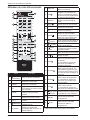
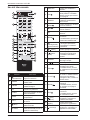
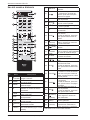
Using Your Remote Control
* This button does not work in these models.
# Button Descriptions
1
(Power)
Press to turn the TV on or off.
2 S.MODE Press to select the sound mode.
3 P.MODE Press to select the picture mode.
4
0-9
Press to enter a channel number
or password.
Q.VIEW
Press to switch to the last viewed
channel.
SLEEP Press to set the sleep timer.
5 VOL+/- Press to adjust the volume level.
6
(Mute)
Press to turn the sound on or off.
AUDIO
Press to select the DTV audio/
NICAM (depending on broadcast
signal).
7 SUBTITLE Press to display the subtitle.
I/II
wxyz
tuv
pqrs
mno
jklghi
def
abc
Q.VIEW
P
SUBTITLE
OK
SOURCE
GUIDE
VOL
3D WORLD
P.MODE S.MODE
SLEEP
BACK
/
MENU /
EXIT /
/
FAV /
CH.LIST
/SCREEN
INFO
/
AUDIO
1
16
17
18
*
*
19
20
21
22
23
24
2
3
4
5
6
7
8
9
10
11
12
13
14
15
I/II
8
FAV/
Press to add a favourite channel.
In teletext mode, press to hold a
page.
9 SCREEN
Press to change the screen
display mode.
10
MENU/
Press to open or close the on-
screen menu.
11
STWX
Press to navigate the on-screen
menu.
OK Press to confirm a selection.
12
BACK/
Press to return to the previous
menu.
In teletext mode, press to enter
mix mode.
13
(reverse)
(forward)
Press to fast forward or reverse
playback in multimedia mode.
14
(TEXT)
Press to open the teletext.
15
(play/
pause)
Press to play/pause in multimedia
and timeshift mode.
16 SOURCE
Press to open the input source
list.
17
P/
Press to change the channel.
18
INFO/
Press to display the channel
information.
In teletext mode, press to reveal
the hidden information.
19
CH.LIST/
Press to open the channel list.
In teletext mode, press to switch
the image to top, bottom or full.
20
GUIDE/
Press to open the programme
guide (DTV only).
In teletext mode, press to enter a
secondary page.
21
EXIT/
Press to close the on-screen
menu.
In teletext mode, press to hide
the text.
22
(prev)
(next)
Press to skip to next or previous
file in multimedia mode.
23
(REC)
Press to start/pause recording.
24
(stop)
Press to stop multimedia
playback, timeshifting or
recording.

Getting Started
LED Backlit Flat TV Instruction Manual EN-9
EN
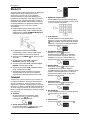
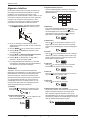
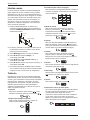
Preparing Your Remote Control
Installing the Batteries
1. Open the battery cover.
2. Install two AAA batteries. Make sure that you
match the + and – symbols on the batteries with
the + and – symbols in the battery compartment.
3. Replace the battery cover.
Remote Control and Battery Cautions
• Ensure that there is nothing between the remote
control and the remote sensor of the TV set.
• Use the remote control carefully. Do not drop the
remote control on the floor.
• Sunlight, or other strong light, will interfere with
the signal from the remote control. Avoid using
near fluorescent lights or neon signs.
• Do not place the remote control in direct heat or in
a damp place as you may damage the remote.
• Danger of explosion if battery is incorrectly
replaced. Replace only with the same or equivalent
type. The batteries (battery pack or batteries
installed) shall not be exposed to excessive heat
such as sunshine, fire or the like.
• If your TV is not to be used for a long period of time,
remove the batteries from the remote control.
• Do not dispose of the batteries with standard
household waste. Do not throw them in a fire.
Dispose of the battery according to local
regulations.
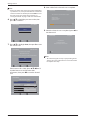
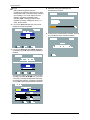
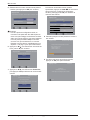
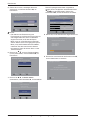
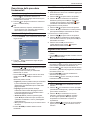
Initial Setup
The first time you turn on your TV, the setup wizard
guides you through setting up basic settings including
the menu language, country, password, signal type
and channel scan.
1. Make sure that you have:
• Installed the remote control batteries. (See page
9 for details)
• Connected an antenna or cable TV. (See page 7
for details)
• Connected the power cord to the AC IN jack on
the back of the TV and to a working power outlet.
For LE32A650CF, just connect the attached power
cord to a working power outlet.
2. Press to turn on the TV. The setup wizard screen
opens. Press OK to start the wizard.
3. Press S/T to highlight your language, then press
X to continue.
4. Press S/T to highlight your country, then press X
to continue.
5. Enter your new 4-digit password twice, then press
OK to continue.
Getting Started
Initial Setup Language
Please select your language:
Back Select Next
Français
Italiano
Español
Deutsch
English
Initial Setup Country
Please select your country:
Back Select Next
Belgium
Switzerland
Czech Republic
Germany
Austria
Initial Setup
Please set password. “0000” is not a valid password
Back Select Next
Confirm Password
New Password

Getting Started
EN-10 LED Backlit Flat TV Instruction Manual
NoteNote
• During the initial setup, if the TV is powered off before
a password is set, a new password must be set from the
Lock menu. Enter the default password-1234 to access
the Lock menu, then change the password. See
“Change Password” on page 17 for more information.
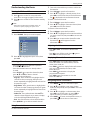
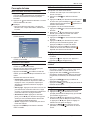
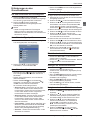
6. Press S/T to highlight your tuner mode, then
press X to continue.
7. Press S/T to highlight Scan, then press X to start
the channel scan.
If the tuner mode is Cable, press S/T/W/X and
number buttons to configure the cable
information, then press OK to start the channel
scan.
8. Wait a while for the channel scan to complete.
9. When the channel scan is completed, press OK to
exit the wizard.
NoteNote
• The initial setup process may vary depending on the
country you select. Follow the on-screen instructions
to complete the setup.
Initial Setup Tuner Mode
Please select your tuner mode:
Back Select Next
Cable
Antenna
Initial Setup Channel Scan
First, please connect antenna.
Start channel scan now?
If you skip this step, the channel scan could be performed in Menu.
Back Select Next
Skip Scan
Scan
Initial Setup
Please configure the cable info.
Select Next
Symbol Rate (Ksym/s)
Frequency (KHz)
Modulation Auto
Network ID
Scan Mode Advance
Auto
Auto
306000
Initial Setup Channel Scan
The channel scan may take a while to complete.
21%
Status: Scanning...
Analogue Channels: 0
Digital Channels: 0
Initial Setup Complete
Congratulations!!
Completed Initial Setup.
Please press [OK] to exit the wizard.
Back

Getting Started
LED Backlit Flat TV Instruction Manual EN-11
EN
Understanding the Basics
Turning the TV On or Off
1. Press to turn on the TV. It may take a few
seconds for an image to appear on the screen.
2. Press to turn off the TV. The TV enters standby
mode.
NoteNote
• When the TV is off, power still flows into it. To
disconnect power, unplug the power cord.
Selecting the Input Source
1. Press SOURCE. The input source list opens.
2. Press S/T to highlight the input source, then
press OK.
Selecting a Channel
• Press P /P to go to the next or previous
channel in the channel list.
• Press the number buttons to directly select a
channel.
• Press CH.LIST/ to open the channel list, then
press S/T and OK to select a channel.
To use the coloured buttons:
• Page up - Press red button to highlight the first
channel on the current page, then press red
button repeatedly to highlight the first channel on
the previous pages.
• Page down - Press green button to highlight the
last channel on the current page, then press green
button repeatedly to highlight the last channel on
the next pages.
• Select List - Press yellow button then S/T to
select the channel type that you want to display
on the list (All/Digital/Radio/Analogue).
• Exit - Press blue button to close the channel list.
• Press Q.VIEW to go to the last viewed channel.
Using Favourite List
To add a favourite channel:
1. Tune to the channel that you want to add to the
favourite list.
2. Press FAV/ to open the favourite list.
3. Press S/T to highlight a desired position, then
press OK to add current channel to the favourite
list. is displayed on the information banner.
To watch a favourite channel:
1. Press FAV/ to open the favourite list.
2. Press S/T to highlight a favourite channel, then
press OK to tune to the channel.
To remove a favourite channel:
1. Press FAV/ to open the favourite list.
2. Press S/T to highlight the favourite channel that
you want to remove, then press OK to tune to the
channel.
3. Press OK again to remove the channel from the
favourite list. will disappear from the
information banner.
Adjusting the Volume
• Press VOL+/VOL- to increase or decrease the
volume.
• Press to turn off the sound. Press again or
press VOL+ to restore the sound.
Displaying Channel Information
• Press INFO/ once to display basic channel
information such as channel number, channel
name, tuner mode, etc.
• Press INFO/ twice to display further information
such as programme title, resolution, audio
information, etc.
• Press INFO/ three times to display the
programme descriptions.
• Press INFO/ one more time to close the
information banner.
Navigating the On-Screen Menu
1. Press MENU/ . The on-screen menu opens.
2. Press S/T to highlight a main menu (Video/
Audio/TV/Setup/Lock), then press OK to access the
sub-menu.
3. Press S/T to highlight a sub-menu item, then
press OK to access the menu, or press W/X to
adjust the setting or select a setting option.
4. Press BACK/ to return to the previous menu, or
press EXIT/ to close the on-screen menu.
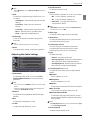
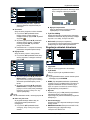
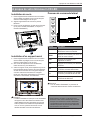
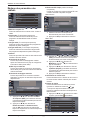
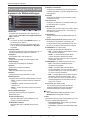
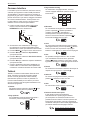
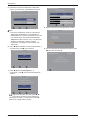
Main
TV
SCART
VGA
HDMI 1
HDMI 2
USB

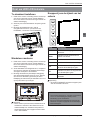
Using Your TV
EN-12 LED Backlit Flat TV Instruction Manual
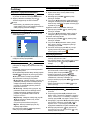
Adjusting the Video Settings
Picture Mode
To select the picture mode. You can select User/
Vivid/Eco/Standard/Mild according to the
programme.
NoteNote
• You can also press P.MODE button to select the picture
mode.
• Manually adjusting picture settings will automatically
change the Picture Mode to User.
Back Light
To adjust the backlight brightness to affect the
overall brilliance of the picture.
Brightness
To brighten or darken the picture.
Contrast
To adjust the intensity of the white level of the
picture.
Saturation
To adjust the colour saturation of the picture.
HUE
To adjust the colour hue of the picture.
Sharpness
To sharpen or soften the picture.
Gamma
To select the gamma type.
Colour Temperature
To select the colour temperature. You can select:
• Cool – Give the white colour a bluish tint.
• Standard – Give the white colour a neutral tint.
• Warm – Give the white colour a reddish tint.
Advanced Video
To adjust advanced video settings.
DNR (Digital Noise Reduction)
To reduce noise on screen and produce a clearer
video image.
MPEG NR
To reduce picture noise in MPEG-compressed
videos.
Adaptive Luma Control
To adjust the average brightness of the picture to
compensate for large areas of brightness.
Flesh Tone
To adjust skin colour based on skin tone
preference.
Dl Film Mode
To optimise the picture settings for watching
films.
Blue Stretch
To increase the blue component of white and
near white pixels without affecting flesh tone
colour.
Game Mode
To optimise the picture settings for playing
games.
Adaptive Back Light
To dynamically change the backlight of the
screen according to the amount of light and dark
in the signal.
VGA Mode (VGA source only)
To select the VGA mode.
• Video – In this mode, images look smoother
and text appears clearer.
• Graphic – In this mode, images look sharper.
Select this mode for watching videos from a
computer.
HDMI Mode (HDMI progressive timing only)
To select the HDMI mode.
• Auto – Choose Video/Graphic automatically.
• Graphic – In this mode, images look smoother
and text appears clear. Select this mode when
connecting a computer.
• Video – In this mode, images look sharper.
Select this mode when watching videos from a
computer or from video players, such as a DVD
player, Blu-ray player, etc.
Overscan (HDMI source only)
To extend part of the display past the visible area
of the screen. The resulting picture will “zoom in”
on the image centre.
Using Your TV
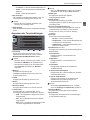
Audio
TV
Setup
Lock
Picture Mode
Back Light
Brightness
Contrast
Saturation
HUE
Sharpness
Eco
50
31
41
37
0
43
ExitSelectEnter
Video

Using Your TV
LED Backlit Flat TV Instruction Manual EN-13
EN
NoteNote
• When Overscan is set to Off, Screen Mode cannot be
selected.
VGA
To adjust the computer image in VGA source. You
can adjust:
• Auto Adjust – Automatically adjust the image
settings.
• H. Position – Adjust picture’s horizontal
position.
• V. Position – Adjust picture’s vertical position.
• Phase – Adjust the focus of stable images.
• Clock – Adjust the sample frequency.
Audio Only
To turn off TV picture and listen to programme
audio only.
NoteNote
• To exit audio only mode, press any button.
Reset
To reset the video settings to the factory defaults.
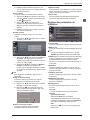
Adjusting the Audio Settings
Audio Mode
To select the audio mode. You can select User/
Standard/Music/Theatre to suit your personal
preference.
NoteNote
• You can also press S.MODE button to select the audio
mode.
• Manually adjusting audio settings will automatically
change the Audio Mode to User.
Balance
To adjust the balance between the left and right
speakers.
Bass
To adjust the low frequency sound.
Treble
To adjust the high frequency sound.
Sound Surround
To simulate surround sound.
Speaker
To turn TV built-in speakers on or off. You can select:
• Off – To turn TV built-in speakers off.
• On – To turn TV built-in speakers on.
• Auto (CEC) – To output audio from the
connected CEC device.
NoteNote
• Auto (CEC) option will be disabled if CEC Function in
the CEC menu is set to Off.
SPDIF Type
To select the SPDIF digital audio output type.
SPDIF Delay
To adjust the SPDIF delay time to synchronise the
sound with the picture (0~250).
Auto Volume Control
Turn this setting on to keep the volume level
consistent when switching channels or when
switching from a TV show to a commercial.
Type
To select audio type.
• Normal – Provide normal audio.
• Hearing Impaired – Provide visual descriptions
of the scenes for hearing impaired viewers.
• Visually Impaired – Provide audio narration of
the scenes for visually impaired people.
Visually Impaired (DTV only)
To adjust the audio settings for visually impaired
people.
Speaker
To turn speakers on or off.
Headphone
To turn headphones on or off.
Volume
To adjust the volume level of the audio narration.
Pan and Fade
To turn the pan and fade control on or off.
Visually Impaired Audio
To select the language of the audio for visually
impaired people. (Options depend on broadcast
audio content)
NoteNote
• Visually Impaired setting is only available when Type
is set to Visually Impaired.
Downmix Mode
To select audio downmix mode.
Audio Mode
Balance
Bass
Treble
Sound Surround
Speaker
SPDIF Type
Standard
0
50
50
Simulate
On
Off
ExitSelectEnter
Video
Audio
TV
Setup
Lock
SS

Using Your TV
EN-14 LED Backlit Flat TV Instruction Manual
Reset
To reset audio settings to the factory defaults.
Adjusting the Channel Settings
Tuner Mode
To select the tuner mode: Antenna/Aerial or Cable.
Audio Channel (ATV only)
To select the audio mode for a multiple audio or
stereo broadcast programme.
Audio Language (DTV only)
To select audio language for programmes that have
multiple language tracks.
Audio Language 2nd (DTV only)
To select second preferred audio language for
programmes that have multiple language tracks.
Channels
To perform channel scan and edit channel list.
Channel Scan
To perform channel scan after selecting your
country and configuring your cable information
(cable mode).
Update Scan
To perform channel scan update to add channels
to the existing channel list.
Analogue Manual Scan
To perform analogue manual scan up or down
from the specified start frequency.
1. Press S/T to highlight Start Frequency
(MHz), then use the number buttons on the
remote control to enter the start frequency.
2. Press S/T to highlight Scan up or Scan
Down, then press OK to scan for higher or
lower frequency channels from the start
frequency.
Single RF Scan (Digital channel only)
To perform single RF scan and check the signal
strength and quality.
Antenna Mode
1. Use the number buttons on the remote
control to enter the RF channel.
2. Press OK to start scanning.
Cable Mode
1. Press S/T to highlight Frequency (KHz),
then use the number buttons on the remote
control to enter the frequency.
2. Press S/T to highlight Modulation, then
press W/X to select the modulation type.
3.
Press S/T to highlight Symbol Rate (Ksym/s),
then use the number buttons on the remote
control to enter the symbol rate.
4. Press OK to start scanning.
Favorite Network Select
To select the network you prefer if there are more
than two networks detected after running the
channel scan.
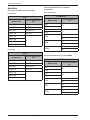
Channel Skip
To select the channels that will be skipped when
using the P /P buttons. You can still tune to
the skipped channels using the number buttons
on the remote control.
1. Press S/T to highlight the channel that you
want to skip, then press OK. will be
displayed.
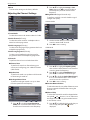
Tuner Mode
Audio Channel
Channels
Time Shift Mode
Device Info
Cable
Stereo
Off
ExitSelectEnter
Video
Audio
Setup
Lock
TV
Scan up
Scan Down
Off
ExitSelectEnter
Video
Audio
Setup
Lock
TV
Start Frequency (MHz)
48.25
Search for analogue channels
Signal Level
Signal Quality
Off
ExitSelectEnter
Video
Audio
Setup
Lock
TV
RF Channel
41
Scan single RF channel. (Digital Only)
Antenna
0%
0%
0%
Off
ExitSelectEnter
Video
Audio
Setup
Lock
TV
Frequency (KHz)
Modulation
Symbol Rate (Ksym/s)
Scan single RF channel. (Digital Only)
Cable
0%
30600
Auto
6875

Using Your TV
LED Backlit Flat TV Instruction Manual EN-15
EN
2. Repeat above step until all the skipped
channels are set.
Channel Sort
To change the order of the channel list.
1. Press S/T to highlight the channel that you
want to change position, then press OK.
will be displayed.
2. Press S/T to highlight the desired channel
position, then press OK to swap the position
of the two channels.
3. Repeat step 1 and 2 until all desired channels
are sorted.
Channel Edit
To edit the channel number and channel name.
1. Press S/T to highlight the channel that you
want to edit, then press OK.
2. Press S/T to highlight Channel Number,
then press the number buttons on the
remote control to enter preferred channel
number.
3. Press S/T to highlight Channel Name, then
enter each character of the new name by
pressing the number buttons repeatedly to
select a character.
NoteNote
• To delete a character, press W button.
Analogue Channel Fine Tune
To fine tune the analogue channel if the
reception is poor.
1. Press S/T to highlight the analogue channel
that you want to fine tune.
2. Press W/X to adjust the frequency while
checking the background image, then press
OK to set.
Clear Channel List
To clear all the channels that are stored in the
channel list.
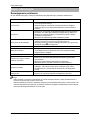
Time Shift Mode
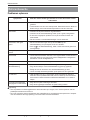
To turn time shift mode on or off. See “Time
Shifting” on page 23 for more information.
Device Info
To check the information of the device that is
connected to the USB jack on the back of the TV.
Adjusting the TV Settings
OSD Language
To select on-screen menu language.
Screen Mode
To select screen display mode.
NoteNote
• You can also press the SCREEN button to select screen
mode.
DPMS (Display Power Management Signals)
Turn this setting on to set the TV to automatically
enter standby mode if no PC input signal is detected
after 40 seconds in VGA mode.
Blue Mute
Turn this setting on to display a blue screen when
there is no input signal or when playing audio
programmes.
Interaction Channel
Turn this setting on to enable interaction channel
function.
912
913
914
915
ExitSelectEnter
Video
Audio
Setup
Lock
TV
910
909
911
Analogue
Analogue
Analogue
Analogue
Analogue
Analogue
Analogue
Channel Name:
Frequency
ExitSelectEnter
Video
Audio
Setup
Lock
TV
Channel Number:
Network Name:
915
503.3
Sports
Channel Number: 901
Channel Name: BBC
Frequency: 85.25 MHz
Set Cancel
CC
OSD Language
Screen Mode
DPMS
Blue Mute
Interaction Channel
MHEG PIN Protection
Time Setup
English
16:9
On
Off
Off
Off
ExitSelectEnter
Video
Audio
Lock
TV
Setup

Using Your TV
EN-16 LED Backlit Flat TV Instruction Manual
MHEG PIN Protection
Turn this setting on to enable MHEG PIN Protection
function.
Time Setup
To adjust time and timer settings.
Time Zone
To select your time zone.
Time
Auto Synchronization
Select On to automatically synchronise date and
time with a digital signal (if available). Select Off
to manually adjust the date and time.
Date
Press W/X and number buttons to set the date.
Time
Press W/X and number buttons to set the time.
Timer Power On
To automatically turn the TV on at a preset time.
Timer
When the power on timer is turned on, press W/
X and number buttons to set the power on time.
Power On Channel
When the power on timer is turned on, select the
power on channel from the channel list.
Timer Power Off
To automatically turn the TV off at a preset time.
Timer
When the power off timer is turned on, press W/
X and number buttons to set the power off time.
Sleep Timer
To automatically turn the TV off after a set
amount of time.
Auto Sleep
To automatically turn the TV off if there is not any
operation after a set amount of time.
Subtitle
To adjust the subtitle settings.
Analogue Subtitle
To turn analogue subtitle on or off. Select Mute
to turn analogue subtitle on when the TV is
muted.
Digital Subtitle Language
To select digital subtitle language.
Digital Subtitle 2nd Language
To select second digital subtitle language.
Subtitle Type
To select digital subtitle type.
Teletext
To adjust teletext settings.
Digital Teletext Language
To select digital teletext language
Decoding Page Language
To select teletext decoding page language.
Common Interface
To check the information of the CAM inserted to the
COMMON INTERFACE slot on the back of the TV.
OAD (Over Air Download)
To update TV software by air.
Manual OAD Download
To manually update TV software by air. Follow the
on-screen instructions to complete the software
update.
Auto Download
Select Yes to enable your TV to download new
software by air automatically
Auto Install
Select Yes to enable your TV to install new
software by air automatically
Version Info
To check software version information.
System Information
To check system information.
Reset Default
To reset picture, audio, channel and user settings to
the factory defaults.
CEC Menu
To adjust CEC settings.
CEC function
To turn CEC function on or off.
Auto turn off
When this option is set to On, the CEC device will
automatically power off when the TV is turned
off.
Device Discovery
Check if your device is connected and supports
CEC.
Standby (When CEC device is connected)
To turn the selected CEC device off.

Using Your TV
LED Backlit Flat TV Instruction Manual EN-17
EN
Power On (When CEC device is connected)
To turn selected CEC device on.
Disable/Enable Sys. Aud. Ctrl. (When CEC
device is connected)
Toggle this setting to enable or disable audio
output from the connected CEC audio device and
its volume adjustment using the TV’s remote
control.
NoteNote
• Not all HDMI devices support CEC. See your device’s
user manual for details.
• HDMI cables must be used to connect HDMI CEC-
compatible devices to your TV.
• The connected device’s HDMI CEC feature must be
turned on.
• If you connect an HDMI device that is not HDMI CEC-
compatible, the CEC control option does not work.
• Depending on the connected HDMI device, the CEC
HDMI control option may not work.
Shop Mode
To turn shop mode on or off.
• On – Settings are designed for maximum
impact in retail shop display and product
information banner will show on the screen.
• Off – Settings are optimised for normal home
viewing and energy efficiency.
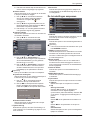
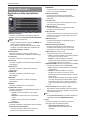
Adjusting Lock Settings
Enter the password that was set during the initial
setup to access the Lock menu.
NoteNote
• If a password is not set during the initial setup, enter
1234 to access the Lock menu.
• If your password is lost, enter the universal password
9443 to access the Lock menu, then set a new
password.
Change Password
To change the password.
Channel Lock
To lock channels that you want to prevent others
from watching.
1. Press S/T to highlight the channel that you
want to lock, then press OK. will be
displayed.
2. Repeat above step until all the locked
channels are set.
NoteNote
• To tune to a locked channel, you must enter the 4-digit
password.
Time Interval Lock (Norway only)
To set the time interval during which the TV
channels will be locked. Password must be entered
to unlock and watch the channels.
Parental Lock
To prevent children from watching certain TV
programmes, according to the rating limit set.
NoteNote
• This function only works for the programmes with Age
Rating information.
Source Lock
To lock input source.
1. Press S/T to highlight the input source that
you want to lock, then press OK. will be
displayed.
2. Repeat above step until all the locked sources
are set.
NoteNote
• To switch to a locked source, you must enter the 4-digit
password.
Child Lock
To lock the control buttons on the side of the TV.
Tuning Lock
To disable TV tuning function. When this option is
set to On, the TV main menu will not be available.
Source Set Mode
To set the TV to turn on with a default input source.
Source Set
To select the default input source, if Source Set
Mode is set to On.
Channel No.
To select the default channel, if Source Set is set to
TV.
Max Volume
To set the maximum volume limit.
Password
ExitSelectEnter
Video
Audio
TV
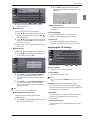
Setup
Lock
SSeettuu
pp
Change Password
Channel Lock
Parental Lock
Source Lock
Child Lock
Tuning Lock
Source Set Mode
Off
Off
On
ExitSelectEnter
Video
Audio
TV
Setup
Lock
OK
SSeettuu
pp

Other Features
EN-18 LED Backlit Flat TV Instruction Manual
Initial Volume Mode
To set the TV to turn on with a default volume level.
Initial Volume
To select the default volume level, if Initial Volume
Mode is set to On.
Clear Lock
To reset the lock settings to the factory defaults.
Initial Setup
To reset picture, audio, channel, user and lock
settings to the factory defaults. The Initial Setup
screen will open.
USB Media Player
The USB Media Player allows you to connect a USB
thumb drive to your TV and play photos, music or
videos.
NoteNote
• The USB thumb drive must be formatted as FAT32.
• Files on the USB thumb drive must end in a supported
file extension (*.mp3, *.jpg, *.mp4, etc).
• Files that are not supported will not be displayed.
• Some files may be unreadable due to individual file
setting.
• The player is not designed to play media from external
hard drives or mp3 players.
• Operation using USB hubs is not guaranteed.
• Due to the limited distance of USB signal transmission,
it is recommended not to use a USB patch cord.
• Use high-speed USB equipment that conforms to the
USB 2.0 full speed interface Standard. If the USB
equipment does not conform to USB full speed
interface standard, playback may be unsmooth.
Caution
• Do not disconnect the USB thumb drive from the TV
before exiting USB media player.
Formatting the USB thumb drive:
You can format your USB thumb drive using the on-
screen menu.
1. Switch to TV source.
2. Press MENU/ . The on-screen menu opens.
3. Press S/T to highlight TV, then press OK.
4. Press S/T to highlight Device Info, then press
OK.
5. Highlight your USB thumb drive, then press OK.
6. Press S/T to highlight Format, then press OK.
7. When the confirmation screen opens, highlight
YES, then press OK.
8. When the formatting is completed. press EXIT.
Using USB media player:
1. Connect your USB thumb drive to the USB port on
the back of the TV.
2. Press SOURCE, then S/T to highlight USB and
press OK to switch to USB mode.
3. Press W/X to highlight the media type: Video,
Photo or Music, then press OK.
4. Press S/T/W/X to highlight the file that you
want to play, then press OK.
5. To adjust the settings, press MENU/ to open the
on-screen menu.
6. Press S/T to highlight an item, then press OK to
execute or to display setting options, then press
S/T to highlight desired option and press OK.
7. Press BACK/ to return to the previous menu or
close the menu.
Thumbnail/List Mode
When viewing contents of the USB thumb drive, press
FAV/ to toggle thumbnail/list mode.
Press MENU/ to open the on-screen menu.
Sort
To select the algorithm for sorting files.
Media Type
To select the media type.
NoteNote
• When browsing contents of the USB thumb drive, to
return to the upper directory,
In thumbnail mode, press BACK/.
In list mode, press S/T to highlight the icon on
top of the list, then press OK.
Other Features
EnterSelect
Video Photo Music
[..]
La page est en cours de chargement...
La page est en cours de chargement...
La page est en cours de chargement...
La page est en cours de chargement...
La page est en cours de chargement...
La page est en cours de chargement...
La page est en cours de chargement...
La page est en cours de chargement...
La page est en cours de chargement...
La page est en cours de chargement...
La page est en cours de chargement...
La page est en cours de chargement...
La page est en cours de chargement...
La page est en cours de chargement...
La page est en cours de chargement...
La page est en cours de chargement...
La page est en cours de chargement...
La page est en cours de chargement...
La page est en cours de chargement...
La page est en cours de chargement...
La page est en cours de chargement...
La page est en cours de chargement...
La page est en cours de chargement...
La page est en cours de chargement...
La page est en cours de chargement...
La page est en cours de chargement...
La page est en cours de chargement...
La page est en cours de chargement...
La page est en cours de chargement...
La page est en cours de chargement...
La page est en cours de chargement...
La page est en cours de chargement...
La page est en cours de chargement...
La page est en cours de chargement...
La page est en cours de chargement...
La page est en cours de chargement...
La page est en cours de chargement...
La page est en cours de chargement...
La page est en cours de chargement...
La page est en cours de chargement...
La page est en cours de chargement...
La page est en cours de chargement...
La page est en cours de chargement...
La page est en cours de chargement...
La page est en cours de chargement...
La page est en cours de chargement...
La page est en cours de chargement...
La page est en cours de chargement...
La page est en cours de chargement...
La page est en cours de chargement...
La page est en cours de chargement...
La page est en cours de chargement...
La page est en cours de chargement...
La page est en cours de chargement...
La page est en cours de chargement...
La page est en cours de chargement...
La page est en cours de chargement...
La page est en cours de chargement...
La page est en cours de chargement...
La page est en cours de chargement...
La page est en cours de chargement...
La page est en cours de chargement...
La page est en cours de chargement...
La page est en cours de chargement...
La page est en cours de chargement...
La page est en cours de chargement...
La page est en cours de chargement...
La page est en cours de chargement...
La page est en cours de chargement...
La page est en cours de chargement...
La page est en cours de chargement...
La page est en cours de chargement...
La page est en cours de chargement...
La page est en cours de chargement...
La page est en cours de chargement...
La page est en cours de chargement...
La page est en cours de chargement...
La page est en cours de chargement...
La page est en cours de chargement...
La page est en cours de chargement...
La page est en cours de chargement...
La page est en cours de chargement...
La page est en cours de chargement...
La page est en cours de chargement...
La page est en cours de chargement...
La page est en cours de chargement...
La page est en cours de chargement...
La page est en cours de chargement...
La page est en cours de chargement...
La page est en cours de chargement...
La page est en cours de chargement...
La page est en cours de chargement...
La page est en cours de chargement...
La page est en cours de chargement...
La page est en cours de chargement...
La page est en cours de chargement...
La page est en cours de chargement...
La page est en cours de chargement...
La page est en cours de chargement...
La page est en cours de chargement...
La page est en cours de chargement...
La page est en cours de chargement...
La page est en cours de chargement...
La page est en cours de chargement...
La page est en cours de chargement...
La page est en cours de chargement...
La page est en cours de chargement...
La page est en cours de chargement...
La page est en cours de chargement...
La page est en cours de chargement...
La page est en cours de chargement...
La page est en cours de chargement...
La page est en cours de chargement...
La page est en cours de chargement...
La page est en cours de chargement...
La page est en cours de chargement...
La page est en cours de chargement...
La page est en cours de chargement...
La page est en cours de chargement...
La page est en cours de chargement...
La page est en cours de chargement...
La page est en cours de chargement...
La page est en cours de chargement...
La page est en cours de chargement...
La page est en cours de chargement...
La page est en cours de chargement...
La page est en cours de chargement...
La page est en cours de chargement...
La page est en cours de chargement...
La page est en cours de chargement...
La page est en cours de chargement...
La page est en cours de chargement...
La page est en cours de chargement...
La page est en cours de chargement...
La page est en cours de chargement...
La page est en cours de chargement...
La page est en cours de chargement...
La page est en cours de chargement...
La page est en cours de chargement...
La page est en cours de chargement...
La page est en cours de chargement...
La page est en cours de chargement...
La page est en cours de chargement...
La page est en cours de chargement...
La page est en cours de chargement...
La page est en cours de chargement...
La page est en cours de chargement...
La page est en cours de chargement...
La page est en cours de chargement...
La page est en cours de chargement...
La page est en cours de chargement...
La page est en cours de chargement...
La page est en cours de chargement...
La page est en cours de chargement...
La page est en cours de chargement...
La page est en cours de chargement...
La page est en cours de chargement...
La page est en cours de chargement...
La page est en cours de chargement...
La page est en cours de chargement...
La page est en cours de chargement...
La page est en cours de chargement...
La page est en cours de chargement...
La page est en cours de chargement...
La page est en cours de chargement...
La page est en cours de chargement...
La page est en cours de chargement...
La page est en cours de chargement...
La page est en cours de chargement...
La page est en cours de chargement...
La page est en cours de chargement...
La page est en cours de chargement...
La page est en cours de chargement...
La page est en cours de chargement...
La page est en cours de chargement...
La page est en cours de chargement...
La page est en cours de chargement...
-
 1
1
-
 2
2
-
 3
3
-
 4
4
-
 5
5
-
 6
6
-
 7
7
-
 8
8
-
 9
9
-
 10
10
-
 11
11
-
 12
12
-
 13
13
-
 14
14
-
 15
15
-
 16
16
-
 17
17
-
 18
18
-
 19
19
-
 20
20
-
 21
21
-
 22
22
-
 23
23
-
 24
24
-
 25
25
-
 26
26
-
 27
27
-
 28
28
-
 29
29
-
 30
30
-
 31
31
-
 32
32
-
 33
33
-
 34
34
-
 35
35
-
 36
36
-
 37
37
-
 38
38
-
 39
39
-
 40
40
-
 41
41
-
 42
42
-
 43
43
-
 44
44
-
 45
45
-
 46
46
-
 47
47
-
 48
48
-
 49
49
-
 50
50
-
 51
51
-
 52
52
-
 53
53
-
 54
54
-
 55
55
-
 56
56
-
 57
57
-
 58
58
-
 59
59
-
 60
60
-
 61
61
-
 62
62
-
 63
63
-
 64
64
-
 65
65
-
 66
66
-
 67
67
-
 68
68
-
 69
69
-
 70
70
-
 71
71
-
 72
72
-
 73
73
-
 74
74
-
 75
75
-
 76
76
-
 77
77
-
 78
78
-
 79
79
-
 80
80
-
 81
81
-
 82
82
-
 83
83
-
 84
84
-
 85
85
-
 86
86
-
 87
87
-
 88
88
-
 89
89
-
 90
90
-
 91
91
-
 92
92
-
 93
93
-
 94
94
-
 95
95
-
 96
96
-
 97
97
-
 98
98
-
 99
99
-
 100
100
-
 101
101
-
 102
102
-
 103
103
-
 104
104
-
 105
105
-
 106
106
-
 107
107
-
 108
108
-
 109
109
-
 110
110
-
 111
111
-
 112
112
-
 113
113
-
 114
114
-
 115
115
-
 116
116
-
 117
117
-
 118
118
-
 119
119
-
 120
120
-
 121
121
-
 122
122
-
 123
123
-
 124
124
-
 125
125
-
 126
126
-
 127
127
-
 128
128
-
 129
129
-
 130
130
-
 131
131
-
 132
132
-
 133
133
-
 134
134
-
 135
135
-
 136
136
-
 137
137
-
 138
138
-
 139
139
-
 140
140
-
 141
141
-
 142
142
-
 143
143
-
 144
144
-
 145
145
-
 146
146
-
 147
147
-
 148
148
-
 149
149
-
 150
150
-
 151
151
-
 152
152
-
 153
153
-
 154
154
-
 155
155
-
 156
156
-
 157
157
-
 158
158
-
 159
159
-
 160
160
-
 161
161
-
 162
162
-
 163
163
-
 164
164
-
 165
165
-
 166
166
-
 167
167
-
 168
168
-
 169
169
-
 170
170
-
 171
171
-
 172
172
-
 173
173
-
 174
174
-
 175
175
-
 176
176
-
 177
177
-
 178
178
-
 179
179
-
 180
180
-
 181
181
-
 182
182
-
 183
183
-
 184
184
-
 185
185
-
 186
186
-
 187
187
-
 188
188
-
 189
189
-
 190
190
-
 191
191
-
 192
192
-
 193
193
-
 194
194
-
 195
195
-
 196
196
-
 197
197


Haier LE32A650CF Manuel utilisateur
- Catégorie
- Téléviseurs LCD
- Taper
- Manuel utilisateur
- Ce manuel convient également à
dans d''autres langues
- español: Haier LE32A650CF Manual de usuario
- Deutsch: Haier LE32A650CF Benutzerhandbuch
- Nederlands: Haier LE32A650CF Handleiding
- polski: Haier LE32A650CF Instrukcja obsługi
Autres documents
-
CONTINENTAL EDISON CELED32SABL20B3 Manuel utilisateur
-
-
-
AYA A22AC2201 Mode d'emploi
-
Panasonic TX55HXW704 Mode d'emploi
-
Panasonic TX43HX700E Mode d'emploi
-
 Grandin LV32W10 Operating Instructions Manual
-
Techwood VL19TV1001 Operating Instructions Manual
-
-
Seg toledo Le manuel du propriétaire
