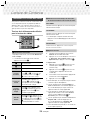
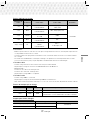
Samsung HT-J4500 Manuel utilisateur
- Catégorie
- Lecteurs Blu-Ray
- Taper
- Manuel utilisateur

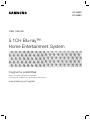
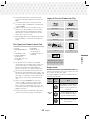
5.1CH Blu-ray™
Home Entertainment System
User manual
HT-J4500
HT-J4530
imagine the possibilities
Thank you for purchasing this Samsung product.
To receive more complete service, please register your product at
www.samsung.com/register

2 - English
Safety Information
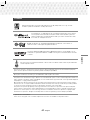
Class II product : This symbol indicates that
it does not require a safety connection to
electrical earth (ground).
AC voltage : This symbol indicates that the
rated voltage marked with the symbol is AC
voltage.
DC voltage : This symbol indicates that the
rated voltage marked with the symbol is DC
voltage.
Caution, Consult instructions for use : This
symbol instructs the user to consult the user
manual for further safety related information.
• The slots and openings in the cabinet and in the back
or bottom are provided for necessary ventilation. To
ensure reliable operation of this apparatus, and to
protect it from overheating, these slots and openings
must never be blocked or covered.
- Do not place this apparatus in a confined space,
such as a bookcase, or built-in cabinet, unless
proper ventilation is provided.
- Do not place this apparatus near or over a radiator or
heat register, or where it is exposed to direct sunlight.
- Do not place vessels (vases etc.) containing water
on this apparatus. A water spill can cause a fire or
electric shock.
• Do not expose this apparatus to rain or place it near
water (near a bathtub, washbowl, kitchen sink, or
laundry tub, in a wet basement, or near a swimming
pool, etc.). If this apparatus accidentally gets wet,
unplug it and contact an authorized dealer immediately.
• This apparatus uses batteries. In your community,
there might be environmental regulations that require
you to dispose of these batteries properly. Please
contact your local authorities for disposal or recycling
information.
• Do not overload wall outlets, extension cords or
adaptors beyond their capacity, since this can result in
fire or electric shock.
• Route power-supply cords so that they are not likely to
be walked on or pinched by items placed on or against
them. Pay particular attention to cords at the plug end,
at wall outlets, and the point where they exit from the
apparatus.
• To protect this apparatus from a lightning storm, or
when it is left unattended and unused for long periods
of time, unplug it from the wall outlet and disconnect
the antenna or cable system. This will prevent damage
to the set due to lightning and power line surges.
• Before connecting the AC power cord to the DC
adaptor outlet, make sure the voltage designation of
the DC adaptor corresponds to the local electrical
supply.
• Never insert anything metallic into the open parts
of this apparatus. Doing so may create a danger of
electric shock.
• To avoid electric shock, never touch the inside of this
apparatus. Only a qualified technician should open this
apparatus.
• Make sure to plug the power cord in until it is firmly
seated. When unplugging the power cord from a wall
outlet, always pull on the power cord's plug. Never
unplug by pulling on the power cord. Do not touch the
power cord with wet hands.
• If this apparatus does not operate normally - in
particular, if there are any unusual sounds or smells
coming from it - unplug it immediately and contact an
authorized dealer or service center.
• Maintenance of Cabinet.
- Before connecting other components to this
product, be sure to turn them off.
- If you move your product suddenly from a cold place
to a warm place, condensation may occur on the
operating parts and lens and cause abnormal disc
playback. If this occurs, unplug the product, wait for
two hours, and then connect the plug to the power
outlet. Then, insert the disc, and try to play back
again.
• Be sure to pull the power plug out of the outlet if the
product is to remain unused or if you are leaving the
house for an extended period of time (especially when
children, elderly, or disabled people will be left alone in
the house).
- Accumulated dust can cause an electric shock, an
electric leakage, or a fire by causing the power cord
to generate sparks and heat or the insulation to
deteriorate.
CAUTION
RISK OF ELECTRIC SHOCK. DO NOT OPEN
CAUTION: TO REDUCE THE RISK OF ELECTRIC SHOCK, DO
NOT REMOVE THE COVER (OR BACK). THERE ARE NO USER
SERVICEABLE PARTS INSIDE. REFER ALL SERVICING TO
QUALIFIED PERSONNEL.
This symbol indicates that high voltage is
present inside. It is dangerous to make
any kind of contact with any internal part
of this product.
This symbol indicates that this product
has included important literature
concerning operation and maintenance.

3 - English
Safety Information
• Contact an authorized service center for information
if you intend to install your product in a location with
heavy dust, high or low temperatures, high humidity,
chemical substances, or where it will operate 24 hours
a day such as in an airport, a train station, etc. Failing
to do so may lead to serious damage of your product.
• Use only a properly grounded plug and wall outlet.
- An improper ground may cause electric shock or
equipment damage. (Class l Equipment only.)
• To turn this apparatus off completely, you must
disconnect it from the wall outlet. Consequently, the
wall outlet and power plug must be readily accessible
at all times.
• Do not allow children to hang on the product.
• Store the accessories (battery, etc.) in a location safely
out of the reach of children.
• Do not install the product in an unstable location such
as a shaky self, a slanted floor, or a location exposed
to vibration.
• Do not drop or strike the product. If the product is
damaged, disconnect the power cord and contact a
service center.
• To clean this apparatus, unplug the power cord from
the wall outlet and wipe the product using a soft,
dry cloth. Do not use any chemicals such as wax,
benzene, alcohol, thinners, insecticide, air fresheners,
lubricants, or detergent. These chemicals can damage
the appearance of the product or erase the printing on
the product.
• Do not expose this apparatus to dripping or splashing.
Do not put objects filled with liquids, such as vases on
the apparatus.
• Do not dispose of batteries in a fire.
• Do not plug multiple electric devices into the same wall
socket. Overloading a socket can cause it to overheat,
resulting in a fire.
• There is danger of an explosion if you replace the
batteries used in the remote with the wrong type of
battery. Replace only with the same or equivalent type.
WARNING :
• TO PREVENT THE SPREAD OF FIRE,
KEEP CANDLES AND OTHER ITEMS
WITH OPEN FLAMES AWAY FROM THIS
PRODUCT AT ALL TIMES.
• To reduce the risk of fire or electric shock,
do not expose this appliance to rain or moisture.
NOTE TO CATV SYSTEM INSTALLER
This reminder is provided to call the CATV system
installer’s attention to Section 820~40 of the NEC which
provides guidelines for proper grounding and, in particular,
specifies that the cable ground shall be connected to the
grounding system of the building, as close to the point of
cable entry as practical.
CLASS 1 LASER PRODUCT
This product is classified as a CLASS 1 LASER product.
Use of controls, adjustments or performance of
procedures other than those specified herein may result
in hazardous radiation exposure.
DANGER :
• VISIBLE AND INVISIBLE LASER RADIATION WHEN
OPEN. AVOID DIRECT EXPOSURE TO BEAM.
(FDA 21 CFR)
CAUTION :
• CLASS 3B VISIBLE AND INVISIBLE LASER
RADIATION WHEN OPEN. AVOID EXPOSURE TO THE
BEAM (IEC 60825-1)
• THIS PRODUCT UTILIZES A LASER. USE OF
CONTROLS OR ADJUSTMENTS OR PERFORMANCE
OF PROCEDURES OTHER THAN THOSE SPECIFIED
HEREIN MAY RESULT IN HAZARDOUS RADIATION
EXPOSURE. DO NOT OPEN THE COVER. DO
NOT REPAIR THE PRODUCT YOURSELF. REFER
SERVICING TO QUALIFIED PERSONNEL.
CLASS 1 LASER PRODUCT
KLASSE 1 LASER PRODUKT
LUOKAN 1 LASER LAITE
KLASS 1 LASER APPARAT
PRODUCTO LÁSER CLASE 1
This Class B digital apparatus complies with
Canadian ICES-003.
This device complies with Industry Canada
licenseexempt RSS standard(s). Operation is subject
to the following two conditions: (1) this device may
not cause interference, and (2) this device must
accept any interference, including interference that
may cause undesired operation of the device.

4 - English
Safety Information
Important Safety Instructions
Read these operating instructions carefully before using
the unit. Follow all the safety instructions listed below.
Keep these operating instructions handy for future
reference.
1. Read these instructions.
2. Keep these instructions.
3. Heed all warnings.
4. Follow all instructions.
5. Do not use this apparatus near water.
6. Clean only with dry cloth.
7. Do not block any ventilation openings. Install in
accordance with the manufacturer’s instructions.
8. Do not install near any heat sources such as
radiators, heat registers, stoves, or other apparatus
(including AV receivers) that produce heat.
9. Do not defeat the safety purpose of the polarized
or grounding-type plug. A polarized plug has two
blades with one wider than the other. A grounding
type plug has two blades and a third grounding
prong. The wide blade or the third prong are
provided for your safety. If the provided plug does
not fit into your outlet, consult an electrician for
replacement of the obsolete outlet.
10. Protect the power cord from being walked on
or pinched particularly at plugs, convenience
receptacles, and the point where it exits the
apparatus.
11. Only use attachments/accessories specified by the
manufacturer.
12. Use only with the cart, stand,
tripod, bracket, or table
specified by the manufacturer,
or sold with the apparatus.
When a cart is used, use
caution when moving the cart/
apparatus combination to
avoid injury from tip-over.
13. Unplug this apparatus during lightning storms or
when unused for long periods of time.
14. Refer all servicing to qualified service personnel.
Servicing is required when the apparatus has been
damaged in any way, such as power-supply cord or
plug is damaged, liquid has been spilled or objects
have fallen into the apparatus, the apparatus has
been exposed to rain or moisture, does not operate
normally, or has been dropped.
3D Precautions
IMPORTANT HEALTH AND SAFETY INFORMATION FOR
3D PICTURES.
Read and understand the following safety information
before using the 3D function.
• Some viewers may experience discomfort while viewing
3D TV such as dizziness, nausea, and headaches.
If you experience any such symptom, stop viewing 3D
TV, remove the 3D Active Glasses, and rest.
• Watching 3D images for an extended period of time
may cause eye strain. If you feel eye strain, stop
viewing 3D TV, remove your 3D Active Glasses, and
rest.
• A responsible adult should frequently check on children
who are using the 3D function.
If there are any reports of tired eyes, headaches,
dizziness, or nausea, have the child stop viewing 3D
TV and rest.
• Do not use the 3D Active Glasses for other purposes
(such as general eyeglasses, sunglasses, protective
goggles, etc.)
• Do not use the 3D function or 3D Active Glasses while
walking or moving around. Using the 3D function or 3D
Active Glasses while moving around may cause you to
bump into objects, trip, and/or fall, and cause serious
injury.
• If you want to enjoy 3D content, connect a 3D device
(3D compliant AV receiver or TV) to the product’s HDMI
OUT port using a high-speed HDMI cable. Put on 3D
glasses before playing the 3D content.
• The product outputs 3D signals only through an HDMI
cable connected to the HDMI OUT port.
• The video resolution in 3D play mode is limited to the
resolution of the original 3D video. You cannot change
the resolution to your preference.
• Some functions such as BD Wise, screen size
adjustment, and resolution adjustment may not operate
properly in 3D play mode.
• You must use a high-speed HDMI cable for proper
output of the 3D signal.
• Stay at least three times the width of the screen from
the TV when watching 3D images. For example, if you
have a 46 inch screen, stay 138 inches (11.5 feet) from
the screen.
• Place the 3D video screen at eye level for the best 3D
picture.
• When the product is connected to some 3D devices,
the 3D effect may not function properly.
• This product does not convert 2D content into 3D.
• “Blu-ray 3D” and “Blu-ray 3D” logo are trademarks of
the Blu-ray Disc Association.

5 - English
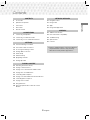
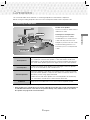
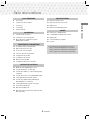
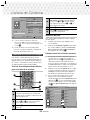
Contents
Contents
CONTENTS
6 Accessories
6 Speaker Components
7 Front Panel
7 Rear Panel
8 Remote Control
CONNECTIONS
9 Connecting the Speakers
11 Connecting to a Network Router
12 Connecting to a TV and External Devices
SETTINGS
13 The Initial Settings Procedure
14 The Home Screen at a Glance
14 Accessing the Settings Screen
15 Settings Menu Functions
18 Radio Setup
19 Network Setup
20 Upgrading Software
21 Setting Up DLNA
PLAYING CONTENT
22 Switching the Source Device
22 Playing Commercial Discs
22 Playing a Disc with User Recorded Content
23 Playing Files on a USB Device
24 Controlling Video Playback
25 Playing a Pre-Recorded Commercial Audio Disc
26 Controlling Music Playback
27 Playing Photo Content
28 Using Bluetooth
30 Using the Special Effects Remote Control
Buttons
NETWORK SERVICES
31 Using BD-LIVE™
31 Using DLNA
31 Apps
32 Using Vewd App Store
APPENDIX
33 Additional Information
34 Disk and Format Compatibility
39 Troubleshooting
42 Specifications
43 Licenses
Figures and illustrations in this User Manual
are provided for reference only and may
differ from actual product appearance.

6 - English
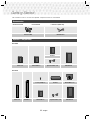
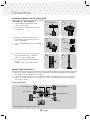
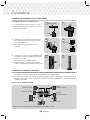
Getting Started
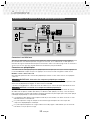
Check the box for the accessories and speaker components listed or shown below.
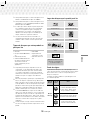
Accessories
• Remote Control • User Manual • Batteries (AAA size)
Power Cable FM Antenna
Speaker Components
HT-J4500
Center
Front x 2 Surround x 2
Speaker Cable
x 6 Subwoofer
HT-J4530
Screw (5x20) x 8
Center
Stand Base x 2
Front x 2 Stand x 2 Surround x 2
Speaker Cable
x 6 Subwoofer

7 - English
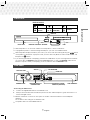
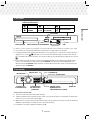
Getting Started
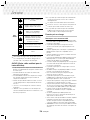
Front Panel
DISPLAY ICONS
5V 0.5A
USBREMOTE CONTROL SENSOR
DISPLAY
DISC TRAY
FUNCTION STOP PLAY/PAUSE
OPEN/
CLOSE
VOLUME
CONTROL
POWER
✎
When the product is on, do not let children touch the product's surface. It will be hot.
✎
To upgrade the product's software through the USB jack, you must use a USB flash drive.
✎
When the product displays the Blu-ray Disc menu, you cannot start the movie by pressing the /
6
button
on the product or the remote. To play the movie, you must select Play Movie or Start in the disc menu, and
then press the
E
button.
✎
If you are using the Internet or are playing content from a USB device on your TV through the home theater,
you cannot select the BD/DVD mode with the
FUNCTION button. To select the BD/DVD mode, exit the
Internet or stop the content you are playing on the TV, and then select the BD/DVD mode.
Rear Panel
SURROUND
SURROUND
COOLING FAN
* FM ANTENNA
AUX IN
HDMI OUT
SPEAKER OUTPUT
CONNECTORS
POWER CORD LAN TERMINALEXTERNAL DIGITAL
AUDIO IN (OPTICAL)
* Connecting the FM Antenna
1. Connect the supplied FM antenna to the FM ANT Jack.
2. Slowly move the antenna wire around until you find a location where reception is good, then fasten it to a
wall or other rigid surface.
✎
Maintain a minimum of 4 inches of clear space on all sides of the home theater to ensure adequate
ventilation.
Do not obstruct the cooling fan or ventilation holes.
✎
This product does not receive AM broadcasts.

8 - English
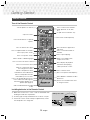
Getting Started
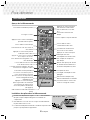
Remote Control
Tour of the Remote Control
Turn the product on and off.
Adjust the volume.
Press numeric buttons to operate
options.
Press to skip backwards or forwards.
Selects the disc subtitle language.
Press to move to the Home screen.
Select on-screen menu items
and change menu values.
Return to the previous menu.
These buttons are used both for
menus on the product and also
several Blu-ray Disc functions.
Press to view the disc menu.
Press to use the Tools menu.
Press to play a disc or files.
Press to direct the audio signal to
the home theater speakers or TV
speaker. (See page 30)
Select the desired DSP/EQ audio
mode.
Press to stop a disc or files.
Cut off the sound temporarily.
Press to search backwards or
forwards.
Press to pause playing.
Allows you to repeat a title,
chapter, track or disc.
Use to enter the Popup menu/
Title menu.
Select MONO or STEREO for radio
broadcasts.
Search for active FM stations and
to change channels.
Use to display the playback
information when playing
a Blu-ray/DVD disc or files.
To open and close the disc tray.
Press to exit the menu.
Press to select Home Theater's
mode. (BD/DVD, D. IN, AUX,
etc.).
Use to set a preset radio frequency.
TOOLS
RETURN
EXIT
INFO
SUBTITLE HOME REPEAT
1
2
3
7
89
DISC MENU TITLE MENU
0
POPUP
4
56
MUTE
MO/ST
TUNER
MEMORY
ABCD
TUNING
DOWN
UP
VOLUME
-
+
DSP/EQTV SOUND
FUNCTION
Installing batteries in the Remote Control
✎
Make sure to match the “+” and “–” ends of the batteries with
the diagram inside the compartment.
✎
Assuming typical usage, the batteries last for about one year.
✎
The remote control can be used up to approximately 23 feet
from the product in a straight line.
Battery size: AAA
Press to record FM radio
broadcasts.

9 - English
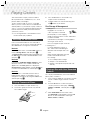
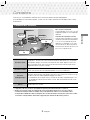
Connections
This section describes various methods of connecting the product to other external components.
Before moving or installing the product, be sure to turn off the power and disconnect the power cord.
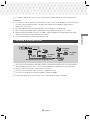
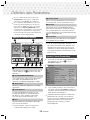
Connecting the Speakers
Surround (L)
Surround (R)
Product
Center
Subwoofer
Front (L)
Front (R)
Position of the product
Place it on a stand or cabinet shelf, or
under the TV stand.
Selecting the Listening Position
The listening position should be
located about 2.5 to 3 times the TV's
screen size away from the TV. For
example, if you have a 46 inch screen,
locate the listening position 115 to
138 inches (9.6 to 11.5 feet) from the
screen.
Front Speakers
Place these speakers in front of your listening position, facing inwards (about
45°) toward you. Place the front speakers so that their tweeters will be at the
same height as your ear. Align the front face of the front speakers with the front
face of the center speaker or place them slightly in front of the center speakers.
Center Speaker
It is best to install the center speaker at the same height as the front speakers.
You can also install it directly over or under the TV.
Surround Speakers
Place these speakers to the side of your listening position. If there isn't enough
room, place these speakers so they face each other. Position them about 2 to 3
feet above your ear, facing slightly downward.
* Unlike the front and center speakers, the surround speakers are used mainly
for sound effects. Sound will not come from them all the time.
Subwoofer
The position of the subwoofer is not so critical. Place it anywhere you like.
* The appearance of your speakers may differ from the illustrations in this manual.
* Each speaker has a colored label on its back or underside. Each cable has a single colored band near
its end. Match the band on each cable to the speaker label by color, and then connect the cable to
the speaker. See page 10 for exact instructions.
Connections

10 - English
Connections
Installing the Speakers on the Tallboy Stand
* HT-J4530 only - Front Speakers
1. Turn the Stand Base upside-down and
connect it to the Stand.
2. Use the driver to combine the screws on the
3 marked holes.
3. Straighten a supplied speaker wire to the
gravity direction and put in the hole on the
center of Stand Base.
4. Connect the upper Speaker to the assembled
Stand.
5. Insert a screw clockwise into the hole on the
rear of the speaker using a screwdriver.
And then connect a speaker cable.
6. This is the appearance after the speaker is
installed.
Follow this steps to install other speaker.
2
4
1
3
Stand Base
Stand
Speaker
Stand
5 6
Speaker Cable Connections
1. Match each speaker cable bundle to the correct speaker by matching the colored band on each bundle to
the colored sticker on the bottom of each speaker.
2. Connect the speaker wire plugs from each speaker to the back of the product by matching the colored
band on each cable to the colors of the speaker jacks. When connecting, make sure to match label color
on the back of speaker.
In case of HT-J4500
SURROUND
SURROUND
SURROUND
SURROUND
Center Speaker
Subwoofer
Front Speaker (L)
Front Speaker (R)
Surround Speaker (L)
Surround Speaker (R)
Refer to page 6 for the speakers of HT-J4530.

11 - English
Connections
✎
If you place a speaker near your TV set, the screen color may be distorted because of the magnetic field.
| CAUTION |
If you want to install the speakers on the wall, fasten screws or nails (not provided) firmly to the wall wherever
you want to hang a speaker, and then, using the hole in the rear of each speaker, carefully hang each
speaker on a screw or nail.
Do not let children play with or near the speakers. They could get hurt if a speaker falls.
When connecting the speaker wires to the speakers, make sure that the polarity (+/ –) is correct.
Keep the subwoofer speaker out of reach of children to prevent children from inserting their hands or alien
substances into the duct (hole) of the subwoofer speaker.
Do not hang the subwoofer on the wall
by
the duct (hole).
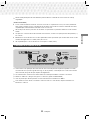
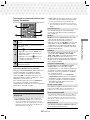
Connecting to a Network Router
SURROUND
L
SURROUND
R
Broadband
service
Broadband
service
Broadband
modem
Router
Or
Broadband modem (with integrated router)
✎
Your router or your Internet Service Provider's policies may prevent the product from accessing Samsung's
software update server. If this occurs, contact your Internet Service Provider (ISP) for more information.
✎
DSL users, please use a router to make a network connection.
✎
Use Cat 7 (*STP Type) cable for the connection. (* Shielded Twist Pair)
✎
You cannot use the product if the network speed is slower than 10Mbps.
✎
To use the DLNA function, you must connect a PC to the network as shown in the figure.

12 - English
Connections
Connecting to a TV and External Devices
OPTICAL OUT
AUDIO OUT
HDMI IN (ARC)
SURROUND
L
SURROUND
R
Method 1 Method 2
R
Red
W
White
External Devices
Connecting to a TV
Connect an HDMI cable (not supplied) from the HDMI OUT jack on the back of the product to the HDMI IN jack
on your TV. If the TV supports ARC, you can hear the audio from your TV through the home theater with only
this cable connected. See page 16 in this manual and the section on ARC in your TV's user's manual for
details.
Connecting to External Devices
To select the correct mode for an external device after you have connected the device, press the FUNCTION
button. Each time you press the button, the mode changes in this order :
BD/DVD
D. IN
AUX
FM
BT
Two methods of connecting external devices to your home theater are explained below.
Method 1 AUX IN : Connecting an External Analog Component
Using an RCA audio cable (not supplied), connect the AUDIO In jack on the product to the AUDIO Out jack on
the external analog component.
Select the AUX mode.
• Be sure to match the colors on the cable plugs to the colors on the input and output jacks.
Method 2 OPTICAL : Connecting an External Digital Audio Component
Use to connect the digital audio output of digital signal components such as Cable Boxes and Satellite
Receivers (Set-Top-Boxes): Using a digital optical cable (not supplied), connect the Optical Digital Audio In jack
on the product to the Digital Optical Out jack of the external digital device using a digital optical cable.
Select the D. IN mode.
✎
To see video from your Cable Box/Satellite receiver, you must connect its video output directly to your TV.
✎
This system supports Digital sampling frequencies of 32 kHz or higher from external digital components.
✎
This system supports only DTS and Dolby Digital audio. MPEG audio, a bitstream format, is not supported.

13 - English
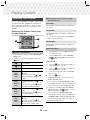
Settings
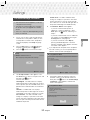
The Initial Settings Procedure
• The Home menu will not appear if you do not
configure the initial settings.
• The OSD (On Screen Display) may change in
this product after you upgrade the software
version.
• The access steps may differ depending on the
menu you selected.
1. Turn on your TV after connecting the product,
and then turn on the product. When you turn
on the product for the first time, the product
automatically displays the Setup Language
screen.
2. Press the ▲▼ buttons to select the desired
language, and then press the
E
button.
3. Press the
E
button to start function setup.
Setup
TV Aspect and Network will be set.
Each setting may be changed later under "Settings"
a
Previous
"
Select
Start
4. The TV Aspect Ratio screen appears. Press
the ▲▼ buttons to select a TV aspect ratio, and
then press the
E
button.
You have four choices:
16:9 Original - For widescreen TVs. Displays
widescreen pictures in their original 16:9 format
and 4:3 pictures (the old, standard format) in 4:3
pillar box format with black bars on the left and
right.
16:9 Full - For widescreen TVs. Displays
widescreen pictures in their original 16:9 format
and expands 4:3 pictures to fill the 16:9 screen.
4:3 Letter Box - For older, standard screen,
analog TVs. Displays 4:3 pictures in full screen
and 16:9 pictures in letter box format that retains
the 16:9 aspect ratio but puts black bars above
and below the picture.
4:3 Pan-Scan - For older, standard screen,
analog TVs. Displays 4:3 pictures in full screen
and 16:9 pictures in Pan-Scan format that fills
the screen, but cuts off the left and right sides of
the picture and enlarges the middle vertically.
5. The Network - Wired screen appears.
- If you have a network with dynamic IP
addresses - and most people do - select
Auto, press the
E
button, and then go to
Step 6.
- If you have a network with static IP addresses,
we suggest you select Skip by pressing the
BLUE (D) button. (See page 19)
- If you have no network, select Skip by
pressing the
BLUE (D) button. The Initial
Settings Complete screen appears, and then
the Home screen appears.
✎
If you skip network setup here or the setup does
not work correctly, you can set up the product's
network connection later. (See page 19)
Setup | Network - Wired
Auto Manual
Choose the method to configure Internet Protocol (IP). Please make sure that the Ethernet
cable is connected.
Auto : Configure IP automatically.
a Previous d Skip < Move " Select
6. The product verifies the network connection
and then connects to the network. When it is
done, press the
E
button. The "Initial settings
completed." screen appears, and then the
Home screen appears.
㾎
㾎
㾎
㾎
Setup | Network - Wired
MAC Address (d0:66:7b:dc:28:fc)
IP Address, Subnet Mask, Gateway, DNS Server
Gateway Ping
Internet Service Test
" Select
OK
Your network is operating properly. If you still have a network problem, contact your
network service provider.
Settings

14 - English
Settings
✎
If you want to display the Setup screen again and
make changes, select the Reset option.
(See page 17)
✎
If you use an HDMI cable to connect the product
to an Anynet+ (HDMI-CEC)-compliant Samsung
TV and 1.) You have set the Anynet+ (HDMI-CEC)
feature to On in both the TV and the product and
2.) You have set the TV to a language supported
by the product, the product will select that
language as the preferred language automatically.
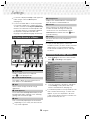
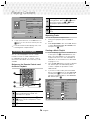
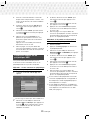
The Home Screen at a Glance
PLAY DISC
App 1 App 2 App 3 App 4
Change
Device
Function
No Disc
Settings
PHOTOS VIDEOS MUSIC
1
345678
2
Vewd App
Store
More
1
PLAY DISC
The disc currently in the tray is displayed.
Press
E
to start playing the disc.
2
PHOTOS/VIDEOS/MUSIC
Play photos, videos, or music content from a
Disc, USB, PC, or mobile device.
3
Apps
Access various for pay or free-of-charge
applications.
4
Vewd App Store
Access the on-line Vewd App Store where you will
find high-quality video streaming, music streaming,
gaming, and social network apps.
5
More
A list of useful and popular apps we recommend.
✎
Depending on your country, this menu function
may not be supported.
6
Change Device
Displays a list of external devices connected to the
main unit. Switch to the desired device.
7
Function
Use for switching to an external device, and
for radio and mode switching for a Bluetooth
connection. You can use the remote control’s
FUNCTION button and the main unit’s button
for mode switching.
8
Settings
Set various functions to suit your personal
preferences.
✎
To play or view video, photo, or music files
located on your PC, you must connect your home
theater and PC to a home network and have
DLNA software installed on your PC. See page
21 and 31.
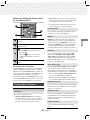
Accessing the Settings Screen
1. Select Settings on the Home screen, and then
press
E
. The Settings screen appears.
Settings
Picture
Sound
Network
System
Language
Security
General
Support
3D Settings
TV Aspect Ratio : 16:9 Original
BD Wise : Off
Resolution : Auto
Movie Frame (24Fs) : Off
HDMI Color Format : Auto
HDMI Deep Color : Off
Progressive Mode : Auto
2. To access the menus, sub-menus, and options
on the Settings screen, please refer to the
remote control illustration. (See page 15)
✎
If you leave the product in the stop mode for more
than 5 minutes without using it, a screen saver
appears on your TV. If the product is left in the
screen saver mode for more than 20 minutes, the
power automatically turns off.

15 - English
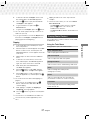
Settings
Buttons on the Remote Control Used
for the Settings Menu
TOOLS
RETURN
EXIT
INFO
SUBTITLE HOME REPEAT
TUNER
24
3
1
1
HOME Button : Press to move to the Home
screen.
2
RETURN Button : Press to return to the
previous menu.
3
E
(
ENTER) / DIRECTION Button :
• Press
▲▼◄►
to move the cursor or
select an item.
• Press the
E
button to activate the
currently selected item or confirm a
setting.
4
EXIT Button : Press to exit the current
menu.
Detailed Function Information
Each Settings function, menu item, and individual
option is explained in detail on-screen. To view an
explanation, use the ▲▼◄► buttons to select the
function, menu item, or option. The explanation will
usually appear on the bottom of the screen.
A short description of each Settings function starts
on this page. Additional information on some of the
functions is also in the Appendix of this manual.
Settings Menu Functions
Picture
3D Settings
Set up the 3D related functions.
3D Blu-ray Playback Mode: Select whether to
play a Blu-ray Disc with 3D contents in 3D Mode.
If you move to the Home menu while in 3D mode,
the product will switch to 2D automatically.
Screen Size: Enter the size of the TV attached to
the product. The product will automatically adjust
the 3D output to the screen size of the TV.
✎
Carefully read the health and safety information
before viewing 3D content. (See page 4)
TV Aspect Ratio
Lets you adjust the output of the product to the
screen size of your TV. (See page 33)
BD Wise
BD Wise is Samsung’s latest inter-connectivity
feature. When you connect a Samsung product
and a Samsung TV with BD Wise to each other
via HDMI, and BD Wise is on in both the product
and TV, the product outputs video at the video
resolution and frame rate of the Blu-ray/DVD Disc.
Resolution
Lets you set the output resolution of the HDMI
video signal to BD Wise, Auto, 1080p, 1080i,
720p, 480p. The number indicates the number
of lines of video per frame. The i and p indicate
interlaced and progressive scan, respectively. The
more lines, the higher quality.
Movie Frame (24Fs)
Setting the Movie Frame (24Fs) feature to Auto
lets the product adjust its HDMI output to 24
frames per second automatically for improved
picture quality if attached to a 24Fs compatible TV.
• You can enjoy the Movie Frame (24Fs) feature
only on a TV supporting this frame rate.
• Movie Frame is only available when the product
is in the HDMI 1080p output resolution modes.
HDMI Color Format
Lets you set the color space format for the HDMI
output to match the capabilities of the connected
device (TV, monitor, etc).
HDMI Deep Color
Lets you set the product to output video from
the HDMI OUT jack with Deep Color. Deep Color
provides more accurate color reproduction with
greater color depth.
Progressive Mode
Lets you improve picture quality when viewing
DVDs.

16 - English
Settings
Sound
Speaker Settings
Lets you adjust the following speaker settings and
turn the speaker test on and off so you can test
the speakers.
Level
: Lets you adjust the relative loudness of
each speaker from 6dB to -6dB. For example, if
you like deep bass, you can increase the loudness
of the subwoofer by 6db.
Distance
: Lets you adjust the relative distance
of each speaker from the listening position up to
30 feet. The farther the distance, the louder the
speaker will be.
Speaker Test
: Lets you run the Speaker Test
function so you can test your adjustments. Setting
Speaker Test to On turns the Speaker Test on.
Setting it to Off turns it off.
Speaker Selection
Lets you select which speakers you want active,
either the TV's speakers or the home theater's
speakers.
Equalizer Mode
Set Equalizer Mode on to use the equalizer.
Equalizer Settings
Lets you set the equalizer.
✎
Equalizer Settings only appears when
Equalizer Mode is On.
Audio Return Channel
Lets you direct the sound from the TV to the Home
Theater speakers. Requires an HDMI connection
and an Audio Return Channel (ARC) compatible
TV.
• If Audio Return Channel is set to on and you
are using an HDMI cable to connect the product
to the TV, digital optical input will not work.
• If Audio Return Channel is set to Auto and you
are using an HDMI cable to connect the product
to the TV, ARC or digital optical input is selected
automatically.
Digital Output
Lets you set the Digital Output to match the
capabilities of the AV receiver you’ve connected to
the product. For more details, please refer to the
digital output selection table. (See page 38)
Dynamic Range Control
Lets you apply dynamic range control to Dolby
Digital, Dolby Digital Plus, and Dolby TrueHD audio.
Auto:
Automatically controls the dynamic range of
Dolby TrueHD audio, based on information in the
Dolby TrueHD soundtrack. Also turns dynamic range
control off for Dolby Digital and Dolby Digital Plus.
Off: Leaves the dynamic range uncompressed,
letting you hear the original sound.
On: Turns dynamic range control on for all three
Dolby formats. Quieter sounds are made louder
and the volume of loud sounds is reduced.
Downmixing Mode
Lets you select the multi-channel downmix method
that is compatible with your stereo system. You
can choose to have the product downmix to
Normal Stereo or to Surround Compatible.
Audio Sync
When the product is attached to a digital TV, lets
you adjust the audio delay so that the audio syncs
with the video. You can set the delay between 0
and 300 milliseconds.
Network
Wired Network Settings
For more information about this function, see page
19.
Network Test
Lets you test the Internet Protocol setup to see if it
is working correctly.
Network Status
Lets you check the current network and Internet
status.
Device Name
Lets you assign an identifying name to the product.
You use this name to identify the product when you
are connecting external devices (smart phones,
tablets, etc.) to it.

17 - English
Settings
BD-Live Internet Connection
Lets you allow or prohibit an Internet connection
for the BD-Live service.
System
Setup
Lets you re-run the Setup procedure.
(See page 13)
Quick Start
You can turn on the power quickly by decreasing
the boot time.
✎
If this function is set to On, Standby power
consumption will be increased. (About 12W ~
20W)
Anynet+ (HDMI-CEC)
Anynet+ is a convenient function that offers linked
operations with other Samsung products that have
the Anynet+ feature and lets you control those
products with one Samsung TV remote. To operate
this function, you must connect this product to an
Anynet+ Samsung TV using an HDMI cable.
BD Data Management
Lets you manage the contents you downloaded
through a Blu-ray disc that supports the BD-Live
service. You can view information about the USB
device you are using for BD Live data storage
including the available storage space. You can also
delete BD Live data and change the device.
Language
Lets you select the language you prefer for the On-
Screen Menu, Disc Menu, etc.
• The selected language will only appear if it is
supported on the disc.
Security
The default PIN is 0000. Enter the default PIN to
access the security function if you haven't created
your own PIN.
BD Parental Rating
Prevents playback of Blu-ray Discs with a rating
equal to or above a specific age rating unless you
enter the PIN.
DVD Parental Rating
Prevents playback of DVDs with a rating above a
specific numerical rating unless you enter the PIN.
Change PIN
Changes the 4-digit PIN used to access security
functions.
General
Time Zone
Lets you specify the time zone that is applicable to
your area.
Support
Software Upgrade
For more information about this function, see page
20.
Contact Samsung
Provides contact information for assistance with
your product.
Terms of Service Agreement
View the general disclaimer regarding third party
contents and services.
Reset
Reverts all settings to their defaults except for the
network. Requires that you enter your security PIN.
The default security PIN is 0000.

18 - English
Settings
Radio Setup
• To listen to the radio, you must connect the
supplied FM antenna.
Operating the Radio with the Remote Control
1. Press the FUNCTION button to select FM.
2. Tune to the desired station.
• Preset Tuning 1 : Press the
5
button to
select PRESET, and then press the TUNING
UP, DOWN button to select a preset station.
- Before you can tune to preset stations, you
must add preset stations to the product's
memory.
• Manual Tuning : Press the
5
button to
select MANUAL, and then press the TUNING
UP, DOWN button to tune in to a lower or
higher frequency.
• Automatic Tuning : Press the
5
button to
select MANUAL, and then press and hold
the
TUNING UP, DOWN button for a few
seconds to automatically search the band.
Selecting Mono or Stereo
Press the MO/ST button.
• Each time you press the button, the sound switches
between STEREO and MONO.
• In a poor reception area, select MONO for a clear,
interference-free broadcast.
Presetting Stations
Example : Presetting FM 89.10 into memory.
1. Press the
FUNCTION button to select FM.
2. Press the TUNING UP, DOWN button to scroll
the FM frequencies, and then select <89.10>.
3. Press the TUNER MEMORY button (the yellow
C button at the bottom of the remote).
4. Press the
TUNER MEMORY button again
within about 5 seconds. The station is stored in
memory.
✎
If you press the
TUNER MEMORY
button
repeatedly without changing the station, the
inputted station may be overwritten.
5. To preset another station, repeat steps 2 to 4.
• To tune in to a preset station, press the
TUNING UP, DOWN button.
✎
To delete all Preset FM stations at once, press the
TITLE MENU button for about 5 seconds in FM
Manual mode until DEFAULT PRESET appears
on the display.
Recording FM Radio
You can record your favorite radio broadcast on a
USB storage device.
1. Insert a USB device into the USB jack on the
front of the product.
2. Press the
FUNCTION button to select FM, and
then press the TUNING UP, DOWN button to
select the station you want to record.
3. Press the RED (A) button to start recording. The
recording process begins.
• The recorded time is displayed on the left and
the recording time still available, based on
the amount of free space in the USB storage
device, is displayed on the right.
4. Press the
EXIT button to finish your recording.
The recording is stopped and saved as an .mp3
file at the same time. To play the recorded file,
refer to "Playing Files on a USB Device".
✎
The recorded file is saved in the Tuner folder which
is created automatically.
✎
Only the ( OPEN/CLOSE), ( POWER), EXIT,
MUTE, and VOLUME +/-, buttons are operable
while FM radio is being recorded.
✎
If you don't press any buttons while recording, the
screen saver will be enabled.
✎
Sound effects, such as DSP, EQ, etc., are not
recorded during FM radio recording.
✎
The radio is recorded at a set, default volume
even if you change the volume or press the
MUTE
button during the recording process.
✎
If you remove the USB device or Power Cable
during the recording process, the portion of the
file which has already been recorded may not play
back.
✎
Recording will not start if the remaining free space
in the USB storage device is less than 2MB.
✎
If the USB device is removed or has insufficient
space (under 2MB), the appropriate message is
displayed and the recording stops.

19 - English
Settings
Network Setup
When you connect this product to a network, you
can use network based applications and functions
such as BD-LIVE and upgrade the product's software
through the network connection.
Configuring Your Network Connection
If you skipped network setup during the Initial Setup,
follow the instructions below to configure the home
theater's network connection.
Before you begin, contact your ISP to find out if your
IP address is static or dynamic. If it is dynamic, we
recommend you use the automatic procedure below.
If it is static, you must use the manual procedure that
follows.
• Before you begin, confirm that the product is
connected to your router with a network cable.
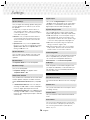
Automatic
To start the configuration process, follow these steps:
1. In the Home menu, select Settings, and then
press the
E
button.
2. Select Network, and then press the
E
button.
3. Select Wired Network Settings, and then press
the
E
button.
The Wired Network Settings screen appears.
4. Press the
+
button on the Internet Protocol
Setup menu.
Use
%
button to select Auto, and then press
the
E
button.
Settings
Picture
Sound
Network
System
Language
Security
General
Support
0000
0
0000
0000
000
Wired Network Settings
Internet Protocol Setup : Auto
IP Address :
Subnet Mask :
Gateway :
DNS : Auto
DNS Server :
> Move " Select ' Return
5. The Network function acquires and fills in the
values for IP Address, Subnet Mask, etc.,
automatically.
6. After the Network function has acquired the
network values, press the RETURN button.
7. Select Network Test, and then press
E
. The
home theater validates the network connection.
When it is done, press the
RETURN button.
Manual
If you have a static IP address or the Automatic
procedure does not work, you’ll need to set the Network
Settings values manually. You can get the Network
Settings from your Internet Service Provider (ISP).
Settings
Picture
Sound
Network
System
Language
Security
General
Support
0000
255 255 255
0
0000
0000
Wired Network Settings
Internet Protocol Setup : Manual
IP Address :
Subnet Mask :
Gateway :
DNS : Manual
DNS Server :
> Move " Select ' Return
1. Follow the first four steps in the Automatic
procedure, but select Manual instead of Auto in
Step 4.
2. Press the
▼
button to go to the first entry field (IP
Address).
3. Use the number buttons on your remote to enter
numbers.
4. When done with each field, use the ► button to
move successively to the next field.
You can also use the other arrow buttons to
move up, down, and back.
5. Enter the IP Address, Subnet Mask, and
Gateway values.
6. Press the ▼ button to go to DNS.
7. Press the ▼ button to go to the first DNS entry
field. Enter the numbers as above.
8. Press the
RETURN button on your remote.

20 - English
Settings
9. Select Network Test, and then press
E
.
When the test is completed, press the
RETURN
button to exit to the previous screen.
10. Select Network Status, and then press
E
.
11. The Network Status screen appears.
The product verifies the network connection and
then connects to the network. When it is done,
highlight OK, and then press
E
.
Upgrading Software
The Software Upgrade menu allows you to upgrade
the product’s software for performance improvements
or additional services.
• Never turn the product off or back on manually
during the update process.
• The update is complete when the product turns
off after restarting. Press the
POWER button to
turn on the updated product for your use.
• Samsung Electronics takes no legal
responsibility for product malfunction caused by
an unstable Internet connection or consumer
negligence during a software upgrade.
1. In the Home menu, select Settings, and then
press the
E
button.
2. Select Support, and then press the
E
button.
3. Select Software Upgrade, and then press the
E
button.
4. Select one of the following methods:
• By Online
• By USB
• Auto Upgrade Notification
5. Press the
E
button.
Directions for each method begin below.
✎
If you want to cancel the upgrade while the
upgrade software is downloading, press the
E
button.
By Online
Your product must be connected to the Internet to
use the By Online function. Remove all discs before
you begin.
1. Select By Online, and then press the
E
button. The Connecting to Server message
appears.
2. If an update is available, a popup message
appears asking if you want to upgrade. If you
select Yes, the product turns off automatically,
turns on, and then begins the upgrade.
3. The update progress popup appears. When
the update is completed, the product turns off
automatically again.
4. Press the
POWER button to turn on the
product.
By USB
1. Visit Samsung's website on a computer and
download the update package to a USB device.
✎
Save the update package in the USB device's
top-level folder. Otherwise, the product will not be
able to locate the update package.
2. Connect the USB device with the update
package to the product.
3. Select Support > Software Upgrade >
By USB. The software is updated using the
update package on the USB device.
✎
There should be no disc in the product when you
upgrade the software using the USB Host jack.
✎
When the software upgrade is done, check the
software details in the Software Upgrade menu.
La page est en cours de chargement...
La page est en cours de chargement...
La page est en cours de chargement...
La page est en cours de chargement...
La page est en cours de chargement...
La page est en cours de chargement...
La page est en cours de chargement...
La page est en cours de chargement...
La page est en cours de chargement...
La page est en cours de chargement...
La page est en cours de chargement...
La page est en cours de chargement...
La page est en cours de chargement...
La page est en cours de chargement...
La page est en cours de chargement...
La page est en cours de chargement...
La page est en cours de chargement...
La page est en cours de chargement...
La page est en cours de chargement...
La page est en cours de chargement...
La page est en cours de chargement...
La page est en cours de chargement...
La page est en cours de chargement...
La page est en cours de chargement...
La page est en cours de chargement...
La page est en cours de chargement...
La page est en cours de chargement...
La page est en cours de chargement...
La page est en cours de chargement...
La page est en cours de chargement...
La page est en cours de chargement...
La page est en cours de chargement...
La page est en cours de chargement...
La page est en cours de chargement...
La page est en cours de chargement...
La page est en cours de chargement...
La page est en cours de chargement...
La page est en cours de chargement...
La page est en cours de chargement...
La page est en cours de chargement...
La page est en cours de chargement...
La page est en cours de chargement...
La page est en cours de chargement...
La page est en cours de chargement...
La page est en cours de chargement...
La page est en cours de chargement...
La page est en cours de chargement...
La page est en cours de chargement...
La page est en cours de chargement...
La page est en cours de chargement...
La page est en cours de chargement...
La page est en cours de chargement...
La page est en cours de chargement...
La page est en cours de chargement...
La page est en cours de chargement...
La page est en cours de chargement...
La page est en cours de chargement...
La page est en cours de chargement...
La page est en cours de chargement...
La page est en cours de chargement...
La page est en cours de chargement...
La page est en cours de chargement...
La page est en cours de chargement...
La page est en cours de chargement...
La page est en cours de chargement...
La page est en cours de chargement...
La page est en cours de chargement...
La page est en cours de chargement...
La page est en cours de chargement...
La page est en cours de chargement...
-
 1
1
-
 2
2
-
 3
3
-
 4
4
-
 5
5
-
 6
6
-
 7
7
-
 8
8
-
 9
9
-
 10
10
-
 11
11
-
 12
12
-
 13
13
-
 14
14
-
 15
15
-
 16
16
-
 17
17
-
 18
18
-
 19
19
-
 20
20
-
 21
21
-
 22
22
-
 23
23
-
 24
24
-
 25
25
-
 26
26
-
 27
27
-
 28
28
-
 29
29
-
 30
30
-
 31
31
-
 32
32
-
 33
33
-
 34
34
-
 35
35
-
 36
36
-
 37
37
-
 38
38
-
 39
39
-
 40
40
-
 41
41
-
 42
42
-
 43
43
-
 44
44
-
 45
45
-
 46
46
-
 47
47
-
 48
48
-
 49
49
-
 50
50
-
 51
51
-
 52
52
-
 53
53
-
 54
54
-
 55
55
-
 56
56
-
 57
57
-
 58
58
-
 59
59
-
 60
60
-
 61
61
-
 62
62
-
 63
63
-
 64
64
-
 65
65
-
 66
66
-
 67
67
-
 68
68
-
 69
69
-
 70
70
-
 71
71
-
 72
72
-
 73
73
-
 74
74
-
 75
75
-
 76
76
-
 77
77
-
 78
78
-
 79
79
-
 80
80
-
 81
81
-
 82
82
-
 83
83
-
 84
84
-
 85
85
-
 86
86
-
 87
87
-
 88
88
-
 89
89
-
 90
90


Samsung HT-J4500 Manuel utilisateur
- Catégorie
- Lecteurs Blu-Ray
- Taper
- Manuel utilisateur
dans d''autres langues
- English: Samsung HT-J4500 User manual
Documents connexes
-
Samsung HT-J4530 Manuel utilisateur
-
-
Samsung HTF5500 Manuel utilisateur
-
-
-
-
-
-
Samsung HT-F4500 Manuel utilisateur
-
