Legrand LMSM-3E/6E Network Supervisor Setup Mode d'emploi
- Taper
- Mode d'emploi

Wattstopper
®
Segment Manager Supervisor Setup Guide
No: 24821 – 06/17 rev. 1
Catalog Numbers • Les Numéros de Catalogue • Números de Catálogo: LMSM-3E/LMSM-6E
Country of Origin: Made in China • Pays d’origine: Fabriqué en Chine • País de origen: Hecho en China
INTRODUCTION
The purpose of this document is to describe the steps needed to connect the Segment Manager Supervisor software to one or more
LMSM-3E or LMSM-6E Segment Managers.
Before beginning this process, you must have properly installed the Workbench and Supervisor applications on the PC used for
monitoring/controlling the DLM devices on your BACnet network. You must also have already installed and discovered the individual
Segment Managers on the network, and imported any LMCS files into the appropriate Segment Managers.
There are four main tasks required to connect the Supervisor with one or more Segment Managers and enable proper communication
between them. The steps to complete each part are described in this document:
• Configure the Supervisor to Connect to a Remote Segment Manager.
• Configure a Remote Segment Manager to Connect to the Supervisor.
• Set Up a Remote Segment Manager to Export Points to the Supervisor.
• Sync the Supervisor with a Remote Segment Manager.
For each separate remote Segment manager, you must complete all of the steps.
NOTE: While it is possible to connect to multiple Segment Managers in the first section before moving on to the second section,
Wattstopper recommends that you complete the entire connection process for each Segment Manager one at a time to avoid
potential confusion, particularly with regard to configuring SSL certificates.
CONFIGURE THE SUPERVISOR TO CONNECT TO A REMOTE SEGMENT MANAGER
In the following steps, you configure the Supervisor to communicate with one or more remote Segment Managers.
1. Open the Workbench application.
a. Record (write down) the station name of the remote Segment Manager.
NOTE: The Segment Manager station should already be discovered, with the room names renamed and the LMCS file
imported through the Segment Manager web application.
b. Record the IP address of the remote Segment Manager.
c. Record the IP address of the Supervisor.
2. Open/Connect to the Supervisor Station (not the Station for a remote Segment Manager).
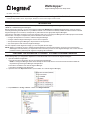
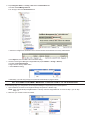
3. Expand Station -> Config -> Drivers . Double-click Niagara Network.

2
4. In the “Database” view on the right, click New.
5. Select OK in the New popup dialog.
6. Define the new Niagara station settings (These are settings of the remote Segment Manager.
Use the name and IP address that you wrote down in Step 1.)
a. Enter the Station Name.
This must completely match the Segment Manager station name (NOTE: It is case sensitive).
b. Enter the Segment Manager IP Address.
c. Change Fox Port to “4911”.
d. Set Use Foxs to “true”.
e. Enter the Username as “lmem_link”.
f. Set the Password to “w@ttstopper”.
g. Ensure Enabled is set to “true”.
h. Click OK to add the station to the Database
7. After creating the connection, the device will ping and show as “failed” and “down”.
This is because the SSL certificate is not yet in the Allowed Hosts section of the CertManagerService.

3
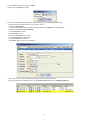
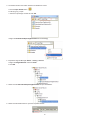
8. Expand Supervisor Station -> Config -> Services -> PlatformServices.
a. Double-click CertManagerService.
b. On the right, select the Allowed Hosts tab.
c. Select the “Unapproved” certificate from the list that matches the IP address of the newly added station.
If you have never connected to this device from the supervisor before, it should be flagged with a red shield.
If you have connected to this device before and just need to re-validate the certificate, it will be flagged with a yellow shield, as
shown in the screenshot below.
d. If this is the first connection attempt, click Approve after selecting the device from the list.
This option is only available on first-time connections.
e. If this is a key revalidation, double-click the certificate and click Accept in the Detected Public Key Change window.
9. Go back to the NiagaraNetwork (Expand Station -> Config -> Drivers).
a. Double-click Niagara Network
b. Right-click the recently added station
c. Select Actions -> Ping.
d. Alternately, if you wait long enough, the system will automatically re-ping the device.

4
CONFIGURE A REMOTE SEGMENT MANAGER TO CONNECT TO THE SUPERVISOR
Next, you must configure the remote Segment Manager to communicate with the Supervisor application.
1. Open/connect to the Segment Manager Station.
2. Expand Station -> Config -> Drivers. Double-click Niagara Network.
3. Because a connection has been made from the Supervisor, the station Status should show “{disabled}” in the Database view on
the right.
4. Double-click the station name to edit the properties
a. Enter the IP Address of the Supervisor station. (This is the address you wrote down in step 1 in the first section.)
b. Enter the Username as “lmem_link”.
c. Set the Password to “w@ttstopper”.
d. Set Enabled to “true”.
e. Click OK.
5. After creating the connection, the device will ping and show as “failed” and “down”. This is because the SSL certificate is not in the
Allowed Hosts section of the CertManagerService.

5
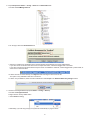
6. Expand Segman Station -> Config -> Services -> PlatformServices.
a. Double-click CertManagerService.
b. On the right, select the Allowed Hosts tab.
c. Select the “Unapproved” certificate from the list that matches the IP address of the newly added station.
d. Click Approve, then click Yes in the confirmation dialog.
7. Go back to the Segment Manager’s NiagaraNetwork (expand Station -> Config -> Drivers).
a. Double-click Niagara Network.
b. Right-click the recently added station.
c. Select Actions -> Ping.
d. Alternately, if you wait long enough, the system will automatically re-ping the device.
SET UP A REMOTE SEGMENT MANAGER TO EXPORT POINTS TO THE SUPERVISOR
In the following steps, you configure the remote Segment Manager to export data points to the Supervisor.
1. Open a Platform connection to the Segment Manager and perform a “Station Copy”
NOTE: If the “SubordinateExportTagNetworkExt” is already under the “NiagaraNetwork” as shown in Step 3, you can skip
Steps 1-3.
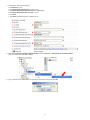
2. Make sure your “Palette” window is enabled.

6
3. The window will be in the bottom-left of the AX Workbench screen
a. Click the Open Palette button.
b. Filter by typing “export”.
c. Select the “exportTags” module and click OK.
d. Right-click SubordinateExportTagNetworkExt and select Copy.
4. Expand the Segment Manager Station -> Config -> Drivers.
a. Right-click NiagaraNetwork and select Paste.
b. Click OK.
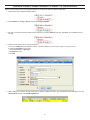
5. Double-click the SubordinateExportTagNetworkExt to open its Database.
6. Double-click the Station Name to open the Properties window.

7
7. Configure the Join Profile as follows:
a. Set Enabled to “true”.
b. Enter Default Subordinate User as “lmem_link”.
c. Set Default Subordinate User Password to “w@ttstopper”.
d. Set Default Subordinate Use Fox SSL to “true”.
e. Click Save.
f. The Status should change from “disabled” to “ok”.
8. Right-click the SubordinateExportTagNetworkExt and select Actions -> Set All Supervisor Station Names.
Then, click Yes in the confirmation dialog.
9. Type in the Supervisor station Name (or select from drop-down menu), then click OK.

8
SYNC THE SUPERVISOR WITH A REMOTE SEGMENT MANAGER
Once the remote Segment Manager is set to export points, the final process is to import the values from the Segment Manager into the
Supervisor, by Syncing the two.
1. In your web browser, connect to the Supervisor User Interface by typing the Supervisor’s IP Address in the address bar.
2. Log in, click Configure to enter Configuration Mode, then click the Connections tab.
3. Locate the desired Segment Manager station from the list and click Sync.
4. Click the Jobs tab to monitor the status of the Sync/Join and confirm it finishes correctly.
This process will take some time depending on the size of the station.
5. Once the Sync job is complete, return to the Connections tab, locate the same station again, and click Groups.
6. Click the Jobs tab to monitor the status of the Groups process and confirm it finishes correctly.
This process typically finishes much faster than the Sync process

800.879.8585
www.legrand.us/wattstopper
No. 24821 – 06/17 rev. 1
© Copyright 2017 Legrand All Rights Reserved.
© Copyright 2017 Tous droits réservés Legrand.
© Copyright 2017 Legrand Todos los derechos reservados.
Wattstopper warranties its products to be free
of defects in materials and workmanship for a
period of one (1) years. There are no obligations
or liabilities on the part of Wattstopper for
consequential damages arising out of, or in
connection with, the use or performance of this
product or other indirect damages with respect
to loss of property, revenue or profit, or cost of
removal, installation or reinstallation.
Wattstopper garantit que ses produits sont
exempts de défauts de matériaux et de fabrication
pour une période de un (1) ans. Wattstopper ne
peut être tenu responsable de tout dommage
consécutif causé par ou lié à l’utilisation ou
à la performance de ce produit ou tout autre
dommage indirect lié à la perte de propriété, de
revenus, ou de profits, ou aux coûts d’enlèvement,
d’installation ou de réinstallation.
Wattstopper garantiza que sus productos están
libres de defectos en materiales y mano de obra por
un período de un (1) año. No existen obligaciones
ni responsabilidades por parte de Wattstopper
por daños consecuentes que se deriven o estén
relacionados con el uso o el rendimiento de este
producto u otros daños indirectos con respecto a
la pérdida de propiedad, renta o ganancias, o al
costo de extracción, instalación o reinstalación.
WARRANTY INFORMATION INFORMATIONS RELATIVES À LA GARANTIE INFORMACIÓN DE LA GARANTÍA
7. Lastly, click the Config tab.
a. Click LMCS-100 Import.
b. Browse to the saved LMCS file for the desired building/panel.
c. Click Submit.
d. The Jobs tab will automatically be selected and you can confirm that the process completes correctly.
-
 1
1
-
 2
2
-
 3
3
-
 4
4
-
 5
5
-
 6
6
-
 7
7
-
 8
8
-
 9
9


Legrand LMSM-3E/6E Network Supervisor Setup Mode d'emploi
- Taper
- Mode d'emploi
dans d''autres langues
Documents connexes
-
Legrand Segment Manager Supervisor Niagara AX 38 Setup Mode d'emploi
-
-
-
-
Autres documents
-
SBC Saia PCD® Supervisor V1.2 Le manuel du propriétaire
-
-
-
-
 Seasonal Designs CF112 Manuel utilisateur
-
3com SuperStack 3 4950 Getting Started Manual
