Tefal BL800G - Mastermix Le manuel du propriétaire
- Catégorie
- Mélangeurs
- Taper
- Le manuel du propriétaire

VI
MS
ZH
TH
ID
FR
EN
KO


1
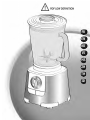
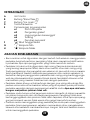
DESCRIPTION
FR
A Bloc moteur
B Touche " Smoothies"
C Touche " Ice crush"
D Bouton rotatif
E Ensemble bol mixeur
e1 Bloc lames
e2 Joint d’étanchéité
e3 Bol mixeur gradué
e4 Couvercle
e5 Bouchon doseur
F " " Mode veille
G " " Vitesse « Min »
H " " Vitesse « Max »
CONSIGNES DE SÉCURITÉ
• Lisez attentivement le mode d’emploi avant la première utilisation de votre
appareil : une utilisation non conforme au mode d’emploi dégagerait le
fabricant de toute responsabilité.
• Cet appareil n’est pas prévu pour être utilisé par des personnes (y compris
les enfants) dont les capacités physiques, sensorielles ou mentales sont
réduites ou des personnes dénuées d’expérience ou de connaissance, sauf
si elles ont pu bénéficier, par l’intermédiaire d’une personne responsable de
leur sécurité, d’une surveillance ou d’instructions préalables concernant
l’utilisation de l’appareil. Il convient de surveiller les enfants pour s’assurer
qu’ils ne jouent pas avec l’appareil.
• L’appareil est conçu pour fonctionner uniquement en courant alternatif.
Vérifiez que la tension d’alimentation indiquée sur la plaque signalétique de
l’appareil correspond bien à celle de votre installation électrique.
Toute
erreur de branchement annule la garantie.
• Ce produit est exclusivement destiné à un usage domestique et culinaire, et
à l’intérieur de la maison. Le fabricant décline toute responsabilité et se
réserve le droit de résilier la garantie en cas d’utilisation commerciale ou
inadaptée, ou de non-respect des consignes.
• Pensez à débrancher l’appareil de l’alimentation, si vous devez le laisser
sans surveillance, avant de placer ou d’enlever les accessoires ou avant de
le nettoyer.
Ne tirez jamais sur le cordon pour débrancher l’appareil.
0

2
• N’utilisez pas votre appareil s’il ne fonctionne pas correctement, s’il a été
endommagé ou si le câble d’alimentation ou la fiche sont endommagés.
Afin d’éviter tout danger, faites-les obligatoirement remplacer par un centre
service agréé (voir liste dans le livret service).
• Toute intervention autre que le nettoyage et l’entretien usuel par le client
doit être effectuée par un centre service agréé.
• Ne mettez pas l’appareil, le câble d’alimentation ou la fiche dans du
liquide.
• Ne laissez pas le câble d’alimentation à portée de mains des enfants, être à
proximité ou en contact avec les parties chaudes de l’appareil, près d’une
source de chaleur ou sur un angle vif.
• Pour votre sécurité, n’utilisez que des accessoires et des pièces détachées
adaptés à votre appareil, vendus en centres de service après-vente agréés.
•
Les lames sont très coupantes : manipulez-les avec précaution pour ne
pas vous blesser, lors du vidage du bol, du montage / démontage des
lames sur le bol, et lors du nettoyage.
• N’utilisez jamais le bol mixeur sans ingrédients, ni avec des ingrédients solides
uniquement. N’y versez jamais de liquides à plus de 80°C et ne
dépassez jamais le niveau maxi préconisé.
• Utilisez toujours le bol mixeur avec son couvercle (e4).
• N’enlevez jamais le couvercle (e4) et/ou le bol mixeur (E) avant l’arrêt
complet de l’appareil.
• Ne placez jamais vos doigts ou tout autre objet dans le bol mixeur pendant
le fonctionnement de l’appareil.
• Ne pas utiliser le bol comme récipient (congélation, cuisson, stérilisation, …).
• Ne passez pas le bol au micro-ondes.
• N’utilisez pas votre appareil plus de 2 minutes 30 en marche continue.
• Placez votre appareil sur un plan de travail stable, résistant à la chaleur,
propre et sec.
• Ne laissez pas pendre vos cheveux, un foulard, une cravate etc. au dessus
du bol pendant le fonctionnement de l’appareil.
• N’utilisez jamais cet appareil pour mélanger ou mixer d’autres éléments que
des ingrédients alimentaires.
• Pour votre sécurité, cet appareil est conforme aux normes et
réglementations applicables :
- Directive Basse Tension
- Compatibilité Electromagnétique
- Environnement
- Matériaux en contact avec les aliments.

• Nettoyer toutes les pièces (E) à l’eau chaude savonneuse, à l’exception du
bloc moteur
(A) qu’il ne faut jamais immerger ni passer sous l’eau
courante (voir § nettoyage).
ATTENTION : Les lames des couteaux sont extrêmement aiguisées, maniez-les
avec précaution lors de l’utilisation ou du nettoyage de l’appareil.
• Assurez vous que tout emballage soit retiré avant le fonctionnement de
l’appareil.
•
Remarque importante : Mettre le bouton rotatif (D) sur avant de placer
le bol mixeur sur le bloc moteur (A).
• L’appareil démarre uniquement si le bol mixeur est bien positionné sur le
bloc moteur.
• Ne faites pas fonctionner l’appareil si le couvercle n’est pas en place.
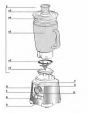
• Insérez le joint (e2) sur le bloc lames (e1) (Fig.1).
• Placez l’ensemble (e1+e2) sur le fond du bol (e3). Verrouillez-le en tournant
le bloc lames d’un quart de tour dans le sens inverse des aiguilles d’une
montre
(Fig.2).
• Introduisez les ingrédients dans le bol assemblé.
• Insérez le couvercle
(e4) sur le bol. Placez le bouchon doseur (e5) dans son
logement situé sur le couvercle.
• Placez l’ensemble bol mixeur
(E) sur le bloc moteur (A). Deux positions du
bol mixeur sont possibles : poignée du bol à droite ou à gauche du bloc
moteur
(Fig.3).
• Une fois le bol mixeur correctement positionné sur le bloc moteur, branchez
l’appareil et mettez en marche avec la fonction souhaitée.
•
Sélection de vitesses : Tournez le bouton rotatif (D) pour choisir la vitesse
désirée, la vitesse augmentant graduellement entre mini " " et max " ".
Vous pouvez modifier cette vitesse en cours de préparation.
•
Fonction "Pulse" : Tournez le bouton rotatif (D) sur la position "Pulse" par
impulsions successives pour un meilleur contrôle des préparations. Dans
cette position, l’appareil démarre directement en vitesse maximale. Il
s’arrête dès que l’on relâche le bouton.
3
AVANT LA PREMIÈRE UTILISATION
MONTAGE DES ACCESSOIRES
MISE EN SERVICE
0

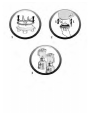
• Fonction " Smoothies" : Cette fonction permet de préparer des milk-shakes
et des cocktails de fruits onctueux. La vitesse est programmée pour un résultat
optimal. Pour utiliser cette fonction, positionnez le bouton rotatif sur , et
appuyez sur la touche
"Smoothies" (B) pour démarrer l’appareil. Pour
l’arrêter, appuyez à nouveau sur la touche "Smoothies" (B).
• Fonction " Ice crush" : Cette fonction permet de piler de la glace finement
grâce à des cycles de fonctionnement et une vitesse programmés. Pour utiliser
cette fonction, positionnez le bouton rotatif sur , et appuyez sur la touche
"Ice crush" (C) pour démarrer l’appareil. Pour l’arrêter, appuyez à nouveau
sur la touche "Ice crush" (C).
• Votre appareil est équipé d’un micro processeur qui contrôle et analyse la
puissance en fonctionnement.
En cas de charge trop importante, votre
appareil s’arrêtera tout seul. Pour redémarrer votre appareil, positionnez le
bouton rotatif sur , débranchez le cordon et retirez du bol mixeur une
partie de vos ingrédients. Laissez votre appareil reposer le temps de revenir à
température ambiante. Rebranchez-le. Vous pouvez alors sélectionner la
vitesse ou la fonction souhaitée pour terminer votre préparation.
• Selon la nature des ingrédients, le bol mixeur vous permet de préparer
jusqu’à :
* 1,5L pour les mélanges épais
* 1,25L pour les préparations liquides
• Vous pouvez préparer des potages finement mixés, des veloutés, des
compotes, des pâtes légères (crêpes, beignets, clafoutis, far, …) des
milk-shakes, des smoothies, des cocktails, …
• Lors du mixage, si des ingrédients restent collés aux parois du bol, arrêtez l’ap-
pareil, retirez le bol mixeur du bloc moteur, faites tomber les ingrédients sur les
lames, puis repositionnez votre bol mixeur pour poursuivre votre
préparation.
• Versez toujours les ingrédients liquides en premier dans le bol mixeur avant
d’ajouter des ingrédients solides, sans dépasser le niveau maximal.
• Pour ajouter des ingrédients au cours du mélange, retirez le bouchon doseur
(e5) du couvercle (e4) et insérez les ingrédients par l’orifice de remplissage.
• Pour de la glace finement pilée, travaillez avec 6 à 10 gros glaçons
maximum en fonction "Ice crush".
Il n’est pas nécessaire d’ajouter de l’eau.
4
CONSEILS
0
0
0

Soupe de carottes au cumin :
Ingrédients :
- 700 g de carottes coupées en cube de 15mmx15mm
- 800 ml d’eau
-1 cuillère à café de cumin
- Sel, poivre
Mettez les carottes dans le bol du blender et ajoutez l’eau. Mixez en vitesse
max
""pendant 5 s. Arrêtez l’appareil. Versez l’ensemble dans une casse-
role, ajoutez le cumin et faites cuire pendant environ 30 min. Vous pouvez
ajouter de l’eau en cours de cuisson pour avoir une soupe moins épaisse.
Salez et poivrez à votre convenance.
• Débranchez l’appareil et retirez le bol mixeur.
•
Les lames des couteaux sont extrêmement aiguisées, maniez-les avec
précaution.
• Pour nettoyer le bloc moteur (A), utilisez un chiffon humide. Séchez-le
soigneusement.
• Ne plongez
jamais le bloc moteur (A) dans l’eau ou tout autre liquide et ne
le passez pas sous l’eau courante.
• Pour faciliter le nettoyage, pensez à laver les éléments amovibles à l’eau
chaude savonneuse immédiatement après utilisation.
• Le bol mixeur
(E) peut être nettoyé au lave-vaisselle avec le programme
"ECO" ou "PEU SALE".
• Pour faciliter le nettoyage du bol mixeur (E), déverrouillez le bloc lames (e1)
en le tournant d’un quart de tour dans le sens des aiguilles d’une montre.
Retirez le joint d’étanchéité
(e2) et nettoyez le tout à l’eau courante ou au
lave vaisselle.
5
RECETTE
NETTOYAGE

6
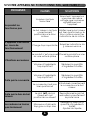
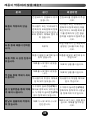
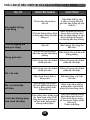
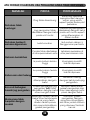
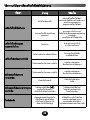
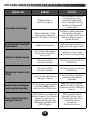
SI VOTRE APPAREIL NE FONCTIONNE PAS, QUE FAIRE ?
PROBLÈMES
CAUSES SOLUTIONS
Le produit ne
fonctionne pas
La prise n’est pas
branchée
Branchez l’appareil sur
une prise de même
voltage que la plaque
signalétique sous
l’appareil
Le bol mixeur n’est pas
correctement
positionné sur le bloc
moteur
Vérifiez que le bol mixeur
est bien positionné sur le
bloc moteur suivant les
indications de la notice
L’appareil s’est arrêté
en cours de
fonctionnement
Charge trop importante
Suivez les indications du
§ mise en service
Vibrations excessives
Le produit n’est pas posé
sur une surface plane
Placez le produit sur une
surface plane
Volume d’ingrédients
trop important
Réduisez la quantité
d’ingrédients traités
Fuite par le couvercle
Volume d’ingrédients
trop important
Réduisez la quantité
d’ingrédients traités
Le couvercle n’est pas
bien positionné
Introduisez correctement
le couvercle sur le bol
mixeur
Fuite par le bas du bol
mixeur
Le joint (e2) du bol
mixeur est mal
positionné ou absent
Repositionnez le joint et
verrouillez correctement
le porte lame
Le couteau ne tourne
pas facilement
Morceaux d’aliments
trop gros ou trop durs
Réduisez la taille ou la
quantité d’ingrédients
traités.
Ajoutez du liquide

7
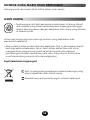
VOTRE APPAREIL NE FONCTIONNE TOUJOURS PAS ?
Adressez-vous à un centre service agréé (voir liste dans livret service).
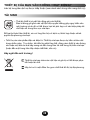
• Elimination des matériaux d’emballage et de l’appareil
L’emballage comprend exclusivement des matériaux sans danger
pour l’environnement, pouvant être jetés conformément aux
dispositions de recyclage en vigueur.
Pour la mise au rebut de l’appareil, se renseigner auprès du service approprié
de votre commune.
• Produits électroniques ou produits électriques en fin de vie :
Votre appareil est prévu pour fonctionner durant de longues années.
Toutefois, le jour où vous envisagez de le remplacer, ne le jetez pas dans
votre poubelle ou dans une décharge mais apportez le au point de
collecte mis en place par votre commune (ou dans une déchetterie le cas
échéant).
Participons à la protection de l’environnement !
Votre appareil contient de nombreux matériaux
valorisables ou recyclables.
Confiez celui-ci dans un point de collecte pour que son
traitement soit effectué.
RECYCLAGE

8
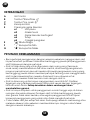
DESCRIPTION
EN
A Motor unit
B " Smoothies" button
C " Ice crush" button
D Control knob
E Blender jug assembly
e1 Blade unit
e2 Gasket seal
e3 Graduated blender jug
e4 Lid
e5 Measuring cap
F " " Stand By Mode
G " " Min Speed
H " " Max Speed
SAFETY INSTRUCTIONS
• Read the instructions for use carefully before using your appliance for the
first time: the manufacturer shall accept no liability in the event of any use
that does not comply with the instructions.
• This appliance is not designed to be used by persons (including children)
with reduced physical, sensorial or mental capacities, or by people with no
prior knowledge or experience, except where they have benefited from
supervision or previous instructions relating to the use of the appliance, from
a person responsible for their safety. Children must be supervised to ensure
that they do not play with the appliance.
• The appliance is designed to work with alternating current only. Please
check that the supply voltage indicated on the rating plate of the
appliance corresponds to your electrical installation.
Any connection error
will invalidate the warranty.
• Your appliance is intended only for domestic culinary use, in an indoor
setting and under supervision. The manufacturer accepts no responsibility,
and the guarantee will not apply, for any commercial use, inappropriate use
or failure to comply with the instructions.
• Be sure to unplug the appliance if you must leave it unattended, before
inserting or removing accessories or before cleaning it. Never pull on the
power cord to unplug the appliance.
0

9
• Do not use your appliance if it does not operate correctly, if it has been
damaged or if the power cord or plug is damaged. To maintain safety, these
parts must be replaced by an approved service centre (see list in the
service booklet).
• Any maintenance other than routine cleaning and upkeep by customers
must be carried out by an approved service centre.
• Do not immerse the appliance, cord or plug in liquid.
• The power cord must be kept out of the reach of children and must not be
placed near or come into contact with the hot parts of the appliance,
sources of heat or sharp corners.
• For your own safety, use only accessories and spare parts designed for your
appliance and sold in an approved service centre.
•
The blades are very sharp: handle them carefully to avoid injury when
emptying the jug, assembling / disassembling the blades on the jar and
cleaning.
• Never use the blender jug without ingredients, or with solid ingredients only.
Never pour liquids hotter than 80 °C into the jug and never exceed the
maximum level recommended.
• Always use the blender jug with its lid (e4).
• Never remove the lid (e4) and/or the blender jug (E) before the appliance
comes to a standstill.
• Never place your fingers or any other object in the blender jug when the
appliance is running.
• Do not use the jug as container for freezing, cooking or sterilisation, etc.
• Do not place the jug in a microwave oven.
• Do not use your appliance for more than 2.5 minutes continuously.
• Place your appliance on a stable, heat-resistant, clean and dry worktop.
• Do not let long hair, scarves, ties, etc. hang over the blender jug when the
appliance is running.
• Never use this appliance for blending or mixing items other than food
ingredients.
• For your safety, this appliance complies with applicable standards and
regulations:
- Low Voltage Directive
- Electromagnetic Compatibility
- Environment
- Materials in contact with food

10
BEFORE THE FIRST USE
• Clean all the parts (E) with warm water and washing up liquid except for the
motor unit
(A) which must never be immersed in water or placed under run-
ning water (see § Cleaning).
CAUTION: The blades are extremely sharp; handle them with caution
when using or cleaning the appliance.
• Make sure all the packaging has been removed before operating the
appliance
•
Important note: Turn the control knob (D) to before placing the blender
jug on the motor unit (A).
• The appliance will start only if the blender jug is positioned correctly on the
motor unit.
•
Do not operate the appliance if the lid is not in place.
• Fit the gasket seal (e2) on the blade unit (e1) (Fig.1).
• Place the assembly (e1+e2) on the base of the jug (e3). Lock it by rotating
the blade unit through a quarter turn in an anticlockwise direction (Fig.2).
• Introduce the ingredients to the assembled jug.
• Place the lid
(e4) on the jug. Place the measuring cup (e5) in its slot on the
lid.
• Place the blender jug assembly
(E) on the motor unit (A). The blender jug
can be placed in two positions: jug handle to the right or the left of the
motor unit
(Fig. 3).
• Once the blender jug is positioned correctly on the motor unit, plug in the
appliance and turn it on using the desired function.
•
Speed selection: Turn the control knob (D) to choose the desired speed; the
speed increases gradually between min " " and max " ". You can change
this speed as required during preparation.
•
"Pulse" function: Turn the control knob (D) to the "Pulse" position. Using a
succession of pulses gives finer control over the degree of blending for
precise preparations. In this position, the appliance starts directly on
maximum speed. It stops as soon as you release the knob.
ASSEMBLING AND FITTING THE JUG
USING YOUR APPLIANCE FOR THE FIRST TIME
0

11
• Function " Smoothies"
This function is used to prepare smooth milkshakes and fruit cocktails. The
speed is pre-programmed for best results. To use this function, turn the control
knob to , and press the
"Smoothies" button (B) to start the appliance. To
stop it, press the "Smoothies" button (B) again.
• Function " Ice crush"
You can use this function to crush ice finely with pre-programmed operating
cycles and speed. To use this function, turn the control knob to , and press
the "Ice crush" button
(C) to start the appliance. To stop it, press the "Ice
crush" button (C) again.
• Your appliance comes with a microprocessor that controls and analyses the
operating power.
If the load becomes too high, your appliance will stop
automatically. To restart your appliance, turn the control knob to , unplug
the appliance and remove some of the ingredients from the blender jug.
Allow your appliance to cool down to room temperature. Plug it in again.
You can then select the desired speed or function to complete your prepa-
ration.
• Depending on the nature of the ingredients, you can use the blender jug to
prepare up to
* 1.5 L for thick mixtures
* 1.25 L for liquid preparations
• You can prepare finely blended soups, cream soups, stewed fruit, light batter
(pancakes, fritters, Yorkshire pudding batter, etc.), milkshakes, smoothies,
cocktails, etc.
• If ingredients stick to the sides of the jug when blending, stop the appliance.
Remove the blender jug from the motor unit, and push the food down onto
the blades using a spatula and put your blender jug back to continue your
preparation.
• Always pour the liquid ingredients into the blender jug first, before adding
the solid ingredients, without exceeding the maximum level.
• To add ingredients while blending, remove the measuring cup
(e5) from the
lid (e4) and add the ingredients through the feeder hole.
• For finely crushed ice, use a maximum of 6 to 10 large ice cubes using "Ice
crush" function. There is no need to add water.
ADVICE
0
0
0

12
RECIPE
Carrot soup with cumin:
Ingredients:
- 700 g carrots, cut into cube of 15 mm x15 mm
- 800 ml of water
- 1 teaspoon cumin
- Salt and pepper
Put the carrot pieces in the glass jar and add the water. Mix in max
""speed
for 5 seconds. Turn off the appliance. Pour the mixture into a saucepan, add the
cumin and cook for about 30 min. You can add water during cooking for a thin-
ner soup. Salt and pepper according your taste.
• Unplug the appliance and remove the blender jug.
• The blades are extremely sharp; handle them with caution.
• To clean the motor unit
(A), use a moist cloth. Dry it carefully.
• Never immerse the motor unit (A) in water or any other liquid and do not put
it under running water.
• For easy cleaning, be sure to wash the removable parts in warm water and
washing up liquid immediately after use.
• The blender jug
(E) can be washed in the dishwasher using the ECONOMY
or QUICK WASH programme.
• To clean the blender jug (E) easily, unlock the blade unit (e1) by rotating it
through a quarter turn in the clockwise direction. Remove the gasket seal
(e2) and clean all an parts under running water or in the dishwasher.
CLEANING

13
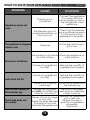
WHAT TO DO IF YOUR APPLIANCE DOES NOT WORK
PROBLEMS
CAUSES SOLUTIONS
Appliance does not
work
The plug is not
connected
Connect the appliance
to a socket with the
same voltage as that on
the rating plate of the
appliance.
The blender jug is not
positioned correctly on
the motor unit
Check that the blender
jug is positioned properly
on the motor unit as
explained in the leaflet.
The appliance stopped
while in use
Overload
Follow the instructions in
§ First use.
Excessive vibrations
The product is not placed
on a flat surface
Place the appliance on
a flat surface.
Volume of ingredients is
too high
Reduce the quantity of
ingredients processed.
Leak from the lid
Volume of ingredients is
too high
Reduce the quantity of
ingredients processed.
The lid is not correctly
positioned
Place the lid correctly on
the blender jug.
Leak at the bottom of
the blender jug
The blender jug gasket
seal (e2) is not positioned
correctly or is absent
Reposition the gasket
seal and lock the blade
holder correctly.
The blade does not
turn easily
Pieces of food too large
or too hard
Liquid has been blended
that was too hot and
distorted the gasket seal
Replace the gasket seal
with a new one.
Reduce the size or
quantity of ingredients
processed.
Add liquid.

14
YOUR APPLIANCE STILL DOES NOT WORK?
Contact an approved service centre (see list in service booklet).
• Disposal of the appliance and its packaging materials
The packaging is comprised exclusively of materials that present
no danger for the environment and which may therefore be
disposed of in accordance with the recycling measures in force in
your area.
For disposing of the appliance itself, please contact the appropriate service
of your local authority.
• End of life electrical and electronic products: Your appliance is expected to
last for many years. However, when the time comes to replace it, do not
throw it in the bin or in a dump, but take it to the recycling centre in your
town (or to a waste reception centre where applicable).
Think of the environment!
Your appliance contains valuable materials which can be
recovered or recycled.
Leave it at a local civic waste collection point.
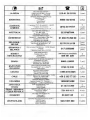
HELPLINE:
If you have any product problems or queries, please contact our
Customer Relations Team first for expert help and advice:
0845 602 1454 – UK
(01) 677 4003 - ROI
RECYCLING

15
각부 명칭
KO
A 모터본체
B " Smoothies" 스무디 버튼
C " Ice crush" 얼음 분
쇄 버튼
D 속도조절 다이얼
E 믹서용기
e1 칼날 몸체
e2 누수방지 실리콘링
e3 믹서용기
e4 믹서용기 뚜껑
e5 계량컵
F " " 대기 모드
G " " 최소 속도
H " " 최
대 속도
안전상 주의사항
• 제품을 처음 사용하시기 전에, 사용설명서를 주의 깊게 읽어주시고 안전을 위하여 정
확하게 사용하여 주십시오. 사용설명서대로 사용하지 않아 발생한 문제는 당사의 품
질보증혜택을 받으실 수 없습니다.
• 어린이의 손에 닿지 않는 곳에 두십시오. 어린이나 몸이 불편하신 분이 제품을 사용
할 때에는 곁에서 도와주시고 각별히 주의하여 주십시오. 어린이가 제품을 가지고 장
난치지 않도록 주의하십시오.
•
제품을 사용하시기 전에 제품의 전압이 가정의 전압과 맞는지 확인하여 주십시오. 전
압을 확인하지 않아 발생한 문제에 대해서는 품질보증 혜택을 받으실 수 없습니다.
• 본 제품은 가정용으로 제작되었으며, 가정용으로만 사용 가능합니다. 상업용으로 사
용되었거나 부적절하게 사용한 경우 당사의 품질보증 혜택을 받으실 수 없습니다.
• 제품을 사용하지 않거나, 조립 또는 분해할 때 또는 세척 시에는 반드시 제품의 전원
코드를 빼주십시오. 전선을 잡아당겨 전원코드를 뽑지 마십시오.
0

16
• 제품이 정상적으로 작동되지 않거나, 제품에 손상이 생긴 경우 사용하지 마시고 당사
서비스센터에 의뢰해 주십시오. (전국 어디서나 1588-1588)
• 일반적인 세척 및 제품 관리를 위한 작업외의 제품의 수리가 필요할 경우는 당사 서
비스센터에 의뢰해 주십시오.
• 제품 모터본체나 코드를 절대로 물에 담그지 마십시오. 제품 코드를 어린이의 손에
닿지 않는 곳에 두십시오. 전원코드 또는 전원전선을 테이블등의날카로운 모서리에
늘어뜨려 놓지 마시고, 뜨거운곳에 닿지 않도록 하십시오. 코드 손상으로 화재 및감
전의 원인이 됩니다.
• 안전을 위하여 제품에 적합한 테팔 정품 부품 및 부속품을 사용하여 주시고 이에 따
를지 않아 발생한 문제에 대해서는 품질보증 혜택을 받으실 수 없습니다.
• 칼날은 매우 날카롭습니다.: 사용시 주의를 기울이십시오.
• 용기가 비어있는 상태나마른 재료만 넣고 작동하지 마십시오. 절대로 뜨거운액체
재료를 넣고 사용하지 마십시오.
• 항상 용기는 용기 뚜껑(e4)을 닫은상태에서 사용하십시오.
• 항상 필터 안에 내용물을 먼저 넣고, 물이나 액체를 다음에 넣으십시오. 절대 용기에
표시된최대 수위를 넘치지 않도록 주의하십시오.
• 사용 중에는 절대로 손가락이나 이물질을 용기 안에 넣지 마십시오.
• 제품의 용기를 음식을 냉동하거나, 요리할 때, 소독용을 위한 용기로 사용하지 마십
시오.
• 제품을 한번에 3분 이상 사용하지 마십시오.
• 제품은 평평하고 깨끗하고 건조한 바닥에 두고 사용하십시오.
• 블렌더를 2.5 분 이상 연속해서 사용하지 마십시오.
• 제품의 뚜껑을 열어둔채작동 시키지 마십시오.
• 작동 후 칼날이 완전히 멈추기 전에 뚜껑(e4)을 열지 마십시오.
• 음식 재료 이외의다른 재료의 혼합이나 믹싱 용도로 이 제품을 사용하지 마십시오
• 안전을 위해 이 제품은 적용 가능한 다음 표준 및 법률을 준수합니다
- 저전압 지침
- 전자파 적합성
- 환경

17
제품을 처음 사용하기 전
주의: 칼날이 날카로우므로 사고의 방지를 위해 제품을 사용하거나 세척 시에 손
으로 직접 만지지 말고 주의를 기울이십시오.
• 본 제품을 사용하기 전에 모터본체(A)를제외한모든 부속품(B,C,D,E)을 따뜻한물
로 세척하여 주십시오.
• 모든포장물은 제품을 사용하기 전에 제거 하십시오.
• 주의 :
용기를 모터본체에 끼우시기 전에 속도조절 다이얼
(D)
을에맞추십시오.
• 용기를 모터 본체에 정확히끼우신 후오른쪽으로 돌려 잠그신 다음 제품을 작동하
십시오.
• 만약 용기의 뚜껑이 제대로 닫혀져 있지 않으면 제품을 작동하지 마십시오.
• 누수방지 실리콘링 (e2)을 칼날몸체(e 1)에 장착합니다(그림. 1).
•
누수방지 실리콘링을 장착한 칼날몸체 (e1+e2)를 용기 믹서용기(e3)에 장착합니다.
칼날 몸체를 시계반대방향으로 1/4 정도 회전시켜서 고정시킵니다
(그림. 2).
• 조립한 용기에 내용물을 넣습니다.
• 뚜껑 (e4)을 용기 위에 장착합니다. 계량 컵 (e5)을뚜껑에 맞춰 고정합니다.
• 믹서 용기 조립부(E) 를 모터 본체(A)에위치시킵니다. 이 믹서 용기는 모터 본체의
오른쪽, 또는 왼쪽으로 용기 손잡이가 향하도록두가지 방식으로 장착 가능합니다
(그림. 3).
• 믹서 용기를 모터 본체에 정확히 장착되면 안내대로 제품 전원을 연결한 후에 작동
시킵니다.
• 속도 선택: 속도조절 다이얼 (D)을 돌려서 원하는 속도를 선택합니다. 속도는 "min
(최소)" 에서 "max(최대)" 까지 점진적으로 빨라집니다. 작동 중에도 이 속도를
원하는대로 조정할 수 있습니다.
• "Pulse(펄스)" 분쇄기능: 속도조절 다이얼 (D)을 "Pulse" 위치로 돌립니다. 레시피에
따른 음식 준비를 위해서 분쇄 정도를 여러번켰다 껐다(펄스)를 반복하십시오. 이
위치에서 제품은 최대 속도로 작동합니다. 손잡이에서 손을 떼면 즉시 작동이 멈춥니
다.
용기 조립 및 장착
제품을 처음 사용하는 경우
0
La page est en cours de chargement...
La page est en cours de chargement...
La page est en cours de chargement...
La page est en cours de chargement...
La page est en cours de chargement...
La page est en cours de chargement...
La page est en cours de chargement...
La page est en cours de chargement...
La page est en cours de chargement...
La page est en cours de chargement...
La page est en cours de chargement...
La page est en cours de chargement...
La page est en cours de chargement...
La page est en cours de chargement...
La page est en cours de chargement...
La page est en cours de chargement...
La page est en cours de chargement...
La page est en cours de chargement...
La page est en cours de chargement...
La page est en cours de chargement...
La page est en cours de chargement...
La page est en cours de chargement...
La page est en cours de chargement...
La page est en cours de chargement...
La page est en cours de chargement...
La page est en cours de chargement...
La page est en cours de chargement...
La page est en cours de chargement...
La page est en cours de chargement...
La page est en cours de chargement...
La page est en cours de chargement...
La page est en cours de chargement...
La page est en cours de chargement...
La page est en cours de chargement...
La page est en cours de chargement...
La page est en cours de chargement...
La page est en cours de chargement...
La page est en cours de chargement...
La page est en cours de chargement...
La page est en cours de chargement...
La page est en cours de chargement...
La page est en cours de chargement...
La page est en cours de chargement...
La page est en cours de chargement...
La page est en cours de chargement...
-
 1
1
-
 2
2
-
 3
3
-
 4
4
-
 5
5
-
 6
6
-
 7
7
-
 8
8
-
 9
9
-
 10
10
-
 11
11
-
 12
12
-
 13
13
-
 14
14
-
 15
15
-
 16
16
-
 17
17
-
 18
18
-
 19
19
-
 20
20
-
 21
21
-
 22
22
-
 23
23
-
 24
24
-
 25
25
-
 26
26
-
 27
27
-
 28
28
-
 29
29
-
 30
30
-
 31
31
-
 32
32
-
 33
33
-
 34
34
-
 35
35
-
 36
36
-
 37
37
-
 38
38
-
 39
39
-
 40
40
-
 41
41
-
 42
42
-
 43
43
-
 44
44
-
 45
45
-
 46
46
-
 47
47
-
 48
48
-
 49
49
-
 50
50
-
 51
51
-
 52
52
-
 53
53
-
 54
54
-
 55
55
-
 56
56
-
 57
57
-
 58
58
-
 59
59
-
 60
60
-
 61
61
-
 62
62
-
 63
63
-
 64
64
-
 65
65


Tefal BL800G - Mastermix Le manuel du propriétaire
- Catégorie
- Mélangeurs
- Taper
- Le manuel du propriétaire