
0099002107E-02
Jump Starter
and DC Power Source
Arrancador
y Fuente de Poder de CC
Bloc d’alimentation
et aide démarrage
OWNERS MANUAL / MANUAL DEL USUARIO /
MANUEL D’UTILISATION
PLEASE SAVE THIS OWNERS MANUAL AND READ BEFORE EACH USE. This manual
will explain how to use the portable power safely and effectively. Please read and follow these
instructions and precautions carefully.
POR FAVOR CONSERVE ESTE MANUAL DEL USUARIO Y LEALO ANTES DE CADA
USO. En este manual le explica cómo utilizar la fuente de poder de manera segura y conable.
Por favor, lea y siga las siguientes instrucciones y precauciones.
ESSAYER DE GARDER LE MANUEL D’INSTRUCTIONS ET LE LIRE AVANT CHAQUE
UTILISATION. Ce manuel explique comment utiliser l’unité d’une façon sûre et efcace. S’il vous
plaît lisez et suivez ces instructions et précautions.
FOR MODELS / PARA MODELOS / POUR LES MODÈLES
SJ1427
SJ1332

CONTENTS
IMPORTANT SAFETY INSTRUCTIONS ...................................................................................................5
PERSONAL SAFETY PRECAUTIONS .......................................................................................................6
FEATURES .................................................................................................................................................6
CHARGING THE INTERNAL BATTERY OF THE JUMP STARTER...........................................................7
OPERATING INSTRUCTIONS ...................................................................................................................7
MAINTENANCE INSTRUCTIONS ............................................................................................................11
MOVING AND STORAGE INSTRUCTIONS .............................................................................................11
TROUBLESHOOTING ..............................................................................................................................11
REPLACEMENT PARTS ...........................................................................................................................12
ACCESSORIES ........................................................................................................................................12
BEFORE RETURNING FOR REPAIRS ....................................................................................................12
LIMITED WARRANTY ...............................................................................................................................12

CONTENIDOS
INSTRUCCIONES IMPORTANTES DE SEGURIDAD .............................................................................13
PRECAUCIONES DE SEGURIDAD PERSONAL .....................................................................................14
CARACTERÍSTICAS ................................................................................................................................14
PARA CARGAR LA BATERIA INTERNA DEL ARRANCADOR.................................................................15
INSTRUCCIONES DE OPERACIÓN ........................................................................................................15
INSTRUCCIONES DE MANTENIMIENTO ...............................................................................................19
INSTRUCCIONES PARA EL MANEJO Y ALMACENAMIENTO ...............................................................19
LOCALIZACIÓN Y SOLUCIÓN DE PROBLEMAS ...................................................................................19
REPUESTOS ............................................................................................................................................20
ACCESORIOS ..........................................................................................................................................20
ANTES DE DEVOLVER A REPARACIONES ............................................................................................20
GARANTÍA LIMITADA ...............................................................................................................................21

TABLE DES MATIÈRES
CONSIGNES DE SÉCURITÉ IMPORTANTES ........................................................................................ 22
MESURES DE SÉCURITÉ PERSONNELLE ............................................................................................23
CARACTÉRISTIQUES ..............................................................................................................................23
CHARGEMENT DE LA BATTERIE INTERNE DE L’AIDE AU DÉMARRAGE ..........................................24
CONSIGNES D’UTILISATION ..................................................................................................................24
INSTRUCTIONS D’ENTRETIEN ..............................................................................................................28
INSTRUCTIONS DE STOCKAGE ET EMPLACEMENT ..........................................................................28
DÉPANNAGE ............................................................................................................................................29
PIÈCES DE RECHANGE ..........................................................................................................................29
ACCESSOIRES ........................................................................................................................................29
AVANT DE RETOURNER POUR LES RÉPARATIONS ............................................................................29
GARANTIE LIMITÉE .................................................................................................................................30

• 5 •
CONTAINS SEALED, NON-SPILLABLE LEAD-ACID BATTERY.
MUST BE DISPOSED OF PROPERLY.
WARNING: Possible explosion hazard. Contact with battery acid may cause severe
burns and blindness. Keep out of reach of children.
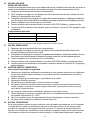
1. IMPORTANT SAFETY INSTRUCTIONS – SAVE THESE INSTRUCTIONS.
WARNING: RISK OF EXPLOSIVE GASES.
WORKING IN THE VICINITY OF A LEAD-ACID BATTERY IS DANGEROUS. BATTERIES GENERATE
EXPLOSIVE GASES DURING NORMAL OPERATION. IT IS IMPORTANT THAT YOU FOLLOW
THESE INSTRUCTIONS EACH TIME YOU USE THE UNIT.
To reduce the risk of battery explosion, follow these instructions and those published by the battery
manufacturer and the manufacturer of any equipment you intend to use in the vicinity of a battery.
Review cautionary markings on these products and on the engine.
WARNING! RISK OF ELECTRIC SHOCK OR FIRE.
1.1 Keep out of reach of children.
1.2 Do not disassemble the jump starter. Take it to a qualied service professional if service or repair is
required. Incorrect assembly may result in re or electrical shock.
1.3 Do not use the jump starter to jump a vehicle while charging the internal battery.
1.4 Do not recharge the jump starter with a damaged extension cord.
1.5 The jump starter gets hot during charging and must have proper ventilation.
1.6 Do not set the jump starter on ammable materials, such as carpeting, upholstery, paper, cardboard, etc.
1.7 Place the jump starter as far away from the battery being jumped as the cables will permit.
1.8 Do not expose the jump starter to rain or snow.
1.9 Never attempt to jump start a frozen battery.
1.10 Never place the jump starter directly above battery being jumped.
1.11 To prevent arcing, never allow the clamps to touch together or to contact the same piece of metal.
1.12 Use of an attachment not recommended or sold by the jump starter manufacturer may result in damage
to the unit or personal injury.
1.13 Never operate the jump starter if it is damaged.
1.14 If someone else uses the jump starter, ensure they are well informed on how to use it safely, and have
read and understood the operating instructions.
1.15 The jump starter is NOT designed to be installed as a replacement for a vehicle battery.
1.16 Use ONLY on vehicles, boats and garden tractors powered with a 12V DC battery system.
1.17 If the engine fails to start after the recommended number of attempts, disconnect the unit and look for
other problems that may need to be corrected.
1.18 Use the jump starter for jump starting lead-acid batteries only. Do not use for dry cell batteries that are
commonly used with home appliances.
Jump Starter and DC Power Source
OWNERS MANUAL
PLEASE SAVE THIS OWNERS MANUAL AND READ BEFORE EACH USE.
This manual will explain how to use the jump starter safely and effectively. Please
read and follow these instructions and precautions carefully.
FOR MODELS
SJ1427
SJ1332
1. IMPORTANT SAFETY INSTRUCTIONS

• 6 •
2. PERSONAL SAFETY PRECAUTIONS
2.1 Restrictions on Use:
The converter may not be used with life support devices or systems. Failure of this converter can
reasonably be expected to cause failure of that life support device or system, or to affect the safety or
effectiveness of that device or system.
2.2 Wear complete eye protection and protective clothing when working near lead-acid batteries. Always
have someone nearby for help.
2.3 Have plenty of fresh water, soap and baking soda nearby for use, in case battery acid contacts your
eyes, skin, or clothing. Wash immediately with soap and water and seek medical attention.
2.4 If battery acid comes in contact with eyes, ush eyes immediately for a minimum 10 minutes and get
medical attention.
2.5 Neutralize any acid spills thoroughly with baking soda before attempting to clean up.
2.6 Remove all personal metal items from your body, such as rings, bracelets, necklaces and watches. A
battery can produce a short circuit current high enough to weld a ring to metal, causing a severe burn.
2.7 Never smoke or allow a spark or ame in the vicinity of the battery or engine.
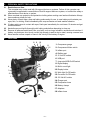
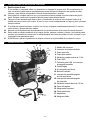
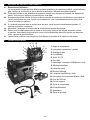
3. FEATURES
1. Compressor gauge
2. Compressor/inator switch
3. Inator port
4. Deator port
5. 12 Volt DC outlets
6. USB port
7. Jump start/USB On/Off switch
8. Digital display
9. Built-in work light
10. Display button
11. Work light On/Off switch
12. Converter On/Off switch
13. 120 Volt AC outlets
14. Charger port
15. Compressor hose
16. Battery clamps
17. Adapters
18. Inator hose
7
6
9
8
10
11
12
5
13
14
15
1
2
4
16
3
17
18

• 7 •
4. CHARGING THE INTERNAL BATTERY OF THE JUMP STARTER
IMPORTANT: CHARGE IMMEDIATELY AFTER PURCHASE, AFTER EACH USE AND EVERY 30 DAYS,
TO KEEP THE UNIT’S INTERNAL BATTERY FULLY CHARGED AND PROLONG BATTERY LIFE.
4.1 CHECKING THE LEVEL OF THE INTERNAL BATTERY
Check the internal battery’s charge level by pressing the Display Button. The Digital Display will show
the battery’s percent of charge. Charge the internal battery if the display shows it is under 100%.
NOTE: The internal battery’s percent of charge is most accurate when the jump starter has been
disconnected from all devices and charging sources for a few hours.
4.2 CHARGING THE INTERNAL BATTERY
Charge the internal battery of the jump starter using an extension cord (not included).
NOTE: Use of an improper extension cord could result in a risk of re and electric shock.
1. Plug an extension cord into the charger port on the back of the jump starter.
2. Plug the extension cord into a 120VAC electrical wall outlet. While the jump starter is connected to an
AC outlet, the green LED on the back of the unit will be on.
3. Monitor the progress of the charge by pressing the display button on the front of the unit. When the
internal battery is fully charged, the display will show 100. Complete charging may take up to 72 hours.
The jump starter is then ready to use.
4. When fully charged, the charger will automatically go into maintain mode and maintain the battery at full
charge without damaging it.
5. Charge the jump starter as soon as possible after use.
4.3 CHARGING THE INTERNAL BATTERY WHILE DRIVING
You may also charge the internal battery while driving, using a male-to-male charger cable (part number
94500109 – not included).
IMPORTANT: DO NOT CHARGE INTERNAL BATTERY FOR MORE THAN 30 MINUTES OR LEAVE THE
BATTERY UNATTENDED. IT COULD EXPLODE, CAUSING PROPERTY DAMAGE OR PERSONAL INJURY.
1. Make sure the car is running.
2. Insert one end of the accessory cable into the 12V DC power outlet.
3. Insert the other end of the accessory cable into the vehicle’s accessory outlet (lighter socket).
NOTE: The GREEN LED does not operate during this method of charging. Using this method to charge the
battery overrides the maintain mode and the battery can be overcharged.
4. Monitor the progress of the charge by pressing the display button on the front of the unit. When the
battery is fully charged, disconnect the accessory cable from the jump starter, then from the lighter
socket of the vehicle.
NOTE: Completely disconnect the charger cable when the engine is not running.
5. OPERATING INSTRUCTIONS
5.1 JUMP STARTING A VEHICLE
IMPORTANT: Using the Jump Start feature without a battery installed in the vehicle will damage the
vehicle’s electrical system.
1. Turn the ignition OFF.
2. Lay the DC cables away from any fan blades, belts, pulleys and other moving parts.
3. For a negative-ground vehicle (as in most vehicles), connect the unit’s POSITIVE (RED) clamp to
the POSITIVE (POS, P, +) battery post. Next, connect the NEGATIVE (BLACK) clamp to the vehicle
chassis or engine block, away from the battery.
4. For a positive-ground vehicle, connect the unit’s NEGATIVE (BLACK) clamp to the NEGATIVE
(NEG, N, -) battery post. Next, connect the POSITIVE (RED) clamp to the vehicle chassis or engine
block away from the battery.
5. Turn the switch to the ON position.

• 8 •
NOTE: When connected to the vehicle, the display shows the vehicle’s battery voltage. When connected
and in the ON position, the display shows the equalized voltage between the vehicle’s battery and
internal battery.
6. Crank the engine for no more than 8 seconds. If the engine does not start, wait 2 minutes before
cranking again.
7. After the engine starts, turn the switch to the OFF position and remove the jump starter from the battery.
8. Charge the unit.
5.2 USING THE USB PORT
The USB port provides up to 2A at 5V DC.
1. Ensure the battery clamps are securely clipped on the storage holders.
2. Turn the unit ON.
3. Plug your device into the USB port.
4. When nished using the USB port, turn the switch to the OFF position.
5. Charge the unit.
5.3 USING THE WORK LIGHT
The work light is controlled by a sliding ON/OFF switch located on the front of the unit.
• Make sure the lamp is turned OFF when the unit is being recharged or stored.
• Position the unit on a at, stable surface near the intended work area.
• Ensure the battery clamps are securely clipped on the storage holders.
5.4 POWERING A 12V DC DEVICE
The unit is a power source for all 12V DC accessories that are equipped with a 12V accessory plug. Use
it for power outages and on shing or camping trips.
NOTE: Do not power a 12V device with the unit while charging the internal battery.
1. Make sure the device to be powered is OFF before inserting the 12V DC accessory plug into the 12V
DC accessory outlet.
2. Open the protective cover of the DC power outlet on the unit.
3. Plug the 12V DC device into the DC power outlet and turn on the 12V DC device (if required).
4. When nished, turn off the DC device (if required) and unplug from the DC power outlet.
CAUTION: Do not use the unit to run appliances that draw more than 20A DC.
NOTE: Extended operation of a 12V DC device may result in excessive battery drain. Recharge the unit
immediately after unplugging the 12V DC device.
5.5 USING THE AIR COMPRESSOR
NOTE: To prevent overheating, the compressor has built-in thermal protection that will turn the
compressor off before it overheats. If the compressor shuts off, wait a few minutes and it will
automatically restart when the compressor cools.
WARNING. Read the instructions of the product being inated before using the compressor. Avoid
overination; do not exceed the manufacturer’s recommended pressures. Do not leave the air
compressor unattended during use.
1. Remove the air compressor hose from the storage compartment.
2. Connect the adapter to the valve stem by threading it onto the end. If necessary, use one of the
additional adaptors.
3. Turn ON the inator power switch and inate to the desired pressure or fullness.
4. When the desired pressure is reached, put the inator power switch to OFF, open the thumb latch and
remove the connector from the valve stem.
5. Allow unit to cool.
6. Recharge the unit before storing.
NOTE: The air compressor is rated for 150 PSI.

• 9 •
5.6 USING THE INFLATOR
WARNING: RISK OF EXPLOSION.
Read instructions of the product being inated before using the inator. Avoid overination, do not
exceed the manufacturer’s recommended pressures. Do not leave the inator unattended during use.
1. Ensure the battery clips are securely on the storage holders.
2. Attach the corrugated hose with end adapter to the high-ow inator outlet located near the
Compressor/Inator switch on the back of the unit.
3. The main accessory adapter attached to the corrugated hose accommodates up to 4 sizes. If another
size is needed, an additional adapter can be attached to the end of the main accessory adapter.
4. Insert the adapter into the product to be inated.
5. Push the Compressor/Inator switch to the INFLATOR position and inate the product.
6. When the product is inated to the desired level, push the Compressor/Inator switch to the OFF
position and remove the adapter.
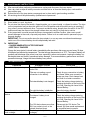
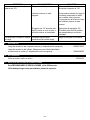
Estimated time for inating
Vehicle tires 13-16" 6-24 minutes
Bike tires 1-3 minutes
Sports balls 30 seconds
These times are approximate. Use the air compressor gauge
to ensure the proper pressure has been reached. Do not overinate.
5.7 USING THE DEFLATOR
1. Ensure the battery clips are securely on the storage holders.
2. Attach the corrugated hose with the end adapter to the high-ow deator outlet, which is located on the
side of the unit.
3. The main accessory adapter attached to the corrugated hose accommodates up to 4 sizes. If another
size is needed, an additional adapter can be attached to the end of the main accessory adapter.
4. Insert the adapter into the item to be deated.
5. Push the Compressor/Inator switch to the INFLATOR position and deate the item.
6. When the product is deated to the desired level, push the Compressor/Inator switch to the OFF
position and remove the adapter.
5.8 BEFORE USING THE CONVERTER
Important Safety Instructions:
1. Keep the unit well ventilated, in order to properly disperse heat generated while it is in use.
Make sure there are several inches of clearance around the top and sides, and do not block the vents
on the back of the unit.
2. Make sure the unit is not close to any potential source of ammable fumes or clothing.
3. Keep the unit dry.
4. DO NOT allow the unit to come into contact with rain or moisture.
5. DO NOT operate the unit if you, the unit, the device being operated or any other surfaces that may
come in contact with any power source are wet. Water and many other liquids can conduct electricity,
which may lead to serious injury or death.
6. Do not place the unit on or near heating vents, radiators or other sources of heat.
7. Do not place the unit in direct sunlight. The ideal air temperature for operation is between 50° and 80° F.
8. Do not use the converter near an open engine compartment where fumes may accumulate.
9. Do not modify the AC receptacles in any way.

• 10 •
5.9 USING THE CONVERTER
It is important to know the continuous wattage of the device you plan to use with the converter. The unit
must be used with devices drawing 200 watts or less. If the wattage is not marked on the device, use
only devices that draw less than 1.7 amps of AC current.
Devices like TVs, fans or electric motors require additional power to start (commonly known as the
“starting” or “peak” power). The unit can supply a momentary surge in wattage; however even devices
rated less than the maximum 200 watts can exceed the converter’s surge capability and cause an
automatic overload shutdown.
Do not use the converter with a product that draws a higher wattage than the converter can provide, as
this may cause damage to the converter and the product.
Make sure the device you are using is compatible with a modied sine wave converter.
CAUTION: Always run a test to establish whether the converter will operate a particular piece of
equipment or device.
In the event of a power overload, the converter is designed to automatically shut down. This safety
feature prevents damaging the converter while testing devices and equipment with the 200-watt range.
If powering more than one device, start one device at a time to avoid a power surge and/or converter overload.
The surge load of each device should not exceed the converter’s Continuous Operation wattage rate.
IMPORTANT: If you are using the power converter to operate any type of battery charger, monitor
the temperature of the battery charger for about 10 minutes. If the battery charger becomes
abnormally warm, disconnect it from the converter immediately.
You can use an extension cord from the converter to the device without signicantly decreasing the
power being generated by the converter. For best operating results, the extension cord should be 16
AWG (1.31 mm2) or larger and no longer than 50 feet.
IMPORTANT: This converter uses a modied sine waveform, which is not quite the same as power
company electricity. For the following devices, we strongly recommend that you use caution and check
the device’s manual to make sure it is compatible with modied sine waveform.
1. Switch mode power supplies
2. Linear power supplies
3. Class 2 transformers
4. Line lter capacitors
5. Shaded pole motors
6. Fan motors
7. Microwave ovens
8. Fluorescent and high-intensity lamps (with a ballast)
9. Transformerless battery chargers
Using the converter with any of these devices may cause the device to run warmer or overheat.
5.10 POWERING A 120V AC DEVICE
1. Ensure the battery clips are securely on the storage holders.
2. Open the protective cover of the AC power outlet on the front panel of the unit.
3. Make sure the 120V AC device to be operated is turned OFF.
4. Plug the 120V AC device into the AC power outlet, and turn the converter switch to the ON position.
NOTE: When the converter is turned on and being used, the display will show the total wattage used by
the device being powered by the converter.
5. Turn the device on.
6. If the device does not operate properly when rst connected to the converter, push the converter rocker
switch ON, OFF, and ON again in quick succession. If this procedure is not successful, it is likely that
the converter does not have the required capacity to operate the device intended.
7. Charge the unit as soon as possible after each use.
WARNING: RISK OF ELECTRIC SHOCK.
Incorrect operation of your converter may result in damage and personal injury. The converter output is
120V AC and can shock or electrocute the same as any ordinary household AC wall outlet.
NOTE: The maximum continuous load is 200 watts. Do not use the converter with a product that draws
more than 200 watts, as this may cause damage to the converter and the product.

• 11 •
6. MAINTENANCE INSTRUCTIONS
6.1 After use and before performing maintenance, unplug and disconnect the jump starter.
6.2 Use a dry cloth to wipe all battery corrosion and other dirt or oil from the battery clips, cords and the
jump starter case.
6.3 Ensure that all of the jump starter components are in place and in good working condition.
6.4 All servicing should be performed by qualied service personnel.
7. MOVING AND STORAGE INSTRUCTIONS
7.1 Store inside, in a cool, dry place.
7.2 Do not store the clips on the handle, clipped together, on or around metal, or clipped to cables. The clips
on the jump starter are live when the switch is in the ON position and will produce arcing or sparking if
they come in contact with each other. To prevent accidental arcing, always place the switch in the OFF
position and keep the clips on the storage holders when not using it to jump start a vehicle.
7.3 If the jump starter is moved around the shop or transported to another location, take care to avoid/
prevent damage to the cords, clips and jump starter. Failure to do so could result in personal injury or
property damage.
IMPORTANT: Do not use and/or store the jump starter in or on any area or surface where damage
could occur if the internal battery should unexpectedly leak acid.
7.4 IMPORTANT:
• CHARGE IMMEDIATELY AFTER PURCHASE
• KEEP FULLY CHARGED
Charge the jump starter’s internal battery immediately after purchase, after every use and every 30 days.
All batteries are affected by temperature. The ideal storage temperature is at 70°F. The internal battery will
gradually self-discharge (lose power) over time, especially in warm environments. Leaving the battery in a
discharged state may result in permanent battery damage. To ensure satisfactory performance and avoid
permanent damage, charge the internal battery every month.
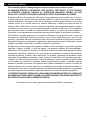
8. TROUBLESHOOTING
PROBLEM POSSIBLE CAUSE SOLUTION
The unit won’t jump start my car. Jump Start/USB switch is not
turned ON.
Clips are not making a good
connection to the battery.
The internal battery is not charged.
The vehicle’s battery is defective.
Turn ON the Jump Start/USB Switch.
Check for poor connection to battery
and frame. Make sure connection
points are clean. Rock clamps back
and forth for a better connection.
Check the battery charge status by
pressing the button on the front of the
unit. See Checking the Level of the
Internal Battery.
Have the battery checked.
The unit won’t power my 12V
device.
The 12V device is not turned on.
The internal battery is not
charged.
The 12V device draws more than
20A, has a short circuit, or the
internal fuse has blown.
Turn on the 12V device.
Check the battery charge status by
pressing the button on the front of the
unit. See Checking the Level of the
Internal Battery.
Disconnect the 12V device.The
internal 20A fuse needs replacement
by a qualied service person.
The battery in the unit won’t
hold a charge.
The battery is bad (will not accept
a charge).
Have the battery checked.

• 12 •
9. REPLACEMENT PARTS
Air compressor accessory kit (3 hose adapters) ................................................................ 2299001425Z
Inator accessory kit: (inator/deator hose, unit end, 3 hose adapters) .......................... 0099000598Z
10. ACCESSORIES
Male-to-male accessory cable ..................................................................................................94500109
11. BEFORE RETURNING FOR REPAIRS
For REPAIRS OR RETURNS, visit 365rma.com
Visit batterychargers.com for Replacement Parts.
12. LIMITED WARRANTY
Go to batterychargers.com to register your product online.
SCHUMACHER ELECTRIC CORPORATION, 14200 FAA BLVD., FORT WORTH, TX 76155, MAKES
THIS LIMITED WARRANTY TO THE ORIGINAL RETAIL PURCHASER OF THIS PRODUCT. THIS
LIMITED WARRANTY IS NOT TRANSFERABLE OR ASSIGNABLE.
Schumacher Electric Corporation (the “Manufacturer”) warrants this jump starter for one (1) year and
the internal battery for ninety (90) days from the date of purchase at retail against defective material
or workmanship that may occur under normal use and care. If your unit is not free from defective
material or workmanship, Manufacturer’s obligation under this warranty is solely to repair or replace
your product with a new or reconditioned unit at the option of the Manufacturer. It is the obligation of
the purchaser to forward the unit, along with proof of purchase and mailing charges prepaid to the
Manufacturer or its authorized representatives in order for repair or replacement to occur.
Manufacturer does not provide any warranty for any accessories used with this product that are
not manufactured by Schumacher Electric Corporation and approved for use with this product.
This Limited Warranty is void if the product is misused, subjected to careless handling, repaired, or
modied by anyone other than Manufacturer or if this unit is resold through an unauthorized retailer.
Manufacturer makes no other warranties, including, but not limited to, express, implied or statutory
warranties, including without limitation, any implied warranty of merchantability or implied warranty of
tness for a particular purpose. Further, Manufacturer shall not be liable for any incidental, special or
consequential damage claims incurred by purchasers, users or others associated with this product,
including, but not limited to, lost prots, revenues, anticipated sales, business opportunities, goodwill,
business interruption and any other injury or damage. Any and all such warranties, other than the
limited warranty included herein, are hereby expressly disclaimed and excluded. Some states do not
allow the exclusion or limitation of incidental or consequential damages or length of implied warranty,
so the above limitations or exclusions may not apply to you. This warranty gives you specic legal
rights and it is possible you may have other rights which vary from this warranty.
THIS LIMITED WARRANTY IS THE ONLY EXPRESS LIMITED WARRANTY AND THE
MANUFACTURER NEITHER ASSUMES OR AUTHORIZES ANYONE TO ASSUME OR MAKE
ANY OTHER OBLIGATION TOWARDS THE PRODUCT OTHER THAN THIS WARRANTY.
Schumacher
®
is a registered trademark of Schumacher Electric Corporation.

• 13 •
Arrancador y Fuente de Poder de CC
MANUAL DEL USUARIO
POR FAVOR CONSERVE ESTE MANUAL DEL USUARIO Y LEALO ANTES DE
CADA USO. En este manual le explica cómo utilizar la fuente de poder de manera
segura y conable. Por favor, lea y siga las siguientes instrucciones y precauciones.
PARA MODELOS
SJ1427
SJ1332
CONTIENE UNA BATERÍA SELLADA DE ÁCIDO-PLOMO NO
DERRAMABLE QUE DEBE DESECHARSE APROPIADAMENTE.
ADVERTENCIA: Posible riesgo de una explosión. El contacto con una batería de
ácido puede causar quemaduras y ceguera. Manténgase alejado de los niños.
1. INSTRUCCIONES IMPORTANTES DE SEGURIDAD – GUARDE ESTAS INSTRUCCIONES.
ADVERTENCIA: RIESGO DE GASES EXPLOSIVOS.
TRABAJAR CERCA DE UNA BATERÍA DE PLOMO-ÁCIDO ES PELIGROSO. LAS BATERÍAS GENERAN
GASES EXPLOSIVOS DURANTE SU FUNCIONAMIENTO NORMAL. ES IMPORTANTE QUE SIGA LAS
INSTRUCCIONES CADA VEZ QUE UTILICE LA UNIDAD.
Para disminuir el riesgo de explosión de la batería, siga estas instrucciones, al igual que las
recomendaciones publicadas por el fabricante de la batería y de cualquier equipo que se utilizará cerca
de la batería. Verique las señales de advertencia que se hayan colocado en estos productos y en el motor.
ADVERTENCIA: EL RIESGO DE DESCARGA ELÉCTRICA O INCENDIO.
1.1 Manténgase alejado de los niños.
1.2 No desarme la unidad; hágalo revisar por una persona capacitada que efectúe reparaciones cuando
necesite servicio de mantenimiento o una reparación. Volver a ensamblar la unidad en forma incorrecta
puede provocar riesgo de incendio o descarga eléctrica.
1.3 No utilice la unidad para pasar corriente a un vehículo mientras se carga la batería interna.
1.4 No recargue la unidad con una extensión dañada.
1.5 La unidad se calienta durante la carga y debe tener una ventilación adecuada.
1.6 No coloque la unidad sobre materiales inamables como alfombras, tapicería, papel, cartón, etc.
1.7 Coloque la unidad tan lejos de la batería que se está cargando como los cables lo permitan.
1.8 No exponga la unidad a la lluvia o la nieve.
1.9 Nunca intente arrancar una batería congelada.
1.10 Nunca coloque la unidad directamente sobre la batería que se está cargando.
1.11 Para evitar la formación de arcos eléctricos, nunca permita que las pinzas se toquen entre sí o estén en
contacto con la misma pieza de metal.
1.12 El uso de un accesorio no recomendado ni vendido por el fabricante del arrancador puede ocasionar
daños en la unidad o lesiones corporales.
1.13 Nunca opere la unidad si está dañado.
1.14 Si otra persona usa la unidad, asegúrese de que esté bien informada sobre cómo usarlo de manera
segura y además, de que haya leído y comprendido las instrucciones de funcionamiento.
1.15 La unidad NO está diseñado para ser instalado como reemplazo de la batería del vehículo.
1.16 Utilícelo SOLO en vehículos, barcos y tractores de jardín alimentados con un sistema de batería de 12 V CC.
1.17 Si el motor no arranca luego de realizar el número recomendado de intentos, desconecte y verique la
unidad en busca de otros problemas.
1.18 Utilice la unidad para recargar baterías de plomo-ácido solamente. No lo utilice para cargar las baterías
de celdas secas que habitualmente se colocan en los aparatos domésticos.
1. INSTRUCCIONES IMPORTANTES DE SEGURIDAD

• 14 •
2. PRECAUCIONES DE SEGURIDAD PERSONAL
2.1 Restricciones de uso:
El convertidor no se puede utilizar con dispositivos o sistemas de soporte vital. El incumplimiento de
este convertidor puede esperar razonablemente causar fallo de ese dispositivo de soporte de vida o
sistema, o para afectar la seguridad o ecacia de ese dispositivo o sistema.
2.2 Use protección completa para los ojos y ropa protectora cuando trabaje cerca de baterías de plomo-
ácido. Siempre cuente con la presencia de otra persona para obtener ayuda.
2.3 Tenga a la mano bastante agua fresca, jabón y bicarbonato de sodio en caso de que el ácido de la
batería entre en contacto con los ojos, la piel o la ropa. Lave inmediatamente con agua y jabón y busque
atención médica.
2.4 Si el ácido de la batería entra en contacto con los ojos, enjuague inmediatamente durante 10 minutos
como mínimo y busque atención médica.
2.5 Neutralice el ácido derramado abundantemente con bicarbonato de sodio antes de intentar limpiarlo.
2.6 Retire todos los objetos metálicos de su cuerpo (anillos, pulseras, collares y relojes). Una batería puede
producir una corriente de cortocircuito lo sucientemente alta como para soldar un anillo al metal, lo que
ocasionaría una quemadura grave.
2.7 NUNCA fume o permita la presencia de chispas o llamas en la proximidad de una batería o motor.
3. CARACTERÍSTICAS
7
6
9
8
10
11
12
5
13
14
15
1
2
4
16
3
17
18
1. Medidor del compresor
2. Interruptor del compresor/inador
3. Puerto para inar
4. Puerto para desinar
5. Salidas de corriente continua de 12 Volt
6. Puerto USB
7. Fuente de poder USB, con interruptor
de apagado/encendido
8. Pantalla digital
9. Luz integrada para laborar
10. Botón de la pantalla
11. Interruptor de encendido/apagado
de la luz para laborar
12. Interruptor de encendido/apagado
del convertidor
13. Salidas de corriente alterna de 120 Volt
14. Puerto del cargador
15. Manguera del compresor
16. Pinzas para batería
17. Adaptadores
18. Manguera inador

• 15 •
4. PARA CARGAR LA BATERIA INTERNA DEL ARRANCADOR
IMPORTANTE: CARGUE LA UNIDAD INMEDIATAMENTE DESPUÉS DE ADQUIRIRLA, AL TÉRMINO
DE CADA USO Y CADA 30 DÍAS PARA MANTENER LA BATERÍA INTERNA DE LA UNIDAD
COMPLETAMENTE CARGADA Y PROLONGARÁ SU VIDA ÚTIL.
4.1 COMPROBACIÓN DEL NIVEL DE CARGA DE LA BATERÍA INTERNA
Compruebe el nivel de carga de la batería interna presionando el botón de la carátula. El indicador
digital demostrará el porcentaje de carga. Cargue la batería interna si la carátula muestra carga por
debajo del 100%.
NOTA: El porcentaje de carga de la batería interna es más connable si la unidad ha sido desconectada
de todos los accesorios y conexiones por unas horas.
4.2 LA CARGA DE LA BATERÍA INTERNA
Para cargar la batería interna de la unidad, utilice un cable de extensión (no incluido).
NOTA: Al utilizar una extensión inadecuada, se corre el riesgo de ocasionar un incendio o descargas eléctricas.
1. Conecte un cable de extensión en el puerto del cargador en la parte posterior de la unidad.
2. Conecte el cable de extensión en un tomacorriente eléctrico de 120 VCA.Mientras que la unidad está
conectado a una toma de CA, la luz LED verde en la parte posterior de la unidad se mantendrá encendida.
3. Monitorear el progreso de la carga pulsando el botón de pantalla en la parte frontal de la unidad.
Cuando la batería interna está completamente cargada, la pantalla mostrará 100. Para una carga
completa se puede tardar hasta 72 horas. Entonces, la unidad estará listo para usar.
4. Cuando está completamente cargada, el cargador se jará automáticamente en modo de
mantenimiento y mantendrá la batería a plena carga sin dañarla.
5. Cargue la unidad tan pronto como sea posible después de cada uso.
4.3 CÓMO CARGAR LA BATERÍA INTERNA CON EL VEHÍCULO EN MARCHA
También puede cargar la batería interna durante la conducción, utilizando un cable de carga de varón a
varón (p/n 94500109 – no incluido).
IMPORTANE: NO CARGAR LA BATERÍA INTERNA POR MÁS DE 30 MINUTOS, NI DEJAR LA BATERÍA SIN
SUPERVISIÓN. PODRÍA EXPLOTAR Y OCASIONAR DAÑOS MATERIALES O LESIONES CORPORALES.
1. Asegúrese de que el vehículo esté en marcha.
2. Inserte un extremo del cable auxiliar en la toma de corriente de 12V CC.
3. Inserte el otro extremo del cable auxiliar en el enchufe auxiliar del vehículo (encendedor).
NOTA: La luz LED VERDE no opera durante este método de carga. Al utilizar este método para cargar la
batería, se anula el modo de mantenimiento y la batería podría sobrecargarse.
4. Para supervisar el progreso de la carga, presione el botón de la pantalla en la parte frontal de la
unidad. Cuando la batería esta completamente cargada, primero desconecte el cable auxiliar de la
unidad y luego, de la toma del encendedor del vehículo.
NOTA: Desconectar completamente el cable del cargador cuando el motor no está funcionando.
5. INSTRUCCIONES DE OPERACIÓN
5.1 DE ARRANCAR UN VEHÍCULO
IMPORTANTE: Utilización de la función arranque del motor sin una batería instalada en el vehículo
dañará el sistema eléctrico del vehículo.
1. APAGUE el motor.
2. Ponga los cables de CD lejos de las aspas del ventilador, bandas, poleas u otras partes móviles.
3. En los vehículos con carga negativa a tierra (como en la mayoría de los vehículos), conecte la
pinza con el polo POSITIVO (ROJO) de la unidad al borne POSITIVO (POS, P, +) de la batería. A
continuación, conecte la pinza con el polo NEGATIVO (NEGRO) al chasis del vehículo o al bloque del
motor, lejos de la batería.
4. En los vehículos con carga positiva a tierra, conecte la pinza con el polo NEGATIVO (NEGRO) de
la unidad al borne NEGATIVO (NEG, N, -) de la batería. A continuación, conecte la pinza con el polo
POSITIVO (ROJO) al chasis del vehículo o al bloque del motor, lejos de la batería.
5. Coloque el interruptor en la posición de Encendido (ON).

• 16 •
NOTA: Cuando está conectada al vehículo, mostrará el voltaje de la batería del vehículo. Cuando está
conectada y en la posición encendido, exhibirá el voltaje igualado entre la batería del vehículo y la
batería interna.
6. Accione el encendido del motor durante no más de 8 segundos. Si el motor no enciende, espere
2 minutos antes de arrancar de nuevo.
7. Una vez que haya arrancado el motor, coloque el interruptor en la posición de Apagado (OFF) y retire
la unidad de la batería.
8. Cargue la unidad.
5.2 EL USO DE PUERTO USB
El puerto USB provee poco más de 2A por 5V de CD.
1. Asegúrese que las pinzas estén jas en el compartimiento.
2. Encienda la unidad (ON).
3. Conecte su aparato en el puerto USB.
4. Cuando termine de usar el puerto USB, coloque el interruptor en la posición de Apagado (OFF).
5. Cargue la unidad.
5.3 CÓMO UTILIZAR LA LUZ DE TRABAJO
La luz de trabajo se controla mediante un interruptor deslizante de Encendido/Apagado (ON/OFF)
situado en la parte frontal de la unidad.
• Asegúrese de que la lámpara esté apagada (OFF) cuando la unidad se esté recargando o permanezca
almacenada.
• Coloque la unidad sobre una supercie plana cerca del área de trabajo.
• Asegúrese que las pinzas estén jas en el compartimiento.
5.4 PARA HACER FUNCIONAR UN APARATO DE 12V DE CD:
La unidad es una fuente de poder para cualquier accesorio de 12V de corriente directa que estén
equipados con enchufe de 12V. Utilícelo durante apagones, pesca o días de campo.
NOTA: no encienda un dispositivo de 12V mientras se esté cargando la batería interna de la unidad.
1. Asegúrese de que el dispositivo que desea cargar esté apagado (OFF) antes de insertar el enchufe
auxiliar de 12V CC en la toma auxiliar de 12V CC.
2. Abra la tapa protectora de la toma de alimentación de CC de la unidad.
3. Conecte el dispositivo de 12V CC a la toma de alimentación de CC y enciéndalo (si es necesario).
4. Cuando haya terminado de cargarse, apague el dispositivo de CC (si es necesario) y desenchúfelo de
la toma de alimentación de CC.
PRECAUCIÓN: no utilice la unidad en aparatos que consuman más de 20A de CC.
NOTA: si hace funcionar un dispositivo de 12 V CC durante mucho tiempo con la unidad, la batería se agotará
por completo. Recargue la unidad inmediatamente después de desconectar los dispositivos de 12V CC.
5.5 USO DEL COMPRESOR DE AIRE
NOTA: Para evitar el sobrecalentamiento, el compresor tiene protección térmica incorporada que
apagará el compresor antes de que se sobrecaliente. Si el compresor se apaga, espere unos minutos y
se reiniciará automáticamente cuando el compresor se enfríe.
ADVERTENCIA. Antes de usar el compresor, lea las instrucciones del objeto a inar. Evite sobre inar, no
exceda la presión de aire recomendado por el fabricante. Durante el uso, no desatienda el compresor.
1. Retire la manguera del compresor de aire desde el compartimiento de almacenamiento.
2. Conecte el adaptador al vástago de la válvula por roscado sobre el extremo. Si es necesario, utilice
uno de los adaptadores adicionales.
3. Encienda el interruptor del compresor y comience a inar a la presión deseada o lleno total.
4. Cuando alcance la presión deseada, apague el interruptor del compresor jándolo en la posición OFF
(apagado), abra el jador y retire el conector del pivote de la válvula.
5. Deje que la unidad se enfríe.
6. Cargue la unidad nuevamente antes de guardarla.
NOTE: El compresor de aire tiene una capacidad de Máxima 150 PSI.

• 17 •
5.6 USO DEL INFLADOR
RIESGO DE EXPLOSIÓN.
Lea las instrucciones del producto que va a ser inado antes de usar el inador. Evite sobre inar, que el aire no
exceda lo recomendado por el productor. Nunca deje el compresor de aire sin atender mientras lo usa.
1. Asegúrese que las pinzas estén jas en el compartimiento.
2. Fije la manguera corrugada con el adaptador de la salida del inador de alto-ujo colocada cerca del
inador en la parte de atrás de la unidad.
3. El adaptador principal para la manguera corrugada adjunto puede adaptarse a 4 diferentes medidas. En
caso de necesitar otra medida diferente de adaptador se puede conectar al nal del adaptador principal.
4. Inserte el adaptador en el producto que va a ser inado.
5. Presione el selector del compresor/inador a la posición INFLATOR (inador) y comience a inar.
6. Cuando el artículo es inado al nivel deseado, presione el selector a la posición OFF (apagado) y quite
el adaptador.
Tiempo estimado para inar
Neumáticos para vehículos de 13 a 16˝ 6 a 24 minutos
Llantas para bicicleta 1 a 3 minutos
Balones deportivos 30 segundos
Estos valores son aproximados. Utilice el medidor del compresor de aire para
asegurarse de que se ha alcanzado el nivel de presión adecuado. No ine en exceso.
5.7 USO DEL DESINFLADOR
1. Asegúrese que las pinzas estén jas en el compartimiento.
2. Fije la manguera corrugada con la punta del adaptador de la salida del desinador de alto-ujo
colocada justamente en el lado de la unidad.
3. El adaptador principal jado a la manguera corrugada puede adaptarse a 4 diferentes medidas. En caso
de necesitar otra medida diferente de adaptador se puede conectar al nal del adaptador principal.
4. Inserte el adaptador en el producto que va a ser desinado.
5. Presione el selector del compresor/inador a la posición INFLATOR (inador) y desine el producto.
6. Cuando el artículo sea desinado al nivel deseado, presione el selector a la posición OFF (apagado) y
quite el adaptador.
5.8 ANTES DE USAR EL CONVERTIDOR
Instrucciones importantes de seguridad:
1. Mantenga ela unidad bien ventilada para que disperse el calor generado mientras se usa. Asegúrese
de que haya suciente espacio alrededor y hacia arriba para que los ventiladores de la unidad no
tengan obstrucción.
2. También verique que no exista fuego o ropa alrededor de la unidad.
3. Mantenga la unidad en lugar seco.
4. NO permita que la unidad entre en contacto con lluvia o humedad.
5. NO opere la unidad si la supercie donde está montada o cualquier otra supercie se encuentra
mojada. El agua o cualquier otro líquido conducen electricidad, y esto podría conducir a provocar
serios daños y hasta la muerte.
6. No coloque la unidad cerca de calentadores, radiadores u otra fuente de calor.
7. Tampoco exponga la unidad a los rayos directos del sol. Las temperaturas ideales para la operación
de la unidad oscila entre los 50° y 80°F.
8. No use el convertidor cerca del compartimiento del motor donde gases o humos se acumulan.
9. De ningún modo modique las salidas de Corriente Alterna CA.
5.9 USO DEL CONVERTIDOR
Es de suma importancia saber la carga continua en vatios del aparato que desea usar con el convertidor.
La unidad debe ser usada con aparatos que operados en 200 vatios o menos. Si los vatios no están
marcados en el aparato use sólo aparatos que usen menos de 1,7 amperes de Corriente Alterna CA.
Aparatos como televisiones, ventiladores o motores eléctricos requieren energía adicional para encender
(comúnmente conocido como arranque o máxima energía). La unidad podría suplementar u operar en

• 18 •
vatios; de cualquier forma aún los aparatos clasicados por debajo de los 200 vatios pueden exceder de la
capacidad del convertidor y lo apaga automáticamente por sobrecarga.
No use el convertidor con un producto que absorbe más vatios de los que el convertidor puede proveer,
esto podría dañar el convertidor y el producto.
Asegúrese que el aparato que sea usado sea compatible con las ondas senoidales del convertidor.
ATENCIÓN: Realice siempre una prueba para asegurar que el convertidor opere un equipo o un aparato.
En caso de sobre carga, el mismo convertidor está diseñado para apagarse automáticamente. Este
rasgo de seguridad previene daño alguno al convertidor mientras se pone a prueba el aparato a un
promedio de 200 vatios.
Si re requiere operar dos aparatos, hágase la operación de uno por uno, para evitar sobrecarga al
convertidor y perder energía. La absorción de cada uno de los aparatos no debe exceder la capacidad
de salida de vatios en una Operación Continua.
IMPORTANTE: Si usted esta usando el convertidor de energía para operar cualquier tipo de cargador
de batería, monitoree la temperatura del cargador de baterías por aproximadamente 10 minutos. Si
el cargador de baterías se pone anormalmente caliente, desconéctelo del convertidor inmediatamente.
Usted puede utilizar una extensión del convertidor al aparato sin disminuir la carga generada por el
convertidor. Para mejores resultados de operación, el cable de extensión debe ser de 16 AWG (1,31
mm2) o de más intensidad pero, que no exeda de 50 pies (15 metros).
IMPORTANTE: Este convertidor utiliza una forma de onda sinusoidal modicada, que no es
exactamente lo mismo que la electricidad de la compañia de energía eléctrica. Para los siguientes
dispositivos, le recomendamos factiblemente que tenga cuidado y revise el manual del dispositivo para
asegurarse de que es compatible con la forma de onda modicada:
1. Fuentes de energía de forma conmutada
2. Fuentes de energía lineal
3. Transformadores clase2
4. Condensadores de capacidad
5. Motores ligeros
6. Motores de ventilador
7. Hornos de microondas
8. Lámparas ourescentes y de alta intensidad (con balastra)
9. Cargadores de baterías sin tranformador
Uso del convertidor con cualquiera de estos dispositivos puede hacer que el dispositivo funcione más
caliente o sobrecalentamiento.
5.10 OPERANDO CON UN APARATO DE 120V DE CORRIENTE ALTERNA
1. Asegúrese que las pinzas estén jas en el compartimiento.
2. Primeramente, abrir la cubierta de salida de corriente CA en el panel del frente de la unidad.
3. Asegúrese de que el aparato de 120V a ser operado este APAGADO (OFF).
4. Conecte el aparato de 120V en la salida de corriente CA, y gire el interruptor del convertidor a la
posición ENCENDIDO. NOTA: Cuando el convertidor se enciende, entonces mostrará el voltaje total
usado por el aparato que operado por el convertidor.
5. Enciende el aparato de 120V.
6. Si el aparato no funciona adecuadamente al momento de conectarlo al convertidor, presione el botón
ON, OFF, y ON una y otra vez consecutivamente. Si este proceso no tiene éxito, quiere decir que el
convertidor no tiene la capacidad requerida para operar el aparato deseado.
7. Cargue la unidad tan pronto sea posible después de cada uso.
ADVERTENCIA: RIESGO DE DESCARGA ELÉCTRICA.
Una operación incorrecta de su convertidor podría resultar en daños y lesiones personales. La salida
del convertidor es de 110V de CA y podría electrocutar o dañar de la misma forma que un tomacorriente
doméstico de pared.
NOTA: La cantidad máxima de carga es de 200 vatios. No use el convertidor con un producto que
absorba más de 200 vatios, porque podría causar daño al convertidor y al producto.

• 19 •
6. INSTRUCCIONES DE MANTENIMIENTO
6.1 Después de usar y antes de realizar mantenimiento, desenchufe y desconecte la unidad (ver secciones 3 y 4).
6.2 Utilice un paño seco para limpiar la corrosión de toda la batería y otra suciedad o aceite de los
terminales, cables y carcasa de la unidad.
6.3 Asegúrese de que todas las piezas de la unidad estén bien instaladas y en buenas condiciones para su función.
6.4 Cualquier servicio debe realizarse por personal calicado en el ramo.
7. INSTRUCCIONES PARA EL MANEJO Y ALMACENAMIENTO
7.1 Almacene en el interior, en un lugar fresco y seco.
7.2 No guarde las pinzas en asas, enganchados entre sí, en o cerca de metales o enganchados en cables.
Las pinzas en la unidad están energizadas. Cuando el interruptor se encuentra en la posición ON y
producen arco o chispas si hacen contacto entre sí. Para evitar arco accidental, siempre mantenga las
pinzas en los soportes de almacenaje y el interruptor en la posición OFF cuando el arrancador no se
está usando para arranque inmediato de un vehículo.
7.3 Si la unidad se mueve alrededor del taller o se transporta a otra localidad, trate de evitar/prevenir daño
a los cables,pinzas y al arrancador. El ignorar estas recomendaciones, podría llegar a causarle daños
personales o de inmueble.
IMPORTANTE: No use o almacene la unidad, bajo ninguna circustancia, en áreas donde puede causar
daño alguno en caso de que la batería derrame ácido.
7.4 IMPORTANTE:
• CARGUE INMEDIATAMENTE DESPUÉS DE CADA USO.
• MANTENGA LA UNIDAD COMPLETAMENTE CARGADA.
Cargue la fuente de poder inmediatamente después de comprarla, después de cada uso y cada 30 días.
La temperatura afecta a todas las baterías. La temperatura ideal de almacenaje es a los 70 grados
Fahrenheit. La batería interna se va descargando (pierde potencia) con el pasar del tiempo, especialmente
en los ambientes cálidos. Si se deja la batería en estado de descarga, puede sufrir daños permanentes. Para
asegurar el rendimiento satisfactorio y evitar daños permanentes, cargue la batería interna mensualmente.
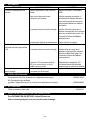
8. LOCALIZACIÓN Y SOLUCIÓN DE PROBLEMAS
PROBLEMA CAUSA POSIBLE SOLUCIÓN
La unidad no arranca mi auto. El Interruptor del arrancador/USB
no esta ENCENDIDO.
Las pinzas no hacen buena
conexión a la batería.
La batería interna no está
cargada.
La batería del vehículo esta
defectuosa.
Encienda el interruptor del
arrancador/USB.
Asegúrese de que existe
buena conexión a la batería y
la carrocería. También que los
puntos de las conexiones estén
limpios. Gire las pinzas para una
conexión efectiva.
Compruebe el estado de carga
de la batería presionando el botón
en la unidad. Vea la sección de
Comprobación del Nivel de Carga
de la Batería Intern de este manual.
Haga un chequeo de la batería.

• 20 •
PROBLEMA CAUSA POSIBLE SOLUCIÓN
La unidad no pone a funcionar mi
aparato de 12V.
El aparato de 12V no enciende.
La batería interna no está
cargada.
El aparato de 12V absorbe más
de 20A, tiene un corto circuito, o
el fusible interno se ha dañado.
Allumez le 12V la machine.
Encienda el aparato de 12V.
Compruebe el estado de carga de
la batería presionando el botón
en la unidad. Vea la sección
Comprobación del Nivel de Carga
de la Batería Interna de este
manual.
Desconecte el aparato de 12V.
El fusible interno de 20A necesita
ser reemplazado por un técnico
calicado.
La batería de la unidad no retiene
la carga.
La batería está en malas
condiciones (No recibirá carga).
Haga un chequeo de la batería.
9. REPUESTOS
Juego de accesorios del compresor de aire (3 adaptadores de manguera) ..................... 2299001425Z
Juego de accesorios del inador: (Manguera para inador/desinador
al extremo de la unidad y 3 adaptadores para la manguera) ............................................ 0099000598Z
10. ACCESORIOS
Cable accesorio macho a macho .............................................................................................94500109
11. ANTES DE DEVOLVER A REPARACIONES
Para REPARACIONES O DEVOLUCIONES, visite 365rma.com
Visite batterychargers.com para obtener piezas de repuesto.
La page est en cours de chargement...
La page est en cours de chargement...
La page est en cours de chargement...
La page est en cours de chargement...
La page est en cours de chargement...
La page est en cours de chargement...
La page est en cours de chargement...
La page est en cours de chargement...
La page est en cours de chargement...
La page est en cours de chargement...
-
 1
1
-
 2
2
-
 3
3
-
 4
4
-
 5
5
-
 6
6
-
 7
7
-
 8
8
-
 9
9
-
 10
10
-
 11
11
-
 12
12
-
 13
13
-
 14
14
-
 15
15
-
 16
16
-
 17
17
-
 18
18
-
 19
19
-
 20
20
-
 21
21
-
 22
22
-
 23
23
-
 24
24
-
 25
25
-
 26
26
-
 27
27
-
 28
28
-
 29
29
-
 30
30


Schumacher SJ1332 Le manuel du propriétaire
- Taper
- Le manuel du propriétaire
- Ce manuel convient également à
dans d''autres langues
- English: Schumacher SJ1332 Owner's manual
- español: Schumacher SJ1332 El manual del propietario
Documents connexes
-
Schumacher SJ1332 1200 Peak Amp Portable Power Station Manuel utilisateur
-
-
Schumacher FR01374 1200 Peak Amp Portable Power Station Le manuel du propriétaire
-
-
-
-
-
-