
40546-1507
1
18
Serial #:
IMPORTANT
GETTING STARTED
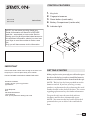
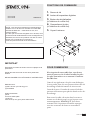
CONTROL FEATURES
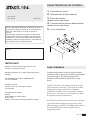
Record the serial number from the tag on the door front.
Keep keys in a secure place away from children.
1. Key lock
2. Fingerprint scanner
3. Reset button (inside safe)
4. Battery Compartment (inside safe)
5. Indicator light
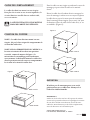
When you rst receive your safe you will need to open
the door with the key in order to install the baeries.
Baeries are included and are located inside the safe.
To open the safe, insert key into lock and turn
clockwise until the door automatically opens.
NOTE: You must turn the key back to the locked
position before you are able to close and lock the
door.
NOTE: is key has also been provided incase the
baeries run low. If you lose your key, you may
purchase a replacement key by referencing the serial
number located on the front of the door. See section
regarding replacement keys for further information.
Instructions
QAS-1512-B
QAS-1545-B
NOTE: You can store your Key # and your
Serial # information on S
tack-On’s SECURE
web site – www.stack-on.com under Service.
Storing your Key # will provide instant access to
this important inform
ation, should you ever lose
your keys or need the num
ber to order a new
set.
Only you will have access to this information.
DO NOT STORE YOUR KEYS INSIDE THE SAFE.
®
Tools Required:
Drill
Flat Head Screwdriver
10 mm Wrench
3/16” (5 mm) drill bit for drilling into wood
Hardware Included:
(4) M6 x 20 mm (3/4” long) Screws
(4) Washers

40546-1507
2
18
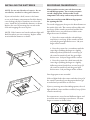
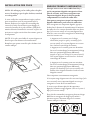
INSTALLING THE BATTERIES
NOTE: Do not mix old and new baeries. Do not
mix alkaline, standard or rechargeable baeries.
NOTE: If the baeries are low the indicator light will
ash blue when you start scanning. Replace with 4
new AA alkaline baeries as shown.
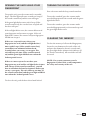
RECORDING FINGERPRINTS
When you rst receive your safe there are no
recorded ngerprints. For security you must
record a ngerprint. Failure to do so will
compromise the safety and security of the safe.
You can record up to 20 dierent ngerprints
for opening the safe.
To record a ngerprint, rst press the Reset Buon on
the inside of the safe. e scanner will turn blue with
two beeps (if the sound is turned on) and the blue
light ashes twice, you will then record the same
nger three times as follows:
1. Press the scanner with the selected nger
until there is one beep (if the sound is turned
on) and the green light ashes once. Li your
nger o the scanner.
2. Press the scanner for a second time with the
same nger (holding the nger in a slightly
dierent position) until there is one beep (if
the sound is turned on) and the green light
ashes once. Li your nger o the scanner.
3. Press the scanner for a third time with the
same nger (holding the nger in a slightly
dierent position) until there are two beeps (if
the sound is turned on) and the green light
ashes twice. Li your nger o the scanner.
If the red light ashes three times with three beeps (if
the sound is turned on) your ngerprint did not get
recorded and you will have to start over.
Your ngerprint is now recorded.
If you try entering more than 20 ngerprints, the red
light will ash 5 times and there will be 5 beeps (if the
sound is turned on).
For convenience, record several dierent ngers and
record the most used nger several times. Position
nger on scanner as shown below.
If your safe includes a shelf, remove it for beer
access to the baery compartment. Push the baery
cover locking tab with a screwdriver to release the
cover. Install the (4) AA alkaline baeries as shown.
Replace the cover by inserting the rear tabs in the
slots and snapping the cover in place.

40546-1507
3
18
OPENING THE SAFE USING YOUR
FINGERPRINT
TURNING THE SOUND OFF/ON
CLEARING THE MEMORY
To turn the sound o, press the scanner with a
recorded ngerprint for 10 seconds until the green
light ashes twice.
To turn the sound on, press the scanner with a
recorded ngerprint until you hear two beeps and
the green light ashes twice.
Your safe comes with the beep sound turned on.
To clear the memory of all recorded ngerprints,
locate the reset buon on the inside of the safe
and press this buon for about 5 seconds until
the green light ashes 10 times with 10 beeps (if
the sound is turned on). All recorded scans will
be erased.
NOTE: For security you must record a
ngerprint. Failure to do so will compromise
the safety and security of the safe.
To open the safe, press the scanner with a recorded
nger. e blue light will come on with one beep (if
the sound is turned on) and the scan will begin.
If the green light ashes twice with 2 beeps (if the
sound is turned on), the scan has been accepted and
the door will open.
If the red light ashes once, the scanner did not read
your ngerprint and you must try again. If the red
light ashes 3 times, the scanner read your ngerprint
and did not accept it.
If there are 3 rejected scans, where your
ngerprint was read, and the red light ashes 5
times with 5 beeps (if the sound is turned on),
you will have an automatic lockout for 60
seconds before you can try a scan again. e
safe will beep one time (if the sound is turned
on) and the green light will ash once when the
lockout period is over.
If there is 1 more rejected scan where your
ngerprint was read and the red light ashes 5 times
with 5 beeps (if the sound is turned on), you will
have an automatic lockout for 5 minutes before you
can try a scan again. e safe will beep one time (if
the sound is turned on) and the green light will ash
once when the lockout period is over.
To close the safe, push the door closed until locked.

STACK-ON PRODUCTS CO.
P.O. BOX 489, WAUCONDA, IL 60084
40546-1507
4
18
IMPORTANT
Keep your keys in a secure place, away from
children. Keep this record of your serial number in a
secure place separate from your safe. To order a
replacement key set, follow the instructions on the
aached form.
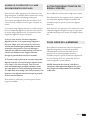
SELECTING A LOCATION
SECURING THE SAFE
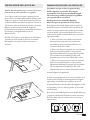
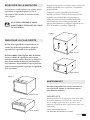
NOTE ON LOCKING THE SAFE: e safe
needs to be in an upright position, as shown in
gure 1, for the locking mechanism to function
properly. Failure to mount the safe in the
corrrect upright position will compromise the
safety and security of the safe.
Secure the safe to a shelf using the predrilled
mounting holes in the safe and hardware provided.
Place the safe in the desired location and mark the
mounting holes to be used with a pencil. Move the
safe and drill the pilot holes for the screws. For
mounting to a shelf, drill 3/16” diameter pilot
holes and aach the safe using the 3/4“ screws and
washers. (Figure 2)
Figure 1
QAS-1512-B
QAS-1512-B
QAS-1545-B
QAS-1545-B
Figure 2
THE SAFE SHOULD ALWAYS BE KEPT
OUT OF THE REACH OF CHILDREN.
e safe must be mounted to a shelf
. For optimal
safety and security, the safe should be installed in
an isolated, dry and secure area.
NOTE: is safe must be mounted to a shelf.
Failure to do so will compromise the safety and
security of the safe.
Do not use glass cleaners or sprays on this safe.
Clean with a damp cloth.
MAINTENANCE

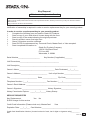
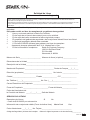
Key Request
“This is not a Registration Form”
Verification of ownership is required in order to receive replacement key for your security product.
In order to receive a replacement key to your security product:
1. Complete the following form and send to Stack-On Products.
2. Send a copy of your valid driver’s license along with the form.
3. Send a copy of the receipt showing the original purchase.
4. Security product owner must sign form.
5. Owner’s signature must be notarized.
6. Send $10.00 for replacement key. Personal Check, MasterCard, or Visa accepted.
7. Send completed information to:
Stack-On Products Company
1360 N. Old Rand Road
P.O. box 489
Wauconda, IL 60084
Serial Number______________________ Key Number (if applicable) _______
Unit Dimensions________________________________________
Unit Description___________________________________________________________
Owner’s Name ____________________________________ Date Purchased___/___/____
Owner’s Address ___________________________ Unit or Apt Number _________________
City ___________________________ State _______________ Zip Code________________
Telephone Number: (____)___________________ Fax Number: (____)___________________
Owner’s Email Address: ________________________________________________________
Owner’s Signature __________________________ Notary Signature________________
Notary Commission Expires: _____/_____/_____ Notary Stamp
SERVICE REQUESTED
Key Replacement: Yes No
$10.00 charge for this service
Credit Card Information (Please circle one) MasterCard Visa
Expiration Date: ___/___/___ Card Number:______________________________________
Credit Card Identification Number (Located on back of card, last 3 digits on signature strip)_________
9/07
NOTE: You can store your Key # and your Serial # information on Stack-On’s SECURE web site – www.stack-on.com under Service.
Storing your Key # will provide instant access to this important information, should you ever lose your keys or need the number
to
order a new set.
Only you will have access to this information.
®
40546-1507
5
18

40546-1507
6
18
THIS WARRANTY GIVES YOU SPECIFIC LEGAL RIGHTS. YOU MAY ALSO HAVE OTHER RIGHTS
WHICH VARY FROM STATE TO STATE.
IN NO EVENT SHALL STACK-ON’S OBLIGATION UNDER THIS WARRANTY EXCEED THE PRICE
OF THE PRODUCT.
STACK-ON’S LIABILITY FOR ANY BREACH OF THIS WARRANTY SHALL BE LIMITED
EXCLUSIVELY TO REPAIR OR REPLACEMENT OF THE DEFECTIVE PRODUCT, AS DESCRIBED
ABOVE, OR A REFUND OF THE PURCHASE PRICE OF THE PRODUCT.
STACK-ON WILL NOT, UNDER ANY CIRCUMSTANCES, BE LIABLE TO THE INITIAL CONSUMER
FOR ANY INCIDENTAL, CONSEQUENTIAL, SPECIAL, EXEMPLARY, OR PUNITIVE DAMAGES
ARISING OUT OF THE PURCHASE OR USE OF ANY STACK-ON PRODUCTS, INCLUDING THE
SAFES.
THIS WARRANTY IS EXCLUSIVE AND EXPRESSLY IN LIEU OF ALL OTHER WARRANTIES
EXPRESSED OR IMPLIED INCLUDING THE WARRANTIES OF MERCHANTABILITY AND FITNESS
FOR A PARTICULAR PURPOSE, WHICH ARE HEREBY DISCLAIMED AND EXCLUDED. STACK-ON
SHALL NOT BE SUBJECT TO ANY OTHER OBLIGATIONS OR LIABILITIES. STACK-ON NEITHER
ASSUMES NOR AUTHORIZES ANY OTHER PERSON TO ASSUME FOR IT, ANY OTHER LIABILITY
IN CONNECTION WITH THE SALE OF STACK-ON’S STEEL SAFES.
THIS WARRANTY DOES NOT COVER ANY PRODUCT, OR ANY PART OF ANY PRODUCT, WHICH
HAS BEEN SUBJECT TO EXCESSIVE USE, ACCIDENT, NEGLIGENCE, ABUSE OR MISUSE,
INCORRECT MAINTENANCE, ALTERATION OR REPAIR BY ANYONE OTHER THAN STACK-ON. IN
ADDITION, THIS WARRANTY DOES NOT COVER ANY ACCESSORIES OR PARTS USED WITH OR
IN THE PRODUCT WHICH ARE NOT INCLUDED WITH THE ORIGINAL PURCHASE.
If Stack-On is properly notified during the three-year warranty period and, after inspection confirms there
is a defect, Stack-On will, at its sole option, provide repair parts or exchange the product at no charge, or
refund the purchase price of the product.
Stack-On Products Company
1360 North Old Rand Road
Wauconda, IL 60084
If you believe there is a defect in material or workmanship in your Steel Safe during the three-year
warranty period, please contact our customer service department, by regular mail or email at the address
listed below, and include with your correspondence proof of purchase information and the model number
of the safe.
Stack-On Products Co. (“Stack-On”) Steel Safes are warranted to be free from defects in material and
workmanship for a period of three (3) years from the date of original purchase by a consumer. This
warranty extends to the initial consumer only.
LIMITED THREE YEAR WARRANTY
STEEL SAFES
®

40546-1507
7
18
IMPORTANT
POUR COMMENCER
Instructions
No série :
FONCTIONS DE COMMANDE
Enregistrer le numéro de série inscrit sur la plaque de la
porte avant.
Garder les clés en lieu sûr et hors de la portée des
enfants.
NE PAS RANGER LES CLÉS DANS LE COFFRE-FORT.
5. Voyant lumineux
Pour ouvrir le core, clé insérer dans la serrure et
tourner vers la droite jusqu'à ce que la porte ouvre
automatiquement. REMARQUE: Vous devez
remere la clé à la position verrouillée avant que
vous êtes en mesure de fermer et verrouiller la
porte.
1. Serrure à clé
2. Lecteur d’empreintes digitales
3. Bouton de réinitialisation
(à l’intérieur du coffre-fort)
4. Compartiment à piles
(à l’intérieur de coffre-fort)
À la réception de votre core-fort, vous devrez
ouvrir la porte avec la clé an d’installer les piles.
Les piles sont incluses et se trouvent à l’intérieur
du core-fort.
Cee clé sert également si les piles sont déchargées.
Si vous perdez votre clé, vous pourrez acheter une clé
de rechange à l’aide du numéro de série inscrit à
l’avant de la porte. Consultez la section à la n des
présentes instructions pour plus de détails sur les clés
de rechange.
NO
TE : Vous pouvez enregistrer les renseignements
relatifs à vos nº de clés et nº de série sur le site W
eb
sécurisé de Stack-On – www.stack-on.com, à la
rubrique Service
Une fois que vous aurez enregistré vos nº de clés, vous
pourrez accéder instantanément à ces renseignem
ents
essentiels, au cas où vous perdriez vos clés ou auriez
besoin d’en commander un nouveau jeu.
Vous seul pourrez accéder à ces informations.
®
QAS-1512-B
QAS-1545-B
Outils nécessaires:
percer
Tournevis à tête plate
10 Clé mm
Foret 3/16 "(5 mm) pour percer dans le bois
Matériel inclus:
(4) M6 x 20 mm (3/4 "de long) Vis
(4) Rondelles

40546-1507
8
18
NOTE: Si les piles sont faibles le voyant clignote en
bleu lorsque vous démarrez la numérisation.
Remplacer par quatre nouvelles piles alcalines AA
comme indiqué.
INSTALLATION DES PILES
NOTA : Ne mélangez pas les vieilles piles et les piles
neuves. Ne mélangez pas les piles alcalines, standard
ou rechargeables.
ENREGISTREMENT EMPREINTES
Si votre core-fort comprend une étagère, enlever
pour un meilleur accès au compartiment de la
baerie. Enfoncez les onglets de verrouillage du
couvercle à l’aide d’un tournevis pour dégager le
couvercle. Installez les 4 piles alcalines (AA) de la
manière illustrée. Remeez le couvercle en place en
insérant ses onglets arrière dans leur rainure, puis en
l’encliquetant.
Lorsque vous recevez votre core-fort il n'y a
pas les empreintes digitales enregistrées. Pour
plus de sécurité, vous devez enregistrer une
empreinte digitale. Ne pas le faire risque de
compromere la sécurité du core-fort.
Vous pouvez enregistrer jusqu'à 20 empreintes
digitales diérentes pour ouvrir le core-fort.
Pour enregistrer une empreinte digitale, appuyez
d'abord sur le bouton de réinitialisation à l'intérieur
du core-fort. Le scanner deviendra bleu avec deux
bips (si le son est activé) et le voyant clignote bleu
deux fois, vous serez alors enregistrer le même doigt
trois fois comme suit:
1. Appuyez sur le scanner avec le doigt
sélectionné jusqu'à ce qu'il y est un bip (si le
son est activé) et le voyant clignote en vert une
fois. Soulevez votre doigt du scanner.
2. Appuyez sur le scanner pour une deuxième
fois avec le même doigt (en maintenant le doigt
dans une position légèrement diérente)
jusqu'à ce qu'il y est un bip (si le son est activé)
et le voyant clignote en vert une fois. Soulevez
votre doigt du scanner.
3. Appuyez sur le scanner pour une troisième
fois avec le même doigt (en maintenant le doigt
dans une position légèrement diérente)
jusqu'à il ya deux bips (si le son est activé) et la
lumière verte clignote deux fois. Soulevez votre
doigt du scanner.
Si le voyant rouge clignote trois fois avec trois bips (si le
son est activé) votre empreinte digitale ne soit pas
enregistrée et vous devrez recommencer.
Votre empreinte est maintenant enregistrée.
Si vous essayez d'entrer plus de 20 empreintes
digitales, la lumière rouge clignote 5 fois et il y aura 5
bips (si le son est activé).
Pour plus de commodité, enregistrer plusieurs doigts
diérents et enregistrer le doigt le plus utilisé à
plusieurs reprises. Position doigt sur le scanner
comme indiqué ci-dessous.

40546-1507
9
18
OUVRIR LE COFFRE-FORT À L’AIDE
DES EMPREINTES DIGITALES
ACTIVATION/DÉSACTIVATION DU
SIGNAL SONORE
POUR VIDER DE LA MÉMOIRE
Pour eacer la mémoire de toutes les empreintes
digitales enregistrées, localisez le bouton de
réinitialisation à l'intérieur du core-fort et
appuyez sur ce bouton pendant environ 5
secondes jusqu'à ce que le voyant vert clignote 10
fois avec 10 bips (si le son est activé). Tous les
scans enregistrées seront eacées.
Pour désactiver le son, appuyez sur le scanner avec
une empreinte digitale enregistrée pendant 10
secondes jusqu'à ce que le voyant vert clignote
deux fois.
Pour activer le son, appuyez sur le scanner avec une
empreinte digitale enregistrée jusqu'à ce que vous
entendez deux bips et le voyant vert clignote deux
fois.
Votre core-fort est livré avec le bip sonore activé.
NOTE: Pour plus de sécurité, vous devez
enregistrer une empreinte digitale. Ne pas le
faire risque de compromere la sécurité du
core-fort.
Pour ouvrir le core, appuyer sur le scanner avec un
doigt enregistré. La lumière bleue viendra avec un bip
(si le son est activé) et le balayage commence.
Si le voyant vert clignote deux fois avec 2 bips (si le
son est activé), l'analyse a été acceptée et la porte va
ouvrir.
Si le voyant rouge clignote une fois, le scanner n'a pas
lu votre empreinte digitale et vous devez réessayer. Si
le voyant rouge clignote 3 fois, le scanner lire votre
empreinte digitale et n'a pas l'accepter.
Si il ya 3 scans rejetés, où votre empreinte
digitale a été lue, et le voyant rouge clignote 5
fois avec 5 bips (si le son est activé), vous avez
un lock-out automatique pendant 60 secondes
avant que vous pouvez essayer un balayage à
nouveau. Le core-fort émet un bip (si le son est
activé) et la lumière verte clignote une fois
lorsque la période de lock-out est terminé.
Si il ya une analyse plus rejeté où votre empreinte
digitale a été lue et le voyant rouge clignote 5 fois
avec 5 bips (si le son est activé), vous avez un
lock-out automatique pendant 5 minutes avant
que vous pouvez essayer un balayage à nouveau.
Le core-fort émet un bip (si le son est activé) et la
lumière verte clignote une fois lorsque la période
de lock-out est terminé.
Pour fermer le core-fort, poussez la porte fermée
jusqu'à verrouillée.

40546-1507
10
18
STACK-ON PRODUCTS CO.
P.O. BOX 489, WAUCONDA, IL 60084
IMPORTANT
Gardez vos clefs en lieu sûr, hors de la portée des enfants.
Conservez le présent document sur lequel gure le numéro
de série de la clef dans un endroit sûr, à l’écart de votre
core-fort. Pour obtenir un jeu de clés de remplacement,
suivez les directives sur le formulaire joint.
CHOIX DE L'EMPLACEMENT
FIXATION DU COFFRE
NOTE SUR LA FERMETURE DU COFFRE: Les
besoins sécuritaires d'être dans une position
verticale, comme le montre la gure 1, le
mécanisme de verrouillage pour fonctionner
correctement. Le défaut de monter le core-fort
dans la position verticale corrrect compromera
la sécurité et la sûreté du core-fort.
Fixer le core sur une étagère en utilisant les trous de
montage pré-percés dans le core et le matériel
fourni.
LA SÉCURITÉ DOIT TOUJOURS ÊTRE
HORS DE PORTÉE DES ENFANTS.
Placez le core-fort à l'endroit désiré et marquer les
trous de montage à utiliser avec un crayon. Déplacez
le core-fort et percer les trous pour les tirefonds.
Pour le montage d'une étagère, percer un 3/16" trou
de diamètre et xer le core-fort à l'aide des 3/4" vis
et rondelles. (Figure 2)
Figure 1
QAS-1512-B
QAS-1512-B
QAS-1545-B
QAS-1545-B
Figure 2
Le core-fort doit être monté sur une étagère.
Pour plus de sécurité et une sécurité optimales, la
sécurité doit être installé dans un endroit isolé,
sec et sécuritaire.
NOTE: Ce core-fort doit être monté sur une
étagère. Ne pas le faire risque de compromere la
sécurité du core-fort.
N’utilisez pas de neoyant pour verre ou de
pulvérisateur sur ce core-fort. Neoyez le à
l’aide d’un chion humide.
ENTRETIEN

Il faut procéder à une vérification du contrôle de possession avant de vous envoyer une clé de
remplacement .
Pour recevoir une clé de remplacement:
1. Remplissez le formulaire qui suit et faites-le parvenir à Stack-On Products.
2. Envoyez une copie de votre permis de conduire valide avec le formulaire.
3. Envoyez une copie du reçu indiquant l'achat original.
4. Le propriétaire de l'armoire de sécurité ou du coffre-fort doit signer le formulaire.
5. La signature du propriétaire doit être notariée.
6. Envoyez 10 $ pour une clé de remplacement. Ce montant peut être
payé par chèque, MasterCard ou Visa.
7. Envoyez tous les renseignements à : Stack-On Products Company
1360 N. Old Rand Road
P.O. Box 489
Wauconda, IL 60084
No de série______________________ Numéro de clé (le cas échéant) ________________
Dimensions de l'unité________________________________________________________
Description de l'unité___________________________________________________________
Nom du propriétaire _____________________________________ Date d'achat ___/___/____
Adresse du propriétaire ___________________________ No d'appartement _____________
Ville ___________________________ Province _______________ Code postal___________
Téléphone: (____)_____________________ Télécopieur: (____)________________________
Courriel du propriétaire: ________________________________________________________
Signature du propriétaire _______________________ Signature du notaire________________
Mon mandat expire le: _____/_____/_____ Sceau du notaire
SERVICE DEMANDÉ
Clé de remplacement: Oui Non
Frais de 10 $ pour ce service
Renseign. carte de crédit (encerclez votre choix) MasterCard Visa
Date d'expiration: ___/___/___ Numéro de la carte:______________________________________
Numéro d'identification de la carte de crédit (figurant à l'endos de la carte, trois derniers chiffres sur la bande de
signature)_________ 9/07
Demande de clé
" Ceci n'est pas un formulaire d'inscription "
NOTE : Vous pouvez enregistrer les renseignements relatifs à vos nº de clés et nº de série sur le site Web sécurisé de Stack-On –
www.stack-on.com, à la rubrique Service
Une fois que vous aurez enregistré vos nº de clés, vous pourrez accéder instantanément à ces renseignements essentiels, au cas
où vous perdriez vos clés ou auriez besoin d’en commander un nouveau jeu.
Vous seul pourrez accéder à ces informations.
®
40546-1507
11
18

40546-1507
12
18
GARANTIE RESTREINTE DE TROIS ANS
COFFRES D’ACIER
Les coffres d’acier de Stack-On Products Co. (« Stack-On ») sont garantis exempts de défauts de
matériel ou de fabrication pour une période de trois (3) ans à partir de la date de l’achat original par un
consommateur. Cette garantie ne touche que le premier acheteur seulement.
Si vous croyez que votre coffre d’acier montre un défaut de matériel ou de fabrication au cours de la
période de garantie de trois ans, veuillez communiquer avec notre service à la clientèle, par courrier
postal ou courriel, aux adresses énumérées plus bas, sans oublier d’inclure les renseignements sur la
preuve d’achat et le numéro de modèle du produit.
Stack-On Products Company
1360 North Old Rand Road
Wauconda, IL 60084
Si Stack-On a été adéquatement avisée du problème au cours de la période de garantie de trois ans et,
qu’après inspection, elle confirme le problème, Stack-On fournira les pièces de réparation ou échangera
le produit sans frais, ou remboursera le prix d’achat du produit.
LA PRÉSENTE GARANTIE NE S’APPLIQUE PAS AUX PRODUITS, OU À TOUTE PIÈCE D’UN
PRODUIT, QUI ONT ÉTÉ ENDOMMAGÉS À LA SUITE D’UN USAGE EXCESSIF, ACCIDENTEL,
NÉGLIGENT, ABUSIF, D’UNE MAUVAISE UTILISATION, D’UN ENTRETIEN INCORRECT,
D’ALTÉRATIONS OU DE RÉPARATIONS PAR QUICONQUE AUTRE QU’UN REPRÉSENTANT DE
STACK-ON. EN OUTRE, CETTE GARANTIE NE S’APPLIQUE À AUCUN ACCESSOIRE OU PIÈCE
UTILISÉS AVEC LE PRODUIT OU DANS LE PRODUIT ET QUI NE FONT PAS PARTIE DE L’ACHAT
ORIGINAL.
CETTE GARANTIE EST EXCLUSIVE ET REJETTE FORMELLEMENT TOUTE AUTRE
GARANTIE EXPRIMÉE OU SUGGÉRÉE, Y COMPRIS LES GARANTIES DE QUALITÉ MARCHANDE
ET D’ADAPTATION À UNE FIN PARTICULIÈRE, QUI, PAR LA PRÉSENTE, SONT DÉSAVOUÉES ET
EXCLUSES. STACK-ON NE SERA PAS ASSUJETTIE À TOUTE AUTRE OBLIGATION OU
RESPONSABILITÉ. STACK-ON N’ASSUME, NI N’AUTORISE PERSONNE D’AUTRE À ASSUMER
POUR ELLE, UNE QUELCONQUE RESPONSABILITÉ RELIÉE À LA VENTE DES COFFRES D’ACIER
DE STACK-ON.
EN AUCUNE CIRCONSTANCE, STACK-ON NE SERA RESPONSABLE ENVERS LE CLIENT INITIAL
DE TOUT DOMMAGE, CONSÉCUTIF, INDIRECT, SPÉCIAL, EXEMPLAIRE OU PUNITIF PROVENANT
DE L’ACHAT OU DE L’UTILISATION DE TOUT COFFRE D’ACIER DE STACK-ON.
LA RESPONSABILITÉ DE STACK-ON POUR TOUTE VIOLATION À CETTE GARANTIE SE
LIMITERA EXCLUSIVEMENT À LA RÉPARATION OU AU REMPLACEMENT DU PRODUIT
DÉFECTUEUX, TEL QUE DÉCRIT PLUS HAUT, OU AU REMBOURSEMENT DU PRIX D’ACHAT DU
PRODUIT.
L’OBLIGATION DE STACK-ON EN VERTU DE LA PRÉSENTE GARANTIE N’EXCÉDERA JAMAIS
LE PRIX DU PRODUIT.
LA PRÉSENTE GARANTIE VOUS ACCORDE DES DROITS LÉGAUX PRÉCIS. VOUS
POUVEZ POSSÉDER D’AUTRES DROITS QUI VARIENT SELON LES ÉTATS.
®

Instrucciones
40546-1507
13
18
IMPORTANTE
# Serie:
CARACTERISTICAS DE CONTROL
Registre el número de serie que aparece en la
etiqueta en frente de la puerta.
Mantenga las llaves en un lugar seguro lejos de los
niños(a).
NO GUARDE SUS LLAVES ADENTRO EN
LA CAJA FUERTE.
Para abrir la caja fuerte, llave insertar en la cerradura
y gire hacia la derecha hasta que la puerta se abre
automáticamente. NOTA: Usted debe girar la llave a
la posición de bloqueo antes de poder cerrar y
bloquear la puerta.
Cuando usted primero reciba su caja fuerte usted
tendra que abrir la puerta con las llaves para instalar
las baterías/pilas. Las baterías/pilas vienen
incluidas y están situadas adentro de la su caja
fuerte.
PARA COMENZAR
NOTA: Esta llave se ha proporcionado encaso de
que las baterías esten bajas. Si usted pierde su llave,
usted puede comprar una llave de reemplazo
reriéndose al número de serie situado en el frente
de la puerta. Consulte la sección relativa a las llaves
de repuesto para más información.
1. Cerradura con Llave
5. La luz indicadora
2. Grabadora de Huellas digitales
3. Botón de reajuste
(adentro de la caja fuerte)
4. Compartimiento para las baterías/pilas
(adentro de la caja fuerte)
NO
TA: Usted puede alm
acenar su Numero de Llave y
su Numero de Serie e información en el W
eb-Site de
Stack-On: www.stack-on.com bajo la opcion de
Servicio.
Almacenando su Numero de Llave en el web-site le
proporcionará acceso de inmediato a su información
importante, en caso de que usted pierda sus llaves o
necesita ha pedir otro juego de llaves. Asi solamente
usted tendra acceso a esta información.
®
QAS-1512-B
QAS-1545-B
Herramientas necesarias:
perforar
Destornillador de cabeza plana
10 mm Llave
Taladro 3/16 "(5 mm) de bits para perforar madera
Hardware incluido:
(4) M6 x 20 mm (3/4 "de largo) Tornillos
(4) Arandelas

40546-1507
14
18
INSTALACIÓN DE LAS PILAS
NOTA: Si las baterías están bajas la luz indicadora
parpadee en azul cuando se inicia el escaneado.
Reemplazar con 4 pilas alcalinas AA como se
muestra.
NOTA: No mezcle pilas viejas y nuevas. No mezcle
pilas alcalinas, pilas estándar o recargables.
GRABACIÓN DE HUELLAS DIGITALES
Si su seguro incluye un estante, quitarlo para un
mejor acceso al compartimiento de la batería/pilas.
Empuje la cubierta e traba de las baterías/pilas con
un destornillador para lanzar la cubierta. Instale las
(4) baterias/pilas de alcalino AA como se muestra.
Regrese la cubierta insertando las lengüetas
posteriores en las ranuras y precionando la cubierta
levemente en su lugar.Instalación de las
Baterías/Pilas.
La primera vez que reciba su seguro no hay
huellas digitales registradas. Para mayor
seguridad se debe registrar una huella digital.
De no hacerlo, pondrá en peligro la seguridad
y la seguridad de la caja fuerte.
Puede grabar hasta 20 huellas digitales
diferentes para la apertura de la caja fuerte.
Para registrar una huella digital, primero pulse el
botón de reinicio en el interior de la caja fuerte. El
escáner se vuelve azul con dos pitidos (si el sonido
está encendido) y la luz azul parpadea dos veces, a
continuación, grabar el mismo dedo tres veces de la
siguiente manera:
1. Pulse el escáner con el dedo seleccionado
hasta que haya un pitido (si el sonido está
encendido) y la luz verde parpadea una vez.
Levante el dedo del escáner.
2. Pulse el escáner por segunda vez con el mismo
dedo (sosteniendo el dedo en una posición
ligeramente diferente) hasta que haya un pitido
(si el sonido está encendido) y la luz verde
parpadea una vez. Levante el dedo del escáner.
3. Pulse el escáner por tercera vez con el mismo
dedo (sosteniendo el dedo en una posición
ligeramente diferente) hasta que hay dos pitidos
(si el sonido está encendido) y la luz verde
parpadea dos veces. Levante el dedo del escáner.
Si la luz roja parpadea tres veces con tres pitidos (si el
sonido está activado) su huella digital no consiguió
registrada y usted tendrá que empezar de nuevo.
Su huella digital está grabando.
Si intenta introducir más de 20 huellas digitales, la luz
roja parpadea 5 veces y habrá 5 pitidos (si el sonido
está activado).
Para mayor comodidad, grabar varios dedos diferentes
y registrar el dedo más utilizado en varias ocasiones.
Posición dedo sobre el escáner como se muestra a
continuación.

40546-1507
15
18
ABRIENDO SU CAJA FUERTE
USANDO SUS HUELLA DIGITALES
ACTIVACIÓN DEL PITIDO
VACIAMIENTO DE MEMORIA
Para borrar la memoria de todas las huellas digitales
registradas, busque el botón de reinicio en la parte
interior de la caja de seguridad y pulse este botón
durante unos 5 segundos hasta que la luz verde
parpadea 10 veces con 10 pitidos (si el sonido está
activado). Se borrarán todos los escaneos grabados.
Para apagar el sonido, presione el escáner con una
huella digital registrada por 10 segundos hasta que la
luz verde parpadea dos veces.
Para activar el sonido, pulse el escáner con una
huella digital registrada hasta escuchar dos pitidos y
la luz verde parpadea dos veces.
Su seguro viene con el sonido de pitido activada.
NOTA: Para mayor seguridad debe registrar una
huella digital. De no hacerlo, pondrá en peligro
la seguridad y la seguridad de la caja fuerte.
Para abrir la caja de seguridad, pulse el escáner con un
dedo registrado. La luz azul se encenderá con un
pitido (si el sonido está activado) y la exploración
comenzará.
Si la luz verde parpadea (si el sonido está activado), el
análisis se ha aceptado dos veces con 2 pitidos y la
puerta se abrirá.
Si la luz roja parpadea una vez, el escáner no leyó su
huella digital y tienes que probar de nuevo. Si la luz
roja parpadea 3 veces, el escáner lee su huella digital y
no lo aceptó.
Si hay 3 exploraciones rechazadas, en la que se
leía su huella digital, y la luz roja parpadea 5
veces con 5 pitidos (si el sonido está activado),
tendrá un bloqueo automático durante 60
segundos antes de que usted puede intentar un
análisis nuevo. La caja fuerte sonará una vez (si
el sonido está encendido) y la luz verde
parpadea una vez cuando el período de bloqueo
ha terminado.
Si hay 1 exploración más rechazados, donde se
leyó su huella digital y la luz roja parpadea 5 veces
con 5 pitidos (si el sonido está activado), tendrá
un bloqueo automático durante 5 minutos antes
de que usted puede intentar un análisis nuevo. La
caja fuerte sonará una vez (si el sonido está
encendido) y la luz verde parpadea una vez
cuando el período de bloqueo ha terminado.
Para cerrar la caja fuerte, empuje la puerta cerrada
hasta que quede asegurada.

STACK-ON PRODUCTS CO.
P.O. BOX 489, WAUCONDA, IL 60084
40546-1507
16
18
IMPORTANTE
Mantenga sus llaves en un lugar seguro, fuera de las manos
de los niños. Mantenga este archivo con su numero de
serie en un lugar seguro fuera de su caja fuerte. Para
ordenar un reemplazo de llaves, siga las instrucciones en la
forma atada.
SELECCIÓN DE LA UBICACIÓN
PARA FIJAR LA CAJA FUERTE
NOTA SOBRE EL BLOQUEO DEL SEGURO:
Las necesidades de seguro para estar en una
posición vertical, como se muestra en la gura 1,
para el mecanismo de bloqueo para funcionar
correctamente. El no montar la caja en posición
vertical corrrect pondrá en peligro la seguridad
de la caja fuerte.
Asegure la caja fuerte a un estante con los oricios de
montaje perforados en la caja fuerte y el hardware
proporcionado.
EL SEGURO SIEMPRE SE DEBE
MANTENERSE FUE DEL ALCANCE
DE LOS NIÑOS.
Coloque la caja de seguridad en la ubicación
deseada y marcar los oricios de montaje para ser
utilizados con un lápiz. Mueva la caja fuerte y
taladre los oricios para los tornillos de jación.
Para el montaje en un estante, perfore un 3/16"
agujero piloto diámetro y coloque la caja fuerte con
los 3/4" tornillos y arandelas. (Figura 2)
Figura 1
QAS-1512-B
QAS-1512-B
QAS-1545-B
QAS-1545-B
Figura 2
La caja fuerte se debe montar a un estante. Para la
seguridad y la seguridad óptima, la caja de
seguridad se debe instalar en una zona aislada,
seco y seguro.
NOTA: Este seguro debe ser montado en un
estante. De no hacerlo, pondrá en peligro la
seguridad y la seguridad de la caja fuerte.
No utilice limpiadores de cristal o aerosoles en
esta caja fuerte. Limpie su caja fuerte con un
paño húmedo nadamas.
MANTENIMIENTO

Requerimos verificación del propietario para procesar esta solicitud de llave de su gabinete de
seguridad.
Para poder recibir su llave de reemplazo de su gabinete de seguridad:
1. Llene y envíe esta solicitud a Stack-On Products.
2. Envíe copia de su licencia de conducir junto con la solicitud.
3. Envíe copia del recibo mostrando la fecha original de compra.
4. El propietario del gabinete de seguridad o de la caja fuerte deberá firmar la solicitud.
5. La firma del propietario deberá estar notariada.
6. 6. Envíe $10.00USD (dólares) para obtener una llave de reemplazo.
Aceptamos cheques personales de E.U.A., MasterCard o Visa.
7. Envíe la información completa a: Stack-On Products Company
1360 N. Old Rand Road
P.O. Box 489
Wauconda, IL 60084
Número de Serie______________________ Número de Llave (si aplica) ______________
Dimensiones de la Unidad_____________________________________________________
Descripción de la Unidad______________________________________________________
Nombre del Propietario ______________________________ Fecha de Compra___/___/____
Dirección (propietario) _____________________________ No. Interior _________________
Ciudad ________________________ Estado _______________ C.P.________________
No. Teléfono: (____)___________________ No. Fax: (____)___________________
Correo Electrónico del Propietario: ______________________________________________
Firma del Propietario __________________________ Firma del Notario________________
Fecha de Vencimiento de
la Comisión del Notario: _____/_____/_____ Sello del Notario
SERVICIO SOLICITADO
Reemplazo de Llaves Si No
- Costo de $10.00USD por este servicio
Información de su tarjeta de crédito (Favor de Indicar Una): MasterCard Visa
Fecha Vencimiento: ___/___/___ No. Tarjeta:_______________________________
Código de Seguridad (Al dorso de la tarjeta- - últimos 3 dígitos impresos en el área de firma)__________
"Este no es un Formato de Registro"
Solicitud de Llave
40546-1507
17
18
NOTA: Usted puede almacenar su Numero de Llave y su Numero de Serie e inform
ación en el W
eb-Site de Stack-On:
www.stack-on.com bajo la opcion de Servicio.
Almacenando su Numero de Llave en el web-site le proporcionará acceso de inm
ediato a su información importante, en caso
de que usted pierda sus llaves o necesita ha pedir otro juego de llaves. Asi solamente usted tendra acceso a esta
información.
®

40546-1507
18
18
GARANTÍA LIMITADA DE TRES AÑOS
CAJAS FUERTES DE ACERO
Las Cajas Fuertes de Acero de Stack-On Products Co. (“Stack-On”) están garantizados como libres
de defectos de materiales y hechura durante un período de tres (3) años a partir de la fecha de compra
original de un consumidor. Esta garantía se aplica al consumidor inicial solamente.
Si usted considera que existe un defecto de material o hechura en su Caja Fuerte de Acero durante
el período de garantía de tres años, comuníquese con nuestro departamento de servicio a clientes por
correo regular o correo-e en la dirección indicada abajo, e incluya con su correspondencia la información
de constancia de compra y el número del modelo del producto.
Stack-On Products Company
1360 North Old Rand Road
Wauconda, IL60084
Si se notifica debidamente a Stack-On durante el período de garantía de tres años y, después de la
inspección se confirma que existe un defecto, Stack-On, a su exclusiva opción, proporcionará piezas de
repuesto o cambiará el producto sin cargo, o reembolsará el precio de compra del producto.
ESTA GARANTÍA NO CUBRE NINGÚN PRODUCTO O NINGUNA PARTE DE UN PRODUCTO QUE HA
ESTADO SUJETO A USO EXCESIVO, ACCIDENTE, NEGLIGENCIA, ABUSO O MAL USO,
MANTENIMIENTO INCORRECTO, ALTERACIÓN O REPARACIÓN POR CUALQUIER TERCERO
QUE NO SEA STACK-ON. ADICIONALMENTE, ESTA GARANTÍA NO CUBRE ACCESORIOS O
PIEZAS USADAS CON O DENTRO DEL PRODUCTO QUE NO ESTÁN INCLUIDOS CON LA COMPRA
ORIGINAL.
ESTA GARANTÍA ES EXCLUSIVA Y EXPRESAMENTE EN LUGAR DE CUALQUIER OTRA
GARANTÍA EXPRESA O IMPLÍCITA, INCLUSIVE LAS GARANTÍAS DE COMERCIABILIDAD E
IDONEIDAD PARA UN PROPÓSITO ESPECÍFICO, QUE POR ESTE MEDIO SE DESCONOCEN Y
EXCLUYEN. STACK-ON NO ESTARÁ SUJETO A NINGUNA OTRA OBLIGACIÓN O
RESPONSABILIDAD. STACK-ON NO ASUME NI AUTORIZA A NINGUNA OTRA PERSONA QUE
ASUMA EN SU NOMBRE, CUALQUIER OTRA RESPONSABILIDAD EN RELACIÓN CON LA VENTA
DE UNA CAJA FUERTE DE ACERO.
STACK-ON NO SERÁ BAJO NINGUNA CIRCUNSTANCIA RESPONSABLE ANTE EL
CONSUMIDOR INICIAL POR DAÑOS INCIDENTALES, CONSECUENTES, ESPECIALES,
EJEMPLARES O PUNITIVOS QUE SURGIESEN DE LA COMPRA O EL USO DE CUALQUIER CAJA
FUERTE DE ACERO.
LA RESPONSABILIDAD DE STACK-ON POR CUALQUIER VIOLACIÓN DE ESTA GARANTÍA ESTARÁ
LIMITADA EXCLUSIVAMENTE A LA REPARACIÓN O EL REEMPLAZO DEL PRODUCTO
DEFECTUOSO, SEGÚN SE DESCRIBE ARRIBA, O EL REEMBOLSO DEL PRECIO DE COMPRA DEL
PRODUCTO.
LA OBLIGACIÓN DE STACK-ON BAJO ESTA GARANTÍA BAJO NINGUNA CIRCUNSTANCIA
EXCEDERÁ EL PRECIO DEL PRODUCTO.
ESTA GARANTÍA LE CONFIERE DERECHOS LEGALES ESPECÍFICOS. ES POSIBLE QUE
TAMBIÉN TENGA OTROS DERECHOS, QUE VARÍAN DE UN ESTADO A OTRO.
®
-
 1
1
-
 2
2
-
 3
3
-
 4
4
-
 5
5
-
 6
6
-
 7
7
-
 8
8
-
 9
9
-
 10
10
-
 11
11
-
 12
12
-
 13
13
-
 14
14
-
 15
15
-
 16
16
-
 17
17
-
 18
18


Stack-On QAS-1512-B Instructions Manual
- Taper
- Instructions Manual
- Ce manuel convient également à
dans d''autres langues
- English: Stack-On QAS-1512-B
- español: Stack-On QAS-1512-B
Documents connexes


Autres documents
-
SentrySafe QAP1BE Manuel utilisateur
-
SentrySafe SFW123BDC Mode d'emploi
-
-
SentrySafe TC8-331 Le manuel du propriétaire
-
-
Phoenix NESO SS0200F Series Mode d'emploi
-
-
Fujitsu Stylistic Q550 Manuel utilisateur