
2281
Call Us First!
DO NOT RETURN TO STORE.
For immediate help with assembly or product information
call our toll-free number:
1-866-890-2211
April through October M - F 8:00 AM to 6:00 PM EST
Saturday 8:30 AM to 4:30 PM EST
November through March M - F 8:00 AM to 5:00 PM EST
or email:
customerservice@backyard-play.com
Our staff is ready to provide assistance.
STOP!
STOP!
- NOTICE -
This playset product is not intended for public use. It is intended for
residential application and is not warranted for public or commercial use.

4HISPAGEINTENTIONALLYLEFTBLANK

- BEFORE YOU BEGIN -
- BEFORE YOU BEGIN -
Your premium playset is manufactured from wood which has many natural characteristics and blemishes that may be present in some of the pieces in your playset. These natural characteristics may include knots or mi-
nor cracks/splits. All individual parts have been cut to provide a smooth and safe surface. All parts have been inspected to assure we pack only the safest, most durable wood product. Any minor blemishes in your playset
ZLOOQRWDIIHFWWKHVWUHQJWKGXUDELOLW\RUVWUXFWXUDOLQWHJULW\RIWKHÀQLVKHGSURGXFW2XUOLPLWHGZDUUDQW\GRHVQRWFRYHUWKHLPSHUIHFWLRQVQRWUHVXOWLQJLQVWUXFWXUDOIDLOXUH
6/01/20122281
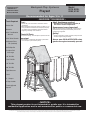
Playset
First...
Check with your homeowner’s association before
assembling.
Read instructions thoroughly before you begin. If you
have purchased accessories to accompany this play
set, please read all installation instructions before
beginning assembly of this structure.
Check All Parts
If a part is missing, circle the part in question and call.
Important
In a drawing, a dotted line represents a part hidden
from view (like a part under a panel).
Adult Assistance required
$VVLVWDQFHLVQHFHVVDU\WRKDQGOHÀW
and secure some components.
Squareness is very Important!
Start with a level surface and keep 90° corners and 90°
perpendiculars throughout the assembly to ensure all
FRPSRQHQWVÀWWRJHWKHU
Safety!
Check for protruding screws and bolts, verify all screw
and bolt lengths during assembly.
Always wear OSHA-APPROVED safety
glasses throughout assembly process.
Tools Required
Socket Set
Hammer
9/16” Combination
Wrench
3/16” Allen Wrench
#2 Square Drive
Bit (included)
#3 Phillips Bit
Cordless Drill
w/Charger
1/8” Drill Bit
7/16” Drill Bit
1/4” Drill Bit
3/8” Drill Bit
Tape Measure
Level
C - Clamps
6’ Step Ladder
Framing/Speed
Square
Recommended for Ages 3 to 11
Backyard Play Systems
Customer Service
1-866-890-2211
1000 Ternes Drive
Monroe, MI 48162
- NOTICE -
This playset product is not intended for public use. It is intended for
residential application and is not warranted for public or commercial use.
Model
6219, 6295,
6296, 4158

STOP!!! Check all parts and hardware before beginning. If any parts are
missing or damaged please circle and call the phone number listed.
DO NOT CONTACT THE STORE OR RETURN YOUR PLAYSET !
2
Wear safety glasses during drilling, assembly of your playset.
Children should not be allowed in the playset assembly and build area.
Note the hole orientation on parts to avoid having to take parts
apart later.
Some steps require the assistance of two people to ensure proper
assembly, safety during assembly, as well as preventing any damage
to the playset.
All hex bolts and lag bolts require a lock washer or lock nut.
To properly install lock nuts, two to three threads must protrude past the
lock nut and be exposed once tightened.
Due to wood characteristics and the manufacturing process hex bolts
may protrude past a surface. If this condition occurs add additional
supplied washers to eliminate bolt protrusion.
To aid in proper assembly pound T-nuts into their respective hole
prior to assembly
Pound in T-nuts while the part is on the ground to ensure proper seating.
Use a soft material under parts when pounding in T-nuts to ensure
no scratching or de-facing of parts.
0DNHVXUHDOOIDVWHQHUVXVHGDUHDVVSHFLÀHG8VLQJDIDVWHQHUQRW
VSHFLÀHGLQDSDUWLFXODUDSSOLFDWLRQPD\UHVXOWLQWRRPXFKWKUHDG
exposure or not enough thread engagement.
ASSEMBLY SAFETY and HELPFUL HINTS
KEEP THIS INSTALLATION MANUAL FOR FUTURE CARE
AND MAINTENANCE REFERENCE.
To aid in making your playset assembly easier,
here is a listing of some helpful hints.
*IMPORTANT HARDWARE INFORMATION*

3
SAFETY WARNINGS
This playset has been designed for use by a maximum of eight occupants at one time having a
combined weight of 1,200 pounds. (This weight does not include occupants in the sandbox area.)
This playset is recommended for children (3) through (11) years of age.
2QVLWHDGXOWVXSHUYLVLRQIRUFKLOGUHQRIDOODJHVLVUHFRPPHQGHG
Instruct children not to walk close to, in front of, behind, or between moving items.
Instruct children not to twist swing chains or ropes or loop them over the top support bar since this may
reduce the strength of the chain or rope.
Instruct children to avoid swinging empty seats.
Teach children to sit in the center of the swings with their full weight on the seats.
Instruct children not to use the equipment in a manner other than intended.
Instruct children not to get off equipment while it is in motion.
3DUHQWVVKRXOGGUHVVFKLOGUHQDSSURSULDWHO\H[DPSOHVZRXOGLQFOXGHWKHXVHRIZHOOÀWWLQJVKRHVDQG
WKHDYRLGDQFHRISRQFKRVVFDUYHVDQGRWKHUORRVHÀWWLQJFORWKLQJWKDWLVSRWHQWLDOO\KD]DUGRXV
while using equipment).
,QVWUXFWFKLOGUHQQRWWRFOLPEZKHQWKHHTXLSPHQWLVZHW6OLSSHU\VXUIDFHVPD\FDXVHDKD]DUG
Verify that suspended climbing ropes, chain, or cable are secured at both ends.
Verify that suspended climbing ropes, chain, or cable cannot be looped back on itself.
,QVWUXFWFKLOGUHQQRWWRDWWDFKLWHPVWRWKHSOD\JURXQGHTXLSPHQWWKDWDUHQRWVSHFLÀFDOO\GHVLJQHGIRU
use with the equipment, such as, but not limited to, jump ropes, clothesline, pet leashes, cables and
FKDLQDVWKH\PD\FDXVHDVWUDQJXODWLRQKD]DUG
Instruct children to remove their bike or other sports helmet before playing on the playground equipment.
Instruct children to not walk or run up slides.
Instruct children to not pick up slides or ramps as this may cause damage or breakage.
Place the equipment on level ground not less than six (6) feet from any obstructions. Be sure to look
overhead for any obstructions above the playset.
Do not use the equipment until fully erected per this playset instruction manual, bolts tightened and
the playset is anchored to the ground.
NOTICE:
This playset product is not intended for public use. It is intended for residential application
and is not warranted for public or commercial use.
Please read carefully. Observing the following statements and warnings
reduces the likelihood of serious or fatal injury.

Periodic maintenance is required to ensure safe enjoyment
of your playset and optional accessories.
Observing the following procedures reduces the likelihood of serious or fatal injury.
PLAYSET CHECKLIST
At the beginning of each play season:
Twice a month during play season:
Once a month during play season:
4
MAINTENANCE
Activity on your playset and optional accessories may loosen fasteners. Check all lock nuts, hex and
lag bolts, quick clips, spring clips, acorn nuts, wood screws, and swing hangers for tightness and
tighten as required. T-nuts should be inspected for full and proper seating into the wood.
Checking, splitting and surface cracking are characteristics of all wooden playsets. This is caused by varying
VHDVRQDOWHPSHUDWXUHVDQGPRLVWXUHFRQGLWLRQV7RPLQLPL]HWKLVFKHFNLQJDQGRUFUDFNLQJ\RXPD\FRDW\RXU
playset with a water repellent.
Tighten all hardware.
Lubricate all metallic moving parts per manufacturer’s instructions.
Check all protective coverings on bolts, pipes, edges, and corners. Replace if they are loose, cracked, or missing.
Check all moving parts including swing seats, ropes, cables, and chains for wear, rust, or other deterioration. Replace as needed.
Check metal parts for rust. If found, sand and repaint using a nonleaded-based paint meeting the requirements of 16 CFR 1303.
Check all wood members for deterioration and splinters. Sand down splinters and replace deteriorating wood members.
Reinstall any plastic parts, such as swing seats or any other items that were removed for the cold season.
5DNHDQGFKHFNGHSWKRIORRVHÀOOSURWHFWLYHVXUIDFLQJPDWHULDOVWRSUHYHQWFRPSDFWLRQDQGWRPDLQWDLQDSSURSULDWHGHSWK5HSODFHDVQHFHVVDU\
Tighten all hardware.
Check all protective coverings on bolts, pipes, edges, and corners. Replace if they are loose, cracked, or missing.
5DNHDQGFKHFNGHSWKRIORRVHÀOOSURWHFWLYHVXUIDFLQJPDWHULDOVWRSUHYHQWFRPSDFWLRQDQGWRPDLQWDLQDSSURSULDWHGHSWK5HSODFHDVQHFHVVDU\
Lubricate all metallic moving parts per manufacturer’s instructions.
Check all moving parts including swing seats, ropes, cables, and chains for wear, rust, or other deterioration. Replace as needed.
At the end of each play season or when the temperature drops below 10°F remove plastic swing seats, tents, sandbox cover, tire swing,
VOLGHDQGRWKHULWHPVDVVSHFLÀHGE\WKHPDQXIDFWXUHUDQGWDNHLQGRRUVRUGRQRWXVH
5DNHDQGFKHFNGHSWKRIORRVHÀOOSURWHFWLYHVXUIDFLQJPDWHULDOVWRSUHYHQWFRPSDFWLRQDQGWRPDLQWDLQDSSURSULDWHGHSWK5HSODFHDVQHFHVVDU\
When you are ready to dispose of your playset, make sure that all metal, plastic and wood components are disposed of in
accordance with local waste ordinances.
Buyer and/or owner should disassemble and dispose of the playground equipment in such a way that no unreasonable hazards will
exist at the time the swing set is discarded.

2H 2H
H
L
6 ft.
6 ft.
6 ft. 6 ft.
L+6 ft.
6 ft.
6 ft.
Use Zone for Single-Axis Swings Use Zone for Multi-Axis Swings
Denotes Use Zone with Protective Surfacing
Denotes Use Zone with Protective Surfacing
5
PLAYGROUND SURFACING MATERIALS
SECTION 4 OF THE CONSUMER PRODUCT SAFETY COMMISSION’S OUTDOOR HOME
PLAYGROUND SAFETY HANDBOOK
9
Select Protective Surfacing
2QHRIWKHPRVWLPSRUWDQWWKLQJV\RXFDQGRWRUHGXFHWKHOLNHOLKRRGRIVHULRXVKHDGLQMXULHVLVWRLQVWDOOVKRFNDEVRUELQJSURWHFWLYHVXUIDFLQJXQGHU
and around your play equipment. The protective surfacing should be applied to a depth that is suitable for the equipment height in accordance with
$6706SHFLÀFDWLRQ)7KHUHDUHGLIIHUHQWW\SHVRIVXUIDFLQJWRFKRRVHIURPZKLFKHYHUSURGXFW\RXVHOHFWIROORZWKHVHJXLGHOLQHV
NOTE: Do not install home playground equipment over concrete, asphalt, or any other hard surface. A fall onto a hard surface can result in
serious injury to the equipment user. Grass and dirt are not considered protective surfacing because wear and environmental factors can reduce
their shock absorbing effectiveness. Carpeting and thin mats are generally not adequate protective surfacing. Ground level equipment – such as
a sandbox, activity wall, playhouse or other equipment that has no elevated play surface – does not need any protective surfacing.
Maximum fall height for this playset is 80".
Loose-Fill Materials:
0DLQWDLQDPLQLPXPGHSWKRILQFKHVRIORRVHÀOOPDWHULDOVVXFKDVZRRGPXOFKFKLSVHQJLQHHUHGZRRGÀEHU(:)RUVKUHGGHGUHF\FOHG
UXEEHUPXOFKIRUHTXLSPHQWXSWRIHHWKLJKDQGLQFKHVRIVDQGRUSHDJUDYHOIRUHTXLSPHQWXSWRIHHWKLJK127($QLQLWLDOÀOOOHYHORI
12 inches will compress to about a 9- inch depth of surfacing over time. The surfacing will also compact, displace, and settle, and should be
SHULRGLFDOO\UHÀOOHGWRPDLQWDLQDWOHDVWDLQFKGHSWK
Use a minimum of 6 inches of protective surfacing for play equipment less than 4 feet in height. If maintained properly, this should be
adequate. (At depths less than 6 inches, the protective material is too easily displaced or compacted.)
Use containment, such as digging out around the perimeter and/or lining the perimeter with landscape edging. Don’t forget to account for
ZDWHUGUDLQDJH86&RQVXPHU3URGXFW6DIHW\&RPPLVVLRQ:DVKLQJWRQ'&RUFDOOWKHWROOIUHHKRWOLQH
&KHFNDQGPDLQWDLQWKHGHSWKRIWKHORRVHÀOOVXUIDFLQJPDWHULDO7RPDLQWDLQWKHULJKWDPRXQWRIORRVHÀOOPDWHULDOVPDUNWKHFRUUHFWOHYHORQ
play equipment support posts. That way you can easily see when to replenish and/or redistribute the surfacing.
Do notLQVWDOOORRVHÀOOVXUIDFLQJRYHUKDUGVXUIDFHVVXFKDVFRQFUHWHRUDVSKDOW
Poured-In-Place Surfaces or Pre-Manufactured Rubber Tiles:
<RXPD\EHLQWHUHVWHGLQXVLQJVXUIDFLQJRWKHUWKDQORRVHÀOOPDWHULDOV²OLNHUXEEHUWLOHVRUSRXUHGLQSODFHVXUIDFHV
Installations of these surfaces generally require a professional and are not “do-it-yourself” projects.
5HYLHZVXUIDFHVSHFLÀFDWLRQVEHIRUHSXUFKDVLQJWKLVW\SHRIVXUIDFLQJ$VNWKHLQVWDOOHUPDQXIDFWXUHUIRUDUHSRUWVKRZLQJWKDWWKHSURGXFW
KDVEHHQWHVWHGWRWKHIROORZLQJVDIHW\VWDQGDUG$670)6WDQGDUG6SHFLÀFDWLRQIRU,PSDFW$WWHQXDWLRQRI6XUIDFLQJ0DWHULDOVZLWKLQWKH
8VH=RQHRI3OD\JURXQG(TXLSPHQW7KLVUHSRUWVKRXOGVKRZWKHVSHFLÀFKHLJKWIRUZKLFKWKHVXUIDFHLVLQWHQGHGWRSURWHFWDJDLQVWVHULRXVKHDG
injury. This height should be equal to or greater than the fall height – vertical distance between a designated play surface (elevated surface for
standing, sitting, or climbing) and the protective surfacing below – of your play equipment.
Check the protective surfacing frequently for wear.
Placement
Proper placement and maintenance of protective surfacing is essential. Be sure to
([WHQGVXUIDFLQJDWOHDVWIHHWIURPWKHHTXLSPHQWLQDOOGLUHFWLRQV
For to-fro swings, extend protective surfacing in front of and behind the swing to a distance equal to twice the height of the top bar from which
the swing is suspended.
For tire swings, extend surfacing in a circle whose radius is equal to the height of the suspending chain or rope, plus 6 feet in all directions.
9 This information has been extracted from the CPSC publications “Playground Surfacing—Technical Information Guide” and “Handbook for Public
3OD\JURXQG6DIHW\µ&RSLHVRIWKHVHUHSRUWVFDQEHREWDLQHGE\VHQGLQJDSRVWFDUGWRWKH2IÀFHRI3XEOLF$IIDLUV86&RQVXPHU3URGXFW6DIHW\
Commission, Washington, D.C., 20207 or call the toll-free hotline: 1-800-638-2772

6
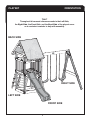
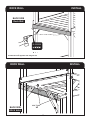
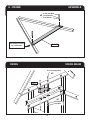
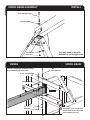
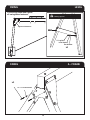
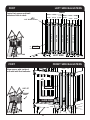
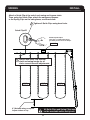
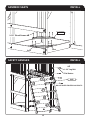
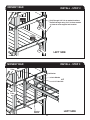
ORIENTATIONPLAYSET
*Hint*
Throughout this manual references made to the Left Side,
the Right Side, the Front Side and the Back Side of the playset serve
as a consistent reminder to help with assembly.
LEFT SIDE
FRONT SIDE
BACK SIDE
RIGHT SIDE

A
A
B
B
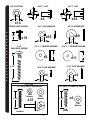
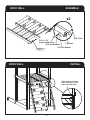
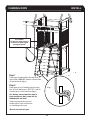
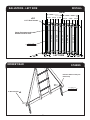
Use these Assembly Procedure Hints throughout the installation process.
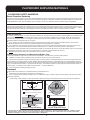
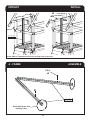
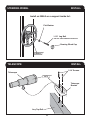
1. All Lag Bolts must have pre-drilled holes. Use a 1/4" drill bit for all 3/8" Lag Bolts.
Use a 3/16" drill bit for all 5/16" Lag Bolts. Pre-drilling pilot holes will help prevent Screws
and Lag Bolts from breaking and wood from splitting during assembly.
2. In areas where drilling a larger 1/2" hole is neccessary, such as when installing T-Nuts,
(Fig. 1) the recommended procedure is to first drill-through a 1/4" pilot hole from the
Hex Bolt side and then drill the larger 1/2" hole from the opposite T-Nut side. This will
help avoid splintering the wood. The “Drill Both Sides ICON” (Fig. 1) will remind you to
drill according to this procedure. Be sure to clean through-holes of debris before
inserting Hex Bolts.
3. When assembling parts that are difficult to hold in position while pre-drilling pilot holes
or assembling, use a clamp to keep parts aligned or in position. The “Clamp ICON”
(Fig. 2) will advise you to use this procedure.
Fig. 1 (example)
Fig. 2
Drill Both Sides
ICON
Clamp ICON
1/4" pilot hole
1/2" drill through
7
IMPORTANT!
DO NOT OVER-TIGHTEN LAG BOLTS

8
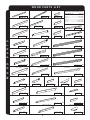
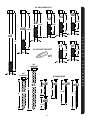
WOOD PARTS LIST
x1
x1
WOOD PARTS
x1
x2
5/4 x 4 x 45-1/8"
x1
x9
x1
x1
3 x 3 x 95"
x3
x1
x2
x12
x2
x1
x2
WOOD SIZE CONVERSION CHART
Nominal Board Size Actual Size
1" x 4"..........................................3/4" x 3-3/8"
1" x 6" 3/4" x 5-3/8"
5/4" x 4"..........................................1" x 3-1/2"
5/4" x 6"..........................................1" x 5-1/2"
2" x 4".......................................1-3/8" x 3-3/8"
2" x 6".......................................1-3/8" x 5-3/8"
..........................................
x1
x1
x4
x1
x1
5/4 x 4 x 15-3/8"2 x 4 x 15-3/8"
5/4 x 6 x 23-3/4"
2 x 4 x 51"
5/4 x 6 x 70-3/4"
x2
x1
5/8 x 3-1/4 x 10"
x7
x4
5/4 x 4 x 71-3/4"
5/4 x 4 x 58-1/2"
5/4 x 4 x 39"
5/4 x 4 x 45-1/8"5/4 x 4 x 45-1/8"
2 x 4 x 51"
2 x 4 x 47-3/4"
x1
4 x 6 x 95"
2526-ST
2501-ST
2502-ST
2516-ST
2521-ST
2522-ST
2515-ST
2524-ST1051-ST
2527-ST
2500-ST
2538-ST
2504-ST
2508-ST
2503-W
2509-ST
2506-ST
x2
x2
x1
5/8 x 3-1/4 x 35-3/4"
2510-ST
2512-ST
2520-MS
2511-MS
2505-ST
x4
2513-ST
2507-ST
2517-ST
2518-ST
2523-ST
2537-ST
2539-ST
1 x 3-1/2 x 27"
x1
2514-ST
x2
x2
3 x 3 x 95"
3 x 3 x 95"
2543-W
2525-W
5/4 x 4 x 56"
2 x 4 x 51"
4 x 4 x 45-1/8"
5/4 x 6 x 45-1/8"
5/4 x 4 x 47"
2 x 4 x 47-1/8"
5/4 x 4 x 47-1/8"
5/8 x 3-1/4 x 29-3/4"
5/8 x 3-1/4 x 33"
5/4 x 6 x 44-7/8"
5/4 x 6 x 11-3/4"
5/4 x 6 x 71-3/4"
x6
1 x 1-3/8 x 17"
1015
2 x 4 x 18"
x4
1020-ST
x2
x1
5/4 x 6 x 22-1/2"
5/4 x 4 x 17"
1120-ST
2222-ST
x8
5/4 x 6 x 23-3/4"
2519-ST

HARDWARE
Quick Clip
x6
9
ACCESSORIES
Safety Handle
x3
x3
x1
x6
x1
Tent Tarp
Plaque
Swing
Climbing RocksClimbing Rope
x1
x4
Telescope Steering Wheel
x1
2097
2451
2443
2405
2073 2008-A
x6
Swing Hanger
2194
x1
x1 x1
x1
x2
x1
90
o
Angle Bracket Plate
Swing Beam Flat Plate
Swing Beam Angled Plate Left Swing Beam Angled Plate RightSwing Beam 90
o
Plate
2411
2448 2447
2485
2412
2449
x1
Slide
2099
x1
2438

1”
1”
3/8” T - NUT 5/16” T - NUT
3/8” FLAT WASHER
1/4” x 1” FENDER WASHER 3/16” x 1” FENDER WASHER
3/8” LOCK WASHER
5/16” FLAT WASHER
5/16” LOCK WASHER
TRUSS HEAD SCREW
3/4”
3/8” LOCK NUT
2-1/2”
PAN HEAD SCREW
2-1/2”
3/8”
3/8”
3/8”
5/16” 5/16”
1/4” ROCK WALL HARDWARE
T - Nut
Lock
Washer
Hex Bolt
Flat
Washer
1-1/2”
1/4” SAFETY HANDLE HDW.
Lag
Screw
Flat
Washer
1-1/2”
10
PLAYSET FASTENERS
x14
x4
x44
x80
x65
x4
x19
x11
x6
x6
x12
x4 x4
2452 Bag

3/8”
LAG BOLT
WOODSCREWS
4”
2-1/2”
3”
1-1/4”
1-5/8”
2”
3/8”
3/8”
2-1/2”
3/8”
2-1/4”
3/8”
2”
3/8”
3/8” HEX HEAD BOLTS
3-3/4”
1-1/2”
3/8”
1-1/4
”
3/8”
1-3/4”
3/8”
6”
3/8”
LAG BOLT
2-1/2”
3/8”
LAG BOLT
3”
11
PLAYSET FASTENERS
x30
x4
x4
x2
x2
x6
x125
x62
x85
x38
x5
x8
#2 SQUARE DRIVE BIT
x1
x1
x1
x2

3/8" TORQUE
WASHER
3/8"
ACTUAL SIZE SHOWN
x4
1-1/2"
3/8”
BUTTON HD.
SCREW
3/8”
BUTT
ON HD
.
SCREW
x2
1-1/4
"
5/16" 5/16"
x2
3/8"
3-1/2"
x2
3/8"
3-3/4"
x6
3/8"
6-1/2"
x2
3/8"
4-1/2"
x2
3/8"
9"
x1
12

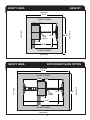
24'-2"
6' SAFETY AREA
6' SAFETY AREA
12'-2"
10'-8"
HEIGHT
12'-6"
FR ONT SIDE
24'-6"
BA CK SIDE
LEFT SIDE
RIGHT SIDE
SWING
SLIDE
LADDER
R OCK
W ALL
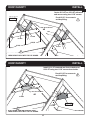
24'-2"
6' SAFETY AREA
6' SAFETY AREA
12'-2"
10'-8"
HEIGHT
FRONT SIDE
33'-6"
BACK SIDE
LEFT SIDE
RIGHT SIDE
SWING
SLIDE
LADDER
MONKEY BARS
ROCK
WALL
21'-6"
BASE KITSAFETY AREA
WITH MONKEY BARS OPTIONSAFETY AREA
13

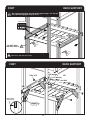
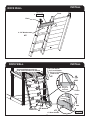
BEGIN PLAYSET ASSEMBLY
14
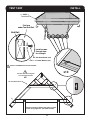
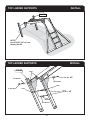
FORT
CORNER POSTS
Note 2 hole
locations.
Note 1 hole location.
3" Wood Screw
Align braces with pre-drilled holes.
Ensure all bracing is square before
installing wood screws.
Hole for Climbing Rope
BOTTOM
Flush
Flush
Flush
T-Nut
Flush
x1
x1
2543-W
2503-W
3 x 3 x 95"
3 x 3 x 95”
x1
x1
5/4 x 4 x 45-1/8"
5/4 x 4 x 45-1/8"
2526-ST
2501-ST
x4
x4
x6
3-3/4" Hex Bolt
Lock Washer
Flat Washer
90°
47"
4"
4"

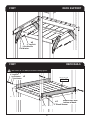
15
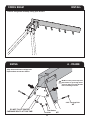
FORT
CORNER POSTS
x6
FORT
BASE
Align braces with pre-drilled holes.
Align braces with
pre-drilled holes.
Large holes toward top
Large holes
toward bottom
Flush
FLIP ASSEMBLY OVER TO INSTALL BOTTOM BRACE
Flush
Flush
Flush
3-3/4" Hex Bolt
Lock Washer
Flat Washer
3" Wood Screws
Flat Washer
Lock Washer
3-3/4" Hex Bolt
x2
x4
x1
x1
2507-ST
2507-ST
5/4 x 6 x 45-1/8"
5/4 x 6 x 45-1/8"
x4
5/4 x 4 x 45-1/8"
x1
2508-ST
5/4 x 6 x 71-3/4"
T-Nut
x6
90°
Ensure all bracing is square before
installing wood screws.
Ensure all bracing is
square before installing
wood screws.
2501-ST

16
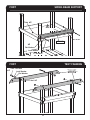
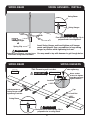
FORT
CORNER POSTS
x4
Note 2 hole
location.
Note 1 hole
location.
Align braces with pre-drilled holes.
Flush
3" Wood Screw
Flush
Flush
Flush
3-3/4" Hex Bolt
Lock Washer
Flat Washer
x1
x1
2543-W
2503-W
3 x 3 x 95"
3 x 3 x 95"
x1
x1
5/4 x 4 x 45-1/8"
5/4 x 4 x 45-1/8"
2526-ST
2501-ST
FORT
BASE
Align braces with pre-drilled holes.
FLIP ASSEMBLY OVER TO INSTALL BOTTOM BRACE
Flush
Flush
3-3/4" Hex Bolt
Lock Washer
Flat Washer
3" Wood Screw
x2
x1
2507-ST
5/4 x 6 x 45-1/8"
Ensure all bracing is square before
installing wood screws.
Ensure all bracing is square before
installing wood screws.
90°
90°
47"
4"
T-Nut
x6
x4
x4

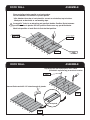
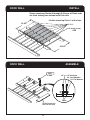
17
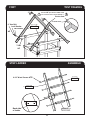
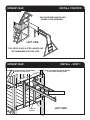
FORT
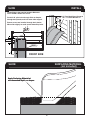
FLOOR FRAME
FORT
FLOOR FRAME
x6
x16
47"
47"
3-3/4" Hex Bolt
Lock Washer
Flat Washer
T-Nut
3" Wood Screws
Ensure 47" measurement from
ERWWRPRIEDVHWRWRSRIÀUVWGHFN
Reinforce bracing with 3" wood
screws at all pre-drilled holes.
Align braces with pre-drilled holes.

evenly spaced
18
FORT
DECK CLEAT
2-1/2" Wood Screws
1-5/8" Wood Screws
Flush
Flush
EQUAL
EQUAL
EQUAL
EQUAL
x28
x14
FORT
DECK PLANKS
Flush
5/4 x 4 x 45-1/8"
x1
2516-ST
x7
2509-ST
5/4 x 6 x 45"
x4
2-1/2" Wood Screws
La page est en cours de chargement...
La page est en cours de chargement...
La page est en cours de chargement...
La page est en cours de chargement...
La page est en cours de chargement...
La page est en cours de chargement...
La page est en cours de chargement...
La page est en cours de chargement...
La page est en cours de chargement...
La page est en cours de chargement...
La page est en cours de chargement...
La page est en cours de chargement...
La page est en cours de chargement...
La page est en cours de chargement...
La page est en cours de chargement...
La page est en cours de chargement...
La page est en cours de chargement...
La page est en cours de chargement...
La page est en cours de chargement...
La page est en cours de chargement...
La page est en cours de chargement...
La page est en cours de chargement...
La page est en cours de chargement...
La page est en cours de chargement...
La page est en cours de chargement...
La page est en cours de chargement...
La page est en cours de chargement...
La page est en cours de chargement...
La page est en cours de chargement...
La page est en cours de chargement...
La page est en cours de chargement...
La page est en cours de chargement...
La page est en cours de chargement...
La page est en cours de chargement...
La page est en cours de chargement...
La page est en cours de chargement...
La page est en cours de chargement...
La page est en cours de chargement...
-
 1
1
-
 2
2
-
 3
3
-
 4
4
-
 5
5
-
 6
6
-
 7
7
-
 8
8
-
 9
9
-
 10
10
-
 11
11
-
 12
12
-
 13
13
-
 14
14
-
 15
15
-
 16
16
-
 17
17
-
 18
18
-
 19
19
-
 20
20
-
 21
21
-
 22
22
-
 23
23
-
 24
24
-
 25
25
-
 26
26
-
 27
27
-
 28
28
-
 29
29
-
 30
30
-
 31
31
-
 32
32
-
 33
33
-
 34
34
-
 35
35
-
 36
36
-
 37
37
-
 38
38
-
 39
39
-
 40
40
-
 41
41
-
 42
42
-
 43
43
-
 44
44
-
 45
45
-
 46
46
-
 47
47
-
 48
48
-
 49
49
-
 50
50
-
 51
51
-
 52
52
-
 53
53
-
 54
54
-
 55
55
-
 56
56
-
 57
57
-
 58
58


Backyard 6296 Manuel utilisateur
- Taper
- Manuel utilisateur
dans d''autres langues
- English: Backyard 6296 User manual
Autres documents
-
 SandLock CSG-60120 Manuel utilisateur
-
Swing-N-Slide WS 3075 Guide d'installation
-
CALHOME SWD11-AB-79 Door-DIY-B36A Manuel utilisateur
-
Lego 2506 Building Instructions
-
Swing-N-Slide Playsets 4367 Mode d'emploi
-
-
Hasbro Fashion Plates-FancyDancer-travel Mode d'emploi
-
-
Lifetime 90918 Le manuel du propriétaire
-
