red lion DA50D Converter Manuel utilisateur
- Taper
- Manuel utilisateur

Install DA50D- B
Drawing No. LP1117
Revised 03/2020
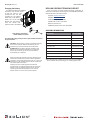
DA50D Advanced Protocol Converter with
Modular Communication
Installation Guide
1
FOR USE IN HAZARDOUS LOCATIONS:
Class I, Division 2, Groups A, B, C, and D
T4
C
US
U
L
R
LISTED
IND.CONT. EQ.
E317425
z Provides enhanced features for data acquisition
z Webserver provides worldwide access to data logs and virtual
HMI
z Virtual HMI offers built-in PC-based SCADA functionality
z Fully isolated design provides reliable operation
z Independent serial ports provide virtually unlimited
integration methods
z 10 Base-T/100 base-TX Ethernet connection provides
networking capability
z Configured using Crimson
®
software (version 3.1 or later)
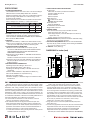
GENERAL DESCRIPTION
The DA50D provides networking and communication
capabilities in a modular architecture to ensure easy deployment
in any industrial application. This modular design makes ensuring
compatibility with rapidly evolving communications standards as
easy as replacing a field-installable sled. With an intuitive LED
status ring, diagnosing issues is simple and straightforward. The
DA50D delivers a compact adaptable solution that securely
connects industrial applications.
CONVERTER PACKAGE CHECKLIST
This product package should contain the items listed below.
This list does not include any sleds that may have been ordered.
If any items are missing or damaged, contact Red Lion immediately.
- DIN Rail Mount DA50D Converter
- Pre-installed Sled Holder
- Installation Guide
SAFETY SUMMARY
All safety related regulations, local codes and instructions that
appear in this document or on equipment must be observed to
ensure personal safety and to prevent damage to either the
device or equipment connected to it.
Do not use these products to replace proper safety interlocking.
No software-based device (or any other solid-state device) should
ever be designed to be responsible for the maintenance of
personnel safety or consequential equipment not equipped with
safeguards. Red Lion disclaims any responsibility for damages,
either direct or consequential, that result from the use of this
equipment in a manner not specified.
CAUTION: Risk of Danger
Read complete instructions prior to installation and
operation of the unit.
ATTENTION : Risque de danger
Lire les instructions complètes avant l’installation et
l’utilisation de l’appareil.
WARNING - EXPLOSION HAZARD - SUBSTITUTION
OF COMPONENTS MAY IMPAIR SUITABILITY FOR
CLASS I, DIVISION 2
AVERTISSEMENT - DANGER D’EXPLOSION - LE
REMPLACEMENT DE COMPOSANTS PEUT NUIRE
L’APTITUDE À LA CLASSE I, DIVISION 2
This equipment is suitable for use in Class I, Division 2,
Groups A, B, C, D, or non-hazardous locations only.
Cet équipement est adapté à une utilisation dans des
endroits de classe I, Division 2, Groupes A, B, C, D, ou
dans des endroits non dangereux seulement.
WARNING - EXPLOSION HAZARD. NOT HOT
SWAPPABLE. DO NOT REMOVE OR REPLACE WHILE
CIRCUIT IS LIVE UNLESS THE AREA IS FREE OF
IGNITIBLE CONCENTRATIONS.
AVERTISSEMENT - RISQUE D’EXPLOSION. PAS
ÉCHANGEABLE À CHAUD. NE PAS RETIRER OU
REMPLACER TANT QUE LE CIRCUIT EST SOUS
TENSION SAUF SI LA ZONE EST EXEMPTE DE TOUTE
CONCENTRATION INFLAMMABLE.
II 3 G Ex ec IIC T4 Gc
DEMKO 20 ATEX 2268X
IECEx UL 20.0007X

2
Drawing No. LP1117 Revised 03 2020
SPECIFICATIONS
1. POWER REQUIREMENTS:
The DA50D Converter must use a Class 2 circuit according to
National Electrical Code (NEC), NFPA-70 or Canadian
Electrical Code (CEC), Part I, C22.1 or a Limited Power Supply
(LPS) according to IEC 60950-1 or Limited-energy circuit
according to IEC 61010-1.
Power connection via removable five position terminal block.
Supply Voltage: 12 to 24 VDC +/- 15%, Class 2 source
INPUT VOLTAGE 12 V 24 V
Typ. Power DA50D Converter only 2.5 W 2.6 W
Max Power DA50D Converter only 3.0 W 3.1 W
Max Power DA50D Converter, with Sleds 5.6 W 5.7 W
2. BATTERY: Lithium coin cell. Typical lifetime of 5 years, at
nominal usage. To maintain UL rating, replacement battery
must be: Red Lion CRA000 BT3V0 00000, Rayovac BR1225X-
BA or Panasonic BR1225A/BN.
3. MEMORY:
On Board User Memory: 1 GB of non-volatile Flash memory.
Memory Card: microSD slot accepts Class 5 or better microSD
cards up to 256 GB capacity. FAT32, industrial grade.
4. COMMUNICATION CAPABILITIES:
USB Device Port: Isolated USB 2.0 full speed, type B
connection. USB DEVICE PORT IS FOR SYSTEM SET-UP
AND DIAGNOSTICS AND IS NOT INTENDED FOR
PERMANENT CONNECTION.
Ethernet Ports: Two 10 BASE-T / 100 BASE-TX RJ-45 Ports,
auto MDI/MDI-X.
Isolation from Ethernet network to converter: 1500 Vrms
Serial Ports: Two serial ports with individual port isolation; 1 -
RS-232 port (RJ12 connector) and 1 - RS-485/422 port
(RJ45 connector)
5. ENVIRONMENTAL CONDITIONS:
Operating Temperature Range: -40 to 75 °C
Storage Temperature Range: -40 to 85 °C
Operating and Storage Humidity: 0 to 85% max. RH non-
condensing
Vibration to IEC 60068-2-6: Operational 5-500 Hz, 2 g
Shock to IEC 60068-2-27: Operational 15 g
Altitude: Up to 2000 meters
Installation Category II, Pollution Degree 2 as defined in IEC/
EN 60664-1.
6. CERTIFICATIONS AND COMPLIANCES:
CE Approved
EN 61326-1 Immunity to Industrial Locations
Emission CISPR 11 Class A
IEC/EN 61010-1
RoHS Compliant
ATEX Approved
II 3 G Ex ec IIC T4 Gc
DEMKO 20 ATEX 2268X
IECEx Approved
IECEx UL 20.0007X
UL Hazardous: File # E317425
Rugged IP30 enclosure
7. CONNECTIONS:
Power Connection: Five-pin top mounted connector
Wire Strip Length: 0.3" (7.5 mm)
Wire Gauge Capacity: 12 to 24 AWG (3.31 to 0.20 mm
2
)
copper wire only
Torque: 4.4-5.3 inch-lbs (0.5-0.6 N-m)
8. CONSTRUCTION: Polycarbonate enclosure with IP30 rating.
For use only in an approved enclosure.
9. MOUNTING REQUIREMENTS: Mounts onto standard DIN
style top hat (T) profile mounting rails according to EN50022
– 35 x 7.5 mm and 35 x 15 mm.
10. WEIGHT: 13 oz (404.3 g)
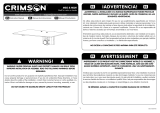
3.40
(86.29)
2.03
(51.60)
6.00
(152.40)
6.86
(174.34)
6.86
(174.34)
5.11 (129.75)
DIMENSIONS In Inches (mm)
EMC INSTALLATION GUIDELINES
Although Red Lion Controls products are designed with a high
degree of immunity to Electromagnetic Interference (EMI), proper
installation and wiring methods must be followed to ensure
compatibility in each application. The type of the electrical noise,
source or coupling method into a unit may be different for various
installations. Cable length, routing, and shield termination are
very important and can mean the difference between a successful
or troublesome installation. Listed are some EMI guidelines for a
successful installation in an industrial environment.
1. A unit should be mounted in a metal enclosure, which is
properly connected to protective earth.
2. Use shielded cables for all Signal and Control inputs. The
shield connection should be made as short as possible. The
connection point for the shield depends somewhat upon the
application. Listed below are the recommended methods of
connecting the shield, in order of their effectiveness.
a. Connect the shield to earth ground (protective earth) at one
end where the unit is mounted.
b. Connect the shield to earth ground at both ends of the cable,
usually when the noise source frequency is over 1 MHz.
3. Never run Signal or Control cables in the same conduit or
raceway with AC power lines, conductors, feeding motors,
solenoids, SCR controls, and heaters, etc. The cables should
be run through metal conduit that is properly grounded. This
is especially useful in applications where cable runs are long
and portable two-way radios are used in close proximity or if
the installation is near a commercial radio transmitter. Also,
Signal or Control cables within an enclosure should be routed
as far away as possible from contactors, control relays,
transformers, and other noisy components.
4. Long cable runs are more susceptible to EMI pickup than
short cable runs.
5. In extremely high EMI environments, the use of external EMI
suppression devices such as Ferrite Suppression Cores for
signal and control cables is effective. The following EMI
suppression devices (or equivalent) are recommended:
Fair-Rite part number 0443167251 (Red Lion #FCOR0000)

3
Revised 03 2020 Drawing No. LP1117
Line Filters for input power cables:
Schaffner # FN2010-1/07 (Red Lion #LFIL0000)
6. To protect relay contacts that control inductive loads and to
minimize radiated and conducted noise (EMI), some type of
contact protection network is normally installed across the
load, the contacts or both. The most effective location is
across the load.
a. Using a snubber, which is a resistor-capacitor (RC) network or
metal oxide varistor (MOV) across an AC inductive load is very
effective at reducing EMI and increasing relay contact life.
b. If a DC inductive load (such as a DC relay coil) is controlled
by a transistor switch, care must be taken not to exceed the
breakdown voltage of the transistor when the load is
switched. One of the most effective ways is to place a
diode across the inductive load. Most Red Lion products
with solid state outputs have internal zener diode
protection. However external diode protection at the load is
always a good design practice to limit EMI. Although the
use of a snubber or varistor could be used.
Red Lion part numbers: Snubber: SNUB0000
Varistor: ILS11500 or ILS23000
7. Care should be taken when connecting input and output
devices to the instrument. When a separate input and output
common is provided, they should not be mixed. Therefore a
sensor common should NOT be connected to an output
common. This would cause EMI on the sensitive input
common, which could affect the instrument’s operation.
Visit https://www.redlion.net/emi for more information on EMI
guidelines, Safety and CE issues as they relate to Red Lion products.
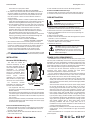
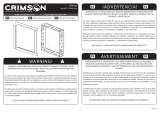
INSTALLATION
Converter DIN Rail Mounting
The DIN rail should be
mounted horizontally so that
the unit’s ventilation holes are
vertical in relation to installation
orientation. A minimum
clearance of 1 inch (25.4 mm)
should be maintained above
and below the unit in order to
ensure proper thermal
regulation. For environments
with vibration or impacts, DIN
rail clamps are recommended.
For hazardous location
installation, the following shall
be taken into consideration:
— The equipment shall only
be used in an area of at least pollution degree 2, as defined in
EN/IEC 60664-1.
— The equipment shall be installed in an enclosure that provides
a minimum ingress protection of IP54 in accordance with EN/
IEC 60079-0. The enclosure shall be accessible only with the
use of a tool.
— Transient protection shall be provided that is set at a level not
exceeding 140% of the peak rated voltage value at the supply
terminals to the equipment.
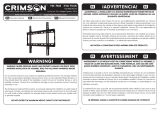
Recommended DIN Rail Mounting Steps:
1. Ensure the DIN rail lock latch is in the outward most position
(unlocked). Hook the top back of the DA50D DIN rail clip on
the unit over the DIN rail.
2. Push the bottom of the unit towards the DIN rail until the
unit is flush with the rail.
3. Push the DIN rail lock latch to the latched (in) position.
Recommended DIN Rail Removal Steps:
1. Move the DIN rail lock latch to the unlatched (out) position.
2. Unhook the top of the unit and remove it from the DIN rail.
SLED INSTALLATION
1. Prior to installing the Sled for your DA50D Converter
application, ensure that the Converter is not receiving power.
2. Disconnect and remove your DA50D from the DIN rail.
3. Remove the DA50D Converter’s front cap by squeezing the
sides and pulling.
4. Slide out the sled holder.
5. Install a sled into the sled holder and hand tighten the captive
fasteners, or use a screwdriver.
6. Re-install the sled holder containing the sled into the
Converter. Make sure it is fully seated.
7. Replace the front cap.
POWER SUPPLY REQUIREMENTS
The DA50D Converter requires a 12-24 VDC power supply. Your
unit may draw considerably less than the maximum rated power
depending upon the configuration and features being used. Your
unit will draw increased power with a sled installed. Items that
could cause increases in current are microSD card, communications
sleds, and other features programmed through software.
To ensure you do not exceed the capacity of your DA50D
Converter host power supply, calculate the total power
consumption required for all planned accessories.
It is very important that the power supply meets the following
requirements and is mounted correctly if the unit is to operate
reliably. Please take care to observe the following points:
– The power supply must be mounted close to the unit, with
usually not more than 6 feet (1.8 m) of cable between the
supply and the Converter. Ideally, the shortest length possible
should be used.
– The wire used to connect the Converter power supply should
be at least 22-gauge wire. If a longer cable run is used, a
heavier gauge wire should be used. The routing of the cable
should be kept away from large capacitors, inverters, and
other devices which may generate significant electrical noise.
– Use a power supply with an NEC Class 2 or Limited Power
Source (LPS) and SELV (safety extra-low voltage) rating. This
type of power supply provides isolation to accessible circuits
from hazardous voltage levels generated by a mains power
supply due to single faults. Safety extra-low voltage circuits
shall exhibit voltages safe to touch both under normal
operating conditions and after a single fault, such as a
breakdown of a layer of basic insulation or after the failure of
a single component has occurred.
– Peak efficiency (DA50D) occurs at the low side of the voltage
range (approx. 12 V), recommended for high temperature
applications.
Visit www.redlion.net for a complete list of our NEC Class 2
power supplies.
DIN RAIL LOCK LATCH
Unlock Lock
CAUTION: Follow standard ESD precautionary
procedures.
ATTENTION: Suivez les procédures de précaution
standard de décharge électrostatique.
CAUTION: Failure to properly align the sled holder
can result in damage to the connector pins.
ATTENTION: Si le tiroir n’est pas correctement
aligné, les broches du connecteur du tiroir risquent
d’être endommagées.

4
Drawing No. LP1117 Revised 03 2020
WIRING
All power, input and output (I/O) wiring must be in accordance
with Class I, Division 2 wiring methods and in accordance with
the authority having jurisdiction.
CONNECTING TO EARTH GROUND
Each DA50D has a chassis ground terminal on the top of the
unit. Your unit should be connected to earth ground. Steps should
be taken beyond connecting to earth ground to eliminate the
buildup of electrostatic charges.
The chassis ground is not connected to signal common of the
unit. Maintaining isolation between earth ground and signal
common is not required to operate your unit. But, other equipment
connected to this unit may require isolation between signal
common and earth ground. To maintain isolation between signal
common and earth ground care must be taken when connections
are made to the unit. For example, a power supply with isolation
between its signal common and earth ground must be used. Also,
plugging in a USB cable may connect signal common and earth
ground.
1
1
USB’s shield may be connected to earth ground at the host.
USB’s shield in turn may also be connected to signal common.
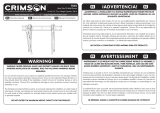
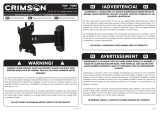
DA50D PORT PINOUTS
FACTORY RESET BUTTON
The factory reset button located in the lower left area of the
front of the unit can be used to access the system console. Refer
to software manual for access procedure and available options.
CONFIGURING A DA50D
The DA50D is configured using Crimson® 3.1 software.
Crimson is available as a no charge download from Red Lion’s
website. Crimson updates for new features and drivers are posted
on the website as they become available. By configuring the
DA50D using the latest Crimson version, you are assured that
your unit has the most up to date feature set. Crimson software
can configure the DA50D through the Serial programming port,
USB device port, Ethernet ports or microSD card.
The microSD card can be used to program a DA50D by placing
an image file on the SD card. The card is then inserted into the
target DA50D and powered. Refer to the Crimson 3.1 User
Manual for more information on the proper names and locations
of this file.
DA50D Cellular Connectivity
Cellular connectivity is achieved using the DA 4G LTE - CAT4
Modem Sled. Refer to the documentation shipped with your DA
4G LTE - CAT4 Modem Sled for installation and setup information.
Ethernet Communications
Ethernet communications can be established at either 10
BASE-T or 100 BASE-TX. The DA50D’s RJ45 jack is wired as a
NIC (Network Interface Card). For example, when wiring to a hub
or switch use a straight-through cable, but when connecting to
another NIC use a crossover cable. Refer to the Crimson 3.1 User
Manual and Red Lion’s website for additional information on
Ethernet communications.
LED COLOR(S) MEANING
YELLOW solid Link established.
YELLOW flashing Data being transferred.
GREEN (OFF) 10 BASE-T Communications
GREEN (ON) 100 BASE-TX Communications
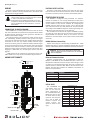
RS232 PORT
The DA50D0B has
one RS232 serial port
that can be used for
either programming or
for communications. The
RS232 port can be used
for either master or slave
protocols. The serial port
has a pair of LEDs to
indicate transmit and
receive activity. The
pinout is shown to the
right.
CAUTION: Only UL listed wiring with temperature
ratings greater than 90 °C permitted for Class I, Division
2, Zone 2 and ATEX/IECex installations.
ATTENTION: Seul le câblage homologué UL avec des
températures nominales supérieures à 90°C est autorisé
pour les installations de classe I, Division 2 , zone 2 et
ATEX/IECex.
CONNECTOR
35 4
PORT 1
ETHERNET PORTS
MICRO SD CARD
USB DEVICE
PORT 1
SERIAL PORTS
12
RESET BUTTON
N/C
N/C
+
-
POWER INPUT
PORT 2
PORT 2
COMM
COMM
CTS (PIN 1)
RTS (PIN 6)
Tx
Rx
COMM
TxA (PIN 8)
TxB (PIN 1)
RxA
RxB
TxB
TxEN
TxA
MICRO
SD CARD
LED
WARNING - Do not connect or disconnect cables while
power is applied unless area is known to be non-hazardous.
Not hot swappable.
DA50D RS232 to a PC
DA50D: RJ12 PC: DB9
Pin # Name Pin # Name
4 COMM 1 DCD
5 Tx 2 Rx
2 Rx 3 Tx
N/C 4 DTR
3 COMM 5 GND
N/C 6 DSR
1 CTS 7 RTS
6 RTS 8 CTS
N/C 9 RI

5
Revised 03 2020 Drawing No. LP1117
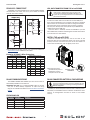
RS485/422 COMMS PORT
The RS485 port of the DA50D can be used for RS485 or RS422
communication. The serial port has a pair of LEDs to indicate
transmit and receive activity.
Note: All Red Lion devices connect A to A and B to B. Refer to
www.redlion.net for additional information.
Examples of RS485 2-Wire Connections
DH485 COMMUNICATIONS
The DA50D’s RS485/422 COMMS port can also be used for
Allen Bradley DH485 communications.
WARNING: DO NOT use a standard DH485 cable to connect
this port to Allen Bradley equipment. A cable and wiring
diagram are available from Red Lion at www.redlion.net/cables-
drivers.
STATUS RING LED
LED COLOR LED STATE MEANING
Green Solid Converter is configured and running
Blue Rapid Flashing Bootloader is Active
Blue Slow Flashing Invalid File System
Red Solid Active Auto Alarm
Red Flashing Active Manual Alarm
USB, DATA TRANSFERS FROM THE microSD CARD
In order to transfer data from the SD card via the USB port, a
driver must be installed on your computer. This driver is installed
with Crimson and is located in the folder C:\Program Files\Red
Lion Controls\Crimson 3.1\Device\ after Crimson is installed.
This may have already been accomplished if your DA50D was
configured using the USB port.
Once the driver is installed, connect the DA50D to your PC
with a USB cable, and follow “Mounting the microSD” instructions
in the Crimson 3.1 User Manual.
INSTALL THE microSD CARD
Insert the microSD card into the slot on the front of the
Converter with the card oriented as shown. The card is inserted
properly when the card clicks into place in the card holder. To
remove the microSD card, push in slightly on the card.
DA50D CONVERTER BATTERY & TIME KEEPING
A battery is used to keep time when the unit is without power.
The battery of a DA50D Converter unit does not affect the unit’s
memory, all configurations and data is stored in non-volatile
memory.
TX
5V
8
1
7
2
TxB
TxA
130K
130K
5
TxEN (OC)
RX
130K
5V
130K
RxB
4
RxA
3
COMM
6
TxEN (OC)
TX/RX
130K
5
TxA
2
8
130K
5V
7
1
TxB
6 COMM
RS485/422 4-WIRE
CONNECTIONS
RS485 2-WIRE CONNECTIONS
DA50D to Red Lion RJ11
DA50D : RJ45 RLC : RJ11
Pin # Name Pin # Name
5 TxEN 2 TxEN
6 COMM 3 COMM
1 TxB 5 B-
2 TxA 4 A+
DA50D to Modular Controller
DA50D Modular Controller
Pin # Name Pin # Name
1,4 TxB 1,4 TxB
4,1 RxB 4,1 RxB
2,3 TxA 2,3 TxA
3,2 RxA 3,2 RxA
5 TxEN 5 TxEN
6 COMM 6 COMM
7 TxB 7 TxB
8 TxA 8 TxA
WARNING - Do not connect or disconnect cables
while power is applied unless area is known to be
non-hazardous. Not hot swappable. USB port is for
system set-up and diagnostics and is not intended for
permanent connection.
microSD Card
Orientation
Note: Removal of the
microSD while power is
applied may result in
corruption or loss of data.
WARNING - Explosion Hazard - The area must be known
to be non-hazardous before servicing/ replacing the unit
and before installing or removing I/O wiring and battery.
Not hot swappable.

6
Drawing No. LP1117 Revised 03 2020
Changing the Battery
To change the battery of a DA50D
Converter, first remove power
to the unit. Insert a small
screwdriver into the slot
provided on the battery
holder and pry the battery
holder out of the unit.
Remove the old battery
from the holder and
replace it with a new battery.
To maintain UL rating, battery must be replaced with one listed in
the Specifications.
RED LION CONTROLS TECHNICAL SUPPORT
If for any reason you have trouble operating, connecting, or
simply have questions concerning your new DA70D Controller,
contact Red Lion’s technical support.
Support: support.redlion.net
Website: www.redlion.net
Inside US: +1 (877) 432-9908
Outside US: +1 (717) 767-6511
Red Lion Controls, Inc.
20 Willow Springs Circle York, PA 17406
ORDERING INFORMATION
DESCRIPTION PART NUMBER
DA50D Single Sled Advanced Protocol Converter DA50D 0BNN 000 0000
4G LTE (CAT4) Cellular Sled for AMER (AT&T, Generic) DA S00 CL9C4S AM000
4G LTE (CAT4) Cellular Sled for AMER (Verizon) DA S00 CL9C4S VZ000
4G LTE (CAT4) Cellular Sled for EMEA, SAARC, APAC DA S00 CL9C4S EU000
802.11n Wi-Fi Sled DA S00 WF10N0 AM000
1 Port USB 2.0 Host Sled DA S00 PN40U4 00000
Dual RS232 Ports Sled (Isolated) DA S00 PN2221 IS000
Dual RS485 Ports Sled (Isolated) DA S00 PN2442 IS000
Mixed RS232/RS485 Ports Sled (Isolated) DA S00 PN2245 IS000
Spaces in listed part numbers are shown to improve readability,
do not include when searching for or ordering these parts.
Note: Battery orientation
MUST MATCH as shown.
+
-
CAUTION: Lithium battery. Danger of explosion if battery
is incorrectly replaced. Replace only with the same or
equivalent type recommended by the manufacturer.
ATTENTION: Pile au lithium. Danger d’explosion si la
batterie est mal remplacée. Remplacez-la uniquement
par une pile du même type ou d’un type équivalent
recommandé par le fabricant.
Please note that the old battery must be disposed of in a
manner that complies with your local waste regulations.
The battery must not be disposed of in fire, or in a manner
whereby it may be damaged and its contents could come
into contact with human skin.
Veuillez noter que la vieille pile doit être éliminée
conformément à la réglementation locale en matière de
déchets. La pile ne doit pas être jetée au feu, ni d’une
manière qui pourrait l’endommager et son contenu
pourrait entrer en contact avec la peau humaine.

7
Revised 03 2020 Drawing No. LP1117
This page intentionally left blank.

8
LIMITED WARRANTY
(a) Red Lion Controls Inc. (the “Company”) warrants that all Products shall be free from defects in material and
workmanship under normal use for the period of me provided in “Statement of Warranty Periods” (available at
www.redlion.net) current at the me of shipment of the Products (the “Warranty Period”). EXCEPT FOR THE
ABOVE-STATED WARRANTY, COMPANY MAKES NO WARRANTY WHATSOEVER WITH RESPECT TO THE
PRODUCTS, INCLUDING ANY (A) WARRANTY OF MERCHANTABILITY; (B) WARRANTY OF FITNESS FOR
A PARTICULAR PURPOSE; OR (C) WARRANTY AGAINST INFRINGEMENT OF INTELLECTUAL PROPERTY
RIGHTS OF A THIRD PARTY; WHETHER EXPRESS OR IMPLIED BY LAW, COURSE OF DEALING, COURSE
OF PERFORMANCE, USAGE OF TRADE OR OTHERWISE. Customer shall be responsible for determining that a
Product is suitable for Customer’s use and that such use complies with any applicable local, state or federal law.
(b) The Company shall not be liable for a breach of the warranty set forth in paragraph (a) if (i) the defect is a
result of Customer’s failure to store, install, commission or maintain the Product according to specicaons; (ii)
Customer alters or repairs such Product without the prior wrien consent of Company.
(c) Subject to paragraph (b), with respect to any such Product during the Warranty Period, Company shall, in its
sole discreon, either (i) repair or replace the Product; or (ii) credit or refund the price of Product provided that,
if Company so requests, Customer shall, at Company’s expense, return such Product to Company.
(d) THE REMEDIES SET FORTH IN PARAGRAPH (c) SHALL BE THE CUSTOMER’S SOLE AND EXCLUSIVE
REMEDY AND COMPANY’S ENTIRE LIABILITY FOR ANY BREACH OF THE LIMITED WARRANTY SET
FORTH IN PARAGRAPH (a).
COPYRIGHT
©2020 Red Lion Controls, Inc. All rights reserved. Red Lion and the Red Lion logo are trademarks of Red Lion Controls, Inc. All other
company and product names are trademarks of their respective owners.
-
 1
1
-
 2
2
-
 3
3
-
 4
4
-
 5
5
-
 6
6
-
 7
7
-
 8
8


red lion DA50D Converter Manuel utilisateur
- Taper
- Manuel utilisateur
dans d''autres langues
- English: red lion DA50D Converter User manual
Documents connexes
-
red lion DA50N Gateway Manuel utilisateur
-
-
-
red lion E3 Guide de démarrage rapide
-
red lion DA 8DI/8DO Module Manuel utilisateur
-
-
-
-
-
Autres documents
-
 Crimson AV A63I Manuel utilisateur
-
 Crimson AV TU55 Manuel utilisateur
-
 Crimson AV FU65 Manuel utilisateur
-
 Crimson AV M631 Guide d'installation
-
 Crimson AV T46 Manuel utilisateur
-
 Crimson AV P30F Manuel utilisateur
-
Crimson VW4600 Manuel utilisateur
-
RODE Microphones WGOIIRX Mode d'emploi
-
Weidmueller 2682600000 Guide d'installation
-
Sixnet VT Guide d'installation


