
MWR-n
MWR 5n
MWR 10n
MWR 20n
gebruiksaanwijzing
user manual
betriebsanleitung
mode d'emploi

2015/03 Rev. 6.0
MWR-n
Nederlands ......................................................... 1
English ............................................................... 6
Deutsch .............................................................. 11
Français ............................................................. 16
Dit apparaat voldoet aan de EMC-richtlijn 89/336/EEG, 92/31/EEG en de
laagspanningsrichtlijn 73/23/EEG.
This appliance is in accordance with the EMC-Directive 89/336/EEC,
92/31/EEC and the low voltage directive 73/23/EEC.
Dieses Gerät wurde in Übereinstimmung gemäß EMV-Richtlinie 89/336/EWG,
92/31/EWG und Niederspannung-Richtlinie 73/23/EWG gebaut.
Cet appareil est conforme à la directive d'EMC 89/336/CEE, 92/31/CEE et à
la directive de basse tension 73/23/CEE.
Animo behoudt zich het recht voor om onderdelen op elk gewenst moment te wijzigen, zonder voorafgaande of directe kennisgeving aan de afnemer.
De inhoud van deze handleiding kan eveneens gewijzigd worden zonder voorafgaande waarschuwing. Deze handleiding is geldig voor de machine in
standaarduitvoering. Animo kan derhalve niet aansprakelijk worden gesteld voor eventuele schade voortvloeiende uit van de standaard uitvoering
afwijkende specificaties van de aan u geleverde machine. Voor informatie betreffende afstelling,onderhoudswerkzaamheden of reparaties waarin
deze handleiding niet voorziet, wordt u verzocht contact op te nemen met de technische dienst van uw leverancier. Deze handleiding is met alle
mogelijke zorg samengesteld, maar Animo kan geen verantwoording op zich nemen voor eventuele fouten in dit boek of de gevolgen daarvan.
Animo has the richt to change parts of the machine at any time without preceding or direct announcements to the client. The contents of this manual
can also be changed without any announcements. This manual is to be used for the standard model/type of the machine. Thus Animo cannot be held
responsible for any damage resulting from the application of this manual to the version delivered to you. For extra information on adjustments main-
tenance and repair, contact the technical department of your supplier. This manual has been written very carefully. However , Animo cannot be held
responsible neither for mistakes in the book nor for their consequences.
Animo behält sich das Recht vor, Einzelteile ohne vorherige Bekanntgabe an den Kunden zu ändern. Der Inhalt dieser Anleitung kann ebenfalls ohne
vorherige Bekanntgabe geändert werden. Diese Anleitung gilt für die Standardausführung der Maschine. Animo haftet daher nicht für Informationen
über Einstellungen, Wartungsarbeiten oder Reparaturen, die nicht in dieser Anleitung enthalten sind. Wenden Sie sich bitte gegebenenfalls an den
Kundendienst Ihres Händlers. Diese Anleitung wurde mit größtmöglicher Sorgfalt zursammengestellt. Animo haftet jedoch nicht fur etwaige Fehler in
dieser Anleitung oder für die Folgen solcher Fehler.
Animo se réserve le droit de modifier les pièces à n’importe quel instant, sans avis préalable et sans obligation de notification au client. Le contenu de
ce manuel est également sujet à modification sans avis préalable. Ce manuel s’applique au modèle standard de la machine. Par conséquent, Animo
n’est past responsable pour les dommages éventuels découlant de l’application de ce manuel aux modèles non standard. Pour les renseignements
sur certains réglages, les travaux d’entretien ou réparations qui ne seraient pas traités dans ce manuel, Animo ne peut ètre tenu responsable des
erreurs éventuelles ni des dommages qui en dècouleraient.
NL
GB
D
F

2015/03 Rev. 6.0
MWR-n
6
GB
GB
TABLE OF CONTENTS
1. MILK-HEATER MWR-n ....................................................................................7
2. TECHNICAL DATA ...........................................................................................7
3. HOW TO INSTALL AND CONNECT THE MACHINE ......................................8
4. CONTROL PANEL ...........................................................................................9
5. PREPARATIONS FOR USE ............................................................................9
6. USE ................................................................................................................9
7. CLEANING ......................................................................................................10
8. MAINTENANCE ...............................................................................................10
9. TEMPERATURE SECURITY ...........................................................................10
10. TRANSPORT ...................................................................................................10
DIMENSIONS
MWR 5n /10n .................................................................................................................. 22
MWR 20n ........................................................................................................................ 23

2015/03 Rev. 6.0
MWR-n
7
GB
Read the instructions carefully, to make sure that the milk-heater functions properly and safely.
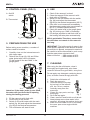
1. MILK-HEATER MWR-n
The inclusion of a water jacket, (i.e. bain-marie system) keeps the milk from becoming crusted.
A thermostat that can be freely adjusted to go up to 75°C automatically controls the storage
tempe rature. This machine is also suitable for heat other products.
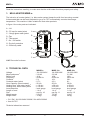
In figure 1 the main parts are indicated.
A - Lid
B - Fill cap for water jacket
C - Gauge glass water jacket
D - Tap
E - Thermostat
F - On- / Off switch
G - Dry boil protection
H - Electricity cable
2. TECHNICAL DATA
MWR 5n MWR 10n MWR 20n
Voltage : 1N~220-240V 1N~220-240V 1N~220-240V
Measured power
1
: 3.2 kW 3.2 kW 3.2 kW
Safety fuse : 16 A 16 A 16 A
Frequency : 50-60 Hz 50-60 Hz 50-60 Hz
Contents : 5 L 10 L 20 L
Contents water jacket : 2,7 L 4,3 L 8 L
Hour Capacity (when heated) : 20 L/h 20 L/h 30 L/h
Heating time, cold water jacket
2
: ± 18 min. ± 38 min. ± 45 min.
Heating time, warm water jacket : ± 16 min. ± 30 min. ± 36 min.
Level detection : level gauge level gauge level gauge
Length of cord : 1.4 m 1.4 m 1.4 m
Size : see fig. 10 see fig. 11 see fig. 12
Weight empty : 5,5 Kg 7,5 Kg 11 Kg
Weight filled : 13 Kg 22 Kg 39 Kg
1 -
CH / DK: 1N~220-240V 2200W / 2N~400V 3200W
2 -
from18-75°C
Technical alterations reserved
A
B
C
D
F
G
H
E
Fig. 1
MWR 5n model is whown

2015/03 Rev. 6.0
MWR-n
8
GB
3. HOW TO INSTALL AND
CONNECT THE MACHINE
• Positionthemachineonafirmandeven
surface so that it can be connected to the
electricity.
• Whenpositioningthemachine,bearin
mind that it is equipped with an overflow
device with comes out into the drip tray.
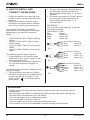
The machine should be connected as
demonstrated in the diagrams shown below,
despending on the machine's electrical
fittings.
• (fig.2)For220V-240V1Phasewithplug
socket.
• (fig.2)For220V-240V1Phase(3core
electric cable).
• (fig.3)For380V2Phase(4coreelectric
cable).
• (fig.4)For380V3Phase(5coreelectric
cable).
The following remarks apply to figure 4:
• Iftheplugfittedonthemachinecable
does not fit in your socket, replace it with
a new plug that does fit.
• Thereplacedplugshouldbedisposedof
as it can be dangerous if plugged in a
socket.
The following points should be observed when
wiring a new plug:
1. The green/yellow-coloured wire ("Earth")
should be connected to the terminal which
is either marked with the letter "E", the
"earth" symbol ( ), or coloured green or
green/yellow.
2. The blue-coloured wire ("Neutral") should
be connected to the terminal which is
either marked with the letter "N", or colou
red black.
3. The brown-coloured wire ("Phase") should
be connected to the terminal which is
either marked with the letter "L", or
coloured brown.
IMPORTANT !
The three core mains cable (fig. 2) has the
following wiring code:
Green/Yellow - Earth
Blue - Neutral
Brown - Phase (L1)
Black - Phase (L2)
Gray - Phase (L3)
fig. 5
fig. 2
Green/Yellow - Earth (E)
Blue - Neutral (N)
Brown - Phase (L)
Green/Yellow - Earth (E)
Blue - Neutral (N)
Brown - Phase 1 (L1)
Black - Phase 2 (L2)
Green/Yellow - Earth (E)
Blue - Neutral (N)
Brown - Phase 1 (L1)
Black - Phase 2 (L2)
Gray - Phase 3 (L3)
fig. 4
WARNING
* Always remove the plug from the socket if the machine has to be opened for repair or
maintenance.
* Do not position the machine in areas where the temperature falls below freezing point
because there is always water left in the system.
* Connect the appliance to an earthed wall socket.
* Do not submerge or spray the machine.
* Have all repairs carried out by a specially trained technician.
* If the machine is not used it is advisable to remove the plug from the socket.

2015/03 Rev. 6.0
MWR-n
9
GB
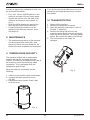
4. CONTROL PANEL (FIG. 5)
A - On/Off
switch
B - Thermostat
5. PREPARATIONS FOR USE
Before taking a new machine, a number of
actions need to be taken.
1. Carefully rinse out the internal reservoir
with clean water.
2. Take off the fill cap (fig. 6A) and fill the
water jacket with cold or hot water.
Fill the jacket till the text 'MAX' in the
gauge glass.
Attention: If the water jacket is over filled ,
the water will eject from the fill opening
during the heating process!
3. Fill the reservoir with fresh milk.
4. Put the plug in the socket.
5. Switch on the milk-heater with the main
switch (fig. 6A) and adjust the thermostat
(fig. 6B) to the desired tempe rature.
6. The milk-heater will start to heat.
6. USE
1. Check if the reservoir is clean!
2. Close the tap and fill the reservoir with
fresh milk or Glühwein.
3. Switch on the milk heater with the switch
(fig. 6A) and adjust the thermostat
(fig.6B) to the desired temperatu re (85°C).
4. If the milk is not consumed immediately,
the thermostat needs to be turned down to
68-72°C (constant pasteurisa tion).
5. Check the water level in the gauge glass
(fig. 6C) during use. Refill in necessary.
6. It is always possible to add fresh milk as
the heating will take place automatically.
Milk is perishable! Therefore, ensure that
the milk does not remain in the reservoir
too long.
IMPORTANT: The boiling point of water in the
water jacket, depends on the altitude at which
the machine is placed, compared to sea-level.
Be careful to set the thermostat in such a way
that the water does not start to boil!
Water will boil at: - 1500 meters at 95°C
- 3000 meters at 90°C
7. CLEANING
After using the the milk heater, clean it
thoroughly and hygieni cally, as a clean
reservoir will ensure a good drink, every time.
Do not apply any detergent containing lemon
juice, as lemon reacts strongly with milk.
1. Switch the milk heater off.
2. Drain the reservoir.
3. Unscrew the top of the tap
by turning it to the left and
pull the silicon washer
vertically away from the
screw top.
4. Clean the tap parts and tap
thoroughly.
5. Re-fit the tap again.
6. Clean, reservoir and lid with a soft brush.
7. Always keep some clean water in the
reservoir, this stops the washer drying out.
8. When the milk heater is not in use, keep
the cover open at an angle with the
machine.
A
B
max
min
D
A
B
C
Fig. 5
Fig. 6
Fig. 7

2015/03 Rev. 6.0
MWR-n
10
GB
In order to remove any remnants of milk, use
the Animo MPW-cleaner.
• Pour100-150mlofMPW-cleanerinthe
reservoir and add 1/2 ltrs of warm water.
• Spreadthesolutionoverthesideofthe
reservoir and leave to react (about 10
min.).
• DraintheMPW-cleanerbyopeningthe
drain tap and rinse out the reservoir.
• Ifusedcarefullythesolutioncanbe
applied to the drain tap, blender, cover
and drip tray.
8. MAINTENANCE
• Thestainlesssteelcasingofthemachine
can be cleaned with a wet cloth, then
wiped dry. Never use any abrasives, as
these can cause scratches and mat spots.
9. TEMPERATURE SECURITY
The machine is fitted with a temperature
security that can be accessed from the
outside. The security is installed at the rear of
the machine, next to the electricity cable
connection. This is activa ted when the
temperature gets to high.
When the security is activated, do the
following:
1. make sure the machine has cooled down.
2. unscrew the black protective cover
(fig. 8A).
3. a button becomes visible. Press it and
re-fit the cover.
If you find the technical malfunction not to be
caused by the temperature security, contact
your dealer.
10. TRANSPORTATION
1. Switch off the machine.
2. Remove the plug from its socket.
3. Drain the reservoir, and clean it (refer to
Chapter 7 “cleaning”)
4. Remove the filling cap and turn the
machine upside down to let the remaining
water out above the sink. The water jacket
drains. Be careful, the water could be hot!
5. The milk heater is now ready for
transport.
A
Fig. 8
Fig. 9

2015/03 Rev. 6.0
MWR-n
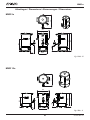
Afmetingen / Dimensions / Abmessungen / Dimensions
MWR 5n
MWR 10n
fig./ Abb. 10
fig./ Abb. 11
Ø 206
129
428
269
314
78
414
282
129
Ø274
409
424
72
280
377
351
22

2015/03 Rev. 6.0
MWR-n
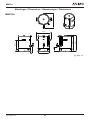
Afmetingen / Dimensions / Abmessungen / Dimensions
MWR 20n
fig./ Abb. 12
Ø 346
432
132
489
501
78
455
357.5
23

Animo B.V.
Dr. A. F. Philipsweg 47
P.O. Box 71
9400 AB Assen
The Netherlands
Tel: +31 (0) 592 376376
Fax: +31 (0) 592 341751
E-mail: [email protected]
www.animo.eu
2015/03 Rev. 6.0
09938
-
 1
1
-
 2
2
-
 3
3
-
 4
4
-
 5
5
-
 6
6
-
 7
7
-
 8
8
-
 9
9
-
 10
10


dans d''autres langues
- English: Animo MWRn Owner's manual
- Deutsch: Animo MWRn Bedienungsanleitung
Documents connexes
-
Animo MPW 6 Le manuel du propriétaire
-
-
-
-
-
-
-
-
-