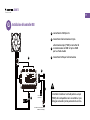
Oversteel Azurite Manuel utilisateur
- Catégorie
- Boîtiers d'ordinateurs
- Taper
- Manuel utilisateur

AZURITE
USER MANUAL.....................................................................................
MANUAL DE USUARIO......................................................................
MANUEL DE L'UTILISATEUR..........................................................
BENUTZERHANDBUCH...................................................................
MANUALE UTENTE............................................................................
02
12
22
32
42
EN
ES
FR
DE
IT
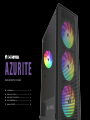
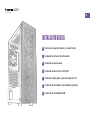
GAMING PC CASE

EN
AZURITE
GAMING PC CASE
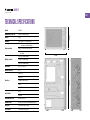
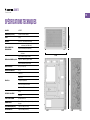
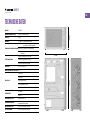
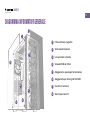
TECHNICAL SPECIFICATIONS
MODEL AZURITE
DIMENSIONS (L x W x H) 340mm x 200mm x 449mm
WEIGHT 5,7Kg
MATERIAL Steel 0,5mm SPCC, tempered glass
FANS LOCATION
Front: 3x 120mm
3x 140mm (3x A-RGB included)
Rear: 1x 120mm (1x A-RGB included)
Top: 2x 120mm
2x 140mm
WATER COOLING
Front: up to 360mm radiator
Top: up to 240mm radiator
Rear: up to 120mm radiator
DRIVE BAYS 4x 2,5" + 2x 3,5"/2,5"
EXPANSION SLOTS x7 + 2
FRONT I/O
USB 3.0 x1
USB 2.0 x2
Headphone/Microfone x1
Power
Reset/LED
DUST FILTER 1x Top
1x Bottom
MOTHERBOARD TYPE ATX, MicroATX, ITX
POWER SUPPLY ATX up to 180mm (not included) bottom position
VGA (GPU) Up to 340mm (not included)
CPU COOLER Up to 174mm (not included)
449mm200mm
340mm

EN
AZURITE
GAMING PC CASE
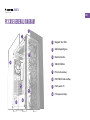
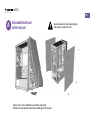
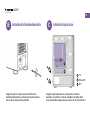
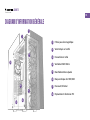
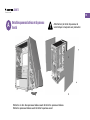
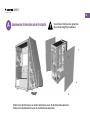
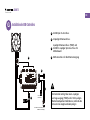
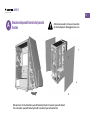
PC CASE GENERAL DIAGRAM
1
2
1
5
5
3
3
7
7
2
6
6
4
4
8
8
Magnetic dust filter
Side tempered glass
Back metal side
120mm RGB fan
PSU enclosure bay
HDD/SSD Enclosure Bay
Front panel I/O
PCI expansion bays

EN
AZURITE
GAMING PC CASE
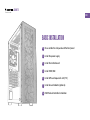
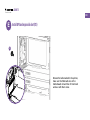
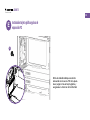
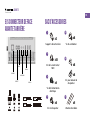
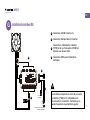
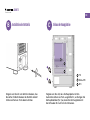
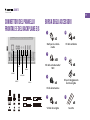
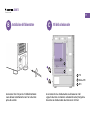
FRONT PANEL I/O AND
MOTHERBOARD CONNECTORS ACCESORY BAG
POWER
RESET
LED
USB2.0
HD AUDIO
USB 3.0
1
7
2
6
5
3
4
Motherboard
standos
Zip ties
Motherboards
/SSD Screws
PSU Screws
HDD Screws
HDD Enclosure screws
Fan Screws
x3
x5
x18
x4
x8
x8
x6
x8

EN
AZURITE
GAMING PC CASE
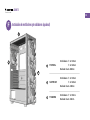
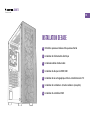
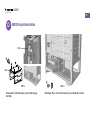
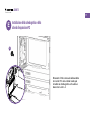
Disassemble the side panel and the front panel
Install the power supply
Install the motherboard
Install HDD/SSD
Install GPU and expansión slot (PCI)
Install fan and radiator (optional)
RGB Fanhub Controller installation
A
E
F
G
C
B
D
BASIC INSTALLATION

EN
AZURITE
GAMING PC CASE
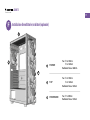
ADisassemble the side panel
and the front panel
Take out the screws before dissasembling side panel
Remove the side panels before dissasembling the front panel
Special atention to the tempered glass
side panel. Handle with care

EN
AZURITE
GAMING PC CASE
Install the power supply Install the motherboard
Make sure the screw holes for PSU and the PC case
are alligned before screwing Make sure that the motherboard aims at the copper cylinder
and install the standos (No.1) before screwing in with the
No.2 screws.
1
2
B C
ITX
Micro-ATX
ATX
1
2
3
1
2
3

EN
AZURITE
GAMING PC CASE
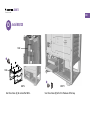
Install HDD/SSD
D
Use the screws (4) to secure the SSDs. Use the screws (6) to fix it to the base of the bay.
SSD
SSD
HDD*2
4
6
SSD*3

EN
AZURITE
GAMING PC CASE
Install GPU and expansión slot (PCI)
E
Remove the bafle marked in the picture,
make sure the VGA card aims at the
motherboard slot and then fix VGA card
and case with No.3 screw.
3

EN
AZURITE
GAMING PC CASE
A
B
C
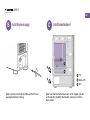
RGB Fanhub Controller installation
F
FRONT
TOP
REAR
A
B
C
Fans → 3x 120mm
→ 3x 140mm
Radiator up to 360mm
Fans → 2x 120mm
→2x 140mm
Radiator up to 240mm
Fans → 1x 120mm
Radiator up to 120mm

EN
AZURITE
GAMING PC CASE
Install fan and radiator (optional)
G
A
D
C
A
B
C
D
B
Connector to
M/B header
Aura Addressable Header(ASUS)
RAINBOW Header(MSI)
5v 3pin A-RGB Connector
3/4pin power connector
4pin (PWM) connector and 5v 3pin
A-RGB syncing for motherboard
SATA connector to PSU power
Controller has 4pin power outputs(PWM),
but its also compatible with 3pin.
Connect it skipping the first starting from left side

ES
AZURITE
GAMING PC CASE
ESPECIFICACIONES TÉCNICAS
MODELO AZURITE
DIMENSIONES (L x An x Al) 340mm x 200mm x 449mm
PESO 5,7Kg
MATERIAL Acero 0,5mm SPCC, cristal templado
UBICACIÓN DE VENTILADORES
Delantero: 3x 120mm
3x 140mm (3x A-RGB incluidos)
Trasero: 1x 120mm (1x A-RGB incluido)
Superior: 2x 120mm
2x 140mm
REFRIGERACION LIQUIDA
Delantero: Radiador hasta 360mm
Superior: Radiador hasta 240mm
Trasero: Radiador hasta 120mm
BAHÍAS PARA DISCOS 4x 2,5" + 2x 3,5"/2,5"
RANURAS DE EXPANSION x7 + 2
E/S FRONTAL
USB 3.0 x1
USB 2.0 x2
Auricular/Microfono x1
Encendido/Apagado
Reinicio/LED
FILTROS ANTIPOLVO 1x Superior
1x Inferior
TIPO DE PLACA BASE ATX, MicroATX, ITX
FUENTE DE ALIMENTACION Formato ATX hasta 180mm (no incluida) colocada en la
parte inferior
TARJETA GRÁFICA (GPU) Hasta 340mm (no incluida)
DISIPADOR CPU Hasta 174mm (no incluido)
449mm200mm
340mm

ES
AZURITE
GAMING PC CASE
DIAGRAMA DE INFORMACIÓN GENERAL
1
2
1
5
5
3
3
7
7
2
6
6
4
4
8
8
Filtro de polvo magnético
Cristal templado lateral
Lateral trasero metálico
Ventilador RGB 120mm
Bahía independiente para fuente de alimentación
Bahía para discos duros HDD/SSD
Panel frontal de E/S
Rarunas de expansión PCI

ES
AZURITE
GAMING PC CASE
PANEL FRONTAL DE E/S Y
CONECTORES PARA PLACA BASE ACCESORIOS PARA INSTALACION
POWER
RESET
LED
USB2.0
HD AUDIO
USB 3.0
1
7
2
6
5
3
4
Soportes para placa
base
Bridas para cableado
Tornillos para placa
base/SSD
Tornillos para fuente de
alimentación
Tornillos para disco duro
Tornillos para bahía
disco duro
Tornillos para ventilador
x3
x5
x18
x4
x8
x8
x6
x8

ES
AZURITE
GAMING PC CASE
Desmontar los paneles laterales y el panel frontal
Instalación de la fuente de alimentación
Instalación de la placa base
Instalación de discos duros HDD/SSD
Instalación tarjeta gráfica y placa de expansión PCI
Instalación de ventiladores y/o radiadores (opcional)
Instalación de controladora RGB
A
E
F
G
C
B
D
INSTALACIÓN BÁSICA

ES
AZURITE
GAMING PC CASE
ADesmontar los paneles laterales y el panel
frontal
Quitar los tornillos de ambos paneles laterales antes de desmontar los paneles laterales
Quitar previamente los paneles laterales antes de desmontar el panel frontal
Precaución al desmontar el panel de
cristal templado. Manejar con cuidado

ES
AZURITE
GAMING PC CASE
Instalación de la fuente de alimentación Instalación de la placa base
Asegúrate que los huecos para los tornillos de la
fuente de alimentación se alinean de manera correcta
con los de la torre antes de atornillar
Asegúrate que la placa base se alinea con los huecos
marcados en la torre e instala los alzadores de cobre (No.1)
antes de atornillar la placa base a la torre con los tornillos No.2
1
2
B C
ITX
Micro-ATX
ATX
1
2
3
1
2
3

ES
AZURITE
GAMING PC CASE
Instalación de discos duros HDD/SSD
D
Usa los tornillos (4) para fijar los SSD Usa los tornillos (6) para fijarlo en la base de la bahía
SSD
SSD
HDD*2
4
6
SSD*3

ES
AZURITE
GAMING PC CASE
Instalación tarjeta gráfica y placa de
expansión PCI
E
Retira el embellecedor que necesites
alineando con la ranura PCI de la placa
base, luego instala la tarjeta gráfica y
asegúrala a la torre con el tornillo No.3
3

ES
AZURITE
GAMING PC CASE
A
B
C
Instalación de ventiladores y/o radiadores (opcional)
F
FRONTAL
SUPERIOR
TRASERO
A
B
C
Ventiladores → 3x 120mm
→ 3x 140mm
Radiador hasta 360mm
Ventiladores → 2x 120mm
→ 2x 140mm
Radiador hasta 240mm
Ventiladores → 1x 120mm
Radiador hasta 120mm
La page est en cours de chargement...
La page est en cours de chargement...
La page est en cours de chargement...
La page est en cours de chargement...
La page est en cours de chargement...
La page est en cours de chargement...
La page est en cours de chargement...
La page est en cours de chargement...
La page est en cours de chargement...
La page est en cours de chargement...
La page est en cours de chargement...
La page est en cours de chargement...
La page est en cours de chargement...
La page est en cours de chargement...
La page est en cours de chargement...
La page est en cours de chargement...
La page est en cours de chargement...
La page est en cours de chargement...
La page est en cours de chargement...
La page est en cours de chargement...
La page est en cours de chargement...
La page est en cours de chargement...
La page est en cours de chargement...
La page est en cours de chargement...
La page est en cours de chargement...
La page est en cours de chargement...
La page est en cours de chargement...
La page est en cours de chargement...
La page est en cours de chargement...
La page est en cours de chargement...
La page est en cours de chargement...
La page est en cours de chargement...
-
 1
1
-
 2
2
-
 3
3
-
 4
4
-
 5
5
-
 6
6
-
 7
7
-
 8
8
-
 9
9
-
 10
10
-
 11
11
-
 12
12
-
 13
13
-
 14
14
-
 15
15
-
 16
16
-
 17
17
-
 18
18
-
 19
19
-
 20
20
-
 21
21
-
 22
22
-
 23
23
-
 24
24
-
 25
25
-
 26
26
-
 27
27
-
 28
28
-
 29
29
-
 30
30
-
 31
31
-
 32
32
-
 33
33
-
 34
34
-
 35
35
-
 36
36
-
 37
37
-
 38
38
-
 39
39
-
 40
40
-
 41
41
-
 42
42
-
 43
43
-
 44
44
-
 45
45
-
 46
46
-
 47
47
-
 48
48
-
 49
49
-
 50
50
-
 51
51
-
 52
52


Oversteel Azurite Manuel utilisateur
- Catégorie
- Boîtiers d'ordinateurs
- Taper
- Manuel utilisateur
dans d''autres langues
- italiano: Oversteel Azurite Manuale utente
- español: Oversteel Azurite Manual de usuario
Documents connexes
Autres documents
-
Corsair iCUE 220T Manuel utilisateur
-
Corsair Carbide Series Guide d'installation
-
NZXT H7 Flow RGB Gaming PC Cases Manuel utilisateur
-
Phanteks Enthoo Evolv ATX Glass Le manuel du propriétaire
-
Gamdias APOLLO M1 Mode d'emploi
-
ZALMAN X7 Manuel utilisateur
-
Aerocool Interstellar Manuel utilisateur
-
Antec Performance 1 Silent Le manuel du propriétaire