Relish AC-02 DAB+-DAB-FM Radio and Music Player Stereo Manuel utilisateur
- Catégorie
- Radios
- Taper
- Manuel utilisateur

User Mnul
Please read this user manual
carefully before using the product
Radio & Music Player
DAB/DAB+/FM

Specifications
Digital Frequency: 174.928MHz(5A) - 239.200MHz(13F)
FM Frequency: 87.5MHz-108MHz
Input: 5.9V DC power adaptor socket (110-230V supplied)
Power Consumption: 8.85W
Speakers:
Audio Output Power: 2 x 1.5W RMS
Output: 3.5mm stereo headphone
Mains Power Adaptor: Input AC 100-240V~ 50/60Hz, 1.5A
Output DC 5.9V 1.5A
Battery: 4 x Type D (not included)
Display: 3 line LCD display
Presets: 3 radio stations
USB Playback: MP3
Operational Temperature: Between 0C to +40C (32F to 104F)
Aerial:
Dimensions: 245 x 108 x h182 mm
Registration Numbers:
EU - 008539993-0002
UK – 6137034
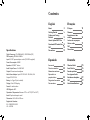
Contents
English Frnçis
Espñol Deutsche
3
About
5
Stations
10
FAQ
4
Getting Started
7
8
How to Upload MP3 Files
12
Precautions
13
À Propos
16
Enregistrement des
stations
17
FAQ
14
Démarrer
17
18
Précautions
19
Acerca de
22
Memorizar emisoras
23
Preguntas frecuentes
20
Puesta en marcha
23
Reproducir su
propia música
24
Precauciones
25
Über das Gerät
28
Sender speichern
29
FAQ
26
Erste Schritte
29
Ihre eigenen Audio-
Aufnahmen abspielen
30
Vorsichtsmaßnahmen

3 4
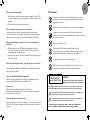
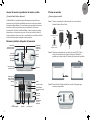
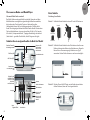
Headphone
socket
USB socket to play
your own music
Factory Reset
Aerial
Aerial
DC power
socket
for power
adaptor
Display
Battery
compartment
4 x D batteries
FM/DAB+ Search between
stations during
setup
‘SELECT’ to select
station during setup
About the Relish Radio & Music Player
Tune in and enjoy the power of music!
‘VOLUME’
dial
‘ON’ button
‘OFF’ button
Memory buttons
stations
‘My Playlist’ button
(plays USB)
Customisable
label behind
Stereo
Speakers
EN
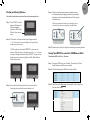
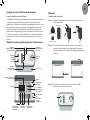
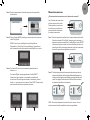
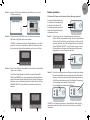
Getting Started
How to set up your radio
Step 1 Assemble the power adaptor with the USA or UK plug.
Connect the power
adaptor supplied to the
DC power socket on the
back of your radio, and
plug the mains adaptor
into the mains supply.
batteries.
Step 2
UK
plug
USA
plug
Adaptor
Press ‘ON’ to turn on
the radio. Make sure
Step 3
Step 4
Back

5 6
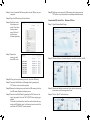
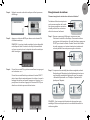
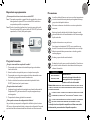
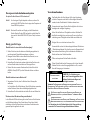
Press ‘MODE’ to switch
between FM radio and
DAB+ radio modes
(Applies to DAB+ Radio
only).
Step 1
In DAB+ mode, press and hold ‘SELECT’ to auto-scan for
stations. When the scan is complete, press the ‘<’ or ‘>’ button
to browse through the stations. Press ‘SELECT’ to tune into the
station you want to listen to (Applies to DAB+ Radio & Music
Step 2
Press and hold a memory button for 8 seconds whilst
Step 3
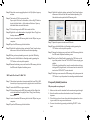
Finding and Saving Stations
Saving Your MP3 Files onto Your USB Memory Stick
Downloaded MP3 Audio Files - Windows
the label by bending it slightly, and write a personalised
description on the customisable label card. Then, replace
Step 4
Step 5
EN
new label if you decide to change the recorded station.
Repeat steps 3 and 4 to setup the remaining two memory buttons.
Step 1
Step 2
Step 3 Right click on the first trck on the playlist. Select ‘Copy’ from
the drop-down menu.

7 8
Insert a formatted USB memory stick into the USB port on your
computer.
Right click inside
the window, and
select ‘Paste’ from
the drop-down
menu. Wait until
Repeat the
process to add
more MP3 music.
Ensure the Relish Radio is in Standby mode by pressing the
‘OFF’ button on the top of the product.
‘OFF’ button to put the product into standby mode beforehand.
Switch on the Relish Radio by pressing the ‘ON’ button on the
top of the product. Press the ‘MY PLAYLIST’ button to play your
playlist.
during an MP3 playlist track, it will resume from the start of the
track when ‘MY PLAYLIST’ is next selected.
Step 4
Step 5
Step 6
Step 7
Step 8
Step 9
Step 10
Step 11
Step 12
Open Windows Media Player.Step 1
Downloded MP3 Audio Files - Windows CD Drive
All tracks will default as selected, if you wish to choose only
a few tracks, untick those you don’t want.
Click on ‘Rip CD’ on the tool bar.
Step 2
Step 3
Step 4

9 10
Select the correct copyright option in the ‘Rip Options’ pop-up
window.
The tracks
Open up the Files icon on the toolbar, click on My PC folder to
locate the Music folder – all the tracks will be here. Open up
tracks.
Step 6
Step 5
Step 7
Insert a formatted USB memory stick into the USB port on your
computer.
Step 9
Step 10
Right click inside the window, and select ‘Paste’ from the drop-
Step 11
Step 12
format: https://support.apple.com/en-gb/guide/music/mus2965/mac
Insert a formatted USB memory stick into the USB port on your
computer.
Right click inside the window, and select ‘Paste’ from the drop-
The
Repeat the process to add more MP3 music.
Ensure the Relish Radio is in Standby mode by pressing the
‘OFF’ button on the top of the product.
‘OFF’ button to put the product into standby mode beforehand.
Switch on the Relish Radio by pressing the ‘ON’ button on the
top of the product. Press the ‘MY PLAYLIST’ button to play your
playlist.
during an MP3 playlist track, it will resume from the start of the
track when ‘MY PLAYLIST’ is next selected.
Step 1
Step 2
Step 3
Step 4
Step 5
Step 6
Step 7
Step 8
Step 9
Step 11
Step 10
MP3 Audio Files From CD - MAC OS
Step 8 Right click on the first trck on the playlist. Select ‘Copy’ from
the drop-down menu.
Right click
on the first trck on the playlist. Select ‘Copy’ from the drop-
down menu.
Ensure the Relish Radio is in Standby mode by pressing the
‘OFF’ button on the top of the product.
Step 13
Step 14
Why is my rdio reception poor?
1. Make sure the aerial is extended for the maximum signal strength.
2.
3.
to your radio, this may cause interference.
4. Re-scan the stations by pressing and holding ‘SELECT’ at the
back.
Frequently Asked Questions

11 12
Precautions
EN
disconnect it from the mains immediately if any liquid is spilled
on or near the radio.
The radio should not be used in a high temperature or high
may damage the unit.
Clean only with dry cloth.
Use only the AC/DC adaptor supplied with the radio.
permanent damage to the radio and may be hazardous.
The mains plug or an appliance couple is used as the disconnect
not expose this product to rain or moisture
:
to reduce the risk of electric shock, do not remove the radio cover.
no user serviceable parts inside, refer servicing to qualified service personnel
WARNING:
the lightning flash and arrowhead within the triangle is a warning sign
alerting you of “dangerous voltage” inside the radio.
the exclamation point within the triangle is a warning sign alerting you
of important instructions accompanying this radio
risk of electric
shock do not open
CAUTION
Don’t treat the radio as household waste. Check your local
Do not open and repair the radio by yourself.
Why is my rdio not working?
1. Make sure your radio is connected to a power supply. Check the DC
and mains sockets. If you are using batteries, make sure they are fully
charged.
2.
How cn I go bck to fctory settings?
Use a pin to press the factory reset button. This can be found near the
USB socket. Please note all memory will be erased once the reset is
pressed.
Why is my plylist plying in n unexpected order?
Please format your memory stick and repeat the step-by-step
when you are completing Step 2 of ‘Downloaded MP3 Audio Files’
Why is the rdio disply reding ‘T1/0’, and not recognising the
udio files?
1. P
‘Desktop’, ‘Documents’ or ‘Music’ folder. Files may not work if
pasted from the ‘Download’ folder.
2. Make
USB memory stick.
Cn I Use Downloded MP3s from Mc OS?
Mac OS is not fully supported. Files will play, but playlist issues may
occur. Format in Windows for a more reliable result.
Plese note:
Visit http://www.worlddab.org/ for more information about digital
radio reception in your area.
Why is the rdio skipping trcks / only plying odd or even trcks?
Please see the point below.

13 14
Prise du casque
Prise USB pour
Réinitialisation
de la radio
Antenne
Aerial
Prise
d’alimentation
c.c. pour
l’adaptateur
Compartiment
pour les piles
Commutation
entre les modes
FM/Numérique
Parcourir les
stations
À propos de notre radio/lecteur de musique
Allumez la radio et profitez du pouvoir de la musique!
en situation de handicap d’écouter la musique qui leur plaît en toute
le mieux.
Bouton de
Bouton de
marche
Bouton
d’arrêt
Boutons de
stations préférées
Bouton de
le mode USB
Nommez les
stations comme
Haut-parleurs
FR
Démarrer
Étape 1
la prise américaine.
Branchez l’adaptateur secteur à la prise c.c. de la radio et
également utiliser 4 piles de type R20. Déployez complètement
l’antenne.
Prise britannique
Prise américaine
Adaptateur
Appuyez sur le bouton de marche pour allumer la radio.
Étape 3

15 16
Appuyez sur le bouton MODE pour alterner entre le mode FM
et le mode numérique.
en Amérique du Nord. Consultez le site http://www.worlddab.
Étape 4
Étape 5
sur les boutons < ou >.
enfoncé pour détecter automatiquement les stations. Lorsque le
balayage des stations est terminé, appuyez sur le bouton < ou >
pour parcourir les stations. Appuyez sur le bouton SELECT pour
Étape 6
Trois boutons Mémoire sont présents
sur le panneau supérieur de la radio.
de radio préférées sur ces boutons
Choisissez le mode FM ou Numérique. Parcourez les stations
SELECT pour écouter la station. Pendant l’écoute de la station
de radio, appuyez sur un bouton de mémoire et maintenez-le
enfoncé pendant 8 secondes pour enregistrer la station.
Étape 1
Enregistrement des stations
plastique sur l’étiquette.
station enregistrée.
Étape 2
FR

17 18
la clé USB, puis appuyez sur le bouton MY PLAYLIST (4e bouton)
du panneau supérieur.
Étape 2
Étape 1
Lecture de vos propres fichiers audio
Pour quelle rison l réception rdio est-elle de muvise qulité?
1.
signal possible.
2. Déplacez la radio à un autre endroit pour tenter d’améliorer la réception.
3.
4. Relancez le balayage des stations en maintenant le bouton SELECT
enfoncé à l’arrière de l’appareil.
Pour quelle rison m rdio ne fonctionne ps?
1.
2.
Comment revenir ux prmètres pr défut?
Foire ux questions
Précautions
FR
Tenir la radio à l’écart des liquides. Éteindre et débrancher
immédiatement la radio de la prise secteur si un liquide se
répand sur l’appareil
très chaud ou très humide pendant une période prolongée au
risque de l’endommager
pourrait endommager irrémédiablement la radio et être dangereux
La prise secteur ou le connecteur est utilisé comme dispositif de
déconnexion. Le dispositif de déconnexion doit rester opérationnel
:
pour réduire le risque de choc électrique, ne pas retirer le
couvercle de la radio. ne contient aucune pièce que l’utilisateur peut réparer.
consulter un professionnel pour les réparationspersonnel
AVERTISSEMENT
la flèche en forme de foudre dans un triangle est un signal d’alerte qui
indique une «tension dangereuse» à l’intérieur de la radio.
le point d’exclamation dans le triangle est un signal d’alerte qui indique
que cette radio est accompagnée d’instructions importantes
risque de choc
électrique, ne pas ouvrir
ATTENTION
Consulter le centre local de gestion des déchets
risque d’incendie ou de choc électrique,
ne pas exposer ce produit à la pluie ou
l’humidité

19 20
Toma para
auriculares
Toma USB para
reproducir su propia
música
Reiniciar la radio
Antena
Aerial
Toma de
alimentación
CC para
adaptador
Pantalla
Compartimento
para las pilas
Seleccione esta
para escuchar
emisoras
Interruptor de
modo FM/Digital
emisoras
Acerca de nuestro reproductor de música y radio
Sintonice y disfrute del poder de la música
personas con todo tipo de habilidades escuchar la música que deseen
de manera independiente. Con tres botones para guardar las emisoras
Dial de
Botón ON
(encendido)
Botón OFF
(apagado)
Botones de
memoria para sus
Interruptor para
reproducir USB
Asigne a las
emisoras el
nombre que
ES
Puesta en marcha
Paso 1 Colocar el adaptador de alimentación con un enchufe de
Estados Unidos o Reino Unido.
Conectar el adaptador de corriente a la toma DC (CC) de la
radio y el otro extremo en la toma de la pared. También se
pueden usar 4 pilas de tipo D. Extender la antena todo lo posible.
Paso 2
Enchufe de Reino
Unido
Enchufe de
Estados Unidos
Adaptador
Pulsar el botón ON (encendido) en la radio. Comprobar que
Paso 3

21 22
Quitar la tapa trasera de la radio para acceder al panel de
Pulsar el botón MODE (modo) para alternar entre los modos de
radio FM y Digital.
Norteamérica. Visite http://www.worlddab.org/ para obtener
Paso 4
Paso 5
En el modo FM, sintonice manualmente presionando los
botones < o >.
En el modo Digital, mantenga pulsado el botón SELECT
las emisoras. Cuando haya terminado el escaneado, pulse el
botón < o > para recorrer las emisoras. Pulse SELECT (seleccionar)
para sintonizar la emisora que desee escuchar.
Paso 6
Hay 3 botones de memoria en
el panel superior de la radio.
Puede guardar sus emisoras
en cualquier momento.
busque la que desee memorizar. En modo Digital, pulse SELECT
(seleccionar) para escuchar la emisora. Mientras escucha una
estación de radio, mantenga presionado un botón de memoria
durante 8 segundos para guardar esa estación.
Paso 1
Memorizar emisoras
Cuando haya terminado de memorizar las emisoras, retire la
escriba una descripción personalizada que tenga sentido para
Paso 2
ES

23 24
Conecte la unidad USB y pulse el botón MY PLAYLIST (mi lista de
reproducción, 4.º botón) en el panel superior.
Para poder reproducir su propia lista de reproducción, primero
Paso 2
Paso 1
Reproducir su propia música
¿Por qué es tn ml l recepción de l rdio?
1.
fuerza de la señal.
2.
3. Compruebe que no haya otros equipos eléctricos demasiado cerca
de la radio, ya que podrían causar interferencias.
4.
SELECT (seleccionar) en la parte trasera.
¿Por qué no funcion l rdio?
1. Asegúrese de que la radio esté conectada a una fuente de alimentación.
Compruebe la CC y las tomas de red. Si usa pilas, asegúrese de que
estén cargadas.
2.
¿Cómo puedo resturr l configurción de fbric?
Pregunts frecuentes
Precauciones
ES
y desconéctela de la red inmediatamente si se derrama algún
líquido sobre ella.
La radio no debe utilizarse en entornos con altas temperaturas
ni mucha humedad durante periodos prolongados de tiempo,
ya que la unidad podría dañarse.
o arenoso.
Límpiela únicamente con un paño seco.
Use solamente el adaptador CA/CC que se suministra con
resultar peligroso.
descarga eléctrica, no exponga este
P:
para reducir el riesgo de descarga eléctrica, no quite la tapa de
la radio, no hay piezas que el usuario pueda reparar en su interior, consulte con
un servicio especializado
ADVERTENCIA
el símbolo del rayo y la punta de flecha dentro del triángulo es una señal
de advertencia que alerta de un “voltaje peligroso” dentro de la radio.
el signo de exclamación dentro del triángulo es una señal de advertencia
que alerta de instrucciones importantes que acompañan a la radio.
riesgo de descarga
eléctrica, no abrir
PRECAUCIÓN
No deseche la radio como un residuo doméstico. Consulte con
obtener información.
No abra y repare la radio usted mismo/a.

25 26
Anschluss für
Kopfhörer
USB-Anschluss
Radio zurücksetzen
Antenne
Aerial
Anschluss für
Gleichstrom-
Netzteil
Anzeige
Batteriefach
Drücken Sie die
AUSWAHL-Taste
Abspielen
Umschaltung FM/
Digital-Modus Sender
durchlaufen
Über unseren Radio- und Musik-Player
Schalten Sie ein und genießen Sie die Kraft der Musik!
Das Relish Radio wurde speziell dafür entwickelt, Menschen mit allen
die sie wünschen. Dank der drei Tasten zur Voreinstellung Ihrer
Lieblingslieder können Sie Ihre Lieblingssender oder -Playlists leicht
Lautstärkeschalter
EIN-Taste (ON)
AUS-Taste (OFF)
Speicher-Tasten für
Ihre Lieblingssender
Umschalttaste
USB
Benennen Sie
die Sender so,
wie es für Sie
am besten ist
Lautsprecher
DE
Erste Schritte
Einrichtung Ihres Radios
Schritt 1 Schließen Sie das Netzteil an einen US- oder UK-Stecker an.
Schließen Sie das Netzteil an den Gleichstrom-Anschluss am
Schritt 2
UK-Stecker
US-Stecker
Netzteil
Drücken Sie auf die EIN-Taste, um das Radio einzuschalten.
Achten Sie darauf, dass der Ton eingeschaltet ist.
Schritt 3

27 28
Nehmen Sie die hintere Abdeckung des Radios ab, um an das
Display zu gelangen.
Drücken Sie auf die MODUS-Taste, um zwischen dem Modus
FM-Radio und Digital-Radio umzuschalten.
-
-
tionen über den digitalen Radioempfang bei Ihnen in der Nähe.
Schritt 4
Schritt 5
Wenn Sie im FM-Modus sind, stellen Sie ihn manuell ein, indem Sie die
Tasten < oder > drücken.
Wenn Sie im Digital-Modus sind, drücken und halten Sie die AUS-
WAHL-Taste (MEMORY), um einen automatischen Sendersuchlauf zu
starten. Nach dem Ende des Suchlaufs können Sie durch Drücken auf
die Tasten < oder > die Sender durchlaufen. Drücken Sie auf die Taste
AUSWAHL (SELECT), um den Sender einzuschalten, den Sie hören
möchten.
Schritt 6
Im oberen Feld des Radios gibt
es 3 Speicher-Tasten (Memory).
In diesen Tasten können Sie
Ihre Lieblingssender speichern,
Gehen Sie zurück zum Anzeigefeld an der Rückseite des
Radios. Wählen Sie entweder den FM- oder den Digital-Modus.
speichern möchten. Wenn Sie im Digital-Modus sind, drücken
Sie auf AUSWAHL (SELECT), um den Sender zu hören. Halten
Sie beim Hören des Senders eine Speichertaste 8 Sekunden
lang gedrückt, um den Sender zu speichern.
Schritt 1
Sender speichern
Wenn Sie mit den gespeicherten Sendern zufrieden sind, nehmen
biegen, und tragen eine personalisierte Beschreibung darauf ein,
gespeicherten Sender ändern möchten, können Sie ein neues Etikett
Schritt 2
DE

29 30
Ihre eigenen Audio-Aufnahmen abspielen
Weshlb hbe ich einen schlechten Radioempfng?
1.
um die maximale Signalstärke empfangen zu können.
2.
3. Kontrollieren Sie, dass keine anderen elektrischen Geräte zu nah
an Ihrem Radio stehen, das könnte zu Störungen führen.
4. Starten Sie einen erneuten Sendersuchlauf, indem Sie auf die
AUSWAHL-Taste (SELECT) auf der Rückseite drücken und diese
halten.
Weshlb funktioniert mein Rdio nicht?
1. Vergewissern Sie sich, dass Ihr Radio mit einer Stromquelle
2. Kontrollieren Sie die Lautstärke und stellen Sie sie nach Bedarf ein.
Wie knn ich zur Werkseinstellung zurückkehren?
auf die Werkseinstellung. Diese Taste können Sie mit einer Nadel
gesamte Speicher gelöscht sein wird.
Hufig gestellte Frgen
Vorsichtsmaßnahmen
DE
-
werden, da das Gerät dadurch Schaden nehmen kann.
Verwenden oder Lagern Sie das Gerät möglichst nicht in einer
staubigen oder sandigen Umgebung.
Reinigen Sie es nur mit einem trockenen Tuch.
Verwenden Sie nur den im Lieferumfang enthaltenen Gleichstrom-
/ Wechselstrom-Adapter. Der Anschluss an eine Stromquelle mit
einer anderen Nennleistung führt zu bleibenden Schäden am
Radio und kann eine Gefahr darstellen.
V:
zur verringerung der stromschlaggefahr entfernen sie nicht die
radioabdeckung. das gerät enthält keine teile, die der nutzer selbst warten kann.
geben sie das gerät zur wartung an fachkräfte.
WARNUNG:
das zeichen mit einem blitz und einer pfeilspitze in einem dreieck ist ein
warnzeichen, das sie auf „gefährliche spannung“ im inneren des radios
aufmerksam machen soll.
das ausrufezeichen in einem dreieck ist ein warnzeichen, das sie auf wichtige
anweisungen hinweisen soll, die im lieferumfang dieses radios enthalten sind.
stromschlaggefahr,
nicht öffnen
ACHTUNG
Geben Sie das Radio bei der Entsorgung nicht in den Hausmüll.
über die Entsorgung zu informieren.
Brand- oder Stromschlaggefahren sollten
Sie dieses Produkt weder Regen noch
Feuchtigkeit aussetzen
Um Ihre eigene Playlist abspielen zu können, müssen Sie
zunächst die MP3-Titel über Ihren Laptop oder Computer auf
Ihrem USB-Stick speichern.
Wechseln Sie zurück zum Display auf der Rückseite des
Radios. Stecken Sie das USB-Laufwerk ein und drücken Sie
Feld.
Schritt 1
Schritt 2
-
 1
1
-
 2
2
-
 3
3
-
 4
4
-
 5
5
-
 6
6
-
 7
7
-
 8
8
-
 9
9
-
 10
10
-
 11
11
-
 12
12
-
 13
13
-
 14
14
-
 15
15
-
 16
16


Relish AC-02 DAB+-DAB-FM Radio and Music Player Stereo Manuel utilisateur
- Catégorie
- Radios
- Taper
- Manuel utilisateur
dans d''autres langues
Autres documents
-
 ESSENTIELB MS-E-500-D Le manuel du propriétaire
-
Lenco DIR-170 Manuel utilisateur
-
Auna Karaboom 100 Wifi enceinte colonne Le manuel du propriétaire
-
-
JVC KD-AVX55E Le manuel du propriétaire
-
Albrecht DR 890 CD, DAB+/UKW/Internet/CD, Walnuss Le manuel du propriétaire
-
Sony CDX-GT570UP Mode d'emploi
-
-
-
Sony DSX-MS60 Mode d'emploi
