Atos TRACOE experc Dilation Set Mode d'emploi
- Taper
- Mode d'emploi

2021-06
801605
3.0
TRACOE experc Dilation Set for
Percutaneous Tracheostomy (REF 520)
DE Gebrauchsanweisung
EN Instructions for Use
FR Instructions d’utilisation
IT Istruzioni d’uso
ES Instrucciones de uso
PT Instruções de uso
DA Brugsanvisning
FI Käyttöohje
NO Bruksanvisning
HU Használati utasítás
SV Bruksanvisning
NL Gebruiksaanwijzing
HR Upute za uporabu
SL Navodila za uporabo
CS Návod k použití
RO Instrucţiuni
TR Kullanma talimatı
RU
PL Instrukcja używania
EL
KO 사용 설명서
ZH 使用说明
HE
AR
TRACOE medical GmbH
Reichelsheimer Straße 1 / 3, 55268 Nieder-Olm / Germany
Tel.: +49 6136 9169-0, Fax: +49 6136 9169-200
[email protected], www.tracoe.com

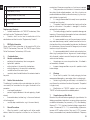
6
7
8
3
2
4
6
8
10
ml
2
5
4
1
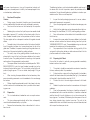
1
2
Cartilago thyroidea
Cartilago cricoidea
Cartilago
trachealis
1.
2.
3.
4.
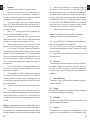
3
4
5
6
7
8
9

10
11
12
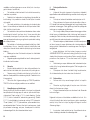
TRACOE twist
TRACOE twist plus
TRACOE vario
13a
13b
13c

MF 1

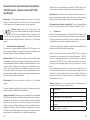
DE / Achtung. Gebrauchsanweisung beachten · EN /
Warning. Please read Instructions for Use · FR / Attention.
Respecter le mode d’emploi · IT / Attenzione. Consultare
le istruzioni per l'uso · ES / Atención. Siga las instrucciones de uso
· PT / Atenção. Ter atenção às instruções de utilização · DA / Vigtigt:
Følg brugsanvisningen · FI / Huomio. Noudata käyttöohjetta
· NO / OBS. Følg bruksanvisningen · HU / Figyelem. Olvassa el a
használati útmutatót · SV / OBS! Se bruksanvisningen · NL / Let op.
Rekening houden met de gebruiksaanwijzing · HR / Upozorenje.
Pridržavajte se uputa za uporabu · SL / Pozor. Upoštevajte navodila
za uporabo · CS / Pozor. Respektujte návod k použití · RO / Atenţie.
Respectaţi instrucţiunile de utilizare · TR / Dikkat. Kullanma talimatına
dikkat ediniz · RU /
· PL / Ostrzeżenie. Zajrzyj do instrukcji używania
· EL / · KO / 주의. 사용
설명서를 준수하십시오 · ZH / 注意。注意使用说明书
/ AR · / HE
DE / Medizinprodukt · EN / Medical Device · FR /
Dispositif médical · IT / Dispositivo medico · ES /
Dispositivo médico · PT / Dispositivo médico · DA / Medicinsk
udstyr · FI / Lääkinnällinen laite · NO / Medisinsk enhet · HU / Orvosi
eszköz · SV / Medicinteknisk produkt · NL / Medisch hulpmiddel
· HR / Medicinski proizvod · SL / Medicinski pripomoček · CS /
Zdravotnický prostředek · RO / Dispozitiv medical · TR / Tıbbi cihaz
· RU / · PL / Wyrób medyczny · EL /
· KO / 의료 기기 · ZH / 医疗器械
/AR · / HE
EN / Federal (USA) law restricts this device to the sale
by or on the order of a physician · ES / Siguiendo las
leyes federales estadounidenses, la venta de este
dispositivo está sometida a prescripción medica
DE / Artikelnummer · EN / Item number · FR / Référence
· IT / Codice prodotto · ES / Número de artículo
· PT / Número do artigo · DA / Artikelnummer · FI / Tuotenumero
· NO / Artikkelnummer · HU / Cikkszám · SV / Katalognummer
· NL / Artikelnummer · HR / Broj artikla · SL / Številka artikla
· CS / Číslo výrobku · RO / Numărul de articol · TR / Ürün
numarası · RU / · PL / Numer katalogowy
· EL / · KO / 품목 번호 · ZH / 产品编号
/ AR · / HE
DE / Chargencode · EN / Batch code · FR / Code de lot
· IT / Numero di lotto · ES / Código de lote · PT / Código
do lote · DA / Batchkode · FI / Eräkoodi · NO / Chargekode
· HU / Tételkód · SV / Satsnummer · NL / Lotcode · HR / Oznaka
serije · SL / Koda šarže · CS / Kód šarže · RO / Cod serie de
producţie · TR / Parti kodu · RU / · PL / Kod partii
· EL / · KO / 생산 단위 · ZH / 批次编码
/ AR · / HE
DE / Hersteller · EN / Manufacturer · FR / Fabricant · IT /
Produttore · ES / Fabricante · PT / Fabricante · DA /
Producent · FI / Valmistaja · NO / Produsent · HU / Gyártó
· SV / Tillverkare · NL / Fabrikant · HR / Proizvođač · SL / Proizvajalec
· CS / Výrobce · RO / Producător · TR / Üretici · RU /
· PL / Wytwórca· EL / · KO / 제조사 · ZH / 生产商
/ AR · / HE
23

DE / Sterilisiert mit Ethylenoxid · EN / Sterilized with
Ethylene oxide · FR / Stérilisé à l‘oxyde d‘éthylène
· IT / Sterilizzato con ossido di etilene · ES / Esterilización con óxido
de etileno · PT / Esterilização com óxido de etileno · DA /
Sterilisation med ethylenoxid · FI / Steriloitu etyleenioksidilla · NO /
Sterilisering med etylenoksid · HU / Sterilizáció etilénoxiddal · SV /
Sterilisering med etylenoksid · NL / Sterilisatie met ethyleenoxide
· HR / Sterilizirano etilen oksidom · SL / Sterilizirano z etilenoksidom
· CS / Sterilizováno ethylenoxidem · RO / Sterilizat cu oxid etilenic
· TR / Etilenoksit ile sterilize edilmiştir · RU /
· PL / Sterylizowany tlenkiem etylenu
· EL / · KO / 에틸렌으로소
독살균되었습니다 · ZH / 乙撑氧 (Ethylene oxide) 灭菌
/ AR · / HE
DE / Herstellungsdatum · EN / Date of manufacture · FR
/ Date de fabrication · IT / Data di produzione · ES /
Fecha de fabricación · PT / Data de fabricação · DA /
Produktionsdato · FI / Valmistuspäivä · NO / Produksjonsdato · HU
/ Gyártási dátum · SV / Tillverkningsdatum · NL / Fabricagedatum
· HR / Datum proizvodnje · SL / Datum proizvodnje · CS / Datum
výroby · RO / Data fabricaţiei · TR / Üretim tarihi · RU /
· PL / Data produkcji · EL /
· KO / 제조일 · ZH / 生产日期 · / HE · / AR
DE / Verwendbar bis · EN / Use by date · FR / Utilisable
jusqu’au · IT / Utilizzare entro il · ES / Fecha de cadu-
cidad · PT / Utilizável até · DA / Anvendes inden · FI /
Käytettävä ennen · NO / Kan brukes til · HU / Felhasználhatóság
dátuma · SV / Används före – utgångsdatum · NL / Bruikbaar tot
· HR / Upotrebljivo do · SL / Uporabno do · CS / Použitelné do · RO
/ Data expirării · TR / Son kullanma tarihi · RU / · PL
/ Użyć do daty · EL / · KO / 유통기한 · ZH / 保质期至
/ AR · / HE
45
DE / Nicht erneut sterilisieren · EN / Do not resterilize ·
FR / Ne pas restériliser · IT / Non risterilizzare · ES / No
esterilizar de nuevo · PT / Não esterilizar de novo
· DA / Må ikke resteriliseres · FI / Ei saa steriloida uudelleen
· NO / Ikke sterilisert på nytt · HU / Tilos újrasterilizálni · SV / Får ej
återsteriliseras · NL / Niet opnieuw steriliseren · HR / Nemojte
ponovno sterilizirati · SL / Ne sterilizirajte znova · CS / Znovu
nesterilizujte · RO / Nu se sterilizează din nou · TR / Tekrar sterilize
etmeyiniz · RU / · PL / Nie
resterylizować · EL /
· KO / 방사선으로 멸균처리됨 · ZH / 经辐射消毒
/ AR · / HE
DE / Nicht wiederverwenden · EN / Do not reuse · FR /
Ne pas réutiliser · IT / Non riutilizzare · ES / No reutilizar
· PT / Não reutilizar · DA / Må ikke genanvendes · FI /
Ei saa käyttää uudelleen · NO / Må ikke benyttes igjen · HU / Tilos
újra felhasználni · SV / Endast för engångsbruk · NL / Niet opnieuw
gebruiken · HR / Ne koristite ponovno. · SL / Ne uporabljajte
znova · CS / Znovu nepoužívejte · RO / Nu se reutilizează · TR /
Tekrar kullanmayınız · RU /
· PL / Nie używać powtórnie· EL /
· KO / 재사용하지 마십시오. · ZH / 不得回收利用
/ AR · / HE

67
DE / Trocken aufbewahren · EN / Store in a dry place ·
FR / Conserver au sec · IT / Conservare in luogo asciutto
· ES / Conservar en un lugar seco · PT / Guardar em local
seco · DA / Opbevares tørt · FI / Säilytettävä kuivassa
· NO / Oppbevares på et tørt sted · HU / Száraz helyen tárolandó
· SV / Förvaras torrt · NL / Droog bewaren · HR / Čuvajte na suhom
mjestu · SL / Hranite na suhem · CS / Uchovávejte v suchu · RO / A se
păstra la loc uscat · TR / Kuru şekilde saklayınız · RU /
· PL / Chronić przed wilgocią· EL /
· KO / 건조한 곳에 보관하십시오. · ZH / 需保存于干燥处
/ AR · / HE
DE / Temperaturbegrenzung · EN / Temperature limits ·
FR / Limitation de température · IT / Limite di temperatura
· ES / Límite de temperatura · PT / Limitação da
temperatura · DA / Temperaturbegrænsning · FI /
Lämpötilarajat · NO / Temperaturbegrensing · HU / Hőmérsékleti
tartomány · SV / Tillåtet temperaturområde · NL /
Temperatuurbegrenzing · HR / Ograničenje temperature · SL /
Omejitev temperature · CS / Omezení teploty · RO / Limitare a
temperaturii · TR / Sıcaklık sınırlaması · RU /
· PL / Dopuszczalna temperatura· EL /
· KO / 온도 제한 · ZH / 温度限值范围
/ AR · / HE
DE / Einzel-Sterilbarrieresystem mit äußerer Schutz-
verpackung · EN / Single sterile barrier system with
protective packaging outside · FR / Système de barrière
stérile unique avec emballage protecteur extérieur · IT /
Sistema di barriera sterile singola con imballaggio protettivo esterno ·
ES / Sistema de barrera estéril sencillo con embalaje externo protector
· PT / Sistema de barreira estéril simples com embalagem protetora
no exterior · DA / System med enkelt steril barriere og beskyttende
emballage udvendigt · FI / Yksi steriili estojärjestelmä ja suojapakkaus
ulkopuolella · NO / Enkelt sterilt barrieresystem med beskyttende
utvendig emballasje · HU / Szimpla steril zárórendszer külső
védőcsomagolással · SV / Enskilt sterilbarriärsystem med
skyddsförpackning utanför · NL / Enkelvoudig steriel barrièresysteem
met beschermende verpakking aan de buitenkant · HR / Sustav jedne
sterilne obloge sa zaštitnom vanjskom ambalažom · SL / Enojni sterilni
pregradni sistem z zunanjo zaščitno embalažo · CS / Systém sterilní
bariéry s vnějším ochranným obalem · RO / Sistem cu o singură
barieră sterilă, cu ambalaj de protecție la exterior · TR / Dıştan
koruyucu ambalajlı tek steril bariyer sistemi · RU /
· PL /
System pojedynczej bariery sterylnej z zewnętrznym opakowaniem
ochronnym · EL /
· KO / 외부 보호 포장이 있는 단일 멸균 장벽
시스템 · ZH / 带外层保护包装的单套无菌屏障系统
/ HE
/ AR
DE / Einzel-Sterilbarrieresystem · EN / Single sterile
barrier system · FR / Système de barrière stérile
unique · IT / Sistema di barriera sterile singola · ES /
Sistema de barrera estéril sencillo · PT / Sistema de barreira estéril
simples · DA / System med enkelt steril barriere · FI / Yksi steriili
estojärjestelmä · NO / Enkelt sterilt barrieresystem · HU / Szimpla
steril zárórendszer · SV / Enskilt sterilbarriärsystem · NL / Enkel-
voudig steriel barrièresysteem · HR / Sustav jedne sterilne obloge ·
SL / Enojni sterilni pregradni sistem · CS / Systém sterilní bariéry ·
RO / Sistem cu o singură barieră sterilă · TR / Tek steril bariyer
sistemi · RU / · PL /
System pojedynczej bariery sterylnej· EL /
· KO / 단일 멸균 장벽 시스템 · ZH / 单套无菌屏障系统
/ AR · / HE
DE / Von Sonnenlicht fernhalten · EN / Protect from
sunlight · FR / Protéger de l’ensoleillement · IT / Non
esporre alla luce del sole · ES / Mantener alejado de la luz
solar · PT / Manter afastado da luz solar · DA / Beskyttes mod sollys
· FI / Säilytettävä auringonvalolta suojattuna · NO / Må holdes unna
sollys · HU / Napfénytől távol tartandó · SV / Skyddas från solljus ·
NL / Beschermen tegen zonlicht · HR / Držite podalje od sunčeve
svjetlosti · SL / Varujte pred sončno svetlobo · CS / Chraňte před
slunečním světlem · RO / A se feri de razele solare · TR / Güneş
ışığından uzak tutunuz · RU /
· PL / Trzymać z dala od światła słonecznego·
EL / ·
KO / 직사광선에 노출되지 않도록 하십시오 · ZH / 避免阳光直射
/ AR · / HE

89
DE / Bei beschädigter Verpackung nicht verwenden · EN
/ Do not use if packaging is damaged · FR / Ne pas
utiliser en cas d’emballage endommagé · IT / Non
utilizzare se la confezione è danneggiata · ES / No utilizar
si el envase está dañado · PT / Não utilizar em caso de embalagem
danificada · DA / Må ikke anvendes, hvis emballagen er beskadiget
· FI / Älä käytä, jos pakkaus on vahingoittunut · NO / Må ikke
benyttes hvis emballasjen er skadet · HU / Tilos felhasználni, ha a
csomagolás sérült · SV / Används inte om förpackningen är skadad
· NL / Niet gebruiken bij beschadigde verpakking · HR / Proizvod ne
koristite ako je pakiranje oštećeno · SL / Ne uporabljajte, če je
embalaža poškodovana · CS / Nepoužívat při zjištění poškození
obalu · RO / Nepoužívat při zjištění poškození obalu · TR / Ambalajı
hasarlıysa kullanmayınız · RU /
· PL / Nie używać, jeżeli
opakowanie jest uszkodzone· EL /
· KO / 포장이 손
상된 경우 사용하지 마십시오. · ZH / 如包装破损,不得使用
/ AR · / HE
DE / Packungsinhalt · EN / Packaging Content · FR /
Contenu de l’emballage · IT / Contenuto della
confezione · ES / Contenido del envase · PT /
Conteúdo da embalagem · DA / Pakningsindhold · FI / Pakkauksen
sisältö · NO / Pakningsinnhold · HU / A csomag tartalma · SV /
Förpackningens innehåll · NL / Inhoud verpakking · HR / Sadržaj
pakiranja · SL / Vsebina embalaže · CS / Obsah balení · RO / Conţinutul
ambalajului · TR / Paket içeriği · RU / · PL
/ Zawartość opakowania· EL / · KO / 포
장 내용물 · ZH / 包装内容 / AR · / HE
1
DE / Phthalat-frei (z. B. DEHP) · EN / Not made with
phthalates (e.g. DEHP) · FR / Sans phtalates (par ex.
DEHP) · IT / Senza ftalati (per es. DEHP) · ES / Sin
ftalatos (p. ej. DEHP) · PT / Sem ftalatos (por ex. DEHP) ·
DA / Phthalat-fri (f.eks. DEHP) · FI / Ftalaatition (esim. DEHP) · NO /
Ftalatfritt (f.eks. DEHP) · HU / Ftalátmentes (pl. DEHP) · SV / Ftalatfri
(t. ex. DEHP) · NL / Niet gefabriceerd met ftalaten (bijv. DEHP) · HR
/ Ne sadrži ftalate (npr. DEHP) · SL / Brez ftalatov (npr. DEHP) · CS
/ Bez obsahu ftalátů (např. DEHP) · RO / Nu conţine ftalaţi (de ex.
DEHP) · TR / Ftalat içermez (örn. DEHP) · RU /
· PL / Nie zawiera ftalanów (np.
DEHP)· EL / · KO /
(디에탈헥실프탈레이트) 포함 · ZH / 不含邻苯二甲酸盐 (DEHP)
/ AR · / HE
DE / Nicht mit natürlichem Latex hergestellt · EN / Not
made with Natural Rubber latex · FR / Non fabriqué avec
du latex naturel · IT / Non realizzato con lattice naturale
· ES / No elaborado con látex natural · PT / Não fabricado com látex
natural · DA / Ikke fremstillet med naturligt latex · FI / Ei valmistettu
luonnonlateksista · NO / Ikke produsert med naturlig latex · HU /
Nem természetes latexből készült · SV / Tillverkad utan användning
av naturlig latex · NL / Niet gefabriceerd met natuurlijk latex · HR /
Nije proizvedeno s prirodnim lateksom · SL / Ni izdelano z naravnim
lateksom · CS / Není vyrobeno z přírodního latexu · RO / Nu este
produs cu latex natural · TR / Doğal lateksle üretilmemiştir · RU /
· PL / Nie zawiera lateksu kauc-
zuku naturalnego · EL /
· KO / 천연 라텍스로 만들지 않음 · ZH / 制作过程未添加天然乳胶 ·
/ AR · / HE
LATEX

10 11
DE DE
mie sollte nur von Ärzten oder unter Anleitung und Aufsicht von
Ärzten erfolgen, die in der Anwendung der Ciaglia-Technik
ausgebildet und erfahren sind. Eine bronchoskopische Überwa-
chung während des Verfahrens wird empfohlen. Dieser Eingriff sollte
von mindestens zwei Personen durchgeführt werden. Eine Person
führt den Eingriff durch, die zweite Person ist für die Narkose, die
Überwachung des Patienten sowie die bronchoskopische Kontrolle
verantwortlich.
Das TRACOE experc Dilatations-Set für die perkutane Tracheotomie
ist zur Anwendung unter sterilen Bedingungen bestimmt.
Gebrauchsanleitung: Dieses Medizinprodukt ist für Situationen
vorgesehen, in denen mithilfe einer perkutanen Dilatationstracheot-
omie ein Zugang zu den Atemwegen mit anschließender Einbrin-
gung einer Tracheostomiekanüle geschaffen werden muss.
Einpatientengebrauch und Nutzungsdauer: Dieses Produkt ist
zur einmaligen Verwendung bestimmt. Die tatsächliche Nutzung ist
deshalb auf höchstens 1 Stunde begrenzt.
2. Allgemeine Beschreibung
Das TRACOE experc Dilatations-Set für die perkutane Tracheotomie
dient der Schaffung eines dilatativen Tracheostoma für die perku-
tane Einführung einer Tracheostomiekanüle, unter Anwendung der
einstufigen Dilatationstechnik nach Ciaglia mit dem Seldingerdraht.
Der Dilatator hat eine hydrophile Gelbeschichtung, wodurch im Ver-
gleich zu einem unbeschichteten Dilatator die Reibung reduziert
wird.
Das Produkt ist zur gemeinsamen Anwendung mit den TRACOE
twist Tracheostomiekanülen mit minimal traumatischer Einführhilfe,
den TRACOE twist plus Tracheostomiekanülen mit minimal trauma-
tischem Einführsystem oder den TRACOE vario Tracheostomieka-
nülen mit minimal traumatischem Einführsystem vorgesehen (siehe
Abschnitt „Ergänzende Produkte“).
Diese Tracheostomiekanülen sind in verschiedenen Durchmessern
und Längen verfügbar. Die Modelle werden mit entleertem Cuff
geliefert. Die minimal traumatische Einführhilfe bzw. das minimal
traumatisches Einführsystem ist vormontiert. Der passende Durch-
messer und die passende Länge der Kanüle sind vom Arzt zu bes-
timmen.
Gebrauchsanweisung für das TRACOE experc
Dilatations-Set für die perkutane Tracheotomie
(REF520)
Hinweis: Lesen Sie diese Gebrauchsanweisung aufmerksam durch.
Sie ist Bestandteil des beschriebenen Produkts und muss jederzeit
verfügbar sein. Zu Ihrer eigenen Sicherheit und zur Sicherheit Ihrer
Patienten beachten Sie die folgenden Sicherheitshinweise.
Ausklappbare Seiten: Die Abbildungen, auf die im
Text verwiesen wird, finden sich auf den (ausklap-
pbaren) bebilderten Seiten am Anfang dieser Anlei-
tung. Die Nummern geben Produktkomponenten an und verweisen
auf die entsprechenden Abbildungen des Produkts. Für das Produkt
verwendete Symbole und Piktogramme werden in den Abschnitten
„Allgemeine Beschreibung“ und „Funktionsbeschreibung“ erläutert.
1. Zweckbestimmung
Das TRACOE experc Dilatations-Set für die perkutane Tracheotomie
ist für die Durchführung einer perkutanen Dilatationstracheotomie
unter Anwendung der Ciaglia-Technik mit einem Seldingerdraht bes-
timmt.
Klinischer Nutzen: Mit dem TRACOE experc Dilatations-Set kann
mithilfe einer perkutanen Dilatationstracheotomie ein künstlicher
Zugang zur Trachea geschaffen werden.Das ermöglicht die Einbrin-
gung einer Tracheostomiekanüle für Beatmungsmaßnahmen wie
etwa die mechanische Beatmung. Zudem wird langfristigen Intuba-
tionsschäden im Larynxbereich vorgebeugt. Im Gegensatz zu einer
operativen Tracheotomie kann eine perkutane Dilatationstracheoto-
mie am Krankenbett durchgeführt werden, sofern die Indikationen
beachtet werden.
Patientenpopulation: Das Produkt ist für Erwachsene und Her-
anwachsende (≥18 Jahren) vorgesehen.
Das Produkt ist für Patienten bestimmt, die eine Tracheostomieka-
nüle benötigen und bei denen eine operative Tracheotomie nicht
angezeigt ist.
Anwenderzielgruppe: Die perkutane Dilatationstracheotomie mit
dem TRACOE experc Dilatations-Set für die perkutane Tracheoto-

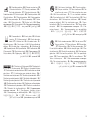
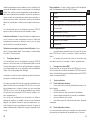
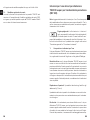
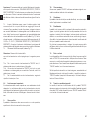
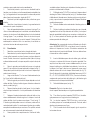
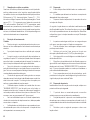
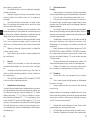
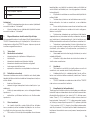
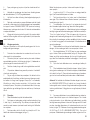
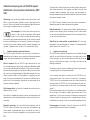
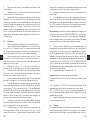
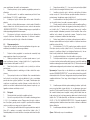
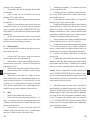
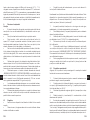
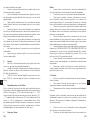
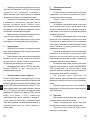
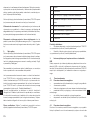
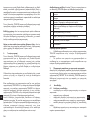
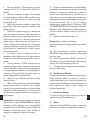
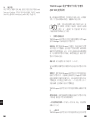
Ausklappbare Seiten: Abbildung 1 zeigt den Inhalt des TRACOE
experc Dilatations-Sets für die perkutane Tracheotomie
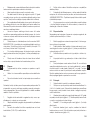
1Skalpell
2Spritze
3Punktionskanüle (14 Gauge) mit Teflonkatheter
4Seldingerdraht mit Schleuse und gerader Einführhilfe
5Kurzer Dilatator (14 Ch/FR)
6Führungskatheter mit Sicherheitssperre
7TRACOE experc Dilatator
84Kompressen
Ergänzende Produkte:
• Verfügbare Kombinationen mit TRACOE Tracheostomieka-
nülen sind im Abschnitt „Ergänzende Produkte“ aufgelistet.
• Produkte, die in Kombination mit dem beschriebenen Pro-
dukt verwendet werden können, sind im Abschnitt „Ergänzende
Produkte“ aufgelistet.
3. MRT-Sicherheitsinformationen
Bitte beachten Sie die MRT-Sicherheitsinformationen in der entspre-
chenden Gebrauchsanweisung für die verwendete TRACOE Trache-
ostomiekanüle. Das TRACOE experc Dilatations-Set für die perku-
tane Tracheotomie ist nicht MR-sicher.
4. Kontraindikationen
4.1 Absolute Kontraindikationen:
• Einbringen der Tracheostomiekanüle in Notfällen
• Applikation in der Pädiatrie
• bestehende Infektionen im Tracheostomiebereich
• bestehende Malignome im Tracheostomiebereich
• instabile Fraktur der Halswirbelsäule
• Unsicherheit bei der Bestimmung der anatomischen
Orientierungspunkte
4.2 Relative Kontraindikationen:
Die folgende Liste zeigt relative Kontraindikationen, bei denen der
Anwender die Risiken sorgfältig gegen den Nutzen des Verfahrens
abwägen muss:
• eine vergrößerte Schilddrüse
• vorangegangene chirurgische Eingriffe im Halsbereich (z.B.
Thyreoidektomie)hohe Blutungsneigung, z.B. bei Behandlung mit
Gerinnungshemmern
• ungewöhnlich tiefliegende Luftröhre, z.B. bei Adipositas
5. Allgemeine Vorsichtsmaßnahmen
• Bei gemeinsamer Anwendung mit weiteren Medizinproduk-
ten ist die jeweilige Gebrauchsanweisung zu beachten. Im Zweifels-
fall ist der jeweilige Hersteller zu kontaktieren.
• Während der beschriebenen Verfahren müssen für den Fall
von Komplikationen Sicherheitsvorkehrungen getroffen werden,
damit ein Arzt sofort durch alternative Atemwege beatmen kann
(z.B. translaryngeale Intubation, Larynxmaske).
• Es wird dringend empfohlen, nahe dem Patienten ein ein-
satzfähiges Reserveprodukt bereitzuhalten.
• Das Produkt muss vor Gebrauch/Einführung auf
Unversehrtheit und Funktionsfähigkeit geprüft werden. Im Falle einer
Beschädigung sollte es durch ein neues Produkt ersetzt werden.
• Die Sterilverpackung sollte vor dem Öffnen auf Schäden
geprüft werden. Sollte die Verpackung beschädigt oder versehen-
tlich geöffnet worden sein, darf das Produkt nicht verwendet
werden.
• Empfohlen wird die Durchführung der perkutanen Tracheot-
omie unter bronchoskopischer Kontrolle, um die intratracheale Posi-
tion der Punktionskanüle, des Führungsdrahts, Dilatators sowie der
Tracheostomiekanüle zu überwachen und die Gefahr einer paratra-
chealen Einführung oder einer Verletzung der Luftröhre zu vermei-
den.
• Es wird empfohlen, mithilfe von Ultraschall die trachealen und
prätrachealen Strukturen (z.B. Schilddrüsenisthmus, große Gefäße,
Cricoidknorpel) zu identifizieren, um die optimale Punktionsstelle zu
ermitteln und Blutungen zu minimieren.
• Hämorrhagien können Atemwegsverlegungen auslösen,
wenn das Blut nicht sofort abgesaugt wird.
• Ungeeignete Aufbewahrungsbedingungen können zur Bes-
chädigung des Produkts oder der Sterilbarriere führen.
6. Warnhinweise
• Das Produkt nicht verwenden, wenn die Sterilverpackung
beschädigt ist (z.B. offene Ränder, Löcher in der Verpackung usw.).
• Eine Aufarbeitung (einschließlich Resterilisierung) ist nicht
zulässig, da sich dies auf das Material und die Funktion des Pro-
dukts auswirken kann. Das Produkt ist nur für die einmalige
Anwendung bestimmt.
12 13
DE DE

• Änderungen an TRACOE Produkten sind nicht zulässig.
TRACOE übernimmt keine Verantwortung für veränderte Produkte.
7. Komplikationen und Nebenwirkungen
Aus der veröffentlichten Fachliteratur zu dieser Art von Produkten
geht hervor, dass während einer perkutanen Dilatationstracheotomie
die folgenden Komplikationen/Nebenwirkungen auftreten können:
Sehr häufig (≥10%): geringfügige Blutungen / Häufig (1% - 10%):
Fraktur von Trachealknorpel, Sauerstoffentsättigung / Selten (0,1%
- 1%): schwere Blutungen, Hypotonie, CPP-Anstieg, kardiale
Arrhythmie / Sehr selten (<0,01%): Pneumothorax, Pneumomedi-
astinum, perioperativer Tod / Häufigkeit unbekannt: Bronchospas-
mus, Verletzung der hinteren Trachealwand, Emphysem, hämody-
namische Instabilität, tracheoösophageale Fistel oder
Tracheotomie-bedingte Sepsis.
8. Funktionsbeschreibung
Achtung:
• Während des Eingriffs muss die Atmung des Patienten mit
einem Endotrachealtubus gesichert und kontinuierlich oxymetrisch
überwacht werden.
• Die Punktion der Luftröhre muss durch Aspiration von Luft
kontrolliert werden.
• Nach der Punktion sollte die Spitze der Punktionskanüle in
einem Winkel von ca. 60° gegenüber der Tracheavorderwand
geneigt werden, um Verletzungen der hinteren Trachealwand zu ver-
meiden. Dies gilt auch für die nachfolgende Einführung des
Führungsdrahts und des Dilatators.
• Um Verletzungen der hinteren Trachealwand zu vermeiden,
darf die distale Spitze des Führungskatheters nie über die Spitze
des Führungsdrahts hinausragen. Deshalb muss die proximale
Markierung des Führungsdrahts immer am proximalen Ende des
Führungskatheters liegen.
• Die Sicherheitssperre des Führungskatheters sollte immer
direkt vor der Spitze des experc Dilatators bzw. der Einführhilfe/des
Einführsystems platziert sein. Zur Kontrolle der korrekten Einführtiefe
sind am Führungskatheter Markierungen angebracht.
• Der experc Dilatator sollte nicht über die „MAXIMUM INSER-
TION“-Markierung (Hautniveau) hinaus eingeführt werden, um
Luftröhrenverletzungen auf Höhe der Carina zu vermeiden. Das ist
besonders wichtig bei kleinen Patienten (Größe ca. 150cm oder
kleiner; Körpergewicht 50 kg oder weniger).
• Bei Einführung des experc Dilatators bzw. der Tracheosto-
miekanüle sind übermäßige Drehbewegungen zu vermeiden, da
dies zu Verletzungen der Luftröhre führen kann.
• Die Dilatation ist entsprechend der gewählten Kanülengröße
so auszuführen, dass die Einführung der Tracheostomiekanüle ohne
großen Druck möglich ist.
8.1 Vorbereitung
• Das Produkt ist steril und für die Anwendung in einer asep-
tischen Umgebung bestimmt.
• Die Größe und passende Länge der nachfolgend verwende-
ten Kanüle sollte von einem Arzt festgelegt werden.
• Die Tracheostomiekanüle entsprechend der zugehörigen
Gebrauchsanweisung vorbereiten.
Die folgenden Funktionen müssen unmittelbar vor Gebrauch kon-
trolliert werden. Wenn das Produkt die erste Überprüfung nicht
besteht, ist der Vorgang mit einem neuen Produkt zu wiederholen.
Das Produkt nicht entsorgen; stattdessen die Anweisungen im
Abschnitt „Rücksendungen und Reklamationen“ befolgen.
1. Die Sterilverpackung auf Festigkeit, Intaktheit und Vollstän-
digkeit der Komponenten überprüfen.
2. Die Verpackung öffnen und das Produkt vor Gebrauch auf
Schäden überprüfen.
3. Es ist zu prüfen, ob sich der Führungsdraht ungehindert
durch den kurzen Dilatator (14 Ch/FR) und den Führungskatheter
schieben lässt.
4. Steriles Wasser oder Kochsalzlösung in die vorgesehene
Mulde der Blisterschale gießen.
5. Zur Aktivierung der Gleitbeschichtung wird das schmale
Ende des experc Dilatators von der Spitze bis zur „MAXIMUM
INSERTION“-Markierung in das sterile Wasser bzw. die Kochsal-
zlösung eingetaucht. Die mitgelieferten Kompressen können zum
Anfeuchten des vorderen Teils des experc Dilatators verwendet
werden.
6. Zur Vorbereitung des Aspirationstests wird die Spritze teil-
weise mit steriler Kochsalzlösung oder sterilem Wasser aufgezogen
und auf die Punktionskanüle mit Teflonkatheter aufgesetzt.
8.2 Vorbereitung des Patienten
Der Patient muss unmittelbar vor der Einführung bzw. erneuten Ein-
führung optimal präoxygeniert sein.
1. Der Patient sollte auf anatomische Anomalien, die sich nachteilig
auf dieses Verfahren auswirken könnten, untersucht worden sein.
14 15
DE DE

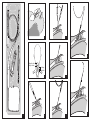
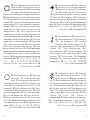
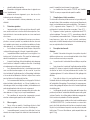
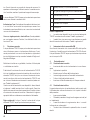
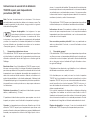
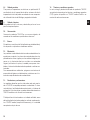
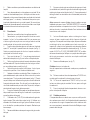
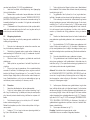
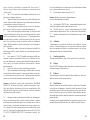
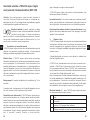
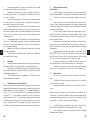
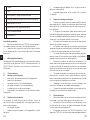
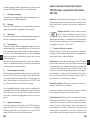
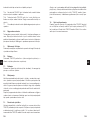
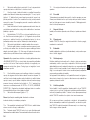
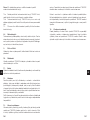
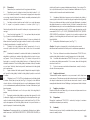
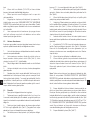
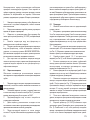
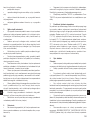
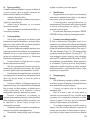
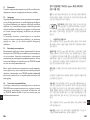
2. Lagerung des Patienten: in Rückenlage mit einem Kissen
zwischen den Schultern bei Extension von Kopf und Nacken (siehe
Abb. 2); das Kopfteil des Patientenbettes sollte um 30-40° erhöht
sein.
3. Die Haut im Halsbereich desinfizieren und mit sterilen
Tüchern abdecken.
4. Den Patienten sedieren und entsprechend den Krankenhau-
sleitlinien überwachen.
5. Vor dem Eingriff sollte der Pharynx abgesaugt werden. Wenn
für die Beatmung ein Endotrachealtubus eingesetzt wird, sollte
dieser entblockt und der Tubus mit dem Cuff bis zum Kehlkopfein-
gang zurückgezogen werden (ca. 1cm unterhalb). Durch das
Zurückziehen des Tubus wird verhindert, dass der Cuff bei der Tra-
chealpunktion angestochen wird. Der Cuff des Endotrachealtubus
muss ggf. wieder aufgeblasen und das Atemzugvolumen bei der
Beatmung angepasst werden.
8.3 Verfahren
1. Im vorgesehenen Bereich ein Lokalanästhetikum
verabreichen.
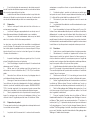
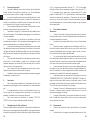
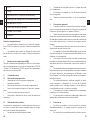
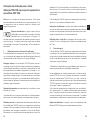
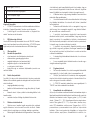
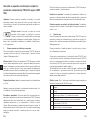
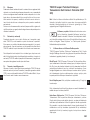
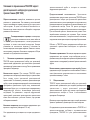
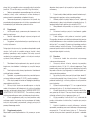
2. Die Punktion der Luftröhre erfolgt in der Regel zwischen dem
2. und 3. oder dem 3. und 4. Trachealring in kaudaler Richtung.
Dafür die Punktionskanüle mit der aufgesetzten Spritze nach poste-
rior und kaudal soweit vorschieben, bis Luftblasen aspiriert werden
können.
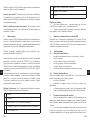
3. Die Punktionskanüle sollte jetzt in einem Winkel von ca. 60°
gegenüber der Tracheavorderwand geneigt sein (siehe Abb. 5).
Die Position der Kanülenspitze in der Trachea durch Aspiration von
Luft in die Spritze prüfen.
4. Eine 1,5-2cm lange Inzision über der Einführungsstelle set-
zen (siehe Abb. 4), um die Dilatation der Haut zu ermöglichen.
5. Die Punktionskanüle aus der Luftröhre zurückziehen,
während der Teflonkatheter in situ verbleibt. Den Katheter mehrere
Millimeter nach posterior und kaudal vorschieben (siehe Abb. 6).
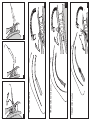
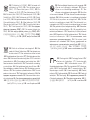
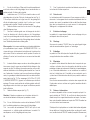
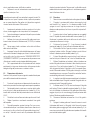
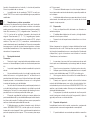
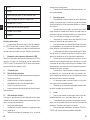
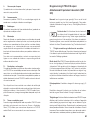
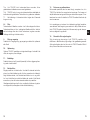
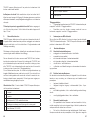
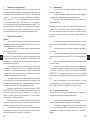
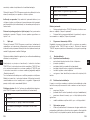
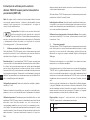
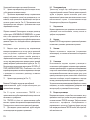
6. Den Führungsdraht aus seiner Hülle herausziehen (ca. 8cm)
und vorschieben, bis sich die J-förmige Spitze in der geraden Ein-
führhilfe befindet.
7. Die Einführhilfe in den Teflonkatheter setzen und den
Führungsdraht vorsichtig durch den Teflonkatheter bis zu dessen
erster Markierung (ca. 10cm) in die Luftröhre einführen (siehe Abb.
7). Der Führungsdraht sollte sich leicht vorschieben lassen und im
Katheter frei beweglich sein. Wenn der Führungsdraht abknickt,
muss er durch einen neuen ersetzt werden.
Die Ausrichtung des Führungsdrahts sollte möglichst mit einem
Bronchoskop kontrolliert werden.
8. Dann kann der Teflonkatheter über den Führungsdraht voll-
ständig herausgezogen werden, wobei der Führungsdraht in seiner
Position in der Trachea verbleibt.
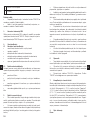
9. Der kurze Dilatator (14Ch/FR) wird über den Führungsdraht
in die Trachea vorgeschoben. Die Punktionsstelle dilatieren (siehe
Abb. 8). Es ist darauf zu achten, dass der Dilatator zum Führungs-
draht ausgerichtet ist (um eine Beschädigung der Spitze zu vermei-
den) und dass er die Tracheahinterwand nicht verletzt. Mit Bron-
choskop überwachen.
10. Den kurzen Dilatator entfernen; die Position des Führungs-
drahts muss dabei unverändert bleiben.
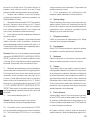
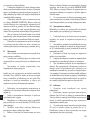
11. Den Führungskatheter mit der Sicherheitssperre nach vorn
(in Pfeilrichtung) über den Führungsdraht so weit vorschieben, bis
die Sicherheitssperre des Führungskatheters das Hautniveau erre-
icht (siehe Abb. 9). Die proximale Markierung des Führungsdrahts
sollte am proximalen Ende des Führungskatheters liegen.
Warnhinweis: Es wird empfohlen, den Dilatator nicht tiefer als bis
zur „MAXIMUM INSERTION“-Markierung auf Hautniveau ein-
zuführen, um Verletzungen der Luftröhre und/oder der Carina
vorzubeugen. Drehbewegungen sind bei der Einführung des Dilata-
tors zu vermeiden. Außerdem sollten Verletzungen der Trachealringe
vermieden werden.
12. Den experc Dilatator über den Führungskatheter vorschie-
ben, bis seine distale Spitze die Sicherheitssperre erreicht. Um den
Punktionskanal aufzudehnen, den Dilatator gemeinsam mit dem
Führungskatheter vorsichtig solange in die Trachea vor- und
zurückschieben, bis die Öffnung etwas größer ist als der Außen-
durchmesser der gewählten Tracheostomiekanüle (siehe Abb. 10).
Zur Orientierung sind Markierungen bei 38Ch/FR und 41Ch/FR
(„MAXIMUM INSERTION“) auf dem Dilatator angebracht. Während
der Dilatation ist darauf zu achten, dass die Position des Führung-
skatheters und des Führungsdrahts gegenüber dem Dilatator gleich
bleibt.
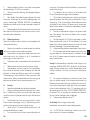
13. Den experc Dilatator entfernen (siehe Abb. 11).
Achtung: Bei dem folgenden Verfahren muss die Anleitung für
die dabei verwendete Tracheostomiekanüle befolgt werden.
16 17
DE DE

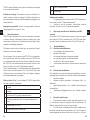
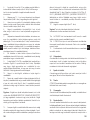
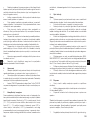
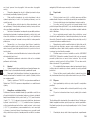
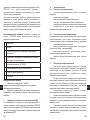
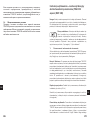
14a. Bei Verwendung von TRACOE twist Tracheostomiekanülen
verbleibt der Führungskatheter zusammen mit dem Führungsdraht
in situ.
14b. In den TRACOE twist plus und vario Tracheostomiekanülen
ist ein Führungskatheter vormontiert. Deshalb verbleibt nur der
Führungsdraht in situ.
15. Bei der Einführung der Tracheostomiekanüle ist die entspre-
chende Gebrauchsanweisung zu beachten.
8.4 Nachsorge
Das Tracheostoma sollte je nach Bedarf mit einer sterilen Wundkom-
presse abgedeckt werden. Ein Wechsel der Tracheostomiekanüle
innerhalb der ersten Tage nach der ersten Tracheotomie sollte nur in
Ausnahmefällen, unter Anwendung der Seldinger-Technik und mit
Intubationsbesteck durchgeführt werden.
9. Pflege und Reinigung
Das Produkt ist ein Einwegprodukt zur einmaligen Verwendung,
daher ist keine Reinigung erforderlich oder zulässig.
10. Lagerung
Lagern Sie die Produkte von TRACOE in ihrer Originalverpackung
unter den auf der Verpackung angegebenen Bedingungen.
11. Verpackung
Das Produkt ist mit Ethylenoxid sterilisiert und kann unter sterilen
Bedingungen angewendet werden.
12. Entsorgung
Gebrauchte Produkte sind in Übereinstimmung mit den geltenden
nationalen Vorschriften, Abfallentsorgungsplänen oder klinischen
Vorschriften zum Umgang mit biologischen Gefahrstoffen zu entsor-
gen, z.B. direkte Entsorgung in einem reißfesten, feuchtigkeits-
beständigen und gesicherten Beutel oder Behälter, der zum örtli-
chen Abfallentsorgungssystem für kontaminierte medizinische
Produkte geleitet wird.
Für weitere Empfehlungen wenden Sie sich an Ihren Hygienebeauf-
tragten in Gesundheitseinrichtungen oder das lokale Abfallent-
sorgungsunternehmen bei häuslicher Anwendung.
13. Rücksendungen und Reklamationen
Rücksendungen gebrauchter Produkte können nur ent-
gegengenommen werden, wenn TRACOE der Rücksendung vorab
zugestimmt hat. Ein ausgefülltes Dekontaminations-Zertifikat sowie
ein Reklamationsbericht sind erforderlich. Diese Formulare erhalten
Sie entweder bei TRACOE medical direkt oder über die Website
www.tracoe.com.
Wenn das Produkt an einem meldepflichtigen Vorkommnis im Sinne
der nationalen gesetzlichen Bestimmungen für Medizinprodukte
beteiligt ist, wenden Sie sich bitte an TRACOE medical (complaints@
tracoe.com) und an die zuständige Behörde des Verwend-
ungslandes.
14. Allgemeine Geschäftsbedingungen
Verkauf, Lieferung und Rücknahme aller TRACOE-Produkte
erfolgen ausschließlich aufgrund der gültigen Allgemeinen
Geschäftsbedingungen (AGB), die bei TRACOE medical GmbH oder
über die Website www.tracoe.com erhältlich sind.
18 19
DE DE

people. One person performs the intervention, while the second
person administers the anesthetic, monitors the patient and per-
forms the bronchoscopy.
The TRACOE experc Dilation Set for Percutaneous Tracheostomy is
intended to be used under sterile conditions.
Indications for Use: This medical device is indicated for cases
where access to the respiratory tract is required by means of a per-
cutaneous dilation tracheotomy, with subsequent placement of a
tracheostomy tube.
Single Patient Use and Useful Life: This is a single use disposable
product. Therefore, the actual use is limited to a maximum of 1 hour.
2. General Description
The TRACOE experc Dilation Set for Percutaneous Tracheostomy is
used to create a dilative tracheostoma for the percutaneous inser-
tion of a tracheostomy tube applying the one-step dilation technique
according to the Ciaglia method with the Seldinger guide wire.
The dilator is coated with a hydrophilic gel, which reduces friction, as
compared to a non-coated dilator.
It is designed to be used together with TRACOE twist Tracheostomy
Tubes with minimally traumatic inserter, TRACOE twist plus Trache-
ostomy Tubes with minimally traumatic insertion system, or TRACOE
vario Tracheostomy Tubes with minimally traumatic insertion system
(see section ”Supplementary Products”).
These tracheostomy tubes are available in different diameters and
lengths. The models are provided with the cuff deflated. Their mini-
mally traumatic inserter respective minimally traumatic insertion sys-
tem is premounted. The appropriate diameter and length of the tube
is to be determined by the physician.
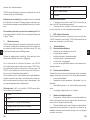
Fold out pages: Image 1 shows the content of the TRACOE experc
Dilation Set for Percutaneous Tracheostomy
1scalpel
2syringe
3puncture needle (14 gauge) with teflon catheter
Instructions for Use for TRACOE experc
Dilation Set for Percutaneous Tracheostomy
(REF 520)
Note: Please read the instructions for use carefully. They are part of
the described product and must be available at all times. For your
own and your patients’ safety, please observe the following safety
information.
Fold out pages: The illustrations to which the text
refers can be found on the (foldout) illustrated pages
at the beginning of these instructions. The numbers
indicate product components and refer to the respective illustrations
of the product. Symbols and icons used with the product are
explained in sections “General Description” and “Functional Descrip-
tion”.
1. Intended Use and Indications for Use
TRACOE experc Dilation Set for Percutaneous Tracheostomy is
intended for performing a percutaneous dilation tracheotomy, apply-
ing the Ciaglia technique with a Seldinger guide wire.
Clinical Benefit: With the TRACOE experc Dilation Set an artificial
access to the trachea can be created using percutaneous dilation
tracheostomy.This allows the placement of a tracheostomy tube for
airway management measures, e.g. mechanical ventilation. Moreo-
ver, it prevents long-term intubation damages in the laryngeal region.
Compared to an open surgical tracheotomy, a percutaneous dilation
tracheostomy can be performed bedside, provided that the indica-
tions are observed.
Patient Population: The product is intended for adults and adoles-
cents (≥ 18 years).
The product is intended for patients requiring a tracheostomy tube,
and who are not indicated for surgical tracheotomy.
Intended User: Percutaneous dilation tracheotomy with the
TRACOE experc Dilation Set for Percutaneous Tracheostomy should
only be performed by physicians or under the instruction and super-
vision of physicians who are trained and experienced in the Ciaglia
technique. Bronchoscopic monitoring during this procedure is rec-
ommended. This intervention should be performed by at least two
20 21
EN EN

4Seldinger guide wire with sheath and straight inserter
5short dilator (14 Ch/FR)
6guiding catheter with safety stop
7TRACOE experc Dilator
84 dressings
Supplementary Products:
• Available combinations with TRACOE Tracheostomy Tubes
are listed in section ”Supplementary Products”.
• Products, which can be used in combination with the
described one are listed in section “Supplementary Products”.
3. MRI Safety Information
Please see MRI safety information in the respective IFU of the
TRACOE Tracheostomy Tube used. The TRACOE experc Dilation
Set for Percutaneous Tracheostomy is MR unsafe.
4. Contraindications
4.1 Absolute contraindications:
• positioning the tracheostomy tube in emergencies
• application in pediatrics
• existing infections in the area of the tracheostomy
• existing malignancy in the area of the tracheostomy
• unstable fracture of the cervical spine
• uncertainty about the identification of the anatomical orienta-
tion points
4.2 Relative Contraindications:
The following list provides relative contraindications for which the
user carefully has to consider the risks against the benefits of the
procedure:
• an enlarged thyroid gland
• previous surgical procedures in the neck region (e.g. thyroid-
ectomy)
• increased tendency to bleed, e.g. in the case of treatment
with anticoagulants
• unusually deep-seated trachea, e.g. in the case of obesity
5. General Precautions
• When the product is used together with other medical
devices, follow their respective instructions for use. Contact the
manufacturer if there are any questions, or if assistance is required.
• Safety precautions must be taken in the event of complica-
tions during the described procedures, such that a physician can
provide immediate ventilation by alternative airways (e.g. trans laryn-
geal intubation, laryngeal mask).
• It is strongly recommended that a ready-to-use spare device
is available near the patient.
• The product should be inspected for integrity and function
prior to use/insertion. If the product is damaged, it should be
replaced with a new product.
• The sterile packaging should be inspected for damage prior
to opening. If the packaging is damaged or has been unintentionally
opened, the device should not be used.
• It is recommended to carry out the percutaneous tracheot-
omy under bronchoscopy control, in order to monitor the intra-tra-
cheal position of the puncture needle, the guide wire, the dilator and
the tracheostomy tube and to avoid the danger of para-tracheal
insertion or injury to the trachea.
• It is recommended to identify tracheal and pre-tracheal con-
ditions (e.g. thyroid gland isthmus, large vessels, cricoid cartilages)
with ultrasound, in order to ascertain the optimal spot for puncture
and to minimize bleeding.
• Hemorrhages can cause airway obstructions, if the blood is
not immediately suctioned.
• Improper storage conditions may result in product or sterile
barrier damage.
6. Warnings
• Do not use this product if the sterile packaging has been
compromised/damaged, e.g. open edges, holes in packaging etc.
• Refurbishing (including re-sterilisation) is not allowed, this
may influence the material and function of the product. The product
is single use only.
• Modifications of TRACOE products are not allowed.
TRACOE will not be responsible for modified products.
7. Complications and Side Effects
Based on the published literature regarding this type of device, the
following complications/side-effects may occur during a percutane-
ous dilation tracheostomy: Very common ( ≥ 10%): minor bleeding /
Common (1% - 10%): fracture of tracheal cartilages, oxygen desat-
uration / Uncommon (0.1% – 1%): severe bleeding, hypotension,
increase of CPP, cardiac arrythmia / Very rare (< 0.01%): pneumo-
thorax, pneumomediastinum procedural-related death / Frequency
22 23
EN EN

not known: bronchospasm, injury of the posterior tracheal wall,
emphysema, hemodynamic instability, tracheoesophageal fistula,
or tracheostomy-related sepsis.
8. Functional Description
Caution:
• During surgery the patient’s breathing must be maintained
with an endotracheal tube and continually monitored by oximetry.
• Puncture of the trachea must be checked by the aspiration
of air.
• Following the puncture, the tip of the puncture needle should
be angled at approx. 60º in relation to the anterior wall of the tra-
chea, in order to avoid injuries to the posterior wall of the trachea.
This also applies to the subsequent insertion of the guide wire and
dilator.
• To avoid injuries to the posterior wall of the trachea the distal
tip of the guiding catheter must never extend over the tip of the
guide wire. Therefore, the proximal marking of the guide wire must
always be at the proximal end of the guiding catheter.
• The safety stop of the guiding catheter should always be
placed right in front of the tip of the experc dilator or the inserter/
insertion system. The guiding catheter has markings which provide
confirmation of the appropriate insertion depth.
• The experc dilator should not be inserted beyond the “MAX-
IMUM INSERTION” mark (skin level) in order to avoid injury to the
trachea at the level of the carina. This is particularly critical with small
patients (height approx. 150 cm or smaller; body weight 50 kg or
less).
• When inserting the experc dilator or the tracheostomy tube,
excessive rotating movements must be avoided as this can damage
the trachea.
• Dilation should be performed to match the chosen tube size,
so that insertion of the tracheostomy tube is possible without exert-
ing pressure.
8.1 Preparation
• This is a sterile device, intended for use in an aseptic environ-
ment.
• The size and appropriate length of the tube subsequently
used should be determined by a physician.
• Prepare the tracheostomy tube, as described in its instruc-
tions for use.
The following functions must be checked immediately prior to use. If
the device fails the initial inspection, repeat the procedure with a
new device. Do not discard the device, and follow instructions pro-
vided in section “Returns and Complaints”.
1. Inspect the sterile packaging to ensure it is secure, undam-
aged and all components are present.
2. Open the package and inspect the device for damages prior
to use.
3. Verify that the guide wire can be advanced without obstruc-
tion through the short dilator (14 Ch/FR) and the guiding catheter.
4. Pour sterile water or saline solution into the available cavity of
the blister tray.
5. Immerse the narrow end of the experc dilator into the sterile
water or saline to activate the lubricant coating, from the tip to the
“MAXIMUM INSERTION” mark. The provided dressings can be used
to moisten the anterior part of the experc dilator.
6. For preparation of the air aspiration testing, partially fill the
syringe with sterile saline solution or sterile water and attach it to the
puncture needle with a teflon catheter.
8.2 Preparing the Patient
Ensure that the patient is optimally pre-oxygenated immediately
before insertion or re-insertion.
1. The patient should be examined for anatomical anomalies
that may adversely affect this procedure.
2. Patient position: supine with a pillow beneath the shoulders
and with the head and neck fully extended (See Fig. 2); the head end
of the patient’s bed should be raised by 30-40°.
3. Disinfect the skin in the neck region and cover it with sterile
drapes.
4. Sedate the patient and monitor in accordance with hospital
guidelines.
5. Prior to the procedure, the pharynx should be suctioned. If
an endotracheal tube is used for ventilation, it should be unblocked
and the tube with the cuff withdrawn as far as the entrance of the
larynx (approx. 1 cm below). Withdrawing the tube prevents the cuff
from being pierced during tracheal puncture. The cuff of the
endotracheal tube is re-inflated if necessary and ventilation adjusted
with respect to volume per minute.
24 25
EN EN

8.3 Procedure
1. Administer a local anesthetic in the region of interest.
2. Typically, the puncture of the trachea is done between tra-
cheal ring 2 and 3, or 3 and 4, in caudal direction. Therefore, push
the puncture needle with syringe attached forward in a posterior
caudal direction until air bubbles can be aspirated.
3. The puncture needle should now be tilted at an angle of
approx. 60º in relation to the anterior wall of the trachea (see Fig. 5).
Confirm the position of the cannula tip in the trachea by aspiration of
air through the syringe.
4. Make a 1.5 - 2 cm long incision across the placement site
(see Fig. 4) to facilitate the dilation of the skin.
5. Withdraw the puncture needle from the trachea, while the
Teflon catheter remains in place. Push the catheter forward several
millimeters in a posterior and caudal direction (see Fig. 6).
6. Take the guide wire out of its sheath (approx. 8 cm) and
advance it until the J-shaped tip is located in the straight inserter.
7. Put the inserter into the Teflon catheter and introduce the
guide wire carefully through the Teflon catheter up to its first marking
(approx. 10 cm) into the trachea (see Fig. 7). It should be possible to
easily push the guide wire forward and move it freely within the cath-
eter. If the guide wire kinks, replace it immediately with a new one.
Check, if possible, the orientation of the guide wire through the
bronchoscope.
8. Then, the Teflon catheter can be completely removed by pull-
ing it out over the guide wire, leaving the guide wire in its current
position within the trachea.
9. The short dilator (14 Ch/FR) is inserted over the guide wire
into the trachea. Dilate the puncture site (see Fig. 8). Ensure that the
dilator is aligned with the guide wire (to avoid damaging of the tip)
and that it does not damage the posterior wall of the trachea. Mon-
itor by bronchoscopy.
10. Remove the short dilator while securing the guide wire in
place.
11. Push the guiding catheter with the safety stop in front (in the
direction of the arrow) over the guide wire until the safety stop of the
guiding catheter reaches skin level (see Fig. 9). The proximal mark-
ing of the guide wire should match the proximal end of the guiding
catheter.
Warning: It is recommended not to insert the dilator deeper than the
“MAXIMUM INSERTION“ mark at skin level, to prevent damage of the
trachea and/or carina. Avoid rotational movements during insertion of
the dilator. In addition, trauma to the tracheal rings should be avoided.
12. Insert the experc dilator over the guiding catheter and
advance until its distal tip reaches the safety stop. In order to
expand the puncture channel, push the dilator and the guiding cath-
eter together carefully forward and backward in the trachea until the
opening is slightly larger than the external diameter of the selected
tracheostomy tube (see Fig. 10). For orientation purposes, there are
38 Ch/FR and 41 Ch/FR (“MAXIMUM INSERTION”) markings on the
dilator. Ensure that the position of the guiding catheter and guide
wire remain constant in relation to the dilator during dilation.
13. Remove the experc dilator (See Fig. 11).
Caution: Please comply with the instructions for the selected
tracheostomy tube used for the following procedure.
14a. If using TRACOE twist Tracheostomy Tubes the guiding cath-
eter stays in place together with the guide wire.
14b. The TRACOE twist plus and vario Tracheostomy Tubes
include a preassembled guiding catheter. Therefore, only the guide
wire stays in place.
15. For insertion of the tracheostomy tube follow the respective
instructions for use.
8.4 After Care
The tracheostoma should be covered with a sterile wound dressing
as required. Changing the tracheostomy tube within the first few
days after the initial tracheostomy should only be performed in
exceptional cases using the Seldinger technique and intubation
equipment.
9. Care and Cleaning
The product is single-use and disposable, therefore, no cleaning is
required or allowed.
10. Storage
Store the TRACOE products in their original packaging according to
the conditions displayed on the packaging.
11. Packaging
The product is provided sterile (with ethylene oxide) which allows
application under sterile conditions.
12. Disposal
Used products are to be disposed of in accordance with national
regulations, waste management plans, or clinical procedures gov-
26 27
EN EN

erning biohazardous waste materials, e.g. the direct disposal in a
tear- and moisture-resistant and secure bag or container, which is
routed to the local waste disposal system for contaminated medical
products.
For further recommendations, contact your hygiene officer in health
facilities, or the local waste management for homecare use.
13. Returns and Complaints
Returned products, that have been used, will only be accepted, if
TRACOE has agreed to the return in advance. A completed decon-
tamination certificate and complaint report is required. These forms
are available either directly from TRACOE medical, or via the website
www.tracoe.com.
If the device is involved in a reportable incident, as defined in local
medical device legislation, please contact TRACOE medical (com-
[email protected]), and the appropriate regulatory body in the
country of use.
14. General Terms and Conditions
The sale, delivery and return of all TRACOE products shall be
affected exclusively on the basis of the valid General Terms and
Conditions (GTC), which are available either from TRACOE medical
GmbH or on our website at www.tracoe.com.
Instructions d’utilisation pour le kit de
dilatation pour la trachéotomie percutanée
TRACOE experc (REF 520)
Remarque : Veuillez lire attentivement les instructions d’utilisation.
Elles font partie du produit décrit et doivent être disponibles à tout
moment. Pour votre propre sécurité et celle de vos patients, veuillez
respecter les consignes de sécurité suivantes.
Pages dépliantes: Vous trouverez les illustrations
associées au texte sur les pages illustrées (dépli-
antes) situées au début des présentes instructions.
Les chiffres désignent les composants du produit et renvoient aux
illustrations respectives du dispositif médical. Les symboles et les
icones utilisés avec le produit sont expliqués dans les rubriques
«Description générale» et «Description fonctionnelle».
1. Utilisation prévue et indications d’utilisation
Le kit de dilatation pour la trachéotomie percutanée TRACOE
experc est destiné à effectuer une trachéotomie percutanée par dil-
atation, en appliquant la technique de Ciaglia avec un fil de guidage
selon Seldinger.
Bénéfice clinique: Le kit de dilatation TRACOE experc permet de
créer un accès trachéal artificiel, en ayant recours à la trachéotomie
percutanée par dilatation.Cela permet la mise en place d’une canule
de trachéotomie pour effectuer des mesures de gestion des voies
aériennes, par exemple la ventilation mécanique. Par ailleurs, le kit
prévient les dommages liés à l’intubation d’une durée prolongée
dans la région laryngée. Par comparaison à une trachéotomie chiru-
rgicale ouverte, une trachéotomie percutanée par dilatation peut
être réalisée au lit du patient, à condition de respecter les indica-
tions.
Population de patients: Le produit est destiné aux adultes et aux
adolescents (≥ 18 ans).
Le produit est destiné aux patients nécessitant une canule de tra-
chéotomie, qui ne sont pas éligibles à une trachéotomie chirurgi-
cale.
Utilisateurs prévus: La trachéotomie percutanée par dilation avec
le kit de dilatation pour la trachéotomie percutanée TRACOE experc
28 29
FR
28
EN

Pages dépliantes: L’image 1 montre le contenu du kit de dilatation
pour la trachéotomie percutanée TRACOE experc
1scalpel
2seringue
3aiguille de ponction (14 G) avec cathéter en Téflon
4fil de guidage selon Seldinger avec gaine et avec dispositif
d’insertion droit
5dilatateur court (14 Ch/FR)
6cathéter-guide avec blocage de sécurité
7dilatateur TRACOE experc
84 compresses
Produits supplémentaires:
• Les combinaisons disponibles avec les canules de trachéot-
omie TRACOE sont listées à la rubrique «Produits supplémen-
taires».
• Les produits qui peuvent être utilisés en association avec
ceux décrits sont listés à la rubrique «Produits supplémentaires».
3. Consignes de sécurité IRM
Veuillez consulter les consignes de sécurité IRM dans les instruc-
tions d’utilisation de la canule de trachéotomie TRACOE correspon-
dante. Le kit de dilatation pour la trachéotomie percutanée TRACOE
experc est incompatible IRM.
4. Contre-indications
4.1 Contre-indications absolues:
• mise en place de la canule de trachéotomie dans des situa-
tions d’urgence
• utilisation en pédiatrie
• infections existantes dans la zone de la trachéotomie
• tumeur maligne existante dans la zone de la trachéotomie
• fracture instable du rachis cervical
• incertitude concernant l’identification des points de repère
anatomique
4.2 Contre-indications relatives:
Les contre-indications relativespour lesquelles les risques doivent
être comparés aux bénéfices de la procédure sont les suivantes:
ne doit être réalisée que par des médecins ou sous la direction et la
supervision de médecins formés et expérimentés à la technique de
Ciaglia. Une surveillance bronchoscopique est recommandée pen-
dant toute la durée de cette procédure. La présence de deux per-
sonnes au moins est nécessaire pour réaliser cette intervention. La
première personne réalise l’intervention, tandis que la deuxième
administre l’anesthésique, surveille le patient et gère la bronchosco-
pie.
Le kit de dilatation pour la trachéotomie percutanée TRACOE
experc est destiné à être utilisé dans des conditions stériles.
Indications d’utilisation: Ce dispositif médical est indiqué dans les
cas où un accès aux voies respiratoires est requis à l’aide d’une
trachéotomie percutanée par dilatation, avec la mise en place
consécutive d’une canule de trachéotomie.
Utilisation chez un patient unique et durée d’utilisation : Ce pro-
duit est à usage unique et jetable. Par conséquent, l’utilisation réelle
est limitée à 1 heure maximum.
2. Description générale
Le kit de dilatation pour la trachéotomie percutanée TRACOE
experc est utilisé pour créer un trachéostome dilatable en vue de
l’insertion percutanée d’une canule de trachéotomie, en appliquant
la technique de dilatation en une seule étape selon la méthode de
Ciaglia, avec le fil de guidage selon Seldinger.
Le dilatateur est revêtu d’un gel hydrophile qui réduit le frottement
par rapport à un dilatateur non enduit.
Il est conçu pour être utilisé avec les canules de trachéotomie avec
guide d’insertion très peu traumatique TRACOE twist, les canules
de trachéotomie avec système d’insertion très peu traumatique
TRACOE twist plus, ou les canules de trachéotomie avec système
d’insertion très peu traumatique TRACOE vario (voir rubrique « Pro-
duits supplémentaires »)
Ces canules de trachéotomie sont disponibles en différents
diamètres et longueurs. Les modèles sont fournis avec le ballonnet
dégonflé. Leur guide d’insertion très peu traumatique ou leur sys-
tème d’insertion très peu traumatique est prémonté. Il incombe au
médecin de déterminer le diamètre et la longueur appropriés de la
canule.
30 31
FR FR

• glande thyroïde hypertrophiée
• interventions chirurgicales antérieures dans la région du cou
(p. ex., thyroïdectomie)
• tendance accrue aux saignements, p. ex., dans le cas d’un
traitement par des anticoagulants
• trachée anormalement située en profondeur p. ex., en cas
d’obésité
5. Précautions générales
• Lorsque le produit est utilisé avec d’autres dispositifs médi-
caux, veuillez suivre leurs instructions d’utilisation respectives. Con-
tactez le fabricant si vous avez des questions ou si vous avez besoin
d’assistance.
• Des mesures de sécurité doivent être prises en cas de com-
plications survenant pendant les procédures décrites, de sorte
qu’un médecin puisse fournir une ventilation immédiate par d’autres
voies aériennes (p. ex., intubation trans-laryngée, masque laryngé).
• Il est fortement recommandé d’avoir toujours à disposition
un dispositif de rechange prêt à l’emploi, à proximité du patient.
• Le produit devraitêtre inspecté quant à son intégrité et à sa
fonction avantl’utilisation/insertion. Si le produit est endommagé, il
devrait être remplacé par un nouveau produit.
• Inspecter l'emballage stérile afin de détecter tout dommage
avant l’ouverture. Le dispositif ne doit pas être utilisé si l'emballage
est endommagé ou a été ouvert involontairement.
• Il est recommandé de réaliser la trachéotomie percutanée
sous contrôle bronchoscopique, afin de surveiller la position
intra-trachéale de l’aiguille de ponction, le fil de guidage, le dilatateur
et la canule de trachéotomie, et d’éviter le risque d’une insertion
para-trachéale ou d’une lésion de la trachée.
• Il est recommandé d’identifier par échographie l’état de la
région trachéale et prétrachéale (p. ex. l’isthme thyroïdien, les vais-
seaux de gros calibre, les cartilages cricoïdes), afin de déterminer le
point de piqûre optimal et de minimiser les saignements.
• Les hémorragies peuvent provoquer des obstructions des
voies aériennes si le sang n’est pas aspiré immédiatement.
• Des conditions de conservation inappropriées peuvent
entraîner un dommage du produit ou de la barrière stérile.
6. Mises en garde
• Ne pas utiliser ce produit si l'emballage stérile est altéré/
endommagé, p. ex. bords ouverts, trous dans l'emballage, etc.
• Le reconditionnement (y compris la re-stérilisation) n'est pas
autorisé, cela risque d'impacter le matériel et le fonctionnement du
produit. Le produit est exclusivement à usage unique.
• Les modifications des produits TRACOE sont interdites.
TRACOE ne sera pas responsable des produits modifiés.
7. Complications et effets secondaires
Sur la base de la littérature publiée concernant ce type de dispositif,
les complications/ effets secondaires suivants peuvent être observés
durant une trachéotomie percutanée par dilatation: Très fréquents (
≥ 10%): saignement mineur / Fréquents (1% - 10%): fracture des
cartilages de la trachée, désaturation en oxygène / Rares (0,1% –
1%): saignement sévère, hypotension, augmentation de la PPC,
arythmie cardiaque / Très rares (< 0,01%): pneumothorax, décès lié
à la procédure pneumomédiastinale / Fréquence indéterminée:
bronchospasme, lésion de la paroi trachéale postérieure,
emphysème, instabilité hémodynamique, fistule trachéo-œsophagi-
enne, ou septicémie liée à la trachéotomie.
8. Description fonctionnelle
Attention:
• Pendant l'intervention chirurgicale, la respiration du patient
doitêtre maintenue avec une canule endotrachéale et faire l'objet
d'une surveillance constante par oxymétrie.
• La ponction de la trachée doit être contrôlée par aspiration
d’air.
• Après la ponction, la pointe de l’aiguille de ponction doit être
courbée à 60° environ par rapport à la paroi antérieure de la trachée,
afin d’éviter les lésions à la paroi postérieure de la trachée. Ceci
s’applique également à l’insertion ultérieure du fil de guidage et du
dilatateur.
• Pour éviter les lésions à la paroi postérieure de la trachée,
l’extrémité distale du cathéter-guide ne doit jamais avancer au-delà
de l’extrémité du fil de guidage. Par conséquent, le marquage prox-
imal du fil de guidage doit toujours être situé à l’extrémité proximale
du cathéter-guide.
• Le blocage de sécurité du cathéter-guide doit toujours être
positionné juste devant l’extrémité du dilatateur experc ou du guide/
système d’insertion. Le cathéter-guide est doté de marquages des-
tinés à confirmer la profondeur d’insertion appropriée.
• Le dilatateur experc ne doit pas être inséré au-delà du repère
«MAXIMUM INSERTION» (insertion maximale, au niveau de la
peau), afin d’éviter toute lésion de la trachée au niveau de la carène.
Ce point est particulièrement important avec des patients de petite
taille (environ 150 cm ou taille inférieure; poids corporel inférieur ou
égal à 50 kg).
32 33
FR FR
La page est en cours de chargement...
La page est en cours de chargement...
La page est en cours de chargement...
La page est en cours de chargement...
La page est en cours de chargement...
La page est en cours de chargement...
La page est en cours de chargement...
La page est en cours de chargement...
La page est en cours de chargement...
La page est en cours de chargement...
La page est en cours de chargement...
La page est en cours de chargement...
La page est en cours de chargement...
La page est en cours de chargement...
La page est en cours de chargement...
La page est en cours de chargement...
La page est en cours de chargement...
La page est en cours de chargement...
La page est en cours de chargement...
La page est en cours de chargement...
La page est en cours de chargement...
La page est en cours de chargement...
La page est en cours de chargement...
La page est en cours de chargement...
La page est en cours de chargement...
La page est en cours de chargement...
La page est en cours de chargement...
La page est en cours de chargement...
La page est en cours de chargement...
La page est en cours de chargement...
La page est en cours de chargement...
La page est en cours de chargement...
La page est en cours de chargement...
La page est en cours de chargement...
La page est en cours de chargement...
La page est en cours de chargement...
La page est en cours de chargement...
La page est en cours de chargement...
La page est en cours de chargement...
La page est en cours de chargement...
La page est en cours de chargement...
La page est en cours de chargement...
La page est en cours de chargement...
La page est en cours de chargement...
La page est en cours de chargement...
La page est en cours de chargement...
La page est en cours de chargement...
La page est en cours de chargement...
La page est en cours de chargement...
La page est en cours de chargement...
La page est en cours de chargement...
La page est en cours de chargement...
La page est en cours de chargement...
La page est en cours de chargement...
La page est en cours de chargement...
La page est en cours de chargement...
La page est en cours de chargement...
La page est en cours de chargement...
La page est en cours de chargement...
La page est en cours de chargement...
La page est en cours de chargement...
La page est en cours de chargement...
La page est en cours de chargement...
La page est en cours de chargement...
La page est en cours de chargement...
La page est en cours de chargement...
La page est en cours de chargement...
La page est en cours de chargement...
La page est en cours de chargement...
La page est en cours de chargement...
La page est en cours de chargement...
La page est en cours de chargement...
La page est en cours de chargement...
La page est en cours de chargement...
La page est en cours de chargement...
La page est en cours de chargement...
La page est en cours de chargement...
La page est en cours de chargement...
La page est en cours de chargement...
La page est en cours de chargement...
La page est en cours de chargement...
La page est en cours de chargement...
La page est en cours de chargement...
La page est en cours de chargement...
La page est en cours de chargement...
La page est en cours de chargement...
La page est en cours de chargement...
La page est en cours de chargement...
La page est en cours de chargement...
La page est en cours de chargement...
La page est en cours de chargement...
La page est en cours de chargement...
La page est en cours de chargement...
La page est en cours de chargement...
La page est en cours de chargement...
La page est en cours de chargement...
La page est en cours de chargement...
La page est en cours de chargement...
La page est en cours de chargement...
La page est en cours de chargement...
La page est en cours de chargement...
La page est en cours de chargement...
-
 1
1
-
 2
2
-
 3
3
-
 4
4
-
 5
5
-
 6
6
-
 7
7
-
 8
8
-
 9
9
-
 10
10
-
 11
11
-
 12
12
-
 13
13
-
 14
14
-
 15
15
-
 16
16
-
 17
17
-
 18
18
-
 19
19
-
 20
20
-
 21
21
-
 22
22
-
 23
23
-
 24
24
-
 25
25
-
 26
26
-
 27
27
-
 28
28
-
 29
29
-
 30
30
-
 31
31
-
 32
32
-
 33
33
-
 34
34
-
 35
35
-
 36
36
-
 37
37
-
 38
38
-
 39
39
-
 40
40
-
 41
41
-
 42
42
-
 43
43
-
 44
44
-
 45
45
-
 46
46
-
 47
47
-
 48
48
-
 49
49
-
 50
50
-
 51
51
-
 52
52
-
 53
53
-
 54
54
-
 55
55
-
 56
56
-
 57
57
-
 58
58
-
 59
59
-
 60
60
-
 61
61
-
 62
62
-
 63
63
-
 64
64
-
 65
65
-
 66
66
-
 67
67
-
 68
68
-
 69
69
-
 70
70
-
 71
71
-
 72
72
-
 73
73
-
 74
74
-
 75
75
-
 76
76
-
 77
77
-
 78
78
-
 79
79
-
 80
80
-
 81
81
-
 82
82
-
 83
83
-
 84
84
-
 85
85
-
 86
86
-
 87
87
-
 88
88
-
 89
89
-
 90
90
-
 91
91
-
 92
92
-
 93
93
-
 94
94
-
 95
95
-
 96
96
-
 97
97
-
 98
98
-
 99
99
-
 100
100
-
 101
101
-
 102
102
-
 103
103
-
 104
104
-
 105
105
-
 106
106
-
 107
107
-
 108
108
-
 109
109
-
 110
110
-
 111
111
-
 112
112
-
 113
113
-
 114
114
-
 115
115
-
 116
116
-
 117
117
-
 118
118
-
 119
119
-
 120
120
-
 121
121
-
 122
122


Atos TRACOE experc Dilation Set Mode d'emploi
- Taper
- Mode d'emploi
dans d''autres langues
Documents connexes
Autres documents
-
Covidien Shiley 60XLTCP Manuel utilisateur
-
Medtronic Tracheal Tube Manuel utilisateur
-
Ambu Aura-i™ Disposable Laryngeal Mask Mode d'emploi
-
Tyco Shiley TracheoSoft Manuel utilisateur
-
-
Well REF 89000 Manuel utilisateur
-
 Merit Medical RadialFlo Instructions For Use Manual
-
-
 Merit Medical Merit Pursue™ Microcatheter CE Mode d'emploi
-

