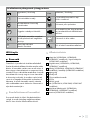
LIVARNO 427645 Le manuel du propriétaire
- Taper
- Le manuel du propriétaire

IAN 427645_2301
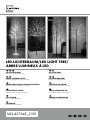
LED-LICHTERBAUM/LED LIGHT TREE/
ARBRE LUMINEUX À LED
LED-LICHTERBAUM
Bedienungs- und Sicherheitshinweise
LED LIGHT TREE
Operation and safety notes
SVĚTELNÝ LED STROM
Pokyny pro obsluhu a bezpečnostní pokyny
OŚWIETLENIE LED W KSZTAŁCIE DRZEWKA
Wskazówki dotyczące obsługi i bezpieczeństwa
LED-FÉNYFA
Kezelési és biztonsági utalások
LED JULETRÆ
Brugs- og sikkerhedsanvisninger
ALBERO LUMINOSO LED
Indicazioni per l’uso e per la sicurezza
LED-LAMPJESBOOM
Bedienings- en veiligheidsinstructies
ARBRE LUMINEUX À LED
Instructions d‘utilisation et consignes de sécurité
ÁRBOL LUMINOSO LED
Instrucciones de utilización y de seguridad
LED SVETELNÝ STROM
Pokyny pre obsluhu a bezpečnostné pokyny

DE/AT/CH Bedienungs- und Sicherheitshinweise Seite 5
GB/IE Operation and safety notes Page 12
FR/BE Instructions d‘utilisation et consignes de sécurité Page 18
NL/BE Bedienings- en veiligheidsinstructies Pagina 26
PL Wskazówki dotyczące obsługi i bezpieczeństwa Strona 33
CZ Pokyny pro obsluhu a bezpečnostní pokyny Strana 40
SK Pokyny pre obsluhu a bezpečnostné pokyny Strana 46
ES Instrucciones de utilización y de seguridad Página 52
DK Brugs- og sikkerhedsanvisninger Side 59
IT Indicazioni per l’uso e per la sicurezza Pagina 65
HU Kezelési és biztonsági utalások Oldal 72

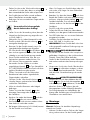
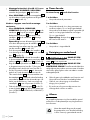
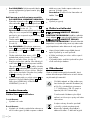
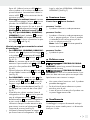
A1 A 2
C ED
1
2
4
3
567
8
67
HG06586A/HG06586CHG06586B 10
9
B
F
10

A B C
D
1
11
3
4
8
567
HG06586D
B C
E

5 DE/AT/CH
Legende der verwendeten Piktogramme ........................................................... Seite 6
Einleitung ......................................................................................................................................... Seite 6
Bestimmungsgemäße Verwendung ....................................................................................................Seite 6
Teilebeschreibung ...............................................................................................................................Seite 6
Technische Daten ................................................................................................................................Seite 6
Lieferumfang ........................................................................................................................................ Seite 7
Sicherheitshinweise ................................................................................................................Seite 7
Montage ...........................................................................................................................................Seite 8
Timer-Funktion ............................................................................................................................Seite 9
Reinigung und Pflege ............................................................................................................Seite 9
Entsorgung .....................................................................................................................................Seite 10
Garantie ........................................................................................................................................... Seite 10
Abwicklung im Garantiefall ................................................................................................................Seite 11
Service .................................................................................................................................................Seite 11
V2.0

6 DE/AT/CH
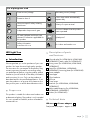
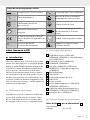
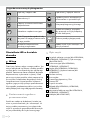
Legende der verwendeten Piktogramme
Gleichstrom/-spannung Wechselstrom/-spannung
Schutzklasse II 6-Stunden-Timer mit automatischer
Wiederholung im Tagesrhythmus
Kurzschlussfester
Sicherheitstrans formator Polarität des Ausgangspols
Unabhängiges Betriebsgerät
Dieses Symbol zeigt an, dass das
Produkt für den Betrieb an das Strom-
netz angeschlossen werden muss.
Das CE-Zeichen bestätigt Konformität
mit den für das Produkt zutreffenden
EU-Richtlinien. Spritzwassergeschützt
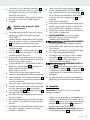
Sicherheitshinweise
Handlungsanweisungen Für den Innen- und Außenbereich
geeignet
LED-Lichterbaum
Einleitung
Wir beglückwünschen Sie zum Kauf Ihres neuen
Produkts. Sie haben sich damit für ein hochwertiges
Produkt entschieden. Die Bedienungsanleitung ist
Teil dieses Produkts. Sie enthält wichtige Hinweise
für Sicherheit, Gebrauch und Entsorgung. Machen
Sie sich vor der Benutzung des Produkts mit allen
Bedien- und Sicherheitshinweisen vertraut. Benutzen
Sie das Produkt nur wie beschrieben und für die
angegebenen Einsatzbereiche. Händigen Sie alle
Unterlagen bei Weitergabe des Produkts an Dritte
mit aus.
Bestimmungsgemäße
Verwendung
Dieses Produkt ist zur Lichtdekoration im Innen- und
Außenbereich geeignet. Das Produkt ist nur für den
Einsatz in privaten Haushalten und nicht für den
gewerblichen Gebrauch vorgesehen.
Teilebeschreibung
1 Erdspieß (für HG06586A, HG06586B,
HG06586C)/Befestigungsspieß (für
HG06586D)
2 Befestigungsschraube (für HG06586A,
HG06586B, HG06586C)
3 Standfuß (für HG06586A, HG06586B,
HG06586C)/Montageplatte (für HG06586D)
4 Netzteil
5 Standrohr
6 10 m-Anschlussleitung
7 LED-Baum
8 Timer-Taste
9 Arretierung (für HG06586A, HG06586B,
HG06586C)
10 Klett-Kabelbefestigung (für HG06586A,
HG06586B, HG06586C)
11 Aufkleber (für HG06586D)
Technische Daten
LED-Baum 7 + Netzteil 4:
Leistungsaufnahme: ca. 4,5 W

7 DE/AT/CH
LED-Baum 7:
Betriebsspannung: 31 V
LEDs: 200 LEDs
(für HG06586A,
HG06586B,
HG06586C),
156 LEDs
(für HG06586D),
(LEDs können nicht
ausgetauscht werden)
Schutzart: IP44 (spritzwasserge-
schützt)
Modell-Nr.: HG06586A,
HG06586B,
HG06586C,
HG06586D GS-zertifiziert.
Netzteil 4:
Betriebsspannung
primär: 220‒240 V ~,
50/60 Hz
Betriebsspannung
sekundär: 31 V , 3,6 W
Schutzklasse:
Schutzart: IP44 (spritzwasserge-
schützt)
Netzteil (Modell-Nr.: DS-310DC0360Hs-IP44)
GS-zertifiziert.
SELV: Schutzkleinspannung
(Safety extra low voltage)
Ta: Maximale Umgebungs-
temperatur
Tc: Gehäusetemperatur am
angegebenen Punkt
Lieferumfang
1 LED-Baum, inklusive 10 m-Anschlussleitung
(HG06586A, HG06586B, HG06586D -
warmweiß) (HG06586C - bunt)
1 Standrohr
1 Montageplatte (für HG06586D)
1 Standfuß (für HG06586A, HG06586B,
HG06586C)
1 Erdspieß (für HG06586A, HG06586B,
HG06586C)
4 Befestigungsspieße (für HG06586D)
1 Netzteil
1 Befestigungsschraube (für HG06586A,
HG06586B, HG06586C)
5 Ersatzblüten (nur für HG06586A, HG06586C)
2 Klett-Kabelbefestigungen (für HG06586A,
HG06586B, HG06586C)
1 Aufkleber (für HG06586D)
1 Bedienungsanleitung
Sicherheitshinweise
MACHEN SIE SICH VOR DER BENUTZUNG
DES PRODUKTS MIT ALLEN BEDIEN- UND
SICHERHEITSHINWEISEN VERTRAUT. HÄNDIGEN
SIE ALLE UNTERLAGEN BEI WEITERGABE DES
PRODUKTS AN DRITTE EBENFALLS MIT AUS!
LEBENS- UND
UNFALLGEFAHR FÜR KLEIN-
KINDER UND KINDER! Lassen
Sie Kinder niemals unbeaufsichtigt mit dem Ver-
packungsmaterial. Es besteht Erstickungsgefahr
durch Verpackungsmaterial. Kinder unterschätzen
häufig die Gefahren. Halten Sie Kinder stets
vom Produkt fern.
Dieses Produkt ist kein Spielzeug, es gehört nicht
in Kinderhände. Kinder können die Gefahren,
die im Umgang mit dem Produkt entstehen, nicht
erkennen.
Dieses Produkt kann von Kindern ab 8 Jahren
und darüber sowie von Personen mit verringerten
physischen, sensorischen oder mentalen Fähig-
keiten oder Mangel an Erfahrung und Wissen
benutzt werden, wenn sie beaufsichtigt oder
bezüglich des sicheren Gebrauchs des Produkts
unterwiesen wurden und die daraus resultieren-
den Gefahren verstehen. Kinder dürfen nicht mit
dem Produkt spielen. Reinigung und Benutzer-
wartung dürfen nicht von Kindern ohne Beauf-
sichtigung durchgeführt werden.
Achten Sie darauf, dass das Produkt nur von
fachkundigen Personen montiert wird.
VORSICHT! ÜBERHITZUNGSGEFAHR!
Betreiben Sie das Produkt nicht in der
Verpackung.

8 DE/AT/CH
Ziehen Sie nicht an der 10 m-Anschlussleitung 6
und stellen Sie sicher, dass diese so verlegt ist,
dass niemand darüber laufen oder stolpern kann.
Das Produkt kann auf allen normal entflamm-
baren Oberflächen verwendet werden.
Befestigen Sie keine zusätzlichen Gegenstände
am Produkt.
Vermeiden Sie Lebensgefahr
durch elektrischen Schlag!
Stellen Sie vor der Verwendung sicher, dass das
Netzteil an die Netzspannung angeschlossen
ist (220–240 V∼).
Überprüfen Sie vor jedem Netzanschluss das
Produkt und die 10 m-Anschlussleitung 6 auf
etwaige Beschädigungen.
Benutzen Sie das Produkt niemals, wenn Sie
irgendwelche Beschädigungen feststellen.
Die 10 m-Anschlussleitung 6 des LED-Baums 7
kann nicht ausgetauscht werden; falls diese be-
schädigt ist, muss das Produkt entsorgt werden.
Dieses Produkt enthält keine Teile, die vom
Verbraucher gewartet werden können. Die
LEDs können nicht ausgetauscht werden.
Verwenden Sie das Produkt nur mit dem
mitgelieferten Netzteil 4 des Typs (Modell-Nr.
DS-310DC0360Hs-IP44), ansonsten erlöschen
jegliche Gewährleistungsansprüche.
Öffnen Sie niemals eines der elektrischen
Betriebsmittel oder stecken irgendwelche
Gegenstände in dieselben.
Schützen Sie die 10 m-Anschlussleitung 6 vor
scharfen Kanten, mechanischen Belastungen
und heißen Oberflächen.
Nicht mit scharfen Klammern oder Nägeln
befestigen.
Ziehen Sie immer das Netzteil 4 vor der
Montage, Demontage oder Reinigung aus
der Steckdose.
Berühren Sie weder das Netzteil 4 noch den
LED-Baum 7 selbst mit nassen Händen.
Das Produkt darf nicht mit einer anderen Lichter-
kette elektrisch verbunden werden.
Bei längerer Nichtnutzung (z. B. Urlaub) trennen
Sie das Produkt vom Stromnetz.
Wenn Sie Fragen zum Produkt haben oder sich
nicht sicher sind, fragen Sie einen Elektrofach-
betrieb um Rat.
Beachten Sie, dass das Netzteil 4 auch ohne
Betrieb des Produkts noch eine geringe Leistung
aufnimmt, solange sich das Netzteil 4 in der
Steckdose befindet. Zum vollständigen Aus-
schalten entfernen Sie das Netzteil 4 aus der
Steckdose.
Die LEDs sind nicht austauschbar.
Sollten die LEDs am Ende ihrer Lebensdauer
ausfallen, muss das ganze Produkt ersetzt werden.
Der LED-Treiber kann nur von einem Fachmann
ausgetauscht werden.
Schließen Sie die Lichterkette nie direkt an
einen 220–240 V∼ Anschluss an.
WARNUNG! Dieses Produkt darf nicht ohne
ordnungsgemäß installierte Dichtungsringe ver-
wendet werden.
EXPLOSIONSGEFAHR!
Verwenden Sie das Produkt nicht in explosions-
gefährdeter Umgebung, in der sich brennbare
Dämpfe, Gase oder Stäube befinden.
Setzen Sie das Produkt keinen starken Vibrationen
oder starken mechanischen Beanspruchungen
aus.
Vergewissern Sie sich, dass Sie die 10 m-Anschluss-
l
eitung 6 nicht in Bereichen verlegen, in denen
Rasenmäher, Beschneidemaschinen, Scheren
oder ähnliche Schneidwerkzeuge verwendet
werden.
VERLETZUNGSGEFAHR
!
Vergewissern Sie sich beim Abbauen des LED-
Baums 7, dass Sie auch die Montageplatte 3
und den Erdspieß 1 mit abbauen, so dass
diese kein Risiko (z. B. Stolpern über die
Montageplatte und den Erdspieß) darstellen.
Die Zweige bestehen aus Metalldraht, der
Kratzer oder Verfärbungen auf empfindlichen
Oberflächen verursachen kann.
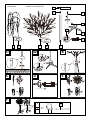
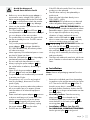
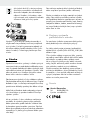
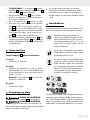
Montage
Hinweis: Entfernen Sie sämtliches Verpackungs-
material vom Produkt.
Nehmen Sie die einzelnen Teile aus der Verpa-
ckung und montieren Sie das Produkt gemäß

9 DE/AT/CH
Abbildungen A–E. Der LED-Baum 7 muss auf
einem festen, ebenen und vibrationsarmen Un-
tergrund installiert werden. Verankern Sie den
LED-Baum 7 fest im Boden und sorgen Sie für
einen stabilen Stand.
Montage im Innenbereich: Platzieren Sie
die
Montageplatte/den Standfuß
3
an der
ausgewählten Stelle. Für HG06586D können
Sie den Aufkleber
11
verwenden, um die Löcher
für die Befestigungsspieße
1
in der Montage-
platte
3
abzudecken.
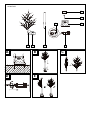
Montage im Außenbereich (s. Abb. A1):
Für HG06586A, HG06586B, HG06586C:
Verankern Sie den Erdspieß 1 im Boden.
Für HG06586D: Platzieren Sie die Montage-
platte 3 auf dem Boden und befestigen Sie
diese mit den Befestigungsspießen 1 (siehe
Abb. A).
Weitere Schritte für beide Montage-
varianten:
Für HG06586A, HG06586B, HG06586C:
Befestigen Sie das Standrohr 5 auf dem Stand-
fuß 3 oder auf dem Erdspieß 1 und ziehen
Sie die Befestigungsschraube 2 an, wenn Sie
das Standrohr
5
auf dem Standfuß
3
befestigen
(siehe Abb. A1-2).
Hinweis: Montieren Sie die Befestigungs-
schraube
2
niemals durch die Öffnung des Stand-
rohrs
5
, sondern befestigen Sie sie nur an der
Oberfläche des Standrohrs
5
(siehe Abb. A2).
Drücken Sie die Arretierung
9
des Standrohrs
5
u
nd befestigen Sie den LED-Baum 7 am Stand-
rohr 5 (siehe Abb. B).
Für HG06586D: Schrauben Sie das Standrohr
5 in die Montageplatte 3, befestigen Sie an-
schließend den LED-Baum 7 am Standrohr 5
(siehe Abb. B).
Biegen Sie die einzelnen Äste des LED-Baumes
7
in die gewünschte Position (siehe Abb. C).
Biegen Sie nicht alle Äste nur zu einer Seite
(siehe Abb. E).
Wickeln Sie die 10 m-Anschlussleitung 6 vor
dem ersten Gebrauch ab. Stecken Sie den
Anschluss stecker der 10 m-Anschlussleitung 6
in die Buchse vom Netzteil 4 und schrauben
Sie die Schraub verbindung fest, damit keine
Feuchtigkeit eindringen kann. Achten Sie dabei
auf den Dichtungsring. Stecken Sie nun das
Netzteil 4 in eine Steckdose (siehe Abb. D).
Verwenden Sie die Klett-Kabelbefestigungen 10 ,
um die 10 m-Anschlussleitung 6 entlang des
Rohrs zu befestigen (für HG06586A,
HG06586B, HG06586C) (siehe Abb. F).
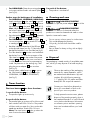
Timer-Funktion
Die Timer-Taste 8 hat drei Funktionen:
1 x drücken:
Das Produkt leuchtet permanent.
2 x drücken:
Das Produkt leuchtet 6 Stunden lang permanent
und schaltet sich anschließend für 18 Stunden
aus. Das Produkt schaltet sich dann zur vorge-
sehenen Zeit wieder für 6 Stunden ein und
anschließend für 18 Stunden aus.
Hinweis: Die Timer-Taste 8 leuchtet, wenn
die Timer-Funktion aktiv ist.
3 x drücken:
Das Produkt ist ausgeschaltet.
Reinigung und Pflege
STROMSCHLAGGEFAHR!
Ziehen Sie zuerst das Netzteil 4 aus der Steckdose.
STROMSCHLAGGEFAHR!
Aus Gründen der elektrischen Sicherheit darf das
Produkt niemals mit Wasser oder anderen Flüssig-
keiten gereinigt oder gar in Wasser getaucht werden.
Benutzen Sie keine Lösungsmittel, Benzin o. Ä.
Das Produkt würde hierbei Schaden nehmen.
Verwenden Sie zur Reinigung nur ein trockenes,
fusselfreies Tuch.
Bei starker Verschmutzung einfach mit einem
leicht feuchten Tuch zu reinigen.

10 DE/AT/CH
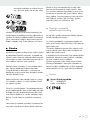
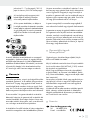
Entsorgung
Die Verpackung besteht aus umweltfreundlichen
Materialien, die Sie über die örtlichen Recycling-
stellen entsorgen können.
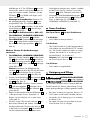
b
a
Beachten Sie die Kennzeichnung der
Verpackungsmaterialien bei der Abfall-
trennung, diese sind gekennzeichnet mit
Abkürzungen (a) und Nummern (b) mit
folgender Bedeutung: 1–7: Kunststoffe/
20–22: Papier und Pappe/80–98: Ver-
bundstoffe.
Möglichkeiten zur Entsorgung des aus-
gedienten Produkts erfahren Sie bei Ih-
rer Gemeinde- oder Stadtverwaltung.
Das Symbol der durchgestrichenen Müll-
tonne bedeutet, dass dieses Gerät am
Ende der Nutzungszeit nicht über den
Haushaltsmüll entsorgt werden darf. Das
Gerät ist bei eingerichteten Sammelstel-
len, Wertstoffhöfen oder Entsorgungsbe-
trieben abzugeben. Zudem sind
Vertreiber von Elektro- und Elektronikge-
räten sowie Vertreiber von Lebensmitteln
zur Rücknahme verpflichtet. LIDL bietet
Ihnen Rückgabemöglichkeiten direkt in
den Filialen und Märkten an. Rückgabe
und Entsorgung sind für Sie kostenfrei.
Beim Kauf eines Neugerätes haben Sie
das Recht, ein entsprechendes Altgerät
unentgeltlich zurückzugeben. Zusätzlich
haben Sie die Möglichkeit, unabhängig
vom Kauf eines Neugerätes, unentgelt-
lich (bis zu drei) Altgeräte abzugeben,
die in keiner Abmessung größer als
25 cm sind. Bitte löschen Sie vor der
Rückgabe alle personenbezogenen Da-
ten. Bitte entnehmen Sie vor der Rück-
gabe Batterien oder Akkumulatoren, die
nicht vom Altgerät umschlossen sind, so-
wie Lampen, die zerstörungsfrei entnom-
men werden können und führen diese
einer separaten Sammlung zu.
Das Produkt inkl. Zubehör und die Verpackungsma-
terialien sind recyclebar und unterliegen einer er-
weiterten Herstellerverantwortung. Entsorgen Sie
diese getrennt, den abgebildeten Info-tri (Sortier-
information) folgend, für eine bessere Abfallbe-
handlung. Das Triman-Logo gilt nur für Frankreich.
Garantie
Das Produkt wurde nach strengen Qualitätsrichtli-
nien hergestellt und vor der Auslieferung sorgfältig
geprüft. Im Falle von Material- oder Herstellungs-
fehlern haben Sie gegenüber dem Verkäufer des
Produkts gesetzliche Rechte. Ihre gesetzlichen
Rechte werden in keiner Weise durch unsere unten
aufgeführte Garantie eingeschränkt.
Die Garantie für dieses Produkt beträgt 3 Jahre ab
Kaufdatum. Die Garantiezeit beginnt mit dem Kauf-
datum. Bewahren Sie den Originalkaufbeleg an ei-
nem sicheren Ort auf, da dieses Dokument als
Nachweis des Kaufs erforderlich ist.
Alle Schäden oder Mängel, die bereits zum Zeit-
punkt des Kaufs vorhanden sind, müssen unverzüg-
lich nach dem Auspacken des Produkts gemeldet
werden.
Sollte das Produkt innerhalb von 3 Jahren ab Kauf-
datum einen Material- oder Herstellungsfehler auf-
weisen, werden wir es – nach unserer Wahl
– kostenlos für Sie reparieren oder ersetzen. Die
Garantiezeit verlängert sich durch einen stattgege-
benen Gewährleistungsanspruch nicht. Dies gilt
auch für ersetzte und reparierte Teile.

11 DE/AT/CH
Diese Garantie erlischt, wenn das Produkt beschä-
digt oder unsachgemäß verwendet oder gewartet
wurde.
Die Garantie deckt Material- und Herstellungsfeh-
ler ab. Diese Garantie erstreckt sich weder auf Pro-
duktteile, die normalem Verschleiß unterliegen, und
somit als Verschleißteile gelten (z. B. Batterien, Ak-
kus, Schläuche, Farbpatronen), noch auf Schäden
an zerbrechlichen Teilen, z. B. Schalter oder Teile
aus Glas.
Abwicklung im Garantiefall
Um eine schnelle Bearbeitung Ihres Anliegens zu
gewährleisten, folgen Sie bitte den folgenden Hin-
weisen:
Bitte halten Sie für alle Anfragen den Kassenbon
und die Artikelnummer (IAN 427645_2301) als
Nachweis für den Kauf bereit.
Die Artikelnummer entnehmen Sie bitte dem Typen-
schild, einer Gravur, auf dem Titelblatt Ihrer Bedie-
nungsanleitung (unten links) oder als Aufkleber auf
der Rück- oder Unterseite des Produkts.
Sollten Funktionsfehler oder sonstige Mängel auf-
treten, kontaktieren Sie zunächst die nachfolgend
benannte Serviceabteilung telefonisch oder per
E-Mail.
Ein als defekt erfasstes Produkt können Sie dann
unter Beifügung des Kaufbelegs (Kassenbon) und
der Angabe, worin der Mangel besteht und wann
er aufgetreten ist, für Sie portofrei an die Ihnen mit-
geteilte Service-Anschrift übersenden.
Service
Service Deutschland
Tel.: 0800 5435 111
E-Mail: [email protected]
Service Österreich
Tel.: 0800 292726
E-Mail: [email protected]
Service Schweiz
Tel.: 0800562153
E-Mail: [email protected]

12 GB/IE
List of pictograms used ........................................................................................................ Page 13
Introduction ................................................................................................................................... Page 13
Proper use ............................................................................................................................................Page 13
Description of parts and features ....................................................................................................... Page 13
Technical data ..................................................................................................................................... Page 13
Included items .....................................................................................................................................Page 14
Safety information .................................................................................................................. Page 14
Installation .....................................................................................................................................Page 15
Timer function .............................................................................................................................. Page 16
Cleaning and care .................................................................................................................... Page 16
Disposal ............................................................................................................................................Page 16
Warranty ......................................................................................................................................... Page 17
Warranty claim procedure ................................................................................................................. Page 17
Service .................................................................................................................................................Page 17

13 GB/IE
List of pictograms used
Direct current/voltage Alternating current/voltage
Protection class II 6 hour timer which automatically
repeats daily
Short-circuit-proof safety isolating
transformer Polarity of output terminal
Independent lamp control gear This icon indicates that the product is
mains operated.
CE mark indicates conformity with
relevant EU directives applicable for
this product. Splashproof
Safety information
Instructions for use For indoor and outdoor use
LED Light Tree
Introduction
We congratulate you on the purchase of your new
product. You have chosen a high quality product.
The instructions for use are part of the product. They
contain important information concerning safety,
use and disposal. Before using the product, please
familiarise yourself with all of the safety information
and instructions for use. Only use the product as
described and for the specified applications. If you
pass the product on to anyone else, please ensure
that you also pass on all the documentation with it.
Proper use
This product is suitable for indoors and outdoor use
as decorative lighting. The product is only intended
for use in private households, and not intended for
commercial use.
Description of parts
and features
1 Ground spike (for HG06586A, HG06586B,
HG06586C)/earth spike (for HG06586D)
2 Fixing screw (for HG06586A, HG06586B,
HG06586C)
3 Stand (for HG06586A, HG06586B,
HG06586C)/mounting plate (for HG06586D)
4 Power adapter
5 Stand pipe
6 10 m lead wire
7 LED tree
8 Timer button
9 Interlock (for HG06586A, HG06586B,
HG06586C)
10 Velcro cable fastening (for HG06586A,
HG06586B, HG06586C)
11 Sticker (for HG06586D)
Technical data
LED tree 7 + Power adapter 4:
Total power consumption: approx. 4.5 W

14 GB/IE
LED tree 7:
Operating voltage: 31 V
LEDs: LEDs x 200
(for HG06586A,
HG06586B,
HG06586C),
LEDs x156
(for HG06586D),
(LEDs are non-replaceable)
Degree of protection: IP44 (splash-proof)
Model No.: HG06586A, HG06586B,
HG06586C,
HG06586D
GS certified.
Power adapter 4:
Operating voltage,
primary: 220–240 V~, 50/60 Hz
Operating voltage,
secondary: 31 V , 3.6 W
Protection class:
Degree of protection: IP44 (splash-proof)
Power adapter (Model no. DS-310DC0360Hs-
IP44) GS certified.
SELV: Safety extra low voltage
Ta: Maximum rated ambient
temperature
Tc:
Rated maximum operating
temperature of the case
of a controlgear
Included items
1 LED tree, including 10 m lead wire (HG06586A,
HG06586B, HG06586D- warm white)
(HG06586C- colorful)
1 Stand pipe
1 Mounting plate (for HG06586D)
1 Stand (for HG06586A, HG06586B,
HG06586C)
1 Ground spike (for HG06586A, HG06586B,
HG06586C)
4 Earth spikes (for HG06586D)
1 Power adapter
1 Fixing screw (for HG06586A, HG06586B,
HG06586C)
5 Spare petals (HG06586A, HG06586C only)
2 Velcro cable fastenings (for HG06586A,
HG06586B, HG06586C)
1 Sticker (for HG06586D)
1 Operating instructions
Safety information
BEFORE USING THE PRODUCT, PLEASE FAMIL-
IARISE YOURSELF WITH ALL OF THE SAFETY
INFORMATION AND INSTRUCTIONS FOR
USE! WHEN PASSING THIS PRODUCT ON TO
OTHERS, PLEASE ALSO INCLUDE ALL THE
DOCUMENTS!
DANGER OF
DEATH AND ACCIDENTS FOR
TODDLERS AND CHILDREN!
Never leave children unsupervised with the
packaging material. The packaging material
represents a danger of suffocation. Children
frequently underestimate the dangers. Please
keep children away from the product at all times.
This product is not a toy. It does not belong in
the hands of children. Children are not able to
appreciate the dangers associated with using
the product.
This product can be used by children aged
from 8 years and above and persons with re-
duced physical, sensory or mental capabilities
or lack of experience and knowledge if they
have been given supervision or instruction con-
cerning use of the product in a safe way and
understand the hazards involved. Children
shall not play with the product. Cleaning and
user maintenance shall not be made by children
without supervision.
Ensure that the product is installed by suitably
experienced or qualified persons only.
CAUTION! RISK OF OVERHEATING! Do
not operate the product inside the packaging.
Do not pull the 10 m lead wire 6 and make
sure it is laid down properly so that no one
walks or trips over it.
The product can be used on all surfaces officially
classified as being of “normal flammability“.
Do not attach any other objects to the product.

15 GB/IE
Avoid the danger of
death from electric shock!
Before use, ensure that the power adapter is
connected to mains voltage (220–240 V∼).
Before connecting the product to the 10 m lead
wire 6 you should always check the product
and the 10 m lead wire 6 for any damage.
Never use the product if you discover that it is
damaged in any way.
This 10 m lead wire 6 of the LED tree 7 is
nonreplaceable. Hence if it becomes damaged
you must dispose of the entire product.
This product does not contain any parts which
can be serviced by the user. The LEDs cannot
be replaced.
Only use the product with the supplied
power adapter 4 for the type (Model No.
DS-310DC0360Hs-IP44); all warranty claims
will otherwise expire.
Never open any of the electrical parts or insert
any kind of object into them.
Protect the 10 m lead wire 6 from sharp edges,
mechanical loads and hot surfaces.
Do not install with sharp fasteners or nails.
Always unplug the power adapter 4 from
the socket before installation, dismantling or
cleaning.
Never touch the power adapter 4 or the
LED tree 7 itself with wet hands.
The product must not be electrically connected
to another set of lights.
If the product is not in use for any length of
time (e.g. holidays), disconnect it from the
power supply.
If you have any questions about the product or
are unsure about any of its aspects, please
seek the advice of an electrical equipment
specialist.
Please note that the power adapter 4 continues
to draw a small amount of power even if the
product is turned off as long as the power
adapter 4 is plugged into a power outlet.
To switch the product off completely, unplug
the power adapter 4 from the socket.
The LEDs are not replaceable.
If the LEDs fail at the end of their lives, the entire
product must be replaced.
The LED driver can only be replaced by a
professional.
Never plug the light chain directly into a
220–240 V~ supply.
WARNING! This product must not be used
without all gaskets being properly installed.
RISK OF EXPLOSION! Do not
use the product in explosive atmospheres where
flammable vapours, gases or dusts are present.
Do not expose the product to any strong
vibrations or heavy mechanical stresses.
Make sure the10 m lead wire 6 is not laid
down in areas where lawn mowers, trimmers,
scissors or similar cutting tools are used.
RISK OF INJURY! Make sure
that, when the LED tree 7 is removed, the
mounting plate 3 and the ground spike 1 are
also removed, so that they do not present any
risk (e.g. risk of stumbed by the mounting plate
and ground spike).
The twigs are made with metal wire, which can
cause scratches or discoloration to delicate sur-
faces.
Installation
Note: Remove all packaging materials from the
product.
Remove the individual parts from the packag-
ing and mount the product according to figures
A–E. The site for the LED tree 7 must be se-
lected in a way that it is erected on a solid,
level and vibration-free base. Anchor the LED
tree 7 firmly to the ground and make sure that
the tree is stable!
Assembly indoor: Place the mounting
plate/stand 3 on the selected site. For
HG06586D, you may use the sticker 11 to
cover the holes for the earth spikes 1 in the
mounting plate 3.
Installation outdoor (see fig. A1):
For HG06586A, HG06586B, HG06586C:
Anchor ground spike 1 to the ground.

16 GB/IE
For HG06586D: Place the mounting plate 3
on the ground then fixed it with earth spikes 1
(see fig. A).
Further steps for both types of installation:
For HG06586A, HG06586B, HG06586C:
Attach stand pipe 5 to the stand 3 or ground
spike 1 and tighten the fixing screw 2 if mount
the stand pipe 5 to the stand 3 (see fig. A1-2).
Hint: Never install the fixing screw 2 though
the hole of stand pipe 5 but only fixed it on
the surface of the stand pipe 5 (see fig. A2).
Press the interlock
9
of stand pipe
5
and attach
LED tree 7 to stand pipe 5 (see fig. B).
For HG06586D: Screw the stand pipe 5
into mounting plate 3 then attach LED tree 7
to stand pipe 5 (see fig. B).
Bend the individual branches of the LED tree 7
to the desired shape (see fig. C). Remind not to
bend all the branches just to one side (see fig. E).
The 10 m lead wire 6 must be unwound before-
hand when first use. Insert the connector of the
10 m lead wire 6 into the socket of the power
adapter 4 and tighten the screw connection,
in order to prevent moisture from penetrating
inside. Pay attention to the sealing ring. Then
plug the power adapter 4 into a socket
(see fig. D).
Use the velcro cable fastenings 10 to secure
the 10 m lead wire 6 along the pipe (for
HG06586A, HG06586B, HG06586C)
(see fig. F).
Timer function
The timer button 8 has three functions:
1 x push of the button:
The product lights up continuously.
2 x push of the button:
The product lights up continuously for 6 hours and
then switches itself off for 18 hours. The product
will then switch on again for 6 hours at the allo-
cated time and then switch off for 18 hours.
Note: The timer button 8 lights up when the
timer function has been activated.
3 x push of the button:
The product is switched off.
Cleaning and care
DANGER OF ELECTRIC
SHOCK! First pull the power adapter 4 out of the
socket.
DANGER OF ELECTRIC
SHOCK! For reasons of electrical safety the
product must never be cleaned with water or other
liquids or immersed in water.
Do not use any solvents, petrol or similar items.
This would damage the product.
Only a dry, lint-free cloth should be used for
cleaning.
Easy to clean for heavy soiling, with a slightly
damp cloth.
Disposal
The packaging is made entirely of recyclable mate-
rials, which you may dispose of at local recycling
facilities.
b
a
Observe the marking of the packaging
materials for waste separation, which
are marked with abbreviations (a) and
numbers (b) with following meaning:
1–7: plastics/20–22: paper and fibre-
board/80–98: composite materials.
Contact your local refuse disposal au-
thority for more details of how to dis-
pose of your worn-out product.
To help protect the environment, please
dispose of the product properly when it
has reached the end of its useful life and
not in the household waste. Information
on collection points and their opening
hours can be obtained from your local
authority.

17 GB/IE
The product incl. accessories and packaging mate-
rials are recyclable and are subject to extended
producer responsibility. Dispose them separately,
following the illustrated Info-tri (sorting information),
for better waste treatment. The Triman logo is valid
in France only.
Warranty
The product has been manufactured to strict quality
guidelines and meticulously examined before deliv-
ery. In the event of material or manufacturing de-
fects you have legal rights against the retailer of
this product. Your legal rights are not limited in any
way by our warranty detailed below.
The warranty for this product is 3 years from the
date of purchase. The warranty period begins on
the date of purchase. Keep the original sales re-
ceipt in a safe location as this document is required
as proof of purchase.
Any damage or defects already present at the time
of purchase must be reported without delay after
unpacking the product.
Should the product show any fault in materials or
manufacture within 3 years from the date of pur-
chase, we will repair or replace it – at our choice
– free of charge to you. The warranty period is not
extended as a result of a claim being granted. This
also applies to replaced and repaired parts.
This warranty becomes void if the product has
been damaged, or used or maintained improperly.
The warranty covers material or manufacturing de-
fects. This warranty does not cover product parts
subject to normal wear and tear, thus considered
consumables (e.g. batteries, rechargeable batter-
ies, tubes, cartridges), nor damage to fragile parts,
e.g. switches or glass parts.
Warranty claim procedure
To ensure quick processing of your case, please
observe the following instructions:
Please have the till receipt and the item number
(IAN 427645_2301) available as proof of purchase.
You will find the item number on the rating plate,
an engraving on the front page of the instructions
for use (bottom left), or as a sticker on the rear or
bottom of the product.
If functional or other defects occur, please contact
the service department listed either by telephone or
by e-mail.
You can return a defective product to us free of
charge to the service address that will be provided
to you. Ensure that you enclose the proof of pur-
chase (till receipt) and information about what the
defect is and when it occurred.
Service
Service Great Britain
Tel.: 08000569216
E-Mail: [email protected]
Service Ireland
Tel.: 1800 200736
E-Mail: [email protected]

18 FR/BE
Légende des pictogrammes utilisés .......................................................................... Page 19
Introduction ................................................................................................................................... Page 19
Utilisation conforme ............................................................................................................................Page 19
Descriptif des pièces ...........................................................................................................................Page 19
Caractéristiques techniques ................................................................................................................Page 19
Contenu de la livraison .......................................................................................................................Page 20
Consignes de sécurité ...........................................................................................................Page 20
Montage ...........................................................................................................................................Page 21
Fonction minuterie ................................................................................................................... Page 22
Nettoyage et entretien ........................................................................................................ Page 22
Mise au rebut ............................................................................................................................... Page 23
Garantie ........................................................................................................................................... Page 23
Faire valoir sa garantie .......................................................................................................................Page 24
Service après-vente .............................................................................................................................Page 24

19 FR/BE
Légende des pictogrammes utilisés
Courant continu / Tension continue Courant alternatif / Tension alternative
Classe de protection II Minuteur de 6 heures à répétition
automatique au rythme journalier
Transformateur de sécurité
anti court-circuit Polarité du pôle de sortie
Appareil au fonctionnement
autonome
Ce symbole indique que le produit
doit être branché sur le réseau
secteur.
Le sigle CE confirme la conformité
avec les directives UE applicables au
produit. Protégé contre les projections d'eau
Instructions de sécurité
Instructions de manipulation Adapté à un usage en intérieur
comme en extérieur.
Arbre lumineux à LED
Introduction
Nous vous félicitons pour l‘achat de votre nouveau
produit. Vous avez opté pour un produit de grande
qualité. Le mode d‘emploi fait partie intégrante de
ce produit. Il contient des indications importantes
pour la sécurité, l’utilisation et la mise au rebut.
Veuillez lire consciencieusement toutes les indica-
tions d‘utilisation et de sécurité du produit. Ce pro-
duit doit uniquement être utilisé conformément aux
instructions et dans les domaines d‘application spé-
cifiés. Lors d‘une cession à tiers, veuillez également
remettre tous les documents.
Utilisation conforme
Ce produit est conçu pour apporter une décoration
lumineuse en espace extérieur et intérieur. Le pro-
duit est uniquement destiné à une utilisation dans
les ménages privés et non à un usage commercial.
Descriptif des pièces
1 Piquet de terre (pour HG06586A,
HG06586B, HG06586C) / Piquet de fixation
(pour HG06586D)
2 Vis de fixation (pour HG06586A,
HG06586B, HG06586C)
3 Pied (pour HG06586A, HG06586B,
HG06586C) / Plaque de montage (pour
HG06586D)
4 Bloc d’alimentation
5 Tube vertical
6 Cordon d’alimentation de 10 m
7 Arbre à LED
8 Touche minuterie
9 Dispositif de blocage (pour HG06586A,
HG06586B, HG06586C)
10 Fixation de câbles autoagrippante (pour
HG06586A, HG06586B, HG06586C)
11 Autocollant (pour HG06586D)
Caractéristiques techniques
Arbre à LED 7 + bloc d‘alimentation 4:
Consommation
d‘énergie: env. 4,5 W

20 FR/BE
Arbre à LED 7:
Tension de service: 31 V
LED: 200 LED (pour HG06586A,
HG06586B, HG06586C),
156 LED (pour HG06586D),
(les LED ne peuvent pas être
remplacées)
Indice de protection: IP44 (protégé contre les
projections d‘eau)
Modèle n° : HG06586A, HG06586B,
HG06586C, HG06586D
certifié GS.
Bloc d‘alimentation 4:
Tension de service
primaire: 220 – 240 V ∼, 50/60 Hz
Tension de service
secondaire: 31V , 3,6 W
Classe de protection:
Indice de protection: IP44 (protégé contre les
projections d‘eau)
Bloc d‘alimentation (modèle n°:
DS-310DC0360Hs-IP44) Certifié GS.
SELV: Très basse tension de protec-
tion (Safety extra low vol-
tage)
Ta: Température ambiante
maximale
Tc: Température du boîtier
au point indiqué
Contenu de la livraison
1 arbre à LED, cordon d‘alimentation de 10 m inclus
(HG06586A, HG06586B, HG06586D - blanc
chaud) (HG06586C - multicolore)
1 tube vertical
1 plaque de montage (pour HG06586D)
1 pied (pour HG06586A, HG06586B, HG06586C)
1 piquet de terre (pour HG06586A, HG06586B,
HG06586C)
4 piquets de fixation (pour HG06586D)
1 bloc d’alimentation
1 vis de fixation (pour HG06586A, HG06586B,
HG06586C)
5 fleurs de rechange (uniquement pour HG06586A,
HG06586C)
2 fixations de câbles autoagrippantes (pour
HG06586A, HG06586B, HG06586C)
1 autocollant (pour HG06586D)
1 mode d’emploi
Consignes de sécurité
AVANT D’UTILISER LE PRODUIT, VEUILLEZ
PRENDRE CONNAISSANCE DE TOUTES LES
INSTRUCTIONS D’UTILISATION ET DE SÉCURITÉ.
SI VOUS REMETTEZ LE PRODUIT À UN TIERS,
VEUILLEZ ÉGALEMENT LUI TRANSMETTRE
TOUS LES DOCUMENTS S’Y RAPPORTANT !
DAN-
GER DE MORT ET RISQUE DE
BLESSURES POUR LES ENFANTS
EN BAS ÂGE ET LES ENFANTS ! Ne jamais
laisser les enfants manipuler le matériel d‘em-
ballage sans surveillance. L‘emballage présente
un risque d‘étouffement. Les enfants sous-estiment
souvent les dangers. Toujours tenir le produit à
l‘écart des enfants.
Ce produit n‘est pas un jouet, il doit être tenu
hors de la portée des enfants. Les enfants ne
sont pas conscients des dangers liés à la mani-
pulation de ce produit.
Le produit peut être utilisé par des enfants âgés
de 8 ans et plus ainsi que par des personnes
ayant des capacités physiques, sensorielles ou
mentales réduites ou manquant d‘expérience
ou de connaissances, s‘ils sont surveillés ou s‘ils
ont été informés de l‘utilisation sûre du produit
et comprennent les risques liés à son utilisation.
Les enfants ne doivent pas jouer avec le produit.
Le nettoyage et l‘entretien du produit ne doivent
pas être effectués par des enfants laissés sans
surveillance.
Veillez à ce que le produit soit uniquement
monté par des personnes compétentes.
ATTENTION! RISQUE DE SURCHAUFFE !
Ne pas faire fonctionner le produit dans son
emballage.
Ne tirez pas sur le cordon d‘alimentation de
10 m 6 et assurez-vous que celui-ci soit posé
de manière à ce que personne ne puisse mar-
cher ou trébucher dessus.
La page est en cours de chargement...
La page est en cours de chargement...
La page est en cours de chargement...
La page est en cours de chargement...
La page est en cours de chargement...
La page est en cours de chargement...
La page est en cours de chargement...
La page est en cours de chargement...
La page est en cours de chargement...
La page est en cours de chargement...
La page est en cours de chargement...
La page est en cours de chargement...
La page est en cours de chargement...
La page est en cours de chargement...
La page est en cours de chargement...
La page est en cours de chargement...
La page est en cours de chargement...
La page est en cours de chargement...
La page est en cours de chargement...
La page est en cours de chargement...
La page est en cours de chargement...
La page est en cours de chargement...
La page est en cours de chargement...
La page est en cours de chargement...
La page est en cours de chargement...
La page est en cours de chargement...
La page est en cours de chargement...
La page est en cours de chargement...
La page est en cours de chargement...
La page est en cours de chargement...
La page est en cours de chargement...
La page est en cours de chargement...
La page est en cours de chargement...
La page est en cours de chargement...
La page est en cours de chargement...
La page est en cours de chargement...
La page est en cours de chargement...
La page est en cours de chargement...
La page est en cours de chargement...
La page est en cours de chargement...
La page est en cours de chargement...
La page est en cours de chargement...
La page est en cours de chargement...
La page est en cours de chargement...
La page est en cours de chargement...
La page est en cours de chargement...
La page est en cours de chargement...
La page est en cours de chargement...
La page est en cours de chargement...
La page est en cours de chargement...
La page est en cours de chargement...
La page est en cours de chargement...
La page est en cours de chargement...
La page est en cours de chargement...
La page est en cours de chargement...
La page est en cours de chargement...
La page est en cours de chargement...
La page est en cours de chargement...
-
 1
1
-
 2
2
-
 3
3
-
 4
4
-
 5
5
-
 6
6
-
 7
7
-
 8
8
-
 9
9
-
 10
10
-
 11
11
-
 12
12
-
 13
13
-
 14
14
-
 15
15
-
 16
16
-
 17
17
-
 18
18
-
 19
19
-
 20
20
-
 21
21
-
 22
22
-
 23
23
-
 24
24
-
 25
25
-
 26
26
-
 27
27
-
 28
28
-
 29
29
-
 30
30
-
 31
31
-
 32
32
-
 33
33
-
 34
34
-
 35
35
-
 36
36
-
 37
37
-
 38
38
-
 39
39
-
 40
40
-
 41
41
-
 42
42
-
 43
43
-
 44
44
-
 45
45
-
 46
46
-
 47
47
-
 48
48
-
 49
49
-
 50
50
-
 51
51
-
 52
52
-
 53
53
-
 54
54
-
 55
55
-
 56
56
-
 57
57
-
 58
58
-
 59
59
-
 60
60
-
 61
61
-
 62
62
-
 63
63
-
 64
64
-
 65
65
-
 66
66
-
 67
67
-
 68
68
-
 69
69
-
 70
70
-
 71
71
-
 72
72
-
 73
73
-
 74
74
-
 75
75
-
 76
76
-
 77
77
-
 78
78


LIVARNO 427645 Le manuel du propriétaire
- Taper
- Le manuel du propriétaire
dans d''autres langues
- italiano: LIVARNO 427645 Manuale del proprietario
- español: LIVARNO 427645 El manual del propietario
- Deutsch: LIVARNO 427645 Bedienungsanleitung
- Nederlands: LIVARNO 427645 de handleiding
- slovenčina: LIVARNO 427645 Návod na obsluhu
- dansk: LIVARNO 427645 Brugervejledning
- polski: LIVARNO 427645 Instrukcja obsługi
Documents connexes
-
LIVARNO 380905 Le manuel du propriétaire
-
-
-
-
-
-
-
-
-