
Fireplace Assembly Instructions
Model # 730
Meridian Wall Hanging Fireplace
730-Meridian-SS-071012
Lot:_________
PO:_________

Warnings 3
Parts Included 4
Installation
Mounting Bracket 5
Mounting the Fireplace 6
Installing the Glass and Ventless Fuel Firebox 7
Filling the trough 8
Lighting and extinguishing the fire 9
Care and Cleaning 10
Warranty Information 11
Contents
2
Thank you for purchasing a Real Flame Fireplace.
Prior to installing or using your Real Flame® Fireplace please be sure to read all of the information
contained in this installation, operation and maintenance manual very carefully. This manual will
detail exactly how the Ventless Fuel Firebox and replace are intended to be used safely.
Failure to follow these instructions could result in property damage, bodily injury or death.
Children and pets should be kept under close supervision and a safe distance away when the Real
Flame® replace is in operation.
Building codes may require extra steps be taken to install your replace in a condo, apartment or
townhouse. Please check with local codes to make sure that every precaution is taken.
TERMS OF USE

3
WARNINGS
!!
If you have questions please call customer service at: 1-800-654-1704
Read all instructions included with
ventless fireplace fuel and fireplace
NOTICE: Buyer assumes all responsibility for safety and use that is not
in compliance with these instructions and warnings.
1. Read entire label and instructions before using ventless fireplace fuel.
2. Do not place fireplace in an area with lots of trac, such as a hallway or entryway.
3. Make sure fireplace is mounted correctly according to the instructions in this manual.
Failure to mount the bracket to a stud could cause the unit to detach from wall resulting in
serious injury, property damage or death.
4. Never burn trash, paper, or wood in the fireplace. Burn only Real Flame® ventless fireplace
fuel in the fireplace.
5. Keep away from children and pets. Unit is not to be operated by children.
6. Do not lean over the unit when lighting.
7. Never burn ventless fireplace fuel outside the designated burn area.
8. Do not burn more than the specified amount of ventless fireplace fuel at any time.
Overfilling may cause fuel to spread outside the designated burn area and could result in
property damage or serious injury if ignited.
9. Never leave a burning fire unattended.
10. Never move or touch unit during or immediately after burning ventless fireplace fuel. Unit
and glass will be extremely HOT. Allow surfaces to cool for 20 minutes before touching.
11. Do not wear flammable or loose clothing when operating the fireplace.
12. Never alter the unit in any manner.
13. Exercise the same precautions as you would with any open fire.
14. DEATH, SERIOUS INJURY OR PROPERTY DAMAGE may result if these warnings are not
followed correctly.
Do not attempt to add ventless fireplace fuel to a fire that is already burning.
Use only Real Flame® ventless fireplace fuel in unit. Do not use with any other
fireplace fuel or flammable material.
Do not store or use gasoline or other flammable materials, including ventless
fireplace fuel, near this product. Vapors from these types of items may collect and
increase the risk of fire, explosion or injury.
In case of an emergency use a CO2 extinguisher or baking soda to extinguish the fire.
RF wall hanging fireplace WARNINGS 030812
-
-
-
-
Using your
Fireplace
Before using unit, be sure you have read and understood the
step-by-step instructions.
After several burns, soot may develop on the inside of the glass.
Clean with a damp soapy rag or any household glass cleaner.
During the initial burn you may experience a slight odor. Odor is
temporary and will be absent on following burns.
Real Flame® Ventless Fireplace Fuel Contains Isopropyl Alcohol
Avoid contact with eyes, mucous membranes or prolonged
contact with skin. May irritate eyes. Store in a cool, dry place. Keep
away from flame, heat or items that spark. Use in well-ventilated
areas. Keep out of reach of children and pets. In case of fire, use a
CO2 fire extinguisher or baking soda.
VENTLESS
FIREPLACE
FUEL
If fuel gets in eyes, flush with water for 15 minutes; get medical
attention. If ingested, do not induce vomiting; call poison control
center or a doctor.
FIRST AID
-
-
-
RISK OF EXPLOSION

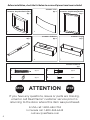
Before installation, check the list below to ensure all pieces have been included
4
ATTENTION
If you have any questions, issues or parts are missing,
email or call Real Flame® customer service prior to
returning to the store where this item was purchased.
STOPSTOP
In USA call: 1-800-654-1704
In Canada call: 1-800-363-6443
custserv@realflame.com
5
1
2
3
6
7
07301401 : Cream Meridian Fireplace
07303101 : Gray Meridian Fireplace
Qty: 1
07300002 - Glass
Qty: 1
07301403 - Cream Mounting Bracket
07303103 - Gray Mounting Bracket
Qty: 1
01282402 - Scraper
Qty: 1
01282401 - Eco Burner
Qty: 1
01282403 - Trough
Qty: 1
Qty: 14
Qty: 14
Qty: 14
A
B
C
Qty: 4
D
07300008- Hardware Kit
Qty: 1

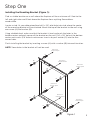
Step One
5
Figure 1
Installing the Mounting Bracket (Figure 1):
Find a suitable location on a wall where the fireplace will be a minimum of 2 feet to the
left and right sides and 2 feet above the fireplace from anything flammable or
combustible.
Locate a stud. At your determined level drill a 1/8” pilot hole into stud where the center
of the mounting bracket will be attached. Mount the top of the bracket to the wall using
one screw (A) and washer (B).
Using a bubble level, make sure that the bracket is level and mark the holes in the
bottom center and each corner of the bracket on the wall. Drill a 1/8” hole at the bottom
center mark and a 3/8“ hole at each corner. Insert a drywall anchor (C) into the four
corner holes.
Finish installing the bracket by inserting a screw (A) with a washer (B) into each location.
NOTE: Some holes in the bracket will not be used.
Drill 1/8” hole
Install into wall stud
Drill 3/8” hole
Install into drywall
A
B
C
A
B
C
A
B
C
A
B
C
A
B
A
B
Drill 1/8” hole
Install into wall stud
Drill 3/8” hole
Install into drywall
Drill 3/8” hole
Install into drywall
Drill 3/8” hole
Install into drywall

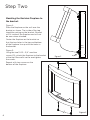
Step Two
Mounting the Envision Fireplace to
the bracket:
Figure 2:
Place the fireplace on the wall over the
bracket as shown. The inside of the top
should be resting on the bracket. Bracket
will fit inside of the fireplace and will not
be seen when attached.
Center the fireplace on the bracket so
that the two holes in the top and bottom
of the fireplace line up with the holes in
the bracket.
Figure 3:
Using the two 10-32 - 3/4” machine
screws (D), attach the fireplace to the bracket
at the top. Be careful not to overtighten
the screws.
Repeat with two screws on the
bottom of the fireplace.
6
Wall
Stud
Drywall
Figure 2
Figure 3
D
D

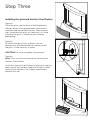
Installing the glass and Ventless Fuel Firebox:
Figure 4:
Place the glass into the front of the fireplace by
sliding it down in the gap between the stainless
steel part and the painted section. There are two
clips inside that the glass will need to sit in. Make
sure that the glass is seated correctly before
proceeding.
Figure 5:
To secure the glass firmly in place, turn the
thumbscrew attached to the clip clockwise until
the glass is held vertically in place.
CAUTION: Do not overtighten thumbscrews.
Figure 6:
Note: Glass must be secure prior to installing the
Ventless Fuel Firebox.
Install the Ventless Fuel Firebox by placing it into the
open area of the Meridian fireplace. When installed-
correctly the Ventless Fuel Firebox should open
towards the user.
Step Three
7
Glass
Figure 5
Thumbscrew
Figure 6
Figure 4

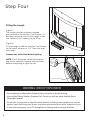
Step Four
Filling the trough
Figure 7
The trough should have been shipped
pre-installed in the Ventless Fuel Firebox. If it
has been removed, reinstall the trough inside
the Ventless Fuel Firebox prior to filling.
NOTE: Finish filling the trough and replace
cap on the ventless fireplace fuel container
before attempting to light the unit.
Figure 8
Fill the trough inside the Ventless Fuel Firebox
to the top of the post or 3/4” from the lip of
the trough.
Cleanup any spilled fuel before lighting.
8
WARNING: RISK OF EXPLOSION
• Do not attempt to add ventless fireplace fuel to a fire that is already burning.
• Use only Real Flame® Ventless Fireplace Fuel. Do not use with any other fireplace fuel or
flammable material.
• Do not store or use gasoline or other flammable materials, including ventless fireplace fuel, near this
product. Vapors from these types of items may collect and increase the risk of fire, explosion or injury.
• In case of an emergency use a CO2 extinguisher or baking soda to extinguish the fire.
Figure 7
6
Real Flame®
Ventless
Fireplace
Fuel
Do not ll past top of post
Figure 8

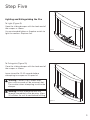
Step Five
Lighting and Extinguishing the Fire
To Light (Figure 9)
Open the sliding damper with the hook end of
the scraper as shown.
Use an extended lighter or fireplace match to
light the ventless fireplace fuel.
To Extinguish (Figure 10)
Close the sliding damper with the hook end of
the scraper as shown.
Leave closed for 10-20 seconds before
attempting to re-open or lift open lid.
Warning: Do not attempt to refill the
through immediately after burning. Allow
20 minutes for unit to cool before refilling.
9
Warning: Ventless Fuel Firebox insert,
glass and surround will be extremely hot.
Use caution when attempting to close the
damper.
!
!
Figure 9
Figure 10

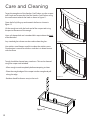
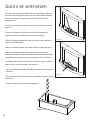
Trough should be cleaned every two burns. This can be cleaned
using the scraper tool included.
- Allow trough to cool completely before attempting to clean.
- Place the straight edge of the scraper into the trough and pull
along the edge.
- Residue should be thrown away in the trash.
To get the trough out of the Ventless Fuel Firebox, use the scraper
tool’s hook end to open the lid of the Ventless Fuel Firebox using
Open the lid by lifting up and towards the front as shown in
Lift the trough out with the hook end of the scraper tool using
the post in the center of the trough.
Use a soft damp cloth and a standard dish soap to clean the body
of the Meridian.
Any standard glass cleaner can be used to clean the glass.
Use stainless steel cleaner or polish to clean the stainless parts.
Discoloration is normal for stainless steel that is in direct contact
with the ame.
Care and Cleaning
Figure 13
10
gure 12.
the small cutout towards the back as shown in gure 11.
Figure 11
Figure 12

11
Customer Service: 1-800-654-1704 in USA
Service à la clientèle: 1-800-363-6443 in Canada
custserv@realflame.com
Warranty & Return Policies
Real Flame®
7800 Northwestern Ave.
Racine, WI 53403
Warranty
Jensen Metal Products, Inc., doing business as Real Flame®, warrants Real Flame vent-less
fireplaces and accessories to be free from defects in parts and workmanship under normal use and
service for a period of 90 days from the date of purchase. In the event of such defects Real Flame
will, at its option, replace the defective product or refund the purchase price. The foregoing is the
exclusive remedy and Real Flame disclaims all other warranties, including any implied warranty of
merchantability or fitness for a particular purpose. In addition, Real Flame will not be responsible
for consequential damages in excess of the purchase price of the product on which such liability is
based. Electric fireplaces carry a one-year warranty on the electric firebox only.
Return Policy
You may return your purchase within 90 days of receipt. No refunds will be issued for incomplete
or unauthorized returns. All returned products must be 100% complete, adequately packaged in
original packaging and in resalable condition. Products that have been assembled or modified will
not be eligible for return. All items must be returned in their entirety, meaning all items included
must be returned together. No returns or exchanges on discontinued items. Please begin the return
process by contacting the store or company where you bought your Real Flame item.
Replacement Parts
In the event that an item has been lost or damaged either by the manufacturer or in shipping you
may request a replacement. Replacement parts are not available for all units and only given at Real
Flame’s discretion. We will assess any damage and find a solution, which could include ordering
and shipping a replacement to you. No replacements are available for discontinued items or
repackaged (open box) products. Please call Real Flame Customer Service at 800-654-1704 for
replacement parts before returning the damaged item. Please have the following information,
which can be found in your instruction manual, ready before you call Customer Service.
• Model Number of Item
• 4-8 digit Part Number
• Lot Code Number
• Shipping Address
• A picture of the damaged item may be requested. Pictures should be
sent to custserv@realflame.com
Incorrect Order Received
If you received something other than you ordered, please contact Real Flame Customer Service at
800-654-1704 within 48 hours of receiving the item.
Please refer to www.Realflame.com for our complete return guidelines and policies.

Lot:_________
PO:_________
Instructions d'assemblage Cheminée
Modèle Nº
730
Foyer mural Meridian
705-Meridian-SS-081412

Avertissements 3
Pièces incluses 4
Installation
Supports de montage 5
Montage du foyer 6
Installation de la vitre et boîte à feu sans ventilation 7
Remplissage du récipient 8
Allumage et extinction du feu 9
Soins et nettoyage 10
Informations sur la garantie 11
Table des matières
2
Merci pour votre achat de ce foyer Real Flame.
Avant d’installer ou d’utiliser votre foyer Real Flame®, s’assurer de lire toutes les informations
contenues dans ce manuel d’installation, d’opération et d’entretien. Ce manuel indiquera en détail
la façon sécuritaire d’utiliser le foyer et son récipient/brûleur.
La négligence à suivre scrupuleusement ces instructions peut occasionner des blessures
sérieuses, des dommages à la propriété et même la mort.
Les enfants et les animaux domestiques doivent être gardés sous surveillance étroite et à une
distance sécuritaire lorsque le foyer Real Flame est en utilisation.
Votre code du bâtiment fédéral, provincial ou local peut exiger des mesures supplémentaires
pour l’installation de votre foyer dans un condo, un bloc appartement ou une maison de ville.
Vérier le code local pour s’assurer que l’installation soit conforme et que toutes les précautions
soit prises.
Termes d’utilisation

3
Mises en garde
!
Pour toute question, contactez notre service à la clientèle au 1-800-654-1704.
Lire toutes les instructions fournies avec le foyer et de combustible pour foyers sans ventilation
Avis : Le client assume l’entière responsabilité de sa sécurité
si le produit n’est pas utilisé selon les recommandations et les instructions du fabricant.
1. Lire toutes les informations contenues sur l’étiquette et toutes les instructions avant d’utiliser de combustible
pour foyers sans ventilation.
2. Ne pas placer le foyer dans un endroit très passant comme un corridor ou une entrée.
3. Vous assurer que le foyer est assemblé correctement et selon les instructions contenues dans le manuel. La
négligence à fixer les supports sur des montants peut faire en sorte que l’ensemble se détache du mur et peut
occasionner des blessures sérieuses, des dommages à la propriété et même la mort.
4. Ne jamais brûler de déchets, de papier ou de bois dans le foyer. Ne brûler que de Real Flame® combustible pour foyers
sans ventilation.
5. Tenir à l'écart des enfants et des animaux de compagnie. Unité ne doit pas être utilisé par des enfants.
6. Ne pas vous pencher au-dessus de la unité lors de l’allumage.
7. Ne pas brûler le combustible pour foyers sans ventilation en dehors de l’endroit désigné.
8. Ne pas brûler plus de combustible pour foyers sans ventilation que la quantité prescrite. Un remplissage abusif peut
occasionner des éclaboussures en dehors du lieu de combustion et peut causer des dommages à la propriété ou des
blessures sérieuses.
9. Ne jamais laisser cette unite sans surveillance lors de son usage.
10. Ne jamais toucher le verre ou les surfaces de métal durant ou immédiatement après la combustion du combustible pour
foyers sans ventilation. Les composantes peuvent être extrêmement CHAUDES. Laisser les surfaces refroidir durant 20
minutes avant de manipuler.
11. Ne pas porter de vêtements amples ou inflammables lors de l’utilisation du produit.
12. Ne jamais modifier ou démonter le unité de quelque façon que ce soit.
13. Faire montre des mêmes précautions que s’il s’agissait d’un feu à ciel ouvert.
14. La négligence à suivre scrupuleusement ces instructions peut occasionner des blessures sérieuses, des dommages à
la propriété et même la mort.
Risque d’explosion
Ne jamais ajouter de combustible pour foyers sans ventilation ou tout autre combustible sur le feu.
Utilisez uniquement du Real Flame® combustible pour foyers sans ventilation dans cette unité. Ne jamais utiliser
d’autres types de combustible ou d’autres matières inflammables.
Ne pas entreposer ou utiliser d’essence et toute autre matière inflammable, incluant de combustible pour foyers sans
ventilation, près de ce produit. Les vapeurs de ces produits peuvent s’accumuler et accroître le risque d’incendie,
d’explosion ou de blessure.
En cas d’urgence, utiliser un extincteur à neige carbonique ou du bicarbonate de soude pour éteindre le feu.
RF wall hanging fireplace WARNINGS 070912
-
-
-
-
Utilisation de
votre foyer
L’ensemble est conçu pour une utilisation intérieure ou extérieure.
Avant l’utilisation, vous assurer d’avoir lu et compris toutes les étapes des
instructions.
Après quelques utilisations, de la suie peut s’accumuler sur la paroi intérieure du
verre. Nettoyer avec un linge et une eau savonneuse ou tout autre nettoyant pour
verre.
Lors de l’utilisation initiale, vous pouvez percevoir une légère odeur. Cette odeur
est temporaire et disparaîtra lors des usages subséquents.
Real Flame
®
combustible pour foyers sans ventilation contient de l’alcool isopropylique. Éviter le
contact avec les yeux, les muqueuses ou un contact prolongé avec la peau. Peut irriter les yeux.
Entreposer dans un endroit frais et sec. Garder éloigné des flammes, des sources de chaleur ou
d’éléments pouvant provoquer des étincelles. Utiliser dans un endroit bien aéré. Garder hors de la
portée des enfants et des animaux domestiques. En cas d’incendie, utiliser un extincteur à neige
carbonique ou du bicarbonate de soude.
Combustible
pour foyers sans
vnetilation
Si du combustible touche les yeux, laver dans l’eau durant une période de 15 minutes. Contacter un
médecin. En cas d’ingestion, ne pas faire vomir et appeler le centre antipoison ou un médecin.
Premiers soins
-
-
-
-

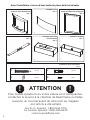
Avant l’installation, s’assurer d’avoir toutes les pièces de la liste suivante
4
ATTENTION
! !
Pour toutes questions ou si des pièces sont manquantes,
contactez le service à la clientèle de Real Flame ou faites
parvenir un courriel avant de retourner au magasin
où l’article a été acheté.
Aux É.-U., appelez : 1-800-654-1704
Au Canada, appelez: 1-800-363-6443
custserv@realflame.com
1
2
3
5
6
7
07301401: Foyer Meridian Crème
07303101: Foyer Meridian Gris
Qté : 1
07300002: Verre
Qté : 1
07301403 : Support de montage Crème
07303103 : Support de montage Gris
Qté : 1
01282402 : Grattoir
Qté : 1
01282401 :
boîte à feu
sans ventilation
Qté : 1
01282403 : Récipient
Qté : 1
Qté : 14
Qté : 14
Qté : 14
A
B
C
Qté : 4
D
07300008: Ensemble de quincaillerie
Qté : 1

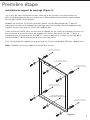
Figure 1
Première étape
5
Installation du support de montage (Figure 1):
rer le mur où vous souhaitez installer votre foyer en allouant un minimum de 2 pi
(61 cm) de dégagement de tous matériaux inflammables et de matières combustibles,
et cela dans toutes les directions.
Repérer un montant. Au niveau souhaité, percer un trou de guidage de ⅛" dans le
montant où le centre du support de montage sera fixé. Installer la partie supérieure du
support au mur avec une vis (A) et une rondelle (B).
Avec un niveau à bulle, vous assurer que le support est au niveau et marquer les trous au
bas au centre et à tous les coins du support sur le mur. Percer un trou de ⅛" dans la
marque du bas au centre et un trou de ⅜" à chacun des coins. Insérer un ancrage pour
cloison sèche (C) dans chacun des quatre trous des coins.
Finir l’installation du support en insérant une vis (A) et une rondelle (B) dans chaque trou.
Note : Quelques trous du support ne seront pas utilisés.
Percer un trou de 1/8"
Installer dans le montant mural
Percer un trou de 3/8"
Installer dans la cloison sèche
A
B
C
A
B
C
A
B
C
A
B
C
A
B
A
B
Percer un trou de 1/8"
Installer dans le montant mural
Percer un trou de 3/8"
Installer dans la cloison sèche
Percer un trou de 3/8"
Installer dans la cloison sèche
Percer un trou de 3/8"
Installer dans la cloison sèche

Figure 2
Figure 3
D
D
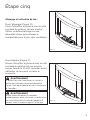
Étape deux
Montage du foyer Envision sur le
support :
Figure 3 :
Placer le foyer sur le mur et sur le support, tel
que montré. L’intérieur du dessus du foyer
devrait reposer sur le support. Centrer le foyer
sur le support pour que les deux trous du haut
du foyer s’alignent avec ceux du support.
Figure 4 :
À l’aide des deux vis de mécanique 10-32 –
¾ po, fixer le foyer au support. Attention de
ne pas trop serrer les vis.
6
Montant
mural
Cloison sèche

Figure 5
Figure 6
Figure 4
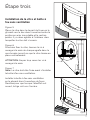
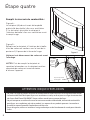
Installation de la vitre et boîte à
feu sans ventilation
Figure 5
Placer la vitre dans le devant du foyer en le
glissant vers le bas dans l’ouverture entre la
portion en acier inoxydable et la section
peinte. Il y a deux agrafes à l’intérieur dans
lesquelles la vitre doit s’asseoir.
Figure 6
Pour bien fixer la vitre, tourner la vis à
serrage à la main de chaque agrafe dans le
sens horaire jusqu’à ce que la vitre tienne en
place verticalement.
ATTENTION: Ne pas trop serrer les vis à
serrage à la main.
Figure 7
Note: La vitre doit être fixée avant d’installer
le boîte à feu sans ventilation.
Installer le boîte à feu sans ventilation
en le plaçant dans l’ouverture du foyer
Meridian pour que lorsque l’étouoir est
ouvert, la tige soit vers l’arrière.
Étape trois
7
Verre
vis à oreilles

6
Figure 8
• Le combustible Real Flame pour foyer sans ventilation est conçu et testé pour un usage sécuritaire dans
des foyers Real Flame SEULEMENT. Ne pas utiliser avec d’autres marques de foyer.
Real Flame®
Combustible
Pour Foyers
Sans
Ventilation
Figure 8
Étape quatre
Remplir le réservoir de combustible :
Figure 8 :
Le récipient (6) devrait avoir été expédié
préinstallé dans boîte à feu sans ventilation.
S’il a été retiré, réinstaller le récipient à
l’intérieur de boîte à feu sans ventilation avant
le remplissage.
Figure 9 :
Remplissez le récipient à l'intérieur de la boîte
à feu de carburant ventless vers le haut de la
poste ou 3/4 pouce de la lèvre de l'auge.
Nettoyer tout déversement de carburant avant
l'allumage.
NOTER: Finir de remplir le récipient et
remettez le bouchon sur le récipient ventless
cheminée de carburant avant de tenter
d'allumer l'appareil.
8
Ne pas remplir au-delà
de la languette
ATTENTION: RISQUE D'EXPLOSION
• Ne jamais essayer de remplir réservoir de combustible lorsque le foyer est en usage ou encore chaud.
• Ne pas entreposer ou utiliser d’essence et toute autre matière inammable, incluant de combustible
pour foyers sans ventilation, près de ce produit. Les vapeurs de ces produits peuvent s’accumuler et
accroître le risque d’incendie, d’explosion ou de blessure.
• En cas d’urgence, utiliser un extincteur à neige carbonique ou du bicarbonate de soude pour éteindre
le feu.

Figure 9
Figure 10
Étape cinq
Allumage et extinction du feu :
Pour l’allumage (Figure 10) :
Ouvrir l’étouoir à glissière avec le côté
crocheté du grattoir, tel que montré.
Utiliser un briquet allongé ou une
allumette à foyer pour allumer le
combustible pour foyers sans ventilation.
Pour éteindre (Figure 11) :
Fermer l’étouoir à glissière avec le côté
crocheté du grattoir,tel que montré.
Laisser fermé de 10 à 20 secondes avant
d’attenter de le rouvrir ou lever le
couvercle
.
Avertissement
Le boîte à feu sans ventilation, la vitre et la
section environnante seront extrêmement
chauds. User de prudence lors de la fermeture
de l’étouoir.
Avertissement
Ne pas tenter de remplir le récipient
immédiatement après utilisation. Le boîte à feu
sans ventilation devrait refroidir pendant 15
minutes avant le remplissage ou l’allumage.
9
!
!
La page est en cours de chargement...
La page est en cours de chargement...
-
 1
1
-
 2
2
-
 3
3
-
 4
4
-
 5
5
-
 6
6
-
 7
7
-
 8
8
-
 9
9
-
 10
10
-
 11
11
-
 12
12
-
 13
13
-
 14
14
-
 15
15
-
 16
16
-
 17
17
-
 18
18
-
 19
19
-
 20
20
-
 21
21
-
 22
22


RealFlame 730-CS Le manuel du propriétaire
- Taper
- Le manuel du propriétaire
dans d''autres langues
- English: RealFlame 730-CS Owner's manual
Documents connexes
Autres documents
-
Real Flame 710 Le manuel du propriétaire
-
-
-
-
-
-
-