Ninja CF087 Manuel utilisateur
- Catégorie
- Cafetières
- Taper
- Manuel utilisateur

ninjakitchen.com
1-877-646-5288
CF087
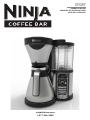
OWNER’S GUIDE
MANUEL DU PROPRIÉTAIRE
GUÍA DEL USUARIO

1
1-877-646-5288
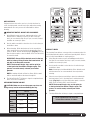
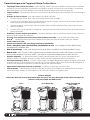
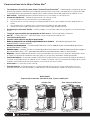
THIS BOOK COVERS MODEL NUMBER:
CF087
TECHNICAL SPECIFICATIONS
Voltage: 120V~, 60Hz.
Power: 1400 Watts
Water Reservoir
Capacity: 43 Ounces
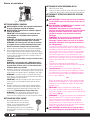
READ ALL INSTRUCTIONS BEFORE USING
YOUR NINJA COFFEE BAR
®
.
Safety Signal Words
This manual and the safety labels attached to this
appliance utilize signal words that signify safety
hazards with different levels of severity.
Below are the words used and the definitions for
these words:
• WARNING indicates a hazardous situation
which, if not avoided, could result in death or
serious injury.
• CAUTION indicates a hazardous situation
which, if not avoided, could result in minor or
moderate injury.
• NOTICE is used to address practices not
related to physical injury.
The words “WARNING” and “CAUTION” are
preceded by a triangle signifying that these are
safety related.
The terms “IMPORTANT” and “NOTE” are also
used to describe good ideas for better and more
efficient equipment use.
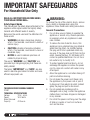
IMPORTANT SAFEGUARDS
For Household Use Only
WARNING:
To reduce the risk of fire, electric shock, serious
injury, death or damage when using this
appliance, follow these basic safety precautions.
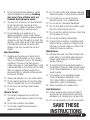
General Precautions
1 Do not allow young children to operate the
appliance or use as a toy. Close supervision
is necessary when any appliance is used
near children.
2 To reduce the risk of electric shock, this
appliance has a polarized plug (one blade is
wider than the other). As a safety feature,
this plug will fit into a polarized outlet only
one way. If the plug does not fit fully into the
outlet, reverse the plug. If it still does not fit,
contact a qualified electrician. Do not force
into outlet or try to modify to fit.
3 To protect against electrical shock, do not
submerge the appliance or allow the power
cord to come into contact with water or any
other liquid.
4 Allow the appliance to cool before taking off
parts and before cleaning.
5 Do not abuse the power cord. Never carry
the appliance by the power cord or yank it
to disconnect from electrical outlet; instead
grasp the plug and pull to disconnect.
6 Do not operate any appliance with a
damaged cord or plug, or after the appliance
malfunctions, has been dropped or damaged
in any manner.
7 Do not let the power cord hang over the edge
of table or counter or touch hot surfaces
such as the stove.

2
ninjakitchen.com
English
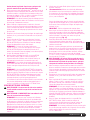
8 Do not remove the brew basket or carafe
while the appliance is brewing. Scalding
may occur if any of these parts are
removed during brewing cycles.
9 The use of an accessory not recommended
by the manufacturer may result in fire,
electric shock, create an overflow condition
and scalding hazard or personal injury.
10 Do not operate your appliance in an
appliance garage or under a wall cabinet.
When storing in an appliance garage always
unplug the unit from the electrical outlet. Not
doing so could create a risk of fire, especially
if the appliance touches the walls of the
garage or the door touches the unit as it
closes.
Operating Notice
11 Clogging and backing up of water and/or
coffee in the filter basket can occur under
any or a combination of any of the following
conditions: The use of too finely ground
coffee, using two or more paper filters, using
a permanent filter in conjunction with a paper
filter, not cleaning coffee grounds from a
permanent filter, or allowing coffee grounds
to spill over the filter.
12 Always use appliance on a dry, level surface.
13 Do not use this appliance for anything other
than its intended use. Do not use outdoors.
14 Do not touch hot surfaces. Use handles
orknobs.
Thermal Carafe
15 The carafe is designed for use with this
appliance. It must never be used on a range
top.
16 Do not place carafe in microwave.
17 Do not use a carafe having a loose or
weakened handle.
18 Do not clean carafe with abrasive cleansers,
steel wools pads, or other abrasive material.
19 Do not place on or near a hot gas or
electrical burner, or in a heated oven.
20 Do not use for carbonated beverages.
21 Do not drink directly from the carafe. Liquid
from the carafe may be very hot.
22 Do not use the carafe to store any other type
of food when not in use.
23 Do not place carafe in dishwasher.
24 Ensure that the carafe is completely empty
before starting a cleaning or brewing cycle.
Starting a cycle with water or coffee in the
carafe will cause an overflow.
Maintenance
25 Remove the power cord from the electrical
outlet, allow to cool before removing brew
basket, water reservoir, or filters before
surface cleaning.
26 To prevent illness from bacterial growth in
the appliance, follow all cleaning instructions
in the “Care & Maintenance” section of this
owner’s guide.
27 If the product is not operating properly
contact SharkNinja Operating LLC at
1-877-646-5288 or ninjakitchen.com for
examination, repair or adjustment.
28 Clean the system on a weekly basis.
Cord Statement
29 A short power-supply cord is provided to
reduce the risks resulting from becoming
entangled in or tripping over a longer cord.
30 Do not use extension cord with this product.
SAVE THESE
INSTRUCTIONS

3
1-877-646-5288
AVERTISSEMENT :
Afin de réduire les risques d’incendie, d’électrocution,
de blessures graves ou mortelles et de dommages
matériels lors de l’utilisation de cet appareil, veuillez
respecter ces consignes de sécurité élémentaires.
Précautions générales
1 Ne permettez pas aux jeunes enfants d’utiliser
l’appareil ou de s’en servir comme jouet. Une
surveillance attentive est nécessaire lors de
l’emploi à proximité des enfants.
2 Afin de réduire les risques d’électrocution, cet
appareil a été muni d’une fiche polarisée (une
lame est plus large que l’autre). Par sécurité, cette
fiche ne s’insère que dans un seul sens dans
une prise polarisée. Si la fiche ne s’insère pas
complètement dans la prise de courant, inversez-
la. Si elle ne s’adapte toujours pas, contactez un
électricien qualifié. Ne forcez pas et ne modifiez
pas la fiche pour la brancher dans une prise
murale.
3 Pour éviter les risques d’électrocution, n’immergez
pas l’appareil et assurez-vous que le cordon
d’alimentation n’entre pas en contact avec l’eau ou
un autre liquide.
4 Laissez refroidir l’appareil avant de le démonter et
de le nettoyer.
5 Prenez soin du cordon d’alimentation. Ne
transportez jamais l’appareil en le tenant par
le cordon. Ne débranchez jamais l’appareil de
l’alimentation électrique en tirant sur le cordon.
6 N’utilisez pas l’appareil si sa fiche ou son cordon
est endommagé(e), s’il a fait défaut ou s’il a été
échappé ou endommagé.
7 Ne laissez pas le cordon traîner sur le dessus
d’une table ou d’un comptoir. Ne le laissez pas
entrer en contact avec des surfaces chaudes,
comme la cuisinière.
CE MANUEL CONCERNE LE MODÈLE :
CF087
SPÉCIFICATIONS TECHNIQUES
Tension : 120V~, 60Hz.
Alimentation : 1400 Watts
Capacité du
réservoir d’eau : 43 Ounces
LISEZ TOUTES LES INSTRUCTIONS AVANT
D’UTILISER VOTRE APPAREIL NINJA COFFEE
BAR
MD
.
Mentions d’avertissement relatives à la
sécurité
Ce manuel ainsi que les étiquettes de sécurité
apposées sur cet appareil comportent des mentions
d’avertissement indiquant des risques pour la
sécurité assortis de différents degrés de gravité.
Voici les mentions de sécurité et la définition de
celles-ci :
• AVERTISSEMENT indique une situation
dangereuse qui, si elle n’est pas évitée,
pourrait entraîner des blessures graves, voire
mortelles.
• MISE EN GARDE indique une situation
dangereuse qui, si elle n’est pas évitée,
pourrait entraîner des blessures légères ou
modérées.
• AVIS ou REMARQUE indique les pratiques qui
ne sont pas relatives aux blessures corporelles.
Les mentions « AVERTISSEMENT » et « MISE EN
GARDE » sont précédées d’un triangle symbolisant
qu’elles concernent la sécurité.
Les mentions « IMPORTANT » et « REMARQUE »
indiquent également des façons de faire un meilleur
usage de l’appareil et d’en améliorer l’efficacité.
CONSIGNES DE SÉCURITÉ IMPORTANTES
Pour usage domestique seulement

4
Français
ninjakitchen.com
8 Ne retirez pas le panier-filtre ou la carafe pendant
que l’appareil effectue un cycle d’infusion. Vous
pourriez vous brûler en retirant l’une de ces
pièces pendant les cycles d’infusion.
9 L’utilisation d’accessoires non recommandés par
le fabricant peut causer un incendie, des brûlures
ou des blessures, entraîner l’électrocution et (ou)
provoquer un débordement.
10 N’utilisez pas l’appareil dans une armoire pour
électroménager ni sous une armoire murale.
Lorsque vous rangez l’appareil dans une armoire
pour électroménager, assurez-vous de toujours
débrancher l’appareil. Le non-respect de
cette consigne présente un risque d’incendie,
particulièrement si l’appareil est en contact avec la
paroi de l’armoire ou si la porte d’armoire fermée
touche l’appareil.
Avis concernant l’utilisation
11 L’obstruction et le refoulement de l’eau et (ou) du
café dans le panier-filtre peut se produire dans
l’une des circonstances suivantes (ou combinaison
de ces circonstances) : l’utilisation de café dont la
mouture est trop fine, l’utilisation de deux filtres
en papier ou plus, l’utilisation du filtre permanent
avec un filtre en papier, l’omission d’éliminer
le marc de café dans le filtre permanent ou le
débordement du marc de café dans le filtre.
12 Utilisez toujours l’appareil sur une surface sèche et
de niveau.
13 N’utilisez l’appareil qu’aux fins pour lesquelles il
est prévu. N’utilisez pas cet appareil à l’extérieur.
14 Ne touchez pas les surfaces chaudes. Utilisez
toujours des poignées.
Carafe isotherme
15 La carafe est conçue pour être utilisée avec cet
appareil. Ne l’utilisez jamais sur le dessus de la
cuisinière.
16 Ne mettez pas la carafe dans le four à
micro-ondes.
17 N’utilisez pas la carafe si sa poignée est lâche ou
desserrée.
18 Ne nettoyez pas la carafe avec des nettoyants
abrasifs, des tampons de laine d’acier ou d’autres
produits abrasifs.
19 Ne placez pas la carafe sur un brûleur au gaz ou
électrique ou près d’un brûleur, ni dans un four
chaud.
20 Ne versez pas des boissons gazéifiées dans cette
carafe.
21 Ne buvez pas directement à même la carafe. Le
liquide dans la carafe pourrait être très chaud.
22 Ne rangez pas des aliments, quelle qu’en soit la
nature, dans la carafe lorsque celle-ci n’est pas
utilisée.
23 Ne mettez pas la carafe au lave-vaisselle.
24 Assurez-vous que la carafe soit complètement
vide avant de démarrer un cycle de nettoyage
ou d’infusion. Si vous démarrez un cycle avec de
l’eau ou du café dans la carafe, ceci mènera à un
débordement.
Entretien
25 Débranchez le cordon d’alimentation, puis laissez
refroidir l’appareil avant d’enlever le panier-filtre,
le réservoir d’eau ou les filtres et avant tout
nettoyage des surfaces.
26
Afin d’éviter les maladies liées à la croissance
bactérienne dans l’appareil, suivez toutes les
instructions de nettoyage figurant dans la section
« Soins et entretien » du présent manuel du
propriétaire.
27 Si l’appareil ne fonctionne pas correctement,
veuillez contacter SharkNinja Operating LLC en
appelant au 1-877-646-5288 ou en visitant le site
ninjakitchen.com pour vérification, réparation ou
réglage.
28 Nettoyez le système toutes les semaines.
Énoncé concernant le cordon d’alimentation
29 Cet appareil est doté d’un court cordon
d’alimentation afin de réduire les risques de
s’emmêler dans le cordon ou de trébucher.
30 N’utilisez pas de rallonge électrique avec cet
appareil.
VEUILLEZ CONSERVER
CES DIRECTIVES

5
1.877.646.5288
ADVERTENCIA:
Para reducir el riesgo de incendio, descargas
eléctricas, lesiones serias, muerte o daños al usar
este artefacto, siga las precauciones básicas
siguientes.
Precauciones generales
1 No permita que los niños pequeños usen el
artefacto o que lo traten como un juguete.
Tenga mucho cuidado al utilizar cualquier
aparato eléctrico cerca de niños.
2 Para reducir el riesgo de una descarga eléctrica,
este artefacto posee un enchufe polarizado
(una pata es más ancha que la otra). Como
medida de seguridad, este cable entrará
únicamente en un tomacorriente polarizado.
Si el enchufe no entra completamente en el
tomacorriente, inviértalo. Si aún no entra, llame
a un electricista calificado. No lo fuerce dentro
del tomacorriente ni trate de modificarlo para
que calce.
3 Para protegerse de una descarga eléctrica, no
sumerja el artefacto ni permita que el cable
de alimentación entre en contacto con agua o
cualquier otro líquido.
4 Deje que el artefacto se enfríe antes de
desarmarlo y de limpiarlo.
5 No maltrate el cable de alimentación. Nunca
levante el artefacto por el cable, o tire del cable
para desconectarlo del tomacorriente; agárrelo
por el enchufe y tire para desconectarlo.
6 No utilice ningún artefacto si el cable o el
enchufe están dañados o luego de una falla, o si
ha sufrido cualquier tipo de daño.
7 No permita que el cable cuelgue por el borde
de la mesa o mesada, o que toque superficies
calientes como la estufa.
ESTE MANUAL CUBRE LOS MODELO:
CF087
ESPECIFICACIONES TÉCNICAS
Voltaje: 120V~, 60Hz.
Potencia: 1400 Vatios
Tanque de agua
Capacidad: 43 Onzas
LEA TODAS LAS INSTRUCCIONES ANTES DE
USAR SU NINJA COFFEE BAR
®
.
Palabras indicadoras de seguridad
Este manual y las etiquetas de seguridad
colocadas en el artefacto usan palabras para
indicar peligros de seguridad con distintos niveles
de gravedad.
A continuación se muestran las palabras que se
usan y sus definiciones:
• ADVERTENCIA indica una situación de
peligro que, de no evitarse, podría causar
heridas graves o la muerte.
• CUIDADO indica una situación de peligro
que, de no evitarse, podría causar heridas
menores o moderadas.
• AVISO se usa para información que no está
relacionada con lesiones físicas.
La palabras “ADVERTENCIA” y “CUIDADO”
están precedidas por un triángulo que indica que
están relacionadas con la seguridad.
Los términos “IMPORTANTE” y “NOTA” también
se usan para describir buenas ideas para usar el
equipo mejor y más eficientemente.
MEDIDAS IMPORTANTES DE SEGURIDAD
Para uso doméstico solamente

6
Español
ninjakitchen.com
8 No saque la canasta del café o la jarra mientras
el artefacto esté preparando café. Puede
llegar a quemarse si remueve cualquiera
de estas partes durante el ciclo de
preparación del café.
9 El uso de cualquier accesorio no recomendado
por el fabricante puede causar incendios,
descargas eléctricas, crear un desborde y
peligro de quemaduras o lesiones personales.
10 No use su artefacto en un cobertizo para
electrodomésticos o debajo de un gabinete
de pared. Cuando lo guarde en un cobertizo
para electrodomésticos, desenchufe siempre
la unidad del tomacorriente. El no hacerlo
puede causar un incendio, especialmente si el
artefacto toca las paredes del cobertizo o si la
puerta toca la unidad al cerrarla.
Aviso de funcionamiento
11 Puede obstruirse la canasta del filtro y
desbordar agua y/o café bajo cualquiera de las
siguientes condiciones o una combinación de
ellas: Usar café molido demasiado fino, usar dos
o más filtros de papel, usar un filtro permanente
junto con un filtro de papel, no limpiar el café
de un filtro permanente o permitir que el café
molido se derrame por encima del filtro.
12 Use siempre el artefacto sobre una superficie
seca y nivelada.
13 No utilice este artefacto para ningún otro
destino distinto al indicado. No lo utilice en el
exterior.
14 No toque las superficies calientes. Utilice las
asas o perillas.
Jarra térmica
15 La jara está diseñada para usarla con este
artefacto. Nunca debe usarse en el quemador
de una estufa.
16 No ponga la jarra en el microondas.
17 No use la jarra si tiene el mango flojo o suelto.
18 No limpie la jarra con limpiadores abrasivos,
lana de acero u otro material abrasivo.
19 No la coloque sobre o cerca de un quemador
eléctrico o a gas, o dentro de un horno caliente.
20 No la use con bebidas gaseosas.
21 No beba directamente de la jarra. El contenido
puede estar muy caliente.
22 No use la jarra para guardar cualquier otro tipo
de alimentos cuando no la necesite.
23 No lo lave en el lavavajillas.
24 Verifique que la jarra esté completamente vacía
antes de comenzar con un ciclo de limpieza o
de preparación de café. El comenzar un ciclo
con agua o café dentro de la jarra hará que se
desborde.
Mantenimiento
25 Desenchufe el cable de alimentación del
tomacorriente, deje que se enfríe antes de
remover la canasta del café, el tanque de agua
o los filtros, y antes de limpiar sus superficies.
26 Para prevenir las enfermedades provenientes
del crecimiento bacteriano en el aparato, siga
todas las instrucciones de limpieza en la sección
“Cuidado y mantenimiento” de este manual del
propietario.
27 Si el producto no funciona correctamente, llame
a SharkNinja Operating LLC al 1-877-646-5288
o visite ninjakitchen.com para que lo examinen,
reparen o ajusten.
28 Limpie el sistema en forma semanal.
Información sobre el cable
29 Se suministra un cable de alimentación
corto para reducir el riesgo de enredarse o
tropezarse con un cable más largo.
30 No use un cable de extensión con este
producto.
CONSERVE ESTAS
INSTRUCCIONES

7
1-877-646-5288
Contents
Thank you for
purchasing the
Ninja
Coffee
Bar
®
.
Getting To Know Your Ninja
Coffee Bar
®
.....................................................................................11
Control Panel ...........................................................................................................................12
Features Of The Ninja
Coffee Bar ...............................................................................................13
Before First Use . .....................................................................................................................14
Setting The Clock And Delay Brew .............................................................................................15
Assembly ................................................................................................................................16
Preparing For Use ....................................................................................................................17
Filling The Water Reservoir ....................................................................................17
How Much Coffee Do You Get In Your Cup...............................................................17
Would You Like A Hotter Coffee ..............................................................................18
Filling The Brew Basket With Coffee .......................................................................19
Drip Stop .............................................................................................................. 19
Brewing Coffee .....................................................................................................19
Classic And Rich Brew .......................................................................................19
Over Ice Brew ...................................................................................................20
Specialty Brew .................................................................................................. 20
Care & Maintenance ................................................................................................................21
Cleaning After A Brew ...........................................................................................21
Cleaning Your Carafe ............................................................................................ 21
Cleaning Your Water Reservoir ..............................................................................21
Cleaning & Descaling Your Brewing System ............................................................21
Enhanced Clean Cycle .......................................................................................... 22
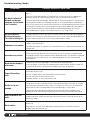
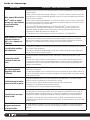
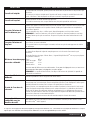
Troubleshooting Guide ..............................................................................................................23
Replacement Parts ...................................................................................................................25
Warranty & Registration ............................................................................................................26
English

8
ninjakitchen.com
Table des matières
Merci d’avoir
acheté l’appareil
Ninja Coffee
Bar
MD
.
Familiarisez-vous avec votre appareil Ninja Coffee Bar
MD
.............................................27
Panneau de commande .............................................................................................28
Caractéristiques de l’appareil Ninja Coffee Bar ............................................................ 29
Avant la première utilisation . ..................................................................................... 30
Réglage de l’horloge et de l’infusion différée ...............................................................31
Assemblage ..............................................................................................................32
Préparatifs pour l’utilisation .......................................................................................33
Remplissage du réservoir d’eau .............................................................................33
Quelle quantité de café obtenez-vous dans votre tasse? ..........................................33
Désirez-vous obtenir un café plus chaud? ...............................................................34
Remplissage du panier-filtre avec le café moulu......................................................34
Dispositif antigouttes ............................................................................................. 35
Infusion du café ....................................................................................................35
Infusion classique (« Classic ») et corsée (« Rich ») ..............................................35
Infusion sur glaçons (« Over Ice Brew ») ..............................................................36
Infusion de boissons de spécialité (« Specialty Brew »).........................................36
Soins et entretien ...................................................................................................... 37
Nettoyage après l’infusion .....................................................................................37
Nettoyage de votre carafe ..................................................................................... 37
Nettoyage de votre réservoir d’eau ........................................................................ 37
Nettoyage et détartrage de votre système d’infusion................................................37
Cycle de nettoyage supérieur ................................................................................ 38
Guide de dépannage .................................................................................................39
Pièces de rechange ...................................................................................................41
Garantie et enregistrement ........................................................................................42
Français

9
1.877.646.5288
Español
Índice
Gracias por
haber comprado
la Ninja Coffee
Bar
®
.
Partes de su Ninja Coffee Bar
®
..................................................................................43
Panel de control ........................................................................................................ 44
Características de la Ninja Coffee Bar ......................................................................... 45
Antes de usarla por primera vez . ............................................................................... 46
Ajuste del reloj y de la preparación con retardo ........................................................... 47
Armado ....................................................................................................................48
Preparación para el uso .............................................................................................49
Llenado del tanque de agua ...................................................................................49
¿Cuánto café obtiene en cada taza? ....................................................................... 49
¿Quiere un café más caliente? ............................................................................... 50
Para llenar la canasta con café ..............................................................................50
Antigoteo .............................................................................................................. 51
Preparación de café ..............................................................................................51
Preparación de café común y fuerte ...................................................................51
Café con hielo ...................................................................................................52
Café especial ................................................................................................... 52
Cuidado y mantenimiento ..........................................................................................53
Limpieza luego de la preparación ........................................................................... 53
Limpieza de la jarra .............................................................................................. 53
Limpieza del tanque de agua ................................................................................53
Limpieza y descalcificación de su sistema de preparación de café ...........................53
Ciclo de limpieza mejorado ...................................................................................54
Guía de diagnóstico de problemas..............................................................................55
Partes de repuesto .................................................................................................... 57
Garantía y registro .....................................................................................................58

10ninjakitchen.com

11
1-877-646-5288
OFF
a
b
c
e
d
l
f
k
i
j
h
g
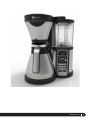
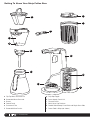
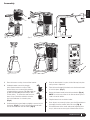
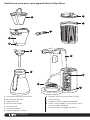
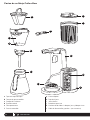
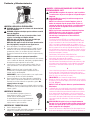
Getting To Know Your Ninja
Coffee Bar
®
a Flip Top Water Reservoir Lid
b Removable Water Reservoir
c Brewer
d Control Panel
e Permanent Filter
f Removable Brew Basket
g Drip Stop Toggle
h Brew-through Carafe Lid
i Thermal Carafe
j Multi-Serve Cup Platform
k Double Sided Scoop: Carafe Side and Single Serve Side
l Power Cord & Wrap (not shown)

12
ninjakitchen.com
English
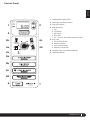
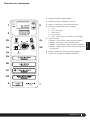
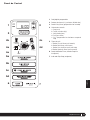
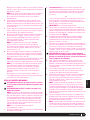
Control Panel
OFF
1 Programmable Digital Clock
2 Clock Hour and Minute Buttons
3 Delay Brew Button
4 Multi-Serve Dial
a Cup
b Travel Mug
c Half Carafe
d Full Carafe
e Off - Turns off all functions except the clock
5 Brew Type
a Classic Brew Button
b Rich Brew Button
c Over Ice Brew Button
d Specialty Brew Button
6 Intelligent Clean Cycle Indicator/Button
7 Drip Stop Indicator
1
3
4b
4a
4c
4d
2
5d
5a
5b
5c
6
7
4e

13
1-877-646-5288
Features of the Ninja
Coffee Bar
®
• Thermal Flavor Extraction
®
Technology - Blends Precision Water Delivery with automated controls for Calibrated
Temperature, Pre-infusion, Coffee Saturation, and Flavor Richness. Ninja’s Thermal Flavor Extraction technology can
truly unlock the full flavor potential of your coffee.
• Multi Serve – Ability to brew directly into your favorite cup, travel mug, or carafe.
• Brew Types – control the strength and style of your coffee:
a. Classic Brew for smooth, balanced hot coffee.
b. Rich Brew for a richer-than-classic and still smooth coffee with more room for milk and cream.
c. Over Ice Brew for a smooth, rich, freshly brewed iced coffee that’s not watered down.
d. Specialty Brew for a strong extract for specialty milk-based drinks or blended iced drinks.
• Multi Serve Cup Platform – Pull it down and place your favorite cup on it and brew directly into it.
• Removable Water Reservoir with Easy Access Flip Top Lid – For quick and easy filling.
• Auto-iQ
®
– The Ninja Coffee Bar
™
knows how much water to use for each size and brew type.
• 43 oz Thermal Carafe.
• LED Control Panel with Programmable Digital Clock.
• 24-HR Programmable Delay Brew Button – Set it to automatically brew the following morning.
• Pre-Heat Mode – The Ninja Coffee Bar brewer will be in an idle mode keeping the internal water pre-heated for 72
hours.
• Sleep Mode – After 72 hours the Ninja Coffee Bar will enter sleep mode to conserve energy or turn the Multi-Serve dial
to “OFF” to manually turn off the pre-heat and all other functions.
• Drip Stop – Stops the flow of coffee from the brew basket allowing you to pour a cup mid-brew; switch toggle to the
closed position to prevent dripping once the brew cycle is finished.
• Clean Function – It illuminates when your Ninja
Coffee Bar senses that there is hard water calcium buildup in your
brewer which can affect the flavor of your coffee. When it illuminates, follow the cleaning instructions in the Care &
Maintenance section or printed on the back of your brewer.
• Audible Ready Signal – Alerts you that your coffee is ready.
• Permanent Filter - The permanent filter is a reusable filter that preserves the natural coffee oils and small coffee
particles to provide a robust flavor, similar to what you would experience when using a French press.
Multi Serve
Brew into a cup, travel mug, or a classic carafe or half carafe.
Classic Carafe or Half CarafeTravel MugCup
H
M
H
M
H
M

14
ninjakitchen.com
English
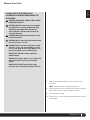
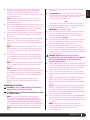
PLEASE KEEP THESE IMPORTANT
SAFEGUARDS IN MIND WHEN USING THE
APPLIANCE:
CAUTION: APPLIANCE CREATES HOT LIQUID.
HANDLE WITH CARE.
CAUTION: DO NOT remove the vessel while
the appliance is running without the Drip
Stop in the closed position. Return the
vessel quickly and open the Drip Stop to
continue the brew.
CAUTION: DO NOT place the thermal carafe
in the dishwasher.
CAUTION: Never open the brew basket when
the coffeemaker is in use.
CAUTION: Please ensure that you are using
at least a 12 oz. cup for the Cup size and a
16 oz. travel mug for the Travel Mug size to
prevent overflow and a scalding injury.
IMPORTANT: DO NOT run the appliance
without water.
IMPORTANT: Always place a vessel beneath
the brew basket to receive the brewed
coffee.
IMPORTANT: DO NOT overfill the water
reservoir, fill water only to the Max Fill line.
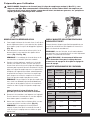
Before First Use
1 Remove all packaging material, stickers and labels from
the brewer.
NOTE: The thermal carafe is NOT dishwasher safe.
2 Wash the water reservoir, permanent filter, thermal carafe and
brew basket in warm, soapy water with a soft cloth.
3 Rinse and dry thoroughly.
4 Before first use, run two full carafe cycles with water only and
discard water.

15
1-877-646-5288
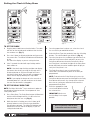
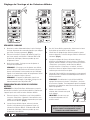
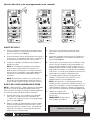
3 Once the proper time has been set, select the size of
the vessel that you would like to brew.
4 Select the Brew Type that you desire from the 4 flashing
buttons. The selected brew type will be lit. (Fig. 3)
5 Once the time, brew size, and brew type have been set,
allow the Delay Brew to flash and lock in or press the
Delay Brew button to activate the Delay Brew. When
the Delay Brew is activated, the light on the Delay Brew
button will illuminate and an audible signal will play to
verify the Delay Brew is set.
6 The Delay Brew time is now set and your Ninja
Coffee Bar
®
will automatically brew at the time you
programmed.
NOTE: To deactivate the Delay Brew cycle, press the
Delay Brew button once more and the light on the Delay
Brew button will turn off. Any change to the selected
brew size or starting any other brew will cancel the
programmed Delay Brew.
7 Place the appropriate-sized
vessel under brew basket for
the selected size.
IMPORTANT: Make sure
the Drip Stop is in the open
position.
TO SET THE CLOCK
1 Plug the power cord into an electrical outlet. The clock
will flash on the control panel to indicate that the time
has not been set. (Fig. 1)
2 Press the H (hour) or M (minute) button until you reach
the current time. The AM or PM indicator will illuminate
on the
left side of the display as you are setting the time.
3 After 5 seconds the clock will stop flashing and the
clock will be set.
NOTE: If the clock stops flashing and does not display
the correct time of day, pressing the H (hour) or the
M (minute) button at any time will again will cause
the clock to flash again. You can now re-program the
correct time of day by following the steps above.
NOTE: If you unplug the brewer or in the event of an
extended power loss, you will need to reset the clock
the next time the brewer is plugged in.
TO SET THE DELAY BREW TIME
NOTE: The Ninja Coffee Bar
®
must remain on in order for
the delay brew function to work. Do not power off after
setting Delay Brew.
1 Press Delay Brew. The Delay Brew button will illuminate
and the clock will begin to flash “12:00” or the last
delay brew time that was set. (Fig. 2)
2 While the clock is flashing, press the H (hour) or M
(minute) button to set the time that you would like
the delay brew to begin. The AM or PM indicator will
illuminate on the left side of the display as you are
setting the desired time.
Setting the Clock & Delay Brew
Fig. 3Fig. 2Fig. 1
Go to ninjakitchen.com for more
information and how-to videos.
OFF
OFF
OFF

16
ninjakitchen.com
English
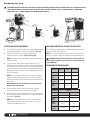
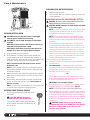
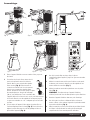
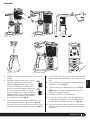
1 Place the brewer on a dry, clean and level surface.
2 Holding the water reservoir by the grip,
twist counterclockwise to remove. Either
flip the lid top over or remove lid by twisting
counterclockwise to remove.
Fill with water up
to, but not exceeding the
Clean Cycle Max
Fill line (30 oz.)
.
To replace the water reservoir,
place on top of the base and twist clockwise
until a click indicates it is locked in place.
(Fig. 4)
3 Slide brew basket out and angle up slightly to remove it from
the brewer. (Fig. 5) To reinsert, align the brew basket with
the rails and slide back into the brewer. (Fig. 6)
Assembly
Fig. 4
Fig. 7 Fig. 8
4 Once the brew basket is in place, slide all the way into place
until you hear a slight click.
5 Twist the brew-through lid clockwise onto the thermal carafe
to lock into place. (Fig. 7)
6 Center the thermal carafe below the brew basket. (Fig. 8)
NOTE: Do not use any coffee for the first two brew cycles in
order to clean the brewer.
7 Plug the brewer into an electrical outlet.
8 Once all parts are securely in place, press the Clean button to
thoroughly clean the machine before first use. (Fig. 9)
9 Discard the water in the carafe and repeat, beginning from
step 2, with one more clean cycle of water before first use.
Fig. 9
Fig. 6Fig. 5
H
M
H
M
OFF
OFF
H
M
OFF

17
1-877-646-5288
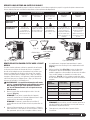
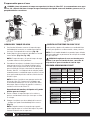
FILLING THE WATER RESERVOIR
1 For easy filling, remove the water reservoir by slightly twisting
counterclockwise until it is free from the brewer. (Fig. 10)
2 Either flip the lid top over or remove lid by twisting
counterclockwise to remove. (Fig. 11a, Fig. 11b)
NOTE: The water reservoir and water reservoir lid can lock in
multiple locations.
3 For best results, fill the water reservoir with fresh, cool,
filtered water. Ensure that the water is above the minimum fill
line for the brew size that is selected. Do not exceed the Max
Fill line. The machine’s intelligence will automatically measure
the amount of water needed. To avoid refilling after each cup,
fill to the carafe line.
NOTE: Do not fill past the Max Fill line or water will begin to
overflow from the overflow hole at the top of the hand grip.
Remove the water reservoir from the brewer and empty to the
Max Fill line.
Depending on the size and brew type, you may have
water left in the reservoir.
4 Place the water reservoir back on the brewer and twist
clockwise until you feel the reservoir lock into place.
5 Place the vessel that you would like to brew into underneath
the brew basket–ensure that the vessel is centered under the
brew basket. (Fig. 12)
NOTE: After removing the water reservoir, there may be a
small amount of water in the reservoir valve. This can be
easily removed with a dry cloth.
Preparing for Use
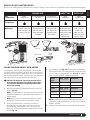
HOW MUCH COFFEE DO YOU GET IN YOUR CUP?
Each size and brew type produces a different amount of coffee to
optimize strength, taste, and size.
NOTE: The coffee grounds will absorb some of the water that is
brewed, resulting in slightly less brewed coffee than water used.
CAUTION: Please ensure that you are using at least a
12 oz. cup for the Cup size and a 16 oz. travel mug for the
Travel Mug size.
APPROXIMATE BREW VOLUME
Size/Brew Over Ice
Coffee Only With Ice
Cup 3.7 oz. 9.5 oz.
Travel
Mug
5.8 oz. 14 oz.
Half
Carafe
10.5 oz. 21 oz.
Full
Carafe
15.8 oz. 38 oz.
Size/Brew Classic Rich Specialty
Cup
9.5 oz. 8.8 oz. 3.1 oz.
Travel
Mug
14 oz. 13.2 oz. 4 oz.
Half
Carafe
21 oz. 19.5 oz. 5 oz.
Full
Carafe
38 oz. 35.5 oz. 10 oz.
CAUTION: Only fill water reservoir up to, but not exceeding the Max Fill line with water; we recommend fresh,
cool, filtered water. Do not fill water reservoir with any other liquids such as brewed coffee, carbonated
beverages, etc. as other liquids may damage your brewer.
Fig. 10
Fig. 12
Fig. 11a Fig. 11b
OR
H
M
OFF
H
M
OFF

18
ninjakitchen.com
English
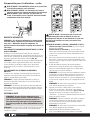
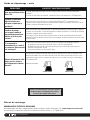
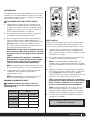
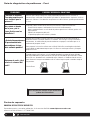
CERAMIC CUP NINJA
®
CUP PAPER CUP
Cup
Temperature
Room
Temperature
Pre-warmed with
hot water
Pre-warmed in
microwave with milk
Room
Temperature
Room
Temperature
Drinking
Temperature
Hot Hotter Hotter Hotter Hottest
Why is there a
difference?
A cold ceramic
mug will steal heat
from the coffee as
it warms itself up.
If the mug is
already warm, it
will not steal as
much heat from
the coffee.
Just like your
cold mug, cold
milk lowers the
temperature of
your coffee.
The Ninja
double wall cup is
designed to retain
initial coffee temp
better than a
ceramic cup.
Unlike a ceramic
mug, a thinner
paper cup
does not steal
substantial heat
from the coffee.
WOULD YOU LIKE A HOTTER COFFEE?
Have you ever wondered why you get paper cups on the go? The type of cup you brew into can drastically influence the drinking temperature!
Fig. 15Fig. 13
Fig. 14
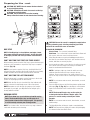
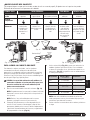
FILLING THE BREW BASKET WITH COFFEE
For best results, use the below measurements of ground coffee
for each size brew–the amount of ground coffee for each size will
remain the same for any brew type that you select. For example, if
you select Cup and Classic Brew, you will use the same amount of
coffee grounds as if you select Cup and Specialty Brew.
CAUTION: The maximum capacity for ground coffee
is 12 rounded tablespoons or 6 Ninja Carafe Scoops.
Exceeding this amount or using fine ground coffee
may cause overflow.
1 Open the brew basket by sliding the brew basket out of the
brewer. (Fig. 13)
NOTE: The brew basket can be removed from the brewer by
lifting the brew basket at a slight upward angle (similar to a
cabinet drawer).
NOTE: Check for any loose grounds that may be left in the
brew basket. Remove and rinse brew basket if needed.
2 Place the permanent filter or a #4 paper cone filter in
the brew basket. If using a paper cone filter, remove the
permanent filter, fold along the seams, open it fully, and
firmly press it into the brew basket making sure that it is fully
seated. (Fig. 14)
3 Use the Ninja Scoop (Fig. 15a) and follow the measurements
below to fill the filter. These measurements are based on level
scoops—adjust to your preferred taste. (Fig. 15) We suggest
using a medium grind size if grinding whole beans.
Single
Serve
Ninja
®
Scoop
(Single Serve Side)
Tablespoon
Cup 2–3 scoops 2–3 Tbsp.
Travel Mug 3–4 scoops 3–4 Tbsp.
Carafe Ninja
®
Scoop
(Carafe Side)
Tablespoon
Half Carafe 2–3 scoops 5–7 Tbsp.
Full Carafe 4–6 scoops 8–12 Tbsp.
NOTE: Exceeding the recommended medium grind size for
whole beans and 6 Ninja Carafe Scoops may cause the brew
basket to overflow.
4 Slide the brew basket back into the brewer and click in place.
Carafe
Single
Serve
Fig. 15a
Ninja Scoop
H
M
OFF
H
M
OFF

19
1-877-646-5288
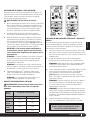
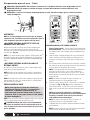
DRIP STOP
NOTE: If the Drip Stop is closed before you begin a brew,
the brewer will notify you with 5 beeps. Set the Drip Stop
to the open position and select your brew concentration
level.
CAN’T WAIT FOR THAT FIRST CUP TO BE READY?
When brewing a carafe close the Drip Stop to pause the brew cycle
and pour a cup. Remember to reopen the Drip Stop to complete
the brew. (Fig. 16)
NOTE: If you forget to open the Drip Stop, the Ninja Coffee Bar
®
will pause the brew, and after 20 seconds it will give you a friendly
audible reminder. After 6 minutes the brew will be canceled.
CAN’T WAIT FOR THE LAST FEW DROPS?
When the brew cycle is complete, set the Drip Stop to the closed
position to stop dripping from the brew basket.
NOTE: While the Drip Stop is closed the Drip Stop indicator will
light up in the bottom right hand corner of the control panel.
NOTE: Remember to open the Drip Stop when you’re ready to
brew again. If you forget, your Ninja Coffee Bar will give you a
friendly audible reminder.
BREWING COFFEE
NOTE: Each brew has a pre-infusion cycle with varying
times. The brew will begin, stop, and be quiet for a
short period of time before it begins again. This process
is used to evenly saturate your coffee grounds.
NOTE: For a hotter coffee, rinse the coffee cup, mug or thermal
carafe with hot water prior to brewing.
Fig. 17 Fig. 18
CAUTION: Ensure the carafe is completely empty before
starting a brewing cycle. Starting a brewing cycle with
coffee in the carafe will cause an overflow.
CLASSIC OR RICH BREW
Classic Brew - For a smooth, balanced flavor.
Rich Brew - For a coffee that is richer than Classic Brew and
still smooth, with more room for milk and cream.
1 After filling the water reservoir and adding ground coffee to
the filter, be sure that the Drip Stop is open and the reservoir,
basket, and filter are securely in place.
2 Use the multi-serve dial to select the size of coffee you would
like to brew. Place the empty vessel that you would like to
brew into underneath the brew basket.
NOTE: If making a single cup, lower the multi-serve cup
platform down and center the cup or mug on the cup
platform. Please ensure that you are using at least a 12oz.
cup for the cup size and a 16 oz. travel mug for the travel mug
size.
NOTE: Do not remove water reservoir, brew basket, or vessel
while brewing.
3 Press the Classic Brew or the Rich Brew button and the brew
will begin. (Fig. 17, Fig. 18) Press the Classic or Rich button
again or turn the Multi-Serve Size dial to Off to cancel the
brew.
NOTE: The brew will begin, stop, and be quiet for
a short period of time before it begins again. This
process is used to evenly saturate your coffee
grounds.
NOTE: Do not remove water reservoir, brew basket, or vessel
while brewing.
4 The Ninja
Coffee Bar will beep to signal a completed brew.
NOTE: Rich Brew will use slightly less water and yield slightly
less brewed coffee than Classic Brew.
CAUTION: HOT WATER Do not remove the brew basket
or vessel while brewing.
CAUTION: STEAM Do not touch steam vents or the top
of the brewer while brewing.
CAUTION: The brew basket is hot after brewing.
Always allow the brewer to cool down before cleaning
.
Preparing for Use - cont.
Fig. 16
OFF
OFF
La page est en cours de chargement...
La page est en cours de chargement...
La page est en cours de chargement...
La page est en cours de chargement...
La page est en cours de chargement...
La page est en cours de chargement...
La page est en cours de chargement...
La page est en cours de chargement...
La page est en cours de chargement...
La page est en cours de chargement...
La page est en cours de chargement...
La page est en cours de chargement...
La page est en cours de chargement...
La page est en cours de chargement...
La page est en cours de chargement...
La page est en cours de chargement...
La page est en cours de chargement...
La page est en cours de chargement...
La page est en cours de chargement...
La page est en cours de chargement...
La page est en cours de chargement...
La page est en cours de chargement...
La page est en cours de chargement...
La page est en cours de chargement...
La page est en cours de chargement...
La page est en cours de chargement...
La page est en cours de chargement...
La page est en cours de chargement...
La page est en cours de chargement...
La page est en cours de chargement...
La page est en cours de chargement...
La page est en cours de chargement...
La page est en cours de chargement...
La page est en cours de chargement...
La page est en cours de chargement...
La page est en cours de chargement...
La page est en cours de chargement...
La page est en cours de chargement...
La page est en cours de chargement...
La page est en cours de chargement...
-
 1
1
-
 2
2
-
 3
3
-
 4
4
-
 5
5
-
 6
6
-
 7
7
-
 8
8
-
 9
9
-
 10
10
-
 11
11
-
 12
12
-
 13
13
-
 14
14
-
 15
15
-
 16
16
-
 17
17
-
 18
18
-
 19
19
-
 20
20
-
 21
21
-
 22
22
-
 23
23
-
 24
24
-
 25
25
-
 26
26
-
 27
27
-
 28
28
-
 29
29
-
 30
30
-
 31
31
-
 32
32
-
 33
33
-
 34
34
-
 35
35
-
 36
36
-
 37
37
-
 38
38
-
 39
39
-
 40
40
-
 41
41
-
 42
42
-
 43
43
-
 44
44
-
 45
45
-
 46
46
-
 47
47
-
 48
48
-
 49
49
-
 50
50
-
 51
51
-
 52
52
-
 53
53
-
 54
54
-
 55
55
-
 56
56
-
 57
57
-
 58
58
-
 59
59
-
 60
60


Ninja CF087 Manuel utilisateur
- Catégorie
- Cafetières
- Taper
- Manuel utilisateur
dans d''autres langues
- English: Ninja CF087 User manual
- español: Ninja CF087 Manual de usuario
Documents connexes
-
Ninja CF082 Manuel utilisateur
-
-
-
-
-
-
-
-
-