La page est en cours de chargement...

Save these instructions
CARE INSTRUCTIONS:
• Unpluglampbeforecleaning.
• Wipecleanwithasoft,dryclothorstaticduster.
• Alwaysavoidtheuseofharshchemicalsorabrasivecleanersastheymay
causedamagetothexture’snish
1
Made in China FL1572FL1573rev042522EFSME1A
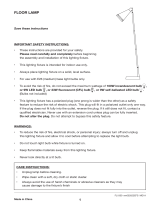
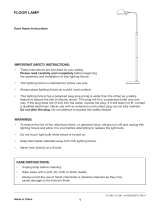
FLOOR LAMP
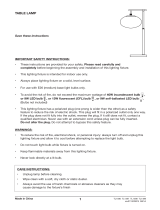
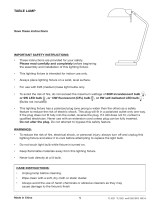
IMPORTANT SAFETY INSTRUCTIONS:
• Theseinstructionsareprovidedforyoursafety.Please read carefully and
completelybeforebeginningtheassemblyandinstallationofthislightingxture.
• Thislightingxtureisintendedforindooruseonly.
• Alwaysplacelightingxtureonasolid,levelsurface.
• ForusewithE26(medium)baselightbulbsonly.
• Toavoidtheriskofre,donotexceedthemaximumwattageof40W incandescent bulb ,
or 9W LED bulb , or 13W uorescent (CFL) bulb , or 9W self-ballasted LED bulb .
(Bulbsnotincluded)
• Thislightingxturehasapolarizedplug(oneprongiswiderthantheother)asasafety
featuretoreducetheriskofelectricshock.Thisplugwilltinapolarizedoutletonlyoneway.
Iftheplugdoesnottfullyintotheoutlet,reversetheplug.Ifitstilldoesnott,contacta
qualiedelectrician.Neverusewithanextensioncordunlessplugcanbefullyinserted.
Do not alter the plug.Donotattempttobypassthissafetyfeature.
WARNINGS:
• Toreducetheriskofre,electricalshock,orpersonalinjury:alwaysturnoandunplugthis
lightingxtureandallowittocoolbeforeattemptingtoreplacethelightbulb.
• Donottouchlightbulbwhilextureisturnedon.
• Keepammablematerialsawayfromthislightingxture.
• Neverlookdirectlyatalitbulb.

2
Made in China
PARTS INCLUDED:
(A)Base
(B)ShortBottomPost
(C)LongBottomPost
(D)ShortTopPost
(E)LongMiddlepost
(F)LongTopPost
(G)Nut
(H)ShadeBase
(J)Socket/Bracket
(K)Lampshade
(L)On/OControl
DO NOT EXCEED THE
SPECIFIED WATTAGE.
For use with light bulbs
with a E26 (medium) base.
PRE-ASSEMBLY:
Carefully remove all parts and hardware from carton, along with any protective plastic
packaging.
Do not discard any contents until after assembly is complete to avoid accidentally
discarding small parts or hardware.
BEGIN ASSEMBLY AT THE BASE ON
A SOLID, FLAT SURFACE.
BE CAREFUL NOT TO STRIP THREADS.
INSTALL LAMPSHADES LAST.
SEE NEXT PAGE FOR LAMPSHADE
INSTALLATION.
H
A
L
B
D
G
GH
J
J
C
E
F
K
K
MAKE SURE THE ASSEMBLY IS DONE ON A LEVEL AND SOFT SURFACE (SUCH AS BLANKETS)
TO PREVENT DAMAGING THE TOP SHELF DURING ASSEMBLY.
ASSUREZ-VOUS QUE L’ASSEMBLAGE EST EFFECTUÉ SUR UNE SURFACE PLANE ET DOUCE
(COMME DES COUVERTURES) POUR ÉVITER D’ENDOMMAGER L’ÉTAGÈRE SUPÉRIEURE PENDANT L’ASSEMBLAGE.
ASEGÚRESE DE QUE EL MONTAJE SE REALICE EN UNA SUPERFICIE NIVELADA Y SUAVE (COMO MANTAS)
PARA EVITAR DAÑAR EL ESTANTE SUPERIOR DURANTE EL MONTAJE.
MAKE SURE THE ASSEMBLY IS DONE ON A LEVEL AND SOFT SURFACE (SUCH AS BLANKETS)
TO PREVENT DAMAGING THE PARTS DURING ASSEMBLY.

3
Made in China
LAMPSHADE INSTALLATION:
Screwinthespeciedlightbulb.
LoosenNut(G)toseparatetheShadeBase(H)fromtheSocket/Bracket(J).
ANGLE and carefully place the Lampshade (K) OVER the Socket/Bracket (J).
The Socket/Bracket should be inside the Lampshade (K).
ReplacetheShadeBase(H)upinthecorrectpositiontosecuretheLampshade(K)
againsttheBracket(J).
SecuretheShadeBase(H)intopositionbyturningtheNut(G).
TIGHTEN FULLY BY HAND.
THISBRACKET
GOESINSIDE
THELAMPSHADE
TOSECUREIT.
K
J
H
G

Conservez ces instructions
INSTRUCTIONS D’ENTRETIEN :
• Déconnectezleluminaireavantdelenettoyer.
• Essuyez-leproprementàl’aided’unchiondouxetsecoud’unessuie-meublestatique.
• Éviteztoujoursd’utiliserdesproduitschimiquesfortsouagentsnettoyantsabrasifs,
carilspourrontendommagerlanitionduluminaire.
4
Fabriqué en Chine
LAMPADAIRE
CONSIGNES DE SÉCURITÉ ESSENTIELLES :
• Cesconsignessontfourniesauxnsdevotresécurité.
Veuillez les lire attentivement et au completavantdecommencerl’assemblage
etlamiseenplacedeceluminaire.
• Celuminaireestdestinéàutilisationàl’intérieurseulement.
• Poseztoujoursceluminairesurunesurfacesolideetdeniveau.
• PourutilisationuniquementaveclesampoulesavecbasedeE26(moyenne).
• Pouréliminertoutrisqued’incendie,évitezdedépasserlapuissancemaximaleprescrited’une
ampouleà incandescence de 40 W , ou d’une ampoule DÉL de 9 W , ou d’une ampoule
uorescente (CFL) de 13 W , ou d’une ampoule DÉL à ballast intégré de 9 W .
(Ampoulesnonincluses)
• Celuminaireprésenteunechepolarisée(avecunebrochepluslargequel’autre)àtitrededispositif
desécuritévisantàamoindrirlerisquedechocélectrique.Cetteches’insèredansuneprisepolarisée
d’uneseulemanière.Silachenes’insèrepasaucompletdanslaprise,inversezlache.Siellenes’y
insèretoujourspasadéquatement,communiquezavecun(e)électricien(ne)qualié(e).N’utilisezjamais
decordonprolongateuravecceluminaireàmoinsquesachepuisses’insérercorrectement.
Évitez d’altérer la che.Évitezdecontournercettecaractéristiquedesécurité.
AVERTISSEMENTS :
• Pouramoindrirlerisqued’incendie,dechocélectriqueoudeblessurecorporelle,veuilleztoujours
mettrehorstensionetdéconnecterceluminaireetlelaisserserefroidiravantdetenterderemplacer
l’ampoule.
• Évitezdetoucherl’ampoulependantqueleluminaireestsoustension.
• Gardeztoutematièreinammableéloignéedeceluminaire.
• Éviteztoujoursderegarderdirectementuneampouleallumée.

5
Fabriqué en Chine
PIÈCES COMPRISES :
(A)Base
(B)Poteau-lampeinférieurcourt
(C)Poteau-lampeinférieurlong
(D)Poteau-lampesupérieurcourt
(E)Poteau-lampecentrallong
(F)Poteau-lampesupérieurlong
(G)Écrou
(H)Socled’abat-jour
(J)Supportdexation-douille
(K)Abat-jour
(L)BoutonON/OFF
ÉVITEZ DE DÉPASSER
LA PUISSANCE
MAXIMALE SPÉCIFIÉE
Pour utilisation uniquement
avec les ampoules avec base
de E26 (moyenne).
PRÉASSEMBLAGE :
Retirez soigneusement de la boîte toutes les pièces, toute la quincaillerie, et tout
emballage de plastique protecteur.
Ne mettez aucun élément de contenu au rebut avant de terminer l’assemblage au complet,
an d’éviter de jeter accidentellement de petites pièces ou un élément de quincaillerie.
COMMENCER L’ASSEMBLAGE À LA BASE
SUR UNE SURFACE SOLIDE ET PLANE.
ATTENTION À NE PAS DÉNUDER LES FILETS.
INSTALLEZ L’ABAT-JOUR EN DERNIER.
VOIR LA PAGE SUIVANTE POUR
L’INSTALLATION DE L’ABAT-JOUR.
H
A
L
B
D
G
GH
J
J
C
E
F
K
K
ASSUREZ-VOUS QUE L’ASSEMBLAGE EST EFFECTUÉ SUR UNE SURFACE PLANE ET DOUCE
(COMME DES COUVERTURES) POUR ÉVITER D’ENDOMMAGER LES PIÈCES L’ASSEMBLAGE.

6
Fabriqué en Chine
INSTALLATION DE L’ABAT-JOUR :
Vissezl’ampoulespéciéeenplace.
Desserrezl’écrou(G)pourséparerlesocled’abat-jour(H)lesupportde
xation-douille(J).
INCLINEZ l’abat-jour (K) et placez-le SUR le support de xation-douille (J).
Le support de xation-douille devrait être à l’intérieur de l’abat-jour (K).
Replacezlesocled’abat-jour(H)danslapositioncorrectepourxerl’abat-jour(K)
contrelesupport(J).
Solidiez le socle d’abat-jour (H) en place en tournant l’écrou (G).
SERREZ FERMEMENT AU COMPLET À LA MAIN.
ASSUREZ-VOUSQUE
CESUPPORTEST
PLACÉÀL’INTÉRIEUR
DEL’ABAT-JOUR
POURSÉCURISER
L’ABAT-JOUR
K
J
H
G

LÁMPARA
Guarde estas instrucciones
INSTRUCCIONES DE CUIDADO:
• Desenchufelalámparaantesdelimpiarla.
• Limpieconunpañosuaveysecooconunpañoparaestática.
• Evitesiempreelusodelimpiadoresquímicosásperosoabrasivos,yaquepuedendañar
elacabadodelaccesorio.
Hecho en China 7
INSTRUCCIONES IMPORTANTES DE SEGURIDAD:
• Estasinstruccionesseproporcionanparasuseguridad.
Léalascuidadosamenteyporcompletoantesdecomenzara
ensamblareinstalarestalámpara.
• Estalámparaestádestinadaaserutilizadasoloeninteriores.
• Coloquesiemprelalámparasobreunabasermeynivelada.
• ParautilizarconbombillasconunabaseE26(mediano)solo.
• Paraevitarelriesgodeincendios,noexcedaelvatajemáximo de una bombilla de
40W incandescente
, LED de 9W , uorescente (CFL) de 13W , o LED
balasto incorporado de 9W .(Bombillasnoincluidas)
• Estalámparatieneunenchufepolarizado(unapatillasesmásanchaquelaotra)como
característicadeseguridadparareducirelriesgodeunelectrochoque.Esteenchufesolo
entraráenuntomacorrientepolarizadodeunasolamanera.Sinoentracompletamenteen
eltomacorriente,inviertaelenchufe.Siaúnasínoentra,comuníqueseconunelectricista
calicado.Noutilicenuncauncableprolongador,amenosqueelenchufesepuedainsertar
porcompleto.Nomodiqueelenchufe.Nointenteeludirestacaracterísticadeseguridad.
ADVERTENCIAS:
• Parareducirelriesgodeincendio,electrochoqueolesionespersonales:siempreapaguey
desenchufeestalámparaydéjelaenfriarantesdeintentarreemplazarlabombilla.
• Notoquelabombillamientraslalámparaestáencendida.
• Mantengalosmaterialesinamableslejosdelalámpara.
• Nuncamiredirectamenteaunabombillaencendida.

8
Hecho en China
PARTES INCLUIDAS:
(A)Base
(B)Posteinferiorcorto
(C)Posteinferiorlargo
(D)Postesuperiorcorto
(E)Postecentrallargo
(F)Postesuperiorlargo
(G)Tuerca
(H)Basedelapantalla
(J)Portalámparas/soporte
(K)Pantalla
(L)Interruptorencendido/apagado
NO EXCEDA EL VATAJE
ESPECIFICADO
Para utilizar con
bombillas con una
base E26 (mediano) solo.
ANTES DEL ENSAMBLADO:
Retire con cuidado todas las piezas y herramientas de la caja, junto con todo el
envoltorio plástico protector.
No deseche nada hasta después de haber terminado de ensamblar para evitar botar por
accidente piezas pequeñas o herramientas.
COMIENCE EL MONTAJE EN LA BASE EN
UN PISO SÓLIDO Y PLANO.
PONIENDO ESPECIAL CUIDADO EN NO
DESGARRAR LOS HILOS.
INSTALE LA PANTALLA EN ÚLTIMO LUGAR.
CONSULTE LA PÁGINA SIGUIENTE PARA
VER LA INSTALACIÓN DE LA PANTALLA.
H
A
L
B
D
G
GH
J
J
C
E
F
K
K
ASEGÚRESE DE QUE EL MONTAJE SE REALICE EN UNA SUPERFICIE NIVELADA
Y SUAVE (COMO MANTAS) PARA EVITAR DAÑAR LAS PIEZAS DURANTE EL MONTAJE.

Hecho en China 9
INSTALLATION DE L’ABAT-JOUR :
Atornillelabombillaeléctricaespecicada.
Aojelatuerca(G)parasepararlabasedelapantalla(H)delportalámparas/soporte(J).
INCLINE LA PANTALLA (K) Y COLÓQUELA SOBRE EL PORTALÁMPARAS/SOPORTE (J)
EL PORTALÁMPARAS/SOPORTE DEBE ESTAR DENTRO DE LA PANTALLA (K).
Vuelvaacolocarlabasedelapantalla(H)enlaposicióncorrectaparaasegurar
lapantalla(K)contraelsoporte(J).
Fije la base de la pantalla (H) en posición girando la tuerca (G).
AJUSTE A MANO POR COMPLETO.
ASEGÚRESEDEQUE
ESTESOPORTESE
COLOCADENTRODE
LAPANTALLAPARA
ASEGURARLA
PANTALLA
K
J
H
G
1/9