
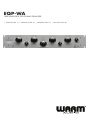
EQP-WA
TUBE AMPLIFIED PROGRAM EQUALIZER
• ENGLISH (PG 1) • FRANÇAIS (PG 11) • ESPAÑOL (PG 17) • DEUTSCH (PG 23)

1
THANK YOU!
Thank you for purchasing the Warm Audio EQP-WA mono program equalizer. We feel this product
offers the best in terms of the sound, function, and vibe of classic premium equalizers from the analog
era of recording. We cut no corners when it comes to what goes into our products, and the EQP-WA
is no exception. We’ve chosen the highest quality input and output transformers, and inductors by Cinemag
Transformers. The EQP-WA features selected high quality vacuum tubes, potentiometers, switches, and rugged
construction. We are confident you will love recording with the EQP-WA.
WELCOME BACK TO THE WORLD OF ANALOG
Though digital technology and software have made great strides in their performance
in recent years; we still feel that nothing compares to the level of articulation, depth,
realism, and responsiveness of a well-built piece of analog gear. When you hear the
bottom end presence and top end detail of quality analog gear, the difference can be astounding. The cost of most
boutique analog equipment is financially out of reach for many recording artists. Our mission is to change this, and
introduce as many people as we can to recording and mixing with real, dedicated hardware. Whether this is the first
piece of outboard gear you’ve ever purchased outside of a recording interface, or merely the first in a long time; we
thank you, and welcome you back to the world of analog.
Bryce Young
President
Warm Audio
Austin, Texas USA
REGISTER YOUR EQPWA
Before we begin, please take the time to visit www.warmaudio.com to register your product. To ensure you receive
proper and uninterrupted warranty support for your product, please register your unit within 14 days from purchase.

2
WARRANTY STATEMENT
Warm Audio warranties this product to be free from defect in materials and workmanship for one year
from date of purchase, for the original purchaser to whom this equipment is registered.
This warranty is non-transferable.
This warranty is void in the event of damage incurred from unauthorized service to this unit, or from electrical or
mechanical modification to this unit. This warranty does not cover damage resulting from abuse, accidental
damage, misuse, improper electrical conditions such as mis-wiring, incorrect voltage or frequency, unstable power,
disconnection from earth ground (for products requiring a 3 pin, grounded power cable), or from exposure to hostile
environmental conditions such as moisture, humidity, smoke, fire, sand or other debris, and extreme temperatures.
Warm Audio will, at it’s sole discretion, repair or replace this product in a timely manner. This limited warranty extends
only to products determined to be defective and does not cover incidental costs such as equipment rental, loss of
revenue, etc. Please visit us at www.warmaudio.com for more information on your warranty, or to request
warranty service.
This warranty applies to products sold in the United States of America. For warranty information in any other country,
please refer to your local Warm Audio distributor. This warranty provides specific legal rights, which may vary from
state to state. Depending on the state in which you live, you may have rights in addition to those covered in this
statement. Please refer to your state laws or see your local Warm Audio retailer for more information.
NON-WARRANTY SERVICE
If you have a defective unit that is outside of our warranty period or conditions; we are still here for you and can get
your unit working again for a modest service fee. Please visit us at www.warmaudio.com to contact us about setting
up a repair or for more information.
With the proper care, your Warm Audio gear should last a lifetime and provide a lifetime of enjoyment. We believe
the best advertisement we can have is a properly working unit being put to great use. Let’s work together to make it happen.

3
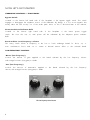
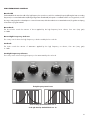
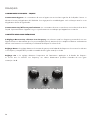
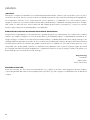
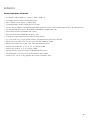
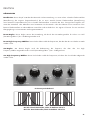
The Low Frequency Control Section.
NOW LET’S GET STARTED!
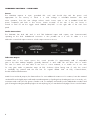
HARDWARE CONTROLS FRONT PANEL
Bypass Switch
Located on the bottom left hand side of the faceplate is the bypass toggle switch. This switch
engages or disengages the equalizer section of the EQP-WA. By design, it is not a true bypass; but
merely takes the EQ circuitry out of the audio path. More on this is discussed later in the manual.
Power Switch and indicator bulb
Located on the bottom right hand side of the faceplate is the mains power toggle
switch. This turns the unit on, and power will be indicated by the adjacent power indicator
bulb.
Boost and Cut - Low Frequency’ selector
The rotary switch selects a frequency in the low to lower midrange bands for boost, cut, or
even simultaneous boost and cut to create a desired texture effect to the selected band.
LOW FREQUENCY CONTROL
‘Boost’ (low frequency)
Controls the amount of gain applied to the band selected by the low frequency selector
with a range from zero (unity gain) to +12dB.
‘Cut’ (low frequency)
Controls the amount of attenuation applied to the band selected by the low frequency
selector, with a range from zero (unity gain) to -18dB.

4
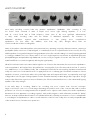
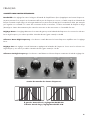
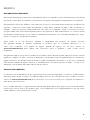
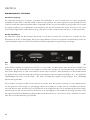
HIGH FREQUENCY CONTROL
Bandwidth
The bandwidth knob varies the width of the high frequency boost and cut controls from a relatively sharp Q (affecting the least surrounding
frequencies) to a somewhat broader Q (affecting a larger area of bandwidth). A sharp Q is considered useful for more surgical work, such as
boosting or cutting a specific overhead piece or octave of an instrument; while a broader Q is more natural and musical, for gentler tone shaping
of instruments or program material.
Boost knob
The boost knob controls the amount of boost applied by the high frequency boost selector, from zero (unity gain)
to +18dB.
Boost High Frequency Selector
This rotary switch selects the high frequency to be boosted by the boost knob.
Cut knob
This knob controls the amount of attenuation applied by the high frequency cut selector, from zero (unity gain)
to -14dB.
Cut High Frequency Selector:
This rotary switch selects the high frequency to be attenuated by the cut knob.
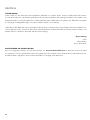
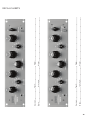
The High Frequency Control Section
To the left: Sharp Q, Bandwidth knob set to 0.
To the right: Broad Q, Bandwidth knob set to 10.

5
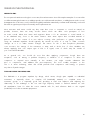
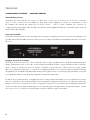
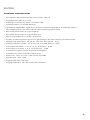
HARDWARE CONTROLS REAR PANEL
Power
The EQP-WA requires a 3-pin, grounded IEC cord, and should ship with the power cord
appropriate for the territory in which it is sold. Voltage is selectable between 115v and
230v operation, from the rear voltage selector switch. Power input is via a standard fused IEC
power receptacle with built in fuse access, chassis mounted on the rear of the unit. Power is
turned on and off via the toggle switch labeled ‘ON/OFF’ on the right side of the unit’s front
panel.
Audio Connections
The EQP-WA has both XLR and ¼ inch TRS balanced inputs and outputs, rear chassis-mounted,
operating at line level. Unbalanced connection is also possible via a ¼ inch TS cable. It is not
advised to connect both input connectors or both output connectors at once.
Tube Gain Adjust
Located next to the output section, this control provides for approximately 6db of adjustable
gain in the tube makeup amplifier, generally between -3 and +3dB. This will allow users to match
two units for stereo use with either a test tone or source material; or to match one or two units
for unity gain within a particular setup. At fully clockwise (when facing rear of unit), the control
is essentially by passed and the EQ has it’s original default level. At fully counterclockwise,
the EQ will be at full attenuation.
Aside from its technical purpose, this feature allows for some additional creative use. For instance, hotter bus material
can benefit from the slightly improved headroom and transparency of pulling down the tube gain lower. Conversely, solo
instruments and vocals (acoustic guitar or female vocal, for example) can benefit from the added tube roundness and
girth of having the tube gain pulled up higher. As with anything, let your ears be the final judge of how to use this feature.

6
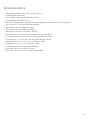
TECHNICAL SPECS
• Tube Equalizer based on the classic “Pultec” EQP-1A
• CineMag USA transformers
• Premium high voltage 12AX7 and 12AU7 tubes
• CineMag USA inductor EQ section
• EQ section is bypassable - signal still passes through tubes and transformers for warming effect
• No insertion loss - loss restored by tube amplifier
• XLR and TRS transformer balanced inputs
• XLR and TRS transformer balanced outputs
• Flat frequency response from 20 Hz - 50 kHz
• Boost and Cut controls can be used simultaneously for phase effect
• Low frequency boost - 20, 30, 60, 100, 200, 400, 800 Hz - 12 db
• Low frequency cut - 20, 30, 60, 100, 200, 400, 800 Hz - 18 db
• High frequency boost - 3, 4, 5, 8, 10, 12, 16 kHz - 18 db
• High frequency cut - 3, 4, 5, 10, 20 kHz - 14 db
• 5 added frequency points for greater flexibility
• Switchable 115/230 volt IEC power inlet
• Dimensions: 19 x 3.5 x 6 inches - 2RU rack mountable

7
A BIT OF HISTORY
Most early recording consoles had very primitive equalization capabilities, often consisting of only
two knobs. These consisted of either a simple ‘tone control’ type shelving equalizer, or a ‘low’
and ‘hi’ control knob with a fixed frequency center. One of the most significant advancements
in early studio recording came with the advent of dedicated equalizers. The invention of
dedicated equalizers inspired desk manufacturers to start putting more comprehensive
equalization into their desks. This addition, more than any other, brought about what we
would consider the modern recording desk.
Many of the earliest outboard equalizers were passive devices, operating in a purely subtractive manner, requiring a
preamplifier (either in the form of outboard gear, or routed back into an unoccupied channel of the console). Not only
did the equalizer lose signal level by performing equalization; but often caused ‘loading loss’ merely by being patched
in, resulting in added noise, hum or buzz, and loss of tone or high frequencies. By the time an equalized signal was
preamplified again and passed through additional console circuitry, the signal to noise ratio was often worse off. This
made EQ difficult to use without negatively affecting the signal quality.
What followed next was the innovation that brought the use of EQ into the mainstream, known as active equalization.
‘Active equalization’ allowed an EQ to be patched into a mixing desk for the first time without the fear of ‘insertion
loss’, added noise, or loss of fidelity. Finally, EQ could be performed risk-free. Most analog equalizers manufactured
today use some form of solid state electronics to apply their boosts or makeup gain. The earliest incarnations of these
equalizers, however, used vacuum tubes, along with large input and output transformers, as required by most high
voltage tube circuits. This type of design imparts a ‘sweet’ character that many modern designs fail to reproduce. Though
many modern EQ’s have a generous amount of features, few offer the warmth and richness, or the natural and forgiving
qualities of the classic designs.
In the early days of recording, distance mic recording was more common than close-mic technique.
Large rooms tend to ‘even out’ a sound stage, eliminating the need for much of the corrective EQ used in modern
production. As close mic recording became the accepted norm for superior track isolation, the need for equalization
became much more apparent to recording engineers. Early studios began to utilize what many termed the ‘Tamla/
Motown’ technique (named after the famous record label and studio), whereby an instrument or voice is ‘manipulated’
to some degree via equalization in order to sit well within the context of a mix. Today, this is a nearly inseparable part
of the art and science of modern music production.

8
WAXING PHILOSOPHICAL
WHEN TO EQ?
This is a question that deserves thought. In some cases, EQ can be intuitive. One of the simplest examples of corrective EQ
would be in treating the human voice; adding top end to a vocal that needs articulation, or adding bottom end to a vocal
that appears thin. In all cases, one should listen thoughtfully and let the material tell you what it needs. Ultimately, one should
EQ when a signal requires help to fit naturally and compliment a mix.
Most musicians and artists would say they want their voice or instrument to sound as natural as
possible; however, there are many acoustic factors which can affect one’s perception of how
an event sounds. What most artists and engineers desire is for an instrument to sound natural or,
in an idealized way, closer to the artist’s intention. Most artists expect their recorded material to
perform well in the context of a mix without covering other performers or getting covered up.
Using an outboard equalizer should typically be viewed as much of a way to make corrective
changes as it is to make creative changes. The reason for this is that microphone placement,
room acoustics, the settings of the instrument or amp, and a whole host of other variables are
always applying their own unique type of EQ to a signal, some of which may be outside of
your control and undesirable.
As a general rule, one should do most EQ after applying compression; though there are
exceptions, such as taming a problem frequency in advance of a compressor to allow the
compressor to respond more naturally. In this situation, one might consider subtractive EQ
prior to compression, and additive EQ post-compression. The most notable exception to this
rule is in stereo mastering, where EQ should precede final compression and limiting, to prevent
any chance of peak overages.
TIPS ON USING YOUR EQPWA
The EQP-WA is a program equalizer by design, which means, though quite capable on individual
instruments, it especially shines on complex, full bandwidth material; i.e. complete mixes or
instrument groups. It is especially good with providing a final tone balance and adjusting the
relationship of the midrange to the low and high frequency bands in finished material. As with
all equalization, listen for what the source material calls for, and reference back to the original
(unaltered) source often to maintain perspective.

9
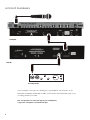
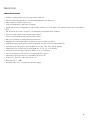
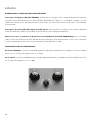
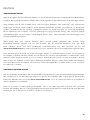
HOOKUP DIAGRAMS
In this example, a microphone is feeding into a preamplifier, which feeds in to the
EQP-WA via a balanced XLR patch cable, which feeds in the LINE LEVEL input of your
recording interface/recorder.
Note: it is important to use a line level input on your recording device
as opposed to a microphone or instrument level input.
Preamplifier
EQP-WA
Recording interface

10
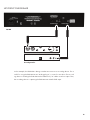
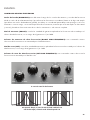
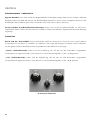
In this example, the EQP-WA is being routed as an insert into a recording device. This is
useful for using the EQP-WA as an “analog plug-in” or insert for mix-down. The record-
ing device is feeding the EQP-WA with a balanced 1/4” cable via a line output. Then,
the recording device is capturing the EQP-WA via a LINE LEVEL input.
EQP-WA
Recording interface
HOOKUP DIAGRAMS

11
FRANÇAIS
MERCI!
Merci d’avoir choisi l’égaliseur mono Warm Audio EQP-WA. Nous avons conçu ce produit pour qu’il offre le meilleur
du son, des fonctionnalités et des sensations des fameux égaliseurs classiques de l’ère du tout analogique. Nous
avons toujours sélectionné les meilleurs composants pour équiper nos produits et l’EQP-WA ne fait pas exception à
cette règle.
L’EQP-WA utilise des transformateurs CineMag de haute qualité ainsi qu’un inducteur également
fabriqué par CineMag. Avec ses lampes, ses potentiomètres et ses commutateurs de haute qualité, l’EQP-WA affiche
une robustesse à toute épreuve. Nous sommes convaincus que vous allez adorer l’EQP-WA et vous remercions de
l’avoir choisi !
BryceYoung
Directeur général de Warm Audio
Austin, Texas USA
ENREGISTREZ VOTRE WA-14!
Avant de commencer, veuillez prendre le temps de visiter www.warmaudio.com afin d’enregistrer votre produit.
Afin de vous assurer d’avoir une vraie garantie sans interruption pour votre produit, veuillez enregistrer votre article
dans les 14jours suivants l’achat.

12
FRANÇAIS
DÉCLARATIONDEGARANTIE
Pendant un an à compter de la date d’achat, Warm Audio garantit ce produit contre tout défaut de fabrication, qu’il
soit causé par un facteur matériel ou humain. La garantie s’applique à l’acheteur original au nom duquel le produit
a été enregistré. Cette garantie n’est pas transférable. Cette garantie est caduque dans le cas d’un dommage causé
au produit par du personnel technique non agréé ou par toute modification électrique ou mécanique de l’appareil.
Cette garantie ne couvre ni les dommages accidentels, ni les dommages résultant d’utilisations abusives ou impropres, ni
les dommages causés par une installation électrique impropre (câblage incorrect, tension ou fréquence secteur inadaptée,
secteur instable, absence de mise à la terre), ni les dommages engendrés par un environnement hostile (moisissure, humidité,
fumée, feu, sable et autres particules), ni les dommages résultant de l’exposition à des températures extrêmes.
Warm Audio réparera ou remplacera ce produit dans un délai satisfaisant à sa seule discrétion. Cette garantie
limitée ne s’applique qu’aux produits estimés défectueux et ne couvre pas les coûts incidents tels que la location
d’un équipement de remplacement, la perte de revenu, etc. Veuillez consulter le site www.warmaudio.com pour plus
d’informations sur nos conditions de garantie ou pour réclamer une réparation sous garantie.
Cette garantie s’applique aux produits vendus aux États-Unis d’Amérique. Pour connaître les conditions
de garantie appliquées dans d’autres pays, veuillez contacter le distributeur Warm Audio du pays
concerné. Cette garantie donne accès à des droits légaux spécifiques qui peuvent varier d’un État à l’autre. Selon
l’État dans lequel vous résidez, il se peut que vous ayez des droits supplémentaires non couverts par cette déclara-
tion de garantie. Consultez la loi en vigueur dans votre État ou contactez le revendeur Warm Audio près de chez
vous pour de plus amples informations.
RÉPARATIONHORSGARANTIE
Au cas où votre appareil tombe en panne après la période de garantie ou en raison de conditions d’utilisation im-
propres, nous restons à votre disposition pour intervenir sur votre produit contre paiement modique. Rendez-vous sur notre
site www.warmaudio.com si vous souhaitez nous contacter pour une réparation ou pour plus d’informations. Utilisé
correctement, votre équipement Warm Audio vous procurera une vie entière de plaisir sonore. Nous pensons que
notre meilleure publicité est de vous fournir des produits au fonctionnement irréprochable servant des productions
musicales de qualité. Travaillons main dans la main pour y arriver.

13
FRANÇAIS
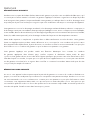
COMMANDESPHYSIQUES–FAÇADE
Commutateur Bypass : Le commutateur de mise en bypass est situé en bas à gauche de la façade. Il active ou
désactive la section d’égalisation de l’EQP-WA. Il ne s’agit pas d’un véritable bypass car il ne fait que retirer le circuit
d’égalisation du flux de signal audio.
Commutateur On/Off et voyant lumineux : Le commutateur de mise en marche est situé en bas à droite de la
façade. Il permet d’allumer l’appareil. Le gros voyant lumineux à côté indique que l’appareil est en marche.
CONTRÔLEDESBASSESFRÉQUENCE
S Réglages Boost et Cut, sélecteur Low Frequency : Le sélecteur rotatif Low Frequency permet de choisir une
fréquence basse ou bas-médium que l’on pourra amplifier (Boost), atténuer (Cut) ou amplifier et atténuer simultanément
afin de créer la texture sonore désirée pour la bande de fréquences sélectionnée.
Réglage Boost : Ce réglage détermine le montant de gain ajouté à la bande de fréquences choisie avec le sélecteur
Low Frequency. L’amplification possible est variable de zéro (gain unitaire) à +12 dB.
Réglage Cut : Ce réglage détermine l’importance de l’atténuation appliquée à la bande de fréquenc-
es choisie avec le sélecteur Low Frequency. Les valeurs d’atténuation possibles s’étendent de zéro (gain
unitaire) à -18 dB.
Section de contrôle des basses fréquences.

14
FRANÇAIS
CONTRÔLEDESHAUTESFRÉQUENCES
Bandwidth : Ce réglage fait varier la largeur de bande de l’amplification (Boost) appliquée aux hautes fréquences.
La pente peut être forte, auquel cas le traitement affecte peu les fréquences voisines, ou faible, auquel cas la bande de
fréquences traitée est plus large. On utilise généralement une pente forte (Sharp) pour les traitements ciblés, par exemple
pour égaliser un overhead ou l’octave d’un instrument donné. Inversement, on utilise une bande de fréquences large
(Broad) pour obtenir des traitements plus naturels et musicaux sur des instruments ou l’ensemble d’un mix.
Réglage Boost : Ce réglage détermine le montant de gain ajouté à la bande de fréquences choisie avec le sélecteur
Boost High Frequency. Les valeurs possibles s’étendent de zéro (gain unitaire) à +18 dB.
Sélecteur Boost High Frequency : Ce sélecteur rotatif détermine la haute fréquence amplifiée avec le réglage
Boost.
Réglage Cut : Ce réglage contrôle l’atténuation appliquée à la bande de fréquences choisie avec le sélecteur Cut
High Frequency. Les valeurs possibles s’étendent de zéro (gain unitaire) à -14 dB.
Sélecteur Cut High Frequency : Ce sélecteur rotatif détermine la haute fréquence atténuée à l’aide du réglage Cut.
Section de contrôle des hautes fréquences.
À gauche : Pente élevée, réglage Bandwidth à 0.
À droite : Bande large, réglage Bandwidth à 10.

15
FRANÇAIS
COMMANDESPHYSIQUES– PANNEAUARRIÈRE
AlimentationSecteur
L’EQP-WA doit être branché au secteur à l’aide d’un cordon IEC 3 broches mis à la terre. Normale-
ment, le cordon secteur fourni est adapté au pays dans lequel l’appareil est vendu. Le commutateur à côté
de l’embase IEC permet de sélectionner la tension secteur : 115V ou 230V. L’embase IEC comporte un
compartiment qui permet d’accéder au fusible. On allume et éteint l’appareil à l’aide du commutateur ON/ OFF situé
en bas à droite de la façade.
ConnexionsAudio
L’EQP-WA offre des entrées et sorties symétriques de niveau ligne sur XLR et jacks 3 points. Les liaisons asymétriques sont
possibles par le biais de câbles montés en jacks 2 points. Il est déconseillé d’utiliser simultanément les deux connecteurs
de sortie.
Réglage du gain de la lampe
Située près de la section de sortie, cette commande fournit un gain ajustable d’environ 6 dB de l’amplificateur de la
lampe, généralement entre -3 et +3 dB. Ceci permettra à l’utilisateur de faire correspondre deux unités en utilisation
stéréo, soit avec un signal test ou une source audio, ou de faire correspondre une ou deux unités pour un gain unitaire
dans une configuration particulière. Lorsqu’elle est complètement dans le sens horaire (lorsquel’on fait face à l’arrière
de l’appareil), la commande est pratiquement désactivée et l’égaliseur est à son niveau d’origine par défaut. Lorsqu’elle
est complètement dans le sens antihoraire, l’égaliseur sera à pleine attenuation.
En dehors de son utilité technique, ce réglage peut offrir un usage créatif. Par exemple, une source audio de fort volume
peut encore bénéficier d’une marge de gain et d’une transparence légèrement supérieures en réduisant le gain de la
lampe. À l’inverse, les instruments solos et les voix (guitare acoustique ou voix de femme par exemple) peuvent bénéfi-
cier de la rondeur de la lampe et de la largeur sonore ajoutées grâce à l’augmentation du gain de la lampe. Comme
pour toute chose, vos oreilles seront le juge ultime sur la façon d’utiliser cette fonctionnalité.

16
FRANÇAIS
CARACTÉRISTIQUES
• Égaliseur à lampes basé sur le classique Pultec EQP-1A
• Transformateurs d’entrée et de sortie CineMag fabriqués aux États-Unis
• Tubes 12AX7 et 12AU7 sélectionnés
• Section d’égalisation à inducteur CineMag
• Bypass de la section d’égalisation : le flux audio traverse encore les tubes et les transformateurs pour réchauffer le
signal
• Pas de baisse de niveau : les pertes sont rattrapées par l’amplificateur à lampes
• Entrées sur XLR et jack symétrisée par transformateur
• Sorties sur XLR et jack symétrisée par transformateur
• Réponse en fréquence linéaire de 20 Hz à 50 kHz
• Réglages Boost et Cut utilisables simultanément pour les effets de phase
• Amplification (Boost) du grave jusqu’à 12 dB à 20, 30, 60, 100, 200, 400 et 800 Hz
• Atténuation (Cut) du grave jusqu’à 18 dB à 20, 30, 60, 100, 200, 400 et 800 Hz
• Amplification (Boost) de l’aigu jusqu’à 18 dB à 3, 4, 5, 8, 10, 12 et 16 kHz
• Atténuation (Cut) de l’aigu jusqu’à 14 dB à 3, 4, 5, 10 et 20 kHz
• 5 points de fréquence ajoutés pour une plus grande souplesse
• Alimentation électrique interne commutable 115/230 volts
• Dimensions : rack 2U / 48,3 x 8,9 x 15,2 cm
• Bruit inhérent : < -75dB
• Impédance de sortie : Jusqu’à 600 ohms de charge

17
ESPAÑOL
¡GRACIAS!
Gracias por comprar el ecualizador monoaural EQP-WA de Warm Audio. Sentimos que este producto ofrece lo mejor
en términos de sonido, función y sensación de los ecualizadores premium clásicos de la era analógica de la grabación.
No escatimamos esfuerzos en los componentes de nuestros productos, y el EQP-WA no es una excepción. Hemos
elegido los inductores y los transformadores de entrada y salida de mayor calidad de CineMag Transformers. El EQP-
WA cuenta con tubos de vacío seleccionados de alta calidad, potenciómetros, interruptores y construcción robusta.
Estamos seguros de que le encantará grabar con el EQP-WA.
BIENVENIDO DE NUEVO AL MUNDO DEL SONIDO ANALÓGICO
Aunque la tecnología digital y el software han hecho grandes progresos en su desempeño en los últimos años; todavía
sentimos que nada se compara con el nivel de articulación, profundidad, realismo y capacidad de respuesta de un
equipo analógico. Cuando se escucha la presencia del final bajo y el detalle del final alto de un equipo analógico de
calidad, la diferencia puede ser asombrosa. El coste de la mayoría del equipo análogo boutique está financieramente
fuera del alcance de muchos artistas que graban. Nuestra misión es cambiar esto y mostrar a tantas personas como
sea posible cómo poder grabar y mezclar con hardware real y dedicado a ello. Si este es el primer equipo que usted
ha comprado fuera de una interfaz de grabación o simplemente el primero en mucho tiempo, le damos las gracias y la
bienvenida de nuevo al mundo del sonido analógico.
Bryce Young
Presidente
Warm Audio
Austin, Texas USA
REGISTRE SU EQP-WA
Antes de comenzar, por favor visite www.warmaudio.com y registre su producto. Para asegurarse de que reciba el
soporte de garantía adecuado e ininterrumpido para su producto, por favor registre su unidad dentro de 14 días de la
compra.

18
ESPAÑOL
DECLARACIÓN DE GARANTÍA
Warm Audio garantiza que este producto estará libre de defectos en materiales y mano de obra durante un año Desde
la fecha de compra, para el comprador original a quien este equipo está registrado. Esta garantía no es transferible.
Esta garantía es nula en caso de daños ocasionados por un servicio no autorizado a esta unidad, o por modificaciones
eléctricas o mecánicas a esta unidad. Esta garantía no cubre daños resultantes de abuso, daño accidental, uso
indebido, condiciones eléctricas inadecuadas tales como fallos en el cableado, voltaje o frecuencia incorrectos,
energía inestable, desconexión de tierra (para productos que requieren un cable de alimentación con conexión a tierra
de 3 patillas) o Desde la exposición a condiciones ambientales hostiles tales como humedad, humedad, humo, fuego,
arena u otros desechos y temperaturas extremas.
Warm Audio, a su sola discreción, reparará o reemplazará este producto de manera oportuna.
Esta garantía limitada se extiende únicamente a productos que se consideran defectuosos y no
cubre costos incidentales como alquiler de equipos, pérdida de ingresos, etc. Por favor, visítenos en
www.warmaudio.com para obtener más información sobre su garantía o para solicitar servicio
de garantía.
Esta garantía se aplica a los productos vendidos en los Estados Unidos de América. Para obtener información sobre la
garantía en cualquier otro país, consulte a su distribuidor local de Warm Audio. Esta garantía proporciona derechos
legales específicos, que pueden variar de estado a estado. Dependiendo del estado en el que viva, usted puede
tener derechos además de aquellos cubiertos en esta declaración. Consulte las leyes de su estado o consulte con su
distribuidor local de Warm Audio para obtener más información.
SERVICIO SIN GARANTÍA
Si usted tiene una unidad defectuosa que está fuera de nuestro período de garantía o condiciones; Todavía estamos
aquí para usted y puede conseguir su unidad de trabajo de nuevo por una tarifa de servicio modesto. Por favor,
visítenos en www.warmaudio.com para comunicarse con nosotros acerca de cómo configurar una reparación o
para obtener más información.
Con el cuidado adecuado, su equipo de audio caliente debe durar toda la vida y proporcionar una vida de disfrute.
Creemos que el mejor anuncio que podemos tener es una unidad que funcione apropiadamente y que esté siendo
usada. Trabajemos juntos para que esto suceda.

19
ESPAÑOL
COMENCEMOS: CONTROLES DEL PANEL FRONTAL
Interruptor de Bypass (EQ ON/BYPASS): está ubicado en el ángulo inferior izquierdo del panel frontal. Este
interruptor activa o desactiva la sección del ecualizador del EQP-WA. Por diseño, no es un bypass verdadero, sino que
simplemente saca al circuito del EQ fuera de la ruta de audio. Encontrará más información al respecto más adelante
en este manual.
Interruptor de encendido ON/OFF y luz indicadora: están ubicados en el ángulo inferior derecho del panel
frontal. Encenderá la unidad y el encendido será verificado por la luz indicadora adyacente.
Selector de corte y aumento de baja frecuencia (BOOST & CUT LOW FREQUENCY): este conmutador
rotativo selecciona una frecuencia en las bandas de rango medio bajo y bajo para aumentar, cortar o incluso aumentar
y cortar simultáneamente, para crear el efecto deseado en la banda seleccionada.
CONTROLES DE BAJAS FRECUENCIAS
Aumento (BOOST): controla la cantidad de ganancia aplicada a la banda seleccionada por el selector de baja
frecuencia con un rango de 0 (ganancia = 1) a +12dB.
Corte (CUT): controla la cantidad de atenuación aplicada a la banda seleccionada por el selector de baja frecuencia,
con un rango de 0 (ganancia = 1) a -18dB.
La page est en cours de chargement...
La page est en cours de chargement...
La page est en cours de chargement...
La page est en cours de chargement...
La page est en cours de chargement...
La page est en cours de chargement...
La page est en cours de chargement...
La page est en cours de chargement...
La page est en cours de chargement...
La page est en cours de chargement...
La page est en cours de chargement...
La page est en cours de chargement...
-
 1
1
-
 2
2
-
 3
3
-
 4
4
-
 5
5
-
 6
6
-
 7
7
-
 8
8
-
 9
9
-
 10
10
-
 11
11
-
 12
12
-
 13
13
-
 14
14
-
 15
15
-
 16
16
-
 17
17
-
 18
18
-
 19
19
-
 20
20
-
 21
21
-
 22
22
-
 23
23
-
 24
24
-
 25
25
-
 26
26
-
 27
27
-
 28
28
-
 29
29
-
 30
30
-
 31
31
-
 32
32


dans d''autres langues
- English: Warm Audio EQP-WA User manual
- español: Warm Audio EQP-WA Manual de usuario
- Deutsch: Warm Audio EQP-WA Benutzerhandbuch
Documents connexes
Autres documents
-
KlarkTeknik EQP-KT Guide de démarrage rapide
-
-
Yamaha V1 Manuel utilisateur
-
Yamaha V3 Manuel utilisateur
-
ONKYO HT-RC630 Le manuel du propriétaire
-
-
-
-
Yamaha V5 Manuel utilisateur