MicroTouch IC-215P-AW1-W10 Touch Computer Manuel utilisateur
- Catégorie
- Barebones PC / poste de travail
- Taper
- Manuel utilisateur

Rev 2071422.1
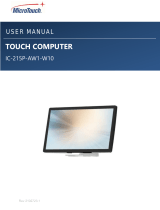
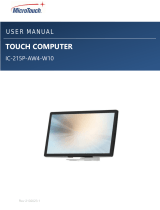
TOUCH COMPUTER
IC-215P-AW1-W10
USER MANUAL

2
Table of Contents
About This Document ................................................................................. 4
Compliance Information .............................................................................. 5
Important Safety Instructions ...................................................................... 7
Usage Notice ............................................................................................................ 7
Precautions............................................................................................................... 7
Warnings .................................................................................................................. 9
Installation Tips ......................................................................................... 10
Product Overview ..................................................................................... 11
Key Features ...........................................................................................................11
Unpacking ...............................................................................................................11
Package Contents .................................................................................................. 12
Product Setup and Use ............................................................................. 13
Input and Output Connectors.................................................................................. 13
Configuration and Cable Connections .................................................................... 14
Turning the Touch Computer On and Off ................................................................ 15
Mounting options ...................................................................................... 16
VESA Mount ........................................................................................................... 16
Specifications and Dimensions ................................................................. 17
Specifications ......................................................................................................... 17
Dimensions (without stand) .................................................................................... 19
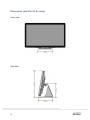
Dimensions (with SS-215-A1 stand) ....................................................................... 21
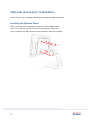
Optional Accessory Installation ................................................................. 22
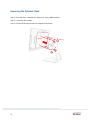
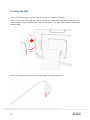
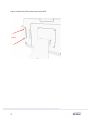
Installing the Optional Stand ................................................................................... 22
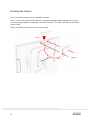
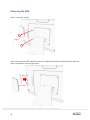
Installing the Camera ............................................................................................. 24
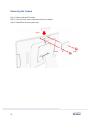
Installing the MSR .................................................................................................. 26

3
Appendix ................................................................................................... 29
Cleaning ................................................................................................................. 29
Solutions to Common Problems ............................................................................. 30
Warranty Information .............................................................................................. 31
RoHS Declaration ................................................................................................... 32

4
About This Document
No part of this publication may be reproduced, transmitted, transcribed, stored in a retrieval system,
or translated into any language or computer language, in any form or by any means, including, but not
limited to, electronic, magnetic, optical, chemical, manual, or otherwise without prior written permission
of MicroTouchTM a TES Company.

5
Compliance Information
For FCC (USA)
This equipment has been tested and found to comply with the limits for a Class B digital device,
pursuant to part 15 of the FCC Rules. These limits are designed to provide reasonable protection
against harmful interference in a residential installation. This equipment generates, uses, and can
radiate radio frequency energy, and if not installed and used in accordance with the instructions, may
cause harmful interference to radio communications. However, there is no guarantee that interference
will not occur in a particular installation. If this equipment does cause harmful interference to radio or
television reception, which can be determined by turning the equipment off and on, the user is
encouraged to try to correct the interference by one or more of the following measures:
• Reorient or relocate the receiving antenna.
• Increase the separation between the equipment and receiver.
• Connect the equipment into an outlet on a circuit different from that to which the receiver is connected.
• Consult the dealer or an experienced radio/TV technician for help.
This device complies with part 15 of the FCC Rules. Operation is subject to the following two conditions:
(1) this device may not cause harmful interference, and (2) this device must accept any interference
received, including interference that may cause undesired operation.
For IC (Canada)
CAN ICES-3(B)/NMB-3(B)
For CE (EU)
The device complies with the EMC Directive 2014/30/EU and Low Voltage Directive 2014/35/EU
Disposal Information
Waste Electrical and Electronic Equipment
This symbol on the product indicates that, under the European Directive 2012/19/EU governing waste
from electrical and electronic equipment, this product must not be disposed of with other municipal
waste. Please dispose of your waste equipment by handing it over to a designated collection point for
the recycling of waste electrical and electronic equipment. To prevent possible harm to the
environment or human health from uncontrolled waste disposal, please separate these items from
other types of waste and recycle them responsibly to promote the sustainable reuse of material
resources.
For more information about recycling of this product, please contact your local city office or your
municipal waste disposal service.

6
Renseighements relatifs à la conformité
Pour la FCC (États-Unis)
Ce matériel a fait l’objet d’essais qui ont déterminé qu’il respectait les limites d’un appareil de classe
B selon la partie 15 des règlements de la FCC. Ces limites sont établies pour assurer une protection
raisonnable contre les parasites nuisant à une installation résidentielle. Ce matériel génère, utilise et
peut émettre des ondes radio électriques, et lorsqu’il n’est pas installé et utilisé selon les instructions,
peut causer des parasites nuisant aux communications radio. Il n’y a toutefois aucune garantie qu’il
n’y aura pas de parasites dans une installation en particulier. Si ce matériel cause des parasites à la
réception d’ondes radio ou de télévision, ce qui peut être déterminé en l’éteignant et en l’allumant,
l’utilisateur est invité à essayer de corriger le problème des parasites par l’une ou l’autre des mesures
suivantes :
• Réorienter ou déplacer l’antenne de réception.
• Augmenter la distance entre le matériel et la réception.
• Brancher le matériel dans une prise sur un autre circuit que celui où le récepteur est
branché.
• Consulter le distributeur ou un technicien radio ou TV expérimenté pour des conseils.
L’appareil respecte la partie 15 des règlements de la FCC. Le fonctionnement doit respecter les deux
conditions suivantes : 1) cet appareil ne doit pas causer de parasites et (2) cet appareil doit accepter
tous les parasites reçus, notamment ceux pouvant causer un fonctionnement non voulu.
Pour Industrie Canada
Norme canadienne NMB-3(B)
Pour la CE (UE)
L’appareil respecte la directive 2014/30/UE relative à la compatibilité électromagnétique et la
directive 2014/35/EU sur les limites de basse tension
Informations sur l'élimination
Déchets d'équipements électriques et électroniques
Ce symbole sur le produit indique que, conformément à la directive européenne 2012/19/UE régissant
les déchets d'équipements électriques et électroniques, ce produit ne doit pas être jeté avec les autres
déchets municipaux. Veuillez éliminer vos déchets d'équipement en les remettant à un point de
collecte désigné pour le recyclage des déchets d'équipements électriques et électroniques. Pour éviter
d'éventuels dommages à l'environnement ou à la santé humaine dus à une élimination incontrôlée
des déchets, veuillez séparer ces articles des autres types de déchets et les recycler de manière
responsable afin de promouvoir la réutilisation durable des ressources matérielles. Pour plus
d'informations sur le recyclage de ce produit, veuillez contacter votre mairie ou votre service municipal
d'élimination des déchets.

7
Important Safety Instructions
Before using this product, please read the user manual thoroughly to help protect against property
damage and to ensure your personal safety and the safety of others.
Be sure to observe the following instructions.
For installation or adjustment, please follow the instructions in this manual and refer all servicing to
qualified service personnel.
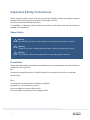
Usage Notice
Precautions
Please follow all warnings, precautions and maintenance as recommended in this user’s manual to
maximize the life of your unit.
Do
:
Disconnect the power plug from AC outlet if the product is not going to be used for an extended
period of time.
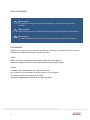
Don’t
:
Do not operate the product under the following conditions:
Extremely hot, cold or humid environment.
Areas susceptible to excessive dust and dirt.
Near any appliance generating a strong magnetic field.
! Warning
To prevent the risk of fire or shock hazards, do not expose the product to moisture.
! Warning
Please do not open or disassemble the product, as this may cause electric shock.
! Warning
The AC power cord must be connected to an outlet with ground connection.

8
Avis d’utilization
Précautions
Veuillez suivre toutes les mises en garde, précautions et entretiens recommandés dans ce manuel
d’utilisation pour maximiser la durée de vie de votre unité.
À faire :
Utiliser uniquement l’adaptateur d’alimentation prescrit pour votre appareil.
Débrancher l’appareil lorsqu’il n’est pas utilisé pendant une période prolongée.
À éviter :
Ne jamais utiliser l’appareil dans les conditions suivantes :
des conditions environnementales extrêmes (chaud, froid ou humidité)
des endroits remplis de poussières et de saletés.
à proximité d’appareils produisant un fort champ magnétique
! Mise en garde
Pour prévenir les risques d’incendie ou d’électrocution, ne pas exposer le produit à
l’humidité.
! Mise en garde
Prière de ne pas ouvrir ou démonter le produit, car cela pourrait entraîner l’électrocution.
! Mise en garde
Le cordon d’alimentation doit être branché à une prise pourvue d’une mise à la terre.

9
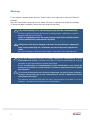
Warnings
To turn off touch computer power, press the “Power” button on the right side on the back of the touch
computer.
When the Power button is pressed, the main power of the touch computer is not turned off completely.
To disconnect power completely, remove the power plug from the outlet.
! Si l’un des événements suivants se produit, débranchez immédiatement la fiche
d’alimentation de la prise: le moniteur est tombé; le boîtier est endommagé; de l’eau est
renversée ou des objets tombent à l’intérieur du moniteur.
Si vou ne débranchez pas immédiatement la fiche d’alimentation, vous risquez de
provoquer un incendie ou un choc életrique. Contacter le personnel de service qualifé
pou inspection.
! Si le cordon d’alimentation ou la fiche est endommagé, ou deviant chaud, éteignez le
moniteur, assurez-vous que la fiche d’alimentation a refroidi et débranchez la fiche
d’alimentation de la prise.
Si le moniteur est toujours utilizé dans cet état, il peut provoquer un incendie ou un choq
électrique. Contactez votre revendeur pour le remplacement.
! If any of the following occur, remove the power plug from the outlet immediately:
the touch computer is dropped; the housing is damaged; water is spilled onto, or objects
dropped inside the touch computer.
Failure to immediately remove the power plug may result in fire or electrical shock.
Contact qualified service personnel for inspection.
! If the power cord or plug is damaged or becomes hot, turn the touch computer off,
make sure the power plug has cooled down and remove the power plug from the
outlet.
If the touch computer is still used in this condition, it may cause fire or electrical shock.
Contact your dealer for replacement.

10
Installation Tips
Things to avoid
Don't install in a high-temperature environment. Operating temperature: 0˚C to 40˚C (0˚F to 104˚F),
storage temperature -20C - 60C (-4˚F to 140˚F). If the touch computer is used in a high temperature
environment or near any heat sources, the case and other parts may become distorted or damaged,
resulting in overheating or electrical shock.
Don't install in a high-humidity environment.
Operating humidity: 20-90%
Don't insert the power plug into anything other than a grounded 100-240V AC outlet.
Don’t use a damaged power plug or worn outlet.
The use of extension cords is not recommended.
The use of the power supply that comes with the MicroTouch product is strongly recommended.
Don't place the touch computer on an unstable shelf or surface.
Don’t place objects on the touch computer.
If the touch computer is covered or the vents are blocked, the touch computer could overheat and
cause a fire.
Please keep a 10 cm minimum distance between the touch computer and the surrounding structures
to allow sufficient ventilation.
Don't move the touch computer when it is connected to the power cord When moving the touch
computer, make sure to remove the power plug and cables.
If you encounter a problem during installation, please contact your dealer for assistance. Do
not attempt to repair or open the touch computer.

11
Product Overview
This desktop touch computer with Windows operating system is designed and developed to provide a
flexible desktop touch computer solution with easily installed optional Camera and MSR accessories.
Its versatility makes it an exceptional choice for applications in all business sectors, especially in the
retail market.
Key Features
Processor: Celeron® J1900
Size: 21.5" TFT LCD
Resolution: 1920 x 1080
Contrast Ratio: 1000:1
Aspect Ratio: 16:9
Brightness: 225 cd/m2
View Angle: H:178˚, V:178˚
Video Output Port: 1 VGA
100 mm x 100 mm VESA mount
P-cap touch with up to 10 simultaneous touches
Plug and Play: no touch driver installation required
Warranty: 3 years
Unpacking
When unpacking please ensure that all the items in the following Accessories section are included. If
any are missing or damaged, please contact the place of purchase for a replacement.

12
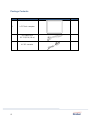
Package Contents
No.
Part
Picture
Qty
1
LCD Touch computer
1
2
AC Power Cord
IEC C15/C16 (1.8 m)
1
3
AC-DC converter
1

13
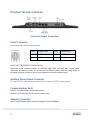
Product Setup and Use
Input and Output Connectors
Power Connector
Power Input: 4-pin 12VDC power connector
12V DC in
Pin #
Signal Name
Pin #
Signal Name
1
12VDC
2
12VDC
3
GND
4
GND
NOTE: USE THE CORRECT POWER SUPPLY.
MicroTouch touch computer models IC-156P/215P-AW2, AW3 and AW4 have similar power
connectors, but they are 24 VDC. If you have a mix of different models, check the voltage rating on
the power converter to ensure it is the correct voltage for the touch computer model.
Auxiliary Power Output Connector
DC Output: 12VDC general purpose power output. Center pin: +12VDC’; barrel: ground.
Communications Ports
USB 2.0 Four type-A USB communications ports
RS-232: Two RJ-50 serial RS-232 communications ports
Network Connection
LAN : RJ-45 Ethernet network connector (Supports 10/100/1000Mbps)

14
Video Output
VGA: Analog video output
Audio Output
Line-Out: Line level audio output for external speaker with amplification and volume control capabilities
Configuration and Cable Connections
Power is supplied by the included AC-to-DC power supply’s fixed 12 volt DC cable connector. Align
the key on the power adapter’s DC connector with the key on the DC jack on the touch computer and
push the connector in. Plug the AC power cable female connector into the receptacle on the power
converter, then plug the male connector of the AC cable into a wall outlet.
Connect your network cable into the LAN connector. All other ports are optional outputs
(communications ports are inputs/outputs).

15
Turning the Touch Computer On and Off
Power On/Off
Switch
Function
Description
Power On
Press the Power button to power on
Sleep, Restart ,
and Shutdown
Use the Window OS power controls to select
Forced power Off
Press and hold the Power button for 4 seconds to force power off
(it is recommended to use the Windows Shutdown option)

16
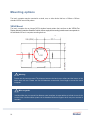
Mounting options
The touch computer may be mounted to a stand, arm, or other device that has a 100mm x 100mm
standard VESA mount hole pattern.
VESA Mount
The touch computer has an integral VESA standard mount pattern that conforms to the “VESA Flat
Display Mounting Interface Standard” which defines a physical mounting interface and corresponds to
the standards for touch computer mounting devices.
! Warning
Please use the correct screws! The distance between the back cover surface and the bottom of the
screw hole is 8 mm. Please use four M4 diameter screws with 8 mm length to mount the touch
computer.
! Mise en garde
Veuillez utilizer les vis correcte! La distance entre la surface du capot arrière et le fond du trou de vis
est de 8 mm. Veuillez utilizer quatre vis de diamètre M4 d’une longueur de 8 mm pour mounter le
moniteur.

17
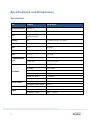
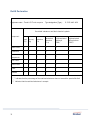
Specifications and Dimensions
Specifications
Item
Category
Specifications
Operating System
Windows 10
Processor
Celeron® J1900
2.0 GHz, 2M Cache
GPU
Integrated Intel® HD
Graphics engine
Memory
8GB
So-DIMM DDR3L 1333 MHz
Storage
128 GB
SSD
W-Fi
802.11
a/b/g/n/ac
Bluetooth
4.2
Supports BLE
LAN
1 x RJ45
Giga LAN
Communications
Ports
4 x USB
2.0 Type A
2 x RS-232
RJ-50 connector
LCD Panel
Size
15.6” TFT LCD
Resolution
1920 x 1080
Brightness (typical)
225 cd/m2
Contrast Ratio (typical)
1000:1
Number of Colors
16.7 million
Viewing Angle (typical)
Horizontal: 178 degrees; Vertical: 178 degrees
Touch Screen
Touch Type
P-CAP
Simultaneous touch points
Up to 10
Video Output
Type
VGA analog
Power
AC Adapter Input
AC 100V - 240V (50/60Hz), 60W max
AC Adapter Output
12VDC, 5A max

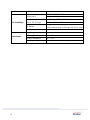
18
Speakers
2 x 2W
Size and Weight
Dimensions (W x H x D)
Without stand
510.8 mm x 308.1 x 45.9 mm
14.53 in x 12.13 in x 1.81 in
Dimensions (W x H x D)
With IS-215-A1 Stand
510.96 mm x 322.28 x 172.98 mm
20.12 in x 12.69 in x 6.81 in
Net Weight
6.77 kg without stand, 9.34 kg with SS-215-A1 stand
14.93 lb without stand, 20.59 lb with SS-215-A1 stand
VESA Mount
100 mm x 100 mm
Environment
Compliance
CE, FCC, LVD, RoHS
Operating Temperature
0C - 40C
Storage Temperature
-20C - 60C
Operating Humidity
20% - 90% RH, non-condensing

19
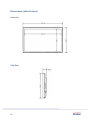
Dimensions (without stand)
Front view
.
Side View

20
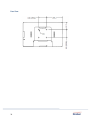
Rear View
La page est en cours de chargement...
La page est en cours de chargement...
La page est en cours de chargement...
La page est en cours de chargement...
La page est en cours de chargement...
La page est en cours de chargement...
La page est en cours de chargement...
La page est en cours de chargement...
La page est en cours de chargement...
La page est en cours de chargement...
La page est en cours de chargement...
La page est en cours de chargement...
La page est en cours de chargement...
-
 1
1
-
 2
2
-
 3
3
-
 4
4
-
 5
5
-
 6
6
-
 7
7
-
 8
8
-
 9
9
-
 10
10
-
 11
11
-
 12
12
-
 13
13
-
 14
14
-
 15
15
-
 16
16
-
 17
17
-
 18
18
-
 19
19
-
 20
20
-
 21
21
-
 22
22
-
 23
23
-
 24
24
-
 25
25
-
 26
26
-
 27
27
-
 28
28
-
 29
29
-
 30
30
-
 31
31
-
 32
32
-
 33
33


MicroTouch IC-215P-AW1-W10 Touch Computer Manuel utilisateur
- Catégorie
- Barebones PC / poste de travail
- Taper
- Manuel utilisateur
dans d''autres langues
Documents connexes
-
 MicroTouch IC-215P-AW1-W10 Manuel utilisateur
-
 MicroTouch IC-156P-AW1-W10 Manuel utilisateur
-
 MicroTouch IC-156P-AW1-W10 Touch Computer Manuel utilisateur
-
 MicroTouch IC-215P-AW4-W10 Manuel utilisateur
-
 MicroTouch IC-215P-AW3-W10 Manuel utilisateur
-
 MicroTouch IC-215P-AA2 Manuel utilisateur
-
 MicroTouch IC-156P-AW4-W10 Manuel utilisateur
-
 MicroTouch SK-097P-A2 Slimline Kiosk Touch Monitor Manuel utilisateur
-
 MicroTouch IC-215P-AW3 Touch Computer Mode d'emploi
-
 MicroTouch IC-156P-AW3 All -In-One Touch Computer Mode d'emploi


Autres documents
-
Tyco ET1725C Manuel utilisateur
-
DRAKE DSE24A Manuel utilisateur
-
 DENT Instruments ELITEpro XC Guide de démarrage rapide
-
Watts FloPro-MD Le manuel du propriétaire
-
-
Behringer EPX3000 Manuel utilisateur
-
Modine Manufacturing HDS Series Heaters Installation & Service Manual
-
 Winmate M900P Manuel utilisateur

