
Gas Flow and Pressure Measurement System
Installation, Operation Manual
Système de mesure du débit et de la pression du gaz
Manuel d’installation et d’utilisation
Dormont.com

2
Table of Contents
Attention Owners and Users ......................................... 3
Important Safety Information. ......................................... 4
Product Introduction. ............................................... 5
FloPro-MD Installation and Operation . .................................. 5
Viewing FloPro-MD Data ............................................10
Exporting Data From FloPro-MD. ......................................11
Bluetooth Communication Troubleshooting ............................. 11
Dimensional Drawings ............................................. 12
Technical Specifications. ............................................13
Kits and Replacement Parts. .........................................14
Disclaimers. ..................................................... 15
Limited Warranty and Remedies. ......................................15
WARNING
!
Read this Manual BEFORE using this equipment.
Failure to read and follow all safety and use information can result in death,
serious personal injury, property damage, or damage to the equipment.
Keep this Manual for future reference.
English

3
FloPro
™
-MD Installation and Operation Manual
Attention Owners and Users
Thank you for purchasing the Dormont
®
FloPro-MD gas flow and pressure mea-
surement system. This patent-pending product will provide safe and productive
operation as long as it is installed, set up, used, serviced and maintained in accor-
dance with the instructions in this manual. Owners and users of this equipment
have the responsibility to make certain that this equipment is used properly and
safely. To avoid the possibility of death, serious personal injury, property damage,
or damage to the equipment, owners should not permit anyone to touch or install
this equipment unless they are over 18 years of age, are adequately trained and
supervised, and have read and understand this manual. Owners should ensure
that no unauthorized personnel come in contact with this equipment.
READ THIS MANUAL care-
fully, learn how to install, set
up, use, service and main-
tain this product correctly,
and strictly follow all safety
information and instructions contained
in this manual and on the equipment,
as well as any requirements of local,
state, and federal law. Failure to do so
could result in death, serious personal
injury, property damage, or damage
to the equipment. This manual should
be considered a permanent part of the
FloPro-MD and be kept available for
easy reference by any user.
If this equipment, or any of its parts,
becomes damaged or needs repair,
stop using the equipment and con-
tact an experienced service individual
immediately. If the product labels or
this manual are misplaced, damaged
or illegible, or if you require additional
copies, please visit Dormont.com.
Please remember that this manual and
the product labels do not replace the
need to be alert, to properly train and
supervise users, and to use common
sense when using this equipment.
If you are ever uncertain about a
particular task or the proper method
of operating this product, ask your
supervisor, consult this manual, visit
Dormont.com, or contact your local
sales representative.
Product Identification
Please record your product’s identification and purchase information which will help
in the event you have questions or need service assistance.
Model: Date of purchase:
Serial No: Seller Name / Address:
Call 1-800-DORMONT for product technical support.

4
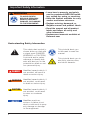
Important Safety Information
Understanding Safety Information
This safety-alert symbol is
shown alone or used with
a signal word (DANGER,
WARNING, or CAUTION).
A pictorial and/or safety
message to identify haz-
ards and alert you to the
potential for death or seri-
ous personal injury.
Identifies hazards which, if
not avoided, will result in
death or serious injury.
Identifies hazards which, if
not avoided, could result
in death or serious injury.
Identifies hazards which, if
not avoided, could result
in minor or moderate
injury.
Identifies practices,
actions, or failure to act
which could result in prop-
erty damage or damage
to the equipment.
• Learn how to properly and safely
use the equipment BEFORE install-
ing, setting up, using, or servicing.
• Keep the manual available for easy
access and future reference.
• Replace missing, damaged, or
illegible manual and product labels.
• Read the manual and all product
labels and follow all safety and
other information.
• Replacement manuals available at
Dormont.com
This pictorial alerts you
to the need to read the
manual.
This pictorial alerts you to
electricity, electrocution,
and shock hazards.
WARNING
!
CAUTION
!
NOTICE
DANGER
!
!
WARNING
!
TO AVOID DEATH,
SERIOUS PERSONAL
INJURY, PROPERTY
DAMAGE, OR DAMAGE
TO THE EQUIPMENT:

5
FloPro
™
-MD Installation and Operation Manual
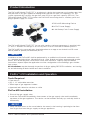
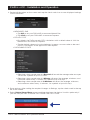
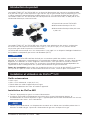
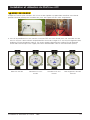
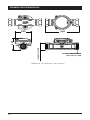
The FloPro-MD Model FPMD75FF is an electronic device that measures and monitors gas flow
and pressure to any gas appliance utilizing either Natural Gas (NG) or Propane (LPG). This
system automatically converts the gas flow rate (CFH) to a gas flow capacity (BTU/hr). The
FloPro-MD Model FPMD75FF includes the FloPro-MD measuring device, a battery pack and
plug-in power supply, as shown.
1 FloPro-MD Measuring Device
2 AC-DC Power Supply
3 4-AA Battery Pack Power Supply
The FloPro-MD Model FPMD75FF for use with standby stationary generators is provided with
½" and ¾" flexlines and fittings as accessory items to assist with the installation process.
The FloPro-MD also communicates that information to an app on an Android or iOS smart
device (tablet or phone) via Bluetooth (BLTE).
NOTICE
Installation of the FloPro-MD shall be performed by a qualified and licensed tradesman such
as a plumber and electrician, following all local, state, federal and other governmental require-
ments, and all building and construction codes and standards. Step-by-step installation
instructions depend upon the application and the configuration of the building’s gas distribu-
tion system.
All installations require thorough inspection of all gas piping BEFORE installation, and testing
for and eliminating all leaks before and after installation.
Tools Required
• Pipe wrench
• Qty 2, 12" adjustable wrenches
• Teflon tape or gas approved sealant
• Approved leak detection solution or sniffer
FloPro-MD Installation
1. Shut off the gas supply valve.
2. Install the FloPro-MD immediately downstream of the gas supply valve and immediately
upstream of the gas appliance. The device can be installed vertically up, vertically down or
horizontally.
NOTICE
3. Verify the blue arrow on the cover label or the arrow in the housing is pointing in the direc-
tion of gas flow from the gas supply to the gas appliance.
Product Introduction
FloPro
™
-MD Installation and Operation
1
2
3

6
FloPro
™
-MD - Installation and Operation
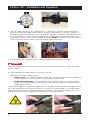
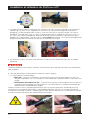
4. The FloPro-MD device comes standard with ¾" female NPT inlet and outlet connections.
Apply a gas approved pipe thread sealant or tape to the mating ¾" male NPT threads of
the pipe or fitting. Hand tighten the ¾" female NPT threads. Using two adjustable wrenches
(or a pipe wrench if no hex surface) complete the final gas tight connection between the
mating NPT threads. One of the adjustable wrenches MUST be placed on the hex surface
of the FloPro-MD device while making the final gas tight connection.
5. Ensure connections are leak tight by using an approved leak solution or sniffer.
DANGER
!
Failure to properly ensure that the connections are leak tight could result in significant bodily
injury or death.
6. Once leak tight has been verified, turn on gas valve(s).
7. There are two power supply options:
• Battery Pack – For field installations where 120-volt power outlets are unavailable, or
if the installation is a quick check to verify gas flow and pressure.
• AC-DC Power Supply – If a two-prong, 120-volt power outlet is in close proximity
to the FloPro-MD installation, or if the FloPro-MD will be installed to collect data for a
longer period of time.
Insert the DC plug from the power supply (AC-DC or battery pack) into the DC plug port locat-
ed on the underside of the FloPro-MD device. The AC-DC power supply is a standard North
American AC input type. The battery pack power supply is secured to the underside of the
FloPro-MD device using the battery clip and the four mounting locations.

7
FloPro
™
-MD Installation and Operation Manual
FloPro
™
-MD - Installation and Operation
CAUTION
!
DO NOT expose AA alkaline batteries to water or liquids which may result in chemical leakage
causing eye, skin or respiratory irritation.
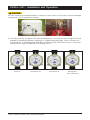
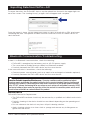
8. At initial power up, the green LED will be energized for 1 second and then all lights become
energized momentarily before changing to a single blinking blue light, which indicates nor-
mal operation. A double blinking blue light indicates that the FloPro-MD device is communi-
cating with the app via Bluetooth Low Energy (BTLE).
Power off Initial power up Initial power up Blinking blue -
normal operation

8
FloPro
™
-MD - Installation and Operation
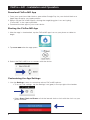
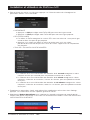
3. Select the FloPro-MD icon to connect with the device.
Customizing the App Settings
1. Use the Settings screen to customize various FloPro-MD options.
• To access the settings, tap the Settings icon (gear) in the top right of the header.
• Select Sync Clock to Phone to link the internal device clock with the clock on your
phone or tablet.
Download FloPro-MD App
1. From your smart hand-held device, open either Google Play for your Android device or
Apple App Store for you Apple product.
2. Search for the FloPro-MD app by clicking the magnifying glass icon and typing
“FloPro-MD” in the space provided.
3. Download the free app to your smart device.
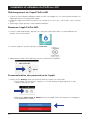
Starting the FloPro-MD App
1. After the app is downloaded, tap the FloPro-MD app icon on your phone or tablet to
begin.
2. Tap scan now after the app opens.

9
FloPro
™
-MD Installation and Operation Manual
FloPro
™
-MD - Installation and Operation
2. Review all the values on the screen and tap the check mark icon to save displayed settings
to the FloPro-MD.
• MEASURED GAS
o Tap NG to set your FloPro-MD to measure Natural Gas.
o Tap LPG to set your FloPro-MD to measure Propane.
• BTU/CU FOOT
o By default, the FloPro records BTU calculations with a default value of 1000 for
Natural Gas and 2500 for Propane.
o Tap the default value and use the keyboard to enter a custom value to be used
for BTU calculations in the app and in data exports.
• DATA SAMPLE RATE
o Selecting a data sample rate of 1 Second will record the average value once per
second for a period of up to 12 hours.
o Selecting a data sample rate of 1 Minute will record the average, minimum, and
maximum values every 1 minute, for a period of up to 3 days.
o Selecting a data sample rate of 10 Minutes will record the average, minimum,
and maximum values every 10 minutes, for a period of up to 30 days.
3. Save settings. After making the required changes in Settings, tap the check mark in the top
left of the screen.
4. Select Delete Stored Data to erase existing data from the device. Use this option only if
you are sure you want to ERASE ALL DEVICE HISTORY LOGS.

10
Viewing FloPro
™
-MD Data
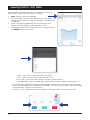
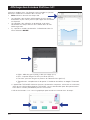
Use the tabs in the gray header to change the amount of
time visible in the chart from one to 12 hours.
• Now displays real-time readings.
• Data continues to load from the most recently taken
sample to the oldest as long as the app is connected to
the device.
• Data is displayed graphically and the real-time data
point is also displayed in the lower left corner.
• There are several data modes that can be selected from
the MODE drop down menu.
o Flow – gas flow in cubic feet per hour (CFH)
o BTU – gas capacity in BTU per hour (BTU/hr)
o Pressure – gas pressure in inches of water column (in/H
2O)
o Temperature – device temperature inside the housing in degrees Fahrenheit (°F)
• The FloPro-MD application displays the average, minimum and maximum data readings
based on the sample rate set on the FloPro-MD. The data rate can be customized. Refer
to the previous section for instructions.
• Use the < and > buttons below the graph to move backward and forward in time.

11
FloPro
™
-MD Installation and Operation Manual
To export data from the FloPro-MD device, tap the upload box located in the upper right cor-
ner of the screen. The “loading history” progress bar will appear until complete.
Once the export is done, tap the upload box again to send an email with a CSV attachment
containing the data. Your phone or tablet must be connected to WiFi or cellular service to
send the email.
Exporting Data from FloPro
™
-MD
Bluetooth Communication Troubleshooting
If there is no Bluetooth communication, check the following:
• FloPro-MD is energized by the battery pack or AC-DC power supply.
• The smart device (mobile phone or tablet) has Bluetooth enabled.
• Proximity between the FloPro-MD device and the smart device.
If the communication is intermittent, check the following:
• Constant power source (battery pack may need to be recharged or batteries replaced).
• Proximity between the FloPro-MD device and the smart device.
Maintenance
FloPro-MD Removal or Replacement
• The FloPro-MD hardware should only be removed by a qualified and skilled service tech-
nician.
• Periodic cleaning of the device should be considered depending on the operating envi-
ronment.
• Do not submerse the device in any form of liquid cleaning solution.
• Apply cleaning solution to a clean cloth or sponge and remove any visible grease or
grime from the device.
WARNING
!
Need for Periodic Inspection/Maintenance: Corrosive conditions and/or unauthorized adjust-
ments or repair could render the product ineffective for the service intended. Regular checking and
cleaning of the product's connection points help ensure maximum life and proper product function-
ality. DO NOT remove the housing lid for any reason as such action will void product warranty. AVOID
excessive buildup of pipe sealant or pipe tape at the inlet and out let connection points, which could
result in flow restrictions or contamination of the product.

12
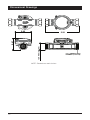
Dimensional Drawings
1.50 HEX (2 PLCS)
3/4" FEMALE NPT
THREAD (2 PLCS)
2.41
5.93
2.93
NOTE: Dimensions are in inches

13
FloPro
™
-MD Installation and Operation Manual
Gas Calibration: Natural Gas (NG)
Gas Flow Rate NG: 15 to 325 CFH
Gas Flow Capacity NG: 15,000 to 325,000 BTU/hr
Gas Pressure Drop NG: 0.45" w.c. @ 325,000 BTU/hr
Gas Calibration: Propane (LPG)
Gas Flow Rate Propane: 6 to 200 CFH
Gas Flow Capacity Propane: 15,000 to 500,000 BTU/hr
Gas Pressure Drop Propane: 0.45" w.c. @ 500,000 BTU/hr
Operating Temperature FloPro-MD
with AC-DC Power Supply 32 to 104°F (0 to 40°C)
Operating Temperature FloPro-MD
with Battery Pack Power Supply 0 to 130°F (-17.8 to 54°C)
Operating Gas Pressure: 0 to 5 psi (0 to 344 mbar)
Operating Atmospheric Pressure: 7.25 to 17.4 psi (0.5 to 1.2 bar)
Operating Humidity Range: 20 to 80% non-condensing
Operating Altitude: -1,640 to 6,561 feet (-500 to 2,000 meters)
Standard End Connections: ¾" Female NPT
Housing Material: Cast Aluminum – Black Powder Coat
End Connection Material: Extruded Aluminum – Black Anodized
Housing Lid Material: PC+ABS Blend – Natural
Reset Button & Power Seal Material: TPE or TPV – Black
O-Ring Seal Material: Fluorocarbon (FKM)
Battery Clip & Cable Retainer Material: PC+ABS Blend – Black
Screw Material Stainless Steel
Vent Material PTFE Membrane
Supply Rating: 6VDC – 12VDC, 2W
AC-DC Power Supply: Input 100-240VAC, 50-60Hz, 0.3A
Output 12VDC, 1A, 12W
DC Plug Dims 5.5mm OD x 2.5mm ID x 9.5mm L
DC Plug Polarity Center Positive
Cord Length 1500mm
Battery Pack Power Supply: Qty 4 – AA Alkaline-Zinc/Manganese Dioxide
(1.5V each)
Life is approx. 230 hours of continuous operation
Industry Standard Dimensions comply with ANSI and
IEC Standards
DC Plug Dims 5.5mm OD x 2.5mm ID x 9.5mm L
DC Plug Polarity Center Positive
Cord Length 170mm
Interface & Communications: Android and iOS Application via BlueTooth Low Energy
Operating Environmental Conditions: Installation Category II
Pollution Degree 2
For Indoor and TEMPORARY Outdoor Use.
DO NOT expose to rain, snow, water or liquids.
NOT for permanent outdoor installations.
Technical Specifications

14
Kits and Replacement Parts
KIT # DESCRIPTION
68004851 Dormont FloPro-MD Model FPMD75FF ¾" FNPT Generac Hard Case Kit
with Flexline Accessories
68004852 Dormont FloPro-MD Model FPMD75FF ¾" FNPT Standard Hard Case Kit
REPLACEMENT
PART #
DESCRIPTION
68004920 Dormont FloPro-MD Model FPMD75FF ¾" FNPT x ¾" FNPT
68004921 AC-DC Power Supply
68004922 Battery Pack Power Supply w/Clip
68004923 AA Alkaline Batteries (Pack of 2)
68004924 Standard Hard Case with Foam Inserts
68004925 Generac Hard Case with Foam Inserts
68001391 40-9898-12FP ¾" x 12" Nut x Nut Flexline
0243612 30-9898-12FP ½" x 12" Nut x Nut Flexline
68004926 70-4041 ¾" x ¾" Male NPT Flare Adapter
68004927 90-3041 ½" x ¾" Male NPT Flare Adapter

15
FloPro
™
-MD Installation and Operation Manual
Limited Warranty / Limitation Of Remedy
A. Limited Warranty. Seller warrants to Buyer that the FloPro-MD items and components
manufactured by Seller other than commercial gas connectors will be free from defects in
material and workmanship for a period of one (1) year from tender of delivery to Buyer. For
items not manufactured by Seller, the only warranty extended is that of the manufacturer or
supplier of those items, if any.
B. Remedies. Seller’s liability and Buyer’s exclusive remedy is expressly limited to Seller’s
replacement of the defective items and components manufactured by the Seller, at Seller’s
cost. Such replacement will be made only upon return of the defective item in accordance
with Seller’s shipping instructions and return authorization procedures. All defective returns
are subject to Seller’s inspection. Seller shall not be liable for any labor or freight charges
related to the return of defective items to Seller. Such remedies are the sole remedies for
breach of warranty.
C. Exclusions and Conditions. Seller’s obligations with respect to the express warranties and
remedies contained herein are conditioned on the following: Buyer shall not assign its rights
under these express warranties, and any attempted assignment shall render such warran-
ties, but not any disclaimers or limitations, void, and the goods shall be sold AS IS.
D. Disclaimer of Implied Warranties; Disclaimer of Damages. Seller gives no warranties except
those expressly contained herein. Seller disclaims all other warranties implied by law, usage
of the trade, course of dealing or course of performance including, but not limited to, the
implied warranties of merchantability and fitness for a particular purpose. In no event shall
seller be liable for special, indirect, consequential or incidental damages, whether arising
under contract, warranty, tort, negligence, strict liability or any other theory of liability. Such
damages include, but are not limited to, loss of profits, loss of use of the goods, damage
to property, and claims of third parties. Some states do not allow the exclusion or limitation
of incidental or consequential damages, or any limitations on how long an implied warranty
lasts, so the above exclusion or limitation may not apply to you. This warranty gives the
buyer specific legal rights, and buyer may also have other rights which vary from state to
state. So far as is consistent with applicable state law, any implied warranties that may not
be disclaimed, including the implied warranties of merchantability or fitness for a particular
purpose, are limited in duration to one year from the date of manufacture.
E. Notice and Time of Claim. Buyer agrees to check and inspect all products against shipping
papers and for damage or shortage upon receipt of goods at destination. Every claim for
loss, damage in transit, or other cause visible upon inspection shall be made with carrier.
Claims for shortage must be made within five (5) days of receipt. Warranty claims must be
made within the applicable warranty period. The parties expressly waive the statute of lim-
itations and agree that any legal proceeding for any breach of this contract shall be waived
unless held within two (2) years after the accrual of the cause of action therefor.
Limited Warranty and Remedies
Tablet and Smart Phone Data Disclaimer
The FloPro-MD collects data such as gas flow, gas pressure, temperature and displays such
data via the FloPro-MD app. The FloPro-MD app can be downloaded to a smart phone
(Android or IOS) or tablet. It displays rolling data, based upon owner/user data input settings,
and the data can be exported to a computer.
Use of the FloPro-MD and the FloPro-MD app are governed by our Privacy Policy and Terms
of Use, which are both available through the FloPro-MD app and our website:
www.watts.com/privacy-policy
www.watss.com/terms-of-use
Disclaimers

16
Français
À l’attention des propriétaires et des utilisateurs ......................... 17
Informations de sécurité importantes. ................................. 18
Introduction du produit. ............................................ 19
Installation et utilisation du FloPro-MD. ................................. 19
Affichage des données du FloPro-MD ..................................24
Exportation des données du FloPro-MD. ................................25
Dépannage des communications Bluetooth ............................. 25
Dessins des dimensions ............................................ 26
Caractéristiques techniques. .........................................27
Trousses et pièces de rechange. ......................................28
Avis. ........................................................... 29
Garantie limitée et recours. ...........................................29
AVERTISSEMENT
!
Lisez ce manuel AVANT d’utiliser cet équipement.
Le non-respect de toutes les instructions de sécurité et d’utilisation de ce pro-
duit peut endommager ce produit ou entraîner d’autres dommages matériels,
des blessures graves ou la mort.
Conservez ce manuel pour référence ultérieure.
Table des matières

17
Installation et utilisation du FloPro
MC
-MD
À l’attention des propriétaires et des utilisateurs
Merci d'avoir acheté le système de mesure du débit et de la pression du gaz
FloPro-MD de Dormont
MD
. Ce produit avec brevet en instance fournira un
fonctionnement sûr et productif à condition qu’il soit installé, configuré, réparé
et entretenu conformément aux instructions fournies dans ce manuel. Les
propriétaires et utilisateurs de cet équipement sont responsables de s’assurer qu’il
est exploité correctement et en toute sécurité. Pour éviter l’éventualité de blessures
graves, voire mortelles, de dommages matériels ou de dommages à l’équipement,
les propriétaires ne doivent autoriser à toucher cet équipement quiconque n’a pas
plus de 18 ans, n’est pas formé et supervisé de façon adéquate, et n’a pas lu et
compris ce manuel. Les propriétaires doivent s’assurer qu’aucun personnel non
autorisé n’entre en contact avec cet équipement.
LISEZ CE MANUEL
attentivement, apprenez
comment installer, configurer,
utiliser, réparer et entretenir
cet équipement correctement
et observez à la lettre l’ensemble des
informations et des instructions de
sécurité contenues dans ce manuel
et sur l’équipement lui-même, ainsi
que l’ensemble des exigences légales,
qu’elles soient locales, régionales, ou
fédérales. Leur non-respect pourrait se
traduire par des blessures graves, voire
mortelles, des dommages matériels
ou des dommages à l’équipement.
Ce manuel doit être considéré comme
faisant partie intégrante du FloPro-MD et
doit être à la disposition des utilisateurs
qui voudraient s'y référer.
Si cet équipement, ou l’une quelconque
de ses parties, est endommagée ou
nécessite une réparation, cessez de
l’utiliser et contacter immédiatement un
technicien d’entretien expérimenté. Si
les étiquettes du produit ou si ce manuel
ont été perdues, sont endommagées
ou illisibles, ou si vous avez besoin de
copies supplémentaires, veuillez visiter le
site Dormont.com.
N’oubliez pas que ce manuel et les
étiquettes du produit ne remplacent
pas la nécessité de rester vigilant, de
former et de superviser correctement
les utilisateurs, et de faire preuve de bon
sens lorsqu’on utilise cet équipement.
Si vous hésitez concernant une tâche
particulière ou sur la méthode correcte
d'utiliser ce produit, demandez à votre
superviseur, consultez ce manuel, visitez
le site Dormont.com, ou contactez votre
représentant local des ventes.
Identification du produit
Veuillez noter l’identification de votre produit et les informations relatives à votre
achat qui seront utiles si vous souhaitez poser des questions ou pour toute autre
demande de service.
Modèle: Date d’achat:
N°de série: Nom/adresse du vendeur:
Composez 1-800-DORMONT pour le soutien technique du produit.

18
Informations de sécurité importantes
Compréhension des renseignements de sécurité
Ce symbole d'alerte
de sécurité est affiché
seul, ou utilisé avec un
mot-symbole (DANGER,
AVERTISSEMENT,
MISE EN GARDE). Une
illustration ou un message
de sécurité pour identifier
les dangers et vous avertir
du potentiel de blessure
grave ou mortelle.
Identifie des dangers qui,
s’ils ne sont pas évités,
entraîneront la mort ou
des blessures graves.
Identifie des dangers qui,
s’ils ne sont pas évités,
peuvent entraîner la mort
ou des blessures graves.
Identifie des dangers qui,
s’ils ne sont pas évités,
peuvent entraîner des
blessures mineures ou
modérées.
DANGER
!
AVERTISSEMENT
!
MISE EN GARDE
!
• Apprenez comment utiliser
l’équipement de façon appropriée
et sécuritaire AVANT d’en débuter
l’installation, la configuration,
l’utilisation ou la réparation.
• Conservez le manuel en lieu sûr et
facile d’accès pour référence future.
• Remplacez les étiquettes et le
manuel dès qu’ils sont illisibles ou
endommagés.
• Lisez le manuel et toutes les
étiquettes du produit, puis observez
toutes les informations de sécurité.
• Des manuels de remplacement sont
disponibles au Dormont.com.
Identifie des pratiques,
des actions ou
l’absence d’actions qui
pourraient entraîner des
dommages matériels
ou des dommages à
l’équipement.
Ce graphique vous avertit
de la nécessité de lire le
manuel.
Cette illustration vous
avertit de la présence
d’électricité, de risque
d’électrocution ou de
décharges électriques.
AVIS
!
AVERTISSEMENT
!
POUR ÉVITER LES
BLESSURES GRAVES,
VOIRE MORTELLES,
ET LES DOMMAGES
MATÉRIELS:

19
Installation et utilisation du FloPro
MC
-MD
Le modèle FPMD75FF du FloPro-MD est un dispositif électronique qui mesure et contrôle le débit
et la pression du gaz à tout dispositif au gaz utilisant soit du gaz naturel (GN) ou propane (GPL). Ce
système convertit automatiquement le débit gazeux (CFH) à la capacité de débit du gaz (BTU/h).
Le modèle FPMD75FF du FloPro-MD inclut le dispositif de mesure FloPro-MD, un bloc-pile et une
alimentation électrique, comme illustrés.
1 Dispositif de mesure FloPro-MD
2 Alimentation électrique CA-CC
3 Alimentation électrique bloc-pile avec
4piles AA
Le modèle FPMD75FF du FloPro-MD pour utilisation avec génératrices de secours stationnaires
est fourni avec des boyaux et raccords de 1/2po (1,3cm) et 3/4po (1,9cm) comme articles
accessoires pour aider au processus d'installation.
Le FloPro-MD communique aussi ces informations à une appli sur un dispositif intelligent Android ou
iOS (tablette ou téléphone) par le biais de Bluetooth (BLTE).
AVIS
L'installation du FloPro-MD doit être réalisée par un membre qualifié des métiers, comme un
plombier et un électricien, conformément à l'ensemble des exigences légales, qu'elles soient locales,
régionales, ou fédérales et autres exigences administratives, ainsi que tous les codes et normes
des bâtiments et de la construction. Les instructions d’installation étape par étape dépendent de
l’application et de la configuration du système de distribution de gaz du bâtiment.
Toutes les installations nécessitent une inspection de tous les tuyaux de gaz AVANT l'installation,
ainsi que le test pour les fuites et l’élimination de toutes les fuites, avant et après l’installation.
Outils nécessaires
• Clé à tuyau
• Qté2, clé à molette de 12po (30,5cm)
• Ruban téflon ou adhésif approuvé pour le gaz
• Solution de détection des fuites ou renifleur approuvé
Installation du FloPro-MD
1. Fermez l’alimentation en gaz à la vanne d'alimentation.
2. Installez le FloPro-MD immédiatement en amont de la vanne d'alimentation de gaz, et
immédiatement en aval du dispositif au gaz. L'appareil peut être installé verticalement vers le haut,
verticalement vers le bas, ou à l'horizontale.
AVIS
3. Vérifiez que la flèche bleue sur l'étiquette du couvercle ou la flèche dans le boîtier pointe dans la
direction du débit de gaz à partir de l'alimentation de gaz vers le dispositif au gaz.
Introduction du produit
Installation et utilisation du FloPro
MC
-MD
1
2
3

20
Installation et utilisation du FloPro
MC
-MD
4. Le dispositif FloPro-MD est livré de façon standard avec des raccords d'entrée et de sortie NPT
femelles de 3/4po (1,9cm). Appliquez un mastic ou un ruban pour filetage de tuyauterie au
filetage NPT mâle concordant de 3/4po (1,9cm) du tuyau ou du raccord. Serrez à la main le
filetage NPT femelle de 3/4po (1,9cm). À l'aide de deux clés à molette (ou une clé à tuyau, s'il
n'y a pas une surface hexagonale), effectuez le dernier raccord étanche au gaz entre les deux
filetages NPT concordants. Une des clés à molette DOIT être placée sur la surface hexagonale du
dispositif FloPro-MD en effectuant le dernier raccord étanche au gaz.
5. Assurez-vous que les raccords sont étanches en utilisant une solution de fuites ou un renifleur
approuvé.
DANGER
!
Le défaut de bien assurer que les raccords sont étanches peut entraîner des blessures importantes,
voire mortelles.
6. Lorsque l'étanchéité a été confirmée, ouvrez les vannes de gaz.
7. Il y a deux options d'alimentation:
• Bloc-pile : pour les installations sur le terrain où des prises de courant de 120volts ne
sont pas disponibles, ou si l'installation est une vérification rapide du débit ou de la pression
du gaz.
• Alimentation électrique CA-CC: si une prise de courant à deux broches de 120volts est
à proximité de l'installation du FloPro-MD, ou si le FloPro-MD est installé pour recueillir des
données pour une période plus longue.
Insérez la prise CC dans l'alimentation électrique (CA-CC ou bloc-pile) dans l'entrée de prise CC
située dessous le dispositif FloPro-MD. L'alimentation électrique CA-CC est un type d'entrée CA
standard en Amérique du Nord. L'alimentation par bloc-pile est fixée dessous le dispositif FloPro-MD
à l'aide de la pince de pile et des quatre endroits de fixation.
La page est en cours de chargement...
La page est en cours de chargement...
La page est en cours de chargement...
La page est en cours de chargement...
La page est en cours de chargement...
La page est en cours de chargement...
La page est en cours de chargement...
La page est en cours de chargement...
La page est en cours de chargement...
La page est en cours de chargement...
La page est en cours de chargement...
La page est en cours de chargement...
-
 1
1
-
 2
2
-
 3
3
-
 4
4
-
 5
5
-
 6
6
-
 7
7
-
 8
8
-
 9
9
-
 10
10
-
 11
11
-
 12
12
-
 13
13
-
 14
14
-
 15
15
-
 16
16
-
 17
17
-
 18
18
-
 19
19
-
 20
20
-
 21
21
-
 22
22
-
 23
23
-
 24
24
-
 25
25
-
 26
26
-
 27
27
-
 28
28
-
 29
29
-
 30
30
-
 31
31
-
 32
32


Watts FloPro-MD Le manuel du propriétaire
- Taper
- Le manuel du propriétaire
- Ce manuel convient également à
dans d''autres langues
- English: Watts FloPro-MD Owner's manual
Documents connexes
Autres documents
-
Dormont 0241215 Guide d'installation
-
Dormont 0240661 Manuel utilisateur
-
 MicroTouch IC-215P-AW1-W10 Touch Computer Manuel utilisateur
-
 MicroTouch IC-156P-AW1-W10 Touch Computer Manuel utilisateur
-
Modine HDS125AS0111FBA Guide d'installation
-
Modine Manufacturing HDS Series Heaters Installation & Service Manual
-
-
-
Desa O36NR Le manuel du propriétaire
-
Middleby PS200 Manuel utilisateur

