
User Manual
RANGE HOOD
Please read the following safety information carefully before installing and/or using this appliance.
We recommend that you keep this manual for future use and/or in case of transfer of ownership
of the range hood
JQG7505/JQG7505-W

- 21 -
Thank you!
Dear User, thank you for purchasing the Fotile
Range Hood. At Fotile, we manufacture exquisite
appliances that are expertly crafted with the finest
materials. Before using the Fotile Range Hood,
please take some time to read through this Product
Manual (manual). It will familiarize you with important
safety, operation and maintenance instructions, as
well as help maximize your culinary experience.
Before using the Fotile Range Hood, you must
follow the instructions, as specified in this manual.
Any damage resulting from the improper operation
and/or maintenance of the appliance may result
in the loss of warranty. The warranty will become
invalid, and your warranty application, whether direct
or indirect, will not be accepted by authorized service
center of Fotile. If you require warranty or post-
warranty after-sale service, please contact the local
authorized service center of Fotile nearest you.
Your satisfaction with the Fotile brand is
important to us. Our after-sales service centers
provide assistance in resolving issues with Fotile
appliances.
Product model and serial number on the plaque
are required if you need services.
as follows:
Contents
1 Safety Information .................................. 22
2 Operation .............................................. 25
2.1 Product Information ......................... 25
2.2 Operation ........................................ 26
3 Cleaning and Maintenance ................... 27
4 FAQ ....................................................... 29
5 Service Information ............................... 30
6 Installation .............................................. 30
6.1 Installation Instructions ................... 30
6.2 Product dimensions ......................... 32
6.3 List of Accessories .......................... 32
6.4 Installation Tools............................... 33
6.5 Installation Procedure ...................... 34
6.6 Test Run After Installation ................ 41
In order to ensure the safe and efficient use of
Fotile appliances, please take note of the following
types of highlighted information that will be outlined
throughout this manual:
IMPORTANT NOTE highlights information that is
particularly important.
CAUTION signals a situation where minor injury or
product damage may occur if instructions are not followed.
WARNING
serious injury or death if precautions are not followed.
Product features and specifications are subject to
change, at any time, without notice and may be
different from those in this material. Please visit our
website at www.fotileglobal.com for the most up-to-
date information.
FOTILE YouTube
FOTILE America LLC
FOTILE Toronto Flagship Store
* Address 6 Campus Dr, Suite 210, Parsippany, NJ 07054
* Toll Free 888-315-0366
* Website us.fotileglobal.com
* Service Mail [email protected]
* Address 8365 Woodbine Ave Markham, L3R2P4
* Toll Free 844-315-0315
* Website ca.fotileglobal.com
* Service Mail [email protected]
US WeChat Service
Canada WeChat Service
Canada Wechat

- 22 - - 23 -
will prevail, and installation personnel must
conform to these requirements.
• The operating temperature of the range hood
should not exceed 104 (40).
• Please do not place anything on top of the
product. Anything placed on top may fall off or
incline. For example, if you place seasoning
bottles on top, the inclination may cause
liquid to flow inside the product, resulting in
damaged electrified components and therefore
unnecessary risks. Our company will not bear
the responsibility for free repair in case of
product damage due to the above reason.
• Clean the Grease Cup frequently to prevent
such as plastic wrap, paper towels, etc.
• When cutting or drilling into the wall or ceiling,
be careful not to damage electrical wiring,
water pipes, gas lines, or other hidden utilities.
• Adhere to the heating equipment manufacturer’s
guidelines and safety standards, such as
those published by the National Fire Protection
Association (NFPA), the American Society for
Heating, Refrigeration and Air Conditioning
Engineers (ASHRAE) and the local code
authorities. Meanwhile, conform to the safety
standards issued by such administrative
• When gas burners are in operation without any
cookware placed on them, they can build up
a lot of heat. A ventilation appliance installed
above the cooker may become damaged or
cookware on them.
• Adhere to the voltage and frequency settings
listed in this manual to avoid possible
damages to the range hood.
• Please use standard accessories provided by
our company to prevent the range hood from
falling down accidentally. The hole drilled in
the wall should precisely match the size of the
expansion pipe, otherwise, the range hood
may loose and fall down.
• Tampered glass is applied to the products of
the company and the tampering treatment
of the glass determines the extremely little
possibility of spontaneous explosion. If the
occurrence of spontaneous explosion is not
due to improper use, our company promises
free replacement of the accessories. The
possibility of tempered glass breaking can
be significantly increased in the following
situations, which should be avoided: For
instance, hitting the glass, especially the
corners of the glass, with cooking utensils
or other hard objects; The glass is impacted
when you open a cabinet door around the
Range Hood; Put the glass in an extremely hot
or cold environment or an environment where
heat and cold are excessively alternated.
lead to risks.
Warning:
Risk of Electric Shock
A defective appliance may cause electric shock.
Never switch on a defective appliance. Unplug the
appliance from the mains or switch off the circuit
breaker in the fuse box in case of problems, and
contact our authorized service center.
• The range hood should be connected to a
standard power socket with safe grounding.
Midway connection, prolonged electric line or
multi-socket wiring may cause electric shock,
overheating and, in some cases, result in
a fire. Installation of the range hood should
be performed by professional electricians in
strict accordance with electricity standards
and regulations of the local area. Before
connecting the rod, turn off the power source
and take appropriate measures to prevent
auto closing of the power switch.
• In order to prevent electric shock and/or other
bodily injuries to persons, do not exceed 120V
AC input.
• Do not install the range hood in a bathroom
and/or a humid area, as this will significantly
increase the risk of electric shock.
• If a wire is damaged or defective, contact an
(provided by Fotile) to replace the wire.
• Do not change, stretch, knot, pressure or
squeeze the wire as any resulting damage can
In order to prevent accidental damage to the
Fotile Range Hood and/or bodily injuries as a
result of its operation, please read the following
safety informationinstalling and/or using this
appliance. Following the instructions carefully
will significantly reduce the risk of fire, electric
shock and/or bodily injuries to persons. We
recommend that you keep this manual for future
use and/or in case of transfer of ownership of
the range hood.
Important Note:
• This appliance is intended for indoor home
cooking only; it cannot be used for outdoor
cooking. Please use this product only
according to the manufacturer’s instructions.
Fotile assumes no responsibility if you use
it in special environment. Please contact
a Fotile authorized service center if you
encounter any problem.
• Check the appliance for damage after
unpacking it. If you detect any obvious
damage to the product, do not proceed with
the installation. Please contact our authorized
service center immediately.
• Avoid placing gypsum powder, construction dust,
etc. within close proximity of the range hood.
• Operate the range hood only in the manner
outlined in this product manual.
• When operating the range hood, do not leave
the appliance unattended. If you have any
questions and/or concerns, please contact our
authorized service center.
• Operate, clean and maintain the range hood in
accordance to the instructions outlined in this manual.
instructions.
• The range hood’s motor has a thermal overload
function, which automatically turns off the motor
when it overheats. Once the motor cools down,
the range hood will automatically restart. If the
motor, continually turns off and restarts, please
contact our authorized service center.
• If the range hood has not been in operation for an
extended period of time, unplug the appliance.
• Please make sure correct installation and
maintenance of the appliance. Installation
work and electrical wiring must be done by
qualified person(s), in accordance with all
rated construction codes and standards. The
installation personnel should be responsible
for normal operation of the appliance at the
installed position.
• When operating the range hood in exhaust
mode, ensure to install the damper along with
the hood.
• For general exhausting only. Do not use this
range hood to exhaust hazardous and /or
explosive materials or gas.
• In order to reduce the risk of fire, all
exhaust pipes, flues and devices should be
metal duct pipes. Never cover the hood with
• Services guaranteed under warranty must be
performed by Fotile certified service provider
or personnel.The warranty is not effective
for products removed for repair without
authorization.
hood for further information and requirements.
• Please install a supplementary air device if
you install the high-power Range Hood in an
airtight room. Due to the configuration of the
Fotile Range Hood, it is recommended for
users with an airtight new house to install a
supplementary air device. Please comply with
relevant regulations to install corresponding
supplementary air device if there are relevant
regulations in your state or region.
• This product is only used in USA and Canada.
• This product is for use in the U.S. and Canada
only.
Caution:
• When applicable local regulations comprise
more restrictive installation and/or certification
requirements, the aforementioned requirements
SAFETY INFORMATION

- 24 - - 25 -
where it started.
Risk of Injury
• This appliance is not intended for use by
persons (including children) with reduced
physical, sensory or mental capabilities, or
lack of experience and knowledge, unless they
have been given supervision or instruction
concerning use of the appliance by a person
responsible for their safety. Children should be
supervised to ensure that they do not play with
the appliance.
• The range hood may have sharp edges. Be
careful to avoid cuts and abrasions during
installation and cleaning. Do wear qualified
protective gloves.
• The accessible parts become very hot when
in operation. Never touch hot parts. Keep
children at a safe distance.
• Do not touch lamps during or soon after
operation. Burns may occur.
• Do not insert your limbs and/or foreign objects
into the impeller while the range hood is in
operation, as that action might cause injury.
• This appliance is not intended for operation with
an external clock timer or a remote control.
• Incorrect repairs are dangerous. Repairs
may only be carried out and damaged power
cables replaced by one of our trained after-
sales technicians..
• If any abnormalities and/or defects occur while
operating the range hood, immediately turn off
the appliance and unplug the appliance from
the mains or switch off the circuit breaker in
the fuse box. Then, contact our authorized
service center. Abnormal operation and
defects may cause hazardous situations, such
• This product contains chemicals known to the
State of California to cause cancer, and birth
defects or other reproductive harm. For more
information, please go to: www.P65Warnings.
ca.gov
Risk of Suffocation:
• Packaging material is dangerous to children.
Never allow children to play with packaging
material, which may cause suffocation.
Keep all packing material out of proximity to
children. Please remember that packaging
materials should not be treated as toys.
Risk of Death:
back in.
• Always ensure adequate fresh air in the room if
the appliance is being operated in exhaust air
mode at the same time as room air-dependent
heat-producing appliance is being operated.
Exhaust gases through the flue (chimney) of
fuel burning equipment to prevent back drafting.
• Fotile is not responsible for injuries caused by
improper and/or incorrect operation of the range hood.
OPERATION
Warning
1. Do not use excessive force to press buttons
on the control panel.
2. Turn off gas burners without any cookware
placed on them.
3. Do not disassemble the appliance with power
on and/or without complying with instructions.
4. Clean the Grease Cup frequently to prevent
5. Disassembly and/or servicing of the range hood
Product Information
Model JQG7505/JQG7505-W
Produce size
L*D*H 29 7/8 × 18 1/4 × 17 7/16 "
(758 × 462 × 442 mm)
Net weight 63.9 lbs(29Kg)
Voltage/Frequency 120V/60Hz
Rated power input
of the range hood 210 W (light power included 3W × 2 )
CFM(HVI)
Super-high-setting
600
High-setting 540
Medium-setting 420
Low-setting 230
Noise
Super-high-setting
56.5dB(A)(7.2Sones)
High-setting 54dB(A)(6.2Sones)
Medium-setting 48.2dB(A)(3.9Sones)
Low-setting 38.5dB(A)(1.2Sones)
• Prevent water from coming into contact with
the range hood’s electrical components, such
as the motor, switch and connector. Do not
wash the appliance with water. Do not use the
appliance if it is wet, as electric leakage and/
or electric shock may occur.
• Do not attempt to change the range hood’s
and/or repairs to the internal wiring can result
in bodily injuries to persons, electric shock
• In order to avoid electric shock, remember to
turn off the appliance’s power source before
installation, cleaning and/or maintenance
service.
• Avoid using high-pressure detergents and/or
steam cleaners on the appliance, as they may
result in electric shock.
• Do not touch the plug or switch with wet hands,
as an electric shock may occur.
Grounding Instructions
• This appliance must be grounded. In the event
of an electrical short circuit, grounding reduces
the risk of electric shock by providing an escape
wire for the electric current. This appliance is
equipped with a cord having a grounding wire with
a grounding plug. The plug must be plugged into
an outlet that is properly installed and grounded.
• Improper grounding can result in electric shock.
• Consult a qualified electrician if the grounding
instructions are not completely understood, or if
doubt exists as to whether the appliance is properly
grounded.
• Do not use an extension cord. If the power supply
an outlet near the appliance.
Risk of Fire
• In order to reduce the risk of fire and to
properly exhaust air, always duct the air
outside. Do not vent exhaust air into spaces
within walls, ceilings, attics, crawl spaces and/
or garages.
• In order to prevent the risk of fire, the range
hood should be operated and maintained in
accordance to the instructions.
• Hot oils may ignite and burn quickly. Never
leave hot oils unattended.
• Clean the hood’s Grease Cup at regular
intervals, as leftover grease deposits may ignite.
• Never operate the range hood without the
• Never work with naked flames close to the
appliance (e.g. flambéing). Do not install the
appliance near a heat-producing appliance for
solid fuel (e.g. wood or coal) .There must be
• Avoid cooking with food products that produce
To R educ e Ri sk of Co okto p Gr ea se F ir e:
A) Never leave surface units unattended at high
settings. Boilovers cause smoking and greasy
spillovers that may ignite. Heat oils slowly on
low or medium settings.
B) Always turn the hood on during cooking.
C) Clean ventilating fans . Grease should not
be allowed to accumulate on fan, filter or in
exhaust ducts.
D) Use proper pan size. Always use cookware
appropriate for the size of the surface element.
To Re d uc e th e Ri sk o f I n ju r y t o Pe r so ns i n t h e E v en t
of a Range Top Grease Fire, Observe the Following:
• Smother flames with close-fitting lid, cookie
sheet, or metal tray, then turn off the burner.
Be careful to prevent burns. If the flames do
not go out immediately, evacuate and call the
off the range hood immediately. Effective
extinguishing measures must be taken at
once, such as covering the open flame with
metal cover, turning off the master gas valve
and keeping flammable substance from the
• Do not use water, including wet dishcloths or
Use an Extinguisher Only If:
• You know you have a class ABC extinguisher
and you already know how to operate it.
• The fire is small and contained in the area

- 26 - - 27 -
Important Note:
Reattach the grease filter after cleaning and
maintenance of the range hood. Do not operate
cause safety hazards.
Caution:
Risk of demager due to corrosion.
• Always switch on the appliance while cooking
to avoid condensation. Condensate can
produce corrosion damage.
• Surface damage due to incorrect cleaning.
Clean stainless steel surfaces in the direction
of the grain only. Do not use any stainless
steel cleaners for operator controls.
• Surface damage due to strong or abrasive
cleaning agents.
• Replace faulty LED lights to prevent the
remaining lights form overloading.
Warning:
• The range hood should only be cleaned as
instructed; otherwise, it may ignite.
• Please remember not to wet the motor and/or
the control panel, as it may result in damaging
the electric circuits or potential hazards.
• Do not clean the appliance with chemical
agents, such as gasoline, acids, benzene and
solvents.
Risk of Electric Shock:
• Penetrating moisture may result in an electric
shock. Prior to cleaning and maintenance,
pull out the mains plug or switch off the circuit
breaker in the fuse box.
• Do not use any high-pressure cleaners or
steam cleaners, which can result in an electric
shock.
CLEANING AND MAINTENANCE
automatically, the fan will start up, the LOW-
SETTING indicator will fully illuminate, and the
range hood will be operated on low-setting;
press the LOW-SETTING FAN lightly again,
the motor will stop, and the LOW-SETTING
indicator will return to low illumination.
(6) LIGHTING: The LIGHTING button opens
the smoke baffle plate and turns on the
lights. Once pressed, the button will fully
illuminate. Press the button again and the light
will turn off and the LIGHTING indicator will
return to low illumination.
(7) DELAY: Press the key lightly while the
range hood motor is working, the delay
indicator will fully illumination, and a two-minute
delay is activated; 2 minutes later, all functions
will turn off, the smoke baffle plate will be
closed automatically, and the range hood will
turn off.
During the delay, if you press the DELAY
button lightly once, the delay will be
stopped, the delay indicator will return to low
illumination, and the range hood will remain the
current working state.
Lightly press the any control panel button other
than the DELAY button once during the delay
to exit the delay, the DELAY indicator will
return to low illumination, and the function of
the pressed button operates.
When the range hood is not working, the
DELAY button is not working, and if the
button is pressed, an alarm sound will engage.
(8) LOCK SCREEN button: Once pressed and
held for 2 seconds when the range hood
fan is not operating, you will hear a “beep”
sound, the LOCK SCREEN button will
fully illuminate, all buttons will be locked, and
any pressing will be invalid; in order to unlock
the control panel, you must press and hold
the LOCK SCREEN button for another
2 seconds. When the range hood fan is in
operation, the LOCK SCREEN button is not
working, if the button is pressed, an alarm
sound will engage.
Hints:
1. The range hood will be turned off automatically
other buttons on the control panel will display
low illumination. Lightly press the POWER
button again to turn off the range hood in the
working conditions. Once the range hood is
off, all functions are off, all buttons will cease
closed automatically.
With the exception of the LOCK SCREEN
button, the other buttons will only work when
the POWER button is active.
(3) HIGH-SETTING/SUPER-HIGH-SETTING
plate will open automatically, and the fan will
start up, while the HIGH-SETTING/SUPER-
HIGH-SETTING indicator will fully illuminate
and the range hood will be operated on high-
setting; press the HIGH-SETTING/SUPER-
HIGH-SETTING FAN lightly again, the
motor will stop, and the HIGH-SETTING/
SUPER-HIGH-SETTING FAN indicator will
return to low illumination; press the HIGH-
SETTING/SUPER-HIGH-SETTING FAN and
hold for 2s, the HIGH-SETTING/SUPER-
HIGH-SETTING indicator will fully illuminate
in green, and the range hood is operated on
SUPER-HIGH-SETTING;Press the HIGH-
SETTING/SUPER-HIGH-SETTING FAN
again and hold for 2s, the range hood can be
operated on the HIGH-SETTING and the
HIGH-SETTING/SUPER-HIGH-SETTING
indicator will fully illuminate; lightly press the
HIGH-SETTING/SUPER-HIGH-SETTING FAN
again, the motor will stop, and the HIGH-
SETTING/SUPER-HIGH-SETTING indicator
will return to low illumination.
(4) MEDIUM-SETTING FAN: Press the
MEDIUM-SETTING FAN lightly, the smoke
will start up; while the MEDIUM-SETTING
indicator will fully illuminate, the range hood
is operated on medium-setting;press the
MEDIUM-SETTING FAN lightly again, the
motor will stop, and the MEDIUM-SETTING
indicator will return to low illumination.
(5) LOW-SETTING FAN: Press the button
lightly, the smoke baffle plate will open
Operation
1. Fotile Range Hood Control Panel
(1)GESTURE function: Wave hands quickly
through the sensor windows at two sides, the
range hood is operated on high-setting and
the lights will be turned on; wave hands
quickly through the sensor windows at two
sides again, all functions of range hood will
be turned off, the button indicator will be
turned off, the smoke baffle plate will be
closed automatically and the range hood is
off.When switching off, press Lighting and
Medium-setting Fan at the same time for 5
seconds to turn on/off the GESTURE function.
(2) POWER button: Once you press the
POWER button, the range hood will be
activated, the button will fully illuminate and the
2. Operation Procedure
Power
Sensor
Window
Lock
Screen
Delay
Lighting
High-setting/
Super-high-
setting Fan
Medium-
setting
Fan
Low-
setting
Fan
Sensor
Window
Max static pressure 540 Pa
Caution:
1. dB noise in the above table complies with the IEC60704
standard, it is the sound pressure level, the corresponding
sound power level is: 70.5dB(A) for supper-high-setting,
68dB(A) for high-setting, 62.2dB(A) for medium-setting
and 52.5dB(A) for low-setting.
2. The noise --Sones -- in the above table is tested in accordance
with HVI-915-2015 in HVI-accredited laboratories in
American.
3. Such parameters as noise may have a deviation of less
than 5%.
HVI-2100 CERTIFIED RATINGS comply with
new testing technologies and procedures prescribed
by the Home Ventilating Institute, for off-the-shelf
products, as they are available to consumers. Product
performance is rated at 0.1 in. static pressure, based
on tests conducted in a state-of-the-art test laboratory.
Sones are a measure of humanly-perceived loudness,
based on laboratory measurements.
if it is not operated for 2 minutes in the standby
state;
2. It’s suggested that the range hood be turned
on during steaming to keep the kitchen air
fresh, otherwise, too much steam passing by
the Sensor Window may trigger the GESTURE
function.

- 28 - - 29 -
3. Use a small flat-head screwdriver to gently
pry the LED assembly out.
4. Disconnect the wires and then replace the
LED lights.
Use type lamp is self-ballasted fluorescent
-Max wattage: 3W
-Voltage range: 8.5~12V
-Dimensions: width 2 13/16
"
(70 mm)/depth
7/8
"
(21 mm)/height 3/4
"
(19mm)
Risk of Electric Shock:
To avoid electric shock, please disconnect the
power plug or shut off the power supply of the
range-hood socket before replacing the LED light.
FAQ
Warning: Risk of Electric Shock
• Incorrect repairs are dangerous. Repairs
may only be carried out and damaged power
cables replaced by our authorized service
3.Lightly press the POWER button. Then,
lightly press the LIGHTING button. After the
plate will open.
4. Hold the two sides of the grease filter and
pull sideward to unlock it.
Suggestion: In order to protect the health of
regularly and it is dishwasher safe for your
convenience.
Warning: Please wear the qualified protective
gloves in operation.
Replacing LED Lights:
1.Lightly press the POWER button; then, press
the LIGHTING button. After the LIGHTING button
2. Unplug the range hood or turn off the power
socket.
Risk of Fire:
• Grease deposits in the grease filter and
•
oil cup, such as plastic wrap, paper towels, etc.
• Please avoid excessive accumulation of
oil and regularly clean oil cup and other
components which can accumulate oil.
Risk of Injury:
• Unplug the appliance from the mains or switch
off the circuit breaker in the fuse box before
installation, cleaning, maintenance and repair
in order to avoid electric shock.
• The range hood may have sharp edges. Be
careful to avoid cuts and abrasions during
installation and cleaning. Do wear qualified
protective gloves.
• While the range hood is in operation, do not
insert your hand into the area housing the fan.
• The appliance will become hot during
operation, especially near LED lights. Allow
the appliance to cool down before cleaning.
Do not touch lamps during or soon after
operation. Burns may occur.
• If you would like to schedule a deep cleaning
for your appliance, please contact our
authorized service center.
• Fotile suggests that you clean the surface of
the appliance for better use.
1) Neutral detergent may be used to clean
stains on the range hood. However, avoid
touching the control panel. Wipe some
detergent on the stains and let the detergent
sit. Do not let the detergent sit for an extended
period of time, as it can cause damages to the
appliance’s surface. Then, wipe off the stain
with a soft cloth and the left detergent with a
slightly wet cloth. Next, use another cloth to
dry the appliance.
2) Stains on the range hood should be cleaned
within a short time period, as to prevent the
stains from becoming permanent.
3) Abrasive detergents, such as a salt solution,
disinfectant or bleach powder cannot be used
to clean the appliance. Wipe off the detergent
with a wet, soft cloth. Next, use another cloth
to dry the appliance.
Warning: Do not clean the appliance with
abrasive tools, such as steel wool, brushes,
and coarse cloths, as these materials will
permanently scratch the surface of the hood.
Preparations before Cleaning:
1.Unplug the range hood or turn off the power
socket.
2. Clear the cookware on the burners.
3. Prepare a neutral detergent and a soft cloth
(or soft brush) for stain removal and cleaning.
Washing and cleaning the surface, Grease
done by the user)
1.Clean the surface of the range hood.
2. Take out the oil cup horizontally and wash it.
Warning: For the safety of you and your family,
please regularly clean out the oil in the oil cup and
sediment on the external surface of the oil cup
to avoid fire risk. Please operate with protective
gloves.

- 30 - - 31 -
Proper installation is the responsibility of the
installer.
Product failure due to improper installation is
not covered under the Fotile warranty.
2. Please use standard installation equipment
and tools provided by Fotile to ensure safe
installation. Make sure to use the expansion
tube and expansion bolt provided by our
company, in case the range hood falls
down accidentally. The hole drilled into the
wall should precisely match the size of the
expansion tube, otherwise the range hood will
not be properly secured to the wall and may
fall down.
3. The range hood should be connected to a
standard power socket with safe grounding.
The midway connection, prolonged electric
line or multi-socket wiring may cause electric
Power off before wiring and make sure
proper measures have been taken to avoid
unexpected connection.
4. During installation, switch off the circuit
breaker in the fuse box during installation.
If the supply cord is damaged, it must be
replaced by a special cord or assembly
available from the manufacturer or its service
agent.
5. The appliance should only be installed,
removed and maintained by qualified
technicians to prevent risks like electric
Risk of Injury:
• Unplug the appliance from the mains or switch
off the circuit breaker in the fuse box before
installation, cleaning, maintenance and repair
in order to avoid electric shock.
• The range hood may have sharp edges. Be
careful to avoid cuts and abrasions during
installation and cleaning. Do wear qualified
protective gloves.
Warning Before Installation
• Prior to installation, ensure that the exhaust
outlet is free of debris, as they may damage
the range hood.
Caution:
• Please carefully read all instructions prior to
installation. Please give special consideration
to the following items:
1.If you are renovating your kitchen, be careful
to not expose the exterior of the range hood.
Building materials, dust, paint, coating, and
gases will corrode and tarnish the surface of
the range hood. It is recommended that you
install the range hood after all renovations are
completed.
2. If you need to remove your gas burner before
3. Do not connect the range hood duct to a duct
used to exhaust hot air or fumes from another
appliance.
4. Two installers are recommended due to
the large size and heavy weight of the range
hood. Since the installation is complex and
the appliance is heavy, professional installers
are required to install the appliance as
outlined in this manual.
5. After the appliance fixed, the plug should
be accessible.
6. Make sure to keep the appliance
horizontally.
7. Ensure that the appliance functions
normally after the installation is complete.
Warning:
• In order to reduce the risk of fire, electric
shock, or injury to persons, please carefully
read the following:
1. The installation and wiring of the appliance
should only be carried out by a professional
electrician in accordance with current national
or local electric safety regulations, including
fire-rated construction. Non-professional
personnel should not conduct installation.
•
If there is a defect in the product, please
disconnect the power plug or shut off the power
supply of the range-hood socket in order to
avoid electric shock. Please contact the service
center authorized by FOTILE.
• To avoid electric shock, please disconnect the
power plug or shut off the power supply of the
range-hood socket before replacing the LED
light.
• If an abnormal condition occurs during
use, immediately stop using the product and
disconnect the power plug or shut off the power
supply of the range-hood socket in order to
check the following:
Problem/Issue Possible Cause
After the POWER button
is pressed, the range hood
remains off and the button
does not illuminate.
The appliance may
be unplugged
The motor works, but the
control panel buttons do
not illuminate.
LED lights have
been damaged
If the problem/issue with the appliance still
persists after ruling out the possible cause(s),
please contact our authorized service center for
assistance.
SERVICE INFORMATION
Warning
• In the event of an abnormal condition during
the use of the range hood, please stop using it,
disconnect the power plug or shut off the power
supply of the range-hood socket. Please contact
the service center authorized by FOTILE.
• The appliance must only be repaired by
professionally trained and certified technician;
otherwise, severe injuries may occur.The ventilator
shall be not allowed to be repaired by any
party other than Fotile’s appointed technicians.
Otherwise it may cause serious consequences
and exempt the product from warranty.
• Please do not repair or replace any part of the
INSTALLATION
6.1 Installation Instructions
Important Note:
• Prior to installation, please read the Fotile
Range Hood Installation carefully and save it
for the local inspector’s future reference.
• This appliance must be installed in accordance
with National Electrical Codes, as well as all
state, municipal and local codes.
• The appliance must be equipped with safe circuit
breaker and installed with safe grounding.
• The correct voltage, frequency and amperage
must be supplied to the appliance according to
the proper voltage, frequency and amperage
ratings listed on the product rating plate.
• This installation must be completed by Fotile
• Please record the model and serial number
before installing the range hood. Position
of plaque can be referred to in figure A as
follows:
in the manual. All other maintenance work
• The following circumstances do not fall into
the scope of free warranty, and a fee will be
charged for repair.
1) Damage resulting from improper handling,
installation, use, maintenance and
safekeeping conducted by customer.
2) Failure and damage caused by using
the product beyond the normal operating
conditions (damage caused in the case that
the voltage is higher than 132V or lower than
104V).
3) The product installed, dismantled or repaired
by customer or any party other than Fotile’s
appointed service staff or agency.
4) Discrepancy between the information on the
purchase voucher and the warranty card and
the product.
5) Product damage caused by force majeure
(such as natural disaster and war, etc.).
6) Product failure or damage arising from use
not in conformity with the “instructions”.

- 32 - - 33 -
6.4 Installation Tools:
Expansion Tubes for Tiles
4
Expansion Tubes for Plasterboards
4
Duct Cover Screws
#8×3/4"(M4×18mm)
4
Upper Plate Fastening Screws
#10×2 13/16"(M5×70mm) 4
(One of them is
for standby)
Set Screw Gasket for Upper
Cabinet Boards
4
(1 for standby)
Wood Screws
#10×2 9/16"(ST5×65mm) 4
• A straight and short ducting run will ensure a
high performance of the range hood.
• A curving and long ducting run should be
avoided, as it will lower the performance of
the range hood.
• Strictly seal the connection between the duct
and duct hole with duct tape. Ensure that the
connection between the duct and the duct cover
is secure, and seal it with aluminum tape.
• A small duct hole will lower the performance
of the range hood. Therefore, it is highly
recommended that you cut a duct hole equal
to or larger than 6"(152.4mm) of the size.
• The bolts used in this product are metric-size
bolts, please do not apply any unqualified
bolts.
6.2 Product Dimensions
Wall Preparation
The wall should be strong enough to support the
range hood. As for hollow wall or hollow plate, The
minimum thickness of the lumber should be 13/16"
(30mm). As for concrete wall, the installation can be
Ductwork Installation
Risk of Injury:
• Unplug the appliance from the mains or switch
off the circuit breaker in the fuse box before
installation, cleaning, maintenance and repair
in order to avoid electric shock.
• The range hood may have sharp edges. Be
careful to avoid cuts and abrasions during
installation and cleaning. Do wear qualified
protective gloves.
• When cutting or drilling into walls or ceilings,
do not damage electrical wiring and other
hidden utilities.
• Ducted fans must always be vented to the
outdoors.
• To reduce the risk of fire and to properly
exhaust air, always duct air outside. Do not
vent exhaust air into spaces within walls,
ceilings, into attics, crawl spaces or garages.
6.3 List of Accessories:
Packing List
Product
1
Duct Cover
1
Gasket
1
Grease Cup
1
Product Manual
1
Installation Paper Template 1
Warranty Card
1
Duct Bracket
1
Hook Screw
#8×1 7/16"(ST4.2×36mm) 4
Housing Assembly Accessories (optional)
Blower Housing
1
Decorative Cover
1
Decorative Cover Bracket
1
1
Duct Cover Screws
#8×7/16"(M4×10mm)
4
Hook Screw
#8×1 7/16"(ST4.2×36mm) 3
The following accessories must be purchased
separately (please contact the authorized Fotile
branch
Expansion Tubes for Tiles
3
Expansion Tubes for Plasterboards
3
Screws
#4×3/4"(ST2.9×19mm)
3
Decorative Plate Assembly Accessories (with upper
cabinet)
6"(152.4mm) or 4"(101.6mm)
Decorative Plate
1
Fixed Decorative Plate Screws
#6×1 7/16"(ST3.5×35mm)
4

- 34 - - 35 -
5 .Place the hole-drilling template with the side
of the hole-drilling dimension drawing facing
down on the bottom of the upper cabinet, and
then drill the holes as indicated on the hole-
drilling template.
Caution: Wear safety goggles when drilling.
In case of batten at the wall facing the bottom
plate, the rear wall side of the paper template shall
be cut as per the thickness of the batten.
Wall” side of the hole-drilling template should be
attached to the bottom of the upper cabinet, using
the tile surface as a reference.
6. Remove the protective film of the stainless
steel surface and Grease Cup at both sides of
the range hood.
7. Lift and position the hood onto the brackets
at the bottom of the backside while keeping an
angle between the wall and the hood, and then
push the hood against the wall tightly.
3. Locate the duct bracket. Determine the
central point and mark the centerline on the
wall where the hood will be installed. Also, mark
the point where the central line and the lowest
point on the bottom board of the top cabinet
meet. This is the location, in which to secure
the bracket. Mark screw hole locations on the
wall. The distance between the lowest point on
bottom board of the top cabinet and the center
of the bracket should be 16" (405mm).
Caution: One of the wood screws(#10×2
9/16"(ST5×65mm)) for main engine must be
fastened to the beam.Screws must be fixed
at Hole A and B in the drawing; also wood
at bracket bores with corresponding wooden
stakes in Area C.
4.Fixing hooks:
1) Punch marks are on tiles (marble): Punch holes
screws(#8×1 7/16"(ST4.2×36mm)), and keep the
hook level with a level ruler.
2) Punch marks are on plasterboards: Screw
at the marks; fix hooks with hook screws(#8×1
7/16"(ST4.2×36mm)), and keep the hook
horizontal with a level ruler.
6.5 Installation Procedure:
In order to secure the safe use of the range
hood and maximize its ability to ventilate cooking
fumes, the installation height is suggested as
follows: The distance from the countertop of the
gas stove to the top board of the range hood
shall not be less than 29 9/16"(750mm) and
shall not be more than 32 1/2"(825mm). This
installation height is only applicable to electric
ranges. If the range hood is installed above a
gas range, the minimum distance between the
supporting surface of the cooking appliance
on the range and the lowest part of the range
hood should be at least 24”(610mm)(in USA)/25
5/8”(650mm)(in Canada). If the installation
instructions for the gas range specify a larger
installation distance, this should be considered.
The installation height of the range hood is the
recommended value, and the cupboard and the
only. When the installation height of this product
(i.e. the distance between the supporting
surface of the cooking appliance on the range
and the lowest part of the range hood) is lower
than 24”(610mm)(in USA)/25 5/8”(650mm)
(in Canada), all parts below 24”(610mm)(in
USA)/25 5/8”(650mm)(in Canada) are non-
flammable parts of the range hood or parts
working under safe and ultra-low voltage, and
the deformation of these parts will not affect the
protection against the touch of live parts.
Where there are relevant laws stipulating the
mounting height of range hood in the state
or region, the laws shall prevail ( Included
but not limited to architecture and firefighting
regulations and standards). However, the effect
of cooking fumes ventilation might be affected.
The range hood can be installed in three ways,
either with or without the upper cabinet.
Caution:
1. One of the wood screws(#10×2 9/16"(ST5×65mm))
for duct bracket must be fastened to the wooden beam.
2. If it is necessary to drill the duct outlet at the back
wall, the distance from the top plane of the range
hood to the center of the hole should be at least 8"
(203mm).
Warning: Excessively low installation height can
cause overheating of the glass panel, increasing the
possibility of breaking.
Installation of the Fotile Range Hood with
an Upper Cabinet:
Diameter of smoke
tube 6" (152.5mm)
Diameter of hole digging
6 1/2" (165mm)
Warning:
1. Unpack the appliance and check the List of
Accessories.
2. Locate the wooden beam and mark the location
with a pencil.
Framing Stud

- 36 - - 37 -
between the decorative sheet and the board
of the top cabinet) of the bottom board of the
top cabinet shall be deemed as the location
datum. And the distance between the upper
edge and the center of the bracket shall be 7
11/16"(194.4mm)for 6"(152.4mm) decorative
sheet and 5 11/16"(143.6mm) for 4"(101.6mm)
decorative sheet.
The upper edge (the fixed
surface between the decorative
sheet and the board of the top
cabinet) of the bottom board of
the top cabinet shall be deemed
as the location datum.
5 11/16"
(143.6mm)
or
7 11/16"
(194.4mm)
Caution: One of the wood screws(#10×2
9/16"(ST5×65mm)) for main engine must be
fastened to the beam.Screws must be fixed
at Hole A and B in the drawing; also wood
at bracket bores with corresponding wooden
stakes in Area C.
4.Fixing hooks:
1) Punch marks are on tiles (marble): Punch
the marks, and embed expansion tube for
hook screws(#8×1 7/16"(ST4.2×36mm)), and
keep the hook level with a level ruler.
2) Punch marks are on plasterboards: Screw
7/16"(ST4.2×36mm)), and keep the hook
horizontal with a level ruler.
7 11/16"(194.4mm)
or
5 11/16"(143.6mm)
6"(152.4mm)
or
4"(101.6mm)
1.Unpack the appliance and check the List of
Accessories.
2. Locate the wooden beam and mark the
location with a pencil.
Framing Stud
3. Locate the duct bracket. Determine the
central point and mark the centerline on the
wall where the hood will be installed. Also, mark
the point where the central line and the top
cabinet meet. This is the location, in which to
secure the bracket. Mark screw hole locations
Installation Instructions for the Decorative
Plate with Upper Cabinet :
Caution: Please confirm the height of the top
cabinet. If the upper cabinet is over 32 1/2" es
(825mm) high, 6"(152.4mm) or 4"(101.6mm)
decorative plate is preferred.
Diameter of smoke
tube 6" (152.5mm)
Diameter of hole digging
6 1/2" (165mm)
Caution: Two installers are required to ensure
safe installation.
8.Use three sets of screws (#10×2
13/16"(M5×70mm)) for upper cabinet boards
to fix the main body, and secure at least two
screws before releasing.
the bottom
board of the
top cabinet
Range hood shel
If there is a big gap between the bottom board
of the top cabinet and the top of the range hood,
please add wood pads based on the gap size near
the three #10×2 13/16"(M5×70mm) screws to
avoid range hood shell deformation caused by the
tightening of screws, which will affect the use of
the range hood.
Range hood shel
the bottom
board of the
top cabinet
Wooden plate
9. Place the seal (notch downward) at the air
outlet of the machine and fix the outlet housing
with 4 outlet-housing bolts of #8×3/4"(M4×18mm).
Then, secure the duct to the duct cover and seal
the connection with aluminum tape.
10. Make sure the hood is leveled. Install the
Grease Cup, and plug in the appliance for a test
run.
Warning: Please wear the qualified protective
gloves in operation.
Caution: Please run the machine and test if
the smoke pipe leaks air after it is sealed with
aluminum foil tape. The smoke pipe should be
able to be straightened as much as possible.

- 38 - - 39 -
and decorative cover bracket:
safety stop
mounting hole
2
5/16"(58.5mm)
4
9/16"(115.5mm)
Max 29 15/16"(760mm)
Max 30 7/8"(783mm)
Min 27 7/8"(708mm)
4
9/16"(115.5mm)
Hole A Area C Hole B
Hole A Area C Hole B
Caution: one of the wood screws(#10×2
9/16"(ST5×65mm)) for main engine must be
fastened to the beam.Screws must be fixed
at hole A and B in the drawing; also wood
at bracket bores with corresponding wooden
stakes in area C.
Firstly determine the installation central point of
the range hood according to the central point
of the cooker, determine the bracket installation
location based on cooker table and mark the
place for drilling. The cooker table is about 27
7/8" (708 mm) to 30 7/8" (783 mm) away from
the central point of bracket;
The location to install the safety buffer baffle
should be 4 9/16" (115.5 mm) to the left of the
duct bracket and 2 5/16" (58.5 mm) straight up.
The location to install the decorative cover
bracket should generally be 29 15/16 " (760
mm) above the central point of the duct bracket.
If the distance between the ceiling and duct
bracket equals to or is less than the value,
secure the decorative cover bracket on the wall
right under the ceiling. If the distance is more
than the value, taller decorative covers (27
9/16" (700 mm) and 35 7/16" (900 mm) in height
respectively) need to be bought separately.
Embed the expansion tube in the punch marks:
1) Punch marks are on tiles (marble): Punch
Installation Instructions for the Decorative
Cover Without Upper Cabinet
Diameter of smoke
tube 6" (152.5mm)
Diameter of hole digging
6 1/2" (165mm)
1. Unpack the appliance and check the List of
Accessories.
2. Locate the wooden beam and mark the
location with a pencil.
Framing Stud
5.
Place the hole-drilling template with the side
of the hole-drilling dimension drawing facing
down on the bottom of the upper cabinet, and
then drill the holes as indicated on the hole-
drilling template.
Caution: Wear safety goggles when drilling.
In case of batten at the wall facing the bottom
plate, the rear wall side of the paper template
shall be cut as per the thickness of the batten.
“Rear Wall” side of the hole-drilling template
should be attached to the bottom of the upper
cabinet, using the tile surface as a reference.
6. Remove the protective film of the stainless
steel surface and Grease Cup at both sides of
the range hood.
7. Place the seal (notch downward) at the
air outlet of the machine and fix the outlet
housing with 4 outlet-housing bolts of
#8×3/4"(M4×18mm).
8. Lift and position the hood onto the brackets at
the top of the backside while keeping an angle
between the wall and the hood, and then push
the hood against the wall tightly. Secure the
duct to the duct cover and seal the connection
with aluminum tape.
Caution: Two installers are required to ensure
safe installation.
9. Install the decorative plate.
Fix the decorative panel in place with 4 #6 × 1
7/16" (ST3.5×35mm) wood screws and fix the
decorative panel on the upper cabinet plate (the
wood screws are provided in the accessory bag
in the packing box of the decorative panel).
10. Make sure the hood is leveled. Install the
Grease Cup, and plug the appliance for a test run.
Warning: Please wear the qualified protective
gloves in operation.
Caution: Please run the machine and test if
the smoke pipe leaks air after it is sealed with
aluminum foil tape. The smoke pipe should be
able to be straightened as much as possible.

- 40 - - 41 -
Caution: Please run the machine and test if
the smoke pipe leaks air after it is sealed with
aluminum foil tape. The smoke pipe should be
able to be straightened as much as possible.
cover and fan cover, and put the decorative cover
into the fan cover. Then take up the decorative
cover and fan cover, hang the decorative cover
on the decorative cover hook, lower the fan cover
slowly, and push the decorative cover and fan
cover inward until the fan cover is fastened to the
corresponding cover screws.
10. Install the Grease Cup.
Warning: Please wear the qualified protective
gloves in operation.
6.6 Test Run After Installation:
1. Lightly press the POWER button. Next,
lightly press the LIGHTING button. At this time,
the smoke baffle plate and lights should work
normally.
2. Lightly press the fan buttons to check the motor.
If any of the following malfunctions occurs, unplug
the hood immediately and re-check the installation
process. (If the malfunction continues, contact our
authorized service center as soon as possible.)
(1) The hood vibrates violently
(2) The impeller does not work
(3) The impeller grates while rotating.
(4) The motor makes strange sounds.
3. Lightly press the POWER button again to turn
the marks, and embed expansion tube for
2) Punch marks are on plasterboards: Screw
the marks.
4. Secure the duct bracket and decorative cover
bracket to the wall with corresponding screws
and tighten the screws. Make sure the bracket
is leveled.
Caution: One of the wood screws(#10×2
9/16"(ST5×65mm)) for duct bracket must be
fastened to the wooden beam.
5. Place the seal (notch downward) at the
air outlet of the machine and fix the outlet
housing with 4 outlet-housing bolts of
#8×3/4"(M4×18mm). Fix four outer cover bolts
of #8×7/16" (M4×10mm) at the corresponding
positions (The cover screws is provided in
the accessory bag in the packing box of the
decorative cover assembly.).
6. Remove the protective film of the stainless
steel surface and Grease Cup at both sides of
the range hood.
7. Lift and position the hood onto the mounting
screws. Make sure the hood is stable and
leveled by using a spirit level. Install the safety
buffer baffle above the hood(The safety block
is provided in the accessory bag in the packing
box of the decorative cover assembly.).
Caution: Two installers are required to ensure
safe installation. Please install the safety stop
as required. The main function of the safety stop
is to prevent the range hood from being lifted up
accidentally, which will cause it to unhook and
potentially fall.
8. Secure the duct to the duct cover and seal the
connection with aluminum tape.
Make sure the hood is leveled. Install the Grease
Cup, and plug the appliance for a test run.

- 42 -
Explosive View
Box Power
Cable
Upper
Gasket
Exhaust
Outlet
Hood
Lid of
Electrical
Box
Power
Panel
Electrical
Box
Control
Pressure
Plate
Control
Plate
Component
Upper
Glass
ComponentLED
Connector
Component
Grease
Filter
Glass for
Smoke Baffle
Plate
Push Rod
Bracket
Electric
Push Rod
Grease
Cup
Electrical
Box Support
Block Volute
Grease
Guide
Board
Snap
Point Motor Impeller
Tightfisted
Nut
Air
Intake
Ring
Lower
GlassRocker
Decorative
Plate
JQG7505/JQG7505-W

- 45 -
Merci !
Cher utilisateur, merci d’avoir choisi ce produit
FOTILE créé spécialement pour vous. Pour vous
familiariser avec toutes les indications concernant la
sécurité, le fonctionnement et l’entretien de la hotte,
veuillez lire attentivement la présente la présente «
Notice d’utilisation et d’installation » (dénommée ci-
après la Notice) avant l’utilisation de l’appareil.
Avant l’utilisation de l’appareil, il est primordial
que vous lisiez attentivement et suiviez les
instructions de la Notice. Les instructions de la notice
sont très importantes pour le bon fonctionnement
du produit. En cas de dommage lié à une utilisation
incorrecte, la garantie ne s’applique pas et aucune
demande directe ou indirecte de garantie gratuite ne
sera acceptée par nos services après-vente. En cas
de besoin de réparations, nous vous recommandons
de contacter notre Service après-vente agréé,
pendant et après la période de garantie du produit.
Pour vous permettre de profiter d’un service
compétent et attentif, notre Service après-vente
vous fournira les pièces de rechange et le soutien
technique professionnel de Fotile de sorte que votre
qualité.
Le modèle de produit et le numéro de série
sur la plaque sont requis si vous avez besoin de
services. La position de la plaque peut se voir dans
Sommaire
1 Consignes de sécurité ........................... 46
2 Fonctionnement .................................... 50
3 Nettoyage et entretient .......................... 52
4 Questions fréquentes ............................ 54
5 Service après-vente .............................. 55
6 Installation ............................................. 55
6.1 Instructions d’installation .................. 55
6.2 Dimensions du produit ...................... 57
6.3 Liste des accessoires ....................... 57
6.4
Liste des produits dans l’emballage
..... 59
6.5 Procédure d’installation .................... 59
6.6 Test après l’installation ..................... 67
Pour une utilisation sûre et optimale du produit,
veuillez prêter une attention particulière aux
instructions suivantes dans la présente notice :
NOTE : pour indiquer les informations très
importantes.
ATTENTION : le non-respect de ces instructions peut
provoquer des blessures légères ou des dommages
au produit.
AVERTISSEMENT : le non-respect de ces consignes
de précaution constitue un danger de blessures
graves ou de mort.
Les caractéristiques et les paramètres du produit
manuel. Vous trouverez les informations mises à jour
sur notre site Internet : www.fotileglobal.com.
FOTILE YouTube
FOTILE Magasin phare à Toronto
* Adresse Suite 210, 6 Allée Campus, Suite 210, Parsippany, NJ 07054
* Numéro vert 888-315-0366
* Site web us.fotileglobal.com
* Email [email protected]
* Adresse 8365 Woodbine Ave Markham, L3R2P4
* Numéro vert 844-315-0315
* Site web ca.fotileglobal.com
* Email [email protected]
Service WeChat aux E.-U.
Service WeChat aux E.-U.
Wechat Canada

- 46 - - 47 -
ATTENTION:
• Lorsque les réglementations locales
applicables comprennent les exigences
d’installations et/ou de certification plus
restrictives, lesdites exigences prévalent sur
celles de ce document et l’installateur entend
s’y conformer.
• La température ambiante pour l’utilisation de
la hotte ne doit pas dépasser 104 (40).
• Les objets déposés sur l’appareil pourraient
tomber ou se renverser. Ne déposez jamais
d’objets sur l’appareil. Si, par exemple, un
flacon déposé sur l'appareil se renversait, le
fluide dans le flacon pourrait s'infiltrer dans
l'appareil, endommager ainsi les pièces
électriques et entraîner des risques évitables.
Si l'appareil était ainsi détérioré, la réparation
ne serait pas prise en charge grauitement.•
Veuillez nettoyer régulièrement la coupe
d’huile pour éviter tout débordement. L’huile
collectée dans la coupe n’est pas réutilisable !
•
Lorsque vous coupez ou percez un mur ou un
plafond, faites attention à ne pas endommager
le câblage électrique, les conduites d’eau ou de
gaz et d’autres équipements cachés. Veuillez
ne pas placer des matériaux inflammables
dans la tasse d'huile, tels que la pellicule
plastique, des serviettes en papier, etc.
• Veuillez suivre les consignes du fabricant de
l’équipement de chauffage et d’autres normes
de sécurité, telles que celles publiées par la
National Fire Protection Association (NFPA),
l’American Society for Heating, Refrigeration
and Air Conditioning Engineers (ASHRAE) et
les autorités désignées par les réglementations
locales. Veuillez respecter également les
normes de sécurité publiées par les services
administratifs comme le service des incendies.
• Lorsque les tables de cuisson à gaz sont en
fonctionnement sans ustensile de cuisson
posé sur elles, l’appareil installé au-dessus
peut être endommagé par la chaleur ou
prendre feu. Sur les foyers gaz, posez toujours
des ustensiles de cuisson lorsque vous les
utilisez.
• Assurez-vous que la tension réelle et la
fréquence sont accordées avec celles
clarifiées dans la notice afin d’éviter les
éventuelles dommages à la hotte.
• Veuillez utiliser les accessoires standards
fournis par notre entreprise, pour éviter
des chutes accidentelles de la hotte ; Les
trous percés sur la paroi du mur doivent
correspondre précisément à la taille des joints
qui peut provoquer une chute accidentelle.
• Le verre trempé est appliqué à l'appareil. Il
existe ainsi un risque minime d'explosion
spontanée vu le processus de trempe du
verre. Si l'utlisation appropriée de l'appareil
donne lieu à une explosion spontanée, la
société s'engage à remplacer gratuitement la
pièce en question. La possibilité de la rupture
du verre trempé peut être considérablement
augmentée dans les situations ci-après ;
celles à éviter : Par exemple, frapper le verre,
en particulier les coins du verre, avec des
ustensiles de cuisine ou d’autres objets durs;
La vitre est heurtée lorsque vous ouvrez une
porte d'armoire autour de la hotte; Placez le
verre dans un environnement extrêmement
chaud ou froid ou dans un environnement où
la chaleur et le froid alternent excessivement.
peut entraîner des risques.
AVERTISSEMENT :
Danger d’électrocution
• Un produit défectueux peut provoquer de
l’électrocution. Ne démarrez jamais un produit
défectueux. En cas de problème, veuillez
débrancher cet appareil de la source de
courant ou couper la source d’alimentation
générale et veuillez contacter les centres de
service agréés de FOTILE.
• L’appareil doit être branché sur une prise
de courant de mise à la terre efficace et
dédiée. L’électrocution, l’échauffement des
prises et l’incendie peuvent survenir lors
de la connexion de ligne d’alimentation
électrique, de l’utilisation de rallonge et de
dispositif de câblage multiport, les opérations
doivent donc toujours être effectuées par
un électricien qualifié, en stricte conformité
In order to prevent accidental damage to the Fotile
Range Hood and/or bodily injuries as a result of
its operation, please read the following safety
informationinstalling and/or using this appliance.
Following the instructions carefully will significantly
reduce the risk of fire, electric shock and/or bodily
injuries to persons. We recommend that you keep
this manual for future use and/or in case of transfer
of ownership of the range hood.
NOTE :
• Le produit ne peut être utilisé qu’à l’intérieur
et non à l’extérieur. Veuillez utiliser le produit
uniquement conformément aux instructions du
fabricant. Si vous utilisez le produit à l’extérieur
ou en des occasions spéciales, Fotile n’en
assumera aucune responsabilité. Si vous avez
des questions, veuillez contacter le centre de
service d’assistance homologué de Fotile.
• Avant d’utiliser ce produit, déballez l’appareil
et assurez-vous de l’absence de dommage.
En cas d’anomalie, n’utilisez pas l’appareil et
contactez immédiatement le centre de service
agréé de FOTILE .
• Garder la hotte loin des matériaux comme
la poudre de plâtre et la poussière de
construction.
• Veuillez utiliser le produit en suivant les
instructions de la notice. Veuillez ne pas faire
fonctionner le produit sans surveillance. En
cas de doute, contactez le centre de service
agréé de FOTILE. .
• En tant qu’utilisateur, vous êtes responsable
du nettoyage, de l’entretien et de l’utilisation
appropriée de la hotte dans votre foyer.
• Veuillez nettoyer le filtre métallique à grasse
selon les conditions réelles.
• Le moteur de la hotte possède une protection
thermique qui coupe automatique le moteur
en cas de surchauffe. Le moteur redémarre
quand il se refroidit. Si le moteur s’éteint et
redémarre constamment, contactez le centre
de service agrée de FOTILE.
• Débranchez l’appareil de la prise en cas
d’inutilisation prolongée.
• Assurez-vous de l’installation et de la
maintenance correctes du produit. L’installation
du produit doit respecter tous les codes et
normes applicables, y compris les normes de
sécurité incendie. L’appareil doit être installé
correctement par un technicien qualifié et
réglementairement relié à la terre. L’installeur
doit s’assurer du fonctionnement normal de
l’appareil en position de montage.
• Lorsque la hotte est en mode d’échappement,
assurez-vous que le clapet anti-retour est
installé.
• Cet appareil est destiné à une utilisation
générale et ne peut pas être utilisé pour
évacuer des matériaux/gaz dangereux et
explosif.
• Pour réduire le risque d’incendie, tous
les tuyaux d’échappement, conduits et
composants de l’appareil doivent être non-
en métal. Ne couvrez jamais la hotte avec du
• Le service de garantie doit être assure par un
service de regulation ou un personnel reconnu
par Fotile. Si vous démontez la machine pour
réparation sans permission, le produit ne sera
plus couvert par la garantie.
• Veuillez lire l’étiquette de spécification sur
la hotte pour plus de renseignements et
exigences.
• Veuillez installer un appareil d’air
supplémentaire si vous installez la hotte de
cuisinière à haute puissance dans une pièce
hermétique. En raison de la configuration de
la hotte Fotile, il est recommandé d'installer
un appareil d’air supplémentaire dans une
nouvelle maison hermétique. Veuillez vous
conformer aux réglementations en vigueur
pour installer un appareil d’air supplémentaire
correspondant si des réglementations
pertinentes existent dans votre état ou votre
région.
• Ce produit est limité aux usa et au Canada.
• L'utilisation de ce produit est réservée aux
États-Unis et au Canada.
Consignes de sécurité

- 48 - - 49 -
2) Mettez toujours la hotte lors des cuissons.
3) Nettoyez la hotte. La graisse ne doit pas
le conduit d’échappement.
4) Utilisez les ustensiles de cuisson aux
dimensions adéquates. Utilisez toujours des
ustensiles adaptés à la talle de surface de la
table de cuisson.
Pour réduire le risque de blessures en cas
de feux de graisse au dessus de la table de
cuisson, respectez les consignes suivantes :
1) Etouffez les flammes avec un couvercle
hermétique, une plaque à biscuits ou un
plateau métallique, puis éteignez la table
de cuisson. Soyez prudent pour éviter les
immédiatement, évacuez le lieu et appelez le
service d’incendie.
Lorsqu’un ustensile de cuisine prend feu,
éteignez la hotte immédiatement (l’utilisation
d’extinction efficaces doivent être prises,
par exemple, couvrir la flamme nue avec
un couvercle en métal, fermer le robinet
de gaz principal et éloigner les substances
2) Ne touchez jamais un ustensile en feu, vous
pouvez vous brûler.
3) N’éteignez jamais le feu avec de l’eau, ni avec
les torchons ou les serviettes humides. Une
violente explosion de vapeur peut se produire.
4) Utilisez un extincteur seulement si :
-Vous avez suivi des formations de base sur
l’extincteur et vous maîtrisez déjà l’utilisation
de celui-ci ;
-Le feu est petit et restreint dans la zone où il a
commencé ;
-Le service d’incendie est appelé ;
-Vous pouvez combattre le feu avec votre dos
à une sortie.
Risque de blessures
• Cet appareil n’est pas destiné à être utilisé par
des personnes (y-compris des enfants) dont les
capacités physiques, sensorielles ou mentales
sont réduites, ou manquant d’expérience et
de connaissances, à moins qu’elles ne soient
surveillées ou instruites par une personne
responsable de leur sécurité sur le mode
l’utilisation de l’appareil. Surveillez les enfants
et faites en sorte qu’ils ne jouent pas avec
l’appareil.
• Les arêtes de la hotte peuvent être très
vives : veuillez toujours porter des gants de
protection lorsque vous manipulez l’appareil
et particulièrement lorsque vous l’installez, le
nettoyez et le réparez, pour éviter les blessures
causées par les bords métallique de l’appareil.
• Les parties accessibles de l’appareil deviennent
très chauds lors de fonctionnement. Ne touchez
jamais les parties chaudes. Veillez à maintenir
les enfants à distance de sécurité.
• Ne touchez pas les ampoules allumées ou à
peine éteintes pour éviter les brûlures.
• Pour éviter des blessures, il est interdit de mettre
vos doigts ou tout autre objet dans la turbine de
l’appareil lorsqu’elle est en fonctionnement.
• Cet appareil n’est pas prévu pour fonctionner
avec une minuterie externe ou une
télécommande.
• Des réparations inexpertes sont dangereuses.
Les réparations sont exclusivement réservées à
• En cas d’anomalie de fonctionnement de
l’appareil, coupez le courant par le disjoncteur
ou débranchez la fiche mâle de la prise de
courant. Contactez immédiatement notre centre
de service agréé. L’utilisation de l’appareil dans
des conditions anormales peut provoquer des
risques d’électrocution et d’incendie.
• Ce produit peut vous exposer à une substance
chimique et l'État de Californie est informé
qu'elle est carcinogène et provoque des
malformations congénitales ou d'autres risques
pour la reproduction. Pour plus d'informations,
veuillez consulter le site : www.P65Warnings.
ca.gov.
Risque d’étouffement
• Le matériau d’emballage est dangereux pour les
enfants. Pour éviter les accidents d’asphyxie,
ne permettez jamais aux enfants de jouer avec
avec tous les codes électriques nationaux
et locaux applicables. Avant le câblage,
couper l’alimentation et prendre des
mesures raisonnables pour éviter l’activation
automatique de l’interrupteur.
• Il est interdit d’utiliser l’appareil avec un
tout danger.
• Il est interdit d’installer le produit dans une
salle de bains ou les endroits très humides
pour éviter l’électrocution.
• Si le câble d’alimentation est endommagé,
il doit être remplacé par le fabricant ou
les professionnels des centres de service
autorisés par le fabricant, afin d’éviter tout
danger.
• Pour éviter les risques d’électrocution et
d’incendie, veillez à ne pas restructurer, étirer,
plier ni presser le câble d’alimentation.
• Les moteurs, les interrupteurs, les connecteurs
et autres composants électriques ne doivent
pas être en contact avec l’eau. Il est interdit
de rincer la hotte avec de l’eau. Ne pas
utiliser l’appareil s’il est humide, l’utilisation
peut provoquer des fuites de courant et
l’électrocution.
• Toute modification non autorisée au câblage
peut provoquer un dysfonctionnement et des
blessures. Une maintenance inappropriée
peut provoquer des risques d’électrocution et
d’incendies.
• Avant de nettoyer, d’installer ou d’entretenir
l’appareil, coupez le courant afin d’éviter
l’électrocution.
• Ne jamais utiliser de nettoyant à haute pression
ou de nettoyeur à vapeur, qui peut provoquer
l’électrocution.
• Ne jamais toucher les composants électriques
du connecteur ou manipuler l’interrupteur avec
les mains mouillées qui peuvent provoquer
l’électrocution.
Mise à terre
• Pour prévenir tout choc électrique en cas de
court-circuit, l’appareil doit être mis à terre. Ce
de terre installée correctement.
provoquer un choc électrique.
• En cas de doute sur la compréhension des
instructions de la notice ou sur la mise à la terre
du produit, veuillez consulter un électricien
• Ne pas utiliser de rallonge. Si le câble
d’alimentation est trop court, demandez à
un électricien qualifié d’installer une prise de
courant à proximité de l’appareil.
Risque d’incendie
• Pour réduire le risque d’incendie, l’air sortant
doit être évacué à l’extérieur. Ne rejeter pas l’air
sortant dans des murs ou des plafonds, ni dans
le grenier, des espaces étroits ou le garage.
• Le non-respect des méthodes de nettoyage
décrites dans la notice peut provoquer des
risques d’incendie.
spontanément. Ne faites chauffer de la
graisse ou de l’huile qu’en les surveillant en
permanence.
• Les dépôts de graisse dans le filtre à graisse
peuvent prendre feu, nettoyez régulièrement le
graisse.
• Les dépôts de graisse dans le filtre à graisse
peut prendre feu. Ne manipulez jamais de
flamme nue à proximité du produit. Ne pas
installer l’appareil à proximité des foyers à
combustibles solides (p.ex. bois ou charbon). La
projection d’étincelles peut provoquer le risque
d’incendie. Evitez de flamber des mets sous
l’appareil.
Pour réduire le risque de feux de graisse des
foyers :
1) Ne laissez jamais les ustensiles de cuisson
chauffer à feu fort sans surveillance. Les
débordements peuvent provoquer le risque
d’incendie par de la fumée et de l’huile. Faites
chauffer les huiles graduellement à feu doux
ou moyen.

- 50 - - 51 -
son fonctionnement conduit à la désactivation de
toutes les fonctions, l’éteinte du rétroéclairage de
la touche et la fermeture automatique de l’écran
isolation de fumées, ainsi la lotte se trouve en
état demi-arrêt.
À part de la touche de verrouillage de l'écran,
les autres touches ne sont activées qu’après
l’activation de l’alimentation.
(3)Touche Fort/Max. : Après un léger contact,
l’écran d’isolation de fumées est activé
automatiquement avec le démarrage du
ventilateur, le voyant de la marche Fort/Max
s’allume entièrement, la hotte fonctionne à la
marche forte ; l’appui une fois de plus sur cette
même touche permet d’arrêter le fonctionnement
du moteur, son rétroéclairage devient à moitié
allumé ; après avoir appuyé longuement (2s au
moins) sur la touche Fort/Max , son voyant
s’allume entièrement en vert, la hotte fonctionne
à la vitesse maximale,Appuyer de nouveau
longuement (2s au moins) sur la touche Fort/Max
, la hotte retournera à la vitesse maximale, son
voyant s’allumant entièrement ; un nouvel appui
sur cette touche peut arrêter l’appareil, le voyant
de la marche Fort/Max retrouve moitié allumé.
(4)Touche Moyen : Un léger contact conduit à
l’activation automatique de l’écran d’isolation de
fumées, le voyant de la marche Moyen s’allume
en entier et la hotte fonctionne à la vitesse
moyenne ; un nouveau contact de cette touche
permet d’arrêter le moteur et de remettre le
voyant correspondant moitié allumé.
(5)Touche Min. : Un léger contact conduit à
l’activation automatique de l’écran d’isolation de
fumées, le voyant de la marche Min. s’allume
en entier et la hotte fonctionne à la vitesse lente ; un
nouveau contact de cette touche permet d’arrêter
le moteur et de remettre le voyant correspondant
moitié allumé.
(6)Touche de l’éclairage : Un léger contact
conduit à l’activation automatique de l’écran
d’isolation de fumées, l’éclairage est allumé et
le voyant d’éclairage l’est aussi ; un nouveau
contact de cette touche permet d’éteindre la
lumière, son voyant retrouve à moitié allumé.
(7)Touche Minuterie : Un léger contact de la
touche durant le fonctionnement de la hotte
conduit à l’allumage entier du voyant de la touche
Minuterie, la hotte se met en état d’arrêt reporté
de 2 minutes à l’issue desquelles toutes les
fonctions seront désactivées, l’écran d’isolation
de fumées se fermera automatiquement et la
hotte s’arrête.
Lorsque l’appareil se trouve en état de report, un
contact léger de la touche Minuterie permet
de quitter le mode de report, le voyant de report
redevient moitié allumé, la hotte reste en mode
de fonctionnement actuel.
Lorsque l’appareil se trouve en état de report, le
contact d’une touche quelconque sauf celle de
report mène à la sortie du report, et le voyant de
report se rallume à moitié, la fonction de la touche
correspondante est exécutée.
Lorsque la hotte se trouve en état d’arrêt, la
touche de report est invalide, un appui sur cette
touche déclenchera l’alarme.
(8)Touche Verrouillage d’écran : Lorsque la hotte
se trouve en état d’arrêt, l’appui long (au moins
2s) sur la touche de verrouillage permet de
verrouiller toutes les touches après un « bip », ainsi
le voyant de la touche de verrouillage s’allume
entièrement et clignote, toutes les touches sont
bloquées et invalides ; une répétition de cette
opération permet de désactiver le verrouillage.
Pendant le fonctionnement de la hotte, la touche
de verrouillage reste invalide, un appui sur
cette touche déclenchera l’alarme.
Invite:
1. En mode veille, aucune opération n'est effectuée
pendant 2 minutes et la hotte aspirante est
automatiquement mise hors tension;
2. Il est recommandé d’allumer la hotte aspirante
la cuisine, faute de quoi une plus grande quantité
de vapeur d'eau pourrait déclencher la fonction
de geste lors du passage à travers la fenêtre de
détection.
(1)Fonction de geste : Un branlement rapide
de la main dans les fenêtres à induction sur
les deux côtés de l’appareil permet d’ouvrir
automatiquement l’écran d’isolation de fumées
et de faire fonctionner la hotte à la marche forte,
l’éclairage est également allumé ; un nouveau
branlement rapide permet de désactiver toutes
les fonctions, d’éteindre les voyants et de
refermer l’écran, ainsi s’arrête la hotte.En cas
de désactivation, appuyez simultanément sur
les boutons Illumination et Vitesse
moyenne pendant 5 secondes pour activer/
désactiver la fonction de détection de geste.
(2)Touche d’alimentation : Après avoir touché
légèrement lors de l’arrêt, la hotte se met en
mode de veille, la touche d’alimentation
s’allume entièrement et les autres voyants la
moitié : un léger contact de cette touche lors de
Fonctionnement
1. Bandeau de commande
2. Description
Fonctionnement
AVERTISSEMENTS
1. Ne pas appuyer trop fort sur les touches ;
2. Ne pas laisser les ustensiles chauffer à vide ;
3. Démonter l’appareil seulement après avoir coupé
le courant et respecter les consignes relatives ;
4. Ne pas laisser déborder la coupe d’huile ;
sont exclusivement réservés au personnel
professionnel ;
6. Il est interdit de laisser les flammes nues
sous la hotte.
Informations du produit
Modèle JQG7505/JQG7505-W
Dimensions du produit
LxDxH
29 7/8 × 18 1/4 × 17 7/16 pouce
(758 × 462 × 442 mm)
Poids net 63,9 lbs(29Kg)
De tension/Fréquence 120V/60Hz
Puissance nominale
d’entrée de l’appareil
210 W (puissance lumineuse
incluse 3W × 2 )
CFM(HVI)
Marche Max.
600
Marche Fort
540
Marche Moyen
420
Marche Min. 230
Bruit
Marche Max.
56,5dB(A)(7,2Sones)
Marche Fort
54dB(A)(6,2Sones)
Marche Moyen
48,2dB(A)(3,9Sones)
Marche Min. 38,5dB(A)(1,2Sones)
Pression statique
maximale 540 Pa
les matériaux d’emballage. Tenez les enfants à
l’écart des matériaux d’emballage. Le matériau
d’emballage n’est pas un jouet.
Danger de mort :
• Des gaz de combustion réaspirés peuvent
provoquer des dangers d’intoxication. Ne
jamais utiliser l'appareil en mode évacuation
en même temps qu'un foyer à air ambiant si un
permettre le rejet des gaz de fumé et éviter la ré-
aspiration.
Fenêtre
induite Verrouillage
de l’écran Minuterie Eclairage Alimentation Marche
Fort/Max.
Marche
Moyen
Marche
Min. Fenêtre
induite
Note :1. Le bruit en dB dans le tableau ci-dessus est
conforme à la norme IEC60704, c'est le niveau
de pression acoustique ; le niveau de puissance
sonore correspondant est : Max. 70,5dB(A), Fort
68dB(A), Moyen 62,2dB(A), Min. 52,5dB(A).
2. Le bruit (sones) est conforme aux critères de
HVI-915-2015 et résulte du test réalisé dans un
laboratoire américain de HVI agréé.
3. Il y peut avoir un écart de moins de 5% pour les
paramètres du bruit, etc..
HVI-2100 CERTIFIED RATINGS comply with
new testing technologies and procedures prescribed
by the Home Ventilating Institute, for off-the-shelf
products, as they are available to consumers. Product
performance is rated at 0.1 in. static pressure, based
on tests conducted in a state-of-the-art test laboratory.
Sones are a measure of humanly-perceived loudness,
based on laboratory measurements.

- 52 - - 53 -
1. Nettoyez la surface de l’appareil.
2. Enlevez la coupe d’huile d'une manière
horizontale et nettoyez-la.
Avertissement: Pour votre sécurité et celle
de votre famille, nettoyez régulièrement l'huile
contenue dans le gobelet et déposez les
sédiments sur la surface extérieure du gobelet
afin d'éviter tout risque d'incendie. Veuillez
utiliser des gants de protection.
3. Appuyez sur la touche Marche/Arrêt, puis
appuyez sur la touche Eclairage, ouvrez l’écran
de fumée.
puis sortez le filtre à graisse en le tirant vers
l’extérieur.
Avertissement : Veillez porter des gants de
protection.
sur l’appareil pour éviter des dommages) et
essuyez les tâches avec un chiffon doux.
Utilisez une serviette légèrement humide
pour nettoyer le détergent, puis une serviette
douce et sèche pour sécher l’appareil.
2) Ne laissez pas les tâches rester trop
longtemps sur la surface de la hotte.
3) Si de la solution saline, du désinfectant, de
l’eau de javel ou d’autres nettoyants tombe
accidentellement sur le panneau en acier
inoxydable, essuyez immédiatement avec
une serviette légèrement humide, puis séchez
avec un chiffon sec.
AVERTISSEMENTS : N’utilisez jamais de
produits à récurer tels que les balles de
nettoyage, les brosses et les chiffons abrasifs
pour éviter les rayures sur la surface de
l’appareil.
Préparations avant le nettoyage :
1.Débranchez la prise électrique de la hotte ou
débranchez la prise de courant.
2.Nettoyez les ustensiles sur la plaque de
cuisson .
3.Préparez un détergent doux et un chiffon
doux (brosse douce) .
Détergent doux Chiffon mouillé
Nettoyez la surface de l’appareil, la coupe
peut être effectuée par l’utilisateur)
NOTE :Après le nettoyage, veuillez réinstaller
correctement le filtre à grasse. Ne pas faire
fonctionner la hotte en l’absence de filtre
à grasse pour éviter le risque de sécurité
éventuel.
ATTENTION:
• Risque de détérioration par la corrosion.
Toujours allumer l'appareil pendant la cuisson
condensation peut provoquer de la corrosion.
• Les surfaces peuvent être endommagées
par un nettoyage non conforme. Nettoyer les
surfaces en inox seulement dans le sens du
métal. Pour les organes de commande, ne
pas utiliser de nettoyant pour inox.
• Les nettoyants agressifs ou à récurer peuvent
endommager la surface.
• Changez immédiatement les LED défectueuses
pour empêcher une surcharge des autres
lampes.
Attention: Au bout de 2 minutes sans opération
en mode veille, la hotte aspirante s'éteindra
automatiquement.
AVERTISSEMENT:
• Le non-respect des méthodes de nettoyage
indiquées dans les instructions peut
provoquer le risque d’incendie.
• Lorsque vous nettoyez la hotte, faites attention
pour éviter que l’eau pénètre dans le moteur
ou dans les touches de commande. La
présence d’eau dans le circuit électrique peut
endommager l’appareil.
• N’utilisez jamais d’essence, de produits
acides, de benzène, de solvant ou d’autres
produits chimiques pour nettoyer la hotte.
Risque d’électrocution :
• L’humidité pénétrée peut provoquer un choc
électrique. Avant le nettoyage et l’entretient
de la hotte, débranchez l’appareil de la
prise d’alimentation ou coupez l’alimentation
principale pour éviter le risque d’électrocution.
• Ne pas utiliser de nettoyeurs à haute pression
ou à vapeur, qui peuvent provoquer un choc
électrique.
Risque d’incendie :
• Les dépôts de grasse dans le filtre à grasse
peuvent prendre feu.
• Veuillez ne pas placer des matériaux
pellicule plastique, des serviettes en papier, etc.
• Veuillez éviter une accumulation excessive
d'huile et nettoyez régulièrement la coupelle
d'huile et les autres composants susceptibles
d'accumuler de l'huile.
Risque de blessures :
• Avant toute opération d’installation, de
nettoyage ou de réparation de l’appareil,
assurez-vous que le courant est coupé pour
éviter l’électrocution. Les arêtes de la hotte
peuvent être très vives : veuillez toujours
porter des gants de protection lorsque vous
manipulez l’appareil et particulièrement
lorsque vous l’installez, le nettoyez et le
réparez, pour éviter les blessures causées
par les bords métallique de l’appareil.
• Lorsque le ventilateur est en cours d’utilisation,
il est interdit de mettre la main dans la zone
de fonctionnement du ventilateur.
• L’appareil, en particulier les parties autour
de lampes LED, chauffe pendant le
fonctionnement. Avant de nettoyer l’appareil,
attendez toujours qu’il ait refroidi. Ne touchez
pas les ampoules LED allumées ou à peine
éteintes, vous risquez de vous brûler.
• Pour un nettoyage en profondeur de la hotte,
contactez un centre de service agréé de FOTILE.
• Pour une utilisation agréable du produit,
veuillez nettoyer régulièrement la surface de
la hotte.
1) Si la surface de la hotte est tâchée, utilisez
un détergent doux pour nettoyer les taches en
évitant les éléments de commande. Mettez du
détergent sur les endroits tâchés, laissez agir
(ne pas laisser le détergent trop longtemps
Nettoyage et entretient

- 54 - - 55 -
Installation
6.1 Instructions d’installation
NOTE :
• Veuillez lire les instructions avant l’installation
et conserver la notice de montage pour la
référence de l’inspecteur local ou pour une
réutilisation ultérieure.
• Cet appareil doit être installé conformément au
Code Electrique National, ainsi que tous les
codes étatiques, municipaux et locaux.
• Protégez le produit par un disjoncteur adapté
• Les caractéristiques nominales de tension, de
fréquence et d'ampérage sont répertoriés sur
être respectés.
• L’installation de l’appareil doit être effectuée
par le centre de service agréé de FOTILE ou
par un installateur autorisé.
• Avant l’installation de la hotte, La position de
suit :
AVERTISSEMENTS
• Si la hotte aspirante présente une quelconque
anomalie, arrêtez d'utiliser l'appareil.
Débranchez la fiche mâle de la prise de
courant ou coupez le courant de la prise
femelle. Contactez le service après-vente
agréé par FOTILE.
• Les réparations de l’appareil sont exclusivement
réservées au personnel qualifié ayant suivi
une formation professionnelle.
• D’autres personnels ne sont pas autorisés à
de graves conséquences. Si le produit est
endommagé en conséquence, il ne sera plus
couvert par la garantie.• Évitez de réparer ou
de remplacer une pièce de la hotte à moins
le manuel. Tous les autres travaux d'entretien
doivent être effectués par des techniciens
• Les éléments suivants ne sont pas couverts
par la garantie gratuite et seront factures pour
des réparations :
RECOMMANDATIONS : Pour votre santé et
celle de votre famille, nettoyez régulièrement le
et nettoyé au lave-vaisselle.
Avertissement: Veillez porter des gants de
protection.
Changer les LED :
1. Appuyez sur la touche Marche/Arrêt, puis
appuyez sur la touche Eclairage, ouvrez l’écran
de fumée ;
2. Débranchez la prise électrique de la hotte ou
débranchez la prise de courant.
3. Utilisez un petit tournevis plat pour insérer
dans le bord de la lampe et enlevez l’ensemble
de la lampe.
Questions fréquentes
AVERTISSEMENTS : RISQUE D’ELECTROCUTION
• Des réparations inexpertes sont dangereuses.
Les réparations et le remplacement des
câbles d’alimentation endommagés sont
exclusivement réservés à nos centres de
Si l'appareil présente une quelconque
défaillance, débranchez la fiche mâle de la
prise de courant ou coupez le courant de
la prise femelle pour éviter l'électrocution.
Contactez le service après-vente agréé par
FOTILE.
4. Démontez le câble de la lampe et remplacez
toute la lampe LED.
La lampe utilisée est LED: la puissance de la
lampe est de 3 W, la plage de tension est de 8,5 ~
12 V et la taille de la lampe est : largeur 2 13/16"
(70mm) / profondeur 7/8" (21mm)/ hauteur 3/4"
(19mm).
Risque d’électrocution :
Avant le changement de la lampe LED,
ou coupez le courant de la prise femelle pour
éviter l'électrocution.
• Avant le changement de la lampe LED,
débranchez la fiche mâle de la prise de
courant ou coupez le courant de la prise
femelle pour éviter l'électrocution.
• Dans le cas d'une quelconque anomalie
pendant l'utilisation, arrêtez d'utiliser l'appareil.
Débranchez la fiche mâle de la prise de
courant ou coupez le courant de la prise
femelle. Examinez les éléments ci-dessous.
Dysfonctionnement Causes possibles
La touche Marche/Arrêt ne
répond pas. La hotte ne
fonctionne pas et l’éclairage
ne s’allume pas.
Pas d’alimentation
électrique.
Le moteur fonctionne mais
l’éclairage ne s’allume pas.
LED défectueuses
Si les causes ci-dessus sont exclues et l’appareil
ne fonctionne toujours pas, contactez le centre
de service agréé par FOTILE pour la réparation.
1.Le produit est endommagé du fait de la
manipulation, l’installation, l’utilisation,
l’entretien et la conservation impropres par
l’utilisateur.
2.Le défaut ou dommage causés par l’utilisation
forcée du produit sous des conditions de
service anormales (par. ex. le dommage
causé par la tension excédent 132V ou
inférieure à 104V).
3.Produit installé et démonté par un l’utilisation
ou par un personnel de service ou une
organisation de service non désigné par
Fotile.
4.L’incohérence des informations sur le bon
d’achat et sur la carte de garantie avec le
produit.
5.Dommage sur le produit causé par une force
majeure (comme une catastrophe naturelle, la
guerre, etc.).
6.Défaillance ou dommage du produit causé par
la défaillance à utiliser le produit conformément
aux « Instructions d’utilisation ».

- 56 - - 57 -
Wall installation
Le mur doit offrir une portance suffisante
pour supporter la hotte. Pour les murs
creux, l’épaisseur de sa partie solide doit
être supérieure à 13/16 pouces (30mm).
Pour les murs en béton, l’installation peut
être directement exploitée. La hotte doit être
Installation des tuyaux
Risque de blessures :
• Avant toute opération d’installation, de
nettoyage ou de réparation de l’appareil,
assurez-vous que le courant est coupé pour
éviter l’électrocution. Les arêtes de la hotte
peuvent être très vives : veuillez toujours
porter des gants de protection lorsque vous
manipulez l’appareil et particulièrement
lorsque vous l’installez, le nettoyez et le
réparez, pour éviter les blessures causées
par les bords métallique de l’appareil.
• Lorsque vous coupez ou percez un mur ou un
plafond, faites attention à ne pas endommager
le câblage électrique, les conduites d’eau ou
de gaz et d’autres produits cachés.
• Le conduit de fumée doit toujours gagner
l’extérieur.
• Pour réduire le risque d’incendie, l’air sortant
doit être évacué à l’extérieur. Ne pas rejeter
l’air sortant dans des espaces à l’intérieur des
murs ou des plafonds, ni dans le grenier ou le
garage.
6.3 Liste des accessoires
Liste des produits dans l’emballage :
Machine principale
1
d’échappement
1
compris les instructions liées à l’incendie. Une
installation correcte est la responsabilité de
l’installateur. Les pannes du produit dues à une
mauvaise installation ne sont pas couvertes
par la garantie de FOTILE.
2. Pour assurer la sécurité et le bon
déroulement de l’installation, utiliser les
accessoires fournis avec l’appareil. Les trous
sur la paroi du mur doivent correspondre
précisément avec la taille des joints de
dilatation. Il est interdit de percer les trous trop
grands afin d’éviter l’instabilité des joints qui
peut provoquer une chute accidentelle !
3. La hotte aspirante doit être branchée sur
et dédiée. Car l’électrocution, l’échauffement
des prises et l’incendie peuvent survenir
lors de la connexion de ligne d’alimentation
électrique, de l’utilisation de rallonge et de
dispositif de câblage multiport. Coupez le
courant avant le câblage, assurez-vous que
les mesures appropriées ont été prises pour
éviter la connexion inattendue.
4. La connexion électrique est interdite
pendant l’installation. Coupez l’alimentation par
la boîte d’alimentation principale. Si le câble
d’alimentation fourni est endommagé, il doit
être remplacé par un câble ou un ensemble
spécifique disponible auprès du fabricant ou
de ses revendeurs.
5. Une installation par l’utilisateur lui-même
peut constituer un danger d’électrocution,
de chute accidentelle et d’incendie. Le
démontage, l’installation et la réparation de
la hotte sont exclusivement réservés aux
professionnels.
Risque de blessures :
• Avant toute opération d’installation, de
nettoyage ou de réparation de l’appareil,
assurez-vous que le courant est coupé pour
éviter l’électrocution.
• Les arêtes de la hotte peuvent être très
vives : veuillez toujours porter des gants de
protection lorsque vous manipulez l’appareil
et particulièrement lorsque vous l’installez,
le nettoyez et le réparez, pour éviter les
blessures causées par les bords métallique de
l’appareil.
Avertissements avant installation
• Afin d’éviter des dommages à la hotte,
assurez-vous que des débris ne rentrent
pas dans l’orifice d’échappement. Estimez
l’emplacement du tuyau d’évacuation relié
à l’extérieur, reportez-vous aux schémas
d’installation.
• L’appareil atteint un rendement meilleur
lorsque le tuyau d’évacuation est droit et court.
• Si les tuyaux d’évacuation sont longs ou
présentent de nombreux coudes, la puissance
maximale d’aspiration ne sera pas atteinte.
• Evitez donc de les utiliser. Utiliser la colle de
tuyau pour étancher strictement la partie de
connexion entre le tuyau d’évacuation et le
trou dans le mur. Il faut assurer que le tuyau
d’évacuation est connecté fermement avec le
ruban adhésif à feuille d’aluminium.
• Si le trou est trop petit, le rendement de
l’appareil peut être réduit. Sur la base du
principe de sécurité, il est recommandé
d’élargir le trou à une taille du tuyau
d’évacuation égale ou supérieure à 6
pouces(152.4mm) pouces.
• Les boulons utilisés dans ce produit sont des
boulons de taille métrique, veuillez ne pas
6.2 Dimensions du produit
ATTENTION:
• Veuillez lire attentivement toutes les
instructions en respectant particulièrement les
consignes suivantes avant l’installation :
1. Si votre cuisine est en cours de rénovation,
n’exposez pas la hotte à l’air. Les matériaux
de construction, les poussières, la peinture et
les revêtements ainsi que leur gaz volatilisé
peuvent provoquer de la corrosion et ternir
les surfaces de l’appareil. Installez la hotte
aspirante après les travaux de rénovation de
votre cuisine.
2. Si vous devez déplacer la cuisinière à
gaz avant l’installation de la hotte, fermez le
robinet du gaz avant de la déplacer.
3. L’air sortant de la hotte ne doit pas pénétrer
dans une cheminée en service destinée à
évacuer la fumée ou des gaz brûlés.
4. Compte tenu de la taille et du poids de la
hotte, il est recommandé de l’installer à deux
personnes, l’installation doit donc être effectuée
par des personnes professionnelles suivant les
instructions indiquées dans la notice.
5. Après que le produit est fixé, la fiche
électrique doit être accessible.
6. La hotte doit être fixée correctement en
respectant une parfaite horizontalité.
7. Vérifier que l’appareil ne présente aucune
anomalie en le mettant en service après
l’installation.
AVERTISSEMENT
• Pour réduire les risques d’incendie,
d’électrocution et de blessures, prêtez une
attention particulièrement aux instructions
suivantes :
1. L’installation et le câblage de la hotte
doivent être effectués par les personnes
professionnelles, conformément à toutes les
réglementations et les normes pertinentes, y
La page est en cours de chargement...
La page est en cours de chargement...
La page est en cours de chargement...
La page est en cours de chargement...
La page est en cours de chargement...
La page est en cours de chargement...
La page est en cours de chargement...
La page est en cours de chargement...
La page est en cours de chargement...
La page est en cours de chargement...
La page est en cours de chargement...
La page est en cours de chargement...
La page est en cours de chargement...
La page est en cours de chargement...
La page est en cours de chargement...
La page est en cours de chargement...
-
 1
1
-
 2
2
-
 3
3
-
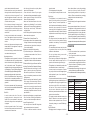 4
4
-
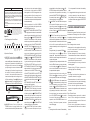 5
5
-
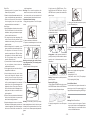 6
6
-
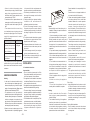 7
7
-
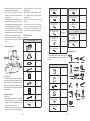 8
8
-
 9
9
-
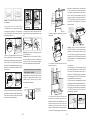 10
10
-
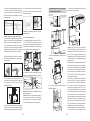 11
11
-
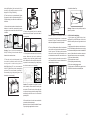 12
12
-
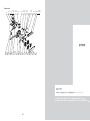 13
13
-
 14
14
-
 15
15
-
 16
16
-
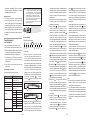 17
17
-
 18
18
-
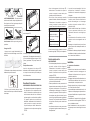 19
19
-
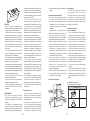 20
20
-
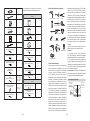 21
21
-
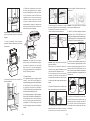 22
22
-
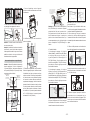 23
23
-
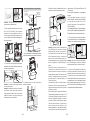 24
24
-
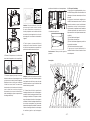 25
25
-
 26
26
-
 27
27
-
 28
28
-
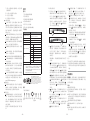 29
29
-
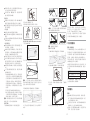 30
30
-
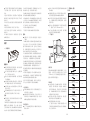 31
31
-
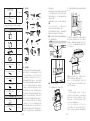 32
32
-
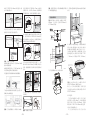 33
33
-
 34
34
-
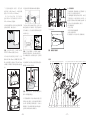 35
35
-
 36
36


FOTILE JQG7505-W Manuel utilisateur
- Taper
- Manuel utilisateur
- Ce manuel convient également à
dans d''autres langues
- English: FOTILE JQG7505-W User manual
