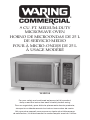
Waring Commercial WMO90 Manuel utilisateur
- Catégorie
- Fours
- Taper
- Manuel utilisateur

.9 CU. FT. MEDIUM-DUTY
MICROWAVE OVEN
HORNO DE MICROONDAS DE 25 L
DE SERVICIO MEDIO
FOUR À MICRO-ONDES DE 25 L
À USAGE MODÉRÉ
WMO90
For your safety and continued enjoyment of this product,
always read the instruction book carefully before using.
Para su seguridad y para disfrutar plenamente de este producto,
siempre lea cuidadosamente las instrucciones antes de usarlo.
An que votre appareil vous procure en toute sécurité beaucoup
de satisfaction, lire attentivement le mode d’emploi avant de l’utiliser.

2
IMPORTANT SAFETY
INSTRUCTIONS
1.
READ ALL INSTRUCTIONS BEFORE USING.
2. Read and specically follow: PRECAUTIONS TO AVOID
POSSIBLE EXPOSURE TO EXCESSIVE MICROWAVE
ENERGY found on page 7.
3. As with most cooking appliances, close supervision is
necessary to reduce the risk of re in the oven cavity.
WARNING: To reduce the risk of re in the oven cavity:
i) Do not overcook food. Carefully attend to the appliance when
paper, plastic, or other combustible materials are placed
inside the oven to facilitate cooking.
ii) R emove wire twist ties and metal handles from paper or
plastic containers/bags before placing them in the oven.
iii) If materials inside the oven ignite, keep the oven door
closed. Turn the oven off, and unplug the appliance.
iv) Do not use the oven cavity for storage purposes. Do not
leave paper products, cooking utensils, or food in the cavity
when not in use.
4. This oven must be grounded. Connect only to a properly
grounded outlet. See GROUNDING INSTRUCTIONS found
on page 5.
5. Install or locate this oven only in accordance with the installation
instructions provided on page 11.
6. Some products, such as whole eggs and sealed containers
(for example, closed glass jars), could explode and should
not be heated in the oven.
WARNING: To reduce the risk of burns, electric shock, re, injury
to persons or exposure to excessive microwave oven energy when
using your appliance, follow basic safety precautions, including
the following:
7. Use this appliance only for its intended use as described in
this manual. Do not use corrosive chemicals or vapors in this
appliance. This oven is specically designed to heat, cook or
dry food. It is not designed for industrial or laboratory use.
8. Do not operate this oven if it has a damaged cord or plug, if
it is not working properly, or if it has been damaged or dropped.

3
9. This appliance should be serviced only by qualied service
technicians. Contact the nearest authorized service facility for
examination, repair or adjustment.
10. Do not cover or block any openings on the oven.
11. Do not store or use this appliance outdoors.
12. Do not use this oven near water; for example, near a kitchen
sink, in a wet basement, near a swimming pool, or similar
locations.
13. Do not immerse cord or plug in water.
14. Keep cord away from heated surfaces.
15. D o not let cord hang over edge of table or counter.
16. When cleaning surfaces of door and oven that come into
contact when closing the door, use only mild, nonabrasive
soaps or detergents applied with a sponge or soft cloth.
WARNING: Liquids such as water, coffee or tea may be overheated
beyond the boiling point without appearing to be boiling. Visible
bubbling or boiling is not always present when the container is
removed from the microwave oven. THIS COULD RESULT IN VERY
HOT LIQUIDS SUDDENLY BOILING OVER WHEN THE CONTAINER
IS DISTURBED, OR WHEN A SPOON OR OTHER UTENSIL IS
INSERTED INTO THE LIQUID.
i) Do not overheat the liquid.
ii) Stir the liquid both before and halfway through heating it.
iii) Do not use straight-sided containers with narrow necks.
iv) After heating, allow the container to stand in the microwave
oven for a short time before removing it.
v) Use extreme care when inserting a spoon or other utensil
into the heated container.
17. DO NOT heat baby bottles in microwave oven.
WARNING: DO NOT run this unit without food.
SAVE THESE INSTRUCTIONS
APPROVED FOR COMMERCIAL USE

4
GROUNDING INSTRUCTIONS
DANGER – Electric Shock Hazard
Touching some of the internal components can cause serious
personal injury or death. Do not disassemble this appliance.
Improper use of the grounding can result in electric shock. Do not
plug into an outlet until appliance is properly installed and grounded.
This appliance must be grounded while in use to protect the operator
from electric shock. Appliance is equipped with a 3-foot-long
conductor cord and a 3-prong grounding plug to t into the proper
outlet. In the event of an electrical short circuit, grounding reduces
the risk of electric shock by providing an escape wire for the electric
current. This appliance has a cord with a grounding wire and a
grounding plug, which must be plugged into a properly installed and
grounded outlet.
The WMO90 plug (Fig. 1) can be connected to an adapter (Fig. 2) for
use in 2-prong receptacles. The grounding lug, which extends from
the adapter, must be connected to a permanent ground, such as a
properly grounded outlet box (Fig. 3) using a metal screw.
Consult a qualied electrician or serviceman if the grounding
instructions are not completely understood or if there is doubt as to
whether the appliance is properly grounded.
EXTENSION CORDS & LONG CORD SETS
Use only 3-wire extension cords that have 3-prong grounding type
plugs and 3-pole cord connectors that accept the plug from the
appliance. Use only extension cords that are intended for indoor use.
Use only extension cords having an electrical rating not less than
the rating of the appliance. Do not use damaged extension cords.
Examine extension cord before using and replace if damaged. Do not
abuse extension cord and do not yank on any cord to disconnect.
Keep cord away from heat and sharp edges.

5
NOTE: The WMO90 is for 120V only. This appliance should not be
used with a converter.
PRECAUTIONS TO AVOID POSSIBLE EXPOSURE
TO EXCESSIVE MICROWAVE ENERGY
(a) DO NOT attempt to operate this oven with the door open since
this can result in harmful exposure to microwave energy. It is
important not to defeat or tamper with the safety interlocks.
(b) D O NOT place any object between the oven front face and the
door, or allow soil or cleaner residue to accumulate on sealing
surfaces.
(c) D O NOT operate the oven if it is damaged. It is particularly
important that the oven door closes properly and that there is
no damage to the:
(1) DOOR (bent)
(2) HINGES AND LATCHES (broken or loosened)
(3) DOOR SEALS AND SEALING SURFACE
(d) The oven should not be adjusted or repaired by anyone except
properly qualied service personnel.
RADIO INTERFERENCE
1. Operation of the microwave oven may cause interference to
your radio, TV or similar equipment.
2. When there is interference, it may be reduced or eliminated by
taking the following measures:
a) Clean door and sealing surface of the oven.
b) Reorient the receiving antenna of the radio or television.
c) Relocate the microwave oven with respect to the receiver.
d) Move the microwave oven away from the receiver.
e) Plug the microwave oven into a different outlet so that
microwave oven and receiver are on different branch circuits.
CAUTION
Personal Injury Hazard
Tightly closed containers could explode during microwaving. Closed
containers should be opened and plastic pouches should be pierced
before cooking.

6
SAFE MATERIALS FOR MICROWAVE
There may be certain non-metallic utensils and containers that are
not safe to use for microwaving. Refer to the instructions on Materials
You Can Use In Microwave Oven and Materials To Be Avoided In
Microwave Oven on pages 8 and page 9.
To check if a material is microwave safe, you can test it following the
procedure below.
1. Fill a microwave-safe container with 1 cup (250ml) of cold water
along with the utensil in question.
2. Cook on maximum power for 1 minute.
3. Carefully feel the utensil. If the utensil is warm, do not use it for
microwave cooking.
4. Do not exceed 1 minute of cooking time.
MATERIALS YOU CAN USE IN MICROWAVE OVEN
Material Remarks
Dinnerware Microwave-safe only. Follow manufacturer’s
instructions. Do not use cracked or chipped
dishes.
Glass jars Always remove lid. Use only to heat food until just
warm. Most glass jars are not heat resistant and
may break.
Glassware Heat-resistant oven glassware only. Make sure
there is no metallic trim. Do not use cracked or
chipped glassware.
Oven cooking Follow manufacturer’s instructions. Do not close
bags with metal tie. Make slits to allow steam to escape.
Paper plates Use for short–term cooking/warming only. Do not
and cups leave oven unattended while cooking.
Paper towels Use to cover food for reheating and absorbing fat.
Use with supervision for short-term cooking only.
Parchment Use as a cover to prevent splattering or a wrap
paper for steaming.

7
MATERIALS YOU CAN USE IN MICROWAVE OVEN
(CONT)
Plastic Microwave-safe only. Follow the manufacturer’s
instructions. Should be labeled as microwave safe.
Some plastic containers soften, as the food inside
gets hot. Boiling bags and tightly closed plastic
bags should be slit, pierced or vented as directed
on package.
Plastic wrap Microwave-safe only. Use to cover food during
cooking to retain moisture. Do not allow plastic
wrap to touch food.
Thermometers Microwave-safe only (meat and candy
thermometers).
Wax paper Use as a cover to prevent splattering and retain
moisture.
MATERIALS TO BE AVOIDED IN MICROWAVE OVEN
Aluminum tray May cause sparking. Transfer food into
microwave-safe dish.
Food carton May cause sparking. Transfer food into
with metal microwave-safe dish.
handle
Metal or Metal shields the food from microwave energy.
metal-trimmed Metal trim may cause sparking.
utensils
Metal twist ties May cause sparking and could cause a re in the
oven.
Paper bags May cause a re in the oven.
Styrofoam®Styrofoam® may melt or contaminate the liquid
inside when exposed to high temperature.
Wood Wood will dry out when used in the microwave
oven and may split or crack.

8
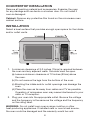
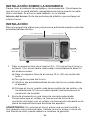
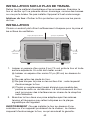
COUNTERTOP INSTALLATION
Remove all packing material and accessories. Examine the oven
for any damage such as dents or a broken door. Do not install if
oven is damaged.
Cabinet: Remove any protective lm found on the microwave oven
cabinet surface.
INSTALLATION
Select a level surface that provides enough open space for the intake
and/or outlet vents.
1. A minimum clearance of 3.0 inches (7.5cm) is required between
the oven and any adjacent walls. One side must be open.
(a) Leave a minimum clearance of 12 inches (30cm) above
the oven.
(b) Do not remove the legs from the bottom of the oven.
(c) Blocking the intake and/or outlet openings can damage the
oven.
(d) Place the oven as far away from radios and TV as possible.
Operation of microwave oven may cause interference to your
radio or TV reception.
2. Plug your oven into the appropriate outlet. Be sure the voltage
and the frequency is the same as the voltage and the frequency
on the rating label.
WARNING: Do not install oven over a range cooktop or other
heat-producing appliances. If installed near or over a heat source,
the oven could be damaged and the warranty would be void.

9
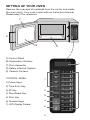
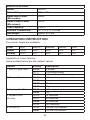
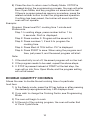
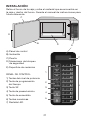
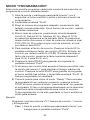
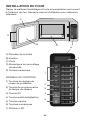
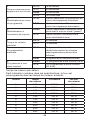
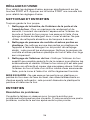
SETTING UP YOUR OVEN
Remove the oven and all materials from the carton and inside
the oven cavity. Your oven comes with an Instruction Manual.
Please keep it for reference.
C
BE
D
A) Control Panel
B) Observation Window
C) Door Assembly
D) Safety Interlock System
E) Ceramic Surface
1
2
3
4
5
6
7
A
CONTROL PANEL
1) Power Keys
2) Time Entry Key
3) X2 Key
4) Stop/Reset Key
5) Start Key
6) Number Keys
7) LED Display Screen

10
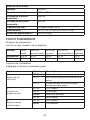
SPECIFICATIONS
Model WMO90
Rated Voltage: 120V ~ 60Hz
Rated Input Power 1550W
(Microwave):
Rated Output Power 1000W
(Microwave):
Oven Capacity: .9 cu. ft.
External Dimensions: 20.1 x 17 x 12.2 inches
Net Weight: Approx. 32.0 lbs.
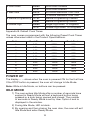
OPERATION INSTRUCTION
Five power levels are available.
Level High Med-Hi Medium Defrost Hold
Power 100% 70% 50% 20% 0%
Display PL10 PL7 PL5 PL2 PL0
Appendix A. User Options
Items bolded below are the default values.
Option Setting Description
1 End of Cycle Tone OP:10 3 Beeps
OP:11 Continuous Beep
OP:12 5 Quick Beeps, Repeating
2 Beeper Volume OP:20 Off
OP:21 Low
OP:22 Medium
OP:23 High
3 Keybeep On/Off OP:30 Off
OP:31 On
4 Keypad Entry OP:40 15 Seconds
Window OP:41 30 Seconds
OP:42 60 Seconds
OP:43 120 Seconds
5 On the Fly OP:50 On-the-Fly Disabled
OP:51 On-the-Fly Enabled

11
6 Door Reset OP:60 Door Reset Disabled
OP:61 Door Reset Enabled
7 Max Time OP:70 60-Minute Maximum Cook Time
OP:71 10-Minute Maximum Cook Time
8 Manual Programming OP:80 Manual Programming Disabled
OP:81 Manual Programming Enabled
9 Double Digit OP:90 Single-Digit Mode, 10 Programs
OP:91 Double-Digit Mode, 100 Programs
Appendix B. Default Cook Times
The oven comes programmed with the following Preset Cook Times
unless otherwise noted in the Product Specications.
Button Cook Time Power Cook Factors
10:10 100% 80%
20:20 100% 80%
30:30 100% 80%
40:45 100% 80%
51:00 100% 80%
61:30 100% 80%
72:00 100% 80%
83:00 100% 80%
94:00 100% 80%
05:00 100% 80%
POWER UP
The display -- -- shows when the oven is powered ON for the rst time.
If the STOP button is pressed, the oven will change to Idle Mode.
Note: While in Idle Mode, no buttons can be pressed.
IDLE MODE
1) The oven enters Idle Mode after a number of seconds have
expired in Ready Mode without a keyboard button being
pressed or a door being opened and closed. The number
of seconds in Ready Mode is set by User Option 4 and is
displayed in the window.
2) During Idle Mode, LED is blank.
3) By opening and then closing the oven door, the oven will exit
Idle Mode and enter Ready Mode.

12
READY MODE
1) In this mode, the oven is ready to either begin a Manual or
Preset Program Cook Mode.
2) Opening and closing the door while the oven is in Idle Mode
will put the oven into Ready Mode.
3) During Ready Mode, 0:00 is displayed.
4) From Ready Mode, the oven can go into almost all of the
other modes.
DOOR OPEN MODE
1) While the door of the oven is open, the oven is in Door Open
Mode. This also allows for entry into Programming Mode.
2) Display is blank, but the fan and oven lamp are on.
3) If User Option OP:60 is selected and the door is opened
during operation, the oven will enter Pause Mode. Closing
the door will allow the Manual or Preset Program currently
running to continue.
4) If User Option OP:61 is selected, opening and closing the
door during operation will reset the oven and clear out any
information about the Manual or Preset Program currently
running.
PAUSE MODE
1) This mode allows the user to temporarily stop the cooking
cycle to inspect or stir food.
2) While in Manual Cook Mode, or Preset Program Cook Mode,
if the door is opened then closed, or if STOP is pressed, the
oven will enter Pause Mode.
3) While paused, LED will display the remaining cooking time.
4) Pause Mode reverts to Idle Mode in the same way as Ready
Mode, depending on User Option 4. Additionally, if STOP
is pressed, the oven will immediately enter Ready Mode.
If START is pressed, the oven will go into Working Mode.
MANUAL COOK ENTRY MODE
1) The user manually enters the cooking time and power level
while in this mode.
2) While the oven is in Ready Mode, press the TIME ENTRY pad
on the keyboard to enter Manual Cook Entry Mode.

13
3) In this mode, 00:00 is displayed. Press a number key to set
timer before choosing power level.
4) If you press HOLD 0%, Defrost 20%, Medium 50% or
Med-Hi 70% to choose a power level, the LED will display
your selection. If the same button is pressed twice, the
power will change to PL10, which is 100%. If no power is
chosen, PL10 is the default.
5) P ress START to enter Manual Cook Mode. Press STOP to
enter Ready Mode.
MANUAL COOK MODE
1) In this mode, food is cooked. While in Manual Cook Entry
Mode, pressing START begins the Manual Cook Mode.
2) The LED displays the remaining cooking time. The fan and
oven lamp will turn on.
3) When the cooking program is nished, the oven enters End
of Cook Cycle Mode. If you press STOP in this mode, the
oven enters Pause Mode.
END OF COOK CYCLE MODE
1) After the time has expired in the Manual Cook Mode, or the
Preset Program Cook Mode, the oven enters the End of
Cook Cycle Mode.
2) During this mode, End is displayed.
3) If either User Option OP:11 or OP:12 is selected, the oven
continues to sound until the user either opens and closes the
door or presses STOP. If User Option OP:10 is selected, after
the 3 beeps, the oven will display “End”. For a period of time
without any key operation, the oven will automatically enter
the Idle Mode.
PRESET PROGRAM COOK MODE
1) This mode cooks food using one touchpad operation.
While in Ready Mode, pressing one of 10 digital keys on
the keyboard will cause the oven to run the Preset Program
associated with that key.
2) The LED displays the remaining cooking time. With multi-
stage cooking, the total remaining cooking time is displayed,
and not the cooking time for any particular stage.
3) If the program chosen exceeds the maximum time allowed
by User Option 7, the oven will rapidly beep three times and
display ProG to indicate that the program is unacceptable.

14
4) When the cooking program is nished, the oven will enter
End of Cook Cycle Mode. If you press STOP in this mode,
the oven will enter Pause Mode.
ON-THE-FLY COOKING MODE
If User Option OP:51 is selected, this will allow the user to add time
while cooking.
1) Press the desired number key during cooking to add time.
The longer cooking cycle will begin automatically.
2) The screen displays the new remaining cooking time. When
cooking program is nished, the oven enters End of Cook
Cycle Mode.
3) To stop cooking before the end of the cooking cycle, press
STOP. The oven will enter Pause Mode.
PROGRAMMING MODE
This mode allows the user to assign cook times and power levels
using a one-touch button.
1) Open the door and press number button 1 for ve
seconds. The buzzer will sound once and the oven enters
Programming Mode.
2) ProG is displayed.
3) Press any number button, 0 to 9, and the LED will display the
saved time. You can then input the time you need.
4) Press HOLD 0%, Defrost 20%, Medium 50% or Med-Hi 70%
to input the power level. The LED will display the related
power. If the same button is pressed twice, the power will
change to PL10, which is the 100% power level. If no power
is chosen, PL10 is the default.
5) T o change the cooking factor: If you press X2, the LED
will display CF:XX. The default cooking factor is 80%, and
CF:80 is displayed. If you need to change the cooking factor,
just press one of the numbered buttons (1 for 10%, 2 for
20%, etc.).
6) After setting the time and power, press START, and the
cooking program will be saved. Once the program is saved,
ProG is displayed.
7) If total cooking time exceeds the MAX time, use User Option
7. Press START to save the program. The buzzer will sound
three times to indicate the oven is not in use. LED will display
ProG. The previous time set will remain in place.

15
8) Close the door to return oven to Ready Mode. If STOP is
pressed during the programming process, the oven will enter
Door Open Mode, and any program not saved will be lost.
If there is program saved as memory procedure, press the
related number button to start the programmed operation.
If nothing has been saved, the buzzer will sound and the
oven will not operate.
Example:
Program: Power level PL7, cooking time 1 minute and
25 seconds.
S tep 1: In waiting stage, press number button 1 for
5 seconds. ProG is displayed.
S tep 2: Press number 3. Program will be saved in 3.
S tep 3: Press numbers 1, 2 and 5 to program the
cooking time.
S tep 4: Press Med-Hi 70% button. PL7 is displayed.
S tep 5: Press START to save. When using the program next
time, just press 3, and the saved program will start.
Note:
1. If the electricity is cut off, the saved program will not be lost.
2. If the program needs to be reset, repeat the above steps.
3. I f STOP is pressed instead of START at the last step, the
oven will go into Door Open Mode, and the program setting
will not be saved.
DOUBLE QUANTITY COOKING
Allows the user to double the set cooking time of a particular
food item.
1) In the Ready mode, press the X2 key before or after pressing
the desired preprogrammed key. LED displays doub.
2) If you wish to change the Cooking Factor, see Programming
Mode.
3) The oven will begin to cook.
4) At the end of the cooking program, the oven will enter End
of Cook Cycle Mode.

16
TO PROGRAM MULTI-STAGE COOKING
Users can cook food items with different combinations of time and
power levels. Up to three stages can be set in Cooking Mode or
Memory Mode.
1) Once power level and time are set for the rst stage:
Pressing TIME ENTRY (S-2 is displayed) lets you program the
power level and time for stage two.
2) Pressing TIME ENTRY again (S-3 is displayed) lets you
program a third power level and time combination.
3) Press START to start cooking.
Example:
STAGE ONE
a. Press number button 1 for ve seconds. LED displays ProG.
b. Press number button 3 to save the program in 3.
c. Enter desired cook time.
d. Press Med-Hi 70%. Display shows PL7.
The rst stage is nished.
STAGE TWO
a. Press TIME ENTRY. Display shows S-2.
b. Enter desired cook time.
c. Press Medium 50%. Display shows PL5.
The second stage is nished.
d. Press START to save the two-stage program, or press TIME
ENTRY once more to program a third stage.
USER OPTION MODE
This allows the user to choose between various ways for the oven
to operate.
1) Open the oven door and press number button 2 for ve
seconds. The buzzer sounds once and this mode is entered.
2) LED displays OP: - -.
3) Press any number button to enter related mode setting.
For example: To set the buzzer to a medium level, press
2. Display shows OP:22. To change, keep pressing 2. LED
displays cycles through OP:20, OP:21, OP:22, OP:23, before
cycling back to OP:20.

17
4) Press START to save the displayed setting. OP: - - will be
displayed again.
5) D uring this process, press STOP to enter Door Open Mode.
Closing the door will return oven to Ready Mode.
6) If START button is not pressed as the last step, the program
will not be saved.
SERVICE MODE
1) Open the oven door and press and hold the number button
3 for ve seconds to enter Service Mode.
2) LED displays SErU.
3) To check the times of closing or opening the door, just
press 3. LED will display the times.
4) To reset: Press and hold both START and the number button
4. In seconds, the message will be cancelled and 4-CL will
be displayed.
5) P ress STOP to enter Door Open Mode. Close the door to
enter Ready Mode.
INQUIRY FUNCTION
While cooking, press TIME ENTRY to check the power level. The LED
will display the power level for 3 seconds. This feature is available for
multi-stage cooking.
FACTORY-DEFAULT SETTING
Press START and 0. Then press START to return to factory-default
settings.

18
CLEANING INSTRUCTIONS
Always keep the oven clean.
1. Cleaning the glass viewing window, the inner door panel
and oven front face: For best performance and to maintain
a high degree of safety, the inner door panel and oven front
face should be free of food or grease buildup. Wipe these
parts with a mild detergent, rinse and wipe dry. Never use
abrasive powders or pads.
2. Cleaning the control panel and plastic parts: Do not apply
a detergent or an alkaline liquid spray to the control panel
and plastic parts, as this may cause damage to these parts.
Use a dry cloth (not a soaked cloth) to clean these parts.
3. Cleaning the oven interior: After use, be sure to clean up
spilled liquids, spattered oil and food debris as quickly as
possible. If the oven is used when dirty, efciency drops and
the dirt gets stuck on the oven surface and may cause bad
odors. Clean the interior with a cloth soaked in lukewarm
water with a mild detergent dissolved in it, then rinse the
soap off with a damp cloth.
CAUTION: Do not wipe plastic and painted sections of the oven with
bleach, thinners or other cleaning agents, as this may cause these
parts to dissolve or change shape.
MAINTENANCE
Troubleshooting
Reference the chart below for any operating issues and try the
solutions provided. If the microwave oven still does not work properly,
contact the nearest authorized service center.
TROUBLE POSSIBLE CAUSE POSSIBLE REMEDY
Oven will not start a. Electrical cord a. Plug into the outlet.
for oven is not b. C lose the door and
plugged in. try again.
b. Door is open. c. Check instructions.
c. Wrong operation
is set.

19
TROUBLE POSSIBLE CAUSE POSSIBLE REMEDY
Sparking a. Materials to a. Use microwave-safe
be avoided in cookware only.
microwave oven b. D o not operate with
were used. oven empty.
b. T he oven is c. Clean cavity with a
operating when wet cloth.
empty.
c. Spilled food remains
in the cavity.
Unevenly cooked a. M aterials to a. U se microwave-safe
foods be avoided in cookware only.
microwave oven b. Co mpletely defrost
were used. food.
b. F ood is not c. Use correct cooking
defrosted time, power level.
completely. d. Turn or stir food.
c. Cooking time, power
level is not suitable.
d. Food is not turned
or stirred.
Overcooked foods Cooking time, power Use correct cooking
level is not suitable. time, power level.
Undercooked foods a. Materials to a. U se microwave-safe
be avoided in cookware only.
microwave oven b. Co mpletely defrost
were used. food.
b. F ood is not c. Check to see that
defrosted oven ventilation ports
completely. are not restricted.
c. Oven ventilation d. Use correct cooking
ports are restricted. time, power level.
d. Cooking time, power
level is not suitable.
Improper defrosting a. Materials to a. Use microwave-safe
be avoided in cookware only.
microwave oven b. U se correct cooking
were used. time, power level.
b. C ooking time, power c. Turn or stir food.
level is not suitable.
c. Food is not turned
or stirred.

20
MEDIDAS DE SEGURIDAD
IMPORTANTES
1.
LEA TODAS LAS INSTRUCCIONES ANTES
DEL USO.
2. Lea y siga cuidadosamente las “PRECAUCIONES PARA
EVITAR LA EXPOSICIÓN EXCESIVA A LAS MICROONDAS”
en la página 23.
3. Al igual que con la mayoría de los aparatos de cocción, es
necesario vigilar la cocción de cerca para reducir el riesgo de
incendio dentro del horno.
ADVERTENCIA: Para reducir el riesgo de incendio dentro del horno:
i) No cocine demasiado los alimentos. Vigile la cocción con
cuidado cuando use papel, plástico u otros materiales
combustibles para facilitar la cocción.
ii) Q uite las ataduras de alambre de las bolsas de papel/
plástico antes de meter estas al horno.
iii) Si los materiales en el horno se prenden, mantenga la puerta
cerrada, apague y desenchufe el aparato.
iv) No use el horno para fines de almacenamiento. No deje
artículos de papel, utensilios de cocina ni alimentos en el
horno cuando no esté en uso.
4. Este aparato debe estar puesto a tierra. Conéctelo a una toma
de corriente debidamente puesta a tierra. Véase la sección
“INSTRUCCIONES DE PUESTA A TIERRA” en la página 22.
5. Instale y ubique el aparto según se describe en las
instrucciones de instalación provistas en la página 26.
6. Algunos alimentos herméticos (p. ej., los huevos enteros) o
recipientes cerrados (p. ej., tarros de vidrio cerrados) pueden
explotar al calentarse en un horno de microondas y no se
deben calentar con este aparato.
ADVERTENCIA: Para reducir el riesgo de incendio, descarga
eléctrica, heridas o exposición excesiva a las microondas, debe
tomar precauciones básicas de seguridad, entre ellas las siguientes:
7. Use este aparato únicamente con el propósito para el cual
fue diseñado y solamente según las instrucciones. No use
productos químicos corrosivos o productos que produzcan
vapores corrosivos en este aparato. Este aparato ha sido
especialmente diseñado para recalentar, cocinar y deshidratar
alimentos. No ha sido diseñado para uso industrial o de
laboratorio.
La page est en cours de chargement...
La page est en cours de chargement...
La page est en cours de chargement...
La page est en cours de chargement...
La page est en cours de chargement...
La page est en cours de chargement...
La page est en cours de chargement...
La page est en cours de chargement...
La page est en cours de chargement...
La page est en cours de chargement...
La page est en cours de chargement...
La page est en cours de chargement...
La page est en cours de chargement...
La page est en cours de chargement...
La page est en cours de chargement...
La page est en cours de chargement...
La page est en cours de chargement...
La page est en cours de chargement...
La page est en cours de chargement...
La page est en cours de chargement...
La page est en cours de chargement...
La page est en cours de chargement...
La page est en cours de chargement...
La page est en cours de chargement...
La page est en cours de chargement...
La page est en cours de chargement...
La page est en cours de chargement...
La page est en cours de chargement...
La page est en cours de chargement...
La page est en cours de chargement...
La page est en cours de chargement...
La page est en cours de chargement...
La page est en cours de chargement...
La page est en cours de chargement...
La page est en cours de chargement...
La page est en cours de chargement...
La page est en cours de chargement...
La page est en cours de chargement...
-
 1
1
-
 2
2
-
 3
3
-
 4
4
-
 5
5
-
 6
6
-
 7
7
-
 8
8
-
 9
9
-
 10
10
-
 11
11
-
 12
12
-
 13
13
-
 14
14
-
 15
15
-
 16
16
-
 17
17
-
 18
18
-
 19
19
-
 20
20
-
 21
21
-
 22
22
-
 23
23
-
 24
24
-
 25
25
-
 26
26
-
 27
27
-
 28
28
-
 29
29
-
 30
30
-
 31
31
-
 32
32
-
 33
33
-
 34
34
-
 35
35
-
 36
36
-
 37
37
-
 38
38
-
 39
39
-
 40
40
-
 41
41
-
 42
42
-
 43
43
-
 44
44
-
 45
45
-
 46
46
-
 47
47
-
 48
48
-
 49
49
-
 50
50
-
 51
51
-
 52
52
-
 53
53
-
 54
54
-
 55
55
-
 56
56
-
 57
57
-
 58
58


Waring Commercial WMO90 Manuel utilisateur
- Catégorie
- Fours
- Taper
- Manuel utilisateur
dans d''autres langues
- English: Waring Commercial WMO90 User manual
- español: Waring Commercial WMO90 Manual de usuario
Documents connexes
Autres documents
-
Waring WMO90 Manuel utilisateur
-
CONTINENTAL EDISON CEMO25FAR Manuel utilisateur
-
KitchenAid YKCMS1655BS0 Le manuel du propriétaire
-
Whirlpool MWO616/01 SIL Le manuel du propriétaire
-
-
Beko MWOFS 30100 SS Microwave Oven Manuel utilisateur
-
Magic Chef MCM1110WF/BF Le manuel du propriétaire
-
Buffalo FB862 25L 1000W Programmable Microwave Manuel utilisateur
-
Buffalo FB864 Manuel utilisateur