
All you need are your two hands, a hammer, this instruction sheet and possibly a “Friend”.
Assemble on the floor (preferably carpeted). Familiarize yourself with the parts and make
sure they are all included.
Tout ce dont vous avez besoin pour procéder à l’assemblage de cet item, c’est de cette
feuille d’instructions, d’un marteau, de vos deux mains et possiblement de celles d’un(e)
ami(e). Avant de débuter, familiarisez-vous avec toutes les pièces et composantes et
assurez-vous qu’elles y soient toutes.
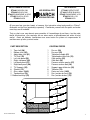
PART DESCRIPTION
1 Top shelf (58)
1 Bottom shelf (60)
1 Adjustable shelf (61)
1 TV Shelf (70)
1 Left side panel (05)
1 Right side panel (06)
1 Left back panel (07)
1 Right back panel (08)
2 TV Supports (35)
6 Shelves (72)
2 Glass doors (1442)
2 Top backings (74)
2 Bottom backings (75)
CONTENU PIÈCES
1 Dessus (58)
1 Dessous (60)
1 Tablette ajustable (61)
1 Tablette pour télévision (70)
1 Côté gauche (05)
1 Côté droit (06)
1 Panneau arrière gauche (07)
1 Panneau arrière droit (08)
2 Supports pour télévision (35)
6 Tablettes (72)
2 Portes en verre (1442)
2 Dos (section du haut) (74)
2 Dos (section du bas) (75)
LES SPÉCIALITÉS
NARCH
SPECIALTIES INC.
ENTERTAINMENT CENTER
ET2400 GOLDEN OAK
ET4400 BLEACH OAK
ET8405 CHAMPAGNE & GOLD
ET9405 BLACK & GOLD
ET9409 BLACK
UNITÉ MURALE
ET 2400 CHÊNE DORÉ
ET 4400 CHÊNE BLANCHI
ET8405 CHAMPAGNE & OR
ET9405 NOIR & OR
ET9409 NOIR
1
Revised 2000-09-26

HARDWARE
28 Assembly screws (5010)
14 Screw cover caps
1 Allen key (5020)
6 Fastening rods and cams (5900)
4 Cam cover caps
4 Casters (5230)
4 Support pins (5035)
4 Plastic dowels (5036)
2 Magnets (5400)
Nails
2 Pairs of glass door hinges (5500
Black) or (5506 Gold)
2 Glass door handles (5510
Black) or (5516 Gold)
CONTENU QUINCAILLERIE
28 Vis d’assemblage (5010)
14 Capuchons de vis
1 Clé Allen (5020)
6 Cames et tiges d’attache (5900)
4 Capuchons pour cames
4 Roulettes (5230)
4 Tiges de support (5035)
4 Gougeons de plastique (5036)
2 Aimants (5400)
Clous
2 Paires de charnières pour
portes en verre (5500 Noir) ou
(5506 Or)
2 Poignées pour portes en verre
(5510 Noir) ou (5516 Or )
2

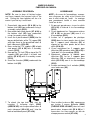
ASSEMBLY PROCEDURE
NOTE: Be sure to keep all finished edges
and faces towards the exposed side of the
unit. Putting this item together will be a lot
easier if you first lay it on its back.
1- Screw both side panels (05 & 06) to the
bottom shelf (60) from underneath using 4
assembly screws (5010).
2- Now attach both back panels (07 & 08) to
the bottom shelf (60) from underneath
using 4 assembly screws (5010).
3- Insert the 4 plastic dowels (5036) into the
top pre-drilled holes of the TV support (35)
and align them to the pre-drilled holes of
both side panels (05 & 06).
4- Now, screw the 2 TV supports (35) to both
side panels (05 & 06) with 4 assembly
screws (5010).
5- Now put the TV shelf (70) on top of the TV
supports (35) and attach it to both side
panels (05 & 06) with 4 assembly screws
(5010).
6- Insert the 4 casters (5230) underneath the
bottom shelf (60).
7- To attach the top shelf (58) start by
inserting 2 fastening cams (5900)
(ARROW UP) into the pre-drilled holes of
each side panel (05 & 06) and 1 into the
back of each back panel (07 & 08).
ASSEMBLAGE
NOTE : Au cours de l’assemblage, assurez-
vous d’exposer les côtés et les chants finis
vers le côté visible de l’unité. Le montage
sera grandement facilité si vous couchez
l’unité sur le dos.
1- En passant par dessous, vissez les côtés
(05 & 06) à l’aide de 4 vis d’assemblage
(5010).
2- Vissez également les 2 panneaux arrières
(07 & 08) au dessous (60) avec 4 vis
d’assemblage (5010).
3- Insérez les 4 gougeons de plastique
(5036) dans les trous percés dans le haut
des 2 supports pour télévision (35) et
alignez les aux trous percés de les deux
côtés (05 & 06).
4- Vissez maintenant les 2 supports pour
télévision (35) aux deux côtés (05 & 06) à
l’aide de 4 vis d’assemblage (5010).
5- Maintenant, déposez la tablette pour
télévision (70) sur les 2 supports pour
télévision (35) et attachez-la aux deux
côtés (05 & 06) avec 4 vis d’assemblage
(5010).
6- Insérez maintenant les 4 roulettes (5230)
sous le dessous (60).
7- Pour installer le dessus (58), commencez
par insérer 2 cames d’attache (5900)
(FLÈCHE VERS LE HAUT) dans les trous
percés dans chaque côté (05 & 06) et 1
came dans les trous percés au dos de
chaque panneau arrière (07 & 08).
MADE IN CANADA
FABRIQUÉ AU CANADA
3

8- Vissez 6 tiges d’attache
(5900)
sous le
dessus (58) et alignez les tiges aux
cames d’attache.
9- Relevez maintenant l’unité avec
précaution et fixez le dessus (58) en
place en tournant les cames d’attache
(5900) avec la clé Allen (5020).
10- Installez 3 tablettes (72) de chaque côté
du meuble. Chaque tablette est vissée
au côté et au panneau arrière avec 2 vis
d’assemblage (5010).
11- Maintenant, insérez les tiges de support
(5035) dans les côtés gauche et droit (05
& 06) et déposez la tablette ajustable
(61) sur ceux-ci.
INSTALLATION DES
PORTES EN VERRE (1442)
12- Enfoncez deux aimants (5400) sous la
tablette pour télévision (70).
13- Installez maintenant 1 paire de
charnières pour portes en verre (5500
Noir) ou (5506 Or) sur chaque porte en
verre (1442) et introduisez celles-ci dans
l’unité entre la tablette pour télévision
(70) et le dessous (60). Installez sur
chaque porte en verre (1442) une
poignée (5510 Noir ou 5516 Or)
directement devant l’aimant (5400).
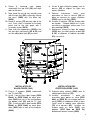
8- Screw 6 fastening rods
(5900)
underneath the top shelf (58) and align
rods to the cams.
9- Now stand the unit up very carefully and
lock the top shelf (58) in place by turning
the cams (5900) with the Allen key
(5020).
10- Attach 3 shelves (72) on each side of the
unit. Each shelf is attached to the back
panel and to the side panel with 2
assembly screws (5010).
11- Now, insert the support pins (5035) in the
left and right side panels (05 & 06) and
rest the adjustable shelf (61) on them.
INSTALLATION OF
GLASS DOORS (1442)
12- Push-in 2 magnets (5400) underneath
the TV shelf (70).
13- Install 1 pair of glass door hinges (5500
Black) or (5506 Gold) on each glass
door (1442) and set it in the unit between
the bottom shelf (60) and the TV shelf
(70). Install one glass door handle (5510
Black) or (5516 Gold) on each glass
door (1442) right in front of the magnets
(5400).
4

✄
14- Continue by nailing the 2 top backings
(74) and the 2 bottom backings (75)
behind the unit.
15- Finally, hide all visible screws and cams
with the appropriate cover caps.
CLEANING: A damp cloth is all you need to
keep the finish shiny clean.
14- Clouez maintentant les dos (section du
haut) (74) et (section du bas) (75)
derrière l’unité.
15- Finalement, il ne vous reste plus qu’à
cacher les vis et cames visibles avec les
capuchons appropriés.
NETTOYAGE : Un linge légèrement humide
est tout ce dont vous aurez besoin pour
nettoyer la surface.
5
CUSTOMER SERVICE / SERVICE
À LA CLIENTÈLE
FAX: (613) 525-4729
ALL U.S. CUSTOMERS SHOULD ORDER PARTS DIRECTLY FROM THE STORE OF PURCHASE.
If any missing or broken parts, please advise MONARCH by specifying the style (eg: style ET9405 and the part number (eg: top shelf is
#58). Therefore if you need the top shelf (58) for the style no. ET9405, you would ask for ET9405/58. REPLACEMENT WILL BE SENT ON
A NO-CHARGE BASIS. YOU MAY FAX OR MAIL IN THIS FORM.
Advenant qu’une pièce soit manquante ou défectueuse, veuillez aviser MONARCH en spécifiant le style (ex : ET9405) et le numéro de la
pièce (ex : le dessus est le no. 58). Donc, si vous avez besoin du dessus (58) pour le style ET9405, demandez pour ET9405/58. TOUT
REMPLACEMENT VOUS SERA ENVOYÉ À NOS FRAIS. ENVOYEZ CE FORMULAIRE PAR TÉLÉCOPIEUR OU PAR COURRIER.
NAME / NOM : _______________________________________________________________________________________________________
ADDRESS / ADRESSE : _______________________________________________________________________________________________
CITY / VILLE : ___________________________________________ PROVINCE OR STATE : _______________________________________
POSTAL OR ZIP CODE/ CODE POSTAL __________________________ TELEPHONE : __________________________________________
EMAIL / COURRIEL : _________________________________________________________________________________________________
STYLE No. : ____________________________________________ PART No. PIÈCE : ____________________________________________
COLOR / COULEUR : _________________________________________ QTY / QUANTITÉ : _______________________________________
REASON FOR SERVICE / RAISON POUR LE SERVICE :_____________________________________________________________________
___________________________________________________________________________________________________________________
BOX SERIAL No. SÉRIE DE BOÎTE : _____________________________________________________________________________________
LES SPÉCIALITÉS MONARCH SPECIALTIES INC.
229 rue Kenyon Street West, P.O. Box 628, Alexandria, Ontario, Canada, K0C 1A0
Tel : (613) 525-4727 Fax : (613) 525-4729
Toll free Tél. Sans frais : (800) 720-4391
Email : service@monarchalex.com
Office hours / Heures de bureau 8:30 am – 4:30 pm Eastern Time / Heure de l’Est
-
 1
1
-
 2
2
-
 3
3
-
 4
4
-
 5
5


