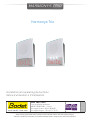
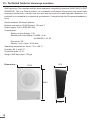
Bodet Harmonys Trio Installation And Operating Instructions Manual
- Taper
- Installation And Operating Instructions Manual

1
Harmonys Trio
Installation and operating instructions
Notice d’utilisation & d’installation
When receiving goods please check nothing is broken otherwise make a claim near shipping company.
S’assurer à réception que le produit n’a pas été endommagé durant le transport pour réserve au transporteur.
Réf : 608479 A
HARMONYS TRIO
BODET TIme & sport
1 rue du Général de Gaulle
49340 TREMENTINES - France
Tél support France: 02 41 29 06 00
Tel support Export: +33 2 41 71 72 33
www.bodet-time.com

2
Table of contents
I - Initial verification 4
1.1 Unpacking the Harmonys.........................................................................................................4
1.2 Cleaning...................................................................................................................................4
1.3 Pre-requisit...............................................................................................................................4
II - Installation of products 5
2.1 Recommandations before installation......................................................................................5
2.2 Wall sounder.............................................................................................................................5
2.4 Factory configuration................................................................................................................6
III - Operation 7
3.1 Time display.............................................................................................................................7
3.2 White LED flash.......................................................................................................................7
3.3 Displaying a message.............................................................................................................7
3.4 Locating the Harmonys Trio.....................................................................................................7
3.5 Test..........................................................................................................................................7
3.6 PoE+ and PoE power supply....................................................................................................7
IV - Use of the product 8
4.1 Home page..............................................................................................................................8
4.2 Network configuration page.....................................................................................................9
4.3 Parameters page...................................................................................................................10
4.4 Time Configuration................................................................................................................12
4.5 Alarm configuration................................................................................................................14
4.6 System page..........................................................................................................................16
V - What to do if...? ... Check. 17
VI - Technical features Harmonys sounders 18
VII - Appendix - Time zones 19

3
Table des matières
I - Vérification initiale 21
1.1 Déballage des carillons Harmonys.........................................................................................21
1.2 Nettoyage...............................................................................................................................21
1.3 Pré-requis...............................................................................................................................21
II - Installation des produits 22
2.1 Recommandations avant installation......................................................................................22
2.2 Harmonys mural.....................................................................................................................22
2.3 Retour en configuration usine.................................................................................................23
III - Fonctionnement 24
3.1 Affichage de l’heure................................................................................................................24
3.2 Flash LED blanc.....................................................................................................................24
3.3 Affichage d’un message ........................................................................................................24
3.4 Localisation ...........................................................................................................................24
3.5 Test........................................................................................................................................24
3.6 Alimentation PoE+ et PoE.....................................................................................................24
IV - Utilisation du produit 25
4.1 Page d’accueil........................................................................................................................25
4.2 Page configuration réseau......................................................................................................26
4.3 Page paramètres....................................................................................................................27
4.4 Page Configuration horaire....................................................................................................29
4.5 Configuration des alarmes......................................................................................................31
4.6 Page système.........................................................................................................................33
V - Que faire si...? ...Vérifier 34
VI - Caractéristiques techniques des carillons Harmonys 35
VII - Annexe - Zones horaires 36

4
I - Initial verification
Thank you for choosing a BODET Harmonys Trio. This product has been carefully designed for
your satisfaction based on ISO9001 quality requirements.
We recommend that you read this manual thoroughly before attempting to manipulate the
product.
Keep this booklet during all the life of your product, so that you can refer to it each time it is
necessary.
Bodet cannot be held responsible for damages caused to the product due
to use that does not conform to the instructions described in this manual.
Any unauthorised modication of the product will invalidate the warranty.
1.1 Unpacking the Harmonys Trio
Unpack with caution and check the contents.
The wall mounted Harmonys Trio (907715) must contain:
■ Wall sounder,
■ This quick start.
1.2 Cleaning
Use an antistatic product.
Never use alcohol, acetone or other solvents which may damage product casing.
1.3 Pre-requisit
For the commissioning of the Harmonys Trio sounder, you must install the SIGMA software
(version > V1.16xx or above) (supplied on CD with your master clock) on your PC. To download
the latest version of the software, contact our export department who will send you the download
links by email: [email protected].
To check compatibility of your equipment and the software version, please have the
version of your master clock.
SLockdown alarms and melodies are available for download on the Bodet website at the following
address :
http://www.bodet-time.com/en/bell-systems/download-melodies.html
The Ethernet port to which the Bodet Harmonys Trio is connected must be PoE+, the
power being supplied by a PoE+ switch or a PoE+ injector. Harmonys Trio can function
while being powered by a PoE switch however some of its operations will be limited (refer
to section 3.7). Make sure that the power capacity of your switch or injector is sucient to
power your product.
Bodet recommends the following brands:
■ PoE+ injectors: Planet PoE-164 (to be used on non PoE Ethernet connections).
■ PoE+ switches: D-Link, Cisco, NetGear.

5
II - Installation of the products
2.1 Recommendations before installation
The location where the sounder is to be installed must be chosen according to the presence of
PoE+ network cable nearby (depending on the version of the product, the cable is fed through the
back ot the product or through its top, so plan accordingly).
The identication of one or more Harmonys sounders, requires the presence of one or two
persons:
- 1 person: we recommend wiring Harmonys one by one to your bay. You can then locate the
sounder easily as long as the cable is identied.
The identication (nding the MAC address) can also be simply done by pressing the test button
of the Harmonys Trio .
- 2 persons: a person making the identication from software (see manual 607726). The
second person standing in the area where the Harmonys sounder is located to hear beeping in
order to identify it (eg: hallway, foyer).
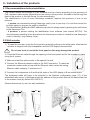
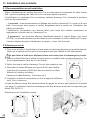
2.2 Wall sounder
1 / To open the sounder, unclip the front panel by manually pulling on the white plate. Note that the
sounder is shipped with the loudspeaker and the LED display disconnected.
Do not use tools to unclip the front panel as this may damage the product.
2 / Feed the Ethernet cable through the opening in the back panel and x the sounder in place
using the 4 screws.
3/ Make sure that the wall sounder is at against the wall.
4/ Connect the Ethernet network cable to the RJ45 connector. To make the
connection easier make a loop with the Ethernet cable inside the casing.
Ethernet cable category: 5 minimum or 6.
5/ Connect the loudspeaker in A and the at cable of the LED display in B as shown below.
The broadcast mode will have to be selected in the Network conguration page (17) of the
embedded web server, in Multicast mode the address of the product must be the same than that
of the master clock (by default 239.192.55.1).
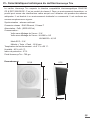
Pattern dimensions (in mm) for wall installation:
53,3
168
282,2
90
87,2
163,8
A
B
A
B

6
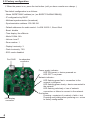
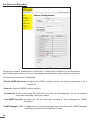
2.3 Factory configuration
1/ When the power is on, press the test button (until you hear a continuous «beep» ).
The default conguration is as follows :
- Name: BODET-MAC address (ex. (ex.:BODET-30AEA4C5BA80))
- IP conguration by DHCP
- Multicast synchronisation (broadcast)
- Synchronisation address: 239.192.54.1
- Default addresses for audio control : A=239.192.55.1, B=not filled
- Boost: disable
- Time display: Hour/Minute
- Mode 12/24h: 24h
- Volume: level 7
- Zone number: 1
- Display luminosity: 3
- Flash luminosity: 75%
- ECO mode: disabled
Power supply indicator :
LED ON (green) = device powered on.
LED OFF = no power.
Test button :
Pressing = emission of a melody + falsh + text
Pressing and holding when powering on = return
to factory conguration
Network indicator :
LED ashing green fast = connection to the
network in progress.
LED ashing green slowly = device connected to
the network
LED ashing red slowly = loss of network
connection or failure to connect to the network.
Port RJ45 Loudspeaker
connector
LED display
connector

7
III- Operation
3.1 Local time display
The parameter setting of the local time display, synchronised via NTP, is performed on the
Parameters page of the unit web server (page 10):
- HH:MM / HH:MM:ss / None (default: HH:MM).
In the HH:MM:ss mode the display is in the 24h format only.
3.2 White LED flash
A white ash can be activated while a melody is being played (scheduled bells or alerts) and/or
a text message is being displayed.
The ash luminous intensity is ajustable on 4 levels: 25%, 50%, 75% and 100%.
The ash can be deactivated from the Sigma software.
3.3 Display of a message
A text message can be added to a melody number in the utilisation screen of the Sigma software.
The message is stored in the Harmonys Trio.
When the melody number is executed, the text message is displayed while the melody is played
for at least 10s.
It is possible to displayed a message can be displayed even without any associated melody.
The text messages are limited to 50 characters. If the text ts in the screen it will be xed, if not
the texte message will be scrolling at least twice.
When no message is specied the time is displayed unless the time display is deactivated then
nothing is displayed.
3.5 Locating the Harmonys Trio
During the « localisation » from the Sigma software, the Harmonys Trio plays a melody, displays
the product name (by default: BODET + adresse MAC, ex.:BODET-30AEA4C5BA80) and ashes.
3.6 Test
When pressing the « Test » button, the Harmonys Trio :
- plays the same melody as the regular Melodys,
- displays:
• the product name (the factory setting being « Bodet + adresse MAC »),
• a full rectangle (all LEDs ON),
• the rmware version,
- ashes.
3.7 PoE+ power supply
The Harmonys Trio must be powered in PoE +. Nonetheless Harmonys Trio will work when
powered by PoE but in this case « #!PoE!# » will be displayed at start up and the volume level,
the display luminous intensity as well as the ash luminosity will be restricted.

8
IV - Use of the product
There are two ways to access the web interface:
1/ Open your web browser and enter the IP address of the product in the address bar.
2/ Using the Sigma software in the Configuration > IP devices > Harmonys Trio tab click the
Web Browser button to open the web server (refer to the software manual, 607726 starting at
version H) (Software version V1.16xx or above).
The SIGMA software lets you:
- detect all the products present on the network,
- set the parameter of each product or copy the parameter of one product toward a group of
products,
- update the product software,
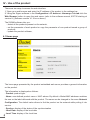
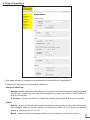
4.1 Home page
The home page presented by the product embedded web server provides a general information
on the product.
The information is displayed as follows:
- Product: product type.
- Name: user-defined product name + MAC adress. By default: «Bodet-MAC address» matches
the one on the label delivered with the product. The name can be changed in the menu Network
Configuration. The default value allows to find the product on the network while putting it into
service.
- Synchro: display of the status of the synchronisation
- Local Date: display of the local date
- Local Time: display of the local time

9
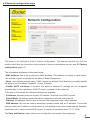
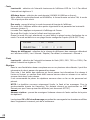
4.2 Network configuration page
This page is for setting the clock’s network configuration. The warning reminds you that the
product could lose its connection to the network if incorrect parameters are set (see 2.3 Factory
configuration, page 17).
The information displayed is described below:
- MAC Address: this is the equipment’s MAC address. This address is unique to each device.
This number is given on a label on the back of Bodet equipments.
- Name: user-defined product name + MAC adress (by défault). Field that lets you easilly identify
the product on the network. Example : Home_Sounder.
- Enable DHCP checkbox: if checked, the device’s network IP settings will be configured
automatically (in the case where a DHCP server is present on the network).
If this box is unchecked, the following settings are available:
- IP Address: manually sets the device’s IP address. (required if not DHCP server).
- Subnet Mask: the subnet mask associates a equipment with the local network.
- Gateway: the gateway can be used to connect the equipment to two data networks.
- DNS Address: this can be used to associate a product name with an IP address. This avoids
having to enter an IP address in the browser: a user-defined name can be used instead. Example:
www.bodet.com, saved via the DHCP server, is simpler to remember than 172.17.10.88.
The Save and Reboot button saves your configuration and reboots the equipment.

10
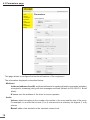
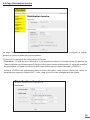
4.3 Parameters page
This page allows to configure the functional features of the equipment.
The information displayed is described below:
- Multicast
Address (address A and B):
multicast addresses for sending all audio commands (melodies,
microphone, streaming) along with text messages and flash (default: A=239.192.55.1, B=left
blank).
N° zone: sets the address of the client or server repeater.
- Audio
Volume: adjust according to the number of sounders in the room and the size of the room.
For example, in an office set a lower (3 or 4) volume and in a refectory the highest (7 or 8)
volume.
Boost: adds a few decibels to the selected volume level.

11
- Text:
Luminosity: Selection of the luminous intensity of the LED display from 1 to 4 (default
value: 3)
Time display: Selection of the time mode (HH:MM / HH:MM:SS / None). Note that when
the HH:MM:SS is selected the display will be in the 24H format.
Eco Mode: Used to enable the clock’s energy-saving mode.
In Eco mode, the clock displays the ashing colon and is set to minimum brightness (level
1).
The Eco mode is applied to the time display only.
In the Eco mode the audio, text and flash remain active.
By default the Eco mode is disabled. When Eco mode is enabled its activation time can be
selected.
Scrolling speed: Selection of the scrolling speed of the scrolling message (Slow / Normal
/ Fast). By default the speed is set to Normal
- Flash
Luminosity: Selection of the luminous intensity of the flash (25%, 50%, 75% or 100%). by
default the intensity is set to 75%.
- Repeater
In a complex network with one or more remote installations it may be necessary to use
network gateways.
To do this, we must define repeaters that will move information from one network to another
in Unicast, a sounder being assigned as server repeater in one network and another as a
client repeater in the other network.
It is recommended to place the server repeater in an area where people are present.
NOTE: The repeater concept concerns only audio, flash and messages. For time
synchronisation the Harmonys Trio on the remote network must synchronise in NTP
Unicast in order to display the time (refer to the document 607729).
Repeater address: used to enter the network address of the other sounder of the repeater
pair.
The Save and Save and Reboot button saves your configuration and reboots the
equipment.

12
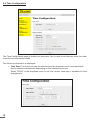
4.4 Time Configuration
The Time Configuration page is divided into two parts. One is used to set the time zone, the other
to set the synchronisation mode.
The following information is displayed:
• Time Zone: The time zone can be selected from the dropdown menu (summer/winter
time is handled automatically depending on the selected time zone).
Select “PROG” in the dropdown menu to set time, month, fixed day or schedule for time
changeovers:

13
• NTP Mode: Used to select one of 3 mode types::
o Unicast: In Address IP 1, enter the IP address of the NTP server. In this case, it is the
clock that calls the NTP server.
It is also possible to set up redundancy (if the first server fails to respond, the second
is requested and so on). For this purpose up to 5 server addresses may be entered
(IP address 1/2/3/4/5).
The Periodicity field sets the frequency with which the clock requests the configured NTP
servers.
o Multicast: In this case, the NTP server broadcasts the time on the Multicast address
given to it. The Multicast address of the clients (receivers) must be the same as the one
on which the server broadcasts.
By default, Bodet products transmit the time or receive using the Multicast address:
239.192.54.1
The Multicast addresses are included between 224.0.0.0 and 239.255.255.255.
o By DHCP: As for Unicast mode, except the NTP server addresses are automatically
retrieved via the DHCP server (option 42 enabled on the DHCP server).
The checkbox "Continue to display" is used to define how the clock should respond if NTP
synchronisation has been lost for 48 hours:
• If "Continue to display" is OFF, the clock blacks out and the colon is xed.
• If "Continue to display" is ON, the clock continues to operate using its internal time base
and the colon «:» ceases to ash.
is used to save any settings made on this page.

14
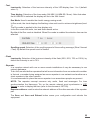
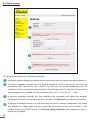
4.4 Alarm configuration
This page is used to enable device supervision, to define the information to be transmitted
and the destination server. One or more settings can be defined and configured as alarms.
The following information is displayed:
- Enable SNMP checkbox: activates the SNMP network service for device supervision from a
control PC.
- Version: choice of SNMP protocol version.
- Community: A set of Harmonys Trio dened by the user. All the Harmonys Trio on the network
must have the same Community name.
- Tick SNMP Trap box: activates (or not) the automatic sending of error messages to SNMP
managers.
- SNMP Manager 1/2/3 : IP addresses of servers receiving alerts from the clocks. SNMP Manager
redundancy increases the reliability of alerts.

15
- Reboot: This setting is used to detect a clock reboot.
- Scheduled melody: This parameter triggers an alarm when a programmed melody is played.
- Manual melody: This parameter is used to trigger an alarm when melody is initiated manually.
- Streaming: the device sends back the information that an audio stream is in process of being
played.
- Alert melody: This parameter triggers an alarm when an alert melody is broadcast.
- Missing File: this parameter sets o an alarm if a text is alone without an associated melody or
ash .
- Web access: This setting is used to trigger an alert if a user connects to the web server of the
clock.
- Authentication failure: This setting is used to trigger an alert if a user sends an incorrect ID to
the web server of the clock.
- Synchronisation failure: This setting is used to detect synchronisation discrepancies with the
master clock (type Sigma) or the time server (type Netsilon).
Multicast: Alarm triggered when the multicast synchronisation is absent for at
least 1hour
Unicast: Alarm triggered when the unicast synchronisation is absent for 3 times
the duration of the poll (periodicity) and at least 1 hour (allowing for the NTP
server maintenance)
- Repeater failure:
This parameter triggers an alarm when a fault occurs on the repeater.
- Periodic Status: This setting is used to verify that the device is still working correctly. This veri-
cation is carried out at a set frequency.
- SNMP test:
The button is used to send a trap status to all of the congured SNMP
managers to ensure that supervision is congured correctly.

16
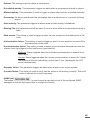
4.5 System page
This page is divided into four sections as follows:
Information panel displaying software version and time since the equipment was powered on.
A warning message reminds you that once a password is set, a connection can only be
established with the clock’s web interface by entering the correct password (max 16
characters). Enter a username and password in the fields provided. To save the new username
and password, click on Save. Authorized characters: A to Z, a to z, 0 to 9, ., - and _.
A warning message reminds you that rebooting the equipment will cause the network
connection to be lost until the clock has fully rebooted. The Reboot button reboots the product.
A warning message reminds you that rebooting the clock in factory configuration will erase
any settings you have made and may cause the equipment to lose its connection to the
network if there is no DHCP server. The Factory config.+Reboot button reboots the clock in
factory configuration.
u
v
w
x
u
v
w
x

17
V - What to do if...? ... Check.
What to do if…? ... Check
No broadcasting sounders
1) The multicast address is identical between the master clock
and Harmonys.
2) Network parameters are compatible: Harmonys Trio must
be on the same Ethernet network as the computer with the
Sigma
software.
No DHCP server on the
network
1) By default the Harmonys takes on the following IP setting
(after about 30 seconds):
- IP: 169.254.0.1 à 169.254.255.254
- MASK: 255.255.0.0
- PASSERELLE: 0.0.0.0
- DNS: 0.0.0.0
2) Using the Sigma software (Conguration> IP devices>
Network button) to set the network settings Harmonys Trio
(product identication with the MAC address on the tag on
the back of the product).
Harmonys does not
broadcast any sound
1) The maximal power of the switch PoE is sucient to feed all
the products connected to the switch.
2) The length of the cable is lower than 100 meters (refer to the
standards of network cabling).
3) The power output of the switch is sucient (IEEE 802.3at) to
power the product.
4) Harmonys sounder is on the broadcast area of the master
clock Sigma.
5) The sounder volume is high enough in the programming of
the web server (see page 18). The sounder beeps when
pressing the test button.
6) The multicast address is identical between the master clock
and Harmonys.
7) the loud speaker is connected
The sounder emits a
continuous beep
1) Sounders in repeater mode (client or server) are:
- properly connected.
- set to the same IP address.
#!PoE!# is displayed at
start up
The Harmonys Trio is powered by PoE instead of PoE+ (some
parameters will be restricted). Use a PoE+ switch
The display shows xed colon
Missing NTP synchronisation signal since at least 48H
1) if the NTP server is still on
2) in the Harmonys Trio if the IP address in the Synchronisation
page is correct

18
VI - Technical features Harmonys sounders
Wall Harmonys Trio complies with the electromagnetic compatibility directive 2004/108/CE & DBT
2006/95/CE. This is a Class A product. In a domestic environment this product may cause radio
frequency interference, in which case the user may be required to take adequate measures. It is
intended for a residential or commercial environment. It complies with the European standards in
force.
Synchronisation: Multicast address.
Network connection: RJ45 Ethernet, 10 base-T.
Power supply: PoE+ (IEEE 802.3at).
Consumption:
Stanby no time display: 3 W
Standby with time display: HH:MM = 4 W
HH:MM:SS = 4.5 W
Eco mode: 3W
Melody + text + ash: 18 W max
Operating temperatures: from 0 °C to +50 °C.
Humidity: 80 % at 40 °C.
Protection index: IP 31.
Weight: Wall Harmonys: 700 grs.
Dimensions :
163,8
282.2
53,3
87,2

19
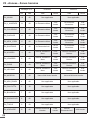
VII - Appendix - Time zones
UTC
oset
Winter/summer Summer/winter
HH MM Date Time Date Time
ZH_HAWAI -10 00 Not applicable Not applicable
ZH_L_ANGELES -8 00
Last Sunday
March
2:00 Local
1e Sunday
November
2:00 Local
ZH_COLORADO -7 00
Last Sunday
March
2:00 Local
1e Sunday
November
2:00 Local
ZH_CHICAGO -6 00
Last Sunday
March
2:00 Local
1e Sunday
November
2:00 Local
ZH_NEW_YORK -5 00
Last Sunday
March
2:00 Local
1e Sunday
November
2:00 Local
ZH_SANTIAGO -4 00 2e Sunday April 23:59 Local
1e Sunday
November
23:59 Local
ZH_ACORES -1 00
Last Sunday
March
0:00 Local
Last Sunday
October
1:00 Local
ZH_LONDRES 0 00
Last Sunday
March
1:00 Local
Last Sunday
October
2:00 Local
ZH_PARIS 1 00
Last Sunday
March
2:00 Local
Last Sunday
October
3:00 Local
ZH_HELSINKI 2 00
Last Sunday
March
3:00 Local
Last Sunday
October
4:00 Local
ZH_MOSCOU 3 00 Summer time all year round Summer time all year round
ZH_ABU_DHABI 4 00 Not applicable Not applicable
ZH_CALCUTTA 5 30 Not applicable Not applicable
ZH_BANGKOK 7 00 Not applicable Not applicable
ZH_SINGAPOUR 8 00 Not applicable Not applicable
ZH_TOKYO 9 00 Not applicable Not applicable
ZH_ADELAIDE 9 30
Last Sunday
October
2:00 Local
Last Sunday
April
4:00 Local

20
ZH_SYDNEY 10 00
1e Sunday
October
2:00 Local 1e Sunday April 3:00 Local
ZH_NOUMEA 11 00 Not applicable Not applicable
ZH_MARTINIQUE -4 00 Not applicable Not applicable
ZH_GUYANE -3 00 Not applicable Not applicable
ZH_REUNION 4 00 Non applicable Non applicable
ZH_PROG Programmable Programmable 2:00 Local Programmable 3:00 Local
La page est en cours de chargement...
La page est en cours de chargement...
La page est en cours de chargement...
La page est en cours de chargement...
La page est en cours de chargement...
La page est en cours de chargement...
La page est en cours de chargement...
La page est en cours de chargement...
La page est en cours de chargement...
La page est en cours de chargement...
La page est en cours de chargement...
La page est en cours de chargement...
La page est en cours de chargement...
La page est en cours de chargement...
La page est en cours de chargement...
La page est en cours de chargement...
La page est en cours de chargement...
-
 1
1
-
 2
2
-
 3
3
-
 4
4
-
 5
5
-
 6
6
-
 7
7
-
 8
8
-
 9
9
-
 10
10
-
 11
11
-
 12
12
-
 13
13
-
 14
14
-
 15
15
-
 16
16
-
 17
17
-
 18
18
-
 19
19
-
 20
20
-
 21
21
-
 22
22
-
 23
23
-
 24
24
-
 25
25
-
 26
26
-
 27
27
-
 28
28
-
 29
29
-
 30
30
-
 31
31
-
 32
32
-
 33
33
-
 34
34
-
 35
35
-
 36
36
-
 37
37


Bodet Harmonys Trio Installation And Operating Instructions Manual
- Taper
- Installation And Operating Instructions Manual
dans d''autres langues
- English: Bodet Harmonys Trio
Documents connexes
-
Bodet harmonys Manuel utilisateur
-
Bodet 608389 Manuel utilisateur
-
Bodet Button Box Manuel utilisateur
-
-
-
Bodet 607915 Mode d'emploi
-
-
-
-
