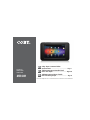
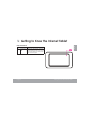
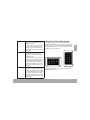
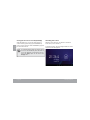
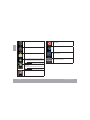
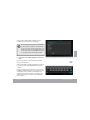
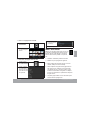
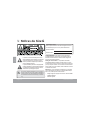
Coby Kyros MID4331 Guide de démarrage rapide
- Catégorie
- Comprimés
- Taper
- Guide de démarrage rapide

EN
Coby® Kyros® Internet Tablet
Quick Start Guide ................................................ Page 2
ES
Tableta Internet con Pantalla Táctil
Guía de Inicio Rápido ........................................Pagina 41
FR
Tablette Internet à Ecran Tactile
Guide de Démarrage Rapide ................................ Page 82
1MFBTFSFBEDBSFGVMMZCFGPSFVTFt-ÏBFMNBOVBMBOUFTEFVTBSt7FVJMMF[MJSFDFMJWSFUBWBOUVUJMJTBUJPO
For series /
Para la serie /
Pour la série
MID4331

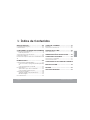
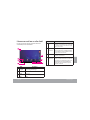
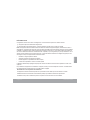
Page 2 Table Of Contents
English
THANK YOU .....................................................3
Package Contents ........................................................3
Features..........................................................................4
GETTING TO KNOW THE INTERNET TABLET .....5
About the Touchscreen ...............................................8
Protective Film ........................................................8
Touchscreen Actions..............................................8
About the Orientation Sensor .....................................9
Charging the Tablet ...................................................10
Inserting a Memory Card ..........................................10
Resetting the Tablet ....................................................12
GETTING STARTED .........................................13
Turning the Tablet on and off ...................................13
Turning the Screen On and Off (Standby) .......14
Unlocking the Screen ..........................................14
Home Screen at a Glance ........................................15
About Applications ....................................................16
Preinstalled Applications .....................................17
Installing Applications .........................................18
About Menus ...............................................................19
$ERXW1RWLÀFDWLRQV ..................................................... 19
CONNECTING TO THE INTERNET ..................21
Requirements ..............................................................21
Connect to a Wi-Fi network ..................................... 22
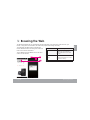
BROWSING THE WEB .....................................24
MANAGING APPLICATIONS ........................28
OPTIONAL CONNECTIONS ..........................31
Connecting to a Computer ......................................31
Connecting to a TV ....................................................32
Connecting Headphones ........................................ 33
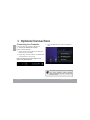
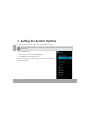
SETTING THE SYSTEM OPTIONS ....................34
SPECIFICATIONS ...........................................35
SUPPORT ........................................................36
SAFETY NOTICES ...........................................37
 Table of Contents

Page 3 Thank You
English
 Thank You
Congratulations on your purchase of a Coby
®
Kyros
®
Internet Tablet. This guide is provided to help you get
started quickly with your player; please read it carefully
and save it for future reference.
For detailed instructions, up-to-date information, and helpful
tips, please visit the Coby website at www.cobyusa.com.
This manual is available for download from the
&RE\ZHEVLWHDVD3')¿OH
To view PDF documents, download and install
the free Adobe Acrobat reader from the Adobe
website at ZZZDGREHFRP
Package Contents
Please make sure that the items shown below are
included in the package. Should an item be missing,
please contact the local retailer from which you pur-
chased this product.
Coby
®
Kyros
®
Internet
Tablet
Protective pouch
USB cable
Power adapter
This package may contain plastic bags or other
PDWHULDOV WKDW SRVH D KD]DUG WR FKLOGUHQ %H
sure to safely dispose of all packing materials
DIWHURSHQLQJ

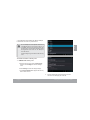
Page 4 Thank You
English
Features
Browse the Web.
Visit your favorite websites
Check your e-mail
Keep in touch with friends and family
Watch YouTube™ videos
Browse the world’s most popular video-sharing com-
munity
Read your favorite books
Download thousands of books with the included
E-book reader *
Discover thousands of apps for Android™
Games, applications, and more with the installed
marketplace
Connect to the Internet wirelessly
High-speed Wi-Fi 802.11 b/g/n networking
Enjoy your media library anywhere
Portable powerhouse plays popular music, video,
and photo formats
microSDHC memory card reader
Increase your storage capacity (up to 32 GB sup-
ported)
Built-in camera
Convenient Rear-facing camera
Automatic orientation detection
Read any way you want; the display adjusts auto-
matically!
* Reading books in the ePub format requires the included
E-book reader application.

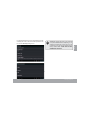
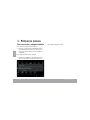
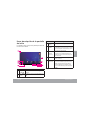
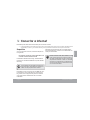
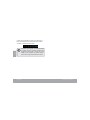
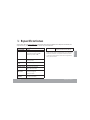
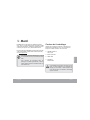
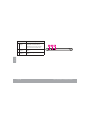
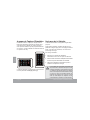
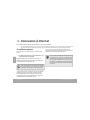
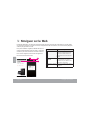
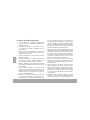
Page 5 Getting To Know The Internet Tablet
English
 Getting to Know the Internet Tablet
Unit at a Glance
Name Description
1 Touchscreen
LCD
Display and control screen. Touch con-
trols are displayed on the screen. Touch
(or touch and hold) icons with your n-
ger to control the player.

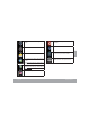
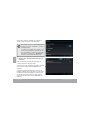
Page 6 Getting To Know The Internet Tablet
English
Name Description
2 Power key Press to turn the unit on, or to turn the
screen on and o.
Press and hold to access the Power O
menu.
3 Volume –
key
Press to decrease the volume level.
4 Volume +
key
Press to increase the volume level.
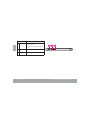
432

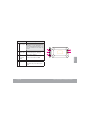
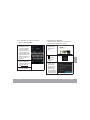
Page 7 Getting To Know The Internet Tablet
English
Name Description
5 Headphone
jack
Audio output connection for head-
phones.
Note: Speaker output is automatically
disabled when headphones are con-
nected to the player.
6 USB 2.0 Hi-
speed port
Connect to a computer to transfer data
(e.g., music, videos, photos, les).
7 microSDHC
card slot
Load external microSDHC memory
cards here.
8 Camera Rear - facing camera
9 Speaker Speaker output is automatically muted
when using headphone Jack.
9
5
8
7
6

Page 8 Getting To Know The Internet Tablet
English
About the Touchscreen
Your tablet comes equipped with an easy-to-use touch-
screen.
2XUFDSDFLWLYHPXOWLWRXFKVFUHHQUHTXLUHVJHQWOH¿QJHUWLS
touch on the glass screen to activate tablet’s functions.
0XOWLSOH¿QJHUVPD\EHXVHGWRSHUIRUPJHVWXUHVHJ
¿QJHUSLFWXUH]RRP
3OHDVHQRWH<RXU¿QJHUWLSVPXVWQRWEHFRYHUHG$
stylus may be used. Make sure it is for capacitive touch-
screens.
To avoid damaging the screen, do not touch it
with excessive force or with any object other
WKDQ\RXU¿QJHU)RUEHVWUHVSRQVHPDNHVXUH
your hands are clean before using the touch-
VFUHHQFRQWUROV
Protective Film
$WKLQ¿OPKDVEHHQDSSOLHGWRWKHWRXFKVFUHHQWRSURWHFW
LWGXULQJVKLSSLQJ7KHSURWHFWLYH¿OPVKRXOGEHUHPRYHG
EHIRUHXVH7RUHPRYHLWVLPSO\WDNHDFRUQHURIWKH¿OP
and peel it away from the screen.
Touchscreen Actions
You can control the functions of the tablet by using
the touchscreen in combination with the three touch
NH\VORFDWHGRQWKHEH]HO7RFRQWUROWKHWDEOHWZLWKWKH
WRXFKVFUHHQXVH\RXU¿QJHUWLSWRPDQLSXODWHLFRQV
buttons, menu items, the on-screen keyboard, and other
items displayed on the screen.
You can perform the following actions on the touchscreen
XVLQJ\RXU¿QJHUWLSRUDSSURSULDWHVW\OXV
Touch: To activate an on-screen item (e.g.,
application icons, buttons, menu
items, and the letter/symbols of the
on-screen keyboard), simply touch
WKHPZLWK\RXU¿QJHUWLS
Touch and
Hold:
Some on-screen items have an
alternate action if you touch and hold
it (e.g., opening an alternate menu, or
to activate the drag function). To touch
and hold an item, touch the item and
GRQRWOLIW\RXU¿QJHUWLSXQWLOWKHDFWLRQ
occurs.

Page 9 Getting To Know The Internet Tablet
English
Drag: Drag an on-screen item to change its
position (e.g., an application icon on
the home screen).
To drag an item, touch and hold it for
a moment, then without lifting your
¿QJHUWLSPRYH\RXU¿QJHUWLSRQWKH
screen until the item reaches its target
destination.
Swipe: Swipe up/down on the screen to scroll
through a list. On some screens,
you may be able to swipe left/right to
FKDQJHWKHYLHZ
To swipe, touch the screen and then
TXLFNO\PRYH\RXU¿QJHUWLSDFURVVWKH
VFUHHQZLWKRXWOLIWLQJ\RXU¿QJHUWLS
Do not pause on the screen with your
¿QJHUWLSDWWKHLQLWLDOSRLQWRIFRQWDFW
or you may accidentally drag an item
instead.
Double-tap: Quickly tap the screen twice on a
webpage or other application screen
to zoom (the application must support
the double-tap/zoom function). Within
the browser, double-tapping a web-
page section will cause the browser to
]RRPDQG¿WWKDWVHFWLRQWRWKHZLGWK
of the screen.
About the Orientation Sensor
The tablet contains a sensor that will automatically
change the orientation of most screens as you rotate the
tablet. The sensor works best when the tablet is rotated
perpendicular to the ground (i.e., when the tablet is held
upright and not fat on its back).
The orientation sensor can be turned on and off in the
Display settings menu.

Page 10 Getting To Know The Internet Tablet
English
Charging the Tablet
The tablet comes with a built-in rechargeable lithium-
polymer battery.
Before using the tablet, the battery should be charged
fully. Press lower right corner settings, next to battery
icon is charging percentage.
To charge the battery:
1. Plug one end of the included power adapter into an
AC 100-240V outlet.
2. Plug the other end of the included power adapter into
the Power jack on the tablet.
3. Disconnect the power adapter when the tablet is fully
charged.
The battery used in this device may present a
¿UH RU FKHPLFDO EXUQ LI PLVWUHDWHG 'R QRW
GLVDVVHPEOHLQFLQHUDWHRUKHDWWKHGHYLFH'R
not leave the de-vice in a place subject to direct
VXQOLJKWRULQDFDUZLWKLWVZLQGRZVFORVHG'R
not connect the device to a power source other
than that which is indicated here or on the label
DVWKLVPD\UHVXOW LQ WKH ULVN RI ¿UH RU HOHFWULF
VKRFN
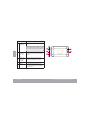
Inserting a Memory Card or USB
Flash Drive
The tablet accepts microSDHC memory cards and USB
ÀDVKGULYH$86%2QWKH*R27*FDEOHVROGVHSD-
rately) is required to connect USB Flash Drives:
Increase the memory capacity of your tablet
3OD\PHGLD¿OHVVWRUHGRQWKHPHPRU\FDUGHJ
PXVLFYLGHRRUSKRWR¿OHV
To insert a memory card:
1. Align the memory card with the card slot. The metal
contacts of the memory card should face down away
from the LCD screen.
2. Slide the card into the spring-loaded slot. Push the
card in until it clicks into place.
To connect a USB Flash drive:
&KHFNWKHWDEOHWVSHFL¿FDWLRQVWRGHWHUPLQHWKHW\SHRI
USB port (micro-USB or mini-USB).
7RFRQQHFWDQ86%ÀDVKGULYHSXUFKDVHD86%
On-the-Go (OTG) cable adapter that corresponds to your
USB port.

Page 11 Getting To Know The Internet Tablet
English
3. The USB OTG cable will adapt the Tablet’s USB port
WRWKHIXOOVL]HFRQQHFWRURQ\RXUÀDVKGULYH
Do not attempt to insert objects other than a
PLFUR6'+&PHPRU\FDUGLQWRWKHFDUGVORW$
FRPSDWLEOH PHPRU\ FDUG VKRXOG ¿W HDVLO\ LQWR
the card slot; if you encounter resistance, check
WKH DOLJQPHQW RI WKH FDUG 'R QRW DWWHPSW WR
IRUFHWKHFDUGLQ
Avoid touching the gold contacts of the memory
FDUG
To release and remove a memory card:
1. UNMOUNT the memory card.
a. From the home screen, tap the Launcher Tab,
and then touch Settings to show the settings
menu.
b. Touch Storage to show the storage settings.
c. Touch Unmount SD card to prepare the memory
card for safe removal.
2. Push the card further into the slot until you hear a
click. The card will spring out of the slot.

Page 12 Getting To Know The Internet Tablet
English
3. Grasp the card by its edge to remove it.
4. 5HPRYHWKH86%ÀDVKGULYH
To avoid damage and data corruption, do not
remove a memory card while data is being
ZULWWHQWRRU UHDGIURPWKHFDUG)RU H[DPSOH
GRQRWUHPRYHDFDUGZKLOHSOD\LQJDPXVLF¿OH
VWRUHGRQWKHFDUG
The available menu items are dependent on the
XQLW$OOLOOXVWUDWLRQLVIRUUHIHUHQFHRQO\
Resetting the Tablet
5HVHWWKHWDEOHWLILWVKRXOGIUHH]HDQGQRWUHVSRQGRU
otherwise malfunction.
1. Disconnect your tablet if it is connected to a com-
puter.
2. Press and hold the POWER key for about 8 seconds
to turn off the tablet, and then press and hold the
POWER key until you see Coby logo.

Page 13 Getting Started
English
 Getting Started
Turning the Tablet on and off
To turn the tablet on:
Press and hold the Power key until the LCD screen
turns on and you see Coby Logo, then wait until you
see the Unlock screen.
To turn the tablet off:
1. Press and hold the PowerNH\XQWLOWKHFRQ¿UPDWLRQ
message appears.
2. Touch OK to turn off the tablet.

Page 14 Getting Started
English
Turning the Screen On and Off (Standby)
When the tablet is on, you can turn off the screen to
conserve battery power. Simply press the Power key
once to turn the screen off. Press the Power key again to
turn the screen back on.
To conserve battery power, the screen can be
set to turn off automatically when the tablet is
not in use (between 15 seconds and 30 min-
XWHV 7KLV Sleep option can be found in the
DisplayPHQX
Unlocking the Screen
When the screen turns off, you will have to unlock the
screen when you turn it back on.
To unlock the screen, touch and drag the lock icon to the
edge of the circle that appears.

Page 15 Getting Started
English
,IDSDVVZRUGKDVEHHQVHWHQWHUWKHSDVVZRUGWR¿QLVK
unlocking the screen. The Screen Unlock password can
be set in the Security settings menu.
WARNING: Please write down your password
ORFN SDWWHUQ3,13DVVZRUG 0LVSODFLQJ RU IRU-
JHWWLQJ WKLV PHWKRG ZLOOORFN WKH XVHU RXW 5H-
covering the unit will reset the device back to
IDFWRU\ GHIDXOWV ALL YOUR DATA & PRO-
GRAMS WILL BE LOST.

Page 16 Getting Started
English
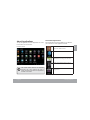
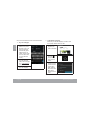
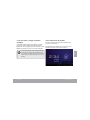
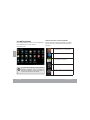
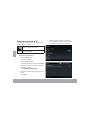
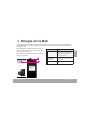
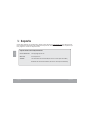
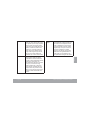
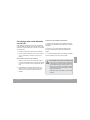
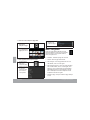
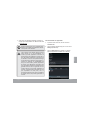
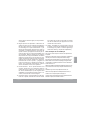
Home Screen at a Glance
The home screen is the starting point for all of the
features of your tablet.
5
6
1
2
3
4
7
Name Description
1 Google
Search
Touch to search with Google browser.
2 Home icon Touch to back to the central Home Screen.
3 Back icon Touch to back to the previous screen.
Name Description
4 Recent Apps Touch to display the list of thumbnail im-
ages of apps you have worked recently.
Touch an App to open it.
5Launcher
Tab
Open the Launcher to view the list of all
Applications and Widgets installed on the
tablet. Touch the Launcher tab to open
the Launcher.
6 Icons Touch an icon to open an application or
folder.
7 Notication
bar
Shows notication icons such as time, bat-
tery level, and the network signal strength;
touch the bar to open the full Notications
panel. Touch a Notication icon to display
more detail.

Page 17 Getting Started
English
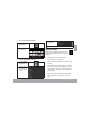
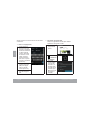
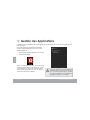
About Applications
To open an application, touch the application icon on the
home screen or in the Launcher.
Launcher screen:
The screen shown above is for illustrative
SXUSRVHVRQO\&RE\UHVHUYHVWKHULJKWWR
PRGLI\DQGLPSURYHWKH¿QDOOLVWRIDSSOLFDWLRQV
DYDLODEOHRQWKHWDEOHW
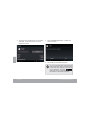
Preinstalled Applications
Some applications have been installed on your tablet for
your convenience. These applications include:
Download and read thousands of e-books.
Supports the ePub standard.
Browse the web.
Display the calendar or record events and
appointments to manage your schedule.
Perform simple mathematical operations.
Take pictures or videos with the front-
facing camera.

Page 18 Getting Started
English
View the current time, or set an alarm.
Get $10 of music from eMusic.
Check your e-mail.
View and manage les stored on the tablet.
Visit http://www.estrongs.com/en/products/
le-explorer.html for more information.
Turn o background apps to conserve bat-
tery power.
Visit http://www.estrongs.com/en/products/
task-manager.html for more information.
View photos and videos, plus edit photos.
Access to thousands of apps with GetJar
Marketplace.
Play music.
Access the Settings menu to adjust the
tablet’s options.
Launch the mobile YouTube™ browser page
to watch internet videos.

Page 19 Getting Started
English
Installing Applications
You can also download an install additional applications
from the device’s applications marketplace, the web
browser, or other sources.
The tablet must be set to allow installation of applications
from non-Market sources. The Unknown sources option
can be set in the Application settings menu.
<RXU &RE\ 0RELOH ,QWHUQHW 'HYLFHPD\ LQFOXGH
access to, or information on, content, products,
DSSOLFDWLRQVDQGVHUYLFHVIURPWKLUGSDUWLHV<RXU
use of such third party content, products,
applications and services is at the discretion of
such third party and expressly governed by such
third party’s terms of use, including any such
third party’s privacy policies, for such content,
SURGXFWV DSSOLFDWLRQV DQG VHUYLFHV &RE\
Electronics Corporation is not responsible for
and expressly disclaims all warranties of any
kind with respect to all such third party content,
SURGXFWV DSSOLFDWLRQV DQG VHUYLFHV &RE\
Electronics Corporation will not be responsible
for any loss, costs, or damages incurred due to
your access to or use of third party content,
SURGXFWVDSSOLFDWLRQVRUVHUYLFHV
About Widgets
Widgets are self-contained applications that you can
place on the Home screens to access your favorite
features.
Adding Widgets to a Home Screen
1. Navigate to the Home screen which you want to
place the Widget on.
2. Touch the Launcher Tab.
3. Touch WIDGETS to show all widgets, and then hold
on a widget icon to add it to the Home screen.
Removing Widgets
Touch and hold the Widget until Remove icon appears
at the top side of the screen, then drag the Widget to the
Remove icon to remove it.

Page 20 Getting Started
English
$ERXW1RWLÀFDWLRQV
7KHLFRQVWKDWDSSHDULQWKH1RWL¿FDWLRQEDUDWWKH
bottom right corner of the screen alerts you when new
messages arrive or alarms or other application events
occur.
9LHZDQGUHVSRQGWRWKHQRWL¿FDWLRQVE\RSHQLQJWKHIXOO
1RWL¿FDWLRQVSDQHO
Touch the 1RWL¿FDWLRQEDUWRRSHQWKH1RWL¿FDWLRQV
panel.
7RUHVSRQGWRDQRWL¿FDWLRQ
7RXFKDQRWL¿FDWLRQLQWKHOLVWWKH1RWL¿FDWLRQVSDQHOZLOO
FORVHDQGWKHDSSOLFDWLRQDVVRFLDWHGZLWKWKHQRWL¿FDWLRQ
will launch.
7RFORVHWKH1RWL¿FDWLRQVSDQHO
Touch any other area of screen except the
1RWL¿FDWLRQVSDQHORU
Touch the Back icon.
La page est en cours de chargement...
La page est en cours de chargement...
La page est en cours de chargement...
La page est en cours de chargement...
La page est en cours de chargement...
La page est en cours de chargement...
La page est en cours de chargement...
La page est en cours de chargement...
La page est en cours de chargement...
La page est en cours de chargement...
La page est en cours de chargement...
La page est en cours de chargement...
La page est en cours de chargement...
La page est en cours de chargement...
La page est en cours de chargement...
La page est en cours de chargement...
La page est en cours de chargement...
La page est en cours de chargement...
La page est en cours de chargement...
La page est en cours de chargement...
La page est en cours de chargement...
La page est en cours de chargement...
La page est en cours de chargement...
La page est en cours de chargement...
La page est en cours de chargement...
La page est en cours de chargement...
La page est en cours de chargement...
La page est en cours de chargement...
La page est en cours de chargement...
La page est en cours de chargement...
La page est en cours de chargement...
La page est en cours de chargement...
La page est en cours de chargement...
La page est en cours de chargement...
La page est en cours de chargement...
La page est en cours de chargement...
La page est en cours de chargement...
La page est en cours de chargement...
La page est en cours de chargement...
La page est en cours de chargement...
La page est en cours de chargement...
La page est en cours de chargement...
La page est en cours de chargement...
La page est en cours de chargement...
La page est en cours de chargement...
La page est en cours de chargement...
La page est en cours de chargement...
La page est en cours de chargement...
La page est en cours de chargement...
La page est en cours de chargement...
La page est en cours de chargement...
La page est en cours de chargement...
La page est en cours de chargement...
La page est en cours de chargement...
La page est en cours de chargement...
La page est en cours de chargement...
La page est en cours de chargement...
La page est en cours de chargement...
La page est en cours de chargement...
La page est en cours de chargement...
La page est en cours de chargement...
La page est en cours de chargement...
La page est en cours de chargement...
La page est en cours de chargement...
La page est en cours de chargement...
La page est en cours de chargement...
La page est en cours de chargement...
La page est en cours de chargement...
La page est en cours de chargement...
La page est en cours de chargement...
La page est en cours de chargement...
La page est en cours de chargement...
La page est en cours de chargement...
La page est en cours de chargement...
La page est en cours de chargement...
La page est en cours de chargement...
La page est en cours de chargement...
La page est en cours de chargement...
La page est en cours de chargement...
La page est en cours de chargement...
La page est en cours de chargement...
La page est en cours de chargement...
La page est en cours de chargement...
La page est en cours de chargement...
La page est en cours de chargement...
La page est en cours de chargement...
La page est en cours de chargement...
La page est en cours de chargement...
La page est en cours de chargement...
La page est en cours de chargement...
La page est en cours de chargement...
La page est en cours de chargement...
La page est en cours de chargement...
La page est en cours de chargement...
La page est en cours de chargement...
La page est en cours de chargement...
La page est en cours de chargement...
La page est en cours de chargement...
La page est en cours de chargement...
La page est en cours de chargement...
La page est en cours de chargement...
La page est en cours de chargement...
-
 1
1
-
 2
2
-
 3
3
-
 4
4
-
 5
5
-
 6
6
-
 7
7
-
 8
8
-
 9
9
-
 10
10
-
 11
11
-
 12
12
-
 13
13
-
 14
14
-
 15
15
-
 16
16
-
 17
17
-
 18
18
-
 19
19
-
 20
20
-
 21
21
-
 22
22
-
 23
23
-
 24
24
-
 25
25
-
 26
26
-
 27
27
-
 28
28
-
 29
29
-
 30
30
-
 31
31
-
 32
32
-
 33
33
-
 34
34
-
 35
35
-
 36
36
-
 37
37
-
 38
38
-
 39
39
-
 40
40
-
 41
41
-
 42
42
-
 43
43
-
 44
44
-
 45
45
-
 46
46
-
 47
47
-
 48
48
-
 49
49
-
 50
50
-
 51
51
-
 52
52
-
 53
53
-
 54
54
-
 55
55
-
 56
56
-
 57
57
-
 58
58
-
 59
59
-
 60
60
-
 61
61
-
 62
62
-
 63
63
-
 64
64
-
 65
65
-
 66
66
-
 67
67
-
 68
68
-
 69
69
-
 70
70
-
 71
71
-
 72
72
-
 73
73
-
 74
74
-
 75
75
-
 76
76
-
 77
77
-
 78
78
-
 79
79
-
 80
80
-
 81
81
-
 82
82
-
 83
83
-
 84
84
-
 85
85
-
 86
86
-
 87
87
-
 88
88
-
 89
89
-
 90
90
-
 91
91
-
 92
92
-
 93
93
-
 94
94
-
 95
95
-
 96
96
-
 97
97
-
 98
98
-
 99
99
-
 100
100
-
 101
101
-
 102
102
-
 103
103
-
 104
104
-
 105
105
-
 106
106
-
 107
107
-
 108
108
-
 109
109
-
 110
110
-
 111
111
-
 112
112
-
 113
113
-
 114
114
-
 115
115
-
 116
116
-
 117
117
-
 118
118
-
 119
119
-
 120
120
-
 121
121
-
 122
122


Coby Kyros MID4331 Guide de démarrage rapide
- Catégorie
- Comprimés
- Taper
- Guide de démarrage rapide
dans d''autres langues
- English: Coby Kyros MID4331 Quick start guide
- español: Coby Kyros MID4331 Guía de inicio rápido
Documents connexes
Autres documents
-
 Boss Audio Systems UBAC50D Manuel utilisateur
-
VeriFone UX7002 Point of Sale Terminal Manuel utilisateur
-
Impecca DVPDS-722 Mode d'emploi
-
Telefunken D43F470J4CW Le manuel du propriétaire
-
-
Graco Sweet Slumber 1751642 Manuel utilisateur
-
-
Braven BFSG Get Started
-
Doro Primo 366 Mode d'emploi
-
Bose CineMate 520 Manuel utilisateur
