Porter Cable PCC608 Manuel utilisateur
- Catégorie
- Perceuses mixtes sans fil
- Taper
- Manuel utilisateur
Ce manuel convient également à

20V Max* 1/2 inch (13mm) Brushless Drill / Driver
Perceuse visseuse sans balai de 13mm (1/2po) et 20V Max*
Taladro/atornillador sin escobillas de 20V Máx* de 1/2 pulg. (13 mm)
CATALOG NUMBER
N° DE CATALOGUE
CATÁLOGO N°
PCC608
Instruction manual
Manuel d’instructions
Manual de’instrucciones
www.portercable.com
INSTRUCTIVO DE OPERACIÓN, CENTROS DE SERVICIO Y PÓLIZA DE GARANTÍA.
ADVERTENCIA:
LÉASE ESTE INSTRUCTIVO ANTES DE USAR EL PRODUCTO.
Thank you for choosing PORTER-CABLE! To register your new product, go to:
www.portercable.com/ServiceAndSupport/ProductRegistration.aspx
Merci d’avoir choisi PORTER-CABLE! Consulter le site Web www.portercable.com/
ServiceAndSupport/ProductRegistration.aspx pour enregistrer votre nouveau produit.
Gracias por elegir PORTER-CABLE usted! Para registrar su nuevo producto, visite: www.
portercable.com / ServiceAndSupport / ProductRegistration.aspx
*Maximum initial battery pack voltage (measured without a workload) is 20 volts.
Measured under a workload, nominal voltage is 18.
*La tension initiale maximale du bloc-piles (mesurée sans charge de travail) est de 20
volts. La tension nominale est de 18.
*El máximo voltaje inicial del paquete de baterías (medido sin una carga de trabajo)
es 20 voltios. la tensión nominal es de 18.

2
General Power Tool Safety
Warnings
WARNING: Read all safety warnings
and all instructions. Failure to follow the
warnings and instructions may result in
electric shock, fire and/or serious injury.
SAVE ALL WARNINGS AND INSTRUCTIONS
FOR FUTURE REFERENCE
The term “power tool” in the warnings
refers to your mains-operated
(corded) power tool or battery-
operated (cordless) power tool.
1) WORK AREA SAFETY
a) Keep work area clean and well
lit. Cluttered or dark areas invite
accidents.
b) Do not operate power tools in
explosive atmospheres, such as in the
presence of flammable liquids, gases
or dust. Power tools create sparks which
may ignite the dust or fumes.
c) Keep children and bystanders
away while operating a power tool.
Distractions can cause you to lose
control.
2) ELECTRICAL SAFETY
a) Power tool plugs must match the
outlet. Never modify the plug in any
way. Do not use any adapter plugs
with earthed (grounded) power tools.
Unmodified plugs and matching outlets
will reduce risk of electric shock.
b) Avoid body contact with earthed
or grounded surfaces such as
pipes, radiators, ranges and
refrigerators. There is an increased
risk of electric shock if your body is
earthed or grounded.
c) Do not expose power tools to rain
or wet conditions. Water entering
a power tool will increase the risk of
electric shock.
d) Do not abuse the cord. Never use
the cord for carrying, pulling or
unplugging the power tool. Keep cord
away from heat, oil, sharp edges or
moving parts. Damaged or entangled
cords increase the risk of electric shock.
e) When operating a power tool
outdoors, use an extension cord
suitable for outdoor use. Use of a
cord suitable for outdoor use reduces
the risk of electric shock.
f) If operating a power tool in a damp
location is unavoidable, use a
ground fault circuit interrupter
(GFCI) protected supply. Use of a
GFCI reduces the risk of electric shock.
3) PERSONAL SAFETY
a) Stay alert, watch what you are
doing and use common sense
when operating a power tool. Do
not use a power tool while you
are tired or under the influence
of drugs, alcohol or medication.
A moment of inattention while
operating power tools may result in
serious personal injury.
b) Use personal protective equipment.
Always wear eye protection.
Protective equipment such as dust
mask, nonskid safety shoes, hard
hat, or hearing protection used for
appropriate conditions will reduce
personal injuries.
c) Prevent unintentional starting.
Ensure the switch is in the off
position before connecting to
power source and/ or battery pack,
picking up or carrying the tool.
Carrying power tools with your finger
on the switch or energizing power
tools that have the switch on invites
accidents.
d) Remove any adjusting key or
wrench before turning the power
SAFETY GUIDELINES - DEFINITIONS
It is important for you to read and understand this manual. The information it contains
relates to protecting YOUR SAFETY and PREVENTING PROBLEMS. The symbols
below are used to help you recognize this information.
DANGER: Indicates an imminently hazardous situation which, if not avoided, will
result in death or serious injury.
WARNING: Indicates a potentially hazardous situation which, if not avoided,
could result in death or serious injury.
CAUTION: Indicates a potentially haz ard ous situation which, if not avoided,
may result in minor or mod er ate injury.
NOTICE: Used without the safety alert symbol indicates potentially hazardous
situation which, if not avoided, may result in property damage.

3
tool on. A wrench or a key left
attached to a rotating part of the power
tool may result in personal injury.
e) Do not overreach. Keep proper
footing and balance at all times.
This enables better control of the
power tool in unexpected situations.
f) Dress properly. Do not wear loose
clothing or jewelry. Keep your
hair, clothing and gloves away
from moving parts. Loose clothes,
jewelry or long hair can be caught in
moving parts.
g) If devices are provided for the
connection of dust extraction and
collection facilities, ensure these
are connected and properly used.
Use of dust collection can reduce
dust-related hazards.
4) POWER TOOL USE AND CARE
a) Do not force the power tool. Use
the correct power tool for your
application. The correct power tool
will do the job better and safer at the
rate for which it was designed.
b) Do not use the power tool if the
switch does not turn it on and
off. Any power tool that cannot
be controlled with the switch is
dangerous and must be repaired.
c) Disconnect the plug from the
power source and/or the battery
pack from the power tool before
making any adjustments,
changing accessories, or storing
power tools. Such preventive safety
measures reduce the risk of starting
the power tool accidentally.
d) Store idle power tools out of
the reach of children and do not
allow persons unfamiliar with the
power tool or these instructions
to operate the power tool. Power
tools are dangerous in the hands of
untrained users.
e) Maintain power tools. Check
for misalignment or binding of
moving parts, breakage of parts
and any other condition that may
affect the power tool’s operation.
If damaged, have the power
tool repaired before use. Many
accidents are caused by poorly
maintained power tools.
f) Keep cutting tools sharp and clean.
Properly maintained cutting tools with
sharp cutting edges are less likely to
bind and are easier to control.
g) Use the power tool, accessories
and tool bits, etc. in accordance
with these instructions, taking into
account the working conditions
and the work to be performed.
Use of the power tool for operations
different from those intended could
result in a hazardous situation.
5) BATTERY TOOL USE AND CARE
a) Recharge only with the charger
specified by the manufacturer. A
charger that is suitable for one type
of battery pack may create a risk of
fire when used with another battery
pack.
b) Use power tools only with
specifically designated battery
packs. Use of any other battery
packs may create a risk of injury and
fire.
c) When battery pack is not in use,
keep it away from other metal
objects like paper clips, coins, keys,
nails, screws, or other small metal
objects that can make a connection
from one terminal to another.
Shorting the battery terminals together
may cause burns or a fire.
d) Under abusive conditions,
liquid may be ejected from the
battery, avoid contact. If contact
accidentally occurs, flush with
water. If liquid contacts eyes,
additionally seek medical help.
Liquid ejected from the battery may
cause irritation or burns.
6) SERVICE
a) Have your power tool serviced by a
qualified repair person using only
identical replacement parts. This will
ensure that the safety of the power
tool is maintained.
Drill Safety Warnings
•
Wear ear protectors with impact drills.
Exposure to noise can cause hearing loss.
• Use auxiliary handle(s), if supplied
with the tool. Loss of control can cause
personal injury.
• Hold power tool by insulated gripping
surfaces, when performing an
operation where the cutting accessory
may contact hidden wiring. Cutting
accessory contacting a “live” wire may
make exposed metal parts of the power
tool “live” and could give the operator an
electric shock.
• Use clamps or another practical way
to secure and support the work piece
to a stable platform. Holding the work
by hand or against your body leaves it
unstable and may lead to loss of control.
• Do not operate this tool for long
periods of time. Vibration caused by the
operating action of this tool may cause
permanent injury to fingers, hands,

4
and arms. Use gloves to provide extra
cushion, take frequent rest periods, and
limit daily time of use.
• Keep your hair, clothing, and gloves
away from air vents. Air vents often
cover moving parts in which these items
can be caught.
• Hammer bits and tools get hot during
operation. Wear gloves when touching them.
•
Hold tool firmly with two hands, one
hand on the handle, and the other
gripping the bottom around the battery
area or the auxiliary handle if provided.
Loss of control can cause personal injury.
• When not in use, place tool on its side
on a stable surface where it will not
cause a tripping or falling hazard. Some
tools with large battery packs will stand
upright but may be easily knocked over.
• Wear safety goggles or other eye
protection. Hammering and drilling
operations cause chips to fly. Flying
particles can cause permanent eye
damage. Everyday eyeglasses are NOT
safety glasses. Also use face or dust
mask if drilling operation is dusty.
ALWAYS WEAR CERTIFIED SAFETY
EQUIPMENT:
• ANSI Z87.1 eye protection (CAN/CPA
Z94.3),
• ANSI S12.6 (S3.19) hearing protection,
• NOSH/OSHA respiratory protection.
WARNING: Some dust created by
power sanding, sawing, grinding,
drilling, and other construction activities
contains chemicals known to the state
of California to cause cancer, birth
defects or other reproductive harm.
Some examples of these chemicals are:
•
lead from lead-based paints,
•
crystalline silica from bricks and cement
and other masonry products, and
•
arsenic and chromium from
chemically-treated lumber.
Your risk from these exposures varies, depending on
how often you do this type of work. To reduce your
exposure to these chemicals: work in a well ventilated
area, and work with approved safety equipment, such
as those dust masks that are specially designed to filter
out microscopic particles.
•
Avoid prolonged contact with
dust from power sanding, sawing,
grinding, drilling, and other
construction activities. Wear
protective clothing and wash exposed
areas with soap and water. Allowing
dust to get into your mouth, eyes, or lay
on the skin may promote absorption of
harmful chemicals.
WARNING:
Use of this tool can
generate and/or disperse dust, which may
cause serious and permanent respiratory
or other injury. Always use NOSH/OSHA
approved respiratory protection appropriate
for the dust exposure. Direct particles away
from face and body.
SYMBOLS
The label on your tool may include the
following symbols. The symbols and their
definitions are as follows:
V .................. volts
A ..................amperes
Hz ................hertz
W ................. watts
min ..............minutes
or AC ......alternating current
or DC ...direct current
n
o ................no load speed
................Class I Construction
................earthing terminal
(grounded)
...............safety alert symbol
................Class II Construction
(double insulated)
.../min or rpm...revolutions or
reciprocation per minute
..............Read instruction manual
before use
................Use proper respiratory
protection
...............Use proper eye protection
................Use proper hearing
protection
BPM ...........beats per minute
IMPORTANT SAFETY INSTRUCTIONS
FOR BATTERY CHARGERS
SAVE THESE INSTRUCTIONS: This
manual contains important safety
instructions for battery chargers.
WARNING: Before using charger,
read all instructions and cautionary
markings on charger, battery pack, and
product using battery pack.
• Shock hazard. Do not allow any liquid
to get inside charger.
• Burn hazard. To reduce the risk
of injury, charge only designated
PORTER-CABLE batteries. Other types
of batteries may burst causing personal
injury and damage.
• Under certain conditions, with the
charger plugged in to the power
supply, the charger can be shorted by
foreign material. Foreign materials of
a conductive nature such as, but not
limited to, steel wool, aluminum foil, or
any buildup of metallic particles should
be kept away from charger cavities.
Always unplug the charger from the
power supply when there is no battery
pack in the cavity. Unplug charger
before attempting to clean.
• DO NOT attempt to charge the battery

5
pack with any chargers other than the
ones in this manual. The charger and
battery pack are specifically designed to
work together.
•
These chargers are not intended for any
uses other than charging designated
PORTER-CABLE rechargeable
batteries. Any other uses may result in
risk of fire, electric shock or electrocution.
• Do not expose charger to rain or snow.
• Pull by plug rather than cord when
disconnecting charger. This will reduce
risk of damage to electric plug and cord.
• Make sure that cord is located so that it
will not be stepped on, tripped over, or
otherwise subjected to damage or stress.
• Do not use an extension cord
unless it is absolutely necessary.
Use of improper extension cord could
result in risk of fire, electric shock, or
electrocution.
• An extension cord must have
adequate wire size (AWG or American
Wire Gauge) for safety. The smaller
the gauge number of the wire, the
greater the capacity of the cable, that
is 16 gauge has more capacity than
18 gauge. When using more than one
extension to make up the total length, be
sure each individual extension contains
at least the minimum wire size.
• Do not place any object on top of
charger or place the charger on a soft
surface that might block the ventilation
slots and result in excessive internal
heat. Place the charger in a position
away from any heat source. The
charger is ventilated through slots in the
top and the bottom of the housing.
• Do not operate charger with damaged cord
or plug — have them replaced immediately.
• Do not operate charger if it has
received a sharp blow, been dropped,
or otherwise damaged in any way.
Take it to an authorized service center.
• Do not disassemble charger; take it
to an authorized service center when
service or repair is required. Incorrect
reassembly may result in a risk of
electric shock, electrocution or fire.
• Disconnect the charger from the
outlet before attempting any cleaning.
This will reduce the risk of electric shock.
Removing the battery pack will not
reduce this risk.
• NEVER attempt to connect 2 chargers
together.
• The charger is designed to operate on
standard household electrical power
(120 Volts). Do not attempt to use it on
any other voltage.
SAVE THESE INSTRUCTIONS
IMPORTANT SAFETY INSTRUCTIONS
FOR BATTERY PACKS
WARNING:
For safe operation, read
this manual and manuals originally supplied
with tool before using the battery pack.
The battery pack is not fully charged out of
the carton. Before using the battery pack and
charger, read the safety instructions below.
Then follow charging procedures outlined.
READ ALL INSTRUCTIONS
• Do not incinerate the battery pack
even if it is severely damaged or is
completely worn out. The battery pack
can explode in a fire. Toxic fumes and
materials are created when Li-Ion battery
packs are burned.
•
Do not charge or use battery in explosive
atmospheres, such as in the presence
of flammable liquids, gases or dust.
Inserting or removing the battery from the
charger may ignite the dust or fumes.
•
If battery contents come into contact
with the skin, immediately wash area
with mild soap and water. If battery liquid
gets into the eye, rinse water over the open
eye for 15 minutes or until irritation ceases.
If medical attention is needed, the battery
electrolyte for Li-Ion batteries is composed
of a mixture of liquid organic carbonates
and lithium salts.
• Contents of opened battery cells may
cause respiratory irritation. Provide
fresh air. If symptoms persists, seek
medical attention.
WARNING:
Burn hazard. Battery liquid
may be flammable if exposed to spark or flame.
• Charge the battery packs only in
PORTER-CABLE chargers.
• DO NOT splash or immerse in water
or other liquids. This may cause
premature cell failure.
• Do not store or use the tool and battery
pack in locations where the temperature
may be reach or exceed 105°F (40˚C)
(such as outside sheds or metal
buildings in summer).
WARNING:
Never attempt to open the
battery pack for any reason. If battery pack
case is cracked or damaged, do not insert
into charger. Do not crush, drop or damage
battery pack. Do not use a battery pack or
charger that has received a sharp blow,
been dropped, run over or damaged in any
Minimum Gage for Cord Sets
Volts Total Length of Cord in Feet
120V 0-25 26-50 51-100 101-150
(0-7,6m) (7,6-15,2m) (15,2-30,4m) (30,4-45,7m)
Ampere Rating
More Not more American Wire Gage
Than Than
0 - 6 18 16 16 14
6 - 10 18 16 14 12
10 - 12 16 16 14 12
12 - 16 14 12 Not Recommended

way (i.e., pierced with a nail, hit with a
hammer, stepped on). Damaged battery
packs should be returned to service center
for recycling.
WARNING:
Fire hazard. Do not
store or carry battery so that metal
objects can contact exposed battery
terminals. For example, do not place
battery in aprons, pockets, tool boxes,
product kit boxes, drawers, etc., with loose
nails, screws, keys, etc. Transporting
batteries can possibly cause fires if the
battery terminals inadvertently come in
contact with conductive materials such
as keys, coins, hand tools and the like.
The US Department of Transportation
Hazardous Material Regulations (HMR)
actually prohibit transporting batteries in
commerce or on airplanes (i.e., packed in
suitcases and carry-on luggage) UNLESS
they are properly protected from short
circuits. So when transporting individual
batteries, make sure that the battery
terminals are protected and well insulated
from materials that could contact them and
cause a short circuit. NOTE: Li-Ion
batteries should not be put in checked
baggage.
NOTE: Do not store the battery packs in
a tool with the trigger switch locked on.
Never tape the trigger switch in the ON
position.
NEVER force the battery pack into the
charger. DO NOT modify the battery pack
in any way to fit into a non-compatible
charger as battery pack may rupture
causing serious personal injury.
Storage Recommendations
1. The best storage place is one that is
cool and dry away from direct sunlight
and excess heat or cold.
2. Long-term storage will not harm the
battery pack or the charger as long as the
battery is not depleted.
6
This product uses the batteries and chargers listed below.
20V Max* Lithium-Ion Batteries: PCC680L, PCC681L, PCC682/PCC682L, PCC685L
20V Max* Lithium-Ion Chargers: PCC690L, PCC691L, PCC692/PCC692L, PCC695L, PCC699L
FUNCTIONAL DESCRIPTION
Figure A
1. Trigger Switch
2. Forward/Reverse Button
3. Torque Adjust Collar
4. Dual Range Gear Selector
5. Keyless Chuck
6. Battery
7. Battery Release Button
8. LED Work Light
9. Bit Tip Holder
2
1
3
4
5
6
9
7
8

Charging Procedure
PORTER-CABLE chargers are designed
to charge PORTER-CABLE battery
packs. Charge times are: PCC690L in
40-80 mins., PCC699L /PCC691L in
70-140 mins., PCC692/PCC692L in 40-80
mins., and PCC695L in 180-360 mins.
depending on the pack being charged.
1. Plug the charger into an appropriate
outlet before inserting the battery pack.
2. Insert the battery pack into the charger.
3. The LED will flash indicating that
the battery is being charged.
4. The completion of charge is indicated
by the LED remaining on continuously.
The pack is fully charged and may be used at
this time or left on the charger.
Recharge discharged batteries as soon
as possible after use or battery life
may be greatly diminished. For longest
battery life, do not discharge batteries
fully. It is recommended that the batteries
be recharged after each use.
Charger Diagnostics
This charger is designed to detect certain
problems that can arise with the battery packs
or the power source. Problems are indicated
by one LED flashing in different patterns.
Bad Battery
The charger can detect a weak or
damaged battery. The LED flashes in
the pattern indicated on the label. If you see
this bad battery blink pattern, do not continue
to charge the battery. Return it to a service
center or a collection site for recycling.
Hot/Cold Pack Delay
When the charger detects a battery
that is excessively hot or excessively
cold, it automatically starts a Hot/Cold
Pack Delay, suspending charging until the
battery has normalized. After this happens,
the charger automatically switches to the
Pack Charging mode. This feature ensures
maximum battery life. The light flashes in
the pattern indicated on the label.
Problem Power Line
When the charger is used with some
portable power sources such as
generators or sources that convert DC to
AC, the charger may temporarily suspend
operation. The LED flashes in the pattern
indicated on the label. This indicates that
the power source is out of limits.
Leaving the Battery in the Charger
The charger and battery pack can be
left connected with the LED glowing
indefinitely. The charger will keep the
battery pack fresh and fully charged.
This charger features an automatic tune-
up mode which equals or balances the
individual cells in the battery pack to allow
it to function at peak capacity. Battery
packs should be tuned up weekly or
whenever the battery no longer delivers the
same amount of work. To use the automatic
tune-up mode, place the battery pack in the
charger and leave it for at least 8 hours.
Important Charging Notes
1. Longest life and best performance can
be obtained if the battery pack is charged
when the air temperature is between 65°F
and 75°F (18°- 24°C). DO NOT charge the
battery pack in an air temperature below
+40°F (+4.5°C), or above +105°F (+40.5°C).
This is important and will prevent serious
damage to the battery pack.
2. The charger and battery pack may
become warm to touch while charging.
This is a normal condition, and does
not indicate a problem. To facilitate the
cooling of the battery pack after use,
avoid placing the charger or battery pack
in a warm environment such as in a metal
shed, or an uninsulated trailer.
3. If the battery pack does not charge
properly:
a. Check current at receptacle by
plugging in a lamp or other appliance
b. Check to see if receptacle is
connected to a light switch which turns
power off when you turn out the lights.
c. Move charger and battery pack to a
location where the surrounding air
temperature is approximately 65°F -
75°F (18°- 24°C).
d. If charging problems persist, take
the tool, battery pack and charger to
your local service center.
4. The battery pack should be recharged
when it fails to produce sufficient power
on jobs which were easily done previously.
DO NOT CONTINUE to use under these
conditions. Follow the charging procedure.
You may also charge a partially used pack
whenever you desire with no adverse
affect on the battery pack.
SAFETY WARNINGS AND
INSTRUCTIONS: DRILLS
WARNING:
Before using tool, read all
instructions and cautionary markings on tool.
WARNING:
Drill may stall (if
overloaded or improperly used) causing a
twist. Always expect the stall. Grip the drill
firmly with two hands to control the twisting
action and prevent loss of control which
could cause personal injury. If a stall does
occur, release the trigger immediately and
determine the reason for the stall before
re-starting.
7

Intended Use
This drill driver is designed for drilling and screw
driving applications.
DO NOT use under wet conditions or in the
presence of flammable liquids or gases.
DO NOT let children come into contact with the
tool. Supervision is required when inexperienced
operators use this tool.
NEVER modify the power tool or any part of it.
Damage or personal injury could result.
Operating Instructions
Installing and Removing the
Battery Pack From the Tool
WARNING:
To reduce the risk of
serious personal injury, turn tool off and
remove the battery pack before making
any adjustments or removing/installing
attachments or accessories. An accidental
start-up can cause injury.
CAUTION: Make certain the lock-off
button is engaged to prevent switch
actuation before removing or installing
battery.
TO INSTALL BATTERY PACK: Insert
battery pack (6) firmly into tool until an
audible click is heard as shown in Figure
B. Ensure battery pack is fully seated and
fully latched into position.
TO REMOVE BATTERY PACK: Depress
the battery release button (7) as shown in
Figure C and pull battery pack out of tool.
Variable Speed Trigger Switch
The tool is turned ON and OFF by
squeezing and releasing the trigger switch
(1). The farther the trigger is depressed,
the higher the speed of the drill.
• To turn the tool on, squeeze the trigger
switch (1).
• To turn the tool off, release the trigger
switch. Your tool is equipped with a
brake. The chuck will stop as soon as
the trigger switch is fully released.
NOTE:
Continuous use in variable
speed range is not recommended. It
may damage the switch and should be
avoided.
Forward/Reverse Button
A forward/reverse control button (2)
determines the rotational direction of the
tool and also serves as a lock off button.
• To select forward rotation, release the
trigger switch and depress the forward/
reverse control button on the right side
of the tool.
• To select reverse, depress the forward/
reverse control button on the left side of
the tool.
• The center position of the control button
locks the tool in the off position. When
changing the position of the control
button, be sure the trigger is released.
Adjusting Torque Control
This tool is fitted with a torque adjustment
collar (3) to select the operating mode
and to set the torque for tightening
screws. Large screws and hard workpiece
materials require a higher torque setting
than small screws and soft workpiece
materials.
• For drilling in wood, metal and plastics,
set the collar to the drilling position
symbol
• For screw driving, set the collar to the
desired setting. If you do not yet know
the appropriate setting, proceed as
follows:
• Set the collar to the lowest torque setting.
• Tighten the first screw.
• If the clutch ratchets before the desired
result is achieved, increase the collar
setting and continue tightening the
screw. Repeat until you reach the correct
setting. Use this setting for the remaining
screws.
Dual Range Gearing
The dual range feature of your drill allows
you to shift gears for greater versatility.
• To select low speed, high torque setting
(position 1), turn tool off and permit to
stop. Slide dual range gear selector (4)
away from the chuck.
8
C
B

• To select the high speed, low torque
setting (position 2), turn tool off and
permit to stop.
Slide gear shifter button
back toward the chuck.
NOTE: Do not change gears when tool is
running. If you are having trouble changing
gears, make sure that the dual range gear
button is either completely pushed forward
or completely pushed back.
Keyless Chuck
WARNING: Make certain the battery
pack is removed to prevent tool actuation
before installing or removing accessories.
To insert a drill bit or other accessory:
1. Grasp the chuck (5) and rotate it in
the counterclockwise direction, as
viewed from the chuck end.
2. I
nsert the bit or other accessory fully
into the chuck, and tighten securely
by rotating the chuck in the clockwise
direction as viewed from the chuck end.
WARNING: Do not attempt to tighten
or loosen drill bits (or any other accessory)
by gripping the front part of the chuck and
turning the tool on. Damage to the chuck
and personal injury may occur when
changing accessories.
Drilling
WARNING:
Drill may stall if
overloaded causing a sudden twist.
Always expect the stall. Grip the drill firmly
to control the twisting action and avoid
injury.
(Shift drill into DRILL mode)
• Use sharp drill bits only.
• Support and secure work properly, as
instructed in the Safety Instructions.
• Use appropriate and required safety
equipment, as instructed in the Safety
Instructions.
• Secure and maintain work area, as
instructed in the Safety Instructions.
• Run the drill very slowly, using light
pressure, until the hole is started enough
to keep the drill bit from slipping out of it.
• Apply pressure in a straight line with the
bit. Use enough pressure to keep the
bit biting but not so much as to stall the
motor or deflect the bit.
• Hold the drill firmly with two hands,
one hand on the handle, and the other
gripping the bottom around the battery
area or the auxiliary handle if provided.
• DO NOT CLICK THE TRIGGER OF A
STALLED DRILL OFF AND ON IN AN
ATTEMPT TO START IT. DAMAGE TO
THE DRILL CAN RESULT.
• Minimize stalling on breakthrough by
reducing pressure and slowly drilling
through the last part of the hole.
9
• Keep the motor running while pulling
the bit out of a drilled hole. This will help
reduce jamming.
• Make sure switch turns drill on and off.
Drilling in Wood
Holes in wood can be made with the
same twist drill bits used for metal or with
spade bits. These bits should be sharp
and should be pulled out frequently when
drilling to clear chips from the flutes.
Drilling in Metal
Use a cutting lubricant when drilling
metals. The exceptions are cast iron
and brass which should be drilled dry.
The cutting lubricants that work best are
sulfurized cutting oil or lard oil.
Screw Driving
WARNING:
Always ensure the bit is
secure before starting the tool. A loose bit
may eject from tool causing possible
personal injury.
(Shift drill into SCREW mode)
• For driving fasteners, the forward/reverse
button should be pushed to the left.
• Use reverse (button pushed to the right)
for removing fasteners.
NOTE: When moving from forward to
reverse, or vice versa, always release the
trigger switch first.
LED Work Light
When drill is activated by squeezing the
trigger switch (1), the integrated LED work
light (8) will automatically illuminate the
work area and will automatically turn off
20 seconds after the trigger switch is
released. If the trigger switch remains
depressed, the work light will remain on.
NOTE: The work light is for lighting
the immediate work surface and is not
intended to be used as a flashlight.
Accessories Storage
• A bit storage slot (9) is built into the
base of the tool.

10
Troubleshooting
Problem Possible Cause Possible Solution
• Unit will not start. • Battery pack not installed properly. • Check battery pack
installation.
• Battery pack not charged. • Check battery pack
charging requirements.
• Internal components too hot. • Allow tool to cool down.
•
Battery pack will not charge.
•
Battery pack not inserted into charger.
• Insert battery pack into
charger until LED
lights.
• Charger not plugged in. • Plug charger into a
working outlet. Refer to
“Important Charging Notes”
for more details.
• Surrounding air temperature • Move charger and battery
too hot or too cold. pack to a surrounding air
temperature of above 40
degrees F (4,5°C) or below
105 degrees F (+40,5°C).
• Unit shuts off abruptly. • Battery pack has reached its • Allow battery pack to cool
maximum thermal limit. down.
• Out of charge. ( To • Place on charger and
maximize the life of the allow to charge.
battery pack it is designed
to shutoff abruptly when
the charge is depleted.)
For assistance with your product, visit our website at www.portercable.com for a list of
service centers, or call the PORTER-CABLE Customer Care Center at (888) 848-5175.
The RBRC
®
Seal
The RBRC® (Rechargeable
Battery Recycling Corp oration)
Seal on the nickel cadmium, nickel metal
hydride or lithium-ion batteries (or battery
packs) indicates that the costs to recycle
these batteries (or battery packs) at
the end of their useful life have already
been paid by PORTER-CABLE. In some
areas, it is illegal to place spent nickel
cadmium, nickel metal hydride or lithium-
ion batteries in the trash or municipal solid
waste stream and the Call 2 Recycle®
program provides an environmentally
conscious alternative.
Call 2 Recycle, Inc., in cooperation
with PORTER-CABLE and other battery
users, has established the program in the
United States and Canada to facilitate the
collection of spent nickel cadmium, nickel
metal hydride or lithium-ion batteries. Help
protect our environment and conserve
natural resources by returning the spent
nickel cadmium, nickel metal hydride
or lithium-ion batteries to an authorized
PORTER-CABLE service center or to your
local retailer for recycling. You may also
contact your local recycling center for
information on where to drop off the spent
battery. RBRC® is a registered trademark
of Call 2 Recycle, Inc.
MAINTENANCE
WARNING:
To reduce the risk of
serious personal injury, turn tool off and
remove the battery pack before making any
adjustments or removing/installing
attachments or accessories. An accidental
start-up can cause injury.
CLEANING
WARNING:
Blow dirt and dust out of
all air vents with clean, dry air at least once
a week. To minimize the risk of eye injury,
always wear ANSI Z87.1 approved eye
protection when performing this.
WARNING:
Never use solvents or
other harsh chemicals for cleaning the non-
metallic parts of the tool. These chemicals
may weaken the plastic materials used in
these parts. Use a cloth dampened only
with water and mild soap. Never let any
liquid get inside the tool; never immerse any
part of the tool into a liquid.

11
Use only mild soap and damp cloth to
clean the tool. Never let any liquid get
inside the tool; never immerse any part of
the tool into a liquid.
CHARGER CLEANING INSTRUCTIONS
WARNING:
Shock hazard. Disconnect
the charger from the AC outlet before
cleaning.
Dirt and grease may be removed from the
exterior of the charger using a cloth or soft
non-metallic brush. Do not use water or
any cleaning solutions.
REPLACEMENT PARTS
Use only identical replacement parts. For a
parts list or to order parts, visit our service
website at www.portercable.com. You can also
order parts from your nearest PORTER-CABLE
Factory Service Center or PORTER-CABLE
Authorized Warranty Service Center. Or, you
can call our Customer Care Center at
(888) 848-5175.
This Class B digital apparatus complies
with Canadian ICES-003.
This device complies with part 15 of the
FCC rules. Operation is subject to the
following two conditions: (1) This device
may not cause harmful interference,
and (2) this device must accept
any interference received, including
interference that may cause undesired
operation.
NOTE: This equipment has been tested
and found to comply with the limits for
a Class B digital device, pursuant to
Part 15 of the FCC Rules. These limits
are designed to provide reasonable
protection against harmful interference in
a residential installation. This equipment
generates, uses and can radiate radio
frequency energy and, if not installed and
used in accordance with the instructions,
may cause harmful interference to radio
communications. However, there is no
guarantee that interference will not occur
in a particular installation.
If this equipment does cause harmful
interference to radio or television
reception, which can be determined
by turning the equipment off and on,
the user is encouraged to try to correct
the interference by one or more of the
following measures:
• Reorient or relocate the receiving
antenna.
• Increase the separation between the
equipment and receiver.
• Connect the equipment into an outlet on
a circuit different from that to which the
receiver is connected.
• Consult the dealer or an experienced
radio/TV technician for help.
Changes or modifications to this unit
not expressly approved by the party
responsible for compliance could void the
user’s authority to operate the equipment.
This Class B digital apparatus complies
with Canadian ICES-003.
SERVICE AND REPAIRS
All quality tools will eventually require servicing
and/or replacement of parts. For information about
PORTER-CABLE, its factory service centers or
authorized warranty service centers, visit our website
at www.portercable.com or call our Customer Care
Center at (888) 848-5175. All repairs made by our
service centers are fully guaranteed against defective
material and workmanship. We cannot guarantee
repairs made or attempted by others. You can also
write to us for information at PORTER-CABLE, 4825
Highway 45 North, Jackson, Tennessee 38305, (888)
848-5175 - Attention: Product Service. Be sure to
include all of the information shown on the nameplate
of your tool (model number, type, serial number, etc.).
ACCESSORIES
WARNING: Since accessories, other
than those offered by PORTER-CABLE,
have not been tested with this product,
use of such accessories with this tool
could be hazardous. To reduce the risk of
injury, only PORTER-CABLE
recommended accessories should be
used with this product.
A complete line of accessories is
available from your PORTER-CABLE
Factory Service Center or a PORTER-
CABLE Authorized Warranty Service
Center. Please visit our Web Site www.
portercable.com for a catalog or for the
name of your nearest supplier.

12
THREE YEAR LIMITED WARRANTY
PORTER-CABLE will repair or replace,
without charge, any defects due to faulty
materials or workmanship for three years
from the date of purchase for tools (two
years for batteries). This warranty does
not cover part failure due to normal
wear or tool abuse. For further detail of
warranty coverage and warranty repair
information, visit www.portercable.com
or call (888) 848-5175. This warranty
does not apply to accessories or damage
caused where repairs have been made or
attempted by others. This warranty gives
you specific legal rights and you may
have other rights which vary in certain
states or provinces.
In addition to the warranty, PORTER-
CABLE tools are covered by our:
1 YEAR FREE SERVICE: PORTER-
CABLE will maintain the tool and replace
worn parts caused by normal use, for
free, any time during the first year after
purchase.
90 DAY MONEY BACK GUARANTEE: If
you are not completely satisfied with the
performance of your PORTER-CABLE
Power Tool for any reason, you can return
it within 90 days from the date of purchase
with a receipt for a full refund – no questions
asked.
LATIN AMERICA: This warranty does not
apply to products sold in Latin America.
For products sold in Latin America, see
country specific warranty information
contained in the packaging, call the local
company or see website for warranty
information.
To register your tool for warranty service
visit our website at www.portercable.com.
WARNING LABEL REPLACEMENT
If your warning labels become illegible or
are missing, call (888) 848-5175 for a free
replacement.
4825 Highway 45 North
Jackson, Tennessee 38305
(888) 848-5175
www.portercable.com

LIGNES DIRECTRICES EN MATIÈRE DE SÉCURITÉ - DÉFINITIONS
Il
est important que vous lisiez et compreniez ce mode d’emploi. Les informations qu’il
contient concernent VOTRE SÉCURITÉ et visent à ÉVITER TOUT PROBLÈME. Les
symboles ci-dessous servent à vous aider à reconnaître cette information.
DANGER : Indique une situation dangereuse imminente qui, si elle n’est pas évitée,
causera la mort ou des graves blessures.
AVERTISSEMENT : Indique une situation potentiellement dangereuse qui, si elle
n’est pas évitée, pourrait causer la mort ou de graves blessures.
MISE EN GARDE : Indique une situation potentiellement dangereuse qui, si elle
n’est pas évitée, pourrait causer des blessures mineures ou modérées.
AVIS : Utilisé sans le symbole d’alerte à la sécurité, indique une
situationvpotentiellement dangereuse qui, si elle n’est pas évitée, peut résulter en des
dommages à la propriété.
13
Avertissements de sécurité
généraux pour les outils électriques
AVERTISSEMENT: Lire tous les
avertissements de sécurité et toutes
les directives. Le non-respect des
avertissements et des directives
pourrait se solder par un choc
électrique, un incendie et/ou une
blessure grave.
Conserver tous les avertissements
et toutes les directives pour un
usage ultérieur.
Le terme «outil électrique» cité dans
les avertissements se rapporte à votre
outil électrique à alimentation sur
secteur (avec fil) ou par piles (sans fil).
1) Sécurité du lieu de travail
a) Tenir la zone de travail propre
et bien éclairée. Les endroits
sombres sont souvent des causes
d’accidents.
b) Ne pas faire fonctionner d’outils
électriques dans un milieu
déflagrant, soit en présence de
liquides inflammables, de gaz ou
de poussière. Les outils électriques
produisent des étincelles qui peuvent
enflammer la poussière ou les
vapeurs.
c) Éloigner les enfants et les curieux
au moment d’utiliser un outil
électrique. Une distraction pourrait
vous en faire perdre la maîtrise.
2) Sécurité en matière d’électricité
a) Les fiches des outils électriques
doivent correspondre à la prise.
Ne jamais modifier la fiche en
aucune façon. Ne jamais utiliser
de fiche d’adaptation avec un outil
électrique mis à la terre. Le risque
de choc électrique sera réduit par
l’utilisation de fiches non modifiées
correspondant à la prise.
b) Éviter tout contact physique
avec des surfaces mises à la
terre comme des tuyaux, des
radiateurs, des cuisinières et des
réfrigérateurs. Le risque de choc
électrique est plus élevé si votre
corps est mis à la terre.
c) Ne pas exposer les outils
électriques à la pluie ou à d’autres
conditions où il pourrait être
mouillé. La pénétration de l’eau
dans un outil électrique augmente le
risque de choc électrique.
d) Ne pas utiliser abusivement le
cordon d’alimentation. Ne jamais
utiliser le cordon pour transporter,
tirer ou débrancher un outil
électrique. Tenir le cordon éloigné
de la chaleur, de l’huile, des bords
tranchants ou des pièces mobiles.
Les cordons endommagés ou
emmêlés augmentent les risques de
choc électrique.
e) Pour l’utilisation d’un outil
électrique à l’extérieur, se servir
d’une rallonge
convenant à une telle utilisation.
L’utilisation d’une rallonge conçue
pour l’extérieur réduit les risques de
choc électrique.
f) S’il est impossible d’éviter
l’utilisation d’un outil électrique
dans un endroit humide, brancher
l’outil dans une prise ou sur un
circuit d’alimentation dotés d’un
disjoncteur de fuite à la terre (GFCI).
L’utilisation de ce type de disjoncteur
réduit les risques de choc électrique.
3) Sécurité personnelle
a) Être vigilant, surveiller le travail
effectué et faire preuve de jugement
lorsqu’un outil électrique est utilisé.
Ne pas utiliser d’outil électrique en
cas de fatigue ou sous l’influence
de drogues, d’alcool ou de

14
médicaments. Un simple moment
d’inattention en utilisant un outil
électrique peut entraîner des blessures
corporelles graves.
b) Utiliser des équipements de
protection individuelle. Toujours
porter une protection oculaire.
L’utilisation d’équipements de
protection comme un masque
antipoussière, des chaussures
antidérapantes, un casque de sécurité
ou des protecteurs auditifs lorsque la
situation le requiert réduira les risques
de blessures corporelles.
c) Empêcher les démarrages
intempestifs. S’assurer que
l’interrupteur se trouve à la position
d’arrêt avant de relier l’outil à
une source d’alimentation et/ou
d’insérer un bloc-piles, de ramasser
ou de transporter l’outil. Transporter
un outil électrique alors que le doigt
repose sur l’interrupteur ou brancher
un outil électrique dont l’interrupteur
est à la position de marche risque de
provoquer un accident.
d) Retirer toute clé de réglage ou clé
standard avant de démarrer l’outil.
Une clé standard ou une clé de réglage
attachée à une partie pivotante peut
causer des blessures.
e) Ne pas trop tendre les bras.
Conserver son équilibre en tout
temps. Cela permet de mieux
maîtriser l’outil électrique dans les
situations imprévues.
f) S’habiller de manière appropriée.
Ne pas porter de vêtements
amples ni de bijoux. Garder les
cheveux, les vêtements et les
gants à l’écart des pièces mobiles.
Les vêtements amples, les bijoux ou
les cheveux longs risquent de rester
coincés dans les pièces mobiles.
g) Si des composants sont fournis
pour le raccordement de dispositifs
de dépoussiérage et de ramassage,
s’assurer que ceux-ci sont bien
raccordés et utilisés. L’utilisation
d’un dispositif de dépoussiérage peut
réduire les dangers engendrés par
les poussières.
4) Utilisation et entretien d’un outil
électrique
a) Ne pas forcer un outil électrique.
Utiliser l’outil électrique approprié
à l’application. L’outil électrique
approprié effectuera un meilleur
travail, de façon plus sûre et à la
vitesse pour laquelle il a été conçu.
b) Ne pas utiliser un outil électrique
dont l’interrupteur est défectueux.
Tout outil électrique dont
l’interrupteur est défectueux est
dangereux et doit être réparé.
c) Débrancher la fiche du secteur ou
le bloc-piles de l’outil électrique
avant de faire tout réglage ou
changement d’accessoire, ou
avant de ranger l’outil électrique.
Ces mesures préventives réduisent
les risques de démarrage accidentel
de l’outil électrique.
d) Ranger les outils électriques
hors de la portée des enfants, et
ne permettre à aucune personne
n’étant pas familière avec un
outil électrique (ou son manuel
d’instruction) d’utiliser ce dernier.
Les outils électriques deviennent
dangereux entre les mains
d’utilisateurs inexpérimentés.
e) Entretenir les outils électriques.
Vérifier les pièces mobiles pour
s’assurer qu’elles sont bien
alignées et tournent librement,
qu’elles sont en bon état et
ne sont affectées par aucun
trouble susceptible de nuire au
bon fonctionnement de l’outil
électrique. En cas de dommage,
faire réparer l’outil électrique avant
toute nouvelle utilisation. Beaucoup
d’accidents sont causés par des
outils électriques mal entretenus.
f) S’assurer que les outils de coupe
sont aiguisés et propres. Les
outils de coupe bien entretenus et
affûtés sont moins susceptibles de
se coincer et sont plus faciles à
contrôler.
g) Utiliser l’outil électrique, les
accessoires, les forets, etc.
conformément aux présentes
directives en tenant compte des
conditions de travail et du travail
à effectuer. L’utilisation d’un outil
électrique pour toute opération autre
que celle pour laquelle il a été conçu
est dangereuse.
5) Utilisation et entretien du bloc-piles
a) Ne recharger l’outil qu’au moyen du
chargeur précisé par le fabricant.
L’utilisation d’un chargeur qui convient
à un type de bloc-piles risque de
provoquer un incendie s’il est utilisé
avec un autre type de bloc-piles.
b) Utiliser les outils électriques
uniquement avec les blocs-piles
conçus à cet effet. L’utilisation de
tout autre bloc-piles risque de causer
des blessures ou un incendie.
c) Lorsque le bloc-piles n’est pas
utilisé, le tenir éloigné des objets
métalliques, notamment des
trombones, de la monnaie, des

15
clés, des clous, des vis, etc., qui
peuvent établir une connexion entre
les deux bornes. Le court-circuit
des bornes du bloc-piles risque de
provoquer des étincelles, des brûlures
ou un incendie.
d) En cas d’utilisation abusive, le
liquide peut gicler hors du bloc-
piles, éviter tout contact. Si un
contact accidentel se produit, laver
à grande eau. Si le liquide entre en
contact avec les yeux, obtenir des
soins médicaux. Le liquide qui gicle
hors du bloc-piles peut provoquer
des irritations ou des brûlures.
6) Réparation
a) Faire réparer l’outil électrique
par un réparateur professionnel
en n’utilisant que des pièces
de rechange identiques. Cela
permettra de maintenir une utilisation
sécuritaire de l’outil électrique.
Avertissements de sécurité
de la perceuse
• Utiliser la ou les poignées auxiliaires
fournies avec l’outil, s’il en est. Une
perte de maîtrise de l’outil peut entraîner
des blessures.
• Tenir l’outil électrique par sa surface
de prise isolée dans une situation où
l’accessoire de coupe pourrait entrer
en contact avec un câble électrique
dissimulé. Tout contact entre un fil
« sous tension » et l’accessoire de
coupe pourrait également mettre « sous
tension » les pièces métalliques exposées
de l’outil et donner un choc électrique à
l’utilisateur.
• Lorsqu’on est installé sur une échelle
ou un échafaudage pour travailler, on
doit déposer l’outil sur le côté lorsqu’on
ne s’en sert plus. Bien que certains outils
munis d’un gros bloc-piles puissent être
placés à la verticale, dans cette position,
ils peuvent facilement être renversés.
• Utiliser des brides de fixation ou un
autre dispositif de fixation permettant de
fixer solidement et de soutenir la pièce
sur une plateforme stable. Tenir la pièce
avec la main ou contre son corps la rend
instable et risque de provoquer une perte
de maîtrise de l’outil.
• Tenir les cheveux, les vêtements et les
gants loin des évents. En effet, les évents
cachent souvent des pièces mobiles qui
risquent de happer ces articles.
• Tenir fermement l’outil à deux mains.
Utiliser la poignée auxiliaire si l’outil en
est muni. Sinon, saisir l’outil par le bas du
bloc-piles. Une perte de maîtrise de l’outil
peut entraîner des blessures.
AVERTISSEMENT :
certains
outils électriques, tels que les
sableuses, les scies, les meules, les
perceuses ou certains autres outils de
construction, peuvent produire de la
poussière contenant des produits
chimiques reconnus par l’État de la
Californie comme étant susceptibles
d’entraîner le cancer, des malformations
congénitales ou pouvant être nocifs
pour le système reproductif. Parmi ces
produits chimiques, on retrouve :
• le plomb dans les peintures à base
de plomb,
• la silice cristalline dans les briques
et le ciment et autres produits de
maçonnerie,
• l’arsenic et le chrome dans le bois
de sciage ayant subi un traitement
chimique.
Le risque associé à de telles expositions
varie selon la fréquence avec laquelle
on effectue ces travaux. Pour réduire
l’exposition à de tels produits, il faut
travailler dans un endroit bien aéré et utiliser
le matériel de sécurité approprié, tel un
masque anti-poussières spécialement conçu
pour filtrer les particules microscopiques.
• Éviter tout contact prolongé avec la
poussière soulevée par cet outil ou
autres outils électriques. Porter des
vêtements de protection et nettoyer
les parties exposées du corps avec de
l’eau savonneuse. S’assurer de bien se
protéger afin d’éviter d’absorber par la
bouche, les yeux ou la peau des produits
chimiques nocifs.
AVERTISSEMENT :
Cet outil
peut produire et répandre de la
poussière susceptible de causer des
dommages sérieux et permanents au
système respiratoire.
Toujours utiliser un
appareil respiratoire anti-poussières
approuvé par le NIOSH ou l’OSHA. Diriger
les particules dans le sens opposé du
visage et du corps.
AVERTISSEMENT :
TOUJOURS
porter des lunettes de sécurité. Les
lunettes de vue ne constituent PAS des
lunettes de sécurité. Utiliser également
un masque facial ou anti-poussière si
l’opération de découpe génère de la
poussière. TOUJOURS PORTER UN
ÉQUIPEMENT DE PROTECTION
HOMOLOGUÉ :
• protection oculaire conforme à la
norme ANSI Z87.1 (CAN/CSA Z94.3);
• protection auditive ANSI S12.6
(S3.19);
• protection des voies respiratoires
conformes aux normes NIOSH/OSHA/
MSHA.

16
Calibre de fil minimum recommandé pour les rallonges
Longueur totale de la rallonge
25 pi 50 pi 75 pi 100 pi 125 pi 150 pi 175 pi
7,6 m 15,2 m 22,9 m 30,5 m 38,1 m 45,7 m 53,3 m
Calibre AWG
18 18 16 16 14 14 12
SYMBOLES
• L’étiquette apposée sur votre outil
pourrait comprendre les symboles
suivants. Les symboles et leurs
définitions sont indiqués ci-après :
V .................volts
A ................. ampères
Hz ............... hertz
W ................watts
min ..............minutes
ou AC ....courant alternatif
ou DC ..courant continu
n
o ...............sous vide
................Construction de classe I
................borne de mise à la minute
(mis à la terre)
...............
Construction de classe II
.............. symbole d´avertissement
.../min ..........tours à la minute
.............. Lire le mode d’emploi
avant l’utilisation
............Utiliser une protection
respiratoire adéquate.
...........Utiliser une protection oculaire
adéquate.
............Utiliser une protection auditive
adéquate.
• En cas d’utilisation d’une rallonge,
s’assurer que les valeurs nominales
de la rallonge utilisée correspondent
bien à celles de l’outil alimenté. L’usage
d’une rallonge de calibre insuffisant
causera une chute de tension entraînant
perte de puissance et surchauffe. Le
tableau ci-dessous illustre les calibres
à utiliser selon la longueur de rallonge
et l’intensité nominale indiquée sur la
plaque signalétique. En cas de doutes,
utiliser le calibre suivant. Plus le calibre
est petit, plus la rallonge peut supporter
de courant.
Directives de sécurité
importantes pour les chargeurs
de piles
CONSERVER CES DIRECTIVES : ce
mode d’emploi comprend d’importantes
directives de sécurité pour les chargeurs
de piles.
AVERTISSEMENT : Avant d’utiliser
le chargeur, lire toutes les directives et tous
les avertissements figurant sur le chargeur, le
bloc-piles et le produit utilisé avec le bloc-
piles.
• Risque de choc électrique. Éviter
la pénétration de tout liquide dans le
chargeur.
• Risque de brûlure. Pour réduire le
risque de blessures, charger uniquement
des piles PORTER-CABLE conseillées.
D’autres types de piles peuvent exploser et
provoquer des blessures corporelles et des
dommages.
• Dans certaines circonstances,
lorsque le chargeur est branché au
bloc d’alimentation, le chargeur peut
être court-circuité par des corps
étrangers conducteurs tels que, mais
sans s’y limiter, la laine d’acier, le papier
d’aluminium ou toute accumulation de
particules métalliques. Ils doivent être
maintenus à distance des ouvertures du
chargeur. Débrancher systématiquement
celui-ci si aucun bloc-piles n’y est inséré.
Débrancher le chargeur avant tout
nettoyage.
•
NE PAS tenter de charger le bloc-piles avec
autre chose qu’un chargeur de marque.
Les chargeurs et blocs-piles sont conçus
spécialement pour fonctionner ensemble.
• Ces chargeurs ne sont pas destinés à
être utilisés à d’autres fins que celles
de charger les piles rechargeables
conseillées PORTER-CABLE. Toute
autre utilisation risque de provoquer
un incendie, un choc électrique ou une
électrocution.
• Protéger le chargeur de la pluie et de
la neige.
• Tirer la fiche plutôt que le cordon
pour débrancher le chargeur ou pour
débrancher les cordons à l’aide de la
fonction de guirlande. Cela permet de
réduire le risque d’endommager la fiche
ou le cordon d’alimentation.
• S’assurer que le cordon est situé en lieu
sûr de manière à ce que personne ne
marche ni ne trébuche dessus ou à ce
qu’il ne soit pas endommagé ni soumis
à une tension.
• Ne pas utiliser de rallonge à moins
que cela ne soit absolument
nécessaire. L’utilisation d’une rallonge

17
inadéquate risque d’entraîner un
incendie, un choc électrique ou une
électrocution.
• Pour la sécurité de l’utilisateur, utiliser
une rallonge de calibre adéquat (AWG,
American Wire Gauge [calibrage
américain normalisé des fils]). Plus le
numéro de calibre de fil est petit et plus
sa capacité est grande, par exemple
un calibre 16 a plus de capacité qu’un
calibre 18. Si plus d’une rallonge est
utilisée pour obtenir la longueur totale,
s’assurer que chaque rallonge présente
au moins le calibre de fil minimum.
• Ne pas mettre d’objet sur le
chargeur ni mettre ce dernier sur
une surface souple, ce qui pourrait
causer l’obstruction des fentes de
ventilation et, du fait, provoquer une
chaleur interne excessive. Éloigner le
chargeur de toute source de chaleur.
La ventilation du chargeur se fait par
les fentes pratiquées dans les parties
supérieures et inférieures du boîtier.
• Ne pas installer le chargeur sur un
mur ni le fixer de manière permanente
sur toute surface. Le chargeur est
destiné à une utilisation sur une surface
plane et stable (c.-à-d. un dessus de
table ou d’établi).
• Ne pas faire fonctionner le chargeur si
la fiche ou le cordon est endommagé;
les remplacer immédiatement.
• Ne jamais se servir d’un chargeur qui a
subi un choc violent, qui est tombé par
terre ou qui est endommagé de quelque
manière que ce soit. Le faire vérifier dans
un centre de réparation autorisé.
• Ne pas démonter le chargeur; confier
l’entretien ou la réparation de l’appareil
à un centre de réparation autorisé. Le
remontage non conforme du chargeur
comporte des risques de choc
électrique, d’électrocution ou d’incendie.
• Débrancher le chargeur avant de le
nettoyer. Cela réduira le risque de choc
électrique. Le risque ne sera pas éliminé
en enlevant simplement le bloc-piles.
• NE JAMAIS relier deux chargeurs ensemble.
• Le chargeur est conçu pour être
alimenté en courant domestique
standard (120 V). Ne pas utiliser une
tension supérieure pour le chargeur.
CONSERVER CES DIRECTIVES
Directives de sécurité
importantes pour les blocs-piles
AVERTISSEMENT :
pour un
fonctionnement sûr, lire le présent mode
d’emploi et les manuels fournis avec l’outil
avant d’utiliser les blocs-piles.
Le bloc-piles n’est pas complètement chargé
à la sortie de l’emballage. Avant d’utiliser le
bloc-piles et le chargeur, lire les directives
de sécurité ci-après. Respecter ensuite les
consignes de chargement décrites.
LIRE TOUTES LES DIRECTIVES.
• Ne pas incinérer le bloc-piles,
même s’il est très endommagé ou
complètement usé, car il peut exploser
au contact de flammes. Des vapeurs
et des matières toxiques sont dégagées
lorsque les blocs-piles au Li-Ion sont
incinérés.
• Ne pas charger ou utiliser un bloc-piles
dans un milieu déflagrant, en présence
de liquides, de gaz ou de poussière
inflammables. Insérer ou retirer un bloc-
piles du chargeur peut enflammer de la
poussière ou des émanations.
• Si le contenu de la pile entre en contact
avec la peau, laver immédiatement la
zone touchée au savon doux et à l’eau.
Si le liquide de la pile entre en contact
avec les yeux, rincer l’oeil ouvert à l’eau
pendant 15 minutes ou jusqu’à ce que
l’irritation cesse. Si des soins médicaux
sont nécessaires, l’électrolyte des piles
au Li-Ion est composé d’un mélange de
carbonates organiques liquides et de
sels de lithium. Quant aux piles au NI-CD,
il est question d’une solution de 25 % à 35
% d’hydroxyde de potassium.
• Le contenu des cellules de pile
ouvertes peut provoquer une irritation
respiratoire. Exposer la personne à de
l’air frais. Si les symptômes persistent,
obtenir des soins médicaux.
AVERTISSEMENT : risque de
brûlure. Le liquide du bloc-piles peut
s’enflammer s’il est exposé à des étincelles
ou à une flamme.
• Charger les blocs-piles uniquement au
moyen de chargeurs PORTER-CABLE.
• NE PAS éclabousser le bloc-piles
ou l’immerger dans l’eau ou tout
autre liquide. Cela peut entraîner une
défaillance prématurée de l’élément.
• Ne pas ranger ni utiliser l’outil et
le bloc-piles dans un endroit où la
température inférieure à-4 ° f (-20
° C) ou peut atteindre ou dépasser
les 40 °C (105 °F) (comme dans les
remises extérieures ou les bâtiments
métalliques en été).
AVERTISSEMENT :
ne jamais
ouvrir le bloc-piles pour quelque raison
que ce soit. Si le boîtier du bloc-piles est
fissuré ou endommagé, ne pas l’insérer
dans un chargeur. Ne pas écraser, faire
tomber ou endommager le bloc-piles. Ne
pas utiliser un bloc-piles ou un chargeur

Procédure de charge
Les chargeurs PORTER-CABLE sont conçus
pour charger les blocs-piles PORTER-
CABLE. Les durées de charge : 40-80 min
avec le PCC690L, 70-140 min avec le
PCC691L, PCC699L, 40-80 min avec le
PCC692/PCC692L et 180-360 min avec le
PCC695L, selon le bloc-piles chargé.
1. Brancher le chargeur dans une prise
appropriée avant d’insérer le bloc-piles.
2. Insérer le bloc-piles dans le chargeur.
3. Le voyant DEL clignotera
indiquant que la pile est en cours
de recharge.
4. La fin de la recharge est
indiquée par le voyant qui
demeurera allumé. Le bloc-piles est
chargé à plein et peut être utilisé ou
laissé sur le chargeur.
Recharger les piles épuisées aussitôt que
possible après leur utilisation pour prolonger
leur durée de vie. Pour préserver le plus
possible la durée de vie du bloc-piles, ne pas
le décharger tout à fait. Il est recommandé de
recharger le bloc-piles après chaque utilisation.
Fonctions de diagnostic du
chargeur
Le chargeur est conçu pour détecter
certains problèmes du bloc-piles ou
de la source d’alimentation. Le type de
clignotement du voyant de charge indique
les problèmes.
Pile en mauvais état
Le chargeur est en mesure
de détecter une pile faible ou
endommagée. Le voyant DEL
clignote selon la séquence
code inscrite sur l’étiquette. Si la
séquence code correspondant
à une pile en mauvais état
est en clignotement, cesser
de recharger la pile. Il faut
la retourner à un centre de
réparation ou à un site de collecte
pour le recyclage.
Fonction de suspension du
bloc-piles chaud/froid
Lorsque le chargeur détecte un
bloc-piles trop chaud ou trop
froid, il suspend automatiquement
la recharge jusqu’au retour à la
normale de la température de
celui-ci. Une fois la température du
bloc-piles revenue à la normale, le
chargeur passe automatiquement
au mode de recharge du bloc-
piles. Cette fonction assure une
durée de vie maximale des blocs-
piles. Le voyant DEL clignote selon
la séquence code inscrite sur
l’étiquette.
18
qui a reçu un choc violent, qui est tombé,
a été écrasé ou est endommagé de
quelque manière que ce soit (p. ex. percé
par un clou, frappé d’un coup de marteau,
piétiné). Les blocs-piles endommagés
doivent être envoyés au centre de
réparation pour être recyclés.
AVERTISSEMENT :
risque
d’incendie. Ne pas ranger ou
transporter les piles de manière à ce
que des objets métalliques puissent
entrer en contact avec les bornes
exposées des piles. Par exemple, ne pas
mettre un bloc-piles dans un tablier, une
poche, une boîte à outils, une boîte de
nécessaire de produit ou un tiroir
contenant des objets tels que des clous,
des vis ou des clés, car tout contact
accidentel entre les bornes à découvert et
un objet métallique conducteur comme
une clé, une pièce de monnaie, un outil à
main, etc. risque de provoquer un
incendie. La Hazardous Material
Regulations (réglementation sur les
produits dangereux) du département
américain des transports interdit en fait le
transport des blocs-piles pour le
commerce et dans les avions (c.-à-d.
dans des valises et les bagages à main) À
MOINS qu’ils ne soient bien protégés
contre les courts-circuits. Pour le transport
de piles individuelles, on doit donc
s’assurer que les bornes sont protégées et
bien isolées contre toute matière pouvant
entrer en contact avec elles et provoquer
un court-circuit.
REMARQUE : ne pas insérer de bloc-
piles dans un outil dont la gâchette et
verrouillée en position de marche. Ne
jamais bloquer l’interrupteur en position
de MARCHE.
NE JAMAIS forcer un bloc-piles dans le
chargeur. NE modifier un bloc-piles en
aucune façon pour le faire rentrer dans
un chargeur incompatible, car il pourrait
se briser et causer des dommages
corporels graves.
REMARQUE : il ne faut pas laisser de piles
au Li-Ion dans les bagages enregistrés.
Recommandations en matière
de rangement
1. Le meilleur endroit de rangement est
celui qui est frais et sec, loin de toute
lumière directe du soleil et protégé d’une
température extrême (chaleur ou froid).
2. Un entreposage prolongé ne nuira pas
au bloc-piles ou au chargeur. Dans les
conditions adéquates, on peut entreposer
les piles au Li-Ion pour une période de
cinq ans ou plus.

Problème avec le secteur
Lorsque le chargeur est utilisé
avec des blocs d’alimentation
portatifs comme des génératrices
ou des alternateurs, le chargeur
peut suspendre temporairement
son fonctionnement. Le voyant
DEL clignote selon la séquence
code inscrite sur l’étiquette. Cela
indique que l’alimentation est hors
tolérance.
Bloc-piles laissé dans le
chargeur
Le chargeur et le bloc-piles peuvent être
laissés branchés, le voyant demeurant
indéfiniment allumé. Le chargeur
maintiendra le bloc-piles en bon état
et complètement chargé. Le chargeur
comporte un mode automatique de mise
au point qui égalise ou équilibre chaque
cellule du bloc-piles pour lui permettre
de fonctionner à plein rendement. Les
blocs-piles doivent être égalisés chaque
semaine ou chaque fois que la durée de
fonctionnement du bloc-piles diminue.
Pour utiliser le mode automatique de
mise au point, mettre le bloc-piles dans le
chargeur et l’y laisser pendant au moins 8
heures.
Remarques importantes pour le
chargement
1. Pour augmenter la durée de vie du
bloc-piles et optimiser son rendement,
le charger à une température entre 18 et
24 °C (65 et 75 °F). NE PAS charger le
bloc-piles à des températures inférieures
à 4,5 °C (40 °F) ou supérieures à 40,5 °C
(105 °F). Ces consignes sont importantes
et permettent d’éviter d’endommager
gravement le bloc-piles.
2. Le chargeur et le bloc-piles peuvent
devenir chauds au toucher pendant la
charge. Il s’agit d’un état normal et cela
n’indique pas un problème. Pour faciliter
le refroidissement du bloc-piles après son
utilisation, éviter de mettre le chargeur
ou le bloc piles dans un endroit chaud
comme dans une remise métallique ou une
remorque non isolée.
3. Si le bloc-piles ne se charge pas
adéquatement, on doit :
a. vérifier le courant à la prise en
branchant une lampe ou un autre
appareil électrique;
b. vérifier si la prise est reliée à un
interrupteur mural qui la met hors
tension lorsque la lumière sont éteinte;
c. déplacer le chargeur et le bloc-piles
dans un endroit où la température
ambiante
est entre 18 et 24 °C (65 et 75 °F);
d. si le problème persiste, apporter
ou envoyer l’outil, le bloc-piles et le
chargeur au centre de réparation de
votre région.
4. Le bloc-piles doit être rechargé lorsqu’il
n’arrive pas à produire suffisamment de
puissance pour des travaux qui étaient
facilement réalisés auparavant. NE PAS
CONTINUER à utiliser le bloc-piles dans
ces conditions. Suivre les procédures de
charge. On peut également recharger à
tout moment un bloc-piles partiellement
déchargé sans nuire à son fonctionnement.
Avertissements de sécurité et
directives : perceuses
AVERTISSEMENT :
Avant
d’utiliser l’outil, lire toutes les instructions et
les mises en garde sur l’outil.
AVERTISSEMENT :
la perceuse
pourrait se bloquer (à cause d’une
surcharge ou d’une mauvaise utilisation),
produisant ainsi une torsion brusque.
Toujours s’attendre à un blocage. Saisir
fermement la perceuse avec les deux
mains afin de maîtriser le mouvement de
torsion et d’éviter d’en perdre la maîtrise
ce qui pourrait entraîner des blessures
corporelles. En cas de blocage, relâcher
la détente immédiatement et déterminer la
raison du blocage avant de redémarrer.
19

Usage prévu
Cette perceuse visseuse a été conçue pour le
vissage et le perçage.
NE PAS l’utiliser en milieu ambiant humide ou
en présence de liquides ou de gaz inflammables.
NE PAS le laisser à la portée des enfants.
Une supervision est nécessaire auprès de tout
utilisateur non expérimenté.
Ne jamais modifier l’outil électrique ni aucun de
ses composants, car il y a risques de dommages
corporels ou matériels.
Mode d’emploi
Installation et retrait du bloc-
piles de l’outil
AVERTISSEMENT :
pour réduire
tout risque de dommages corporels
graves, arrêter l’outil et retirer le bloc-
piles avant tout réglage ou avant de
retirer ou installer toute pièce ou tout
accessoire. Tout démarrage accidentel
comporte des risques de dommages
corporels.
MISE EN GARDE : S’assurer
que le bouton de verrouillage est bien
engagé pour empêcher l’utilisation de
l’interrupteur lors de la pose et du retrait
du bloc-piles.
INSERTION DU BLOC-PILES : insérer le
bloc-piles (7) dans l’outil, comme montré
à la figure B.
RETRAIT DU BLOC-PILES : Enfoncer le
bouton de dégagement du bloc-piles (8),
comme montré à la figure C, puis retirer le
bloc-piles de l’outil.
20
Ce produit est compatible avec tous les modèles de piles et de chargeurs énumérés dans le tableau ci-dessous.
Bloc-piles : Li-Ion 20V Max*: PCC680L, PCC681L, PCC682/PCC682L, PCC685L
Chargeur : pour piles au Li-Ion 20V Max*: PCC690L, PCC691L, PCC692/PCC692L, PCC695L, PCC699L
FUNCTIONAL DESCRIPTION
Figure A
1. Gâchette
2. Bouton de marche avant/arrière
3. Torque Adjust Collar
4. Sélecteur d’engrenage à deux vitesses
5. Mandrin Automatique
6. Bloc-piles
7. Bouton de libération du bloc-piles
8. Lampe de travail DEL
9. Porte-embouts
2
1
3
4
5
6
9
7
8
C
B
La page est en cours de chargement...
La page est en cours de chargement...
La page est en cours de chargement...
La page est en cours de chargement...
La page est en cours de chargement...
La page est en cours de chargement...
La page est en cours de chargement...
La page est en cours de chargement...
La page est en cours de chargement...
La page est en cours de chargement...
La page est en cours de chargement...
La page est en cours de chargement...
La page est en cours de chargement...
La page est en cours de chargement...
La page est en cours de chargement...
La page est en cours de chargement...
La page est en cours de chargement...
La page est en cours de chargement...
La page est en cours de chargement...
La page est en cours de chargement...
-
 1
1
-
 2
2
-
 3
3
-
 4
4
-
 5
5
-
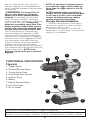 6
6
-
 7
7
-
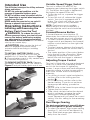 8
8
-
 9
9
-
 10
10
-
 11
11
-
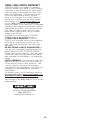 12
12
-
 13
13
-
 14
14
-
 15
15
-
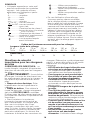 16
16
-
 17
17
-
 18
18
-
 19
19
-
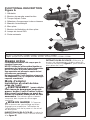 20
20
-
 21
21
-
 22
22
-
 23
23
-
 24
24
-
 25
25
-
 26
26
-
 27
27
-
 28
28
-
 29
29
-
 30
30
-
 31
31
-
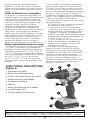 32
32
-
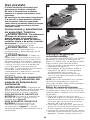 33
33
-
 34
34
-
 35
35
-
 36
36
-
 37
37
-
 38
38
-
 39
39
-
 40
40


Porter Cable PCC608 Manuel utilisateur
- Catégorie
- Perceuses mixtes sans fil
- Taper
- Manuel utilisateur
- Ce manuel convient également à
dans d''autres langues
- English: Porter Cable PCC608 User manual
- español: Porter Cable PCC608 Manual de usuario
Documents connexes
-
 Portable Cable PCC647 Manuel utilisateur
-
Porter-Cable PCC621LB Manuel utilisateur
-
-
Porter Cable PCCK600LB Manuel utilisateur
-
-
Porter-Cable PCCR701 Manuel utilisateur
-
-
-
-
