
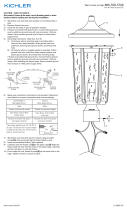
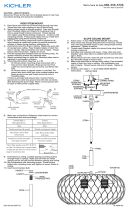
1) Pass fixture wire through hole in bottom of one loop. Thread
loop onto threaded pipe on top of roof.
2) Thread small threaded pipe into end of second loop. Pass
threaded pipe on loop up through hole in canopy.
3) Thread lockwasher onto end of threaded pipe protruding
from inside canopy.
4) Thread hexnut onto threaded pipe protruding from inside
canopy.
5) Attach one end of chain to loop on top of roof. Attach other
end of chain to small loop on canopy.
6) Weave electrical wire and ground wire through chain links no
more than 3 inches apart.
7) TURN OFF POWER.
IMPORTANT: Before you start, NEVER attempt any work
without shutting off the electricity until the work is done.
a) Go to the main fuse, or circuit breaker, box in your
home. Place the main power switch in the “OFF”
position.
b) Unscrew the fuse(s), or switch “OFF” the circuit breaker
switch(s), that control the power to the fixture or room
that you are working on.
c) Place the wall switch in the “OFF” position. If the fixture
to be replaced has a switch or pull chain, place those in
the “OFF” position.
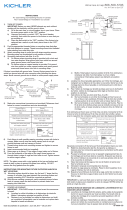
8) Find the appropriate threaded holes on mounting strap that
align with hole distance in canopy. Thread mounting screws
into threaded holes starting from outlet box side.
9) Attach mounting strap to outlet box with strap mounting
screws. Mounting strap can be adjusted to suit position of
fixture.
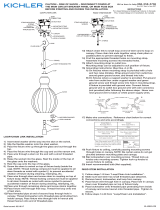
10) Grounding instructions (see Illus. A or B):
A) On fixtures where mounting strap is provided with a
hole and two raise dimples. Wrap ground wire from
outlet box around green ground screw, and thread into
hole.
B) On fixtures where a cupped washer is provided. Put
ground wire from outlet box under cupped washer and
green ground screw and thread screw into hole in
mounting strap.
If fixture is provided with ground wire. Connect fixture ground
wire to outlet box ground wire with wire connector, after
following the above steps. Never connect ground wire to black
or white power supply wires.
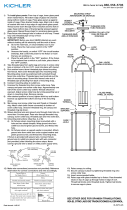
11) Make wire connections. Reference chart below for correct
connections and wire accordingly.
12) Push fixture to ceiling, carefully passing mounting screws
through holes in canopy.
13) Thread knurled lock-up knobs onto mounting screws.
Tighten knobs to secure fixture to ceiling.
14) Insert recommended bulb (not supplied).
15) Raise top of the cage up to inside of fixture roof.
16) Thread one screw from underneath the top of cage and into
holes in the fixture roof. Tighten screws to secure cage in
place.
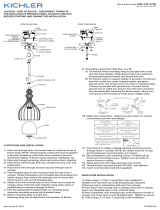
Connect Black or
Red Supply Wire to:
Connect
White Supply Wire to:
Black White
*Parallel cord (round & smooth)
*Parallel cord (square & ridged)
Clear, Brown, Gold or Black
without tracer
Clear, Brown, Gold or Black
with tracer
Insulated wire (other than green)
with copper conductor
Insulated wire (other than green)
with silver conductor
*Note: When parallel wires (SPT I & SPT II)
are used. The neutral wire is square shaped
or ridged and the other wire will be round in
shape or smooth (see illus.)
Neutral Wire
Date Issued: June 29, 2017 IS-49689-CB
We’re here to help 866-558-5706
Hrs: M-F 9am to 5pm EST
SEE OTHER SIDE FOR CANADIAN FRENCH
TRANSLATIONS.
VOIR L’AUTRE CÔTÉ POUR LES CANADIENS
TRADUCTIONS EN FRANÇAIS.
INSTRUCTIONS
For assembling and installing fixtures in Canada
Pour l’assemblage et l’installation au Canada
GREEN GROUND
SCREW
CUPPED
WASHER
OUTLET BOX
GROUND
FIXTURE
GROUND
DIMPLES
WIRE CONNECTOR
OUTLET BOX
GROUND
GREEN GROUND
SCREW
FIXTURE
GROUND
A
B
Strap mounting screws
Vis de support de sangle
Mounting strap
Étrier de montage
Wire connector
Connecteur de fil
Outlet box
Boîte à prises
Lock-up knobs
Boules de verrouillage
Loop
Boucle
Chain
Chaîne
Roof
Toit
Socket
Douille
Bulb
Ampoule
Screws
Vis
Cage
Cage
NOTE: The glass comes with a vinyl gasket at the top and
bottom and needs to stay in place to prevent the glass from
rattling. DO NOT remove the vinyl gaskets from the glass.

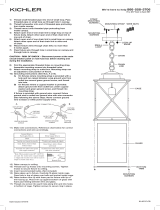
1) Passer le fil du luminaire par le trou dans la partie inférieure
d’une boucle. Visser une boucle dans le tube fileté au-
dessus du toit.
2) Visser un petit tube fileté dans l’extrémité de la deuxième
boucle. Passer le tube fileté sur une boucle par le trou situé
dans le couvercle.
3) Visser la rondelle de blocage sur l’extrémité du tube fileté
sortant de l’intérieur du couvercle.
4) Visser un écrou hexagonal sur le tube fileté sortant de
l’intérieur du couvercle.
5) Fixer une extrémité de la chaîne à la boucle au-dessus du
toit. Fixer l’autre extrémité de la chaîne à la petite boucle sur
le couvercle.
6) Passer le fil électrique et le fil de terre par les maillons de la
chaîne avec une distance de 7,62 cm maximum.
7) COUPER LE COURANT.
IMPORTANT : TOUJOURS couper le courant avant de
commencer le travail.
a) Localiser le coffret à fusibles ou le disjoncteur du
domicile. Mettre l’interrupteur principal en position
d’Arrêt.
b) Dévisser le ou les fusibles (ou mettre le disjoncteur sur
Arrêt) qui contrôlent l’alimentation vers le luminaire ou la
pièce dans laquelle le travail est effectué.
c) Mettre l’interrupteur mural en position d’Arrêt. Si le
luminaire à remplacer est doté d’un interrupteur ou
d’une chaîne connectée à l‘interrupteur, placer ces
éléments en position d’Arrêt.
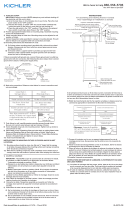
8) Localiser les trous taraudés appropriés, sur l’étrier de
montage, qui s’alignent sur la distance de trou dans le
couvercle. Serrer les vis de montage dans les trous
taraudés en commençant par le côté de la boîte de sortie.
9) Fixer l’étrier de montage sur la boîte de sortie avec les vis
de fixation de l’étrier. L’étrier de montage peut être réglé en
fonction de la position du luminaire.
10) Instructions de mise à la terre (voir illus. A ou B) :
A) Sur les luminaires où un étrier de montage est fourni
avec un trou et deux crans surélevés. Enrouler le fil de
terre de la boîte à prises autour de la vis de terre verte
et visser dans le trou.
B) Sur les luminaires où une rondelle concave est fournie.
Fixer le fil de terre de la boîte à prises sous la rondelle
concave et la vis de terre verte, et visser ensuite la vis
dans l’étrier de montage.
Si le luminaire est fourni avec un fil de mise à la terre, connecter
le fil de mise à la terre du luminaire au fil de mise à la terre de la
boîte à prises avec le capuchon de connexion après avoir suivi
les étapes précédentes. Ne jamais connecter le fil de terre aux
fils d’alimentation blancs ou noirs.
11) Établir les branchements des fils. Se reporter au tableau
ci-dessous pour les connexions appropriées et acheminer
les fils selon les instructions.
12) Pousser le luminaire vers le plafond en passant
soigneusement les vis de montage par les trous dans le
couvercle.
13) Visser les boules de blocage sur les vis de montage.
Resserrer les boules pour fixer le luminaire au plafond.
14) Introduire l’ampoule recommandée (non fournie).
15) Soulever le haut de la cage à l’intérieur du toit du luminaire.
16) Passer une vis par le dessous du haut de la cage et dans
des trous du toit du luminaire. Serrer les vis pour fixer la
cage.
Date de publication : 29 juin 2017 IS-49689-CB
We’re here to help 866-558-5706
Hrs: M-F 9am to 5pm EST
Connecter le fil noir ou
rouge de la boite
Connecter le fil blanc de la boîte
A Noir A Blanc
*Au cordon parallèle (rond et lisse)
*Au cordon parallele (à angles droits el strié)
Au bransparent, doré, marron, ou
noir sans fil distinctif
Au transparent, doré, marron, ou
noir avec un til distinctif
Fil isolé (sauf fil vert) avec
conducteur en cuivre
Fil isolé (sauf fil vert) avec
conducteur en argent
*Remarque: Avec emploi d’un fil paralléle
(SPT I et SPT II). Le fil neutre est á angles
droits ou strié et l’autre fil doit étre rond ou
lisse (Voir le schéma).
Fil Neutre
SEE OTHER SIDE FOR ENGLISH TRANSLATIONS.
VOIR L’AUTRE CÔTÉ DES TRADUCTIONS EN
ANGLAIS.
INSTRUCTIONS
For assembling and installing fixtures in Canada
Pour l’assemblage et l’installation au Canada
Strap mounting screws
Vis de support de sangle
Mounting strap
Étrier de montage
Wire connector
Connecteur de fil
Outlet box
Boîte à prises
Lock-up knobs
Boules de verrouillage
Loop
Boucle
Chain
Chaîne
Roof
Toit
Socket
Douille
Bulb
Ampoule
Screws
Vis
Cage
Cage
REMARQUE: Le verre est livré avec un joint en vinyle en haut et
en bas et doit rester en place pour empêcher le verre de claquer.
NE PAS retirer les joints en vinyle du verre.
-
 1
1
-
 2
2


Kichler Lighting 49689OZ Manuel utilisateur
- Taper
- Manuel utilisateur
- Ce manuel convient également à
dans d''autres langues
- English: Kichler Lighting 49689OZ User manual
Documents connexes
-
 Kichler Lighting 49686BKL18 Manuel utilisateur
-
 Kichler Lighting 49895OZ Manuel utilisateur
-
 Kichler Lighting 49927OZ Manuel utilisateur
-
Kichler Lighting 49690OZL18 Manuel utilisateur
-
 Kichler Lighting 49723WZC Manuel utilisateur
-
 Kichler Lighting 49747WZC Manuel utilisateur
-
 Kichler Lighting 43958NBR Manuel utilisateur
-
 Kichler Lighting 43953NI Manuel utilisateur
-
 Kichler Lighting 49718OZ Manuel utilisateur
-
 Kichler Lighting 43869BK Manuel utilisateur


