
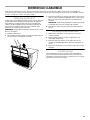
THROUGH-THE-WALL
AIR CONDITIONER
Use & Care Guide
For questions about features, operation/performance, parts,
accessories or service call: 1-888-842-2440.
CLIMATISEUR
ENCASTRÉ DANS
LE MUR
Guide d’utilisation et d’entretien
Au Canada, pour assistance, installation ou service,
composez le : 1-888-842-2440
Table of Contents/Table des matières ................ 2
AC-9999-72

2
TABLE OF CONTENTS
AIR CONDITIONER SAFETY .........................................................2
INSTALLATION REQUIREMENTS................................................3
Tools and Parts ............................................................................3
Location Requirements................................................................4
Electrical Requirements ...............................................................4
INSTALLATION INSTRUCTIONS..................................................5
Unpack the Air Conditioner..........................................................5
Before Installing Air Conditioner ..................................................5
Install Air Conditioner in Existing Wall Sleeve .............................5
Plastic Grille Installation ...............................................................6
Install Air Conditioner in New Wall Sleeve...................................7
Complete Installation ...................................................................8
AIR CONDITIONER USE................................................................9
Starting Your Air Conditioner .......................................................9
Using the Remote Control..........................................................11
Changing Air Direction ...............................................................12
Normal Sounds...........................................................................12
AIR CONDITIONER CARE ...........................................................12
Cleaning the Air Filter .................................................................12
Cleaning the Front Panel............................................................13
Annual Maintenance...................................................................13
TROUBLESHOOTING ..................................................................13
ASSISTANCE OR SERVICE.........................................................14
In the U.S.A. ...............................................................................14
In Canada ...................................................................................14
WARRANTY ..................................................................................15
TABLE DES MATIÈRES
SÉCURITÉ DU CLIMATISEUR ....................................................16
EXIGENCES D’INSTALLATION...................................................17
Outillage et pièces......................................................................17
Exigences d’emplacement.........................................................17
Spécifications électriques..........................................................17
INSTRUCTIONS D'INSTALLATION ............................................19
Déballage du climatiseur............................................................19
Avant l’installation du climatiseur ..............................................19
Installation du climatiseur dans une gaine murale existante.....19
Installation de la grille de plastique............................................20
Installation du climatiseur dans une nouvelle gaine murale......21
Achever l’installation ..................................................................22
UTILISATION DU CLIMATISEUR................................................23
Mise en marche du climatiseur ..................................................23
Utilisation de la télécommande..................................................25
Changement de direction de l'air...............................................26
Sons normaux ............................................................................26
ENTRETIEN DU CLIMATISEUR ..................................................27
Nettoyage du filtre à air ..............................................................27
Nettoyage du panneau avant.....................................................27
Entretien annuel..........................................................................27
DÉPANNAGE.................................................................................28
ASSISTANCE OU SERVICE.........................................................30
Aux États-Unis............................................................................30
Au Canada..................................................................................30
GARANTIE.....................................................................................31
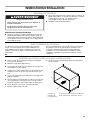
AIR CONDITIONER SAFETY
You can be killed or seriously injured if you don't immediately
You
can be killed or seriously injured if you don't
follow
All safety messages will tell you what the potential hazard is, tell you how to reduce the chance of injury, and tell you what can
happen if the instructions are not followed.
Your safety and the safety of others are very important.
We have provided many important safety messages in this manual and on your appliance. Always read and obey all safety
messages.
This is the safety alert symbol.
This symbol alerts you to potential hazards that can kill or hurt you and others.
All safety messages will follow the safety alert symbol and either the word “DANGER” or “WARNING.”
These words mean:
follow instructions.
instructions.
DANGER
WARNING

3
INSTALLATION REQUIREMENTS
Tools and Parts
Gather the required tools and parts before starting installation.
Read and follow the instructions provided with any tools listed
here.
Tools Needed
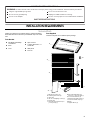
Parts Supplied
Check that all parts are included in parts package.
IMPORTANT SAFETY INSTRUCTIONS
WARNING:
To reduce the risk of fire, electrical shock or injury when using your air conditioner, follow these basic precautions:
SAVE THESE INSTRUCTIONS
Unplug air conditioner before servicing.
Use two or more people to move and install air conditioner.
Plug into a grounded 3 prong outlet.
Do not remove ground prong.
Do not use an adapter.
Do not use an extension cord.
■ Flat-blade and Phillips
screwdrivers
■ Pliers
■ Level
■ Tape measure
■ Cordless drill and ¹⁄₈" or
smaller bit
■ Utility knife
■ Scissors
A. Narrow trim frames (4)
B. Insulating foam seals (4)
C. New grille
D. #8—32 self-tapping screws (6)
E. Plastic grille
F. Universal side trim frames (3.1"
[7.9 cm] wide) (2)
G. Universal top/bottom trim
frames (2.7" [6.9 cm] wide) (2)
H. Screws with washers (4)
I. Horizontal insulation strips (2)
J. Vertical insulation strips (2)
K. Baffle
L. Support blocks (2)
AC Parts Supplied 5A.eps
A
C
D
E
J
K
L
F
G
H
I
B

4
Location Requirements
IMPORTANT: Observe all governing codes and ordinances.
Check the location where the air conditioner will be installed.
Proper installation is your responsibility. Make sure you have
everything necessary for correct installation.
The location should provide:
■ Grounded electrical outlet within 4 ft (122 cm) of where the
power cord exits the air conditioner.
NOTE: Do not use an extension cord.
■ Free movement of air in room to be cooled.
■ A large enough opening for the air conditioner and sleeve
(sold separately).
■ Adequate wall support for weight of air conditioner.
Electrical Requirements
The electrical ratings for your air conditioner are listed on the
model and serial number label. The model and serial number
label is located behind the front panel on the front flange above
the coil area.
Specific electrical requirements are listed in the chart below.
Follow the requirements for the type of plug on the power supply
cord.
Recommended Grounding Method
This air conditioner must be grounded. This air conditioner is
equipped with a power supply cord having a 3 prong grounding
plug. The cord must be plugged into a mating, grounded 3 prong
outlet, grounded in accordance with all local codes and
ordinances. If a mating outlet is not available, it is the customer's
responsibility to have a properly grounded 3 prong outlet installed
by a qualified electrical installer.
It is the customer's responsibility:
■ To contact a qualified electrical installer.
■ To assure that the electrical installation is adequate and in
conformance with National Electrical Code, ANSI/NFPA 70—
latest edition, and all local codes and ordinances.
Copies of the standards listed may be obtained from:
National Fire Protection Association
1 Batterymarch Park
Quincy, MA 02169
Power Supply Cord
NOTE: Your air conditioner’s device may differ from the one
shown.
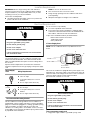
This room air conditioner is equipped with a power supply cord
required by UL. This power supply cord contains state-of-the-art
electronics that sense leakage current. If the cord is crushed, the
electronics detect leakage current and power will be
disconnected in a fraction of a second.
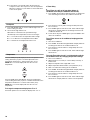
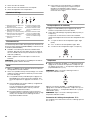
To test your power supply cord:
1. Plug power supply cord into a grounded 3 prong outlet.
Power Supply
Cord Wiring Requirements
■ 115-volt (103.5 min. to 126.5 max.)
■ 7.6 to 12 amps
■ 15-amp time-delay fuse or circuit
breaker
■ Use on single outlet circuit only.
■ 230/208-volt (197.6 min. to 253 max.)
■ 0 to 12 amps
■ 15-amp time-delay fuse or circuit
breaker
■ Use on single outlet circuit only.
Electrical Shock Hazard
Plug into a grounded 3 prong outlet.
Do not remove ground prong.
Do not use an adapter.
Do not use an extension cord.
Failure to follow these instructions can result in death,
fire, or electrical shock.
WARNING
¹⁄₄"
(0.6 cm)
A. Test button
B. Reset button
TEST
RESET
A
B
Electrical Shock Hazard
Plug into a grounded 3 prong outlet.
Do not remove ground prong.
Do not use an adapter.
Do not use an extension cord.
Failure to follow these instructions can result in death,
fire, or electrical shock.
WARNING

5
2. Press RESET.
3. Press TEST (listen for click; Reset button will trip and pop
out).
4. Press and release RESET (listen for click; Reset button will
latch and remain in). The power supply cord
is ready for
operation.
NOTES:
■ The Reset button must be pushed in for proper operation.
■ The power supply cord must be replaced if it fails to trip when
the test button is pressed or fails to reset.
■ Do not use the power supply cord as an off/on switch.
■ A damaged power supply cord must be replaced with a new
power supply cord obtained from the product manufacturer
and must not be repaired.
■ The power supply cord contains no user serviceable parts.
Opening the tamper-resistant case voids all warranty and
performance claims.
INSTALLATION INSTRUCTIONS
Unpack the Air Conditioner
Remove Packaging Materials
■ Remove and dispose of/recycle packaging materials.
Remove tape and glue residue from surfaces before turning
on the air conditioner. Rub a small amount of liquid dish soap
over the adhesive with your fingers. Wipe with warm water
and dry.
■ Do not use sharp instruments, rubbing alcohol, flammable
fluids, or abrasive cleaners to remove tape or glue. These
products can damage the surface of your air conditioner.
■ Handle the air conditioner gently.
Before Installing Air Conditioner
This air conditioner has been designed for installation through the
wall in a sleeve. It is the responsibility and obligation of the
customer to have this product installed by a qualified technician
familiar with through-the-wall installation.
OR
If you choose to install the air conditioner yourself, read all
installation instructions, as well as the electrical requirements and
operating instructions, before installing your unit. This will help to
avoid any installation problems and will help ensure trouble-free
performance of your new air conditioner.
Install Air Conditioner in Existing Wall Sleeve
■ It is recommended that you remove the existing rear grille and
install the new grille that came with your air conditioner.
■ Handle air conditioner gently.
■ Be sure your air conditioner does not fall out of the opening
during installation or removal.
■ The place where the power cord exits the air conditioner
should be no more than 4 ft (122 cm) from a grounded outlet.
■ Be sure the wall where the air conditioner will be installed will
support the weight of the unit.
■ Do not install the air conditioner where the plastic cabinet
front will be exposed to a heat source that raises the surface
temperature above 120ºF (49ºC).
■ Do not block the louvers in the front panel.
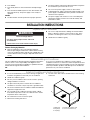
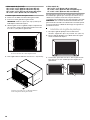
1. Measure the existing wall sleeve.
2. See the section that matches the dimensions of the existing
wall sleeve.
WARNING
Excessive Weight Hazard
Use two or more people to move and install
air conditioner.
Failure to do so can result in back or other injury.
A. Width (W)
B. Height (H)
C. Depth (D)
D. Horizontal insulation strip
E. Vertical insulation strip
A
B
C
D
E

6
Wall Sleeve Dimensions (W x H x D):
25¹⁄₂" x 15¹⁄₄" x 17¹⁄₂" (64.8 cm x 38.7 cm x 44.5 cm),
25³⁄₄" x 16⁷⁄₈" x 18⁵⁄₈" (65.4 cm x 42.9 cm x 47.3 cm),
25⁷⁄₈" x 16¹⁄₂" x 17¹⁄₂" (65.7 cm x 41.9 cm x 44.5 cm) or
26" x 15⁵⁄₈" x 16⁷⁄₈" (66 cm x 39.7 cm x 42.9 cm)
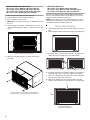
1. Remove the existing grille from the wall sleeve.
2. Remove all debris from inside the wall sleeve.
3. Insert new grille into wall sleeve.
NOTE: Make sure that the word “Top” is readable from inside
the room.
4. Using the grille as a template, mark locations of 2 holes on
each side of the wall sleeve. Drill ¹⁄₈" (3 mm) holes into the wall
sleeve.
5. Attach the rear grille using #8—32 sheet metal screws
(provided).
Wall Sleeve Dimensions:
26³⁄₄" x 15³⁄₄" x 15" (68 cm x 40 cm x 38.1 cm),
27" x 16³⁄₄" x 16³⁄₄" (68.6 cm x 42.6 cm x 42.6 cm), or
27" x 16³⁄₄" x 19³⁄₄" (68.6 cm x 42.6 cm x 50.2 cm)
These sleeves require a larger rear grille and installation parts
than the ones provided with this air conditioner. See your local
supplier for a kit to fit this size wall sleeve.
NOTE: If you install your new air condtioner into this size wall
sleeve without using the kit, you will cause damage to your new
air conditioner and the warranty will be void.
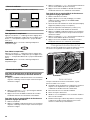
Plastic Grille Installation
1. Cut the plastic grille 26¹⁄₂" (67.3 cm) wide and 15¹⁄₂" (39.4 cm)
high.
2. Place the plastic grille inside the wall sleeve at the rear flange.
3. If needed, drill ¹⁄₈" holes into the wall sleeve. Then fasten the
grille to the wall sleeve with the screws with washers.
4. If existing wall sleeve has insulation that does not need to be
replaced, skip to Step 7. Otherwise, replace the insulation.
5. Remove the backing from the horizontal insulation strip and
attach it to the inside of the wall sleeve.
6. Remove the backing from the vertical insulation strip and
attach it to the inside front of the wall sleeve as shown below.
A. Drill
¹⁄₈
" holes into the wall sleeve.
Insert the four #8—32 sheet metal screws (provided)
through the holes in the grille and into the wall sleeve.
A
A
A. Vertical insulation strip
B. Horizontal insulation strip
AC Plastic Grille Install 2.eps
OR
A
B

7
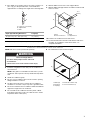
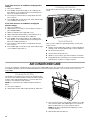
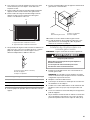
7. If the depth of your existing sleeve is less than or equal to 18"
(45.7 cm), go to Step 10. Otherwise, cut the baffle and
support blocks according to the lengths in the following table.
8. Slide the baffles into the slots of the support blocks.
9. Slide the baffle and support block assemblies inside the wall
sleeve as shown.
10. Install the air conditioner into the wall sleeve.
11. The universal trim frame must be used with this wall sleeve
assembly. To assemble the universal trim frame, see
“Complete Installation.”
Install Air Conditioner in New Wall Sleeve
NOTE: Wall sleeve must be purchased separately.
■ Install the new grille that came with your air conditioner or
new wall sleeve.
NOTE: If this grille is not installed in the wall sleeve, your air
conditioner will not operate correctly and the warranty will be
void.
■ Handle air conditioner gently.
■ Be sure your air conditioner does not fall out of the opening
during installation or removal.
■ The place where the power cord exits the air conditioner
should be no more than 4 ft (122 cm) from a grounded outlet.
■ Be sure the wall where the air conditioner will be installed will
support the weight of the air conditioner.
■ Do not install the air conditioner where the plastic cabinet
front will be exposed to a heat source that raises the surface
temperature above 120ºF (49ºC).
■ Do not block the louvers in the front panel.
A. Length (see chart below)
B. Support block
C. Baffle
Depth (D) of Existing Wall Sleeve Length (A)
18" (45.7 cm) < D < 18⁵⁄₈" (47.3 cm) ³⁄₄" (1.9 cm)
18⁵⁄₈" (47.3 cm) < D < 19³⁄₄" (50.2 cm) 1³⁄₄" (4.5 cm)
19³⁄₄" (50.2 cm) < D < 22" (55.9 cm) 4" (10.2 cm)
A
B
C
A
A. Wall
B. Front of wall sleeve
C. Baffle
D. Support block
A
B
C
D
7³
/
₃₂
"
(18 cm)
WARNING
Excessive Weight Hazard
Use two or more people to move and install
air conditioner.
Failure to do so can result in back or other injury.
A. Width (W)
B. Height (H)
C. Depth (D)
D. Horizontal insulation strip
E. Vertical insulation strip
A
B
C
D
E

8
Wall Sleeve Dimensions (W x H x D):
25⁷⁄₈" x 15¹⁷⁄₃₂" x 16²³⁄₃₂" (65.7 cm x 39.5 cm x 42.5 cm)
1. Remove the front and back covers from the new wall sleeve.
NOTE: Save the covers for future use to seal the wall sleeve if
the air conditioner is removed.
2. See instructions provided with the wall sleeve for complete
installation of the wall sleeve and grille.
Complete Installation
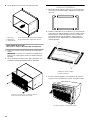
1. Assemble the trim frame by laying the 4 frame pieces face
down on a flat surface and snapping them securely together.
2. Install the ¹⁄₈" (3 mm) insulating foam around the inside edge
of the trim frame. Begin in the bottom left corner and place
the insulating foam around the entire inside of trim frame.
Check that the foam is flush with the bottom edge of the trim
frame.
3. Slide the trim frame onto the air conditioner until the foam
makes a seal with the wall sleeve.
4. Plug into a grounded 3 prong outlet.
5. Press RESET on power supply cord.
Insert the 4 - #8 - 32 sheet metal screws (provided)
through the holes in the grille and into the wall sleeve.
A. Insulating foam seals
B. Trim frame
A
B
B
A. Trim frame against wall sleeve
A
Electrical Shock Hazard
Plug into a grounded 3 prong outlet.
Do not remove ground prong.
Do not use an adapter.
Do not use an extension cord.
Failure to follow these instructions can result in death,
fire, or electrical shock.
WARNING

9
AIR CONDITIONER USE
Operating your air conditioner properly helps you to obtain the
best possible results.
This section explains proper air conditioner operation.
IMPORTANT:
■ If you turn off the air conditioner, wait at least 3 minutes
before turning it back on. This keeps the air conditioner from
blowing a fuse or tripping a circuit breaker.
■ Do not try to operate your air conditioner in the cooling mode
when outside temperature is below 66°F (19°C). The inside
evaporator coil will freeze up, and the air conditioner will not
operate properly.
NOTES:
■ In the event of a power failure, your air conditioner will
operate at the previous settings when the power is restored.
■ If the electronic control will not respond to touch pad or
remote control commands, it is necessary to unplug the air
conditioner from the electrical outlet for 5 seconds before
plugging back in.
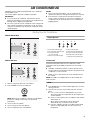
Starting Your Air Conditioner
Models Without Heat
Models With Heat
1. Remove clear plastic film from control panel.
2. Press POWER to turn on air conditioner.
NOTE: When the air conditioner is turned on, it will display
the previous settings for the mode, fan speed and
temperature.
3. Choose mode. See “Mode.”
4. Choose fan speed. See “Fan Speed.”
5. Choose temperature. See “Temperature.”
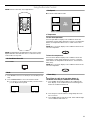
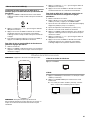
Display Symbols
Exhaust Air
The Exhaust Air feature allows the air conditioner to either
recirculate inside air (CLOSED) or exhaust air to the outside
(OPEN).
■ CLOSED—used when maximum cooling is desired. It may
also be used for air recirculation without cooling when the air
conditioner is set to Fan mode.
■ OPEN—removes stale air from the room and exhausts it to
the outside.
NOTE: The OPEN or CLOSED position can be used with any
mode selection.
Mode
1. Press MODE until you see the indicator light come on for the
setting you desire.
2. Choose Cool, Heat (on some models), Fan Only or Power
Saver.
■ Cool—Cools room. Press FAN SPEED to choose fan
speed. Then adjust the temperature by pressing the plus
or minus buttons.
■ Heat (on some models)—The air conditioner will circulate
and heat the air.
When heater is powered off, Low fan speed will
automatically stay on and run for 30 seconds.
■ Fan Only—Operates the fan at Low, Mid or High speed,
without cooling. Display will show the current room
temperature.
A. Cool mode indicator light
B. Fan only mode indicator light
C. Heat indicator light
(on some models)
D. Power Saver indicator light
E. Timer indicator light
F. Auto fan mode indicator light
G. Low fan mode indicator light
H. Mid fan mode indicator light
I. High fan mode indicator light
F
G
A
B
C
D
E
H
I

10
■ Power Saver—The fan will switch off whenever the
compressor turns off in response to the set temperature.
When the compressor cycles back on, the fan will return
to the set fan speed.
Fan Speed
1. Press FAN SPEED until you see the indicator light come on
for the setting you desire.
2. Choose Auto, High, Mid or Low.
When Auto is selected, the fan speed will change
automatically as the temperature in the room changes.
■ 7º or more above the set temperature will use High.
■ 4º to 7º above the set temperature will use Mid.
■ 4º or below the set temperature will use Low.
Temperature
Press the TEMP plus pad. Display shows the Temperature control
setting. Each time you press or hold the plus button, the
temperature will increase 1º until it reaches 88°F (31ºC).
NOTE: After 3 seconds, display will show the set room
temperature.
Press the TEMP minus pad. Display shows the Temperature
control setting. Each time you press or hold the minus button, the
temperature will decrease 1º until it reaches 66°F (19ºC).
NOTE: After 3 seconds, display will show the set room
temperature.
To change the temperature display from ºF to ºC
Press both pads at once to switch the display from ºF to ºC.
Timer Delay
To set Timer for a 0.5- to 24-hour delay before air
conditioner turns Off (air conditioner must be On):
1. Press TIMER. Timer indicator light will remain on. Display will
show remaining hours before air conditioner will turn off.
2. Press the plus or minus pad to change the delay time from
0.5 to 24 hours.
3. Press TIMER again or wait 10 seconds. Timer indicator light
will remain on. Display will show remaining hours before air
conditioner will turn off.
4. To turn Timer off, press TIMER again, or press POWER to turn
off the air conditioner.
To set Timer to turn on air conditioner, keeping previous
settings:
1. Turn off air conditioner.
2. Press TIMER. Timer indicator light will flash. Display will show
remaining hours before air conditioner will turn off.
3. Press the plus or minus button to change delay time from
0.5 to 24 hours.
4. Press TIMER again or wait 10 seconds. Timer indicator light
will remain on.
To set the Timer delay for a 0.5- to 24-hour delay until the
air conditioner turns on, changing the previous settings:
1. Turn on air conditioner.
2. Adjust Mode to Cool, Heat (on some models), Fan Only, or
Power Saver.
3. Adjust Fan Speed to Auto, High, Mid or Low.
4. Adjust temperature between 66°F (19ºC) and 88°F (31ºC).
5. Wait 3 seconds before turning off air conditioner.
6. Press TIMER. Timer indicator light will flash. Display will show
remaining hours before air conditioner will turn on.
7. Press the plus or minus button to change delay time from
0.5 to 24 hours.
8. Press TIMER again or wait 10 seconds. Timer indicator light
will remain on. Display will show current room temperature.

11
Using the Remote Control
NOTE: Remote control may vary in appearance.
NOTE: Two AA batteries (included) power the remote control.
Replace batteries after 6 months of use, or when the remote
control starts to lose power.
Air Conditioner On or Off
Press POWER.
Mode
1. Press MODE to choose Cool, Heat (on some models) or Fan
Only.
2. Press POWER SAVER to choose Power Saver mode.
■ Cool, Heat (on some models), Fan Only or Power Saver—
you can adjust the fan speed.
Fan Speed
Press AUTO, HIGH, MID or LOW.
Temperature
To raise the temperature:
Press the plus button. Display on air conditioner shows the
Temperature control setting. Each time you press or hold the plus
button, the temperature will increase 1º until it reaches 88°F
(31ºC).
NOTE: After 3 seconds, display on air conditioner will show the
set room temperature.
To lower the temperature:
Press the minus button. Display on air conditioner shows the
Temperature control setting. Each time you press or hold the
minus button, the temperature will decrease 1º until it reaches
66°F (19ºC).
NOTE: After 3 seconds, display on air conditioner will show the
set room temperature.
Timer Delay
To set Timer for a 0.5- to 24-hour delay before air
conditioner turns Off (air conditioner must be ON):
1. Press TIMER. Timer indicator light on air conditioner will
flash. Display on air conditioner will show remaining hours
before air conditioner will turn off.
2. Press the plus or minus button to change delay time from
0.5 to 24 hours.
3. Press TIMER again or wait 10 seconds. Timer indicator light
on air conditioner will remain on.

12
To set Timer to turn on air conditioner, keeping previous
settings:
1. Turn off air conditioner.
2. Press TIMER. Timer indicator light on air conditioner will
flash. Display on air conditioner will show remaining hours
before air conditioner will turn off.
3. Press the plus or minus button to change delay time from
0.5 to 24 hours.
4. Press TIMER again or wait 10 seconds. Timer indicator light
on air conditioner will remain on.
To set Timer to turn on air conditioner, changing the
previous settings:
1. Turn on air conditioner.
2. Adjust Mode to Cool, Heat (on some models), Fan Only, or
press POWER SAVER.
3. Adjust Fan Speed to Auto, High, Mid or Low.
4. Adjust temperature between 66°F (19ºC) and 88°F (31ºC).
5. Wait 3 seconds before turning off air conditioner.
6. Press TIMER. Timer indicator light on air conditioner will
flash. Display on air conditioner will show remaining hours
before air conditioner will turn on.
7. Press the plus or minus button to change delay time from
0.5 to 24 hours.
8. Press TIMER again or wait 10 seconds. Timer indicator light
on air conditioner will remain on.
Changing Air Direction
Use the tabs to direct the air up, down, right, left or straight
ahead.
Normal Sounds
When your air conditioner is operating normally, you may hear
sounds such as:
■ Droplets of water hitting the condenser, causing a pinging or
clicking sound. The water droplets help cool the condenser.
■ Air movement from the fan.
■ Clicks from the thermostat cycle.
■ Vibrations or noise due to poor wall or window construction.
■ A high-pitched hum or pulsating noise caused by the modern
high-efficiency compressor cycling on and off.
AIR CONDITIONER CARE
Your new air conditioner is designed to give you many years of dependable service. This section tells you how to clean and care for your
air conditioner properly. Call your local authorized dealer for an annual checkup. Remember… the cost of this service call is your
responsibility.
Cleaning the Air Filter
The air filter is removable for easy cleaning. A clean filter helps
remove dust, lint, and other particles from the air and is important
for best cooling and operating efficiency. Check the filter every
2 weeks to see whether it needs cleaning.
NOTE: Do not operate the air conditioner without the filter in
place.
1. Turn off air conditioner.
2. Grasp air filter at tabs. Slide air filter up and out of filter slot.
3. Use a vacuum cleaner to clean air filter. If air filter is very dirty,
wash it in warm water with mild detergent. Do not wash air
filter in the dishwasher or use any chemical cleaners.
NOTE: Air dry filter completely before replacing to ensure
maximum efficiency.
4. Slide air filter down into filter slot.

13
Cleaning the Front Panel
1. Unplug air conditioner or disconnect power.
2. Remove the air filter and clean it separately. See “Cleaning
the Air Filter.”
3. Clean the front panel using a soft, damp cloth with a mild
detergent and warm water. Rinse with clear water and dry.
4. Plug in air conditioner or reconnect power.
Annual Maintenance
Your air conditioner needs annual maintenance to help ensure
steady, top performance throughout the year. Call your local
authorized dealer to schedule an annual checkup. The expense
of an annual inspection is your responsibility.
TROUBLESHOOTING
Before calling for service, try the suggestions below to see whether you can solve your problem without outside help.
Air conditioner will not operate
■ The power supply cord is unplugged. Plug into grounded
3 prong outlet. See “Electrical Requirements.”
■ The power supply cord has tripped (Reset button has
popped out). Press and release RESET (listen for click; Reset
button will latch and remain in) to resume operation.
■ A household fuse has blown, or a circuit breaker has
tripped. Replace the fuse or reset the circuit breaker. See
“Electrical Requirements.”
■ The Power button has not been pressed. Press POWER.
■ The local power has failed. Wait for power to be restored.
Air conditioner blows fuses or trips circuit breakers
■ Too many appliances are being used on the same circuit.
Unplug or relocate appliances that share the same circuit.
■ Time-delay fuse or circuit breaker of the wrong capacity
is being used. Replace with a time-delay fuse or circuit
breaker of the correct capacity. See “Electrical
Requirements.”
■ An extension cord is being used. Do not use an extension
cord with this or any other appliance.
■ You are trying to restart the air conditioner too soon after
turning off the unit. Wait at least 3 minutes after turning off
the unit before trying to restart the air conditioner.
Air conditioner power supply cord trips (Reset button
pops out)
■ Disturbances in your electrical current can trip (Reset
button will pop out) the power supply cord. Press and
release RESET (listen for click; Reset button will latch and
remain in) to resume operation.
■ Electrical overloading, overheating, cord pinching or
aging can trip (Reset button will pop out) the power
supply cord. After correcting the problem, press and release
RESET (listen for click; Reset button will latch and remain in)
to resume operation.
NOTE: A damaged power supply cord must be replaced with a
new power supply cord obtained from the product manufacturer
and must not be repaired.
Air conditioner seems to run too much
■ The current air conditioner replaced an older model. The
use of more efficient components may cause the air
conditioner to run longer than an older model, but the total
energy consumption will be less. Newer air conditioners do
not emit the “blast” of cold air you may be accustomed to
from older units, but this is not an indication of lesser cooling
capacity or efficiency. Refer to the efficiency rating (EER) and
capacity rating (in Btu/h) marked on the air conditioner.
■ The air conditioner is in a heavily occupied room, or heat-
producing appliances are in use in the room. Use exhaust
vent fans while cooking or bathing and try not to use heat-
producing appliances during the hottest part of the day. A
higher capacity air conditioner may be required, depending
on the size of the room being cooled.
Air conditioner cycles on and off too much
■ The Mode is set to Power Saver. Use Power Saver only
when you are asleep or away from home. Use Cool and a
higher fan setting for your best comfort.
■ The air conditioner is not properly sized for your room.
Check the cooling capabilities of your room air conditioner.
Room air conditioners are not designed to cool multiple
rooms.
■ The filter is dirty or obstructed by debris. Clean the filter.
■ There is excessive heat or moisture (open container
cooking, showers, etc.) in the room. Use a fan to exhaust
heat or moisture from the room. Try not to use heat-
producing appliances during the hottest part of the day.
■ The louvers are blocked. Install the air conditioner in a
location where the louvers are free from curtains, blinds,
furniture, etc.
Electrical Shock Hazard
Plug into a grounded 3 prong outlet.
Do not remove ground prong.
Do not use an adapter.
Do not use an extension cord.
Failure to follow these instructions can result in death,
fire, or electrical shock.
WARNING

14
■ The outside temperature is below 66°F (19°C). Do not try to
operate your air conditioner in the cooling mode when the
outside temperature is below 66°F (19°C).
■ The temperature of the room you are trying to cool is
extremely hot. Allow extra time for the air conditioner to cool
off a very hot room.
■ Windows or doors to the outside are open. Close all
windows and doors.
■ The Air Exchanger is set to OPEN (on some models). Set
the Exhaust control to CLOSED for maximum cooling and/or
heating.
■ Temperature control is not at a cool enough setting.
Adjust the Temperature control to a cooler setting. Press the
TEMP minus pad to reduce the temperature by 1º until it
reaches 66ºF (19ºC). Set the Fan Speed control to High or
Turbo (on some models).
Water drips from cabinet into your house
■ The air conditioner is not properly leveled. The air
conditioner should slope slightly downward toward the
outside. Level the air conditioner to provide a downward
slope toward the outside to ensure proper drainage. See the
Installation Instructions.
NOTE: Do not drill a hole in the bottom of the metal base and
condensate pan.
Air conditioner cooling, but room is too warm—Ice
forming on cooling coil behind intake grille
■ The outside temperature is below 66°F (19°C). Do not try to
operate your air conditioner in the cooling mode when the
outside temperature is below 66°F (19°C).
■ The filter is dirty or obstructed by debris. Clean the filter.
ASSISTANCE OR SERVICE
Before calling for assistance or service, please check
“Troubleshooting.” It may save you the cost of a service call. If
you still need help, follow the instructions below.
When calling, please know the purchase date and the complete
model and serial number of your appliance. This information will
help us to better respond to your request.
If You Need Replacement Parts
If you need to order replacement parts, we recommend that you
only use factory specified replacement parts. Factory specified
replacement parts will fit right and work right because they are
made with the same precision used to build every new appliance.
To locate factory specified replacement parts in your area, call us
or your nearest designated service center.
Keep this book and your sales slip together for future
reference. You must provide proof of purchase or installation
date for in-warranty service.
Write down the following information about your major appliance
to better help you obtain assistance or service if you ever need it.
You will need to know your complete model number and serial
number. You can find this information on the model and serial
number label located on the product.
Dealer name____________________________________________________
Address ________________________________________________________
Phone number__________________________________________________
Model number __________________________________________________
In the U.S.A.
Call Haier America toll free: 1-888-842-2440.
Our consultants provide assistance with:
■ Features and specifications on our appliances.
■ Installation information.
■ Use and maintenance procedures.
■ Repair parts sales.
■ Referrals to repair parts distributors, and service companies.
Manufacturer-authorized service technicians are trained to
fulfill the product warranty and provide after-warranty service,
anywhere in the United States.
For Further Assistance
If you need further assistance, you can write with any questions
or concerns to:
Haier America
1356 Broadway
New York, NY 10018
Please include a daytime phone number in your correspondence.
In Canada
Call Haier America toll free: 1-888-842-2440.
Our consultants provide assistance with:
■ Features and specifications on our appliances.
■ Use and maintenance procedures.
■ Repair parts sales.
■ Referrals to repair parts distributors, and service companies.
Manufacturer-authorized service technicians are trained to
fulfill the product warranty and provide after-warranty service,
anywhere in Canada.
For Further Assistance
If you need further assistance, you can write with any questions
or concerns to:
Haier America
1356 Broadway
New York, NY 10018
U.S.A.
Please include a daytime phone number in your correspondence.

15
LIMITED WARRANTY
ONE YEAR LIMITED WARRANTY
This warranty covers all defects in workmanship or material for the mechanical and electrical parts (including labor costs) contained in
this product for a period of 12 months from the date of purchase. For commercial or rental application, the warranty is 90 days. You
must keep and be able to provide your original sales receipt as proof of the date of purchase.
FIVE YEAR LIMITED WARRANTY ON THE SEALED SYSTEM
The sealed system and compressor (hermetic compressor, condenser and evaporator) contained in this product is for a period of 5
years from the date of purchase (excluding labor costs after the initial 12-month period). In commercial or rental use, the additional
limited compressor warranty is for 1 year and 9 months (excluding labor costs after the initial 90-day period). You must keep and be
able to provide your original sales receipt as proof of the date of purchase.
WHO IS COVERED
The original retail purchaser of this product.
WHAT WILL BE DONE
Haier America will repair or replace any mechanical, electrical part or the compressor, which proves defective in normal household use
for a period of 12 months. Haier America will repair or replace (excluding labor costs) the sealed system and compressor (parts only) for
an additional 4-year period.
HOW CAN YOU GET SERVICE
Contact your nearest manufacturer-authorized Service Depot. For the name of the Service Depot nearest you, contact Haier America at
1-888-842-2440.
All service must be performed by a manufacturer-authorized Service Depot.
THIS WARRANTY DOES NOT COVER
1. Damages from improper installation.
2. Damages in shipping.
3. Defects other than manufacturing.
4. Damages from misuse, abuse, accident, alteration, lack of proper care and maintenance or incorrect current or voltage.
5. Damage from other than household use.
6. Damages from service by other than an authorized dealer or service center.
7. Decorative trims or replaceable light bulbs.
8. Labor, service, transportation and shipping charges for the removal of defective parts and installation of replacement parts beyond
the initial 12-month period.
9. Credit or refund for products over 30 days past date of purchase, or for any loss or injury caused by the product or defects to the
product including but not limited to incidental or consequential damages.
10. Food loss for food spoiled as a direct result of mechanical failure of a product or of any delay in providing service, repair or
replacement.
11. Refurbished product purchased as/like new or second-hand.
THIS LIMITED WARRANTY IS GIVEN IN LIEU OF ALL OTHER WARRANTIES, EXPRESS OR IMPLIED, INCLUDING THE
WARRANTIES OF MERCHANTABILITY AND FITNESS FOR A PARTICULAR PURPOSE.
The remedy provided in this warranty is exclusive and is granted in lieu of all other remedies. This warranty does not cover incidental or
consequential damages. Some states do not allow the exclusion of incidental or consequential damages, so this limitation may not
apply to you. Some states do not allow limitations on how long an implied warranty lasts, so this limitation may not apply to you. This
warranty gives you specific legal rights and you may also have other rights which vary from state to state.
This warranty covers units within the continental United States, Canada and Puerto Rico.
2/09

SÉCURITÉ DU CLIMATISEUR
Risque possible de décès ou de blessure grave si vous ne
suivez pas immédiatement les instructions.
Risque possible de décès ou de blessure grave si vous
ne suivez pas les instructions.
Tous les messages de sécurité vous diront quel est le danger potentiel et vous disent comment réduire le risque de blessure et
ce qui peut se produire en cas de non-respect des instructions.
Votre sécurité et celle des autres est très importante.
Nous donnons de nombreux messages de sécurité importants dans ce manuel et sur votre appareil ménager. Assurez-vous de
toujours lire tous les messages de sécurité et de vous y conformer.
AVERTISSEMENT
DANGER
Voici le symbole d’alerte de sécurité.
Ce symbole d’alerte de sécurité vous signale les dangers potentiels de décès et de blessures graves à vous
et à d’autres.
Tous les messages de sécurité suivront le symbole d’alerte de sécurité et le mot “DANGER” ou
“AVERTISSEMENT”. Ces mots signifient :
IMPORTANTES INSTRUCTIONS DE SÉCURITÉ
AVERTISSEMENT :
Pour réduire les risques d'incendie, de choc électrique ou des blessures lors de l'utilisation du
climatiseur, prendre quelques précautions fondamentales, y compris les suivantes :
CONSERVEZ CES INSTRUCTIONS
Débrancher le climatiseur avant l'entretien.
Utiliser deux ou plus de personnes pour déplacer et
installer le climatiseur.
Brancher sur une prise à 3 alvéoles reliée à la terre.
Ne pas enlever la broche de liaison à la terre.
Ne pas utiliser un adaptateur.
Ne pas utiliser un câble de rallonge.

17
EXIGENCES D’INSTALLATION
Outillage et pièces
Rassembler les outils et pièces nécessaires avant de commencer
l’installation. Lire et suivre les instructions fournies avec les outils
indiqués ici.
Outils nécessaires
Pièces fournies
Vérifier que toutes les pièces sont présentes dans le sachet de
pièces.
Exigences d’emplacement
IMPORTANT : Respecter tous les codes et règlements en
vigueur.
Inspecter l’emplacement où le climatiseur sera installé. C'est à
l'utilisateur qu'incombe la responsabilité d'assurer une
installation correcte. S'assurer d'avoir tout le nécessaire pour une
installation correcte.
L’emplacement d’installation doit disposer de :
■ Une prise électrique avec liaison à la terre située à moins de
4 pi (122 cm) de la sortie du cordon d'alimentation du
climatiseur.
REMARQUE : Ne pas utiliser de cordon de rallonge.
■ Une circulation libre de l'air jusqu'aux pièces à refroidir.
■ Une ouverture de taille suffisante pour le climatiseur et la
gaine murale (vendue séparément).
■ Un support mural adéquat pour le poids du climatiseur.
Spécifications électriques
Les caractéristiques électriques du climatiseur sont indiquées sur
la plaque signalétique. La plaque signalétique est située derrière
le panneau avant sur la bride avant au-dessus du serpentin.
Les exigences électriques spécifiques sont indiquées dans le
tableau ci-dessous. Suivre les recommandations pour le type de
prise électrique indiquées sur le cordon d’alimentation.
■ Tournevis Phillips et
tournevis à lame plate
■ Pince
■ Niveau
■ Mètre-ruban
■ Perceuse sans fil et foret
de ¹⁄₈" ou plus petit
■ Couteau tout usage
■ Ciseaux
A. Tringles de garniture étroite (4)
B. Joints de mousse isolante (4)
C. Nouvelle grille
D. Vis autotaraudantes Nº 8—32 (6)
E. Grille de plastique
F. Tringle latérale du cadre de garniture
universel (largeur 3,1" [7,9 cm]) (2)
G. Tringle du cadre de garniture universel
(haut et bas) (largeur 2,7" [6,9 cm]) (2)
H. Vis avec rondelle (4)
I. Tige d’isolant pour
composants horizontaux (2)
J. Tige d’isolant pour
composants verticaux (2)
K. Plaque de séparation
L. Cale de soutien en
polystyrène (2)
A
C
D
E
J
K
L
F
G
H
I
B
Cordon électrique Spécifications du câblage
■ 115 volts (103,5 min. à 126,5 max.)
■ 7,6 à 12 ampères
■ Fusible temporisé 15 ampères
ou disjoncteur
■ Alimenter le climatiseur uniquement
à partir d’un circuit qui n’alimente
que cet appareil.
AVERTISSEMENT
Risque de choc électrique
Brancher sur une prise à 3 alvéoles reliée à la terre.
Ne pas enlever la broche de liaison à la terre.
Ne pas utiliser un adaptateur.
Ne pas utiliser un câble de rallonge.
Le non-respect de ces instructions peut causer
un décès, un incendie ou un choc électrique.

18
Méthode recommandée de liaison à la terre
Ce climatiseur doit être relié à la terre. Ce climatiseur est équipé
d'un cordon d'alimentation électrique à trois broches pour la
liaison à la terre. On doit brancher le cordon sur une prise de
courant de configuration correspondante, à 3 alvéoles, reliée à la
terre et installée conformément à tous les codes et règlements
locaux. Si une prise de courant compatible n’est pas disponible,
c’est au client qu’incombe la responsabilité de faire installer une
prise de courant à 3 alvéoles convenablement reliée à la terre,
par un électricien qualifié.
C'est au client qu’incombe la responsabilité de :
■ Contacter un électricien qualifié.
■ Veiller à ce que l’installation électrique soit réalisée de façon
adéquate et en conformité avec le code national de
l’électricité, ANSI/NFPA 70—dernière édition, et tous les
codes et règlements locaux en vigueur.
On peut obtenir des exemplaires des normes mentionnées à
l’adresse suivante :
National Fire Protection Association
1 Batterymarch Park
Quincy, MA 02169
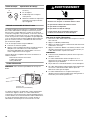
Cordon d’alimentation
REMARQUE : Votre climatiseur peut différer de celui qui est
illustré.
Ce climatiseur de pièce est équipé d’un cordon d’alimentation
conforme aux exigences de UL. Ce cordon d’alimentation
comporte des circuits électroniques d’avant-garde détectant les
courants de fuite. En cas d’écrasement du cordon d’alimentation,
les circuits électroniques détectent les courants de fuite et
l’alimentation est interrompue en une fraction de seconde.
Pour tester le cordon d’alimentation :
1. Brancher le cordon d'alimentation dans une prise à 3 alvéoles
reliée à la terre.
2. Appuyer sur RESET (réinitialisation).
3. Appuyer sur TEST (un déclic se fait entendre, le bouton Reset
se déclenche et ressort).
4. Appuyer sur le bouton RESET et le relâcher (un déclic se fait
entendre, le bouton Reset s’enclenche et reste enfoncé). Le
cordon d’alimentation est prêt à être utilisé.
REMARQUES :
■ Le bouton Reset (réinitialisation) doit être enfoncé pour une
utilisation correcte.
■ Le cordon d’alimentation doit être remplacé s’il ne se
déclenche pas lorsqu’on appuie sur le bouton de test ou si
l’appareil n'est pas réinitialisé.
■ Ne pas utiliser le cordon d’alimentation comme interrupteur.
■ Un cordon d’alimentation endommagé doit être remplacé par
un nouveau cordon d'alimentation obtenu auprès du
fabricant et ne doit pas être réparé.
■ Le cordon d’alimentation ne comprend aucune pièce
utilisable. Ouvrir le boîtier inviolable annule toute garantie et
réclamation pour mauvaise performance.
■ 230/208 volts (197,6 min. à
253 max.)
■ 0 à 12 ampères
■ Fusible temporisé 15 ampères
ou disjoncteur
■ Alimenter le climatiseur uniquement
à partir d’un circuit qui n’alimente
que cet appareil.
A. Bouton Test
B. Bouton Reset (réinitialisation)
Cordon électrique Spécifications du câblage
¹⁄₄"
(0,6 cm)
TEST
RESET
A
B
AVERTISSEMENT
Risque de choc électrique
Brancher sur une prise à 3 alvéoles reliée à la terre.
Ne pas enlever la broche de liaison à la terre.
Ne pas utiliser un adaptateur.
Ne pas utiliser un câble de rallonge.
Le non-respect de ces instructions peut causer
un décès, un incendie ou un choc électrique.

19
INSTRUCTIONS D'INSTALLATION
Déballage du climatiseur
Enlèvement des matériaux d’emballage
■ Enlever et recycler les matériaux d'emballage. Enlever tout
résidu de ruban adhésif et de colle des surfaces avant de
mettre le climatiseur en marche. Frotter une petite quantité de
savon liquide à vaisselle sur l'adhésif avec les doigts. Rincer
à l'eau tiède et sécher.
■ Ne pas utiliser d'instruments coupants, d'alcool à friction, de
liquides inflammables ou de nettoyants abrasifs pour enlever
le ruban adhésif ou la colle. Ces produits peuvent
endommager la surface de votre climatiseur.
■ Manipuler le climatiseur délicatement.
Avant l’installation du climatiseur
Ce climatiseur est conçu pour l’installation dans une gaine
murale. C’est à l’acquéreur qu’incombent l’obligation et la
responsabilité de faire installer ce produit par un technicien
qualifié, connaissant les exigences de l’installation dans une
gaine murale.
OU
Pour une installation par l’acquéreur, lire toutes les instructions
d'installation, ainsi que les spécifications électriques et les
instructions d’utilisation du produit, avant d’entreprendre
l’installation; ceci permettra d’éviter des problèmes durant
l’installation et garantira une performance fiable du nouveau
climatiseur.
Installation du climatiseur dans une gaine murale existante
■ Enlever la grille arrière existante; installer la nouvelle grille
fournie avec le climatiseur.
■ Manipuler le climatiseur délicatement.
■ S’assurer que le climatiseur ne tombe pas de l’ouverture lors
de l’installation ou de la dépose.
■ L’endroit où le cordon d’alimentation sort du climatiseur doit
être placé à moins de 4 pi (122 cm) d’une prise reliée à la
terre.
■ Le mur où le climatiseur sera installé doit pouvoir supporter le
poids de l’appareil.
■ Ne pas installer le climatiseur dans un endroit où l’avant de la
caisse de plastique serait exposé à une source de chaleur
portant la température de la surface à plus de 120ºF (49ºC).
■ Ne pas bloquer les persiennes sur le panneau avant.
1. Mesurer la gaine murale existante.
2. Voir la section qui correspond aux dimensions de la gaine
murale existante.
AVERTISSEMENT
Risque du poids excessif
Utiliser deux ou plus de personnes pour déplacer et
installer le climatiseur.
Le non-respect de cette instruction peut causer
une blessure au dos ou d'autre blessure.
A. Largeur (L)
B. Hauteur (H)
C. Profondeur (P)
D. Tige d’isolant pour composants horizontaux
E. Tige d’isolant pour composants verticaux
A
B
C
D
E

20
Gaine murale de (L x H x P) :
25¹⁄₂" x 15¹⁄₄" x 17¹⁄₂" (64,8 cm x 38,7 cm x 44,5 cm),
25³⁄₄" x 16⁷⁄₈" x 18⁵⁄₈" (65,4 cm x 42,9 cm x 47,3 cm),
25⁷⁄₈" x 16¹⁄₂" x 17¹⁄₂" (65,7 cm x 41,9 cm x 44,5 cm) ou
26" x 15⁵⁄₈" x 16⁷⁄₈" (66 cm x 39,7 cm x 42,9 cm)
1. Retirer la grille existante de la gaine murale.
2. Enlever tous les débris à l’intérieur de la gaine murale.
3. Insérer la nouvelle grille dans la gaine murale.
REMARQUE : Veiller à ce que le mot “Top” (sommet) soit
lisible depuis l’intérieur de la pièce.
4. Utiliser la grille comme un gabarit; marquer l’emplacement
des 2 trous de chaque côté de la gaine murale. Percer des
trous de ¹⁄₈" (3 mm) dans la gaine murale.
5. Fixer la grille arrière à l’aide des vis à tôle nº 8—32 (fournies).
Gaine murale de :
26³⁄₄" x 15³⁄₄" x 15" (68 cm x 40 cm x 38,1 cm),
27" x 16³⁄₄" x 16³⁄₄" (68,6 cm x 42,6 cm x 42,6 cm), ou
27" x 16³⁄₄" x 19³⁄₄" (68,6 cm x 42,6 cm x 50,2 cm)
Une telle gaine murale nécessite une grille arrière et des pièces
d'installation plus grandes que celles qui sont fournies avec ce
climatiseur. Consulter le fournisseur local pour obtenir un
ensemble de pièces adapté pour une gaine murale de cette taille.
REMARQUE : Si le nouveau climatiseur était installé dans une
gaine murale de cette taille sans utilisation de l’ensemble spécial,
le nouveau climatiseur subirait des dommages et la garantie ne
pourrait être honorée.
Installation de la grille de plastique
1. Découper la grille de plastique selon les dimensions
suivantes : largeur 26¹⁄₂" (67,3 cm)—hauteur 15¹⁄₂" (39,4 cm).
2. Placer la grille de plastique sur le rebord arrière de la gaine
murale, à l’intérieur de la pièce.
3. Si nécessaire, percer des trous de ¹⁄₈" dans la gaine murale.
Puis, placer les vis avec rondelle pour fixer la grille sur la
gaine murale.
A. Percer des trous de
¹⁄₈
" dans la gaine murale.
Insérer les 4 vis à tôle nº 8—32 (fournies) dans les
trous de la grille et dans la gaine murale.
A
A
OU
La page est en cours de chargement...
La page est en cours de chargement...
La page est en cours de chargement...
La page est en cours de chargement...
La page est en cours de chargement...
La page est en cours de chargement...
La page est en cours de chargement...
La page est en cours de chargement...
La page est en cours de chargement...
La page est en cours de chargement...
La page est en cours de chargement...
La page est en cours de chargement...
-
 1
1
-
 2
2
-
 3
3
-
 4
4
-
 5
5
-
 6
6
-
 7
7
-
 8
8
-
 9
9
-
 10
10
-
 11
11
-
 12
12
-
 13
13
-
 14
14
-
 15
15
-
 16
16
-
 17
17
-
 18
18
-
 19
19
-
 20
20
-
 21
21
-
 22
22
-
 23
23
-
 24
24
-
 25
25
-
 26
26
-
 27
27
-
 28
28
-
 29
29
-
 30
30
-
 31
31
-
 32
32


