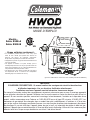
Coleman 2302 Series Le manuel du propriétaire
- Catégorie
- Chauffe-eau
- Taper
- Le manuel du propriétaire

SHEET 1 OF 1
Wichita, Kansas USA 67219
The Coleman Company, Inc.
COMPOSITE- NO
CRITICAL DIMENSION
cm3
REV.
MATERIAL:
SEE NOTES
SEE NOTES
1:1
23-OCT-15
Black
Program: InDesign CS6
Melvin H.
INSTRUCTION MANUAL - HWOD H2Oasis - US
Leo Y.
02
4010047124
SCALE:
NAME:
DATE: DRAWN BY: APPROVED BY: REVISION
FINISH
SPEC.:
DATE
NAME
ECN NO.
MODIFICATIONS
grams
g/cm3
This drawing contains proprietary information and trade secrets of The Coleman Company, Inc.
Unauthorized use or copying is prohibited.
METRIC
[INCH]
CHECKING IS COMPULSORY
VOLUME
01
23-OCT-15 Melvin H. 20050601NEW
MASS
DENSITY
GENERAL TOLERANCES
EXCEPT AS NOTED
0 TO 6mm = ±0.1
>6 TO 30mm = ±0.2
>30 TO 80mm = ±0.3
>80 TO 180mm = ±0.4
>180mm = ±0.5
ANGULAR = ± 3°
PART
NO.:
DO NOT PRINT THIS PAGE
Printing Notes:
Material: 20 Pound (US) or 80 GSM (International) bond paper, white
Ink: Black
Resolution: 150 DPI or above
Printing method: Offset Printing
Binding: Saddle Stitch
Folded size: 8.5 x 11 in (W x H)
02
14-DEC-15 Melvin H. 20054446
Added component “main power switch” and related instructions; added
instructions for draining water.

IMPORTANT
SAVE THESE INSTRUCTIONS - This manual contains important safety and operating instructions for use.
Read these instructions for use carefully.
Familiarize yourself with the appliance before connecting it to its gas container.
This instruction manual contains important information necessary for the proper assembly and safe use of the
appliance. Follow all warnings and instructions when using the appliance. If you have questions about assembly,
operation, servicing or repair of this product, please call Coleman on 1-800-835-3278 or TDD: 316-832-8707. Gas
cylinders shall be changed in a well-ventilated location, preferably outside away from people and any sources of
ignition, such as naked flames, pilot flames, electric heaters / equipment. If there is a leak on your appliance (smell
of gas) and you cannot stop the gas flow, remove the appliance to a well-ventilated location away from any ignition
source. Check for leaks using soapy water. Do not try to detect leaks using a flame.
- Outdoor use only -
• This portable and self-contained water heater is designed to
provide hot water for outdoor showering / cleaning tasks only.
Do not use the product to heat drinking water.
• This appliance is not designed to connect to garden hose
directly.
• This appliance is for point of use, for temporary water heating
and not for connection to a permanent inlet water connection
or for connection to a water distribution system to supply
multiple outlets.
• This appliance is designed to heat a water source up to about
30°C above ambient temperature (to a maximum of 122°F).
(For illustration purpose only, may look different from your model)
Instructions for Use
MODEL -
Series 2302-A
Series 2302-B
English ..............................2-12
Français ..........................13-25
Español ...........................25-34

2
Contents
General Safety Information 2-3
System Overview 3-4
To Set Up 4-6
Use and Operation 6-7
Helpful Hints 8
Storage 8
Maintenance 8
Chart of Indicators 9
Troubleshooting Guide 10
Technical Characteristics 10
Replacement Parts 10
Circuit Diagram 11
Warranty 12
General Safety Information
This manual contains important information about the assembly, operation
and maintenance of this water heater. General safety information is
presented in these first few pages and is also located throughout the
manual. Particular attention should be paid to information accompanied by
the safety alert symbol “
DANGER”, “ WARNING”, “ CAUTION”.
Keep this manual for future reference and to educate new users of this
product. This manual should be read in conjunction with the labeling on the
product.
Safety precautions are essential when any mechanical or propane fueled
equipment is involved. These precautions are necessary when using,
storing, and servicing. Using this equipment with the respect and caution
demanded will reduce the possibilities of personal injury or property
damage.
The symbols shown below are used throughout this manual. Always heed
these precautions, as they are essential when using any mechanical or
propane fueled equipment.
DANGER
DANGER indicates an imminently hazardous situation which, if not
avoided, will result in death or serious injury.
WARNING
WARNING indicates a potentially hazardous situation which, if not
avoided, could result in death or serious injury.
CAUTION
CAUTION indicates a potentially hazardous situation which, if not
avoided, may result in minor or moderate personal injury, or property
damage.
DANGER
If you smell gas:
1. Shut off gas to the appliance.
2. Extinguish any open flame.
3. If odor continues, keep away from the
appliance and immediately all your fire
department.
Failure to follow these instructions could result
in fire or explosion which could cause property
damage, personal injury or death.
WARNING
Do not store or use gasoline or other flammable
vapors and liquids in the vicinity of this or any
other appliance.
General Safety Information (continued)
DANGER
CARBON MONOXIDE
HAZARD
This appliance can produce
carbon monoxide which has
no odor.
Using it in an enclosed space
can kill you.
Never use this appliance in
an enclosed space such as a
camper, tent, car or home.
DANGER
Water temperature over
125°F (52°C) can cause
server burns instantly or
death from scalds.
Children, disabled and
elderly are at highest risk of
being scalded.
See instruction manual
before setting temperature
at water heater.
Feel water before bathing
or showering.
BURN
HOT
DANGER
EXPLOSION - FIRE HAZARD
•Never store propane near high heat, open flames, pilot lights, direct
sunlight, other ignition sources or where temperatures exceed 120
degrees F (49°C).
•Propane is heavier than air and can accumulate in low places. If you
smell gas, leave the area immediately.
•Never install or remove propane tank while heater is operating, near
flame, pilot lights, other ignition sources or while heater is hot to
touch.
•During operation, this product can be a source of ignition. Never
ignite or use the heater in spaces that contain or may contain volatile
or air-borne combustibles, or products such as gasoline, solvents,
paint thinner, dust particles or unknown chemicals. Minimum
clearances from combustible materials: 12 inches (30.5 cm) from
sides & 48 inches (122 cm) from the top.
•Provide adequate clearances around air openings into the product.
Do not obstruct the flow of combustion and ventilation air.
WARNING
Not for home or recreational vehicle use.
We cannot foresee every use which may be made of our products.
Check with your local fire safety authority if you have questions
about use.
Other standards govern the use of fuel gases and heat producing
products for specific uses. Your local authorities can advise you about
these.
•Neverrefilldisposablecylinders.
•Usethepresetregulatorthatisinstalledinthewaterheater.Donot
attempt to adjust.

3
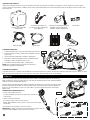
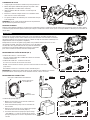
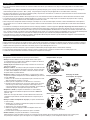
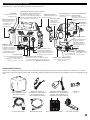
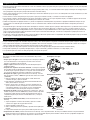
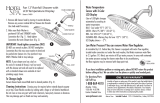
Storage compartment for recharger cord
& match extension–
12V auto recharger and 120V household
recharger cords are stored here (120V
charger Available on model 2302-A only)
Shower (varies by model)-
Detachable handheld shower
Fuse Socket -
Replaceable fuse is
installed here.
Shower Arm–
Adjustable shower
arm that holds the
shower in place.
Power socket for pump –
Power the pump by
connecting the pump
power cord to this socket.
Regulator –
where the gas cylinder
is to be connected to.
Match Extension –
Use match extension
to hold and insert a
lighted match through
flame window.
Display panel (varies by model)-
A display that shows the status of
the appliance, like water temperature,
error codes etc. See section “Chart of
Indicators”
Control knob – press to
turn in a counterclockwise
direction. Adjust knob to
desired water temperature.
Water outlet –
connects to shower.
Water inlet –
connects to pump.
Recharging Port –
plug 12V and 120V
Recharger cords
Main Power Switch–
(Available on 2302-A
only)
General Safety Information (continued)
DANGER
Failure to comply with the precautions and instructions provided with
this product can result in death, serious bodily injury and property loss
or damage from hazards of fire, explosion, burn, asphyxiation, and/or
carbon monoxide poisoning.
Only persons who can understand and follow the instructions should
use or service this product.
If you need assistance or information such as an instruction manual or
labels, contact The Coleman Company, Inc.
WARNING
When using electrical products, basic precautions should always be
practiced including the following:
1. READ AND FOLLOW ALL SAFETY INSTRUCTIONS.
2. Read and follow all instructions that are on the product or provided
with the product.
3. For a cord-connected or direct plug-in power unit, do not use an
extension cord.
4. Do not install or use within 10 feet (3 m) of a pool.
5. Do not use in a bathroom.
WARNING: Risk of Electric Shock. When used outdoors, install only
to a covered Class A GFCI protected receptacle that is weatherproof
with the power unit connected to the receptacle. If one is not provided,
contact a qualified electrician for proper installation. Ensure that the
power unit and cord do not interfere with completely closing the
receptacle cover.
WARNING
•This product is fueled by propane gas. Propane gas is invisible,
odorless, and flammable. An odorant is normally added to help
detect leaks and can be described as a “rotten egg” smell. The
odorant can fade over time so leaking gas is not always detectable
by smell alone.
•Propane gas is heavier than air and leaking propane will sink to
the lowest level possible. It can ignite by ignition sources including
matches, lighters, sparks or open flames of any kind many feet
away from the original leak. Use only propane gas set up for vapor
withdrawal.
•Gas cylinders must be stored outdoors in a well ventilated area out of
the reach of children, any indoor storage shall comply with
AS/NZS 1596.
•Disconnect propane before storing the heater.
WARNING
SERVICE SAFETY
•Keep all connections and fittings clean. Inspect propane cylinder and
propane connections for damage before attaching.
•During set up, check all connections and fittings for leaks using
soapy water. Never use a flame. Bubbles indicate a leak. Check that
the connection is not cross-threaded and that it is tight. Perform
another leak check. If there is still a leak, remove the cylinder and
contact Coleman for service or repairs.
•Use for water heating only. Never alter in any way or use with any
device or part not expressly approved by Coleman.
•Always use in an upright position.
WARNING: Never leave heater unattended when hot or in use. Do not touch metal parts and venting holes of the heater, which may get very hot when
in use. Keep out of reach of children. THIS APPLIANCE IS NOT INTENDED FOR THE SUPPLY OF DRINKING WATER.
System Overview
Thank you for purchasing Coleman’s Hot Water on Demand
TM
unit.
Before You Go
Battery compartment –
12 volt / 2000 mAh
rechargeable Li-Ion battery
is located in compartment.
Battery operates the pump
& circuitry.
Flame Window –
check status of pilot
light and burner flame,
or insert a lit match
through this window
to light the heater
manually.
USB Ports x 2 –
(Available on
model 2302-A only)
For charging USB
compatible devices.
(voltage: 5V each;
current: ≤1A total)
Air Vents –
Do not block air
vents.

4
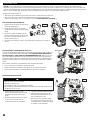
UNPACKING THE PRODUCT.
Unpack your new water heater from the carton and make sure that all of the parts are included. If you find that one of the components is missing, please
contact Coleman for a replacement: 1-800-835-3278 or TDD: 316-832-8707. Make sure to remove the protective film on the display panel on the front of the
heater before use.
5-Gallon (19 L) Collapsible
Water Carrier
12 Volt Auto Recharger Cord
(Located in storage compartment
of the appliance)
120 Volt Household Recharger Cord
(available on model 2302-A only,
located in storage compartment)
Pump Assembly Shower Hose Mesh Hose Carrybag
Shower
(varies by model)
Shower Arm
CHARGING THE BATTERY
1. Charge the battery before using your water heater for the first time.
2. Turn the main power switch to “OFF” position (available on model
2302-A only)
3. (Fig. 1) Remove the rubber flap covering the charging port.
4. Plug either 12 Volt Auto Recharger Cord or 120 Volt Household
Recharger Cord into unit and the power source.
5. See indicator chart for battery status / charging status.
NOTE: Please charge the battery for 6 hours at the first time to
maximize the performance of the battery.
CLEANING THE PRODUCT
Clean before first use. It is strongly recommended that you clean the heater prior to using for the first time. Follow the simple steps on page 7 before you leave
home, and then clean at least once a year or when the hose becomes discolored with a white calcium build up.
To Set Up
Select a level, sturdy surface for your water heater. A picnic table or camp table is ideal. Do not operate Hot
Water on Demand
TM
unit from a position directly on the ground. (This allows water to drain, preventing damage
while the unit is off in freezing temperatures.)
Fill the 5-gallon (19 L) collapsible water container with water. The product may use water from a lake or stream,
but make sure that there’s no debris or sand in the water, which may clog the water system and damage the
product. It’s recommended to use a piece of cloth as filter to cover the opening of the water carrier before
filling in water.
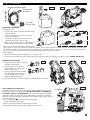
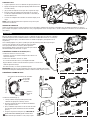
SHOWER HEAD CONNECTION (FIG. 2)
•Shower end: threaded connector
Screw the threaded connector on the shower hose onto the end
of the shower.
•Heater end: sleeved connector
A - Pull up & hold the sleeve on the connector.
B & C - While holding the sleeve, push the connector into water outlet
until it stops.
D - Release the sleeve and the connector is locked.
IMPORTANT: To unplug the shower hose from the heater, pull up the sleeve to
unlock first, while holding the sleeve, pull out the connector.
A B
C
D
Fig. 2
THIS SIDE UP
Fig. 1
OFF
1
2

5
To Set Up (continued)
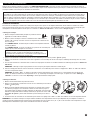
WATER PUMP CONNECTION
•Pump end (Fig. 3):
1. Place the water carrier at a level below the water heater
for proper drainage.
2. Screw the water pump to the opening of the water
container & hand tighten.
3. Lay the water container on its side so the pump is
towards the bottom of the container (step 2).
4. Make sure to rotate the pump where “THIS SIDE UP” is
facing upward so pump will prime and water will flow.
TIP: You can also submerge The Water Pump into an open
water container such as a cooler (cooler not included). Or if available, you can connect a garden hose directly to the unit. Ensure water flow is not too high,
this will affect the ability of the unit to heat water and could possibly force the outlet connection to disconnect. Conversely ensure water flow is not too low,
this can cause a low flow error. Ensure water is flowing before lighting the unit and adjust flow as required.
•Heater end (Fig. 4):
1. Plug the pump power jack into the pump power socket on the heater.
2. Plug the sleeved connector of the pump into the water inlet on the heater. (Follow same steps A, B, C, D given in section “SHOWER CONNECTION”)
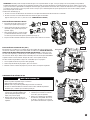
SHOWER ARM INSTALLATION
1. Dismantle The Shower Arm by screwing off
the adjustment knob (Fig. 5).
2. Install The Shower Arm to the rail on
heater, and tighten by screwing on the
adjustment knob. (Fig. 6)
3. Loosen the Adjustment Knob and adjust
the angle & height of The Shower Arm,
once the desired position is reached,
tighten the adjustment knob (Fig. 7).
4. After the Shower Arm is installed, you may put The Shower onto The Shower Arm.
GAS CYLINDER INSTALLATION (FIG. 8)
This appliance shall only be used with 1 lb. Coleman Propane LPG disposable gas cylinders
certified to DOT-39 NRC 232/290 M1110.
IT MAY BE HAZARDOUS TO ATTEMPT TO
FIT OTHER TYPES OF GAS CONTAINERS.
Check that all seals between the appliance
and the gas cylinder are in place and in good condition before connecting the gas cylinder.
Remove all transit protection material. DO NOT move the appliance during operation. After use,
turn off the control knob.
Do not use MAPP gas cylinders or any other fuel except propane.
1. Turn the control knob to OFF position.
2. Remove cap from the propane gas cylinder but do not discard.
3. While holding the propane cylinder upright, thread it into The Regulator.
A B
C
D
THIS SIDE UP
THIS SIDE UP
To water
carrier / tank
To water inlet
on heater
To power socket on heater
THE WATER PUMP
Fig. 3
Fig. 4
Fig. 5 Fig. 6 Fig. 7
OFF
REGULATOR
Fig. 8
THIS SIDE UP

6
To Set Up (continued)
GAS LEAK CHECK
WARNING
•Perform leak test outdoors.
•Extinguish all open flames.
•NEVER leak test when smoking.
•Do not use Hot Water on Demand
TM
unit until connection has been leak tested and does
not leak.
1. Make 2 to 3 oz. (56~85 g) of leak check
solution (one part liquid dishwashing
detergent and three parts water).
2. Apply several drops of solution at the
connection between the propane cylinder
and the regulator.
3. Bubbles indicate a leak.
4. Check that the connection is not cross-
threaded and that it is tight.
5. Perform another leak check. If there is still
a leak, remove the cylinder and contact
Coleman for services or repair.
Use and Operation
Clean before first use (see “CLEANING INSTRUCTIONS” next page). It is strongly recommended that you clean the heater prior to using for the first time.
Follow these simple steps before you leave home, and then clean at least once a year or when the hose becomes discolored with a white calcium build up.
CAUTION: accessible parts may be very hot. Keep young children away, USE OUTDOORS ONLY. Must only be operated on a horizontal surface. Not suitable
for marine environments. Do not modify this appliance. Annual service by an authorized person is recommend. Or if any of the following conditions are
noticed; incomplete ignition, appreciable yellow tipping, carbon deposition, lifting, floating, lighting back or objectionable odor. DO NOT use this appliance
if it has damaged or worn seals. DO NOT use this appliance if it is leaking, damaged or does not operate properly. To check if the gas cylinder is empty,
disconnect the cylinder from the appliance and shake from side to side. If there is no sound or movement of liquid, the cylinder is empty.
LIGHTING THE HEATER
The water heater must not be exposed to flammable vapors or liquids during lighting. Before lighting the heater, please make sure that the water supply is
ready, the shower connection & pump connection is setup, the gas cylinder is installed and the rechargeable battery is not running low (check battery status by
referencing the section “Chart of Indicators” or see section “Charging the Battery”).
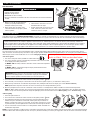
• Electronic Ignition
1. Turn on the main power switch (available on model 2302-A only).
2. Turn on the electrical system by switching the power button “ON”, which is located
on the display panel. When powered on:
On MODEL 2302-A - battery indicator is lit and the current environment temperature
is displayed.
On MODEL 2302-B - a flashing green light on Display Panel indicates that the
electrical system is powered on.
IMPORTANT: When powered on, the pump starts to pump & water starts to run,
before the heater being ignited. To conserve water usage, get yourself familiar
with the complete operation instructions before you switch the power on.
3. Press and turn the control knob counter-clockwise to the ignition position “ PILOT”.
4. Press and hold (7~10 seconds) the control knob to start the electronic ignition sequence, you will hear the clicking sound.
5. While pressing control knob, check whether the pilot light is lit by reading the indicator on the display (see section Chart of Indicators).
NOTE: Ignition takes longer time at the first use for the reason that gas runs through and fills the gas line.
6. When the pilot light is lit, then turn the control knob counter-clockwise to a setting between “MAX” and “MIN” for a desired water temperature.
NOTE: At “MAX” setting, the heater can increase the water temperature by about 30°C (If the source water temperature is 59°F, the heater will heat the
water to 113°F). If the electronic ignition fails to light the pilot light, please refer to the below section “Match Lighting” or the “Troubleshooting” section.
• Match Lighting
1. Switch the power button on.
2. Press and turn the control knob counter-clockwise to the ignition position “
PILOT”.
3. Put a lighted long wooden match near the burner by inserting it through the flame
window, then press and hold the control knob until the pilot is lit (see indicator on
display). If a long-reach match is not accessible, use the match extension (see section
“System Overview”) to hold a lighted match and feed the match through the window.
4. Turn the control knob counter-clockwise to a setting between “MAX” and “MIN” for a
desired water temperature.
NOTE: It is typical to experience a slight change in water flow & temperature when moving spray adapter from high to low heights. The heater will automatically
shut off the burner when water temperate exceeds 125°F (52°C). Should overheating occur or the gas supply fail to shut off, turn off the control knob manually.
PRESSE
PRESSE
PRESSE
Varies by model
PRESSE
PRESSE
Fig. 9
ON
You may use either method to light the heater,
Electric or Match. Both are described below.

7
Use and Operation (continued)
SHUTTING OFF THE HEATER
1. Turn the control knob clockwise to the “OFF” position.
2. Switch off the power button on the display panel.
3. Turn the main power switch to “OFF” position (available on model 2302-A only).
IMPORTANT: User must not change the order of the shut-off-operation sequence. Alwasy shut off the burner and
gas supply by turning the control knob to the “OFF” position first, then switch off the power button.
STOPPING THE HEATER TEMPORARILY
Due to safety reasons, there’s no switch to pause the water flow while taking a shower. You can only shut off the main burner by turning the control knob
clockwise back to the ignition position “
PILOT” to conserve gas, the pilot light remains lit, the pump & water keeps running. To resume heating the water, turn
the control knob counter-clockwise to a setting between “MAX” & “MIN” position.
Or you may shut off the heater completely by following steps in above section “Shutting Off the Heater”, then restart the whole ignition process illustrated in
section “Lighting the Heater”.
CLEANING INSTRUCTIONS
1. In a clean container mix two-gallons (7.5 L) of water with 12
oz. (340 g) of calcium, lime, and rust remover (available at the
cleaner section of hardware, general merchandise and food
stores).
2. Place the pump and shower in the container with the water/
solution. The label “This Side Up” on pump should be facing up.
3. Start the heater by following instructions in section “Lighting the
Heater” and turn the control knob to a “warm” setting.
4. Circulate the water/solution through the heater for 2 minutes,
then turn off heater by turning the knob clockwise to the “off”
position and switching off the power button on display panel.
5. Dispose of the cleaning solution in a sink or other drain, do not
dump on the ground.
6. Fill container with 2.4 gallon (9 L) of clean water.
7. Place the pump and shower in the container with the water.
8. Turn the heater on and circulate the clean water through the
water heater for 2 minutes at the “cool” setting,
9. Turn the heater off.
10. Repeat steps 6-9 with another batch of clean water.
11. Clean the screen at the pump water inlet to remove the residue that may clog the pump. See maintenance section on page 8 for instructions.
CHARGING USB COMPATIBLE DEVICES (Available on model 2302-A only)
You may charge 2 mobile phones at the same time by connecting the phones to the USB ports on the
heater. The capacity of the rechargeable battery inside the heater is 2000 mAh, which could charge a
1570 mAh mobile phone (iPhone 5s) one complete cycle.
IMPORTANT: USB ports only work when the Main Power Switch is turned on. Do not connect
devices to the USB ports on the heater when the heater is in operation or is still hot to touch. Do
not connect devices to the USB ports on the heater if there’s a “LOW BATTERY” indication on the
Display Panel (see chart of indicators in section
“Chart of Indicators”). Do not charge devices whose battery capacity exceeds 1700 mAh.
CHANGING TEMPERATURE DISPLAY
(available on model 2302-A only)
Current water temperature is shown on Display
Panel, cycle through the Celsius / Fahrenheit
display by pressing the
button repeatedly
on the Display Panel.
CHANGING SHOWER SPRAYS
(available on model 2302-A only)
The shower features aerated, full and
fine sprays. Change the spray by rotating
the dial on the shower head. You may
shut-off the water by rotating the dial on
shower head to OFF position.
NOTE: When the heater is powered on, turning the dial on the shower
head to “OFF” position will trigger the LOW WATER FLOW warning and
shut off the unit. Please ensure shower head is open before restarting.
PRESSE
PRESSE
Cool
Warm
Water / solution cycle
Clean water cycle
OFF
IGNITE
IGNITE
OFF
OFF

8
Helpful Hints
•There’s a hook-&-loop strap on the back of the shower, you may tie the shower onto an overhead object (available on model 2302-A only).
•If you do not intend to use the water heater for a period of time (3 days or longer), it is strongly recommended to turn the main power switch to ‘OFF’. This
will prolong the charge of your battery (applicable to model 2302-A only).
•Never place the shower 6.5 feet (2 m) above the heater, otherwise the water flow may drop to a warning level triggering the shut-off mechanism.
•Never twist or bend hoses that the water runs through, which will lead to a drop of water flow and trigger the shut-off mechanism.
•The heater will typically make 40 gallons (151 L) of warm or hot water on one full battery charge and a 16.4 oz. (464 g) cylinder of propane. Make sure to pack
sufficient fuel for the duration of your outing.
•Thanks to the integrated mechanical and electrical over-temperature shut-off devices, the burner will be shut off immediately when the water temperature
reaches 122°F at the water outlet on the heater. Meanwhile the pump will continue to pump for 30 seconds, to cool down the heater.
•The water heater is ideal for many outdoor cleaning tasks. Coleman supports the Leave No Trace Principles that encourage minimal impact to the
environment while camping. You’ll find that less soap is necessary with warm water than with cool or cold water, so use small amounts of biodegradable
soap. Please dispose of your gray water responsibly. Wash yourself or dishes 200 feet (61 m) away from streams or lakes to avoid soap run-off finding its way
to a natural water source. Contact your campground or park to learn about their specific gray water disposal policy.
•Continuous operation of water heater at warm setting for 20 minutes may cause the propane cylinder to freeze up. Let the cylinder thaw or replace with a
fresh propane cylinder.
Storage
• Remove propane cylinder from heater after use and before transporting or storing the heater. Always store propane outdoors.
• Drain water from hoses and unit before storing: Disconnect hoses and lean product toward the hose connection side. Move the unit left to right while leaning
until water drainage stops.
• Recharge the battery before storing. Turn off the main power switch (applicable to model 2302-A only).
• For long term storage, clean and dry the heater and store indoors in a clean and dry location.
•Coleman’s padded carry case is ideal for storing and transporting.
Maintenance
This appliance must only be serviced by an authorized person.
• Clean water route at least once a year or whenever a white build up
appears in the hose. Refer to Cleaning Instructions on page 7 of this
manual.
• Charge battery immediately after each outing to reach optimum
performance.
• Cleaning heater exterior - Clean only when the unit is off and cool to
touch, and the gas cylinder is removed. Wipe clean with a soft cloth
damped with diswashing solution. Never use abrasives.
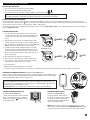
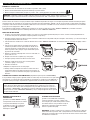
• Replacing battery (see illustrations on the right)- Use only a Coleman
®
replacement battery 2000027851 (12 Volt, 2000 mAh Li-Ion battery).
1. Remove the screw from the battery cover on the right side of your water
heater and remove the cover.
2. Pull the battery out from storage compartment and unplug the
connectors.
3. Replace the battery and connect the connectors, make sure the circular
pin and the rectangular pin on male connector are correctly aligned with the
circular hole and rectangular hole on the female connector. Replacement
batteries are available to order from Coleman.
• Replacing fuse (see illustrations on the right)- Use only a Coleman
®
replacement fuse 2000027844 (current rating: 5A).
Remove the screw from the fuse socket right above the battery
compartment, discard the defective fuse and replace with a new one.
• Cleaning pump screen (see illustrations on the right)-
1. Grip the nozzle at the end of the pump and rotate counter-clockwise to
screw it off.
2. Separate the nozzle and the ring cap.
3. Use your finger to push the pump screen out from the nozzle and clean
the screen.
4. Then reverse the steps to put the parts together.
• Checking flame (see illustrations on the right)-
Check flame by looking into the flame window on the front panel of the
appliance. A good flame should be blue with a yellow tip. Some yellow tips
on flames up to 1 inch in length are acceptable as long as no carbon or
soot deposits appear.
Pump Screen Cleaning
Fuse Replacement
Battery Replacement
Flame Check
BadGood
Burner Hole
Yellow
Yellow
Blue
Blue
Sealing
O-ring

9
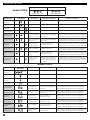
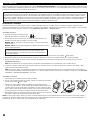
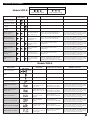
Chart of Indicators
MODEL 2302-B
Steady light: Flashing light:
/ /
(Red / Yellow / Green)
/ /
(Red / Yellow / Green)
Explanation Display of Indicators Trigger System Reaction Corrective Action
Battery being charged
Battery fully charged
Electrical system is
turned on
Pilot Light is lit
Hot water warning
(chamber)
Water temperature at heat
exchanger exceeds 131°F.
Gas will be cut off immediately. Pump will
be shut off in 30 seconds.
Turn off the control knob and the power button.
See troubleshooting section and solve the
problem, then restart the ignition sequence.
Hot water warning
(water outlet)
Water temperature at water
outlet exceeds 122°F.
Gas will be cut off immediately. Pump will
be shut off in 30 seconds.
Turn off the control knob and the power button.
See troubleshooting section and solve the
problem, then restart the ignition sequence.
Tilt warning
Heater is tilted more than 30
degrees.
Gas & pump will be shut off immediately.
Turn off the control knob and the power button.
See troubleshooting section and solve the
problem, then restart the ignition sequence.
Flames out warning
Flames out / pilot light out Gas & pump will be shut off immediately.
Turn off the control knob and the power button.
See troubleshooting section and solve the
problem, then restart the ignition sequence.
Low battery warning
In-house battery voltage is
lower than 9.8V.
Gas & pump will be shut off immediately.
Turn off the control knob and the power button.
See troubleshooting section and solve the
problem, then restart the ignition sequence.
Low water flow
warning
Water flow rate is lower that
0.4 gallon (1.5 L)/min.
2 seconds after the first warning is
signaled, system will detect the flow rate
again; if the flow rate is still lower than the
specified level, gas & pump will be shut off.
Turn off the control knob and the power button.
See troubleshooting section and solve the
problem, then restart the ignition sequence.
MODEL 2302-A
Explanation Display of Indicators Trigger System Reaction Corrective Action
Battery being charged
(animated)
Battery fully charged
Pilot Light is lit
Water is running
Hot water warning
(chamber)
Water temperature at heat
exchanger exceeds 131°F.
Gas will be cut off immediately. Pump will be
shut off in 30 seconds.
Turn off the control knob and the power button.
See troubleshooting section and solve the
problem, then restart the ignition sequence.
Hot water warning
(water outlet)
Water temperature at
water outlet exceeds
122°F.
Gas will be cut off immediately. Pump will be
shut off in 30 seconds.
Turn off the control knob and the power button.
See troubleshooting section and solve the
problem, then restart the ignition sequence.
Tilt warning
Heater is tilted more than
30 degrees.
Gas & pump will be shut off immediately.
Turn off the control knob and the power button.
See troubleshooting section and solve the
problem, then restart the ignition sequence.
Flames out warning
Flames out / pilot light out Gas & pump will be shut off immediately.
Turn off the control knob and the power button.
See troubleshooting section and solve the
problem, then restart the ignition sequence.
Low battery warning
In-house battery voltage is
lower than 9.8V.
Gas & pump will be shut off immediately.
Turn off the control knob and the power button.
See troubleshooting section and solve the
problem, then restart the ignition sequence.
Low water flow
warning
Water flow rate is lower
that 0.4 gallon (1.5 L)/min.
Gas & pump will be shut off 2 seconds later
Turn off the control knob and the power button.
See troubleshooting section and solve the
problem, then restart the ignition sequence.

10
Troubleshooting Guide
Symptom Possible Cause Solution
Hot water warning
Water tank/carrier is running out of water Fill water tank/carrier with water.
Environment temperature is high Turn control knob to a cooler setting.
Temperature sensor defective Contact Coleman Service Center and return the product to Coleman when necessary.
Tilt warning
Heater is tilted more than 30 degrees. Gas & pump will be shut off immediately.
Sensor defective Contact Coleman if under warranty.
Flames out warning
Flames blown out by strong wind / pilot light is
out
Do not use in strong wind condition. Turn off the heater completely and restart the ignition
sequence.
Flame detection module defective Contact Coleman if under warranty.
Low battery warning
Battery voltage lower than 9.8V. Recharge the battery.
Defective battery Contact Coleman if under warranty.
Low water flow warning
Pump is not in correct position Rotate pump so “THIS SIDE UP” is facing upward.
Water tank/carrier out of water Fill water tank/carrier with water.
Pump inlet screen clogged Clean the screen, seen instructions given in maintenance section.
Hose twisted / kinked Straighten hose.
Battery lead disconnected Remove battery cover & reinstall lead.
Pump power cord disconnected Plug cord into power socket on heater.
Low battery Recharge the battery.
Flow rate sensor defective Contact Coleman if under warranty.
Burner will not light
Propane cylinder empty Replace cylinder.
Propane cylinder frosted Replace cylinder and reuse after thawing.
Fuse defective Refer to maintenance section and replace the fuse.
Electronic circuit defective Contact Coleman if under warranty.
Water leakage
Connectors cross-threaded;
Sleeved-connectors were not locked into place
Reconnect the connectors.
Read instructions for connecting sleeved connectors and reconnect the connectors.
Defective seal or break
Replace sealing components (O-rings) or send to Coleman when necessary
Hose turns white or
discolors inside
Calcium buildup Clean heater (refer to section “cleaning instructions” on page 7)
Battery won’t hold a Charge
Defective Battery Contact Coleman if under warranty.
Main power switch is neglected See Helpful Hints section on how to use the main power switch
No display
Battery lead disconnected Remove battery cover & reinstall lead
Fuse defective Refer to maintenance section and replace the fuse.
Electronic circuit defective Contact Coleman if under warranty.
Low battery Recharge the battery.
Main power switch at “OFF” position (for model
2302-A only)
Turn on the main power switch
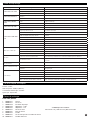
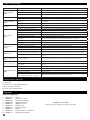
Technical Characteristics
Pressure: 2.8 kPa
Injector size: 0.026 in (0.66 mm)
Total gas consumption: 21.0 MJ/h
Gas type: Propane LPG
Replacement Parts
Parts List
1. 2000027853 Shower
2. 2000027851 Li-Ion Battery
3. 2000027849 Pump Assembly
4. 2000027850 Adapter – 120V
5. 2000027848 Adapter – 12V
6. 2000027847 Water Carrier
7. 2000027845 Shower Arm
8. 2000027844 Fuse
9. 2000027842 Shower Assembly Carry bag
10. 2000027937 Shower Hose
- Contact Coleman -
www.coleman.com | 1-800-835-3278 | TDD 316-832-8707
Contact Coleman if
under warranty.
Use Match Lighting instructions in the USE
AND OPERATION section. If still not
lighting, contact Coleman if under warranty.
2000028448
2000028470
2000014870
2000028606

11
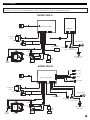
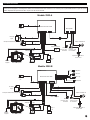
Circuit Diagram
CAUTION: Label all wires prior to disconnection when servicing controls. Wiring errors can cause improper and dangerous operation. Verify proper operation
after servicing. This connection is for low-volatage battery or direct current only. Do not connect to 120 or 240 Volts AC input.
MODEL 2302-A
MODEL 2302-B
2
L
N
PASS
2
2
2
7
2
2
7
2
2
2
3
L
N
PASS
2
2
2
2
2
2
2
2
3
2
2
2
Water Flow Sensor
Water Flow Sensor
Yellow LED
Green LED
Red LED
Power Switch
PH01 Display
PH01 Power Supply Module
PH01 Power Supply Module
Shell of Appliance
Shell of Appliance
Shell of
Appliance
Shell of
Appliance
USB
Module
Water
Pump
Water
Pump
Fuse
Main Power Switch
Main Power Switch
Fuse
Tilt Protection
Circuit
Tilt Protection
Circuit
Over-heat
Protection Circuit
Over-heat
Protection Circuit
Temperature Senor at
Water Outlet
Temperature Senor at
Water Outlet
Igniting
Switch
Igniting
Switch
Pulse Ignitor
Pulse Ignitor
Rechargeable
Battery
Rechargeable
Battery
Battery
Charger
Battery
Charger
Gas
Valve
Gas
Valve
Thermal
Coupler
Thermal
Coupler

Three Year Limited Warranty
The Coleman Company, Inc. (“Coleman”) warrants that for a period of three (3) years from the date of original retail purchase, this product will be free from
defects in material and workmanship. Coleman, at its option, will repair or replace this product or any component of the product found to be defective during
the warranty period. Replacement will be made with a new or remanufactured product or component. If the product is no longer available, replacement may be
made with a similar product of equal or greater value. This is your exclusive warranty.
This warranty is valid for the original retail purchaser from the date of initial retail purchase and is not transferable. Keep the original sales receipt. Proof of pur-
chase is required to obtain warranty performance. Coleman dealers, service centers, or retail stores selling Coleman
®
products do not have the right to alter,
modify or in any way change the terms and conditions of this warranty.
What This Warranty Does Not Cover
This warranty does not cover normal wear of parts, parts that are not genuine Coleman
®
parts, or damage resulting from any of the following: negligent use
or misuse of the product; commercial use of the product; use contrary to the operating instructions; disassembly, repair or alteration by anyone other than
Coleman or an authorized service center. Further, the warranty does not cover Acts of God, such as fire, flood, hurricanes and tornadoes. Warranty void if dam-
age to the product results from the use of a part other than a genuine Coleman
®
part.
COLEMAN SHALL NOT BE LIABLE FOR DEFECTS THAT ARE CAUSED BY THE USE OF UNAUTHORIZED PARTS OR SERVICE. COLEMAN SHALL NOT BE
LIABLE FOR ANY INCIDENTAL OR CONSEQUENTIAL DAMAGES CAUSED BY THE BREACH OF ANY EXPRESS OR IMPLIED WARRANTY OR CONDITIONS.
EXCEPT TO THE EXTENT PROHIBITED BY APPLICABLE LAW, ANY IMPLIED WARRANTY OF MERCHANTABILITY OR FITNESS FOR A PARTICULAR
PURPOSE IS LIMITED IN DURATION TO THE DURATION OF THE ABOVE WARRANTY OR CONDITIONS. SOME STATES, PROVINCES, OR JURISDICTIONS
DO NOT ALLOW THE EXCLUSION OR LIMITATION OF INCIDENTAL OR CONSEQUENTIAL DAMAGES OR LIMITATIONS ON HOW LONG AN IMPLIED
WARRANTY LASTS, SO THE ABOVE LIMITATIONS OR EXCLUSION MAY NOT APPLY TO YOU. THIS WARRANTY GIVES YOU SPECIFIC LEGAL RIGHTS,
AND YOU MAY ALSO HAVE OTHER RIGHTS THAT VARY FROM STATE TO STATE OR PROVINCE TO PROVINCE.
How to Obtain Warranty Service
Your product must be under warranty in order to obtain warranty service. If your product is defective and is within your warranty period, contact us at 1-800-
835-3278 (TDD 1-316-832-8707) in order to receive a return authorization. Do not return product to Coleman without authorization. You will be directed to
attach a tag to the product that includes your name, address, daytime telephone number and description of the problem. Include a copy of the original sales
receipt. Carefully package the product and send insured by UPS, FedEx Ground or Parcel Post with shipping and insurance prepaid to:
For products purchased in the United States:
The Coleman Company, Inc.
3600 North Hydraulic Wichita, KS 67219
U.S.A.
For products purchased in Canada:
Sunbeam Corporation (Canada) Limited
DBA Jarden Consumer Solutions
20B Hereford Street
Brampton, ON L6Y 0M1
The cost of transporting the product to Coleman for warranty service is the responsibility of the purchaser. Do not mail products with fuel in tanks, or with dis-
posable propane cylinders. DO NOT RETURN THIS PRODUCT TO THE PLACE OF PURCHASE. If you have any questions regarding this warranty please call
1-800-835-3278 or TDD 1-316-832-8707 in the United States or 1-800- 387-6161 in Canada.
Warranty

13
IMPORTANT
CONSERVER CES DIRECTIVES - Ce manuel contient des consignes de sécurité et des directives
d’utilisation importantes. Lire ces directives d’utilisation attentivement.
Familiarisez-vous avec l’appareil avant de le brancher à une source de gaz.
Ce manuel d’instruction contient des renseignements importants nécessaires pour assurer un montage approprié
et une utilisation sécuritaire de l’appareil. Respecter tous les avertissements et toutes les directives pour utiliser cet
appareil. Si vous avez des questions concernant le montage, le fonctionnement, l’entretien ou la réparation de ce
produit, veuillez communiquer avec Coleman au 1-800-835-3278 ou sur la ligne ATS suivante: 316-832-8707. Les
bonbonnes de gaz doivent être changées dans un endroit bien aéré, préférablement à l’extérieur et à l’écart des
gens et des sources d’allumage, comme des flammes vives, des flammes de pilote et des équipements électriques
de chauffage. En cas de fuite dans l’appareil (odeur de gaz) et qu’il est impossible de couper le débit de gaz,
déplacer l’appareil dans un endroit bien aéré, à l’écart de toute source d’allumage. Utiliser de l’eau savonneuse pour
détecter toute fuite. Ne pas essayer de détecter une fuite à l’aide d’une flamme.
- Usage extérieur seulement -
• Ce chauffe-eau portatif autonome a été conçu pour
fourni de l’eau chaude pour prendre des douches ou
effectuer des tâches de nettoyage uniquement.
Ne pas utiliser le produit pour chauffer de l’eau à boire.
• Cet appareil n’a pas été conçu pour être branché directement
à un tuyau de jardin.
• Cet appareil est destiné à un point d’usage, pour le
chauffage temporaire d’eau, et non pas pour être relié à une
entrée d’eau permanente ou un système d’alimentation en
eau permettant d’alimenter plusieurs sorties.
• Cet appareil a été conçu afin de chauffer de l’eau jusqu’à
une température de 30 °C au-dessus de la température
ambiante (jusqu’à un maximum de 122°F).
(pour fins d’illustration seulement, votre modèle pourrait être différent)
MODE D’EMPLOI
Modèle -
Série 2302-A
Série 2302-B

14
Contenu
Renseignements généraux sur la sécurité .14-15
Vue d’ensemble du système ........................ 16-17
Installation .....................................................17-18
Utilisation et fonctionnement ....................... 19-20
Astuces utiles ................................................ 21
Entreposage .................................................21
Entretien ........................................................21
Tableau des indicateurs ...............................22
Guide de dépannage ....................................23
Caractéristiques techniques ........................23
Pièces de rechange ......................................23
Schéma de circuit .........................................24
Garantie ..........................................................25
Renseignements généraux sur la sécurité
AVERTISSEMENT
Ne pas entreposer ou utiliser d’essence ou
d’autres vapeurs et liquides inflammables à
proximité de cet appareil ou de tout autre appareil.
DANGER
DANGER RELATIF AU
MONOXYDE DE CARBONE
Cet appareil peut générer du
monoxyde de carbone, qui
est inodore.
L’utiliser dans un espace clos
peut vous tuer.
Ne jamais utiliser cet appareil
dans un espace clos, comme
une autocaravane, une tente,
une voiture ou une résidence.
DANGER
L’eau à une température
excédant 125 °F (52 °C)
peut causer des brûlures
graves sur le champ,
voire le décès suite à
l’ébouillantage.
Les enfants, les personnes
invalides et les personnes
âgées sont plus à risque
d’ébouillantage.
Se reporter au mode
d’emploi avant de régler la
température du chauffe-
eau.
Vérifier la température
avant de se baigner ou de
se doucher.
CHAUD
BRÛLURE
Ce manuel contient des renseignements importants quant à l’assemblage,
au fonctionnement et à l’entretien du produit et du système. Des généralités
de sécurité sont présentées dans les premières pages puis un peu partout
dans le manuel. Faites tout particulièrement attention quand vous voyez ces
symboles: «
DANGER», « AVERTISSEMENT», « ATTENTION».
Gardez ce manuel pour le consulter au besoin et pour apprendre aux
nouveaux utilisateurs à se servir de l’appareil. Le manuel devrait être
compulsé de concert avec les étiquettes apposées sur le produit.
Des précautions de sécurité sont indispensables en présence de tout
appareil mécanique ou à propane. De telles précautions sont nécessaires
pour l’utilisation, le rangement et l’entretien. Utiliser cet appareil avec tous
les soins qui lui sont dus réduira les risques de blessures corporelles ou de
dommages matériels.
Les symboles illustrés ci-après sont régulièrement employés dans ce
manuel. Tenez compte de ces précautions impératives lors de l’utilisation
de tout appareil mécanique ou à carburant.
DANGER
«DANGER» indique une situation dangereuse qui, si elle n’est pas
contournée, entraînera la mort ou des blessures graves.
AVERTISSEMENT
«AVERTISSEMENT» signale une situation potentiellement dangereuse qui,
si elle n’est pas évitée, peut entraîner la mort ou des blessures raves.
ATTENTION
«ATTENTION» dénote un danger potentiel qui, s’il n’est pas contourné,
risque d’entraîner des blessures corporelles allant de peu graves à
moyennes ou bien des dommages matériels.
DANGER
Si vous sentez une odeur de gaz:
1. Couper l’arrivée de gaz vers l’appareil.
2. Éteindre toute flamme vive.
3. Si l’odeur persiste, rester à l’écart de l’appareil
et appeler un service de pompiers.
Tout manquement à suivre ces directives pourrait
résulter en incendie ou en explosion, ce qui
pourrait causer des dommages, des blessures et
même la mort.

15
Renseignements généraux sur la sécurité (suite)
DANGER
EXPLOSION - RISQUE D’INCENDIE
•Ne jamais entreposer de propane à proximité de sources de chaleur
élevée, de flammes vives, de flammes de pilote, de la lumière directe
du soleil ou d’autres sources d’allumage ou à des températures
excédant 120 °F (49 °C).
•Le propane est plus lourd que l’air et s’accumule dans les endroits
plus bas. Si vous sentez une odeur de gaz, quittez immédiatement la
zone.
•Ne jamais installer ou retirer le réservoir de gaz propane tant que le
chauffe-eau est en fonction, ni à proximité de flammes, de témoins
pilotes ou d’autres sources d’allumage ou pendant que le chauffe-
eau est encore chaud au toucher.
•Ce produit peut être une source d’allumage pendant qu’il fonctionne.
Ne jamais allumer ou utiliser le chauffe-eau dans des espaces
contenant des combustibles volatiles ou présents dans l’air ou des
produits comme de l’essence, des solvants, des diluants à peinture,
des particules de poussière ou autres produits chimiques inconnus.
Espace de dégagement minimum avec les matériaux combustibles:
12 pouces (30,5 cm) sur les côtés et 48 pouces (122 cm) du haut.
•Assurer suffisamment d’espace de dégagement autour des
ouvertures d’aération du produit.
AVERTISSEMENT
Non destiné à une utilisation dans une résidence ou un véhicule récréatif.
Nous ne pouvons prévoir toutes les utilisations que vous ferez de nos
produits.
Consultez les autorités locales en matière d’incendie si vous avez
des questions sur l’utilisation.
D’autres normes régissent l’utilisation de gaz combustibles et produits
permettant la génération de chaleur pour des fins particulières. Vos
autorités locales pourront vous conseiller à cet effet.
•Nejamaisremplirlesbonbonnesjetables.
•Utiliserlerégulateurpré-régléquiaétéinstallédanslechauffe-eau.Ne
pas tenter de l’ajuster.
DANGER
Tout manquement à se conformer aux précautions et directives
accompagnant ce produit peut entraîner la mort, des blessures graves
et des dommages causés par des risques d’incendie, d’explosion, de
brûlure, d’asphyxie et d’empoisonnement au monoxyde de carbone.
Seules les personnes qui peuvent comprendre et suivre les directives
devraient pouvoir utiliser ou réparer ce produit.
Si vous avez besoin d’aide ou de renseignements, comme un mode
d’emploi ou des étiquettes, veuillez communiquer avec
The Coleman Company, Inc.
AVERTISSEMENT
Lorsque vous utilisez des produits électriques, il faut toujours mettre en
œuvre des précautions de base, incluant ce qui suit:
1. REALIRE ET SUIVRE TOUTES LES CONSIGNES DE SÉCURITÉ.
2. Lire et respecter toutes les directives présentes sur le produit ou
accompagnant celui-ci.
3. S’il est question d’un appareil électrique avec cordon d’alimentation
ou branchement direct, ne pas utiliser de rallonge.
4. Ne pas installer à moins de 10 pieds (3 m) d’une piscine.
5. Ne pas utiliser dans une salle de bain.
AVERTISSEMENT : Risque de choc électrique. Lorsqu’utilisé à
l’extérieur, ne brancher l’unité qu’à une prise protégée par un
disjoncteur de fuite de terre de classe A qui est étanche. Si aucune
prise de la sorte n’est disponible, communiquer avec un électricien
qualifié pour en faire installer une. Vérifier que l’unité électrique et son
cordon n’empêchent pas la fermeture du couvercle de la prise.
AVERTISSEMENT
•Ce produit est alimenté par du gaz propane. Le gaz propane est
invisible, inodore et inflammable. Un agent odorant est habituellement
ajouté afin de faciliter la détection des fuites; l’odeur est décrite
comme une odeur d’«œufs pourris». L’agent odorant peut se
dégrader avec le temps; les fuites de gaz ne peuvent donc pas
toujours être détectées uniquement par l’odeur.
•Le gaz propane est plus lourd que l’air; en cas de fuite, il tend a se
déposer dans les endroits les plus bas possibles. Il peut être allumé
par des sources d’allumage comme des allumettes, des briquets,
des étincelles ou des flammes vives de toutes sortes, même à
plusieurs mètres de la fuite. N’utiliser que du gaz propane dans un
environnement permettant le retrait de vapeur.
•Les bonbonnes de gaz doivent être rangées à l’extérieur, dans un
endroit bien aéré et hors de la portée des enfants. Tout espace
d’entreposage intérieur doit être conforme à la norme AS/NZS 1596.
•Débrancher la source de gaz avant d’entreposer le chauffe-eau.
AVERTISSEMENT
SÉCURITÉ DE FONCTIONNEMENT
•Tenir tous les raccords et branchements bien propres. Inspecter la
bonbonne de propane et les raccords de propane pour assurer qu’ils
sont exempts de dommages avant de brancher.
•Lors de l’installation, vérifier tous les branchements et raccords avec
de l’eau savonneuse pour détecter toutes fuites. Ne jamais utiliser
de flamme. La présence de bulles indique une fuite. Vérifier que le
branchement n’est pas fileté de manière inappropriée et que le joint
est suffisamment serré. Exécuter une autre vérification de fuite. Si
la fuite persiste, retirer la bonbonne et communiquer avec Coleman
pour obtenir un entretien ou des réparations.
•Pour le chauffage de l’eau uniquement. Ne jamais modifier ou utiliser
un dispositif d’une manière n’étant pas explicitement approuvée par
Coleman.
•Toujours utiliser de manière érigée.
AVERTISSEMENT: Ne jamais laisser le chauffe-eau sans surveillance
quand il est chaud ou en cours d’utilisation. Ne pas toucher aux
pièces de métal et aux orifices d’aération du chauffe-eau; ils
pourraient devenir très chauds en cours d’utilisation. Tenir hors de
portée des enfants. CET APPAREIL N’A PAS ÉTÉ CONÇU POUR
L’APPROVISIONNEMENT EN EAU POTABLE.

16
Vue d’ensemble du système
Merci d’avoir acheté une unité Hot Water on Demand
TM
de Coleman.
Compartiment de stockage pour cordon
de chargeur et rallonge –
les cordons des chargeurs d’auto 12V et
de maison 120V sont rangés ici (chargeur
120V disponible pour le modèle 2302-A
uniquement)
Douche (varie selon le
modèle) - Douche amovible
à tenir dans la main
Prise de fusible -
là où se trouve le
fusible remplaçable
Bras de douche -
Bras de douche
ajustable tenant la
douche en place.
Prise d’alimentation de la
pompe -
pour alimenter la pompe
en branchant son cordon
d’alimentation à cette prise.
Régulateur –
là où la bonbonne de
gaz est branchée.
Rallonge d’allumette –
utiliser la rallonge
d’allumette pour tenir
et insérer une allumette
enflammée dans le
regard de la
flamme.
Panneau d’affichage (varie selon le modèle)
un affichage montrant l’état de l’appareil, comme la
température de l’eau, les codes d’anomalie, etc. Se
reporter à la section «Tableau des indicateurs»
Bouton de commande –
appuyer sur le bouton puis le
tourner dans le sens anti-horaire.
Ajuster le bouton pour que l’eau
ait la température désirée.
Sortie d’eau -
se branche à
la douche.
Entrée d’eau -
se branche à la
pompe.
Port de recharge –
pour brancher les
cordons de chargeur
de 12V et 120V
Interrupteur
d’alimentation
principale –
(disponible sur le
modèle 2302-A
seulement)
Compartiment à pile -
12 volt / 2000 mAh
emplacement pour la pile
de 12V/2000mAh Li-Ion
rechargeable. La pile
permet de faire fonctionner
la pompe et les circuits.
Ports USB x 2 -
(disponible sur le modèle 2302-A
uniquement) pour le chargement des
appareils USB compatibles. (tension:
5V chacun; intensité: ≤1A au total)
Orifices
d’aération -
ne pas bloquer
les orifices
d’aération.
Regard de la flamme –
pour vérifier l’état du
pilote et de la flamme du
brûleur ou pour insérer
une allumette enflammée
et allumer manuellement
le chauffe-eau.
DÉBALLER LE PRODUIT.
Sortez votre nouveau chauffe-eau de sa boîte et assurez-vous que tous les pièces sont bien présentes. S’il vous manque des composantes, veuillez
communiquer avec Coleman pour obtenir un remplacement: 1-800-835-3278 ou par ATS: 316-832-8707. Assurez-vous de retirer le film protecteur se trouvant
sur le panneau d’affichage à l’avant du chauffe-eau avant de l’utiliser.
Réservoir d’eau de 5
gallons (19 L) pliable
Cordon de chargeur d’auto 12V
(se trouve dans le compartiment
de rangement de l’appareil)
Cordon de chargeur domestique 120V
(pour le modèle 2302-A uniquement,
dans le compartiment de rangement)
Ensemble de pompe Flexible de douche Sac de transport en filet du flexible
Douche
(varie selon le modèle)
Bras de douche
THIS SIDE UP

17
CHARGEMENT DE LA PILE
1. Charger la pile avant d’utiliser le chauffe-eau pour la première fois.
2. Mettre l’interrupteur d’alimentation principale en position «OFF»
(éteint) (applicable au modèle 2302-A seulement).
3. (figure 1) Retirer le rabat de caoutchouc couvrant le port de
chargement.
4. Brancher le cordon de chargeur d’auto 12V ou résidentiel 120V
dans l’unité et la source d’alimentation.
5. Se reporter au tableau de l’indicateur pour connaître l’état de la pile
et du chargement.
REMARQUE : Laisser charger la pile pendant 6heures la première fois
afin de maximiser la performance de la pile.
NETTOYER LE PRODUIT
Nettoyer avant la première utilisation. Il est fortement recommandé de nettoyer le chauffe-eau avant de l’utiliser pour la première fois. Suivre les étapes simples
se trouvant en page 20 avant de quitter la maison puis nettoyer le chauffe-eau au moins une fois par an ou lorsque le flexible se décolore par l’accumulation de
calcium blanc.
Installation
Sélectionner une surface robuste de niveau pour y poser le chauffe-eau. Une table de pique-nique ou
une table de camping sont des surfaces idéales. Ne pas faire fonctionner l’unité Hot Water on Demand
TM
directement à partir du sol (cela permet à l’eau de se drainer et empêche l’unité d’être endommagée si la
température descend sous le point de congélation).
Remplir d’eau le réservoir de 5 gallons (19 L) pliable. Il est possible de mettre l’eau d’un lac ou d’un
ruisseau dans le produit, mais il faut s’assurer qu’il n’y a pas de débris ou
de sable dans l’eau, qui pourraient boucher le système et endommager
le produit. Il est recommandé d’utiliser un bout de tissu comme filtre
pour couvrir l’ouverture du réservoir avant de le remplir d’eau.
BRANCHEMENT DE LA TÊTE DE DOUCHE (FIG. 2)
•Extrémité de la douche: connecteur fileté
Visser le connecteur fileté dans le flexible de la douche se trouvant à
l’extrémité de la douche.
•Extrémité du chauffe-eau: connecteur à manchon
A - Tirer sur le manchon du connecteur et le retenir.
B et C - Tout en retenant le manchon, pousser le connecteur dans la sortie d’eau
jusqu’à fond.
D - Relâcher le manchon; le connecteur est alors verrouillé en place.
IMPORTANT: Pour débrancher le flexible de douche du chauffe-eau, tirer d’abord sur le manchon
pour déverrouiller le connecteur puis, tout en retenant le manchon, sortir le connecteur.
BRANCHEMENT DE LA POMPE À EAU
•Extrémité de la pompe (Fig. 3):
1. Mettre le réservoir d’eau sous le niveau du chauffe-eau
afin d’assurer un bon drainage.
2. Visser manuellement la pompe à eau sur l’ouverture du
réservoir d’eau.
3. Déposer le réservoir d’eau sur son côté afin que la pompe
soit orientée vers le bas du réservoir (étape 2).
4. S’assurer de faire tourner la pompe pour que la marque
«THIS SIDE UP» (ce côté vers le haut) soit vers le haut
pour que la pompe puisse s’amorcer et permettre l’eau de
s’écouler.
A B
C
D
Fig. 2
A B
C
D
THIS SIDE UP
THIS SIDE UP
Ensemble de pompe
Fig. 3
Fig. 4
Vers le
réservoir d’eau
Vers l’entrée d’eau
du chauffe-eau
Vers la prise d’alimentation du chauffe-feau
THIS SIDE UP
Fig. 1
OFF
1
2

18
Installation (suite)
ASTUCE: Vous pouvez également submerger la pompe à eau dans un réservoir d’eau ouvert, comme une glacière (glacière non comprise). Si non
disponible, il est possible de brancher un boyau d’arrosage directement sur l’unité. Assurer que le débit d’eau n’est pas trop élevé; la pression affectera la
capacité de chauffage de l’unité et pourrait entraîner le débranchement de la sortie. Assurer également qu’à l’inverse, le débit d’eau n’est pas trop bas pour
éviter les erreurs de faible débit. Assurer que l’eau coule adéquatement avant d’allumer l’unité, et ajuster le débit au besoin.
•Extrémité du chauffe-eau (Fig. 4):
1. Brancher la prise d’alimentation de la pompe dans la fiche correspondante du chauffe-eau.
2. Brancher le connecteur à manchon de la pompe dans l’entrée d’eau du chauffe-eau.
(suivre les mêmes étapes, A, B, C, D, que pour la section «BRANCHEMENT DE LA DOUCHE»)
INSTALLATION DU BRAS DE DOUCHE
1. Démonter le bras de douche en dévissant la
molette de réglage (Fig. 5).
2. Installer le bras de douche sur le rail du
chauffe-eau puis serrer la molette de réglage
(Fig. 6).
3. Desserrer la molette de réglage et ajuster
l’angle et la hauteur du bras de douche. Une
fois le bras à la position désirée, serrer la
molette à nouveau (Fig. 7).
4. Une fois le bras de douche en place, il est possible de poser la douche sur le bras de
douche.
INSTALLATION DE LA BONBONNE DE GAZ (FIG. 8)
Ce dispositif doit être utilisé uniquement avec une bonbonne de gaz propane GPL Coleman de
1 lb (454 g) certifiée DOT-39 NRC 232/2990 M1110.
IL POURRAIT ÊTRE DANGEREUX
DE FAIRE APPEL À UN AUTRE TYPE DE BONBONNE DE GAZ.
Vérifier que tous les
joints entre l’appareil et la bonbonne de gaz sont présents et en bon état avant de brancher
la bonbonne de gaz. Retirer tout le matériel de protection pour le transport. NE PAS déplacer
l’appareil pendant qu’il fonctionne. Après usage, mettre le bouton de commande en position
d’arrêt.
Ne pas utiliser de bonbonnes de gaz MAPP ou autre. Seulement du propane.
1. Tourner le bouton de commande en position OFF (arrêt).
2. Retirer le capuchon de la bonbonne de propane et le conserver pour plus tard
3. Tout en retenant la bonbonne de propane debout, la fileter dans le régulateur.
VÉRIFICATION DE FUITE DE GAZ
AVERTISSEMENT
•Exécuter le test de fuite à l’extérieur.
•Éteindre toute flamme vive.
•NE JAMAIS procéder au test de fuite tout en fumant.
•Ne pas utiliser l’unité Hot Water on Demand
TM
tant qu’aucune vérification de fuite n’a pas
été effectuée sur le raccord.
1. Préparer de 55 à 85g (2 à 3oz) de
solution de vérification de fuite (une partie
de liquide à vaisselle pour trois parties
d’eau).
2. Appliquer plusieurs gouttes de la solution
sur le raccord se trouvant entre la
bonbonne de propane et le régulateur.
3. La présence de bulles indique une fuite.
4. Vérifier que le branchement n’est pas
fileté de manière inappropriée et que le
joint est suffisamment serré.
5. Exécuter une autre vérification de fuite.
Si la fuite persiste, retirer la bonbonne et
communiquer avec Coleman pour obtenir
un entretien ou des réparations.
Fig. 5 Fig. 6 Fig. 7
ARRÊT
RÉGULATEUR
Fig. 8
Fig. 9

19
Utilisation et fonctionnement
Nettoyer avant la première utilisation (se reporter aux «DIRECTIVES DE NETTOYAGE» de la page suivante). Il est fortement recommandé de nettoyer le
chauffe-eau avant de l’utiliser pour la première fois. Suivre ces étapes simples avant de quitter la maison puis nettoyer le chauffe-eau au moins une fois par an
ou lorsque le flexible se décolore par l’accumulation de calcium blanc.
MISE EN GARDE: les pièces accessibles peuvent devenir très chaudes. Tenir hors de portée des jeunes enfants. N’UTILISER QU’À L’EXTÉRIEUR. Doit
être installé sur une surface horizontale. Ne convient pas aux environnements marins. Ne pas modifier cet appareil. Il est recommandé de lui faire subir un
entretien annuel par une personne autorisée. Ou si l’une des conditions suivantes est remarquée, soit allumage incomplet, flamme jaune en grande partie,
dépôt de carbone, soulèvement, flottement, ré-allumage ou mauvaise odeur. NE PAS utiliser cet appareil si ses joints sont endommagés ou usés. NE PAS
utiliser cet appareil en présence de fuites ou de dommages ou s’il ne fonctionne pas correctement. Pour vérifier si la bonbonne de gaz est vide, il suffit de la
débrancher de l’appareil et de la secouer. L’absence de son ou de mouvement de liquide signifie que la bonbonne est vide.
ALLUMER LE CHAUFFE-EAU
Au moment de son allumage, le chauffe-eau ne doit pas être exposé à des vapeurs ou des liquides inflammables. Avant d’allumer le chauffe-eau, vérifier
que le réservoir d’eau est prêt, que les raccords avec la douche et la pompe sont en place, que la bonbonne de gaz est installée et que la charge des piles
rechargeables est suffisante (vérifier l’état des piles en se référant au «Tableau des indicateurs» ou à la section «Charger les piles»).
• Allumage électronique
1. Mettre l’interrupteur d’alimentation principale en position de marche
(applicable au modèle 2302-A seulement)
2. Mettre le système électrique en marche en mettant le bouton d’alimentation en
position «ON» (marche). Ce bouton se trouve sur le panneau de commande. Une
fois sous tension:
Sur le MODÈLE 2302-A - l’indicateur de pile est allumé et la température ambiante
actuelle est affichée.
Sur le MODÈLE 2302-B - un témoin vert clignote sur le panneau de commande pour
indiquer que le système électrique est sous tension.
IMPORTANT: Une fois sous tension, la pompe se met en marche et l’eau
commence à couler, ce avant que le chauffe-eau ne soit allumé. Il est
recommandé de se familiariser avec l’ensemble du mode d’emploi avant de
mettre l’appareil sous tension pour conserver l’eau.
3. Appuyer sur le bouton de commande et le tourner en sens antihoraire pour le mettre en position « PILOT» (pilote).
4. Appuyer sur le bouton de commande et le tenir enfoncé (pendant 7 à 10secondes) afin de lancer la séquence d’allumage électronique; des clics seront
audibles.
5. Tout en tenant le bouton de commande enfoncé, vérifier si la lampe pilote est allumée en surveillant l’indicateur de l’affichage (Se reporter au Tableau des
indicateurs).
REMARQUE : L’allumage est plus long la première fois car il faut que le gaz remplisse d’abord la conduite de gaz.
6. Une fois la lampe pilote allumée, tourner le bouton de commande en sens antihoraire pour le mettre à un réglage entre «MAX» et «MIN» afin d’obtenir
une eau à la température désirée.
REMARQUE : Au réglage «MAX», le chauffe-eau peut faire monter la température de l’eau d’environ 30°C (si la température de l’eau utilisée était
de 59°F, le chauffe-eau l’amènera à une température de 113°F). Si l’allumage électronique ne fonctionne pas, se reporter à la section «Allumage à
l’allumette» ci-dessous ou à la section «Dépannage» afin de pouvoir allumer la lampe pilote.
• Allumage à l’allumette
1. Mettre le bouton d’alimentation en position de marche.
2. Appuyer sur le bouton de commande et le tourner en sens antihoraire pour le mettre en
position «
PILOT» (pilote).
3. Mettre une longue allumette enflammée près du brûleur en l’insérant dans le regard
de la flamme, puis appuyer sur le bouton de contrôle et le tenir enfoncé jusqu’à ce
que la lampe pilote soit allumée (surveiller l’indicateur de l’affichage). Si aucune longue
allumette n’est disponible utiliser la rallonge d’allumette (se reporter à la section «Vue
d’ensemble du système») afin de tenir l’allumette et pouvoir la faire passer dans le
regard.
4. Tourner le bouton de commande en sens antihoraire pour le mettre à un réglage entre «MAX» et «MIN» afin d’obtenir une eau à la température désirée.
REMARQUE : Il est normal de remarquer une légère variation du débit et de la température de l’eau lorsque l’adaptateur de jet est déplacé en hauteur. Le
chauffe-eau éteindra automatiquement le brûleur lorsque la température de l’eau excèdera 125 °F (52 °C). En cas de surchauffe ou de manquement à couper
automatiquement l’alimentation en gaz, fermer manuellement le bouton de commande.
PRESSE
PRESSE
PRESSE
varie selon le modèle
PRESSE
PRESSE
ON
La page est en cours de chargement...
La page est en cours de chargement...
La page est en cours de chargement...
La page est en cours de chargement...
La page est en cours de chargement...
La page est en cours de chargement...
La page est en cours de chargement...
La page est en cours de chargement...
La page est en cours de chargement...
La page est en cours de chargement...
La page est en cours de chargement...
La page est en cours de chargement...
La page est en cours de chargement...
La page est en cours de chargement...
La page est en cours de chargement...
La page est en cours de chargement...
La page est en cours de chargement...
La page est en cours de chargement...
La page est en cours de chargement...
La page est en cours de chargement...
La page est en cours de chargement...
-
 1
1
-
 2
2
-
 3
3
-
 4
4
-
 5
5
-
 6
6
-
 7
7
-
 8
8
-
 9
9
-
 10
10
-
 11
11
-
 12
12
-
 13
13
-
 14
14
-
 15
15
-
 16
16
-
 17
17
-
 18
18
-
 19
19
-
 20
20
-
 21
21
-
 22
22
-
 23
23
-
 24
24
-
 25
25
-
 26
26
-
 27
27
-
 28
28
-
 29
29
-
 30
30
-
 31
31
-
 32
32
-
 33
33
-
 34
34
-
 35
35
-
 36
36
-
 37
37
-
 38
38
-
 39
39
-
 40
40
-
 41
41


Coleman 2302 Series Le manuel du propriétaire
- Catégorie
- Chauffe-eau
- Taper
- Le manuel du propriétaire
dans d''autres langues
Documents connexes
-
Coleman 5080A751 Manuel utilisateur
-
-
-
-
-
-
-
-
-
Autres documents
-
 Dream Spa 1489 Manuel utilisateur
-
Camplux BW422 Manuel utilisateur
-
Rinnai V53DeN Guide d'installation
-
Camplux BD158 Manuel utilisateur
-
-
Warm Tech WTCACG18V-920 Manuel utilisateur
-
Kampa GA4000 Manuel utilisateur
-
Rinnai RV53I Manuel utilisateur
-
-
