DCS WD130-SSOD Installation Instructions and User Guide
- Catégorie
- Tiroirs chauffants
- Taper
- Installation Instructions and User Guide

US CA
Installation instructions
and User guide
Professional Outdoor
Warming Drawer
WD1-30-SSOD models
Instructions d’installation
et Guide d’utilisation
Professional extérieur
réchauement tiroir
Modèles WD1-30-SSOD

1
A MESSAGE TO OUR CUSTOMERS
2
Thank you for selecting this DCS Outdoor Warming Drawer. Because of its unique features, we have developed
this Use and Care and Installation Guide. It contains valuable information on how to properly operate, install and
maintain your new Warming Drawer for years of safe and enjoyable use.
To help serve you better, please fill out and submit your Ownership Registration by visiting our website at www.
dcsappliances.com and selecting “Customer Service” on the home page and then select “Ownership Registration”.
You may also submit the enclosed Ownership Registration Card by mailing it to the address below. In addition,
keep this guide handy, as it will help answer questions that may arise as you use your new DCS Warming Drawer.
For your convenience, product questions can be answered by a DCS Customer Care Representative by phone:
1-888-936-7872, email: [email protected], or by mail:
WARNING
The warming drawer is not intended to be used in conjunction with water. DO NOT fill the drawer or warming cavity
with water. Doing so could create a shock hazard, resulting in possible injury.
WARNING
TO REDUCE THE RISK OF INJURY TO PERSONS IN THE EVENT OF A WARMING DRAWER GREASE FIRE, OBSERVE THE
FOLLOWING: SMOTHER FLAMES with a close-fitting lid, cookie sheet, or metal tray, then turn off the unit.
BE CAREFUL TO PREVENT BURNS. If the flames do not go out immediately EVACUATE AND CALL THE FIRE
DEPARTMENT. NEVER PICK UP A FLAMING PAN - You may be burned. DO NOT USE WATER, including wet dishcloths
or towels - a violent steam explosion will result. Use an extinguisher ONLY if:
1. You know you have a Class ABC extinguisher, and you already know how to operate it.
2. The fire is small and contained in the area where it started.
3. The fire department is being called.
4. You can fight the fire with your back to an exit.
WARNING
DO NOT use water on grease fires. Turn OFF the warming drawer, then smother the fire with baking soda or use a
dry chemical or foam-type fire extinguisher.
PLEASE RETAIN THIS MANUAL
FOR FUTURE REFERENCE.
Fisher & Paykel Appliances Inc.
Attention: DCS Customer Care
695 Town Center Drive, Suite 180
Costa Mesa. CA 92626-1902 USA
email: customer[email protected]
NOTE: Please write the Model and Serial Number on this page for references (See page 6 for location of Model and
Serial Number.)
MODEL NUMBER
SERIAL NUMBER

1
TABLE OF CONTENTS
2
SAFETY PRACTICES & PRECAUTIONS 35
WARMING DRAWER FEATURES 6
INSTALLATION
Specifications 7
Cutout Dimensions 7
Mounting Installation 10-11
USE AND CARE INFORMATION
Operational Guide 12
Cleaning the Warming Drawer 13
Removing the Drawer 14
Replacing the Drawer 15
SUGGESTED TEMPERATURE SETTINGS TO KEEP FOODS HOT 16
WIRING DIAGRAM 17
SERVICE 18

4
SAFETY PRACTICES & PRECAUTIONS
3
READ AND UNDERSTAND THESE PRECAUTIONS
n Read this Use and Care and Installation Manual thoroughly before using your new appliance. This will help to
reduce the risk of fire, electric shock, or injury to persons.
n Remove all packaging materials from your appliance.
n Install according to instructions. To insure proper installation and servicing, follow the installation guide which
came with this appliance.
n Be sure to have a qualified service technician install and ground this appliance.
n Plug into rated outlet: 120 Volts AC, 15 amp GFI (Ground Fault Interrupt) circuit requirement.
WARNING
To reduce the risk of electric shock and fire, do not use an extension cord with this appliance.
WARNING
FOR OUT DOOR INSTALLATION, INSTALLER MUST INSTALL A GROUND FAULT INTERRUPT (GFI).
n The installer should leave these instructions with the consumer who should retain for local inspector’s use and for
future reference.
n This appliance is not fused. Protect with a proper sized fuse or circuit breaker and a GFI for outdoor models.
n Line disconnect switch, circuit breaker, GFI (for outdoor models) or plug/receptacle of power cord connection
should be readily accessible to the operator.
n Ground unit per applicable electrical codes.
n Any installation not matching the specifications discussed in these instructions will void the manufacturer’s war-
ranty.
n Children should not be left alone or unattended in an area where appliances are in use. They should never be al-
lowed to turn knobs, push buttons, sit or stand on any part of an appliance.
n Children in walkers, or children crawling can be attracted to the round door handle and may grab and open the
warming drawer. This can result in injury from the door being pulled open on a child, or severe burns if it is in
use and hot.
WARNING
Do not store items of interest to children in, above or around any appliance. Children could be seriously injured if
they should climb onto the appliance to reach these items.
Be certain to use only dry pot holders: Moist or damp pot holders on hot surfaces may cause burns
from steam. Do not use a towel or other bulky cloth in place of pot holders.
n Never store anything in the warming drawer. Flammable materials can catch fire, plastic items may melt or ig-
nite and other types of items could be ruined.
n Do not hang articles from any part of the appliance or place anything against the drawer. Some fabrics are quite
flammable and could catch on fire.

4
SAFETY PRACTICES & PRECAUTIONS
n For safety reasons and to avoid damage to the appliance, never sit, stand, or lean on the warming drawer door.
n For personal safety, wear proper apparel. Loose fitting garments or hanging sleeves should never be worn while
using this appliance. Some synthetic fabrics are highly flammable and should not be worn while using this appli-
ance.
n Do not use aluminum foil to line any part of the warming drawer. Using a foil liner could result in a fire hazard, or
the obstruction of the flow of heat and ventilation air. Foil is an excellent heat insulator and heat will be trapped
underneath it. This trapped heat can upset the perfor mance of the warming drawer parts.
WARNING
This appliance is designed for keeping food warm. Based on safety considerations, never use the warming drawer to
warm or heat a room.
n As with any cooking appliance, never leave the warming drawer unattended when in use. This could be a fire
hazard.
n Only certain types of glass, heat proof glass-ceramic, ceramic, earthenware or glazes are suitable for use in this
warming drawer. Utensils that are not thermally heat safe may break with sudden temperature changes.
n Never heat unopened containers, a build up of pressure may cause the container to burst.
n 120 volt AC, 15 amp GFI circuit required.
n Grease is flammable, avoid letting grease deposits collect in the warming drawer, clean up spillage.
n DO NOT use water on grease fires. Turn OFF the warming drawer, then smother the fire with baking soda or use
a dry chemical or foam-type fire extinguisher.
n When opening the drawer while keeping liquids like soups and sauces, the drawer must be opened slowly to
avoid spillage.
n Use care when opening a hot warming drawer. To avoid severe burns, open slowly and allow the hot air or steam
to escape before reaching into the warming drawer to remove or replace any foods.
n Do not repair or replace any part of this appliance unless it is specifically recommended in this manual. All other
servicing should be referred to a qualified Service Technician. Service Technicians must disconnect the power
supply before servicing this appliance.
n When using the warming drawer: To avoid burn injuries, DO NOT TOUCH THE INTERIOR SURFACES or the exterior
area immediately surrounding the door until it has had sufficient time to cool.
n Clean the warming drawer with caution. Avoid steam burns; do not use a wet sponge or cloth to clean the appli-
ance while it is hot. Some cleaners produce noxious fumes if applied to a hot surface. Follow directions provided
by the cleaner manufacturer.
n Be sure all the controls are turned off and the appliance is cool before using any type of aerosol cleaner on or
around the appliance. The chemical that produces the spraying action could, in the presence of heat, ignite or
cause metal parts to corrode.
n Use caution when touching the heating element (even if it is dark in color) and the interior surfaces of the warm-
ing drawer.
n Do not allow flammable materials which may ignite to come in contact with the hot heating element or the inte-
rior surface of the warming drawer until the unit has had a sufficient time to cool.
3

6
5
SAVE THESE INSTRUCTIONS
n Read all instructions
n Do not touch hot surfaces. Use handles or knobs.
n To protect against electrical shock, do not immerse cord, plugs, or element in water or other liquid.
n Close supervision is necessary when any appliance is used by or near children.
n Unplug from outlet when not in use and before cleaning. Allow to cool before putting on or taking off parts.
n Do not operate any appliance with a damaged cord or plug or after the appliance malfunctions or has been dam-
aged in any manner. Return appliance to the nearest authorized service facility for examination, repair, or adjust-
ment.
n The use of accessory attachments not recommended by the appliance manufacturer may cause injuries.
n Do not let cord hang over edge of table or counter, or touch hot surfaces.
n Do not place on or near a hot gas or electric burner, or in a heated oven.
n Extreme caution must be used when moving an appliance containing hot oil or other hot liquids.
n Always attach plug to appliance first, then plug cord into the wall outlet. To disconnect, turn any control to “off”,
then remove plug from wall outlet.
n Do not use appliance for other than intended use.
n Save these instructions.
n Use only on properly grounded outlet.
n To reduce the risk of fire, do not place any heating or cooking appliance beneath the appliance.
n To reduce the risk of fire, do not mount unit over or near any portion of a heating or cooking appliance.
n To reduce the risk of electric shock, do not mount over a sink.
n To reduce the risk of fire, do not store anything directly on top of the appliance surface when the appliance is in
operation.
IMPORTANT SAFEGUARDS

6
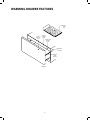
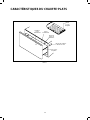
WARMING DRAWER FEATURES
Power
Indicator
Lens
Thermostat
Control
Knob
Stainless
Steel
Tray
Power
Indicator
Light
Stainless
Steel
Drawer
Model and
serial tag
Fig. 01
5

8
7
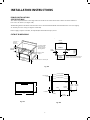
INSTALLATION INSTRUCTIONS
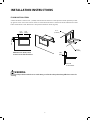
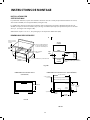
PROUD INSTALLATION
SPECIFICATIONS
The cabinet depth from the outer edge of the face frame to the inside back of the cabinet or wall should be at
least 24 3/16” inches (see figure 02A).
The Warming Drawer should be installed into a base cabinet with minimum outside dimensions of 18 1/2” high by
31” wide by 24 3/16” deep (see figures 03A & 04A).
Power supply required: 120 VAC; 15 amp GFI (Ground Fault Interrupt) circuit
A 120 Volt AC (GFI)
outlet should be
located below the
Warming Drawer
2-1/2” min. to
bottom of
countertop
2x4’s or similar
support
Position supporting boards as shown so
product can be secured into position.
24 3/16” (614mm) min. cabinet depth
28 3/8"
(720mm)
14-11/16"
(372mm)
28 3/8"
(720mm)
21 1/8"
(537mm)
1 7/8"
(47mm)
1 7/8"
(47mm)
14-11/16"
(372mm)
PROUD
Electrical
outlet
Installed
bracket
16”
23 1/4” (590mm)
26 1/8” (663mm)
1 1/8” (28mm)
24 1/8” (613mm)
11-11/16”
(297mm)
12-1/4”
(311mm)
13/16”
(20mm)
1”(25mm)
30”
14 -7/16”
(367mm)
1 -5/8”
(41mm)
Drain
Electrical
outlet
Installed
bracket
16”
23 1/4” (590mm)
26 1/8” (663mm)
1 1/8” (28mm)
24 1/8” (613mm)
11-11/16”
(297mm)
12-1/4”
(311mm)
13/16”
(20mm)
1”(25mm)
30”
14 -7/16”
(367mm)
1 -5/8”
(41mm)
Drain
Fig. 02A
Fig. 03A
Fig. 04A
CUTOUT DIMENSIONS

8
7
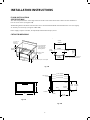
INSTALLATION INSTRUCTIONS
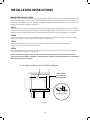
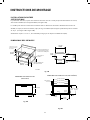
FLUSH INSTALLATION
SPECIFICATIONS
The cabinet depth from the outer edge of the face frame to the inside back of the cabinet or wall should be at
least 26 3/16” inches (see figure 02B).
The Warming Drawer should be installed into a base cabinet with minimum outside dimensions of 18 1/2” high by
31” wide by 26 3/16 deep (see figures 03B & 04B).
Power supply required: 120 VAC; 15 amp GFI (Ground Fault Interrupt) circuit
A 120 Volt AC (GFI)
outlet should be
located below the
Warming Drawer
2-1/2” min. to
bottom of
countertop
2x4’s or similar
support
Position supporting boards as shown so
product can be secured into position.
26 3/16" (664mm) min. cabinet depth
30 3/16"
(766mm)
16 3/16"
(411mm)
30 3/16"
(766mm)
21 1/8"
(537mm)
2 3/4"
(70mm)
2 3/4"
(70mm)
16 3/16"
(411mm)
FLUSH
Electrical
outlet
Installed
bracket
16”
23 1/4” (590mm)
26 1/8” (663mm)
1 1/8” (28mm)
24 1/8” (613mm)
11-11/16”
(297mm)
12-1/4”
(311mm)
13/16”
(20mm)
1”(25mm)
30”
14 -7/16”
(367mm)
1 -5/8”
(41mm)
Drain
Electrical
outlet
Installed
bracket
16”
23 1/4” (590mm)
26 1/8” (663mm)
1 1/8” (28mm)
24 1/8” (613mm)
11-11/16”
(297mm)
12-1/4”
(311mm)
13/16”
(20mm)
1”(25mm)
30”
14 -7/16”
(367mm)
1 -5/8”
(41mm)
Drain
Fig. 02B
Fig. 03B
Fig. 04B
CUTOUT DIMENSIONS

10
3/16” (4mm)
1/16"
(2mm)
1/16"
(2mm)
2 5/8”
(67mm)
FLUSH
2" x 4"
(or similar)
2" x 4"
(or similar)
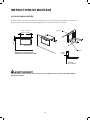
FLUSH MOUNT
SECTION
9
INSTALLATION INSTRUCTIONS
FLUSH INSTALLATION
A frame should be constructed 2 ” (51mm) setback from the front face of the product to both push the product
up against and to conceal the cutout clearance around the front frame as below. The internal dimensions of the
frame should be the same dimension as the proud installation cutout (fig 02A).
WARNING
Do not seal the product in with silicone or similar. Doing so will result in the product being difficult to remove for
servicing.
Minimum 3/16” (4mm) cutout
clearance around the front frame

10
INSTALLATION INSTRUCTIONS
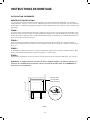
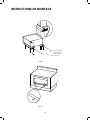
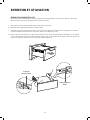
MOUNTING INSTALLATION
The lower rear corners of the cabinet need to provide proper support to the back of the Warming Drawer and the
anti-tip mounting clips. A 120 volt AC 15 amp (GFI) outlet should be located no further than 36 inches from the
back center of the Warming Drawer. Illustrations suggest one possible bottom support, but the consumer is not
limited to this idea for mounting configuration.
STEP 1
The bottom rear section of the cabinet should be made of moisture protected lumber and needs to be installed
to hold the anti-tip mounting clips and support the weight of Warming Drawer, which is 90 lbs. A pair of supports
located as shown on the previous pages is recommended to allow water to drain from drawer once installed.
STEP 2
Use the screws provided to attach the mounting clips which must be installed for anti-tip safety to the bottom
support at the back. See placement dimensions in Fig. 05 and Fig. 06.
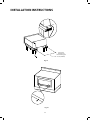
STEP 3
The Warming Drawer has slots on the back side where it will slide onto the anti-tip mounting clips.
Plug power cord into the AC outlet. See figure 06.
STEP 4
Fasten the front face to the cabinet by passing the screws through the 2 holes of the front face of the warming
drawer to finish the installation. See figure 07.
NOTE: The bottom support made of moisture protected lumbar runners or other moisture pro-
tected construction must be capable of supporting the weight of the warming drawer. A drain hole
MUST be provided for drainage.
Slide drawer
on to Anti-Tip
mounting clips
mounting clips
21 3/8" (proud installation) or 23 3/8" (ush installation).
Center line
to Center line
for mounting clips
21 1/8" (536mm)
Fig. 05
9

12
11
INSTALLATION INSTRUCTIONS
Slide drawer
on to Anti-Tip
mounting clips
mounting clips
21 3/8" (proud installation) or 23 3/8" (ush installation).
Center line
to Center line
for mounting clips
21 1/8" (536mm)
Slide drawer
on to Anti-Tip
mounting clips
mounting clips
21 3/8" (proud installation) or 23 3/8" (ush installation).
Center line
to Center line
for mounting clips
21 1/8" (536mm)
Fig. 06
Fig. 07

12
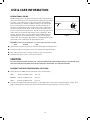
USE & CARE INFORMATION
OPERATIONAL GUIDE
The Warming Drawer is designed to keep previously cooked foods at a
safe, warm temperature, for extended periods of time, when operated
correctly. It is not designed to cook or reheat food. The Warming
Drawer should be pre-heated on HIGH according to the chart below
prior to inserting the food to be warmed. Food may be kept up to
two hours in the warming drawer. Failure to pre-heat could result in
unsafe food temperatures, which could accelerate the formation of
bacteria in the food being kept warm. The dial on the top right corner
of the unit is the on/off and temperature control adjustment. After
preheat, when the dial is turned clockwise from the OFF position to
the LOW position, the unit will maintain a temperature of approxi-
mately 175°F. By rotating the dial clockwise to the HIGH position, the
drawer will reach a temperature of approximately 230°F.
TO USE: TURN THE THERMOSTAT DIAL TO A TEMPERATURE SETTING:
HIGH MEDIUM LOW
n If you will be using the tray, preheat it while preheating the warming drawer.
n Preheat any empty serving dishes to be used, while preheating the drawer.
n Add cooked, hot food in its cooking container or heat-safe container.
n Aluminum foil may be used to cover food containers.
CAUTION
Do not use plastic containers or plastic wrap. They can melt if in direct contact with the drawer or a hot utensil and if
these items melt, they may adhere to the drawer and may be unremovable. Use only heat-safe dishes.
PREHEAT TIME AND TEMPERATURE SELECTOR:
n Always preheat on HIGH, then turn the knob to the desired setting.
LOW..............Preheat on HIGH 10 min. 140°-170°
MEDIUM .... Preheat on HIGH 15 min. 170°-200°
HIGH............Preheat on HIGH 20 min. 200°-230°
n To keep several different foods hot together, set the temperature to the food needing the highest setting. Place
items needing highest setting on the bottom of the drawer and food needing less heat on the tray.
Fig. 08
Power
Indicator
Lens
Thermostat
Control
Knob
Stainless
Steel
Tray
Power
Indicator
Light
Stainless
Steel
Drawer
Model and
serial tag
11

14
13
USE & CARE INFORMATION
CLEANING THE WARMING DRAWER
n Be careful cleaning any part of this appliance, particularly the drawer box and back of the drawer face. All parts of
the drawer can be cleaned with a hot soapy damp cloth, rinsed, dried and buffed with a heavy pile cloth. Always
try this first, as it is the mildest cleaning procedure.
n Be sure the Warming Drawer is turned off and the appliance is cool before using any type of aerosol cleaner on
or around the appliance. The chemical that produces the spraying action could, in the presence of heat, ignite or
cause metal parts to corrode.
n Use the mildest cleaning procedure first. Some brands of cleaners are harsher than others, read their directions.
Try on a small area first.
n To avoid marring the surface always rub the metal finishes in the direction of the polish grain lines. The cleaner
will be more effective when used in the direction of the polish lines.
n Use only clean sponges, soft cloths, paper towels, plastic or non-metal soap pads for cleaning or scouring, as rec-
ommended in this section. (Caution: some soap pads can scratch).
n Be sure to rinse all parts thoroughly and to wipe dry to avoid water marks.
n Remove food particles after every use.
1. DRAWER: Clean the drawer with warm soapy damp sponge or cloth.
2. DRAWER FRONT: Shine with stainless steel cleaner in direction of grain.
3. GASKET: Clean with warm soapy damp sponge (care should be taken when cleaning the gasket because silicon is
tough until it is cut, at which time it will tear very easily).
4. KNOB: The on/off/ temperature knob may be removed to be cleaned. See Figure 01. Be aware that the pull off
force will decrease and a loose knob could become a choking hazard for small children.
5. LIGHT: Clean with damp cloth or sponge.
6. DRAWER CAVITY: Same as drawer above.
7. ELEMENT: Care should be taken when cleaning the heating element. Only clean the element when the unit is
cool. Use warm soapy water on a damp cloth.
8. STAINLESS STEEL TRAY: Can be removed and cleaned with hot soapy water at the sink.

14
USE & CARE INFORMATION
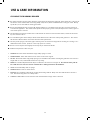
REMOVING THE DRAWER
Be sure the drawer is cool and no food items or trays are in the drawer. Never attempt to remove the drawer
while the unit is on or warm.
1. To remove the drawer, first remove plates, trays, etc., from the drawer.
2. Pull the drawer open towards you all the way until the latches are visible.
3. Carefully push the latch down on the left side, while lifting up the latch on the right side.
4. Pull the drawer out of the frame. Note: to prevent damage to surfaces, place the drawers on a stable surface on a
protective towel or table cloth.
Left Slider latch
Right Slider latch
13

16
15
USE & CARE INFORMATION
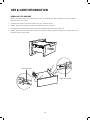
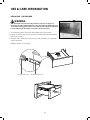
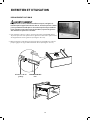
REPLACING THE DRAWER
WARNING
With the drawer removed, the heating element is exposed (see Figure 13).
Never turn the unit on while the drawer is removed. Never let children play near
or touch the warming drawer while it is not safely installed. Push the slides back
into the cabinet while the drawer is removed to prevent accidents.
1. To reinstall the drawer, extend the slides fully to their stop position.
2. Engage the drawer rails into the guide rails. Pull the guide rails forward until
they ‘click’ into place.
3. Push the drawer all the way in (you may feel some resistance) to completely
engage the drawer.
NOTE: the drawer is ‘soft closing’.
Extend guide rails Engage drawer rails

16
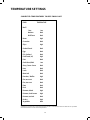
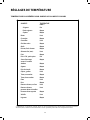
TEMPERATURE SETTINGS
FOOD TEMPERATURE
Beef**
Rare Low
Medium Med
Well Done Med
Bacon High
Casseroles Med
Chips High
Cooked Cereal Med
Eggs Med
Fish, Seafood Med
Fried Foods (all) High
Fruit Med
Garlic Bread, Rolls Low
Gravy, Cream Sauces Med
Ham Med
Lamb Med
Meat Loaf Med
Pancakes, Waffles High
Pies, one crust Med
Pies, two crust Med
Pizza Med
Pork Med
Potatoes, baked High
Potatoes, hash browns High
Potatoes, mashed Med
Poultry High
Vegetables Med
SUGGESTED TEMPERATURES TO KEEP FOODS HOT
**USDA/FSIS recommends an internal temperature of 145
0
F as the minimum doneness for beef. Use a portable
meat thermometer to check internal temperatures.
15

18
17
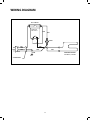
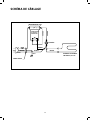
WIRING DIAGRAM
AUX. SWITCH
LIGHT
WARMING ELEMENT
500 WATTS, 120 VAC.
GND
L1
NEU
STRAIN RELIEF
1
THERMOSTAT
TEMP. SWITCH
2
1
2
WHT
GRN
BLK
WHT
RED
WHT
RED
RED

18
SERVICE
HOW TO OBTAIN SERVICE:
Before you call for service:
1. Is the circuit breaker or GFI tripped or the fuse blown?
2. Is there a power outage in the area?
For warranty service, please contact your local service provider or DCS Customer Care
Representative at (888) 936-7872. Before you call, please have the following information ready:
n Model Number
n Serial Number
n Date of installation
n A brief description of the problem
Your satisfaction is of the utmost importance to us. If a problem cannot be resolved to your satis-
faction, please write or email us at:
Write:
Fisher & Paykel Appliances Inc.
Attention: DCS Customer Care
695 Town Center Drive, Suite 180
Costa Mesa. CA 92626-1902 USA
email: [email protected]
17

20
La page charge ...
La page charge ...
La page charge ...
La page charge ...
La page charge ...
La page charge ...
La page charge ...
La page charge ...
La page charge ...
La page charge ...
La page charge ...
La page charge ...
La page charge ...
La page charge ...
La page charge ...
La page charge ...
La page charge ...
La page charge ...
La page charge ...
La page charge ...
-
 1
1
-
 2
2
-
 3
3
-
 4
4
-
 5
5
-
 6
6
-
 7
7
-
 8
8
-
 9
9
-
 10
10
-
 11
11
-
 12
12
-
 13
13
-
 14
14
-
 15
15
-
 16
16
-
 17
17
-
 18
18
-
 19
19
-
 20
20
-
 21
21
-
 22
22
-
 23
23
-
 24
24
-
 25
25
-
 26
26
-
 27
27
-
 28
28
-
 29
29
-
 30
30
-
 31
31
-
 32
32
-
 33
33
-
 34
34
-
 35
35
-
 36
36
-
 37
37
-
 38
38
-
 39
39
-
 40
40


DCS WD130-SSOD Installation Instructions and User Guide
- Catégorie
- Tiroirs chauffants
- Taper
- Installation Instructions and User Guide
dans d''autres langues
- English: DCS WD130-SSOD