Honeywell 408 Manuel utilisateur
- Catégorie
- Systèmes de contrôle d'accès de sécurité
- Taper
- Manuel utilisateur
Ce manuel convient également à

N9942-2V2 4/04 Rev. A
FBII Security System
FBII Security SystemFBII Security System
FBII Security System
O
OO
O
O
OO
O
M
MM
M
M
MM
M
N
NN
N
N
NN
N
I
II
I
I
II
I
®
-
--
-
-
--
-
4
44
4
4
44
4
0
00
0
0
00
0
8
88
8
8
88
8
O
OO
O
O
OO
O
M
MM
M
M
MM
M
N
NN
N
N
NN
N
I
II
I
I
II
I
®
-
--
-
-
--
-
4
44
4
4
44
4
0
00
0
0
00
0
8
88
8
8
88
8
E
EE
E
E
EE
E
U
UU
U
U
UU
U
User Guide

– 2 –

– 3 –
Table Of Contents
QUICK REFERENCE.............................................................................................4
Arming the System............................................................................................4
Disarming the System ....................................................................................... 4
Arm System/Stay Inside....................................................................................4
Arm System/Stay Inside/Instant Mode..............................................................4
Smoke Detector Reset ......................................................................................4
INTRODUCTION.................................................................................................... 6
SYSTEM REFERENCE .........................................................................................7
SYSTEM OPERATION ........................................................................................10
To Arm the System and Leave .......................................................................10
When the System is Not Ready ...................................................................... 11
To Arm the System and Stay Inside ...............................................................11
To Arm the System In Instant Mode and Stay Inside ..................................... 12
To Arm the System In Instant Mode ...............................................................13
To Bypass a Zone ...........................................................................................13
To Unbypass a Zone.......................................................................................14
Disarming the System ..................................................................................... 14
USER CODES......................................................................................................16
Adding/Changing a User Code .......................................................................16
Deleting a User Code......................................................................................16
PAGING FEATURE..............................................................................................17
Follow-Me Displays .........................................................................................17
Changing the Pager Follow-Me Phone Number .............................................17
MISCELLANEOUS COMMANDS ........................................................................19
TESTING THE SYSTEM......................................................................................22
System Test .................................................................................................... 22
Battery Test.....................................................................................................22
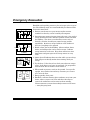
RECOMMENDATIONS ON SMOKE DETECTORS ............................................23
EMERGENCY EVACUATION..............................................................................24
RADIO FREQUENCY EMISSIONS STATEMENTS.................................... 25
FEDERAL COMMUNICATIONS COMMISSION (FCC) PART 15....................... 25
TELEPHONE/MODEM INTERFACE STATEMENTS ................................. 25
TELEPHONE OPERATIONAL PROBLEMS.................................................26
O560 DECLARATION OF CONFORMITY...............................................26
SYSTEM LIMITATIONS.......................................................................................27
GLOSSARY..........................................................................................................29

– 4 –
Quick Reference
Arming the System
Check to make sure the system is ready — Green READY LED is lit.
Enter your 4-digit User Code (or press the ARM button on your
keyfob).
The ARMED LED goes on.
Exit through a door designated by your installer as an exit/entry door.
Disarming the System
Enter through door designated by your installer as an exit/entry door.
Enter your 4-digit User Code (or press the DISARM button on your
keyfob).
The ARMED LED goes out.
Arm System/Stay Inside
Check to make sure the system is ready — Green READY LED is lit.
Press STAY followed by your User Code.
The ARMED and STAY LEDs light.
You must disarm the system if you want to open the door or leave the premises
after the exit time has passed.
Arm System/Stay Inside/Instant Mode
Check to make sure the system is ready — Green READY LED is lit.
Press INSTANT then STAY followed by your User Code.
The ARMED, INSTANT, and STAY LEDs are all lit.
Smoke Detector Reset
Enter your 4-digit User Code.

– 5 –
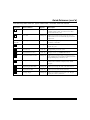
Quick Reference (cont’d)
The following table lists the “Quick Commands” available with this control.
Keystroke Quick Command Keypads Description
# 1
Quick Arm All keypads
If system is ready, allows you to arm the system without
requiring your User Code. Your User Code is always
needed to disarm the system.
# 2
Force Arm All keypads
Allows you to arm the system even if some zones are
faulted. These zones are automatically bypassed and are
unprotected.
[BYPASS] +
Zone No.
Quick Bypass All keypads
Allows you to bypass a specific zone number. Must be
enabled by your installer.
# 3
Set Time All keypads
Allows entry of the current system time (hours, minutes,
month, day, year).
# 4
Zone Directory LCD only Displays listing of zones in system.
# 55
Display Firmware Version LCD only Displays version of your OMNI-408 firmware.
# 56
Display Keyfob Battery Status All keypads
Allows you to test battery status of your keyfob. Upon
entry of this mode, press any button on the keyfob and the
keypad will display if your battery is low.
# 58
Change/View Pager Number All keypads
Allows you to redirect pager output to a different pager
number. Phone numbers are displayed only on LCD
keypads.
# 6
Display/Toggle Chime Mode All keypads Allows you to change the status of the chime function.
# 7
Display Current Time LCD only Allows you to view the current system time.
# 8
User Page Toggle All keypads
Allows you to turn the pager mode on or off. Keypad
displays the current system status.

– 6 –
Introduction
Congratulations on your decision to protect your home or business
with the OMNI
®
-408 security system. You have chosen a reliable,
state-of-the-art security system that is remarkably easy to operate.
Representatives from your local security company, who can explain
the specifics of your system, have professionally installed your system.
The keypad is the input and display device for your security system.
Your system can use either the OMNI-KP, OMNI-KP-US, OMNI-LCD,
OMNI-LCD-US, XK7LC, or XK108 keypads. The OMNI-KP and
OMNI-KP-US keypads display the system status with fixed words, the
OMNI-LCD, OMNI-LCD-US, and XK7LC keypads display two lines of
text, and the XK108 keypad displays the current zone status,
including alarms, bypasses, and faults, using LEDs. Each condition
causes the LEDs to operate differently.
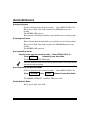
Throughout this guide, the following conventions are used to display
the keystrokes required to perform functions.
BYPASS
Key labeled [BYPASS]
INSTANT
Key labeled [INSTANT]
STAY
Key labeled [STAY]
CODE
Key labeled [CODE]
Enter your four-digit User Code.
Please keep your guide in a convenient location so you can refer to it if
needed.

– 7 –
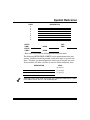
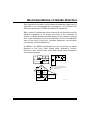
System Reference
ZONE DESCRIPTION
1
2
3
4
5
6
7
8
ENTRY
TIME 1
DOOR
EXIT
TIME*
ENTRY
TIME 2
DOOR
* Exit time is the same for all designated entry/exit doors.
The following SEND HELP ALERTS can be programmed into your
system. Both keys must be pressed at the same time to activate the
alert. The keys you press depend on which type of keypad you have.
Your installer will show you how to activate these emergency keys.
DESCRIPTION KEYS
[#] and [*]
[7] and [9]
[1] and [3]
See page 8 of this User Guide for pictures of the OMNI-KP,OMNI-KP-US, OMNI-
LCD, OMNI-LCD-US, XK7LC, and XK108 keypads.

– 8 –
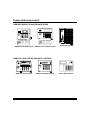
System Reference (cont’d)
OMNI-KP,OMNI-KP-US AND XK108 KEYPADS
ALARM
FIRE
INSTANT
BYPASS
TRBL
PAGE
STAY
SUPRVSN
CANCELED
CHIME
BAT
NOT READY
PHONE
TEST
TAMPER NO AC
OMNI-KP Fixed-Word Keypad
ALARM
FIRE
INSTANT
BYPASS
TRBL
PAGE
STAY
SUPRVSN
CANCELED
CHIME
BAT
NOT READY
PHONE
TEST
TAMPER NO AC
OMNI-KP-US Fixed-Word Keypad
XK108 LED Keypad
OMNI-LCD, OMNI-LCD-US, AND XK7LC KEYPADS
OMNI-LCD Alpha Keypad
OMNI-LCD-US Alpha Keypad
STAY
BYPASS
INSTANT
CODE
1
2
3
4
5
6
7
8
9
*
0
#
XK-7LC_kypd
XK7LC Alpha Keypad

– 9 –
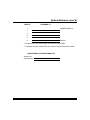
System Reference (cont’d)
USER ID ASSIGNED TO
1 (MASTER USER 1)
2
3
4
5
6 Duress**
* The Master User can add, change, or erase other User Codes.
** If enabled, this User Code will transmit a duress signal to the central station.
MONITORING STATION INFORMATION
Account No.
Telephone No.

– 10 –
System Operation
You can arm or disarm the burglar portion of your security system.
Before you can arm the system, it must be “ready.” If you have a
protected door open, or if someone is moving in view of a motion
detector, the system will not display “READY.”
The system is ready if the READY LED is lit and the display shows:
LCD Keypad:
SYSTEM READY
Fixed-Word Keypad:
READY LED lit
NOTE: If programmed by your installer, you may arm the system if a
delay or interior zone is faulted. However, faulted zones must be
restored before your exit time expires or an alarm or zone bypass will
result. Ask your installer if your system has this feature and, if so, if it
causes an alarm or zone bypass.
To Arm the System and Leave
Enter your User Code.
The ARMED LED goes on and the display shows:
LCD Keypad:
ON: AWAY
Fixed-Word Keypad:
ARMED LED lit
Exit through a door designated by your installer as an exit/entry door.
You must leave within the exit time programmed by your installer.
Refer to the reference sheet for the time that has been set for your
system.

– 11 –
System Operation (cont’d)
When the System is Not Ready
If the system is not ready to be armed, the READY LED is off and the
display indicates which zone or zones are not ready.
Determine which zone or zones are not ready, resolve the problem,
and arm the system normally. If the problem cannot be resolved, you
may bypass the zone that is not ready. Bypassing should only be done
if the problem on the zone cannot be resolved, OR if you intentionally
wish to leave the zone disarmed. For example, you would leave the
zone disarmed if you plan to keep the window open for ventilation.
Zones that are bypassed are not protected when the system is armed.
Refer to the paragraph entitled, “To Bypass a Zone” for a description
of the procedure.
To Arm the System and Stay Inside
To arm the perimeter portion of your burglar alarm and move around
freely inside the premises, use the STAY mode.
Check to make sure the system is ready. When it is ready, press:
STAY followed by your user code.
When the system has been armed successfully, the ARMED LED is
on, and the following is displayed:
LCD Keypad:
ON: STAY
Fixed-Word Keypad:
STAY
REMEMBER: You must disarm the system if you want to open the
door or leave the premises after the exit time has passed.

– 12 –
System Operation (cont’d)
To Arm the System In Instant Mode and Stay Inside
In INSTANT STAY mode, the perimeter portion of your burglar
alarm system is armed, but the time delays are eliminated from your
normal entry/exit door(s). All interior protection is disarmed, so you
are free to move around inside.
Check to make sure the system is READY. When it is ready, press:
INSTANT followed by
STAY followed by your User Code.
When the system has been armed successfully, the ARMED LED is
on, and the following is displayed:
LCD Keypad:
ON: STAY / INS
Fixed-Word Keypad:
STAY
INSTANT
NOTE: This system can be programmed by the installer for the
AUTOSTAY feature which automatically bypasses interior zones if
you arm the system in AWAY mode, but do not exit through a delay
zone during exit time.

– 13 –
System Operation (cont’d)
To Arm the System In Instant Mode
In INSTANT mode, all alarm sensors, including doors that normally
have a delay to allow you to disarm the system, will immediately
report an alarm if activated. Check to make sure the system is ready.
When it is ready, press:
INSTANT followed by your User Code.
When the system has been armed successfully, the ARMED LED is
on, and the following is displayed:
LCD Keypad:
ON: INSTANT
Fixed-Word Keypad:
INSTANT
To Bypass a Zone
The Bypass function excludes a zone of protection from the security
system until it is unbypassed (either by using the unbypass procedure
or when you disarm the system). Bypassing can only be done while
the system is disarmed.
Press the BYPASS button. Then enter your User Code and the zone
number (1-8) to be bypassed, as follows:
BYPASS followed by your User Code
†
and Zone No. (1-8)
†
If the Quick Bypass feature has been enabled by the installer, do not
enter the User Code when bypassing zones.

– 14 –
System Operation (cont’d)
NOTE: Bypassed zones are NOT protected when the system is armed.
After the bypass command has been accepted, the keypad sounds one
long beep, and the following is displayed:
LCD Keypad:
BYPASSED: ZN1
FRONT DOOR
Fixed-Word Keypad:
BYPASS
zone number displayed
To Unbypass a Zone
Pressing the BYPASS button returns a bypassed zone to normal
operation. To unbypass a zone(s), repeat the bypass function as
follows:
BYPASS followed by your User Code
†
and Zone No. (1-8)
After unbypassing, the zone display shows the state of the zones.
†
If the Quick Bypass feature has been enabled by the installer, do not
enter the User Code when unbypassing zones.
Disarming the System
When you disarm the system, you disarm only the burglar portion of
your system; any smoke or heat detectors and panic keys will remain
armed. You must enter through a designated entry door and disarm
the system within the time allowed. You can have different amounts
of time for different entry points. See your system reference sheet for
the times established for your system.
To disarm your system:
Enter your User Code.

– 15 –
System Operation (cont’d)
If no alarms have taken place, the ARMED LED goes off, and the
display shows:
LCD Keypad:
SYSTEM READY
Fixed-Word Keypad:
READY LED lit
If alarms occurred while the system was armed, or if a trouble
condition exists, the display shows:
LCD Keypad:
ALM MEM ZN1
FRONT DOOR
Fixed-Word Keypad:
ARMED LED off
READY LED blinks
The keypad scrolls through the zone or zones that were in alarm.
Burglary alarms sound a steady tone at the keypad(s), and fire alarms
generate a pulsing sound.
IMPORTANT: If an intrusion has taken place while you were away, do
not enter until the location has been checked. Call for help from a
neighbor's house and wait there for the police.
To clear the display of alarm or trouble conditions and silence the
audible alert:
Enter your User Code again.

– 16 –
User Codes
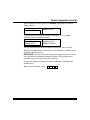
Adding/Changing a User Code
Users can be added or changed directly at the keypad. Your system
can have up to 6 different User Codes.
To add or change a User Code, press the following:
Master User Code User ID (1-6) New User Code
CODE
NOTES:
• User number 1 is a master user and can create or modify other
users.
•
User number 6 can be a duress code that will transmit a special
duress code to the central station.
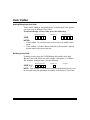
Deleting a User Code
To delete a user, press the CODE button followed by the 4-digit
Master User Code. Enter the user number, then press [∗] to delete.
For example, to delete user 3, do the following:
Master User Code User ID (1-6) ∗ to delete
CODE 3 [∗
∗∗
∗] *
NOTE: User number 1, the master user, cannot be deleted, but it can
be changed using the procedure for adding or changing a User Code.

– 17 –
Paging Feature
Your installer may have programmed your system to send messages
with certain system conditions to your pager. An explanation of those
messages is provided below.
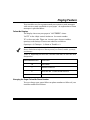
Follow-Me Displays
The display shown on your pager is "ACCTEXXX" where:
"ACCT" is the 4-digit central station no. 2 account number.
"E" is the event code. There are 4 event types: alarms, troubles,
openings, and closings. These event codes are as follows:
Openings = 0, Closings = 1, Alarm or Trouble = 9
If multiple events occur, the signal for the highest-priority event is sent first.
Events ranked from highest to lowest priority are alarms, trouble, openings,
and closings.
"XXX" is, depending on the event, the zone (001-008) or user (001-014)
designation.
USER DESIGNATION FUNCTION
1-6 User Codes
7 Remote arm/disarm
8 Quick Arm No. 1, Quick Forced Arm No. 2
9-14 Keyfobs
Changing the Pager Follow-Me Phone Number
You can change your pager follow-me phone number as follows if your
installer enabled this feature:

– 18 –
Paging Feature (cont’d)
1. Access pager number programming by pressing in sequence the
[#], [5], and [8] keys. An acknowledgement tone sounds to indicate
pager number programming has been accessed.
The [#], [5], [8] command is accessible only while the system is disarmed and the
dialer, dialer delay, and bell are not active.
LCD keypads will display the existing pager phone number.
2. Enter your new pager phone number. Your new pager phone
number may consist of up to 16 characters (1-9, 0). It may be
necessary to add time to allow the pager to answer before dialing
your pager number. To enter a 2-second pause, press the [CODE]
key. (Entering a 2-second pause is optional and is not required to
enter your pager phone number.) If the [CODE] key was pressed,
it counts as one character. The keypad will emit a single
acknowledgement chirp as each number is pressed.
3. Press the [#] key after you have made your pager phone number
changes. Pressing the [#] key saves your new pager number and
nulls out the remaining locations. An acknowledgement tone
sounds.
To exit without saving changes, press the [✴] key to exit pager phone
number programming. An acknowledgement tone sounds to indicate
pager number programming has been exited.
If you press the [✴] key without first pressing the [#] key to save your new pager
phone number, the system exits the pager phone number programming mode
without saving the changes.
If no key is pressed within 10 seconds, the pager phone number programming
mode times out and exits automatically without saving any information entered.

– 19 –
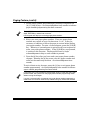
Miscellaneous Commands
Arm System (Maid Code)
If you choose to have a code that cannot disarm the system, but can
arm the system, have your installer program this feature. If
programmed, User Code No. 5 has system arming capability only, and
you can issue this code to a temporary user so they can secure the
premises when they leave.
Send Help Conditions
Your system can be programmed for three separate Send Help Alerts
that send an emergency signal to your central station. These three
alerts, along with their keypad combinations, are shown below:
Fire Panic Aux
[7] and [9] [*] and [#] [1] and [3]
Duress
Your system can be programmed to send an emergency signal to the
central station if you are forced to enter the premises. If you choose to
include this feature, User Code No. 6 is dedicated to this function and
must only be used under a duress circumstance.
Quick Arming Yes No
If programmed by your installer, Quick Arming allows you to arm the
system in the Away mode without entering a User Code. To enable
Quick Arm:
Press [#], [1].

– 20 –
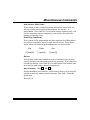
Miscellaneous Commands (cont’d)
Quick Forced Arm Yes No
If programmed by your installer, Quick Forced Arm allows you to arm
the burglar portion of your alarm system in the Away mode, bypassing
all zones that are not ready. To enable Quick Force Arm:
Press [#], [2].
A valid User Code is still required to disarm the system.
U
L
The Quick Forced Arm feature is disabled on UL installations.
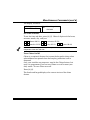
Quick Exit Yes No
If enabled, this feature allows the user to exit without having to
disarm, then arm the system. It is activated by pressing the [STAY]
key while the system is armed and not in entry delay. This starts the
exit time, causes the keypad to beep once, and allows the user to exit
without disarming the system. The system returns to its last armed
state after the exit time has expired.
Quick Bypass Yes No
If you have Quick Bypass programmed for your system, you do not
have to use your User Code to bypass zones. The Quick Bypass
procedure is:
BYPASS , Zone No. (1-8)
Bypassed zones are not protected while the system is armed. After the
Bypass command has been accepted, the keypad sounds one long beep, and
the zone or zones bypassed slowly blink.
La page est en cours de chargement...
La page est en cours de chargement...
La page est en cours de chargement...
La page est en cours de chargement...
La page est en cours de chargement...
La page est en cours de chargement...
La page est en cours de chargement...
La page est en cours de chargement...
La page est en cours de chargement...
La page est en cours de chargement...
La page est en cours de chargement...
La page est en cours de chargement...
-
 1
1
-
 2
2
-
 3
3
-
 4
4
-
 5
5
-
 6
6
-
 7
7
-
 8
8
-
 9
9
-
 10
10
-
 11
11
-
 12
12
-
 13
13
-
 14
14
-
 15
15
-
 16
16
-
 17
17
-
 18
18
-
 19
19
-
 20
20
-
 21
21
-
 22
22
-
 23
23
-
 24
24
-
 25
25
-
 26
26
-
 27
27
-
 28
28
-
 29
29
-
 30
30
-
 31
31
-
 32
32


Honeywell 408 Manuel utilisateur
- Catégorie
- Systèmes de contrôle d'accès de sécurité
- Taper
- Manuel utilisateur
- Ce manuel convient également à
dans d''autres langues
- English: Honeywell 408 User manual
Documents connexes
Autres documents
-
 Vivint Smart Hub Panel? User's Quick Start Manual
-
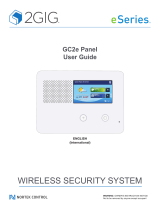 2gig GC2e Mode d'emploi
-
Ryobi TEK4 Manuel utilisateur
-
Support Honeywell ADT 2X16AIO Home Security Panel Guide d'installation
-
Velleman HAA85WP Manuel utilisateur
-
DSC WTK5504 Manuel utilisateur
-
-
DSC HS2TCHP Manuel utilisateur
-
-
Tyco HS2TCHPROBLK Manuel utilisateur

