La page est en cours de chargement...

Digital Alarm Clock Radio / Rádio Despertador Digital
Reloj Despertador Digital / Radio Réveil Digital
Instructions Manual
Manual de Instruções
Manual de Instrucciones
Mode d’emploi
Snoozer * RA-06B.005B
RoHS


GB
Instructions for use 1
Dear costumer
Thank you for having chosen a HÆGER product.
The HÆGER products have been produced to think about the welfare of the consumer
privileging the most raised standards of quality, functionality and assign. We are sure
you will be happy with this appliance.
Before using your radio for the first time please read these instructions thoroughly
and retains them for future reference.
INTENDED USE
This clock radio is exclusively intended as an entertainment device, as a clock and
receiver for medium wave (AM) and frequency modulation (FM) radio stations and
only for private non-commercial use.
SAFETY INSTRUCTIONS
When using electrically powered product, basic safety precautions should always be
followed including the following:
• Use the device only for the intended purpose.
• Do not place the clock radio in areas exposed to direct sunlight! Otherwise it
could overheat and be damaged beyond repair. This could cause a fire!
• Do not place in the immediate vicinity of heat sources such as ovens, heaters and
similar devices or vent openings of other electrical devices! Otherwise the clock
radio could be damaged beyond repair. This could cause a fire!
• Do not place in damp areas or near water. Otherwise moisture could enter the
radio. This could cause danger of electrical shock and fire!
• Select a suitable location for the clock radio, such as a dry, flat, non-slip surface on
which it is easy to operate.
• Do not place the clock radio in areas exposed to extreme physical shock or
constant vibrations. Physical shock and constant vibrations could lead to
malfunctions and long-term damage.
• No flame sources, such as lighted candles, should be placed on the apparatus.
• Ensure that the clock radio is sufficiently ventilated. The ventilation should not be
impeded by covering the ventilation openings with items such as newspaper,

English
2 Instructions for use
table-cloths, curtains etc. Leaving at least 5 cm around the apparatus for sufficient
ventilations.
• Only connect the device at a properly installed plug socket. Pay attention that the specified
voltage corresponds to the voltage of the plug socket.
• Never open the housing of the device. Incorrect repairs can constitute a considerable risk
for the user. Should the device become damaged, in particular the mains supply cable, do
not operate the device any longer, but rather have it repaired by a technician. Check the
mains supply cable regularly for damage.
• If the device is not used for a longer period, remove the plug connector from the plug
socket or take out the batteries.
• In order to ensure your children‘s safety, please keep all packaging (plastic bags,
boxes, polystyrene etc.) out of their reach.
Caution! Do not allow small children to play with the foil as there is a
danger of suffocation!
• To protect children from the dangers posed by electrical appliances, make sure
that the cable is hanging low and that children do not have access to the
appliance.
• This appliance can be used by children aged from 8 years and above and persons
with reduced physical, sensory or mental capabilities or lack of experience and
knowledge if they have been given supervision or instruction concerning use of
the appliance in a safe way and understand the hazards involved.
• Children shall not play with the appliance. Cleaning and user maintenance shall
not be made by children without supervision.
These symbols may be found on the machine and are intended to indicate the
following:
The lightning symbol should advise the user of parts in the inside of the
device which carry dangerously high voltage levels.
The symbol with an exclamation mark should advise the user of
important operation or maintenance instructions in the accompanying
documentation.
IMPROVING THE RECEPTION
FM: Extend the antenna and adjust the angle for optimum reception.
AM: Rotate the unit horizontally for the position in which reception is clearest. A
ferrite bar antenna is built into the unit.

English
Instructions for use 3
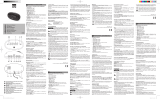
OPERATING CONTROLS
1. RADIO ON/OFF MODE 2. LED Digital CLOCK Display
3. VOLUME Control Λ /AL 1 4. VOLUME Control V / AL 2
5. FM ANTENNA 6. TUNING Λ / HR
7. TUNING V / MIN 8. SLEEP
9. SET 10. SNOOZE
11. AM/FM BAND 12. MEM (Memory)
13. BATTERY COMPARTMENT 14. AL1 Buzzer indicator
15. AL1 radio indicator 16. AL2 Buzzer indicator
17. AL2 radio indicator
AC POWER SUPPLY
• Insert the plug into a properly installed 230 V, 50 Hz power socket.
• Ensure that the voltage is the same as that indicated on the model identification
plate.
INSERTING THE BATTERIES (not supplied)
If there is a power cut or the mains plug has been removed from the power socket,
the settings will be retained if the power reserve batteries are inserted.
1. Open the battery compartment on the underside.
2. Insert 2xAAA/LR03 size (or equivalent) batteries to the supply connection.
Please ensure the correct polarity.
3. Close the battery compartment again.
4. If the device is not used for a prolonged period of time, please take the batteries
out in order to prevent leakage of battery acid.
NOTES ON BATTERIES
• Do not charge the dry batteries.
• Do not carry the dry batteries with coins or other metallic objects. It can generate
heat if the positive and negative terminals of the batteries are accidentally
contacted by a metallic object.
• Do not use different types of batteries at the same time.
• When you replace the batteries, replace all with new ones.
• When you are not going to use the unit for a long time, remove the batteries to
avoid damage from battery leakage and corrosion.

English
4 Instructions for use
Battery acid could leak out, especially if the batteries are old. Therefore
you should remove all batteries if you do not plan to use the radio for
long periods of time. This protects the radio from battery acid leakage.
BASIC OPERATION
STANDBY MODE
After connecting the power supply, the unit is in standby mode and the clock time
0:00 will flash. Please refer to “CLOCK AND ALARM TIME SETTING” to set the time.
Press RADIO ON/OFF (1) button to turn on the unit to power on / radio mode or press
it again to go back to the standby mode.
RADIO MODE
Press RADIO ON/OFF (1) button to switch on the unit, the current radio frequency
appears on the display for about 5 seconds, after which the current time indication
returns to the display.
CLOCK AND ALARM TIME SETTING
CLOCK TIME SETTING
In standby mode,
1. Press and hold SET (9) button for about 2 seconds until
the hour and minute digits blink.
2. Press HR (6) button to set the hours.
3. Press MIN (7) button to set the minutes.
4. Press SET (9) button again to confirm the clock time
setting (hour and minute digits will become solid when finished).
ALARM 1 TIME SETTING
In standby mode,
1. Press and hold AL1 (3) button for about 2 seconds until the hour and minute
digits blink.
2. Press HR (6) button to set the hours.
3. Press MIN (7) button to set the minutes.
4. Press AL1 (3) button again to confirm the alarm 1 time setting (current time
indication returns to the display when finished).

English
Instructions for use 5
ALARM 2 TIME SETTING
In standby mode,
1. Press and hold AL2 (4) button for about 2 seconds until the hour and minute
digits blink.
2. Press HR (6) button to set the hours.
3. Press MIN (7) button to set the minutes.
4. Press AL2 (4) button again to confirm the alarm 2 time setting (current time
indication returns to the display when finished).
PLEASE NOTE: When operating from batteries only (during back-up mode), the
display will be off and clock will only remain accurate for a short period of time. The
clock accuracy will decrease due to the voltage drop of the back-up batteries. It is
important that the mains supply is restored as soon as possible. If no backup
batteries are installed or the power failure is prolonged, you will need to set the clock
again.
ALARM OPERATION
You can set the radio or buzzer alarms at both preset alarm times in standby mode:
WAKE UP BY BUZZER OR RADIO
1. To set or adjust the alarm time, follow the steps in “CLOCK AND ALARM TIME
SETTING”.
2. To set alarm mode (radio or buzzer) or disable the alarm function for ALARM 1,
Press AL1 (3) repeatedly until the desired alarm mode appears on the display.
Each time you press AL1 (3), the alarm indication changes as follows:
No alarm indication (alarm 1 is disabled) → AL1 buzzer indicator (14) →
AL1 radio indicator (15) → No alarm indication (alarm 1 is disabled)
3. To set alarm mode (radio or buzzer) or disable the alarm function for ALARM 2,
Press AL2 (4) repeatedly until the desired alarm mode appears on the display.
Each time you press AL2 (4), the alarm indication changes as follows:
No alarm indication (alarm 2 is disabled) → AL2 buzzer indicator (16) →
AL2 radio indicator (17) → No alarm indication (alarm 2 is disabled)
4. When the alarm time is reached, the radio or buzzer will sound unless the alarm
function is disabled.

English
6 Instructions for use
NOTE: While volume of buzzer alarm is fixed and cannot be adjusted, the volume,
band and frequency of radio alarm are preset as last tuned. When the radio alarm
sounds, you can also adjust the listening level by VOLUME Λ (3) / V (4) buttons. To
select the station, refer to “Radio Operation”.
REVIEW THE ALARM TIME
In standby mode, press and hold AL1 (3) button for ALARM 1 or AL2 (4) button for
ALARM 2 for about 2 seconds, then the alarm time setting will blink in the display.
Press AL1 (3) (for ALARM 1) or AL2 (4) (for ALARM 2) again to return to the clock time
display.
SNOOZE FUNCTION
When the alarm is sounding, press SNOOZE (10) button to stop the alarm
temporarily. The AL1/AL2 buzzer indicator (14)/(16) or AL1/AL2 radio indicator
(15)/(17) will keep blinking while the snooze function is in operation, and the alarm
will sound again after about 9 minutes. To stop the alarm, press the RADIO ON/OFF
(1) button once. The alarm indicator will become solid and the alarm will function at
the same time on the next day.
RADIO OPERATION
LISTEN TO THE RADIO
1. Press RADIO ON/OFF MODE (1) button to turn on the
radio.
2. The default frequency 87.5 (MHz) (FM mode, for first
use) or the last tuned frequency (AM or FM mode) will be
displayed.
3. Press BAND (11) button to select the band.
4. Automatic tuning - Press and hold TUNING Λ (6) / V (7) button for about 2
seconds until the frequency displayed move up or down. Release the button.
The tuner will scan and stop for the first strong station. Repeat until the desired
station is reached.
5. Manual fine-tuning - Press TUNING Λ (6) button / V (7) button repeatedly to
adjust the frequency by each step.
VOLUME CONTROL
In radio mode, press the VOLUME Λ (3) / V (4) button to adjust the volume level.

English
Instructions for use 7
PROGRAM PRESET RADIO STATIONS
You can store up to 10 preset stations each for FM and AM band.
1. Tune in the station you want to preset.
2. Press and hold SET (9) button for about 2 seconds until
program number blink. Press the SET (9) button again to
store the station.
3. Repeat these steps to store additional stations.
RECALL PRESET RADIO STATION
In radio mode, press the MEM (12) button repeatedly to the program number of
which the desired station is stored.
INFORMATION REGARDING RADIO OPERATION
Interference when listening to the radio can be caused by other electrical devices in
the near vicinity (e.g. television, PC screens, etc.) The radio should be kept away from
these devices that interfere.
SLEEP TIMER
In radio mode, you can use the sleep timer function to turn off the radio
automatically after a preset duration (up to 90 minutes).
1. Press SLEEP (8) button, and“90”is displayed.
2. Press SLEEP (8) button repeatedly to select the duration: 90,
80, 70…. Each time the button is pressed, the duration is
reduced by 10 minutes, until “OFF” is displayed.
3. The radio will turn off automatically after the selected
preset duration has elapsed.
4. To check the remaining playing time, press SLEEP (8) button once.
5. To cancel the sleep function and turn off the radio, press RADIO ON/OFF (1)
button.
CLEANING
Clean the cabinet with a soft cloth moistened with water or mild detergent. Do not
use solvents such as alcohol, benzene or thinner, as they may damage the cabinet
finish. Make sure to disconnect the mains lead from the supply before cleaning.

English
8 Instructions for use
WARNING
The clock radio contains no user-serviceable parts. The warranty is void if the casing
of the radio is opened! No liability will be taken and no guarantee will be made for
damages due to opening the case of the radio, resulting from repair attempts not
made by qualified experts and use of the radio for purposes other than intended!
TECHNICAL DATA
Model: RA-06B.005B
Power supply: AC 230V, 50Hz
Power output: 0.3W RMS
Back-up batteries: 2 x 1,5V AAA / LR03 type or equivalent
Frequency range: FM: 87.5-108 MHz
AM: 522 – 1620 KHz
Power consumption (standby mode) < 1.0W
CONFORMITY
This product complies with essential requirements of the Radio
Equipment Directive 2014/53/EU and has been constructed in
accordance with the latest Health and Safety requirements and
Protection requirements relating electromagnetic compatibility.
ENVIRONMENT
Please consider our environment
Do not dispose of the appliance in your normal domestic waste. This
product is subject to the European guideline 2012/19/EU.
Dispose of the appliance through an approved disposal centre or at your community
waste facility. Observe the currently applicable regulations. In case of doubt, please
contact your waste disposal centre.
Dispose of all packaging materials in an environmentally responsible manner.
NOTE: You should remove all batteries before disposing of the radio. Do not dispose
of the batteries in the household waste! Return the used batteries to an appropriate
recycling collection centre. Used batteries can usually be returned to the store in
which they were bought.

English
Instructions for use 9
GUARANTEE
This unit is covered by a 24 months (*) warranty, from the purchase date, and covers
the repair free of charges of the damaged due to the manufacturer fault or defected
components. The distributor reserves the right to change the unit for an equivalent
model.
The warranty does not cover any damaged caused by incorrect use, lightning,
incorrect installation, external factors or any intentional damaged. The warranty does
not cover damage thus attributable to falls, blows, spill, exposure to extreme
environmental conditions or deterioration caused by normal use of plastic parts or
keyboards, as well as by the use of batteries other than those specified in this manual.
For the repairing, during the warranty period, the unit shall be sent to the distributor
or reseller, or to the address indicated by them, and must be jointed the warranty
certificated and the respective original invoice or selling ticket, where the buying date
is expressed indicated.
The consumer is protected by the guarantee provided by Directive 1999/44/CE of
European Parliament and Council of 25 May.
(*) Only on European Union countries

PT
10 Manual de Instruções
Estimado Cliente
Obrigado por ter escolhido um produto HÆGER.
Os produtos HÆGER foram concebidos a pensar no bem-estar do consumidor,
privilegiando os mais elevados padrões de qualidade, funcionalidade e designe.
Estamos certos da sua satisfação pela aquisição deste produto.
Antes da primeira utilização, leia cuidadosamente este manual e guarde-o para
consultas futuras.
UTILIZAÇÃO PREVISTA
Este rádio relógio destina-se exclusivamente como um dispositivo de entretimento
como um relógio e um recetor de estações de rádio de frequência modulada (FM) e
de ondas médias (AM) e apenas para uso privado e não comercial.
INDICAÇÕES DE SEGURANÇA
Ao usar aparelhos elétricos, precauções básicas de segurança devem ser sempre
seguidas, incluindo as seguintes:
• Utilize o aparelho só para o fim previsto.
• Não coloque o rádio relógio em locais sujeitos à radiação solar direta! Caso
contrário, poder-se-á sobreaquecer e danificar-se de forma irreparável. Existe
também o perigo de incêndio!
• Não coloque o aparelho perto de fontes de calor como por exemplo fornos,
termoventiladores e aparelhos similares, bem como aberturas de ventilação de
outros aparelhos elétricos! Caso contrário, poderá danificar-se de forma
irreparável. Existe também o perigo de incêndio!
• Não coloque o rádio relógio em ambientes húmidos ou perto da água pois a
humidade poderá penetrar no aparelho havendo o perigo de um choque elétrico
e de incêndio!
• Escolha um local adequado para colocar o aparelho. Por exemplo sobre uma
superfície seca, horizontal e antiderrapante na qual possa servir-se bem do
aparelho.
• Não coloque o rádio em locais sujeitos a forte trepidação ou constantes vibrações.
As fortes trepidações e as vibrações constantes poderão causar falhas de
funcionamento temporárias ou mesmo danos permanentes.

Português
Manual de Instruções 11
• Não devem ser colocadas sobre o aparelho fontes de chama aberta, como por
exemplo, velas acesas.
• O aparelho devera estar bem ventilado. A ventilação não deve ser impedida pela
cobertura de ventilação por jornais, toalhas de mesa, cortinas, etc. Deixe pelo
menos 5 cm ao redor do aparelho para ventilação suficiente.
• Ligue o aparelho a uma tomada de corrente devidamente instalada. Tenha
atenção para que a tensão indicada corresponda à tensão da tomada de corrente.
• Nunca se deve abrir a caixa do aparelho. Devido a reparações inadequadas
poderão resultar perigos para o utilizador do aparelho. Em case de avaria no
aparelho, principalmente referentes ao cabo de alimentação, nunca se deverá
voltar a por o aparelho a funcionar, mas sim mandar conserta-lo por um técnico
qualificado. No que respeita a possíveis estragos é aconselhável verificar
regularmente o cabo de alimentação.
• No caso de não se utilizar o aparelho por longo tempo devera retirar-se a ficha da
rede da tomada de corrente ou retirar as baterias.
• Para a segurança dos seus filhos, não deixe partes da embalagem (sacos plásticos,
papelão, esferovite, etc.) ao alcance dos mesmos.
Atenção! Não deixe crianças pequenas brincarem com folhas de plástico.
Perigo de asfixia!
• Para proteger as crianças dos perigos relacionados com aparelhos elétricos, nunca
deixe os fios pendurados e atente em que as crianças não possam chegar a tais
aparelhos.
• Este aparelho só pode ser utilizado por crianças a partir dos 8 anos e por pessoas
com capacidades físicas, sensoriais ou mentais limitadas, ou pessoas com falta de
experiência ou conhecimento, caso tenham recebido supervisão ou formação
sobre como utilizar o aparelho de forma segura e percebam os perigos inerentes.
• As crianças não devem utilizar este aparelho como um brinquedo. A limpeza e a
manutenção do aparelho não devem ser efetuadas por crianças sem supervisão.
Poderão ser encontrados estes símbolos no aparelho. Eles servem para chamar a
atenção para o seguinte:
O símbolo de raio deverá chamar a atenção do utilizador para as peças
do interior do aparelho, as quais podem motivar perigos de alta tensão.
O símbolo com pontos de exclamação deverá chamar a atenção ao
utilizador para importantes instruções de serviço e de assistência que
se encontram nas folhas anexas.

Português
12 Manual de Instruções
MELHORAR A RECEPÇÃO
FM: Estenda a antena e ajuste o comprimento e o ângulo para a melhor receção.
AM: Gire o aparelho na horizontal para a posição em que a receção é mais clara. Uma
antena de barra de ferrite está incorporada no aparelho.
ELEMENTOS DE COMANDO
1. MODO RADIO ON/OFF 2. Visor LED RELÓGIO DIGITAL
3. Controlo de VOLUME Λ /AL1 4. Controlo de VOLUME V / AL2
5. ANTENA FM 6. BOTÃO DE SINTONIA Λ /HR
7. BOTÃO DE SINTONIA V / MIN 8. BOTÃO SLEEP
9. BOTÃO SET 10. BOTÃO SNOOZE
11. SELECTOR DE BANDA AM/FM 12. BOTÃO MEM (Memória)
13. COMPARTIMENTO DE PILHAS 14. Indicador AL1 BUZZER
15. Indicador AL1 RADIO 16. Indicador AL2 BUZZER
17. Indicador AL2 RADIO
LIGAÇÃO A CORRENTE ELÉCTRICA
• Insira a ficha de alimentação a uma tomada de corrente de 230 V /50 Hz instalada
conforme os regulamentos.
• Certifique-se de que a tensão da corrente corresponde as indicações da placa de
características.
COLOCAÇÃO DAS PILHAS (não incluídas)
Se houver um corte de energia ou a ficha de alimentação foi removido da tomada, as
configurações serão mantidas se as pilhas de reserva de energia forem instaladas.
1. Abra a tampa do compartimento das pilhas que se encontra na parte inferior.
2. Introduza 2 pilhas de 1,5 volts AAA/LR03 (ou equivalentes). Por favor verifique a
polaridade correta.
3. Feche o compartimento das pilhas.
4. Se o aparelho não for usado por um período prolongado, por favor retire as pilhas
a fim de evitar o vazamento de ácido de bateria.

Português
Manual de Instruções 13
NOTAS ACERCA DAS PILHAS
• Não tente recarregar pilhas secas.
• Não transporte as pilhas secas juntamente com moedas ou outros objetos
metálicos. Se os polos, positivo e negativo das pilhas entrarem acidentalmente
em contacto com objetos metálicos, pode gerar-se calor.
• Não utilize simultaneamente diferentes tipos de pilha.
• Na substituição de pilhas, troque todas por outras novas.
• Se não tencionar utilizar o aparelho durante muito tempo, retire as pilhas para
evitar os danos provocados pela fuga do eletrólito e pela corrosão.
Poderão ocorrer fugas de ácido de pilhas, principalmente no caso de
pilhas velhas. Por conseguinte, retire todas as pilhas se não for utilizar o
rádio durante um período mais prolongado. Desta forma protegerá o
rádio de eventuais danos devidos a fuga de ácido de pilhas.
OPERAÇÕES BÁSICAS
MODO NORMAL
Depois de ligar a ficha de alimentação à tomada, o aparelho apresenta as horas 0:00
a piscar fica em modo de espera (modo normal). Consulta “AJUSTAR A HORA E O
ALARME” para acertar a hora. Pressione o botão RADIO ON/OFF (1) para ligar o rádio
ou pressione novamente para voltar ao modo normal.
MODO RÁDIO
Pressione o botão RADIO ON/OFF para ligar o rádio. A frequência da estação de rádio
atual aparece no visor durante 5 segundos após os quais retorna para a indicação das
horas.
AJUSTAR A HORA E O ALARME
ACERTAR A HORA
Em modo de espera,
1. Pressione e mantenha pressionado o botão SET (9) cerca
de 2 segundos até os dígitos da hora e dos minutos
piscam.
2. Pressione o botão HR (6) para acertar a hora.
3. Pressione o botão MIN (7) para acertar os minutos.
4. Pressione de novo o botão SET (9) para confirmar (os
dígitos da hora e dos minutos ficaram fixos quando terminar).

Português
14 Manual de Instruções
ALARME 1 – REGULAR A HORA DE DESPERTAR 1
Em modo de espera,
1. Pressione e mantenha pressionado o botão AL1 (3) cerca de 2 segundos até que
os dígitos da hora e dos minutos comecem a piscar.
2. Pressione o botão HR (6) para ajustar a hora.
3. Pressione o botão MIN (7) para ajustar os minutos.
4. Pressione de novo o botão AL1 (3) para confirmar o alarme 1 (o visor mostra a
hora atual quando terminar).
ALARME 2 – REGULAR A HORA DE DESPERTAR 2
Em modo de espera,
1. Pressione e mantenha pressionado o botão AL2 (4) cerca de 2 segundos até que
os dígitos da hora e dos minutos comecem a piscar.
2. Pressione o botão HR (6) para ajustar a hora.
3. Pressione o botão MIN (7) para ajustar os minutos.
4. Pressione de novo o botão AL2 (4) para confirmar o alarme 1 (o visor mostra a
hora atual quando terminar).
ATENÇÃO: Quando está a funcionar somente com as pilhas (durante o modo de
reserva), o visor fica desligado e relógio só estará correto durante um curto período.
A precisão do relógio diminuirá devido à queda de tensão das baterias de reserva. É
importante que a fonte de alimentação seja restaurada o mais rapidamente possível.
Se não houver baterias de reserva instaladas ou a falta de energia for prolongada,
terá de ajustar o relógio novamente.
FUNCIONAMENTO DO ALARME
Poderá definir o despertar com rádio ou com zumbido em ambos os alarmes
predefinidos em modo de espera.
DESPERTAR COM ZUMBIDO OU COM RÁDIO
1. Para programar ou ajustar a hora do alarme, siga os passos em “AJUSTAR A
HORA E O ALARME”.
2. Para programar o modo de alarme (rádio ou zumbido) ou desativar a função
para o ALARME 1, pressione AL1 (3) repetidamente até o modo de alarme
desejado aparecer no visor. Cada vez que pressione o botão AL1 (3), o indicador
de alarme muda como se segue.

Português
Manual de Instruções 15
Sem indicação de alarme (alarme 1 desativado) → Indicador AL1 BUZ (14) →
Indicador AL1 RADIO (15) → Sem indicador de alarme (alarme 1
desativado)
3. Para programar o modo de alarme (rádio ou zumbido) ou desativar a função
para o ALARME 2, pressione AL2 (4) repetidamente até o modo de alarme
desejado aparecer no visor. Cada vez que pressione o botão AL2 (4), o indicador
de alarme muda como se segue.
Sem indicação de alarme (alarme 2 desativado) → Indicador AL2 BUZ (16) →
Indicador AL2 RADIO (17) → Sem indicador de alarme (alarme 2
desativado)
4. Logo que se alcance a hora programada, ouve-se o rádio ou um sinal acústico a
menos que o alarme esteja desligado.
NOTA: Enquanto o volume de alarme sonoro é fixo e não pode ser ajustado, o
volume, a banda e frequência de rádio despertador estão predefinidas como último
ajuste. Quando se ouve o rádio alarme, também pode ajustar o nível de audição
através dos botões VOLUME Λ (3) / V (4). Para selecionar a estação, consulte
"FUNCIONAMENTO DO RÁDIO"
REVER A HORA DO ALARME
Em modo de espera, pressione e mantenha pressionado o botão AL1 (3) para o
ALARME 1 ou AL2 (4) para o ALRME 2 cerca de 2 segundos até que a hora do alarme
pisca no visor. Pressione AL1 (3) ou AL2 (4) de novo para voltar para o modo de hora
atual.
FUNÇÃO SNOOZE
Quando o alarme soa, pressione o botão SNOOZE (10) para parar o alarme
temporariamente. O indicador BUZZER AL1/AL2 ou indicador RADIO AL1/AL2 ficará a
piscar enquanto a função SNOOZE está em funcionamento, o alarme irá soar
novamente passados cerca de 9 minutos. Para parar o alarme, pressione o botão
RADIO ON/OFF (1) uma vez. O indicador de alarme ficará fixo e irá tocar novamente
no dia seguinte.
FUNCIONAMENTO DO RADIO
ESCUTAR A RÁDIO
1. Pressione o botão RADIO ON/OFF (1) para ligar o rádio.
2. A frequência por defeito 87.5 MHz (modo FM, na
primeira utilização) ou a última frequência sintonizada
(modo AM ou FM) será apresentada.

Português
16 Manual de Instruções
3. Pressione o botão BANDA (11) para selecionar a banda.
4. Sintonia automática – Pressione e mantenha pressionado o botão de SINTONIA
Λ (6) / V (7) cerca de 2 segundos até que a frequência mostrada mova para
cima ou para baixo. Liberte o botão. O sintonizador irá pesquisar e para na
primeira estação com sinal forte. Repita até encontrar a estação pretendida.
5. Sintonia manual fina – Pressione o botão SINTONIA Λ (6) / V (7) repetidamente
para ajustar a frequência por etapas.
CONTROLO DE VOLUME
Em modo de rádio, pressione o botão VOLUME Λ (3) / V (4) para aumentar ou
diminuir o volume.
MEMORIZAR ESTAÇÕES DE RÁDIO
Pode memorizar até 10 estações de rádio para cada banda FM ou AM.
1. Sintonize a estação que pretende memorizar.
2. Pressione e mantenha pressionado o botão SET (9) cerca
de 2 segundos até o número do programa piscar.
Pressione o botão SET (9) de novo para memorizar a
estação.
3. Repita estes passos para memorizar mais estações.
CHAMAR UMA ESTAÇÃO DE RÁDIO MEMORIZADA
Em modo de rádio, pressione o botão MEM (12) várias vezes para o número do
programa no qual a estação está memorizada.
INFORMAÇÃO QUANTO AO FUNCIONAMENTO DO RÁDIO
As interferências no caso do funcionamento do rádio podem ser ocasionadas por
outros aparelhos elétricos nas proximidades (p.ex., aparelhos de televisão,
monitores, etc.). O aparelho deve ser mantido afastado destas fontes de
interferências.
FUNÇÃO SLEEP (TEMPORIZADOR)
Em modo de rádio, pode usar a função temporizador SLEEP
para desligar automaticamente o rádio após um tempo pré-
definido. (até 90 minutos)
1. Pressione o botão SLEEP (8), o visor mostra 90”.
2. Pressione o botão SLEEP (8) repetidamente para definir
a duração: 90, 80, 70, …. De cada vez que pressione o

Português
Manual de Instruções 17
botão SLEEP, a duração é reduzida de 10 minutos até aparecer “OFF”
(desligado).
3. O rádio desliga-se automaticamente após o período pré-definido ter decorrido.
4. Para verificar o tempo que falta, pressione o botão SLEEP (8) uma vez.
5. Para cancelar a função e desligar o rádio, pressione o botão RADIO ON/OFF (1).
LIMPEZA
Limpe a caixa do rádio apenas com um pano macio e ligeiramente humedecido com
água ou detergente neutro. Não use solventes como álcool, benzina ou diluente, pois
pode danificar o acabamento da caixa. Certifique-se de desligar o cabo de
alimentação da tomada de corrente antes de limpar.
AVISO
O rádio não contém quaisquer componentes que necessitem de manutenção por
parte do utilizador. A garantia caducará se o rádio for aberto! Não assumimos
qualquer responsabilidade nem oferecemos garantia por danos devidos à abertura
do rádio, a tentativas de reparação efetuadas por pessoal não especializado nem
qualificado e à utilização incorreta do rádio.
DADOS TÉCNICOS
Modelo: RA-06B.005B
Alimentação: 230VAC, 50Hz
Potência de saída: 0,3W RMS
Pilhas de reserva: 2x 1,5V tamanho AAA/LR03 ou equivalente
Gama de frequência: FM: 87.5-108 MHz
AM: 522 – 1620 KHz
Consumo de energia (modo de espera) < 1.0W
CONFORMIDADE CE
Este produto está em conformidade com os requisitos essenciais da
Diretiva de Equipamento de Rádio 2014/53/EU e foi construído de
acordo com os mais recentes requisitos de Saúde e Segurança e
requisitos de Proteção relacionados com compatibilidade
eletromagnética.

Português
18 Manual de Instruções
MEIO AMBIENTE
Tenha sempre presente o nosso meio ambiente
Nunca deite o aparelho no lixo doméstico normal.
Este produto está em conformidade com a diretiva europeia 2012/19/EU.
Elimine o aparelho através de um serviço de eliminação autorizado ou das
entidades de eliminação locais.
Preste atenção às prescrições atuais válidas. Em caso de dúvida entre em contacto
com a entidade de eliminação de resíduos.
Elimine todos os materiais de embalagem de forma ecológica.
NOTA: Retire imprescindivelmente as pilhas antes de eliminar o rádio. Não elimine as
pilhas com os resíduos domésticos! Entregue as pilhas usadas junto de um local de
recolha ou eliminação própria. As pilhas usadas podem também ser devolvidas à loja
onde foram adquiridas.
GARANTIA
O importador garante este produto por um período de 24 meses (*) a partir da data
de compra, e cobre a reparação sem encargos com mão-de-obra e materiais, avarias
devidas a defeitos de fabricação ou componentes defeituosos, reservando-se o
responsável pela garantia, segundo o seu próprio critério, o direito de substituição
por aparelho igual ou equivalente.
A garantia não cobre as avarias provocadas por uso indevido, instalação incorreta,
descargas elétricas, dano intencional do aparelho ou por causas estranhas ao mesmo.
A garantia não cobre assim danos atribuíveis a quedas, pancadas, derrame de
líquidos, exposição a condições extremas do meio ambiente ou deterioração
provocada pelo uso normal das partes plásticas ou teclados, bem como pelo uso de
baterias ou pilhas diferentes das especificadas neste manual.
Se o aparelho avariar durante o período da garantia, deverá entrar em contacto com
o estabelecimento vendedor e remeter o aparelho para o local por este indicado,
fazendo-o acompanhar do certificado de garantia e respetiva prova de compra.
O consumidor goza de todas as garantias previstas na Diretiva 1999/44/CE do
Parlamento Europeu e do Conselho, de 25 de maio.
(*) Só para países da União Europeia.
/