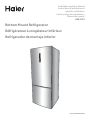
Haier HRB15N3BGS Manuel utilisateur
- Catégorie
- Réfrigérateurs combinés
- Taper
- Manuel utilisateur

Bottom Mount Refrigerator
Réfrigérateur à congélateur inférieur
Refrigerador de montaje inferior
Installation and User Manual
Instructions d’installation et
guide de l’utilisateur
Instrucciones de instalación y
Manual del usuario
HRB15N3
Part # 0570001012 REV A


1
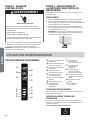
TABLE OF CONTENTS
REFRIGERATOR SAFETY ........................................................................................................................................................................ 2
PARTS AND FEATURES .......................................................................................................................................................................... 3
INSTALLATION REQUIREMENTS ............................................................................................................................................................ 4
Location Requirements .............................................................................................................................................................................................. 4
Electrical Requirements .............................................................................................................................................................................................4
INSTALLATION INSTRUCTIONS ............................................................................................................................................................. 5
Step 1 - Unpack the Refrigerator ............................................................................................................................................................................... 5
Step 2 - Door Reversing .............................................................................................................................................................................................5
Step 3 - Complete the Installation .............................................................................................................................................................................9
Step 4 - Leveling and Door Adjustment ..................................................................................................................................................................10
REFRIGERATOR USE ............................................................................................................................................................................. 10
Using the Controls .................................................................................................................................................................................................... 10
Features ....................................................................................................................................................................................................................12
REFRIGERATOR CARE .......................................................................................................................................................................... 13
Cleaning ....................................................................................................................................................................................................................13
Lights .........................................................................................................................................................................................................................14
Vacation and Moving Care .......................................................................................................................................................................................14
Reinstalling/Using Refrigerator Again .....................................................................................................................................................................14
TROUBLESHOOTING ........................................................................................................................................................................... 14
LIMITED WARRANTY ........................................................................................................................................................................... 16
RECORD KEEPING
Thank you for purchasing this Haier product. This user manual will
help you get the best performance from your new refrigerator.
For future reference, record the model and serial number located on
the inside wall of the refrigerator, and the date of purchase.
Staple your proof of purchase to this manual to aid in obtaining
warranty service if needed.
___________________________________________________________
Model number
___________________________________________________________
Serial number
___________________________________________________________
Date of purchase

2
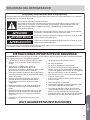
REFRIGERATOR SAFETY
Your safety and the safety of others are very important.
We have provided many important safety messages in this manual and on your appliance. Always read and obey all
safety messages.
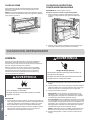
DANGER
WARNING
CAUTION
This is the safety alert symbol.
This symbol alerts you to potential hazards that can kill or hurt you and others. All safety messages will
follow the safety alert symbol and either the word “DANGER,” “WARNING” or “CAUTION.”
These words mean:
An imminently hazardous situation. You could be killed or seriously injured if you don’t
immediately follow instructions.
A potentially hazardous situation which, if not avoided, could result in death or serious
bodily injury.
A potentially hazardous situation which, if not avoided, may result in moderate or minor
injury.
All safety messages will tell you what the potential hazard is, tell you how to reduce the chance of injury, and tell you what
can happen if the instructions are not followed.
IMPORTANT SAFETY INSTRUCTIONS
WARNING: To reduce the risk of re, electrical shock, injury to persons, or damage when using the refrigerator, follow basic
precautions, including the following:
•
Use this appliance only for its intended purpose as
described in this user manual.
•
This refrigerator must be properly installed in
accordance with the installation instructions before it
is used. See grounding instructions in the installation
section.
•
Flammable refrigerant used. Do not use mechanical
devices to defrost freezer. Do not puncture refrigerant
tubing.
•
Flammable refrigerant used. To be repaired only by
trained service personnel. Do not puncture refrigerant
tubing.
•
Flammable refrigerant used. Dispose of properly in
accordance with federal or local regulations.
•
Flammable refrigerant used. Follow handling
instructions carefully. Risk of re or explosion due to
puncture of refrigerant tubing.
•
Plug into a grounded 3 prong outlet.
•
Do not remove ground prong.
•
Do not use an adapter.
•
Do not use an extension cord.
•
Do not repair or replace any part of the appliance unless
specically recommended in the manual. All other
servicing should be referred to a qualied technician.
•
Disconnect power before servicing.
•
Replace all parts and panels before operating.
•
Use nonammable cleaner.
•
Keep ammable materials and vapors, such as gasoline,
away from refrigerator.
•
Cabinet edges along stamp/ cutout areas may be sharp.
Avoid placing hands, ngers or other appendages near
these areas.
•
Before discarding or removing from service, remove
the doors. This will reduce the possibility of danger to
children.
READ AND SAVE THESE INSTRUCTIONS
State of California Proposition 65 Warnings:
WARNING: This product contains one or more chemicals known to the State of California to cause cancer.
WARNING: This product contains one or more chemicals known to the State of California to cause birth defects or other
reproductive harm.

3
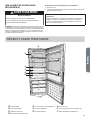
PROPER DISPOSAL OF YOUR OLD
REFRIGERATOR
WARNING
Suffocation Hazard
Remove doors from your old refrigerator.
Failure to do so can result in death or brain damage.
IMPORTANT: Child entrapment and suocation are not problems
of the past. Junked or abandoned refrigerators are still dangerous -
even if they will sit for “just a few days.” If you are getting rid of your
old refrigerator, please follow these instructions to help prevent
accidents.
Before You Throw Away Your Old Refrigerator or Freezer:
•
Take o the doors.
•
Leave the shelves in place so that children may not easily climb
inside.
Important information to know about disposal of refrigerants:
Dispose of freezer in accordance with Federal and Local
regulations. Refrigerants must be evacuated by a licensed, EPA
certied refrigerant technician in accordance with established
procedures.
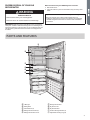
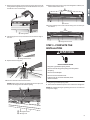
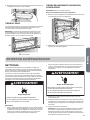
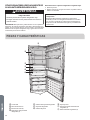
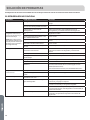
PARTS AND FEATURES
a
c
c
d
d
d
e
b
f
g
h
j
i
i
i
a LED Light
b Rating Plate
c Glass Shelves (2)
d Refrigerator Door Bins (3)
e Refrigerator Drawer Cover
f Refrigerator Drawer
g My Zone Cover
h My Zone Drawer
i Freezer Storage Drawers (3)
j Adjustable Leveling Legs (2)

4
INSTALLATION REQUIREMENTS
LOCATION REQUIREMENTS
WARNING
Explosion Hazard
Keep flammable materials and vapors, such as gasoline,
away from appliance.
Failure to do so can result in death, explosion or fire.
IMPORTANT: This refrigerator is designed for indoor, household use
only.
To ensure proper ventilation for your refrigerator, allow for 1"
(2.54cm) of space on each side and at the top. Allow for 2" (5.08 cm)
of space behind the refrigerator. When installing your refrigerator
next to a xed wall, leave 4" (10 cm) minimum to allow for the door
to swing open.
NOTE: This refrigerator is intended for use in a location where
the temperature ranges from a minimum of 55°F (13°C) to a
maximum of 110°F (43°C). The preferred room temperature range
for optimum performance, which reduces electricity usage and
provides superior cooling, is between 60°F (15°C) and 90°F (32°C). It
is recommended that you do not install the refrigerator near a heat
source, such as an oven or radiator.
ELECTRICAL REQUIREMENTS
WARNING
Electrical Shock Hazard
Plug into a grounded 3 prong outlet.
Do not remove the ground prong from the power
cord plug.
Do not use an adapter.
Do not use an extension cord.
Failure to do so can result in death, fire or
electrical shock.
Before you move your refrigerator into its nal location, it is
important to make sure you have the proper electrical connection.
Recommended Grounding Method
A 115 volt, 60 Hz, AC only 15- or 20-amp fused, grounded electrical
supply is required. It is recommended that a separate circuit serving
only your refrigerator be provided. Use an outlet that cannot be
turned o by a switch. Do not use an extension cord.
NOTE: Before performing any type of installation or cleaning,
disconnect the refrigerator from the electrical source. When you
are nished, reconnect the refrigerator to the electrical source and
reset the temperature controls to the desired setting.

5
INSTALLATION INSTRUCTIONS
STEP 1 - UNPACK THE
REFRIGERATOR
WARNING
Excessive Weight Hazard
Use two or more people to move and install refrigerator.
Failure to do so can result in back or other injury.
WARNING
Fire or Explosion Hazard
Do not puncture refrigerant tubing.
Follow handling instructions carefully.
Flammable refrigerant used.
Failure to do so can result in death, explosion or fire.
IMPORTANT: Handle with care when moving to avoid either
damaging the refrigerant tubing or increasing the risk of a leak.
REMOVE THE PACKAGING
•
Remove tape and glue residue from surfaces before turning on
the refrigerator. Rub a small amount of liquid dish soap over the
adhesive with your ngers. Wipe with warm water and dry.
•
Do not use sharp instruments, rubbing alcohol, ammable
uids, or abrasive cleaners to remove tape or glue. These
products can damage the surface of your refrigerator. For more
information, see “Refrigerator Safety.”
•
Dispose of/recycle all packaging materials.
When Moving Your Refrigerator:
Your refrigerator is heavy. When moving the refrigerator
for cleaning or service, be sure to cover the oor with
cardboard or hardboard to avoid oor damage. Always pull
the refrigerator straight out when moving it. Do not wiggle or
“walk” the refrigerator when trying to move it, as oor damage
could occur.
CLEAN BEFORE USING
After you remove all of the packaging materials, clean the inside
of the refrigerator before using it. See the cleaning instructions in
“Refrigerator Care.”
Important information to know about glass shelves and
covers:
Do not clean glass shelves or covers with warm water when
they are cold. Shelves and covers may break if exposed to
sudden temperature changes or impact, such as bumping.
Tempered glass is designed to shatter into many small, pebble-
size pieces. This is normal. Glass shelves and covers are heavy.
Use both hands when removing them to avoid dropping.
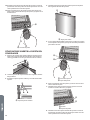
STEP 2 - DOOR REVERSING
(OPTIONAL)
The door hinges are factory installed on the right-hand side. If
you want the doors to open from the opposite direction, you can
reverse the door swing.
IMPORTANT:
•
Before you begin, unplug the refrigerator, or disconnect power.
•
Remove food and the bins from the refrigerator door.
•
The door hinges are designed to be right-hand swing or left-
hand swing specic. Replace the right-hand hinges with the left-
hand hinges provided in the parts bag. After removing, keep the
right-hand hinges in case you would need to reverse the door
swing.
Parts Provided:
•
Top Hinge
•
Center Hinge
•
Bottom Hinge
Tools Needed:
•
Flat-blade Screwdriver
•
Phillips-head Screwdriver
•
8 mm Socket Wrench
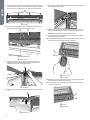
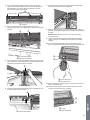
REMOVE AND REVERSE REFRIGERATOR
DOOR
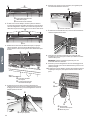
1. Unplug refrigerator or disconnect power.
2. Pull down to remove the hinge screw covers from the wiring
cover.
NOTE: The wiring cover spans the width of the cabinet top.
ba
a Wiring Cover
b Hinge Screw Covers

6
3. Using a Phillips screwdriver, remove the four screws attaching
the wiring cover to the top of the refrigerator cabinet. Lift up on
the wiring cover and allow it to rest on the top of the cabinet.
a
a Screws
4. Disconnect the wiring harnesses, by pinching each end and
gently pulling them apart. Set wiring cover aside.
a
b
a Wiring Harnesses
b Wiring Cover
5. With your thumbs in the opening next to the hinge, press
upward on the top plate to release and remove it from the
refrigerator door. Set the top plate aside.
a
a Top Plate
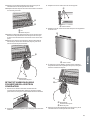
6. Lift up to remove the hinge cover, and keep it for possible future
use.
a
a Hinge Cover
7. Using an 8 mm socket wrench, remove the two screws attaching
the top hinge to the cabinet.
8. Slide the top hinge to disengage it from the third screw on the
cabinet, and then lift up to remove the hinge pin from the door.
NOTE: Save the top hinge for possible future use.
9. Lift the refrigerator door o of the center hinge, and gently lay
the door on a covered surface.
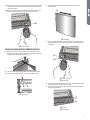
10. Using a Phillips screwdriver, remove the plastic door closure and
the metal door stop from the bottom of the door.
a
b
a Door Closure
b Door Stop
11. Remove the screw from the door closure, and replace the screw
into the hole from which it was removed.
12. Move the door stop to the opposite side. Insert screw into the
center hole and fasten.
b
a
a Screw
b Door Stop

7
13. Move the door closure to the opposite side. Flip over the door
closure so that the curved edge of the closure is toward the
center of the door.
14. Remove innermost screw. Fit the door closure on top of the
door stop screw, and fasten with the innermost screw.
a
a Door Closure
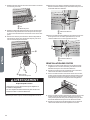
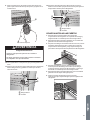
REMOVE AND REVERSE FREEZER DOOR
1. Remove the two screws attaching the center hinge to the
bottom of the refrigerator compartment. Remove the center
hinge and save for possible future use.
2. Lift the freezer compartment door from the bottom hinge.
3. Move the hole plugs and the screw to the opposite side.
a
a Hole Plugs
4. Move the hole plug on the top of the freezer door to the
opposite side.
a
a Hole Plug
5. Using a Phillips screwdriver, remove the two screws fastening
the plastic door closure and the metal door stop to the bottom
of the door.
a
b
a Door Closure
b Door Stop
6. Remove the screw from the door closure, and replace the screw
into the hole from which it was removed.
7. Move the door stop to the opposite side. Insert screw into the
center hole and fasten.
b
a
a Screw
b Door Stop

8
8. Move the door closure to the opposite side. Flip over the door
closure so that the curved edge of the closure is toward the
center of the door.
9. Remove innermost screw. Fit the door closure on top of the
door stop screw, and fasten with the innermost screw.
a
a Door Closure
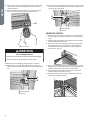
WARNING
Excessive Weight Hazard
Use two or more people to move and install refrigerator.
Failure to do so can result in back or other injury.
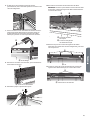
10. Using two or more people lay the refrigerator on the oor.
11. Remove the three screws attaching the bottom hinge to the
cabinet. Remove the bottom hinge and save for possible future
use.
a
b
a Bottom Hinge
b Screws
12. Remove a new bottom hinge from the accessory bag. Using the
three screws removed earlier, fasten the bottom hinge to the
opposite side of the cabinet.
a
b
a Bottom Hinge
b Screws
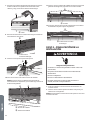
REINSTALL DOORS
1. Align the hole in the bottom of the freezer compartment door
with the hinge pin and gently lower the door onto the bottom
hinge.
2. Align the edge of the freezer door with the side of the cabinet
before installing the center hinge.
3. Remove the new center hinge from the accessory bag, insert
the hinge pin into the top of the freezer compartment door,
and then fasten the hinge to the bottom of the refrigerator
compartment opening.
4. Remove the new top hinge from the accessory bag. Insert the
hinge pin into the hinge hole in the top of the refrigerator door,
and then gently lower the door onto the center hinge.
5. Align the edge of the refrigerator door with the side of the
cabinet before fastening the top hinge.
6. Using the top hinge screws, removed earlier, fasten the top
hinge to the refrigerator cabinet.

9
7. Remove the new hinge cover from the accessory bag. Insert the
wiring cable through the clips on the underside of the cover, and
then t the cover over the hinge.
a
a Wiring Cable
8. Flip the hinge screw cover, and insert it into the interior edge of
the door.
a
a Hinge Screw Cover
9. Replace the door top plate.
a
a Top Plate
10. Connect the ends of both wire harnesses.
NOTE: Make sure the wiring is pressed rmly into the clips, and
t the excess length into the cabinet opening.
a
b
a Wiring Harnesses
b Wiring Cover
11. Replace the wiring cover on top of the refrigerator cabinet, and
fasten with the four screws.
a
a Screws
12. Insert the hinge screw covers into the wiring cover on the top of
the cabinet.
a
a Hinge Screw Covers
STEP 3 - COMPLETE THE
INSTALLATION
WARNING
Electrical Shock Hazard
Plug into a grounded 3 prong outlet.
Do not remove the ground prong from the power
cord plug.
Do not use an adapter.
Do not use an extension cord.
Failure to do so can result in death, fire or
electrical shock.
1. Plug into a grounded 3 prong outlet.
2. Return all removable door parts to door and food to refrigerator.
NOTE: This refrigerator begins operating as soon as it is connected
to the power supply.

10
STEP 4 - LEVELING AND DOOR
ADJUSTMENT (IF NEEDED)
The refrigerator must be level to maintain optimal performance and
appearance.
LEVELING
1. Move the refrigerator to its nal location.
2. Turn the feet on the bottom, front of the cabinet to raise or
lower that side of the refrigerator until the refrigerator is level
side-to-side.
3. Turn both front legs, by the same amount, to slightly raise the
front of the refrigerator. This will make it easier for the doors to
close.
NOTE: Having someone push against the top of the refrigerator
takes some weight o the leveling screws. This makes it easier
to turn the screws.
REFRIGERATOR USE
USING THE CONTROLS
Fridge
Hold 3 sec.
Lock
My Zone
Freezer
Quick Cool
Quick Freeze
Sabbath
Hold 3 sec.
h
i
j
k
l
m
n
b
a
c
d
e
f
g
a Refrigerator Temperature
Indicator
b My Zone Temperature
Indicator
c Freezer Temperature
Indicator
d Quick Cool Indicator
e Quick Freeze Indicator
f Sabbath Indicator
g Lock Indicator
h Fridge Temperature Control
i My Zone Temperature
Control
j Freezer Temperature
Control
k Quick Cool Control
l Quick Freeze Control
m Sabbath Mode Control
n Lock Control
TOUCH PADS
The controls are touch pads, which respond when lightly touched.
CONTROL PANEL LOCK
The control panel is automatically locked after 30 seconds of non-
use. To change any settings the control panel must be unlocked.
To Unlock the Control Panel:
Hold 3 sec.
Lock
1. Press and hold LOCK for 3 seconds. The Lock indicator will turn
OFF.
Hold 3 sec.
Lock
To Lock the Control Panel:
1. Press and hold LOCK for 3 seconds. The Lock indicator will turn
on.
TEMPERATURE DISPLAY
Fridge
C C
My Zone
C
Freezer
When no buttons or doors are operated for 30 seconds, all the LEDs
on display panel turn o.
When a button is pressed or a door opened, the LEDs on display
panel illuminate.
UNITS SELECT
The Units Select feature allows you to choose between displaying
the set temperature in either degrees Fahrenheit (°F) or degrees
Celsius (°C).
The default temperature unit is degrees Fahrenheit.
1. If locked, unlock the control panel by pressing and holding LOCK
for 3 seconds.
2. Press and hold FRIDGE and FREEZER at the same time for
3 seconds. °C will appear next to the temperature display to
indicate that the unit has been changed to degrees Celsius.

11
3. To return to displaying the set temperature in degrees
Fahrenheit, press and hold FRIDGE and FREEZER at the same
time for 3 seconds. The °C will disappear from the Temperature
display.
Fridge
Freezer
C
C
Fridge
Freezer
C
C
TEMPERATURE CONTROLS
The temperature range for the refrigerator compartment is
34°F to 42°F (1°C to 6°C). The temperature range for the freezer
compartment is -6°F to 4°F (-21°C to -16°C). The temperature
range for the My Zone compartment is 27°F to 41°F (-3°C to 5°C).
The refrigerator and My Zone compartments are preset to
the recommended temperature of 37°F (3°C) and the freezer
compartment is preset to the recommended temperature of 0°F
(-18°C). When the refrigerator is rst plugged in, the display will
show the recommended temperature settings.
IMPORTANT:
•
The recommended setting should be correct for normal
household refrigerator use.
•
When the refrigerator is rst turned on, it may take up to
12hours to cool to the preset temperatures. Wait 24 hours for
your refrigerator to cool completely before adding food. If you
add food before the refrigerator has cooled completely, your
food may spoil.
•
If the temperature is too warm or too cold in the refrigerator or
freezer, rst check the air vents to be sure they are not blocked
before adjusting the controls.
Adjusting Controls
Except when rst turning on the refrigerator, do not adjust either
temperature more than one degree at a time. Wait 24 hours
between adjustments for the temperature to stabilize.
NOTE: The temperature cannot be adjusted if any other control
function such as Quick Freeze, Quick Cool or Sabbath Mode is
activated, or the Control Panel is locked. The corresponding
indicator will illuminate and a tone will sound.
To Adjust the Refrigerator Temperature:
1. If locked, unlock the control panel by pressing and holding LOCK
for 3 seconds.
2. Press Fridge to adjust the temperature.
NOTE: The temperature increases by one degree and a tone
sounds with each press of the button.
Fridge
C
After 5 seconds have passed with no button being pressed the
temperature setting conrms automatically.
To Adjust the Freezer Temperature:
1. If locked, unlock the control panel by pressing and holding LOCK
for 3 seconds.
2. Press the Freezer button to adjust the temperature.
NOTE: The temperature decreases by one degree and a tone
sounds with each press of the button.
C
Freezer
After 5 seconds have passed with no button being pressed the
temperature setting conrms automatically.
To Adjust the My Zone Temperature:
1. If locked, unlock the control panel by pressing and holding LOCK
for 3 seconds.
2. Press MY ZONE to adjust the temperature.
NOTES:
•
The temperature increases by two degrees F (one degree C)
and a tone sounds with each press of the control.
•
The temperature in the My Zone compartment cannot
be set warmer than the temperature of the refrigerator
compartment.
My Zone
3. Press any control except My Zone to conrm. The indicator light
will stop ashing.
NOTE: Temperature setting will conrm automatically after
5seconds have passed.
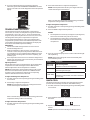
Setting Description
35°F - 41°F
(2°C - 5°C)
Fruits and Vegetables
Suitable to store fruits and vegetables
27°F (-3°C) Defrost Frozen Food
Rapid cooling of beverages
29°F - 35°F
(-2°C - 2°C)
Meats
Suitable to store fresh sh, meat and cooked food
for 1 to 2 days.
QUICK COOL
The Quick Cool feature accelerates the cooling of fresh food and
protects the foods already stored from undesirable warming.
1. If locked, unlock the control panel by pressing and holding LOCK
for 3 seconds.
Hold 3 sec.
Lock
2. Press the Quick Cool button. The Quick Cool indicators will
illuminate.
Quick Cool
3. Repeat steps 1 and 2 to manually turn o the Quick Cool
feature.
NOTE: Quick Cool will automatically turn o after 3 hours.

12
QUICK FREEZE
The Quick Freeze function accelerates the freezing of fresh food
and protects frozen food from undesirable warming. If you need
to freeze a large amount of food, it is recommended to select the
Quick Freeze feature a few hours in advance.
1. If locked, unlock the control panel by pressing and holding LOCK
for 3 seconds.
Hold 3 sec.
Lock
2. Press the Quick Freeze button. The Quick Freeze indicators will
illuminate.
Quick Freeze
3. Repeat steps 1 and 2 to manually turn o the Quick Freeze
feature.
NOTE: Quick Freeze will automatically turn o after 24 hours.
SABBATH
The Sabbath function is designed for those whose religious
observances require turning o the lights. All interior lights and
alarms will be disabled.
1. If locked, unlock the control panel by pressing and holding LOCK
for 3 seconds.
2. Press and hold SABBATH for 3 seconds until the Sabbath
indicator illuminates.
NOTES:
•
All alert tones and lights are deactivated.
•
If Quick Cool and/or Quick Freeze was on, Sabbath mode
turns o these features automatically.
•
The Control Panel will remain unlocked while in Sabbath
mode.
Sabbath
Hold 3 sec.
Sabbath
3. To deselect Sabbath mode, press and hold SABBATH for
3 seconds.
FEATURES
Important information to know about glass shelves and
covers:
Do not clean glass shelves or covers with warm water when
they are cold. Shelves and covers may break if exposed to
sudden temperature changes or impact, such as bumping.
Tempered glass is designed to shatter into many small, pebble-
size pieces. This is normal. Glass shelves and covers are heavy.
Use both hands when removing them to avoid dropping.
ADJUSTABLE SHELVES
The height of the shelves can be adjusted to t your storage needs.
1. To remove a shelf, lift up on both the front and back edge to
disengage the shelf hooks from the shelf supports along the
refrigerator wall and pull it out.
2. To reinstall a shelf, rest the shelf on both the front and rear
supports. Push the shelf toward the rear of the refrigerator until
the back of the shelf hooks around the rear shelf supports.
REMOVABLE DOOR BINS
To Remove/Replace a Door Bin:
1. Place hands on both sides of the bin and lift upward, and pull out.
2. Replace the door bin by inserting it above the support and press
down to engage.
MY ZONE DRAWER
The My Zone compartment allows you to store temperature
sensitive foods at the correct temperature to ensure optimal
nutritional value.
NOTE: My Zone is not recommended for the storage of cheese or
cold-sensitive fruits and vegetables such as avocados, bananas,
potatoes, cucumbers, tomatoes.
a
a My Zone Drawer

13
REMOVABLE FREEZER STORAGE DRAWERS
IMPORTANT: Do not overload the drawers.
To Remove and Replace a Freezer Drawer:
1. Remove the freezer draw by extending the drawer fully, and then
lift up on the drawer and pull out to remove.
2. Replace the drawer by tilting the back of the drawer downward
onto the support and sliding it in.
REFRIGERATOR CARE
CLEANING
Both the refrigerator and freezer sections defrost automatically.
However, clean both sections about once a month to avoid buildup
of odors. Wipe up spills immediately.
Because air circulates between both sections, any odors formed in
one section will transfer to the other. You must thoroughly clean
both sections to eliminate odors. To avoid odor transfer and drying
out of food, wrap or cover foods tightly.
WARNING
Explosion Hazard
Use nonflammable cleaner.
Failure to do so can result in death, explosion or fire.
IMPORTANT:
•
Do not use harsh chemicals, ammonia, chlorine bleach,
concentrated detergent, solvents, abrasives or metal scouring
pads to clean your refrigerator inside or out. They can damage
and/or discolor the refrigerator nish.
•
Do not use warm water to clean glass shelves while they are still
cold. Glass may break when exposed to sudden temperature
changes or impact.
WARNING
Electrical Shock Hazard
Unplug your appliance or disconnect power before
cleaning.
Failure to do so can result in death, electric shock or
personal injury.
1. Unplug refrigerator or disconnect power.
2. Clean the interior. Hand wash, rinse, and dry removable parts
and interior surfaces thoroughly. Use a clean sponge or soft
cloth and a mild detergent in warm water.
3. Clean the exterior surfaces.
Painted metal: Wash painted metal exteriors with a clean, soft
cloth or sponge and a mild detergent in warm water. Rinse
surfaces with clean, warm water and dry immediately to avoid
water spots.
Stainless steel: Stainless steel is corrosion resistant and not
corrosion-proof. To help avoid corrosion of your stainless steel,
wash stainless steel surfaces with a clean, soft cloth or sponge
and a mild detergent in warm water. Rinse surfaces with clean,
warm water and dry immediately to avoid water spots.
NOTE: When cleaning stainless steel, always wipe in the
direction of the grain to avoid cross-grain scratching.
4. Plug in refrigerator or reconnect power.

14
LIGHTS
The interior lights of the refrigerator turn o when the doors are
open for more than 7 minutes.
IMPORTANT: Your refrigerator is equipped with LED lighting. These
lights are designed to last for the life of your refrigerator. However,
if the lights stop operating, please contact a qualied technician for
replacement.
VACATION AND MOVING CARE
WARNING
Fire or Explosion Hazard
Do not puncture refrigerant tubing.
Follow handling instructions carefully.
Flammable refrigerant used.
Failure to do so can result in death, explosion or fire.
VACATION
If You Choose to Leave the Refrigerator On While You’re Away:
1. Use up any perishables and freeze other items.
If You Choose to Turn O the Refrigerator Before You Leave:
1. Remove all food from the refrigerator and freezer.
2. Unplug refrigerator or disconnect power.
3. Clean refrigerator, wipe it, and dry well.
4. Tape rubber or wood blocks to the tops of both doors to prop
them open far enough for air to get in. This stops odor and mold
from building up.
MOVING
WARNING
Excessive Weight Hazard
Use two or more people to move and install refrigerator.
Failure to do so can result in back or other injury.
When you are moving your refrigerator to a new home, follow these
steps to prepare it for the move.
1. Remove all food from the refrigerator and pack all frozen food in
dry ice.
2. Unplug refrigerator.
3. Clean, wipe, and dry thoroughly.
4. Take out all removable parts, wrap them well, and tape them
together so they don’t shift and rattle during the move.
5. Raise the leveling legs so they don’t scrape the oor. See
“Leveling.”
6. Tape the doors closed and tape the power cord to the back of
the refrigerator.
7. When you get to your new home, replace removable parts.
Refer to the “Installation Instructions” section to prepare the
refrigerator for use.
REINSTALLING/USING
REFRIGERATOR AGAIN
If the refrigerator has been placed in a horizontal or tilted position
for any period of time wait 24 hours before plugging it in to allow the
refrigerant to settle.
1. Clean refrigerator. See “Cleaning.“
2. Place refrigerator in desired location and level. See “Installation
Instructions.”
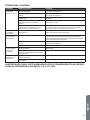
TROUBLESHOOTING
Try the solutions suggested here rst in order to avoid the cost of an unnecessary service call.
REFRIGERATOR IS NOT OPERATING
PROBLEM POSSIBLE CAUSE(S) SOLUTION
Refrigerator does not run. Refrigerator is unplugged. Plug power cord into power source.
Breaker is tripped or turned o / Fuse is
blown.
Reset / Turn on breaker or replace fuse.
Refrigerator is in defrost mode. Wait about 40 minutes for defrost cycle to end and cooling
system to restart.
Refrigerator compressor
runs frequently or for long
periods of time.
NOTE: This refrigerator is
designed to run for longer
periods of time at a lower
energy usage.
Refrigerator is rst plugged in. This is normal. Allow 24 hours for the refrigerator to cool down.
Warm or large amounts of food added. This is normal.
Door is left open. Ensure that door is not being held open by an item.
Hot weather or frequent openings This is normal.
Temperature control set to coldest
setting.
Adjust temperature to a warmer setting.

15
Refrigerator has an odor Food is not sealed or packaged properly. Reseal packaging. Place an opened box of baking soda in the
refrigerator, replace every 3 months.
Interior needs to be cleaned. Clean the interior. See “Cleaning.”
Food stored too long. Dispose of spoiled food.
Light does not come on Refrigerator is unplugged. Plug refrigerator in to power source.
LED light is burned out. Contact a qualied technician to replace the burned out LED.
Sabbath Mode is activated. Lights are disabled in Sabbath mode. To turn on lights you must
turn o Sabbath Mode. See “Sabbath Mode” for instructions.
Doors do not close properly Refrigerator is not level. See “Leveling.”
Something is obstructing door closure. Check for and remove obstructions.
Vibration or rattling Refrigerator is not resting rmly on oor. See “Leveling.”
Normal Sounds It sounds like water is owing from the
refrigerator.
Refrigerant owing in the lines will make this sound when the
compressor starts and stops.
The refrigerator has an automatic defrosting system. The
defrosted water will make this sound.
Humming or buzzing sounds The compressor and fans for cold air circulation can make this
sound. If the refrigerator is not level, the sound will be louder.
Cracking or clicking sounds The interior parts will make this sound as they contract and
expand in response to temperature changes.
TEMPERATURE AND MOISTURE
PROBLEM POSSIBLE CAUSE(S) SOLUTION
Refrigerator or
freezer is too warm
Temperature control is not set low enough. Adjust the compartment to a colder setting; allow 24 hours for the
temperature to adjust.
Doors opened frequently or left open. Keep door closed / Check that a package is not preventing door
from closing.
Warm food added recently. Allow time for food and refrigerator to cool.
The space between the back of the
refrigerator and the wall is too close.
Allow 2" (5 cm) space between the back of the refrigerator and the
wall.
Items against back of compartments are
blocking proper airow.
Store items only inside the trim of the glass shelves; don’t place
items against sides of the compartments or directly in front of any
vents.
Refrigerator or
freezer is too cold
Temperature control is set too low. Adjust temperature in the compartment to the next warmer
setting; allow 24 hours to adjust.
Moisture on
exterior/interior of
refrigerator
High humidity This is normal. Dry surface and adjust temperature to slightly colder
setting. Turn on the “Dehumidify” function if moisture appears on
the hinged bar on the left-hand refrigerator door.
Doors opened frequently or left open. Keep door closed. Check that a package is not preventing door from
closing.
Open container of water in refrigerator Cover or seal container.
Frost or ice crystals
on frozen food
Freezer door left open or opened frequently. Adjust the temperature to a warmer setting; allow 24 hours to
adjust.
Items blocking freezer air vents and
preventing proper air ow.
Move items away from rear wall.
Food freezing in
refrigerator
Food placed too close to the air vent. Move items away from back and top of the refrigerator.
Temperature control set too cold. Adjust the temperature to a less cold setting.
FOR MORE HELP, VISIT HAIERAMERICA.COM OR CALL THE CONSUMER HELP LINE AT
1-877-337-3639.

16
LIMITED WARRANTY
IN-HOME SERVICE
FULL ONE YEAR WARRANTY
For 12 months from the date of original retail purchase, Haier will
repair or replace any part free of charge including labor that fails due
to a defect in materials or workmanship.
Haier may replace or repair at their sole discretion any part, sub
system including the entire product.
Product must be accessible, without encumbrance and installed
properly to receive for warranty repair service.
LIMITED WARRANTY
After one year from the original retail purchase date, Haier will
provide a part at no cost, as indicated below, to replace said part
as a result of a defect in materials or workmanship. Haier is solely
responsible for the cost of the part. All other costs, such as labor,
trip charge, etc., are the responsibility of the owner.
Second through Fifth Year
For 60 months from the date of original retail purchase. The
components of the sealed system (e.g. hermetic compressor,
condenser and evaporator) from manufacturing defects. Any
damage to such components caused by mechanical abuse or
improper shipping and handling will not be covered.
NOTE: This warranty commences on the date the item was
purchased, and the original purchase receipt must be presented to
the authorized service representative before warranty repairs are
rendered.
Exceptions: Commercial Use Warranty
90 days labor from date of original purchase
90 days parts from date of original purchase
No other warranty applies.
FOR WARRANTY SERVICE
All service must be performed by a Haier authorized service center.
For the name and telephone number of the nearest authorized
service center, please call 1-877-337-3639.
Before calling please have available the following information:
Model number and serial number of your appliance. The name and
address of the dealer you purchased the unit from and the date of
purchase.
A clear description of the problem.
A proof of purchase (sales receipt).
This warranty covers home appliance services within the
contiguous United States and Canada and where available in
Alaska, Hawaii and Puerto Rico.
What is not covered by this warranty:
Replacement or repair of household fuses, circuit breakers, wiring
or plumbing.
A product whose original serial number has been removed or
altered.
Any service charges not specically identied as normal such as
normal service area or hours.
Replacement of light bulbs.
Damage incurred in shipping.
Damage caused by improper installation or maintenance.
Damage from misuse, abuse accident, re, ood, or acts of nature.
Damage from service other than an authorized Haier dealer or
service center.
Damage from incorrect electrical current, voltage or supply.
Damage resulting from any product modication, alteration or
adjustment not authorized by Haier.
Adjustment of consumer operated controls as identied in the
owner’s manual.
Hoses, knobs, lint trays and all attachments, accessories and
disposable parts.
Labor, service transportation, and shipping charges for the removal
and replacement of defective parts beyond the initial 12-month
period.
Damage from other than normal household use.
Any transportation and shipping charges.
THIS LIMITED WARRANTY IS GIVEN IN LIEU OF ALL OTHER
WARRANTIES, EXPRESS ED OR IMPLIED, INCLUDING BUT NOT
LIMITED TO, THE WARRANTIES OF MERCHANTABILITY AND
FITNESS FOR A PARTICULAR PURPOSE
The remedy provided in this warranty is exclusive and is granted in
lieu of all other remedies.
This warranty does not cover incidental or consequential damages,
so the above limitations may not apply to you. Some states do
not allow limitations on how long an implied warranty lasts, so the
above limitations may not apply to you.
This warranty gives you specic legal rights, and you may have
other rights, which vary from state to state.
Haier America
Wayne, NJ 07470

17
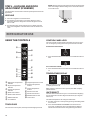
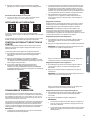
TABLE DES MATIÈRES
SÉCURITÉ DU RÉFRIGÉRATEUR ............................................................................................................................................................ 18
PIÈCES ET CARACTÉRISTIQUES .......................................................................................................................................................... 19
EXIGENCES D’INSTALLATION .............................................................................................................................................................. 20
Exigences d’emplacement ....................................................................................................................................................................................... 20
Spécications électriques ........................................................................................................................................................................................20
INSTRUCTIONS D’INSTALLATION ....................................................................................................................................................... 21
Étape 1 - Déballage du réfrigérateur .......................................................................................................................................................................21
Étape 2 - Inversion du sens d’ouverture des portes ...............................................................................................................................................21
Étape 3 - Achever l’installation ................................................................................................................................................................................26
Étape 4 - Nivellement et ajustement des portes .................................................................................................................................................... 26
UTILISATION DU RÉFRIGÉRATEUR ....................................................................................................................................................... 26
Utilisation des commandes ......................................................................................................................................................................................26
Caractéristiques .......................................................................................................................................................................................................28
ENTRETIEN DU RÉFRIGÉRATEUR ......................................................................................................................................................... 29
Nettoyage .................................................................................................................................................................................................................29
Éclairage ....................................................................................................................................................................................................................30
Précautions à prendre pour les vacances ou le déménagement ...........................................................................................................................30
Réinstallation/réutilisation du réfrigerateur ...........................................................................................................................................................30
DÉPANNAGE ........................................................................................................................................................................................ 31
GARANTIE LIMITÉE .............................................................................................................................................................................. 33
DOCUMENTS À CONSERVER
Merci d’avoir acheté ce produit Haier. Ce manuel vous aidera
à obtenir les meilleures performances de votre nouveau
réfrigérateur.
Pour référence ultérieure , notez le modèle et le numéro de série
situés sur la paroi interne du compartiment de réfrigération, et la
date d’achat.
Pour faciliter l’obtention d’un service sous garantie, agrafer la
preuve de la date d’achat à ce manuel.
___________________________________________________________
Numéro de modèle
___________________________________________________________
Numéro de série
___________________________________________________________
Date d’achat

18
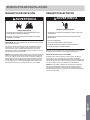
SÉCURITÉ DU RÉFRIGÉRATEUR
Votre sécurité et celle des autres est très importante.
DANGER
AVERTISSEMENT
ATTENTION
Voici le symbole d’alerte de sécurité.
Ce symbole d’alerte de sécurité vous signale les dangers potentiels de décès et de blessures graves à
vous et à d’autres. Tous les messages de sécurité suivront le symbole d’alerte de sécurité et le mot
“DANGER,” “AVERTISSEMENT” ou “ATTENTION.”
Ces mots signifient :
Une situation de danger imminent. Vous courez le risque d’un décès ou de
blessures graves si vous ne suivez pas immédiatement les instructions.
Une situation potentiellement dangereuse qui, si vous ne l’évitez pas, peut
provoquer la mort ou des blessures graves.
Une situation potentiellement dangereuse qui, si vous ne l’évitez pas, peut
entraîner des blessures légères à modérées.
Tous les messages de sécurité vous diront quel est le danger potentiel et vous disent comment réduire le risque de
blessure et ce qui peut se produire en cas de non-respect des instructions.
Nous donnons de nombreux messages de sécurité importants dans ce manuel et sur votre appareil ménager.
Assurez-vous de toujours lire tous les messages de sécurité et de vous y conformer.
IMPORTANTES INSTRUCTIONS DE SÉCURITÉ
AVERTISSEMENT : An de réduire le risque d’incendie, de choc électrique, de blessures corporelles ou de dommage lors
de l’utilisation du réfrigérateur, il convient d’observer certaines précautions fondamentales, notamment :
•
Utiliser cet appareil uniquement dans le but auquel il
est destiné et tel que décrit dans le présent manuel
d’utilisation.
•
Avant utilisation, ce réfrigérateur doit être
correctement installé conformément aux instructions
d’installation. Voir les instructions de mise à la terre
incluses dans les instructions d’installation.
•
Utilisation d’un liquide frigorigène inammable. Ne pas
dégivrer le réfrigérateur par des moyens mécaniques.
Ne pas perforer le circuit frigorigène.
•
Utilisation d’un liquide frigorigène inammable. Toute
réparation doit être eectuée par un technicien de
service qualié. Ne pas perforer le circuit frigorigène.
•
Utilisation d’un liquide frigorigène inammable. Mettre
au rebut d’une manière appropriée en conformité avec
la législation fédérale ou locale.
•
Utilisation d’un liquide frigorigène inammable. Suivre
attentivement les instructions de manipulation. Risque
d’incendie ou d’explosion dû à la perforation du circuit
frigorigène.
•
Brancher sur une prise de courant à 3 alvéoles, reliée à
la terre.
•
Ne pas enlever la prise de liaison à la terre.
•
Ne pas utiliser d’adaptateur.
•
Ne pas utiliser de rallonge.
•
Ne réparer ni remplacer aucune pièce de l’appareil sans
recommandation spécique du manuel. Toutes les
autres tâches d’entretien doivent être eectuées par
un technicien qualié.
•
Déconnecter la source de courant électrique avant
l’intervention.
•
Replacer pièces et panneaux avant de faire la mise en
marche.
•
Utiliser un produit de nettoyage ininammable.
•
Tenir les matières et les vapeurs inammables, telles
que l’essence, à l’écart du réfrigérateur.
•
Les bords de la caisse, les zones de découpe et les
zones comportant un code d’identication ou des
découpes peuvent être tranchantes. Tenir les mains,
les doigts ou autres appendices éloignés de ces zones.
•
Avant de jeter l’appareil ou de le rendre inutilisable,
retirer les portes. Cela réduira la possibilité de danger
pour les enfants.
LIRE ET CONSERVER CES INSTRUCTIONS
La page est en cours de chargement...
La page est en cours de chargement...
La page est en cours de chargement...
La page est en cours de chargement...
La page est en cours de chargement...
La page est en cours de chargement...
La page est en cours de chargement...
La page est en cours de chargement...
La page est en cours de chargement...
La page est en cours de chargement...
La page est en cours de chargement...
La page est en cours de chargement...
La page est en cours de chargement...
La page est en cours de chargement...
La page est en cours de chargement...
La page est en cours de chargement...
La page est en cours de chargement...
La page est en cours de chargement...
La page est en cours de chargement...
La page est en cours de chargement...
La page est en cours de chargement...
La page est en cours de chargement...
La page est en cours de chargement...
La page est en cours de chargement...
La page est en cours de chargement...
La page est en cours de chargement...
La page est en cours de chargement...
La page est en cours de chargement...
La page est en cours de chargement...
La page est en cours de chargement...
La page est en cours de chargement...
La page est en cours de chargement...
La page est en cours de chargement...
La page est en cours de chargement...
La page est en cours de chargement...
La page est en cours de chargement...
-
 1
1
-
 2
2
-
 3
3
-
 4
4
-
 5
5
-
 6
6
-
 7
7
-
 8
8
-
 9
9
-
 10
10
-
 11
11
-
 12
12
-
 13
13
-
 14
14
-
 15
15
-
 16
16
-
 17
17
-
 18
18
-
 19
19
-
 20
20
-
 21
21
-
 22
22
-
 23
23
-
 24
24
-
 25
25
-
 26
26
-
 27
27
-
 28
28
-
 29
29
-
 30
30
-
 31
31
-
 32
32
-
 33
33
-
 34
34
-
 35
35
-
 36
36
-
 37
37
-
 38
38
-
 39
39
-
 40
40
-
 41
41
-
 42
42
-
 43
43
-
 44
44
-
 45
45
-
 46
46
-
 47
47
-
 48
48
-
 49
49
-
 50
50
-
 51
51
-
 52
52
-
 53
53
-
 54
54
-
 55
55
-
 56
56


Haier HRB15N3BGS Manuel utilisateur
- Catégorie
- Réfrigérateurs combinés
- Taper
- Manuel utilisateur
dans d''autres langues
- English: Haier HRB15N3BGS User manual
- español: Haier HRB15N3BGS Manual de usuario
Documents connexes
-
Haier HRC2725BL Le manuel du propriétaire
-
-
-
-
-
-
-
-
-