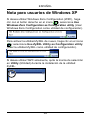
ZyXEL NWD-310N Le manuel du propriétaire
- Catégorie
- Les routeurs
- Taper
- Le manuel du propriétaire
Ce manuel convient également à


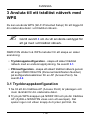
ENGLISH
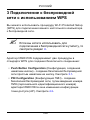
2
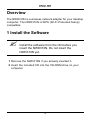
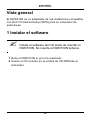
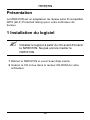
Overview
The NWD310N is a wireless network adapter for your desktop
computer. The NWD310N is WPS (Wi-Fi Protected Setup)
compatible.
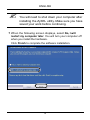
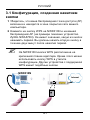
1 Install the Software
" Install the software from the CD before you
insert the NWD310N. Do not insert the
NWD310N yet.
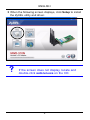
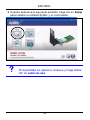
1 Remove the NWD310N if you already inserted it.
2 Insert the included CD into the CD-ROM drive on your
computer.
ENGLISH

3
ENGLISH
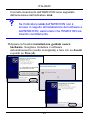
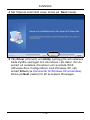
3 When the following screen displays, click Setup to install
the ZyXEL utility and driver.
V If the screen does not display, locate and
double-click autorun.exe on the CD.

ENGLISH
4
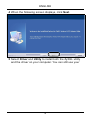
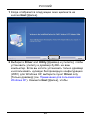
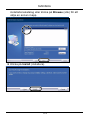
4 When the following screen displays, click Next.
5 Select Driver and Utility to install both the ZyXEL utility
and the driver on your computer. You can still use your

5
ENGLISH
operating system’s wireless network utility, if you choose
not to install the ZyXEL utility.
6 Click Install.

ENGLISH
6
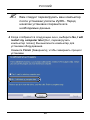
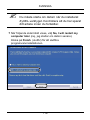
" You will need to shut down your computer after
installing the ZyXEL utility. Make sure you have
saved your work before continuing.
7 When the following screen displays, select No, I will
restart my computer later. You will turn your computer off
when you install the hardware.
Click Finish to complete the software installation.

7
ENGLISH
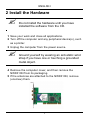
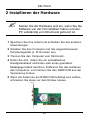
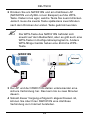
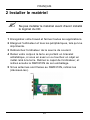
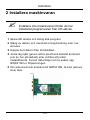
2 Install the Hardware
" Do not install the hardware until you have
installed the software from the CD.
1 Save your work and close all applications.
2 Turn off the computer and any peripheral device(s), such
as a printer.
3 Unplug the computer from the power source.
" Ground yourself by wearing an anti-static wrist
strap if you have one or touching a grounded
metal object.
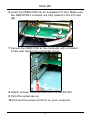
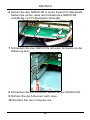
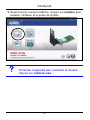
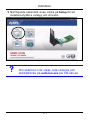
4 Remove the computer cover, and then remove the
NWD310N from its packaging.
5 If the antennas are attached to the NWD310N, remove
(unscrew) them.

ENGLISH
8
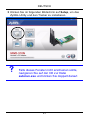
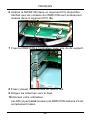
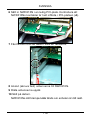
6 Insert the NWD310N into an available PCI slot. Make sure
the NWD310N's contacts are fully seated in the PCI slot
(A).
7 Secure the NWD310N to the computer with a bracket
screw and replace the computer cover.
8 Attach (screw) the antennas onto the NWD310N.
9 Point the antennas up.
10 Connect the power and turn on your computer.
A

9
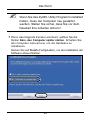
ENGLISH
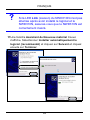
The NWD310N’s Link LED (light) turns on if it is properly
inserted.
V If the NWD310N’s Link LED is not on after you
have installed the software and the NWD310N,
make sure the NWD310N is properly inserted.
11A Found New Hardware Wizard window displays. Select
Install the software automatically (recommended) and
click Next and then click Finish.

ENGLISH
10
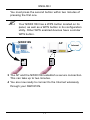
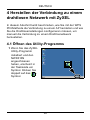
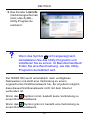
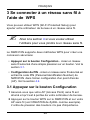
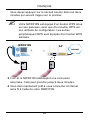
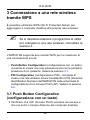
3 Connect to a Wireless Network
Using WPS
You can use Wi-Fi Protected Setup (WPS) to add your
desktop computer to a wireless network.
" Go to Section 4 if you want to use the utility to
join a wireless network.
The NWD310N supports two WPS methods for creating a
secure connection:
• Push Button Configuration - create a secure wireless net-
work simply by pressing a button. See section 3.1.
• PIN Configuration - create a secure wireless network by
entering the NWD310N’s PIN (Personal Identification Num-
ber) into the configuration screen of an Access Point (AP).
See section 4.2.
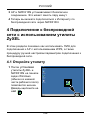
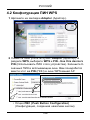
3.1 Push Button Configuration
1 Make sure that your wireless AP (Access Point) is turned
on and that it is within range of your desktop computer.
2 Press the WPS button on the NWD310N and on your
wireless AP (ZyXEL’s NWA570N is shown as an
example). It doesn’t matter which button is pressed first.

11
ENGLISH
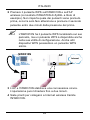
You must press the second button within two minutes of
pressing the first one.
" Your NWD310N has a WPS button located on its
panel, as well as a WPS button in its configuration
utility. Other WPS enabled devices have a similar
WPS button.
3 The AP and the NWD310N establish a secure connection.
This can take up to two minutes.
4 You are now ready to connect to the Internet wirelessly
through your NWD310N.
WPS
Internet
AP
NWD310N

ENGLISH
12
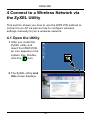
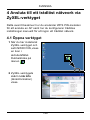
4 Connect to a Wireless Network via
the ZyXEL Utility
This section shows you how to use the WPS PIN method to
connect to an AP as well as how to configure wireless
settings manually to join a wireless network.
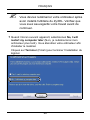
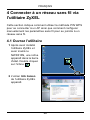
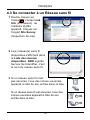
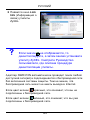
4.1 Open the Utility
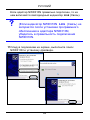
1 After you install the
ZyXEL utility and
insert the NWD310N,
an icon appears in the
system tray. Double-
click the icon.
2 The ZyXEL utility Link
Info screen displays.

13
ENGLISH
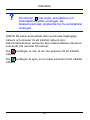
V If the icon does not display, uninstall and re-
install the ZyXEL utility. See the User’s Guide
for how to uninstall the utility.
The NWD310N automatically connects to an available
wireless network without security enabled. However, this
wireless network may not be connected to the Internet.
If the icon is green you are already connected to a
wireless network.
If the icon is red, you are not connected to a wireless
network.
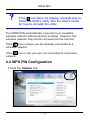
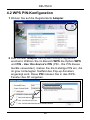
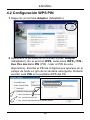
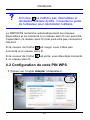
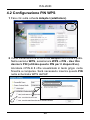
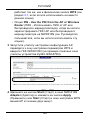
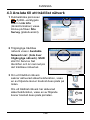
4.2 WPS PIN Configuration
1 Click the Adapter tab.

ENGLISH
14
2 The ZyXEL utility Adapter screen displays. In the WPS
section, select WPS and PIN - Use this device’s PIN.
Write down the 8-digit PIN that is displayed in the grayed-
out text field of the pop-up window. You will need to enter
this PIN in the WPS screen of the AP.
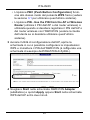
• The PBC (Push Button Configuration) option works
the same way as the physical WPS button (see section
3.1 if you want to use this instead).
• The PIN - Use the PIN from the AP or Wireless
Router option is used when you want to register the
AP’s or wireless router’s PIN with the NWD310N (see
the User’s Guide if you want to use this instead).
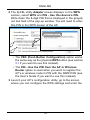
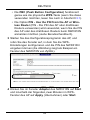
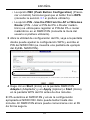
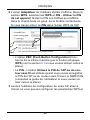
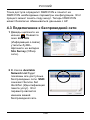
3 Launch your AP’s configuration utility, go to the screen
where you can configure the WPS settings and enter the

15
ENGLISH
NWD310N’s PIN (an example screen from ZyXEL’s
NWA570N is shown).
4 Click Start in the NWD310N Adapter screen and Apply or
Start in the AP’s WPS screen within two minutes.
The AP authenticates the NWD310N and sends the proper
configuration settings to the NWD310N. This may take up to
two minutes. The NWD310N is now able to communicate with
the AP securely.
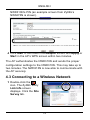
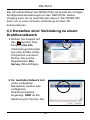
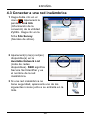
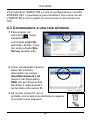
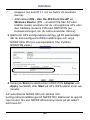
4.3 Connecting to a Wireless Network
1 Double-click the
icon. The ZyXEL utility
Link Info screen
displays. Click the Site
Survey tab.

ENGLISH
16
2 The available wireless
networks display in the
Available Network List.
SSID means Service Set
Identifier and is the name
of the wireless network.
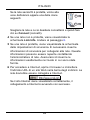
3 If a wireless network has no
security, one of the following icons appears
next to its entry in the list.
If a wireless network has security, one of the
following icons appears next to its entry in
the list.
Choose the network you want to connect to by clicking on it
and clicking Connect.
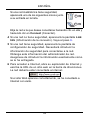
4 If a network has no security, the Link Info screen displays.
Go to step 6.
5 If a network has security, the security settings screen
appears. You need to enter security information to connect
to the network. Get this information from the network
administrator. Be sure to enter the information exactly as it
was given to you.

17
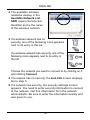
ENGLISH
6 To access the Internet, open your Internet browser and
enter the URL of a web site in the address bar. The AP
should be connected to the Internet.
If the web site displays correctly, you are successfully
connected to the Internet.
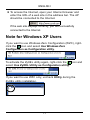
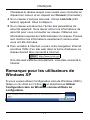
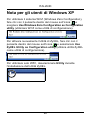
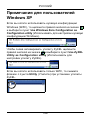
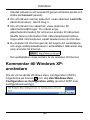
Note for Windows XP Users
If you want to use Windows Zero Configuration (WZC), right-
click the icon and select Use Windows Zero
Configuration as Configuration utility.
To activate the ZyXEL utility again, right-click the icon and
select Use ZyXEL Utility as Configuration utility.
If you want to use WZC only, uncheck Utility during the
ZyXEL utility installation.

ENGLISH
18
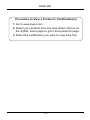
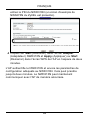
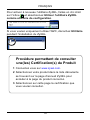
Procedure to View a Product’s Certification(s)
1 Go to www.zyxel.com.
2 Select your product from the drop-down list box on
the ZyXEL home page to go to that product's page.
3 Select the certification you wish to view from this

19
ENGLISH

DEUTSCH
20
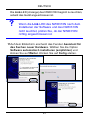
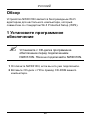
Übersicht
Der NWD310N ist ein WPS-kompatibler
Drahtlosnetzwerkadapter für Ihren Desktop-Computer (WPS
= "Wi-Fi Protected Setup"; Wi-Fi-geschützte Installation).
1 Installation der Software
" Installieren Sie die Software von der CD,
bevor Sie die NWD310N einstecken.
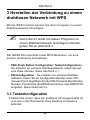
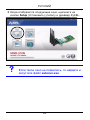
1 Entfernen Sie die NWD310N wieder, falls Sie sie bereits
eingesteckt haben.
2 Legen Sie die mitgelieferte CD in das CD-ROM-Laufwerk
des Computers ein. Bei entsprechender Einstellung Ihres
Betriebssystems startet das Setup Programm
automatisch.
D
EUTSC
H
La page est en cours de chargement...
La page est en cours de chargement...
La page est en cours de chargement...
La page est en cours de chargement...
La page est en cours de chargement...
La page est en cours de chargement...
La page est en cours de chargement...
La page est en cours de chargement...
La page est en cours de chargement...
La page est en cours de chargement...
La page est en cours de chargement...
La page est en cours de chargement...
La page est en cours de chargement...
La page est en cours de chargement...
La page est en cours de chargement...
La page est en cours de chargement...
La page est en cours de chargement...
La page est en cours de chargement...
La page est en cours de chargement...
La page est en cours de chargement...
La page est en cours de chargement...
La page est en cours de chargement...
La page est en cours de chargement...
La page est en cours de chargement...
La page est en cours de chargement...
La page est en cours de chargement...
La page est en cours de chargement...
La page est en cours de chargement...
La page est en cours de chargement...
La page est en cours de chargement...
La page est en cours de chargement...
La page est en cours de chargement...
La page est en cours de chargement...
La page est en cours de chargement...
La page est en cours de chargement...
La page est en cours de chargement...
La page est en cours de chargement...
La page est en cours de chargement...
La page est en cours de chargement...
La page est en cours de chargement...
La page est en cours de chargement...
La page est en cours de chargement...
La page est en cours de chargement...
La page est en cours de chargement...
La page est en cours de chargement...
La page est en cours de chargement...
La page est en cours de chargement...
La page est en cours de chargement...
La page est en cours de chargement...
La page est en cours de chargement...
La page est en cours de chargement...
La page est en cours de chargement...
La page est en cours de chargement...
La page est en cours de chargement...
La page est en cours de chargement...
La page est en cours de chargement...
La page est en cours de chargement...
La page est en cours de chargement...
La page est en cours de chargement...
La page est en cours de chargement...
La page est en cours de chargement...
La page est en cours de chargement...
La page est en cours de chargement...
La page est en cours de chargement...
La page est en cours de chargement...
La page est en cours de chargement...
La page est en cours de chargement...
La page est en cours de chargement...
La page est en cours de chargement...
La page est en cours de chargement...
La page est en cours de chargement...
La page est en cours de chargement...
La page est en cours de chargement...
La page est en cours de chargement...
La page est en cours de chargement...
La page est en cours de chargement...
La page est en cours de chargement...
La page est en cours de chargement...
La page est en cours de chargement...
La page est en cours de chargement...
La page est en cours de chargement...
La page est en cours de chargement...
La page est en cours de chargement...
La page est en cours de chargement...
La page est en cours de chargement...
La page est en cours de chargement...
La page est en cours de chargement...
La page est en cours de chargement...
La page est en cours de chargement...
La page est en cours de chargement...
La page est en cours de chargement...
La page est en cours de chargement...
La page est en cours de chargement...
La page est en cours de chargement...
La page est en cours de chargement...
La page est en cours de chargement...
La page est en cours de chargement...
La page est en cours de chargement...
La page est en cours de chargement...
La page est en cours de chargement...
La page est en cours de chargement...
La page est en cours de chargement...
La page est en cours de chargement...
La page est en cours de chargement...
La page est en cours de chargement...
La page est en cours de chargement...
La page est en cours de chargement...
-
 1
1
-
 2
2
-
 3
3
-
 4
4
-
 5
5
-
 6
6
-
 7
7
-
 8
8
-
 9
9
-
 10
10
-
 11
11
-
 12
12
-
 13
13
-
 14
14
-
 15
15
-
 16
16
-
 17
17
-
 18
18
-
 19
19
-
 20
20
-
 21
21
-
 22
22
-
 23
23
-
 24
24
-
 25
25
-
 26
26
-
 27
27
-
 28
28
-
 29
29
-
 30
30
-
 31
31
-
 32
32
-
 33
33
-
 34
34
-
 35
35
-
 36
36
-
 37
37
-
 38
38
-
 39
39
-
 40
40
-
 41
41
-
 42
42
-
 43
43
-
 44
44
-
 45
45
-
 46
46
-
 47
47
-
 48
48
-
 49
49
-
 50
50
-
 51
51
-
 52
52
-
 53
53
-
 54
54
-
 55
55
-
 56
56
-
 57
57
-
 58
58
-
 59
59
-
 60
60
-
 61
61
-
 62
62
-
 63
63
-
 64
64
-
 65
65
-
 66
66
-
 67
67
-
 68
68
-
 69
69
-
 70
70
-
 71
71
-
 72
72
-
 73
73
-
 74
74
-
 75
75
-
 76
76
-
 77
77
-
 78
78
-
 79
79
-
 80
80
-
 81
81
-
 82
82
-
 83
83
-
 84
84
-
 85
85
-
 86
86
-
 87
87
-
 88
88
-
 89
89
-
 90
90
-
 91
91
-
 92
92
-
 93
93
-
 94
94
-
 95
95
-
 96
96
-
 97
97
-
 98
98
-
 99
99
-
 100
100
-
 101
101
-
 102
102
-
 103
103
-
 104
104
-
 105
105
-
 106
106
-
 107
107
-
 108
108
-
 109
109
-
 110
110
-
 111
111
-
 112
112
-
 113
113
-
 114
114
-
 115
115
-
 116
116
-
 117
117
-
 118
118
-
 119
119
-
 120
120
-
 121
121
-
 122
122
-
 123
123
-
 124
124
-
 125
125
-
 126
126
-
 127
127


ZyXEL NWD-310N Le manuel du propriétaire
- Catégorie
- Les routeurs
- Taper
- Le manuel du propriétaire
- Ce manuel convient également à
dans d''autres langues
- italiano: ZyXEL NWD-310N Manuale del proprietario
- Deutsch: ZyXEL NWD-310N Bedienungsanleitung
Documents connexes
-
ZyXEL Communications APH 5020 Manuel utilisateur
-
 ZyXEL Communications NWD-270N Manuel utilisateur
-
ZyXEL Communications 802.11n Manuel utilisateur
-
-
 ZyXEL Communications NWD210N Le manuel du propriétaire
-
 ZyXEL Communications NWD-170 - Manuel utilisateur
-
 ZyXEL Communications G-202 Le manuel du propriétaire
-
ZyXEL Communications ZyXEL M-302 Manuel utilisateur
-
 ZyXEL Communications WAP6405 Guide de démarrage rapide
-
 ZyXEL Communications G-210H Guide de démarrage rapide


