La page est en cours de chargement...

APEX APP22 Dual Phantom
Power Adapter
The Facts about “Matching”
Phantom Power
Condenser microphones usually specify dif-
ferent requirements for their phantom power.
These ratings can range from 48 volts all the
way down to 9 volts. Fortunately, there’s a
certain amount of flexibility with matching
Phantom Power voltage to your mic. A rough
rule-of-thumb would be “more is better.” For
example, a 24-volt condenser mic usually
works perfectly with a 48 volt Phantom Power
Suppy. In fact some mics rated at as little as
9 volts can operate on voltages up to 48 volts
(you might want to check with the manufac-
turer first). Conversely, a mic will generally
perform best driven by not less than its rated
voltage. So, for a 48 Volt mic, you would get
best performance with 48 volts of Phantom
Power.
The APEX APP22
• The APP22 provides Phantom Power for
one or two condenser mics.
• Power is supplied by an AC power cord (no adaptor needed) and 115 or 220 Volt
operation is possible.
• Low-noise operation is featured in all modes
Operation
a)Plug the power cord into the APP22 and the other end into a grounded *115 -
120VAC socket.
b) Connect the mic cable to an Input connector on the APP22
c) Using another mic cable, patch from the adjacent (male) Output connector on the
APP22 to a mic input on the mixer.
d) Set the Power switch to ON – the red light beside it should come on. If not, check
your power connection and if necssary check the fuse. Replace with similar type only.
* The APP22 features a 115V-220V AC selector switch. It is held immobile by a strip of metal across the slot. If you are
in an area or country where the AC voltage is different than the switch setting, it can be altered as follows: 1) Make sure
that the APP22 is unplugged. 2) Loosen the two small screws at either end of the switch slot so that the switch assembly
can drop down slightly. 3) Slide the switch selector under the metal strip to the desired position. 4) Tighten the screws.
Specifications
• Input Connectors: 2 x XLR female
• Output connectors: 2 x XLR male
• Size: 6.0 x 2.0 x 5.0 inches (144mm x 45mm x 92mm)
• Fuse: 0.25A fastblo
• Weight: 3.5 lb (1.6 kg)
www.apexelectronics.com
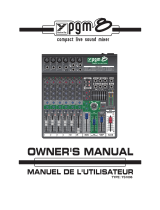
BALANCED
OUTPUT
MIC B
BALANCED
OUTPUT
MIC A
BALANCED
INPUT
MIC B
BALANCED
INPUT
MIC A
TO REDUCE THE RISK OF FIRE OR ELECTRICAL SHOCK
DO NOT EXPOSE THIS UNIT TO RAIN OR MOISTURE
POUR RÉDUIRE LE RISQUE DE FEU OU DE CHOC ÉLECTRIQUE
NE PAS EXPOSER À LA PLUIE OU À L'HUMIDITÉ
48V PHANTOM POWER
APP22
3
1
2
3
1
2
48V PHANTOM
3
1
2
3
1
2

www.apexelectronics.com
L’Adaptateur d’Alimentation
en Duplex Double APEX APP22
Le mariage de l’alimentation en duplex
et du microphone. Les faits
Les microphones à condensateur ont
généralement différentes exigences en ce
qui concerne l’alimentation en duplex. Ces
exigences peuvent varier de 9 à jusqu’à 48
volts. Heureusement, il y a une certaine
flexibilité lorsque vous mariez l’alimentation
en duplex avec le microphone. En général,
plus le voltage est élevé, mieux c’est.
Certains microphones conçus pour fonction-
ner avec 9 volts fonctionneront aussi avec
48 volts (consultez d’abord le fabriquant).
Réciproquement, vous obtiendrez générale-
ment une meilleure performance avec un
voltage qui n’est pas inférieur à celui recom-
mandé. Donc, avec un microphone
requérant 48 volts, vous obtiendrez la
meilleure performance avec une alimenta-
tion en duplex de 48 volts.
Le APEX APP22
• Le APP22 offre l’alimentation en duplex pour un ou deux microphones à condensateur.
• L’alimentation CA est obtenue à l’aide d’un cordon d’alimentation (adaptateur non-
requit) et l’appareil peut être utilisé avec une source de 115 ou 220 Volts.
• Une opération avec niveau de bruit réduis caractérise tous les modes.
Opération
a)Branchez une extrémité du cordon d’alimentation au APP22 et l’autre extrémité du
même cordon à une prise murale 115 – 120 VCA avec mise à la terre.
b) Branchez un câble pour microphone à une prise d’entrée du APP22. À l ‘autre
extrémité de ce câble, raccordez votre microphone à condensateur.
c) À l’aide d’un autre câble pour microphone, raccordez la prise de sortie adjacente
(mâle) sur le APP22 à une prise d’entrée de microphone sur le mixeur.
d)Réglez le commutateur d’alimentation à la position “ON” – la DEL rouge à côté du
sélecteur devrait s’allumer. Sinon, vérifiez la connexion du cordon d’alimentation et
si nécessaire, vérifiez le fusible. Le fusible ne doit être remplacé que par un du
même type.
* Le APP22 est doté d’un sélecteur de voltage 115V-220V CA. Il est maintenu en position par une baguette de métal à
travers l’ouverture. Suivez les procédures qui suivent pour changer le voltage d’opération lorsque vous êtes dans une
région ou le voltage est différent du voltage sélectionné sur le APP22: 1) Assurez-vous que le APP22 est débranché. 2)
Desserrez les deux petites vis aux extrémités de l’ouverture pour le sélecteur de façon à ce que l’assemblage descende
un peu. 3) Glissez le sélecteur sous la baguette de métal à la position désirée. 4) Resserrez les vis.
Spécifications
• Connecteurs d’entrée: 2 x XLR femelles
• Connecteurs de sortie: 2 x XLR mâles
• Dimensions: 6.0 x 2.0 x 5.0 pouces (144mm x 45mm x 92mm)
. Fusible : 0.25A à action rapide
• Poids: 1 livres (1.6 kg)
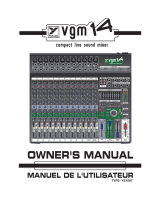
BALANCED
OUTPUT
MIC B
BALANCED
OUTPUT
MIC A
BALANCED
INPUT
MIC B
BALANCED
INPUT
MIC A
TO REDUCE THE RISK OF FIRE OR ELECTRICAL SHOCK
DO NOT EXPOSE THIS UNIT TO RAIN OR MOISTURE
POUR RÉDUIRE LE RISQUE DE FEU OU DE CHOC ÉLECTRIQUE
NE PAS EXPOSER À LA PLUIE OU À L'HUMIDITÉ
48V PHANTOM POWER
APP22
3
1
2
3
1
2
48V PHANTOM
3
1
2
3
1
2
1/2