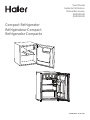
Haier QHE02GGMABB Le manuel du propriétaire
- Catégorie
- Réfrigérateurs-congélateurs
- Taper
- Le manuel du propriétaire
Ce manuel convient également à

User Manual
Guide de l’utilisateur
Manual del usuario
QHE02GGM
QHE03GGM
Compact Refrigerator
Réfrigérateur Compact
Refrigerador Compacto
49-60800-2 01-18 GEA

49-60800-22

349-60800-2
TABLE OF CONTENTS
ENGLISH
REFRIGERATOR SAFETY ...........................................................................................4
Proper Disposal of Your Old Refrigerator ................................................................................5
PARTS AND FEATURES .............................................................................................6
INSTALLATION INSTRUCTIONS ....................................................................................7
Connecting Electricity ................................................................................................. 7
Circulation ............................................................................................................7
Installation Limitations .................................................................................................7
Unpacking .............................................................................................................7
Leveling ...............................................................................................................7
Door Alignment .......................................................................................................8
Reversing the Door Position: QHE02GGM ..............................................................................8
Reversing the Door Position: QHE03GGM ..............................................................................9
REFRIGERATOR USE ..............................................................................................10
Freezer Compartment/Ice Cube Trays .................................................................................10
Refrigerator Interior Shelves ........................................................................................... 10
Food Storage Information .............................................................................................10
Using the Thermostat ................................................................................................10
Defrosting ............................................................................................................10
REFRIGERATOR CARE ........................................................................................... 11
Cleaning .............................................................................................................. 11
Maintenance ..........................................................................................................11
TROUBLESHOOTING . . . . . . . . . . . . . . . . . . . . . . . . . . . . . . . . . . . . . . . . . . . . . . . . . . . . . . . . . . . . . . . . . . . . . . . . . . . . . . . . . . . . . . . . . . . . .12
Normal Operating Sounds You May Hear . . . . . . . . . . . . . . . . . . . . . . . . . . . . . . . . . . . . . . . . . . . . . . . . . . . . . . . . . . . . . . . . . . . . . . . . . . . . . . . 12
LIMITED WARRANTY ............................................................................................ 13
RECORD KEEPING ...............................................................................................14

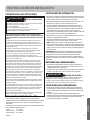
¿ Use this appliance only for its intended purpose as
described in this user manual.
¿ This appliance must be properly installed in accordance
with the installation instructions before it is used. See
grounding instructions in the installation section.
¿ Plug into a grounded 3 prong outlet.
¿ Do not remove ground prong.
¿ Do not use an adapter or extension cord.
¿ Do not repair or replace any part of the appliance unless
specifically recommended in the manual. All other
servicing should be referred to a qualified technician.
¿ Disconnect power before servicing.
¿ Replace all parts and panels before operating.
¿ Use nonflammable cleaner.
¿ Do not store or use gasoline or other flammable vapors
and liquids in the vicinity of this or any other appliance.
¿ Do not store explosive substances such as aerosol cans
with a flammable propellant in this appliance.
¿ Before discarding or removing from service, remove the
door. This will reduce the possibility of danger to children.
¿ To avoid serious injury or death, children should not stand
on, or play in or with the appliance.
¿ Children and persons with reduced physical, sensory or
mental capabilities or lack of experience and knowledge
can use this appliance only if they are supervised or have
been given instructions on safe use and understand the
hazards involved.
¿ This appliance is intended to be used in household and
similar applications such as: staff kitchen areas in shops,
offices and other working environments; farm houses;
by clients in hotels, motels, bed & breakfast and other
residential environments; catering and similar non-retail
applications.
CAUTION
To reduce the risk of injury when using your refrigerator, follow these basic safety precautions.
¿ Do not clean glass shelves or covers with warm water
when they are cold. Glass shelves and covers may break if
exposed to sudden temperature changes or impact, such
as bumping or dropping. Tempered glass is designed to
shatter into many small pieces if it breaks.
¿ Keep fingers out of the “pinch point” areas; clearances
between the door and cabinet are necessarily small. Be
careful closing door when children are in the area.
¿ Do not refreeze frozen foods which have thawed
completely.
¿ Do not touch the cold surfaces in the freezer
compartment when hands are damp or wet, skin may stick
to these extremely cold surfaces.
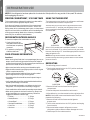
IMPORTANT SAFETY INSTRUCTIONS
WARNING
To reduce the risk of fire, electrical shock, injury to persons, or damage when using the refrigerator,
follow basic precautions, including the following:
STATE OF CALIFORNIA PROPOSITION 65 WARNINGS:
WARNING
This product contains one or more chemicals known to the State of California to cause cancer and
birth defects or other reproductive harm.
WARNING
EXPLOSION HAZARD Flammable Refrigerant
This appliance contains isobutane refrigerant, R600a,
a natural gas with high environmental compatibility.
However, it is also combustible. Adhere to the warnings
below to reduce the risk of injury or property damage.
1) When handling, installing and operating the appliance,
care should be taken to avoid damage to the refrigerant
tubing.
2) Service shall only be performed by authorized service
personnel. Use only manufacturer-authorized service
parts.
3) Dispose of refrigerator in accordance with Federal and
Local Regulations. Flammable refrigerant and insulation
material used require special disposal procedures.
Contact your local authorities for the environmentally
safe disposal of your refrigerator.
4) Keep ventilation openings in the appliance enclosures or
in the built-in structure clear of obstruction.
5) Do not use mechanical devices or other means to
accelerate the defrosting process.
6) Do not damage refrigerant circuit.
7) Do not use electrical appliances inside the food storage
compartment of the appliance.
49-60800-24
REFRIGERATOR SAFETY
ENGLISH

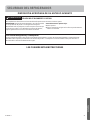
PROPER DISPOSAL OF YOUR OLD APPLIANCE
WARNING
SUFFOCATION AND ENTRAPMENT HAZARD
Failure to follow these disposal instructions can result in death or serious injury.
IMPORTANT: Child entrapment and suffocation are not
problems of the past. Junked or abandoned appliances are
still dangerous even if they will sit for “just a few days.” If
you are getting rid of your old appliance, please follow the
instructions below to help prevent accidents.
Before You Throw Away Your Old Appliance:
Take off the door.
Leave the shelves in place so that children may not easily
climb inside.
Refrigerant and Foam Disposal:
Dispose of refrigerator in accordance with Federal and Local Regulations. Flammable refrigerant and insulation material
used require special disposal procedures. Contact your local authorities for the environmentally safe disposal of your
refrigerator.
READ AND SAVE THESE INSTRUCTIONS
549-60800-2
REFRIGERATOR SAFETY
ENGLISH

49-60800-26
ENGLISH
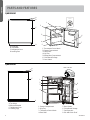
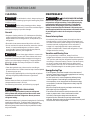
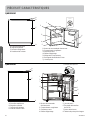
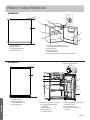
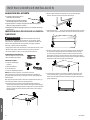
PARTS AND FEATURES
QHE03GGM
QHE02GGM
A. Top Hinge
B. Recessed Handle
C. Refrigerator Door
D. Leveling Legs
A
B
C
D
1. Freezer Compartment
2. Drip Tray
3. Thermostat Control Knob
4.Glass Shelf
5 .Door Gasket
6. 2 Liter Bottle Storage
7. Can Dispenser
8. Full-width Door Shelf
1
8
2
6
3
5
4
7
TEMP CONTROL
A. Top Hinge
B. The Handle
C. Refrigerator Door
D. Leveling Feet
A
B
C
D
Tem p er a t u r e
1
2
3
4
5
6
2ႇ
Coldest
1. Thermostat Control Knob
2. Freezer Compartment
3. Glass Shelf
4. Drip Tray
5. Refrigerator Compartment
6. 2 Liter Bottle Storage
7. Door Gasket
1
2
3
4
5
6
7

749-60800-2
INSTALLATION INSTRUCTIONS
INSTALLATION LIMITATIONS
• Do not install the refrigerator where the temperature will
go below 55°F (13°C) because it will not run often enough to
maintain proper temperatures.
• Do not install the refrigerator where the temperature will go
above 110°F (43°C) because it will not perform properly.
• Select a suitable location for the refrigerator on a hard
even surface away from direct sunlight or heat source, e.g.
radiators, baseboard heaters, cooking appliances, etc. Any
floor unevenness should be corrected with the leveling legs
located on the front bottom corners of the refrigerator.
• Install it on a floor strong enough to support it fully loaded.
• Do not install the refrigerator in a location exposed to water
(rain, etc.) or direct sunlight.
NOTE: As the door gets pressed in during shipping, after
reversing the door, the gasket may have to be reset. This is
done to prevent the cool refrigerated air from escaping. If
there is a gap between the door gasket and the cabinet, set
the gasket by gently pulling it out to seal the gap.
IMPORTANT: This refrigerator is designed for freestanding
installation only. It should not be recessed or built-in an
enclosed cabinet. To ensure your refrigerator works at
optimum efficiency, you should install it in a location where
there is proper air circulation, and electrical connections.
UNPACKING YOUR REFRIGERATOR
1. Remove all packaging material. This includes the foam base
and all adhesive tape holding the refrigerator accessories
inside and outside.
2. Inspect and remove any remains of packing, tape or
printed materials before powering on the refrigerator.
LEVELING YOUR REFRIGERATOR
• Your refrigerator has two leveling legs which are located in
the front bottom corners of your refrigerator. After properly
placing your refrigerator in its final position, you can level
your refrigerator.
• Leveling legs can be adjusted by turning them
counterclockwise to raise your refrigerator or by turning
them clockwise to lower your refrigerator. The refrigerator
door will close easier when the leveling legs are extended.
CAUTION
EXPLOSION HAZARD
Do not puncture refrigerant tubing. Flammable refrigerant
used. Handle with care when moving refrigerator to avoid
either damaging the refrigerant tubing or increasing the risk
of a leak.
Do not, under any circumstances, cut or remove the third
(ground) prong from the power cord. For personal safety,
this appliance must be properly grounded.
The power cord of this appliance is equipped with a
3-prong (grounding) plug which mates with a standard
3-prong (grounding) wall outlet to minimize the possibility
of electric shock hazard from this appliance.
Have the wall outlet and circuit checked by a qualified
electrician to make sure the outlet is properly grounded.
Where a standard 2-prong wall outlet is encountered, it
is your personal responsibility and obligation to have it
replaced with a properly grounded 3-prong wall outlet.
The refrigerator should always be plugged into its own
individual electrical outlet which has a voltage rating that
matches the rating plate.
A 115 Volt AC, 60 Hz, 15- or 20-amp fused, grounded
electrical supply is required. This provides the best
performance and also prevents overloading house wiring
circuits which could cause a fire hazard from overheated
wires.
Never unplug your refrigerator by pulling on the power
cord. Always grip plug firmly and pull straight out from the
outlet.
Immediately discontinue use of a damaged supply cord.
If the supply cord is damaged, it must be replaced by a
qualified service professional with an authorized service
part from the manufacturer.
When moving the refrigerator away from the wall, be
careful not to roll over or damage the power cord.
CONNECTING ELECTRICITY
WARNING
ELECTRICAL SHOCK
HAZARD
Plug into a grounded 3-prong outlet.
Do not remove the ground prong.
Do not use an adapter.
Do not use an extension cord.
Failure to follow these instructions can result in death,
fire, or electrical shock.
PROPER AIR CIRCULATION
• To ensure your refrigerator works at the maximum
efficiency it was designed for, you should install it in a
location where there is proper air circulation, plumbing and
electrical connections.
• The following are recommended clearances around the
refrigerator:
Sides .........2” (51 mm)
Top ............1/2” (13 mm)
Back ..........2” (51 mm)
ENGLISH

49-60800-28
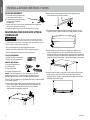
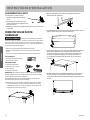
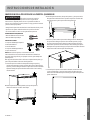
DOOR ALIGNMENT
1. Unscrew the top hinge cover
screw and remove cover.
2. Loosen the top hinge screws
using a 10 mm socket
screwdriver.
3. Adjust the door or put a spacer between the hinge and
case, then tighten the screws.
4. Replace the top hinge cover and hinge cover screws.
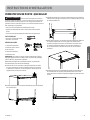
REVERSING THE DOOR POSITION:
QHE02GGM
WARNING
Follow all steps when reversing the door
swing. Failure to follow these instructions, leaving off parts,
or overtightening screws, can lead to the door falling off and
result in injury and property damage.
• Ensure the appliance is unplugged and empty.
• Adjust the two leveling feet to their highest position.
• We recommend you have someone assist you.
TOOLS REQUIRED
• 10 mm socket screw driver
• Phillips style screw driver
PARTS INCLUDED
1. Upper Hinge Bracket
2. Leveling Leg
3. Machine Screw
4. Bottom Hinge Bracket
NOTE: To take the door off, it is necessary to tilt the
appliance backward. You should rest the appliance on
something solid, e.g. a chair, just below the top panel.
DO NOT lay the appliance completely flat as this may damage
the coolant system.
1. Unscrew the top hinge cover screw and remove cover.
Unscrew the upper hinge bracket screws and remove
hinge. Take off the left side screw covers. Pull the
appliance door upward to remove.
2. Remove left leveling leg and bottom hinge bracket by
unscrewing the mounting screws.
3. Install the leveling leg and bottom hinge bracket on the
opposite side. Tighten the bottom hinge bracket screws.
4. Slide the door onto the bottom hinge pin. Replace the
upper hinge bracket on the opposite side and check to
make sure the door/hinge is moving smoothly. Tighten the
screws of the upper hinge bracket. Replace the hinge cover
and right side screw covers. Tighten the hinge cover screw.
5. Check that the door is aligned, horizontally and vertically,
and that the seals are closed on all sides before finally
tightening the upper hinge screws and hinge cover screw.
Readjust the leveling feet.
INSTALLATION INSTRUCTIONS
ENGLISH

949-60800-2
ENGLISH
INSTALLATION INSTRUCTIONS
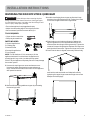
REVERSING THE DOOR POSITION: QHE03GGM
WARNING
Follow all steps when reversing the door
swing. Failure to follow these instructions, leaving off parts,
or overtightening screws, can lead to the door falling off and
result in injury and property damage.
• Ensure the appliance is unplugged and empty.
• Adjust the two leveling legs to their highest position.
• We recommend you have someone assist you.
TOOLS REQUIRED
• 10 mm socket screw driver
• Phillips style screw driver
PARTS INCLUDED
1. Upper Hinge Bracket
2. Leveling Legs
3. Machine Screw
4. Bottom Hinge Bracket
5. Door Stopper
NOTE: To take the door off, it is necessary to tilt the
appliance backward. You should rest the appliance on
something solid, e.g. a chair, just below the top panel.
DO NOT lay the appliance completely flat as this may damage
the coolant system.
1. Unscrew the top hinge cover screw and remove cover.
Unscrew the upper hinge bracket screws and remove
hinge. Take off the left side screw covers. Pull the appliance
door upward to remove.
2. Remove left leveling leg and door stopper by unscrewing
the mounting screws.
3. Install the leveling leg, door stopper, and bottom hinge
bracket on the opposite bottom side. Tighten the screws
on the door stopper and bottom hinge bracket.
4. Slide the door onto the bottom hinge pin. Replace the
upper hinge bracket on the opposite side and check to
make sure the door/hinge is moving smoothly. Tighten the
screws of the upper hinge bracket. Replace the hinge cover
and right side screw covers. Tighten the hinge cover screw.
5. Check that the door is aligned, horizontally and vertically,
and that the seals are closed on all sides before finally
tightening the upper hinge screws and hinge cover screw.
Readjust the leveling legs.

49-60800-210
ENGLISH
REFRIGERATOR USE
NOTE: If the refrigerator has been placed in a horizontal or tilted position for any period of time, wait 30 minutes
before plugging the unit in.
FREEZER COMPARTMENT / ICE CUBE TRAYS
This compartment is designed for making ice cubes and for
short-term food storage (a few days at most).
If ice cube tray freezes to the bottom of the compartment,
pour a little warm water around it to loosen it. Do not use
boiling water, which can damage plastic parts, or sharp metal
objects such as a knife or screwdriver, which can damage the
cooling system tubing. Wash the ice cube tray in lukewarm
water only. Do not wash in the dishwasher.
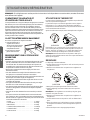
REFRIGERATOR INTERIOR SHELVES
To remove or replace a full-width slide-out shelf:
1. Gently tilt the shelf up
and slide forward until the
shelf has been completely
removed.
2. To replace the shelf, gently
slide the shelf back.
FOOD STORAGE INFORMATION
Fresh Food
• When storing fresh food that is not prepackaged, be sure to
wrap or store food in airtight and moisture proof material
unless otherwise noted. This will ensure proper shelf life and
prevent the transfer of odors and tastes.
• Wipe containers before storing to avoid needless spills.
• Eggs should be stored in an upright position in their original
carton to maximize shelf life.
• Fruit should be washed and dried, then stored in sealed
plastic bags before storing in the refrigerator.
• Vegetables with skins should be stored in plastic bags or
containers.
• Leafy vegetables should be washed and drained and then
stored in plastic bags or containers.
• Hot food should be allowed to cool before storing in the
refrigerator. This will prevent unnecessary energy use.
• Fresh seafood should be used the same day as purchased.
• When storing meats in the fresh food section, keep in the
original packaging or re-wrap as necessary. Follow the
suggestions below for safe storage:
• Chicken ..................... 1-2 Days
• Steaks/Roasts ............... 3-5 Days
• Ground Beef ................ 1-2 Days
• Smoked/Cured Meats ........ 7-10 Days
• Cold Cuts ................... 3-5 Days
• All others .................... 1-2 Days
USING THE THERMOSTAT
The thermostat control knob for the refrigerator and freezer
is located beside the freezer compartment.
ÝëèĤõö÷÷ìðèüòø÷øõñ÷ëèøñì÷òñäçíøö÷÷ëè÷ëèõðòö÷ä÷
control knob to “3” and give your refrigerator time to cool
down completely before adding food; a full 24 hours is
recommended.
After it is fully cooled, test it and adjust towards “1” to make
less cool or towards “6” to cool more to best suit your needs.
However, the setting of “3” should be appropriate for home or
òĦæèõèéõìêèõä÷òõøöè
NOTE: Ýøõñìñê÷ëè÷ëèõðòö÷ä÷æòñ÷õòïîñòå÷ò÷ëèēØģĔ
óòöì÷ìòñúìïïö÷òó÷ëèæòòïìñêæüæïèåø÷çòèöñò÷öëø÷òģ÷ëè
power to the unit.
DEFROSTING
The defrosting process is manual.
1. Turn the thermostat knob to the “Off” position and leave
the refrigerator door open.
2. Remove all food from the freezer and refrigerator
compartment.
3. Clean and wipe out the melted frost with a cloth.
4. After defrosting, turn thermostat knob to original position.
NOTE: If the freezer has accumulated excessive frost/ice,
please do the following:
1. Remove all food from the freezer and refrigerator
compartment.
2. Turn the thermostat knob to the “Off” position and unplug
from the outlet.
3. Place towel under compact refrigerator or move
refrigerator outdoors where no water damage can occur.
4. Follow steps 3 & 4 from above section.
1
2
3
4
5
6
2ႇ
Coldest
QHE02GGM QHE03GGM
1
2
3
4
5
6
2ႇ
Coldest
QHE02GGM QHE03GGM

1149-60800-2
ENGLISH
REFRIGERATOR CARE
CLEANING
WARNING
To avoid electric shock, always unplug your
refrigerator before cleaning. Ignoring this warning may result
in death or injury.
CAUTION
Before using cleaning products, always
read and follow manufacturer’s instructions and warnings to
avoid personal injury or product damage.
General
• Prepare a cleaning solution of 3-4 tablespoons of baking
soda mixed with warm water. Use sponge or soft cloth,
dampened with the cleaning solution, to wipe down your
refrigerator.
• Rinse with clean warm water and dry with a soft cloth.
• Do not use harsh chemicals, abrasives, ammonia, chlorine
bleach, concentrated detergents, solvents or metal
scouring pads. Some of these chemicals may dissolve,
damage and/or discolor your refrigerator.
CAUTION
Do not clean glass shelves or covers with
warm water when they are cold. Glass shelves and covers
may break if exposed to sudden temperature changes or
impact, such as bumping or dropping. Tempered glass is
designed to shatter into many small pieces if it breaks.
Door Gaskets
• Clean door gaskets every three months according to
general instructions. Gaskets must be kept clean and pliable
to assure a proper seal.
• Petroleum jelly applied lightly on the hinge side of gaskets
will keep the gasket pliable and ensure a good seal.
Defrost
Defrost whenever frost on the wall of the freezer
compartment becomes 1/8” thick.
For defrosting instructions, see Defrosting on page 8.
DANGER
EXPLOSION HAZARD
Risk of Fire or Explosion due to puncture refrigerant
tubing. Flammable refrigerant used. Do not use metal
instruments to defrost refrigerator. Do not puncture
refrigerant tubing.
Make sure the drip tray is in place and unplug the unit. Defrosting
usually takes a few hours. To defrost faster, keep the door
open and place a bowl of warm water in the refrigerator. After
defrosting, empty water from the drip tray and wash the drip
tray in warm water.
MAINTENANCE
WARNING
EXPLOSION OR FIRE HAZARD
Risk of Fire or Explosion. Flammable refrigerant used. Do
not puncture refrigerant tubing. To be repaired only by
trained authorized service personnel. Consult Repair
Manual before attempting to service this product. All
Safety Precautions Must be followed. Component parts
shall be replaced with like components to minimize the risk
of possible ignition due to incorrect parts or improper
service.
Power Interruptions
• Occasionally there may be power interruptions due to
thunderstorms or other causes. Remove the power cord
from wall outlet when a power outage occurs. When power
has been restored, replug power cord to wall outlet. If
outage is for a prolonged period, inspect and discard
spoiled or thawed food in freezer and refrigerator. Clean
refrigerator before reusing.
Vacation and Moving Care
• For long vacations or absences, empty food from
refrigerator and freezer, move the temperature dial to the
“Off” position and clean the refrigerator and door gaskets
according to “General Cleaning” section. Prop doors open,
so air can circulate inside. When moving, always move
the refrigerator vertically. Do not move with the unit lying
down. Possible damage to the sealed system could occur.
Energy Saving Tips
• The refrigerator should be located in the coolest area of
the room, away from heat-producing appliances or heating
ducts, and out of direct sunlight.
• Let hot foods cool to room temperature before placing
in the refrigerator. Overloading the refrigerator forces
the compressor to run longer and thus increases energy
consumption. Foods that refrigerate too slowly may lose
quality or spoil.
• Be sure to wrap foods properly, and wipe containers dry
before placing in the refrigerator.
• The shelves should not be lined with aluminum foil, wax
paper, or paper towels. Liners interfere with cold air
æìõæøïä÷ìòñðäîìñê÷ëèõèéõìêèõä÷òõïèööèĦæìèñ÷
• Organize food to reduce door openings and extended
searches. Remove as many items as needed at one time, and
close the door as soon as possible.

49-60800-212
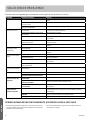
TROUBLESHOOTING
ENGLISH
First try the solutions suggested here to possibly avoid the cost of a service call.
Problem Possible Causes What To Do
Refrigerator does not
run.
Refrigerator is unplugged. Plug refrigerator into a grounded 3 prong outlet.
The circuit breaker is tripped/turned
òģòõ÷ëèéøöèìöåïòúñ
Reset/Turn on circuit breaker or replace fuse.
Ýëè÷èðóèõä÷øõèæòñ÷õòïìöìñ÷ëèØģ
position.
Turn the temperature control to a setting between 1 and 7.
Compressor runs too
frequently
The room temperature is hot and/or
humid.
This is normal to maintain constant temperature during high
temperature, humid days.
Refrigerator door is ajar. Close the door completely
The door gasket is not sealing properly. Clean the door gasket. See Cleaning.
Frequent or prolonged door openings. Limit door openings to maintain the internal temperature.
Door is blocked open. Rearrange or remove items that are keeping the door from
closing completely.
Door does not close
properly
Refrigerator is not level or door is not
aligned.
Level refrigerator or align the door.
Door is blocked open. Rearrange or remove items that are keeping the door from
closing completely.
Food temperature is
too warm
The door is opened frequently. Limit door openings.
A large amount of food was recently
added.
Allow time for recently added warm food to cool.
The door is not sealing properly. Clean the door gasket. See Cleaning.
The control is not set to a cold enough
temperature.
Adjust the temperature control to a colder setting.
Food temperature is
too cold
The control is set to a too cold setting. Adjust the temperature to a less cold setting.
Refrigerator has an
odor.
The refrigerator needs cleaning. Clean refrigerator. See Cleaning.
Òðóõòóèõïüúõäóóèçéòòçìöêìùìñêòģ
an odor.
Wrap and seal food tightly before storing in the refrigerator.
Moisture build up on
interior or exterior of
the refrigerator
The room temperature is hot and/or
humid.
This is normal during high humidity periods.
Frequent or prolonged door openings. Limit door openings.
The door gasket is not sealing properly. Clean the door gasket. See Cleaning.
Popping or cracking
sound when
compressor comes on
Refrigerator is not level. Õèùèï÷ëèõèéõìêèõä÷òõÜèèÕèùèïìñêÒé÷ëèĥòòõìöøñèùèñüòøðäü
need to place metal or wood shims underpart of the refrigerator.
Ýëèĥòòõðäüåèøñèùèñòõúèäî Ëèöøõè÷ëèĥòòõæäñäçèôøä÷èïüöøóóòõ÷÷ëèõèéõìêèõä÷òõÕèùèï
the refrigerator by putting wood or metal shims under part of the
refrigerator.
The refrigerator is touching a wall. Move the refrigerator away from the wall and re-level, if
necessary.
NORMAL OPERATING SOUNDS YOU MAY HEAR
• Boiling water, gurgling sounds or slight vibrations that
are the result of the refrigerant circulating through the
cooling coils.
• The thermostat control will click when it cycles on
and off.

LIMITED WARRANTY
1349-60800-2
ENGLISH
12 Months on Parts and Labor
For 12 months from the date of original retail purchase, GE
Appliances will replace any part of the refrigerator that fails
due to a defect in materials or workmanship. GE Appliances
will choose, at its discretion, to replace or service the
defective unit. Should GE Appliances decide to service the
unit, GE Appliances will provide any part which fails due to a
defect in materials or workmanship free of charge, along with
any labor and related service costs to replace the defective
part. During this period, should GE Appliances choose
to replace the unit, it may do so by providing you with a
certificate redeemable at a retailer for a replacement product.
Product must be accessible, without encumbrance and
installed properly to receive warranty repair service.
NOTE: This warranty commences on the date the item
was purchased, and the original purchase receipt must be
presented to the authorized service representative before
warranty repairs are rendered.
FOR WARRANTY SERVICE
All warranty service must be performed by our Factory
Service centers or an authorized Customer Care Technician.
To schedule service, call 1-877-337-3639.
In Canada, call 1.877.470.9174.
Please have serial number and model number available when
calling for service.
EXCLUSION OF IMPLIED WARRANTIES - Your sole and exclusive remedy is product repair as provided in this Limited
Warranty. Any implied warranties, including the implied warranties of merchantability or fitness for a particular purpose,
are limited to one year or the shortest period allowed by law.
What is not covered by this warranty:
Service trips to your home to teach you how to use the
product.
Improper installation, delivery, or maintenance.
Failure of the product if it is abused, misused, or used for
other that the intended purpose or used commercially.
Loss of food due to spoilage.
Damage caused after delivery.
Replacement of house fuses or resetting of circuit breakers.
Replacement of the light bulbs.
Damage to the product caused by accident, fire, floods or
acts of God.
Incidental or consequential damage caused by possible
defects in this appliance.
Product not accessible to provide required service.
Associated costs when GE Appliances chooses to issue the
consumer a certificate as a form of product replacement.
This warranty is extended to the original purchaser and any succeeding owner for products purchased for home use within
the USA. If the product is located in an area where service by a GE Appliances Authorized Servicer is not available, you may be
responsible for a trip charge or you may be required to bring the product to an Authorized GE Appliances Service location for
service. In Alaska, the warranty excludes the cost of shipping or service calls to your home.
Üòðèö÷ä÷èöçòñò÷äïïòú÷ëèèûæïøöìòñòõïìðì÷ä÷ìòñòéìñæìçèñ÷äïòõæòñöèôøèñ÷ìäïçäðäêèöÝëìöúäõõäñ÷üêìùèöüòøöóèæìĤæ
legal rights, and you may also have other rights which vary from state to state. To know what your legal rights are, consult your
ïòæäïòõö÷ä÷èæòñöøðèõäģäìõöòĦæèòõüòøõö÷ä÷èđöÊ÷÷òõñèüÐèñèõäï
Warrantor US:
GE Appliances, a Haier company
For Customers in Canada: This warranty is extended to the original purchaser and any succeeding owner for products
purchased in Canada for home use within Canada. In-home warranty service will be provided in areas where it is available and
deemed reasonable by Mabe to provide.
Warrantor Canada:
MC Commercial, Burllington, Ontario, L7R 5B6

49-60800-214
ENGLISH
RECORD KEEPING
Thank you for purchasing this Haier product. This user
manual will help you get the best performance from your new
refrigerator.
For future reference, record the model number, serial number,
and the date of purchase. The model/serial number plate is
located on the inside wall of the refrigerator.
Staple your proof of purchase to this manual to aid in
obtaining warranty service if needed.
_______________________________________
Model number
_______________________________________
Serial number
_______________________________________
Date of purchase

1549-60800-2
TABLE DES MATIÈRES
SÉCURITÉ DU RÉFRIGÉRATEUR. . . . . . . . . . . . . . . . . . . . . . . . . . . . . . . . . . . . . . . . . . . . . . . . . . . . . . . . . . . . . . . . . . . . . . . . . . . . . . . . . . . .16
Mise au rebut de votre ancien réfrigérateur .............................................................................17
PIÈCES ET CARACTÉRISTIQUES ...................................................................................18
INSTRUCTIONS D’INSTALLATION .................................................................................19
Branchements électriques ............................................................................................ 19
Circulation ...........................................................................................................19
Limitations relatives à l’installation ....................................................................................19
Déballage ............................................................................................................19
Nivellement ..........................................................................................................19
Alignement de la porte ................................................................................................20
Inversion du sens d’ouverture de la porte : QHE02GGM ................................................................20
Inversion du sens d’ouverture de la porte : QHE03GGM ................................................................21
UTILISATION DU RÉFRIGÉRATEUR ................................................................................22
Compartiment congélateur et utilisation du tiroir à glace ...............................................................22
Clayettes intérieures de rangement .................................................................................... 22
Renseignements sur le stockage de nourriture ........................................................................22
Utilisation du thermostat .............................................................................................22
Degivrage ............................................................................................................22
ENTRETIEN DU RÉFRIGÉRATEUR ................................................................................. 23
Nettoyage ............................................................................................................ 23
Entretien .............................................................................................................23
CONSEILS DE DÉPANNAGE .......................................................................................24
Fonctionnement normal ...............................................................................................24
GARANTIE LIMITÉE .............................................................................................. 25
DOCUMENTS À CONSERVER ......................................................................................26
FRANÇAIS

¿ Utiliser cet appareil uniquement dans le but auquel il est destiné
et tel que décrit dans le présent manuel d’utilisation.
¿ Avant utilisation, cette centre de boissons doit être
correctement installée conformément aux instructions
d’installation. Voir les instructions de mise à la terre incluses
dans les instructions d’installation.
¿ Brancher sur une prise à 3 alvéoles reliée à la terre.
¿ Ne pas enlever la prise de liaison à la terre.
¿ Ne pas utiliser d’adaptateur ou de rallonge.
¿ Ne réparer ni remplacer aucune pièce de l’appareil sans
recommandation spécifique du manuel. Toutes les autres tâches
d’entretien doivent être effectuées par un technicien qualifié.
¿ Déconnecter la source de courant électrique avant l’entretien.
¿ Replacer pièces et panneaux avant de faire la mise en marche.
¿ Utiliser un produit de nettoyage ininflammable.
¿ Abstenez-vous d’entreposer ou d’utiliser de l’essence ou
d’autres vapeurs et liquides inflammables aux alentours de cet
électroménager ou d’autres appareils.
¿ N’entreposez pas dans cet électroménager des substances
explosives telles que des bombes aérosols qui contiennent un
gaz propulseur.
¿ Avant de jeter l’appareil ou de le rendre inutilisable, retirer la
porte. Cela réduira la possibilité de danger pour les enfants.
¿ Afin de prévenir les accidents graves ou la mort, les enfants ne
doivent pas se tenir ni jouer dans ou sur l’électroménager.
¿ Les enfants et les personnes dont les capacités sont réduites
sur le plan physique, sensoriel ou mental, ou qui manquent
d’expérience ou de connaissances, peuvent utiliser cet
électroménager seulement si elles sont surveillées ou ont reçues
des consignes de sécurité sur son usage et les risques y sont
associés.
¿ Cet électroménager est conçu pour une utilisation domestique
et applications similaires : salle du personnel dans une usine,
un bureau ou d’autres lieux de travail; maison de ferme; clients
dans un hôtel, un motel, un gîte touristique et d’autres lieux
résidentiels; approvisionnement et applications similaires non
reliées au commerce de détail.
ATTENTION
Pour réduire le risque de blessures lorsque vous utilisez votre appareil, veuillez suivre les consignes de sécurité
suivantes :
¿ Ne nettoyez pas les clayettes ou les couvercles en verre avec de
l’eau tiède quand ceux-ci sont froids. Les clayettes et couvercles
en verre peuvent se casser s’ils sont exposés à des changements
soudains de température ou si vous les cognez ou les faites
tomber. Le verre trempé est conçu pour se briser en petits
morceaux en cas de casse.
¿ Éloignez les doigts des parties du réfrigérateur où l’on peut
facilement se pincer : les espaces entre le porte et la cuve sont
toujours étroits. Soyez prudent lorsque vous fermez le porte en
présence d’enfants.
¿ Ne recongelez pas les aliments surgelés qui ont complètement
dégelé.
¿ Ne touchez pas les surfaces froides du congélateur lorsque vous
avez les mains humides ou mouillées. La peau risque d’adhérer à
ces surfaces extrêmement froides.
AVERTISSEMENT
An de réduire le risque d’incendie, de choc électrique, de blessures corporelles ou de dommage lors de
l’utilisation du appareil, il convient d’observer certaines précautions fondamentales, notamment :
AVERTISSEMENTS DE LA PROPOSITION 65 DE L’ÉTAT DE LA CALIFORNIE:
AVERTISSEMENT
Ce produit contient une ou plusieurs substances chimiques reconnues par l’État de Californie pour causer
le cancer et des anomalies congénitales ou d’autres problèmes liés à la reproduction.
AVERTISSEMENT
RISQUE D’EXPLOSION Fluide frigorigène inflammable
Cet électroménager contient le réfrigérant isobutane, R600a, un gaz naturel à compatibilité élevée avec l’environnement. Il s’agit
cependant d’un combustible. Observez les consignes de sécurité ci-dessous afin de réduire le risque de blessure ou de dommage à la
propriété.
1) Lors de la manipulation, de l’installation et de l’utilisation de
cet appareil, prenez soin de ne pas endommager les tubes de
circulation du fluide frigorigène.
2) L’entretien ou la réparation doivent être effectués par un
personnel de service autorisé. Utilisez seulement des pièces de
rechange autorisées par le fabricant.
3) Mettez le réfrigérateur au rebut conformément aux
réglementations fédérales et locales. Le fluide frigorigène
inflammable et le matériel isolant utilisés nécessitent des
procédures de mise au rebut spéciales. Communiquez avec les
autorités locales compétentes pour la mise au rebut de votre
réfrigérateur sans danger pour l’environnement.
4) N’obstruez pas les évents dans l’enceinte prévue pour l’appareil.
5) N’utilisez pas d’appareils ou autres moyens mécaniques pour
accélérer le processus de dégivrage.
6) N’endommagez pas le circuit du fluide frigorigène.
7) N’utilisez pas d’appareils électriques dans le compartiment
réfrigérateur de cet appareil.
49-60800-216
SÉCURITÉ DU RÉFRIGÉRATEUR
FRANÇAIS

MISE AU REBUT DE VOTRE VIEIL APPAREIL
AVERTISSEMENT
RISQUE DE SUFFOQUER OU D’Y ÊTRE EMPRISONNÉ
Le non-respect de ces instructions d’élimination peut entraîner la mort ou des blessures graves.
IMPORTANT: Les enfants pris au piège ou morts d’asphyxie
sont toujours d’actualité. Les réfrigérateurs et congélateurs
abandonnés sont toujours aussi dangereux, même si on n’attend
que «quelques jours» pour s’en débarrasser. Si vous ne gardez
pas votre ancien réfrigérateur ou congélateur, veuillez suivre les
directives ci-dessous afin de prévenir les accidents.
Avant de vous débarrasser de votre ancien appareil
¿ Ôter les porte.
¿ Laisser les tablettes en place de sorte que les enfants ne
puissent pas y pénétrer facilement.
Mise au rebut des produits réfrigérants et en mousse :
Mettez l’électroménager au rebut conformément à la réglementation fédérale et locale. Le fluide frigorigène inflammable et le matériel
isolant utilisés nécessitent des procédures de mise au rebut spéciales. Communiquez avec les autorités locales pour connaître la façon
de mettre votre électroménager au rebut qui soit respectueuse de l’environnement.
LIRE ET CONSERVER CES INSTRUCTIONS
1749-60800-2
SÉCURITÉ DU RÉFRIGÉRATEUR
FRANÇAIS

49-60800-218
PIÈCES ET CARACTÉRISTIQUES
QHE03GGM
QHE02GGM
A. Charnière supérieure
B. Poignée encastrée
C. Porte du réfrigérateur
D. Pieds de mise à niveau
A
B
C
D
1. Bouton de commande
du thermostat
2. Compartiment congélateur
3. Clayette en verre
4. Plateau d’égouttage
5. Joint de porte
6. Stockage de bouteilles
de 2 litres
7. Centre de boissons
8. Tablette de porte pleine largeur
1
2
3
4
7
Commande de température
A. Charnière supérieure
B. Poignée encastrée
C. Porte du réfrigérateur
D. Pieds de mise à niveau
A
B
C
D
Tem p er a t u r e
1
2
3
4
5
6
2ႇ
Coldest
1. Bouton de commande du thermostat
2. Compartiment congélateur
3. Clayette en verre
4. Plateau d’égouttage
5. Refrigerator Compartment
6. Stockage de bouteilles de 2 litres
7. Joint de porte
1
2
3
4
5
6
7
FRANÇAIS
8
6
5

1949-60800-2
INSTRUCTIONS D’INSTALLATION
LIMITATIONS RELATIVES À L’INSTALLATION
¿ N’installez pas le réfrigérateur dans une pièce où les températures
descendent en-dessous de 55°F (13°C) parce qu’il serait difficile
d’y maintenir une température correcte.
¿ N’installez pas le réfrigérateur dans un endroit où la température
ambiante sera supérieure à 100°F (37°C), il ne fonctionnera pas
correctement.
¿ Choisir un endroit convenable et placer le réfrigérateur sur une
surface solide et plane, loin de sources de chaleur telles que: les
radiateurs, les éléments chauffants à plinthes, les cuisinières, etc.
Toute irrégularité au sol doit être corrigée à l’aide des pieds de
mise à niveau situés sur les coins avant de la partie inférieure du
réfrigérateur.
¿ Installez l’appareil sur un plancher suffisamment robuste pour
supporter son poids à pleine capacité.
¿ N’installez pas le réfrigérateur/congélateur dans un endroit exposé
à l’eau (pluie, etc.) ou aux rayons directs du soleil.
REMARQUE: Comme le joint aoouyédans pendant l’expédition,
après avoir renversé la porte le joint peut devoir être remet á
l’état initial. Ceci est fait pour empécher le refroidit l’air réfrigéré
d’échapper. Si là-bas est un écart entre la porte et le placard, régle
le joint en tirant doucement il hors sceller l’écart.
IMPORTANT : Ce réfrigérateur est conçu uniquement pour être
utilisé d’une manière autoportante. Il ne doit pas être encastré ni
installé dans un placard fermé. Pour vous assurer que le réfrigérateur
fonctionne à son efficacité optimale, il doit être installé dans un
endroit où la circulation d’air et les raccordements électriques sont
appropriés.
DÉSEMBALLAGE DU RÉFRIGÉRATEUR
1. Retirer l’ensemble du matériel d’emballage. Ceci comprend la
base en mousse ainsi que l’ensemble du matériel adhésif qui
maintient les accessoires du réfrigérateur à l’intérieur tout comme
à l’extérieur.
2. Inspecter et enlever tout restant d’emballage, de scotch ou de
matériaux imprimés avant de brancher le réfrigérateur.
MISE Á NIVEAU DU RÉFRIGÉRATEUR
• Le réfrigérateur posséde deux pieds de mise á niveau qui
sont situés sur les coins avant du réfrigérateur. Après avoir
convenablement installé le réfrigérateur à la place qu’il occupera,
procéder à la mise à niveau.
• Pour régler les pieds de mise á niveau, les tourner dans le sens des
aiguilles d’une montre afin de surélever le réfrigérateur et dans le
sens inverse des aiguilles d’une montre pour l’abaisser. La porte du
réfrigérateur se ferme plus facilement lorsque les pieds de mise à
niveau sont surélevés.
AVERTISSEMENT
RISQUE D’EXPLOSION
Risque d’incendie ou d’explosion due à la tuyauterie de réfrigérant
çèóìôƶõèÛŻéõìêŻõäñ÷ìñĥäððäåïèø÷ìïìöŻÖäñìóøïèýäùèæöòìñ
quand réfrigérateur mobile pour éviter d’endommager la tuyauterie
réfrigérante ou d’augmenter le risque d’une fuite.
Ne coupez pas ou n’enlevez pas, sous aucun prétexte, la
troisième broche de mise à la terre du cordon d’alimentation.
Pour des raisons de sécurité, cet appareil doit être
correctement mis à la terre.
Le cordon d’alimentation de cet appareil est équipé d’une fiche
à trois broches (pour une mise à la terre) qui s’adapte à la prise
de courant standard à 3 broches (pour une mise à la terre) pour
minimiser les risques de chocs électriques par cet appareil.
Faites vérifier la prise murale et le circuit électrique par
un électricien qualifié pour s’assurer que le système est
correctement mis à la terre.
Dans le cas d’une prise biphasée, l’installateur a la responsabilité
et l’obligation de la remplacer par une prise triphasée
correctement mise à la terre. N’utilisez pas d’adaptateur.
Le appareil doit toujours être branché à sa propre prise électrique
d’une tension nominale correspondant à celle indiquée sur sa
plaque signalétique.
Une alimentation électrique à 115 volts CA, 60 Hz, avec un fusible
de 15 ou 20 ampères et une mise à la terre est nécessaire. Ceci
permet d’obtenir un meilleur rendement et évite de surcharger
les circuits électriques du domicile qui risque d’occasionner un
incendie en surchauffant.
Ne débranchez jamais le appareil en tirant sur le cordon
d’alimentation. Prenez toujours fermement la fiche en main et
tirez pour la sortir de la prise.
Cessez immédiatement d’utiliser un cordon électrique
endommagé. Si le cordon électrique est endommagé, son
remplacement doit être effectué par un technicien en réparation
qualifié au moyen d’un cordon de rechange autorisé par le
fabricant.
Lorsque vous éloignez votre appareil du mur, faites attention à
ne pas le faire rouler sur le cordon d’alimentation afin de ne pas
l’endommager.
BRANCHEMENTS ÉLECTRIQUES
AVERTISSEMENT
RISQUE DE CHOC
ÉLECTRIQUE
Branchez l’appareil dans une prise triple avec terre.
Ne retirez pas la broche de terre.
N’utilisez pas d’adaptateur.
N’utilisez pas de cordon de rallonge.
Le non-respect de ces instructions peut entraîner des risques
d’incendies, des chocs électriques ou la mort.
CIRCULATION D’AIR ADÉQUATE
• Pour être sur que le réfrigérateur fonctionne á son maximum
d’efficacité, l’installer dans un environnement favorable à
une bonne circulation d’air et possédant des connexions de
plomberie et d’électricité saines.
• Les indications suivantes concernent l’espace recommandé
autour du réfrigérateur:
Latéralement. . . . . . .2 po (51 mm)
Partie supérieure. . .1/2 po (13 mm)
Arrière .............2 po (51 mm)
FRANÇAIS

49-60800-220
ALIGNEMENT DE LA PORT
1. Dévissez les vis du cache de la
charnière supérieure et retirez le
cache.
3. Ajustez la porte ou placez une cale
entre la charnière et le compartiment,
puis serrez les vis.
4. Replacez le cache de la charnière supérieure et les vis du cache de
la charnière.
PERMUTATION DE PORTE:
QHE02GGM
AVERTISSEMENT
Suivez toutes les étapes pour inverser
le sens d’ouverture de porte. L’omission de suivre ces instructions,
de ne pas utiliser toutes les pièces, ou le serrage excessif des vis,
peuvent causer la chute de la porte et occ asionner des blessures
ou des dommages à la propriété.
• Assurez-vous que l’appareil est débranché et vide.
• Ajustez les deux pieds de mise à niveau à leur position la plus
haute.
• Il est recommandé de demander l’aide d’une autre personne.
OUTILS REQUIS
• Tournevis à douille de 10 mm
• Tournevis cruciforme
PIÈCES INCLUSES
1. Charnière supérieure
2. Pieds de mise à niveau
3. Vis à métaux
4. Charnière inférieure
REMARQUE : Pour retirer la porte, inclinez l’appareil vers l’arrière.
Appuyez l’appareil contre un objet solide, une chaise par exemple,
juste en dessous du panneau supérieur.
NE mettez PAS l’appareil complètement à plat, le système de
refroidissement pourrait être endommagé.
1. Dévissez les vis du cache de la charnière supérieure et retirez
le cache. Dévissez les vis de la charnière supérieure et retirez-
la. Retirez les caches des vis du côté gauche. Tirez la porte de
l’appareil vers le haut pour la retirer.
2. Enlevez le pied de mise à niveau et la charnière inférieure en
dévissant les vis de fixation.
3. Installez le pied de mise à niveau et la charnière inférieure du côté
opposé. Serrez les vis de la charnière inférieure.
4. Faites glisser la porte sur l’axe de la charnière inférieure. Replacez
la charnière supérieure sur le côté opposé et vérifiez que la
charnière et la porte tournent correctement. Serrez les vis de
la charnière supérieure. Replacez le cache de la charnière et
les caches des vis du côté droit. Serrez les vis du cache de la
charnière.
5. Vérifiez que la porte est parfaitement alignée, horizontalement
et verticalement, et que les joints adhèrent de tous les côtés
avant de serrer la charnière supérieure. Réglez les pieds de mise à
niveau.
INSTRUCTIONS D’INSTALLATION
FRANÇAIS
La page est en cours de chargement...
La page est en cours de chargement...
La page est en cours de chargement...
La page est en cours de chargement...
La page est en cours de chargement...
La page est en cours de chargement...
La page est en cours de chargement...
La page est en cours de chargement...
La page est en cours de chargement...
La page est en cours de chargement...
La page est en cours de chargement...
La page est en cours de chargement...
La page est en cours de chargement...
La page est en cours de chargement...
La page est en cours de chargement...
La page est en cours de chargement...
La page est en cours de chargement...
La page est en cours de chargement...
La page est en cours de chargement...
La page est en cours de chargement...
-
 1
1
-
 2
2
-
 3
3
-
 4
4
-
 5
5
-
 6
6
-
 7
7
-
 8
8
-
 9
9
-
 10
10
-
 11
11
-
 12
12
-
 13
13
-
 14
14
-
 15
15
-
 16
16
-
 17
17
-
 18
18
-
 19
19
-
 20
20
-
 21
21
-
 22
22
-
 23
23
-
 24
24
-
 25
25
-
 26
26
-
 27
27
-
 28
28
-
 29
29
-
 30
30
-
 31
31
-
 32
32
-
 33
33
-
 34
34
-
 35
35
-
 36
36
-
 37
37
-
 38
38
-
 39
39
-
 40
40


Haier QHE02GGMABB Le manuel du propriétaire
- Catégorie
- Réfrigérateurs-congélateurs
- Taper
- Le manuel du propriétaire
- Ce manuel convient également à
dans d''autres langues
- italiano: Haier QHE02GGMABB Manuale del proprietario
- English: Haier QHE02GGMABB Owner's manual
- español: Haier QHE02GGMABB El manual del propietario