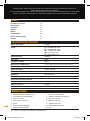
Triton TSPS450 Mode d'emploi
- Catégorie
- Outils électroportatifs
- Taper
- Mode d'emploi
Ce manuel convient également à

www.tritontools.com
Operating and
Safety Instructions
Bedienings- en veiligheids-
voorschriften
Instructions d’utilisation et
consignes de sécurité
Gebrauchs- und
Sicherheitsanweisung
Istruzioni per l'uso e la
sicurezza
Instrucciones de funcionamiento
y seguridad
76mm / 3"
Oscillating
Spindle Sander
TSP S450
TSPS400_Z1MANPRO2.indd 1 18/09/2014 08:44

GB
CONTENTS
Thank you for purchasing this Triton tool. Please read these instructions: they contain information necessary for safe and
effective operation of this product. This product has a number of unique features and, even if you are familiar with similar
products, reading the instructions will help you get the full benefit of its unique design. Keep these instructions close to hand
and ensure all users of this tool have read and fully understand them.
Contents / Specifications / Symbols
SYMBOLS
ENVIRONMENTAL PROTECTION
Waste electrical products should not be
disposed of with household waste.
Please recycle where facilities exist.
Check with your local authority or
retailer for recycling advice.
Always wear ear, eye and respiratory
protection.
Conforms to relevant legislation
and safety standards.
WARNING. To reduce the
risk of injury, user must read instruction
manual
Instruction warning.
Double insulated for additional
protection.
2
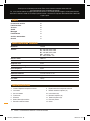
SPECIFICATIONS
Model no: TSPS450
Voltage: EU- 220-240V, 50Hz, 450W
SA- 220-240V, 50Hz, 450W
AU- 220-240V, 50Hz, 450W
USA- 120V, 60Hz, 3.5A
JP- 100V, 50-60Hz, 3.5A
No load speed: 2,000rpm
Oscillations: 58opm
Stroke length: 16mm /
5
⁄8"
Sanding sleeve sizes: 13mm, 19mm, 26mm, 38mm, 51mm, 76mm dia /
1
⁄2",
3
⁄4", 1", 1
1
⁄2", 2", 3"
Dust extraction port: 38mm / 1
1
⁄2"
Table size: 370mm / 14
1
⁄2" x 295mm / 11
1
⁄2"
Spindle dimensions: 12.7mm /
1
⁄2" x 1.5mm /
1
⁄16" thread
Insulation: Double insulated
Net weight: 14.6 kg / 32.1 lbs
Sound and vibration information:
Sound Pressure L
PA
: 76dB(A)
Sound Power L
WA
: 89dB(A)
Uncertainty K: 3dB
Specifications 2
Symbols 2
Know your product 3
Safety 4
Assembly 6
Operation 7
Service & maintenance 7
Warranty 8
Declaration of Conformity 40
TSPS400_Z1MANPRO2.indd 2 18/09/2014 08:44

3
GB
Know your Product
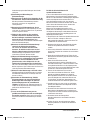
KNOW YOUR PRODUCT
1. On-Board Table Insert Storage
2. On/Off Switch
3. Motor Housing
4. Table Top
5. Spindle
6. Spindle Lock Nut
7. Lower Spindle Washer
8. On-Board Spindle Storage
9. Upper Spindle Washers (x3)
10. Table Insert (x6)
11. Sanding Sleeve (x6)
12. Rubber Drum (x5)
13. Dust Extraction Port
14. Wrench
1
14
2
3
4
5
6
8
7
9101112
13
Operation 7
Service & maintenance 7
Warranty 8
Declaration of Conformity 40
TSPS400_Z1MANPRO2.indd 3 18/09/2014 08:44

4
GB
WARNING Read all safety warnings and all
instructions. Failure to follow the warnings and
instructions may result in electric shock, fire and/
or serious injury.
Save all warnings and instructions for future
reference.
The term "power tool" in the warnings refers to your
mains-operated (corded) power tool or battery-
operated (cordless) power tool.
1) Work area safety
a) Keep work area clean and well lit. Cluttered or dark
areas invite accidents.
b) Do not operate power tools in explosive
atmospheres, such as in the presence of
flammable liquids, gases or dust. Power tools
create sparks which may ignite the dust or fumes.
c) Keep children and bystanders away while
operating a power tool. Distractions can cause you
to lose control.
2) Electrical safety
a) Power tool plugs must match the outlet. Never
modify the plug in any way. Do not use any
adapter plugs with earthed (grounded) power
tools. Unmodified plugs and matching outlets will
reduce risk of electric shock.
b) Avoid body contact with earthed or grounded
surfaces, such as pipes, radiators, ranges and
refrigerators. There is an increased risk of electric
shock if your body is earthed or grounded.
c) Do not expose power tools to rain or wet
conditions. Water entering a power tool will increase
the risk of electric shock.
d) Do not abuse the cord. Never use the cord for
carrying, pulling or unplugging the power tool.
Keep cord away from heat, oil, sharp edges or
moving parts. Damaged or entangled cords increase
the risk of electric shock.
e) When operating a power tool outdoors, use an
extension cord suitable for outdoor use. Use of
a cord suitable for outdoor use reduces the risk of
electric shock.
f) If operating a power tool in a damp location is
unavoidable, use a residual current device (RCD)
protected supply. Use of an RCD reduces the risk of
electric shock.
NOTE: The term “residual current device (RCD)”
may be replaced by the term “ground fault circuit
interrupter (GFCI)” or “earth leakage circuit breaker
(ELCB)”.
3) Personal safety
a) Stay alert, watch what you are doing and use
common sense when operating a power tool. Do
not use a power tool while you are tired or under
the influence of drugs, alcohol or medication. A
moment of inattention while operating power tools
may result in serious personal injury.
b) Use personal protective equipment. Always wear
eye protection. Protective equipment such as dust
mask, non-skid safety shoes, hard hat, or hearing
protection used for appropriate conditions will reduce
personal injuries.
c) Prevent unintentional starting. Ensure the switch
is in the off-position before connecting to power
source and/or battery pack, picking up or carrying
the tool. Carrying power tools with your finger on the
switch or energising power tools that have the switch
on invites accidents.
d) Remove any adjusting key or wrench before
turning the power tool on. A wrench or a key left
attached to a rotating part of the power tool may result
in personal injury.
e) Do not overreach. Keep proper footing and balance
at all times. This enables better control of the power
tool in unexpected situations.
f) Dress properly. Do not wear loose clothing or
jewellery. Keep your hair, clothing and gloves
away from moving parts. Loose clothes, jewellery or
long hair can be caught in moving parts.
g) If devices are provided for the connection of dust
extraction and collection facilities, ensure these
are connected and properly used. Use of dust
collection can reduce dust-related hazards.
4) Power tool use and care
a) Do not force the power tool. Use the correct power
tool for your application. The correct power tool will
do the job better and safer at the rate for which it was
designed.
b) Do not use the power tool if the switch does not
turn it on and off. Any power tool that cannot be
controlled with the switch is dangerous and must be
repaired.
c) Disconnect the plug from the power source and/
or the battery pack from the power tool before
making any adjustments, changing accessories,
or storing power tools. Such preventive safety
measures reduce the risk of starting the power tool
accidentally.
d) Store idle power tools out of the reach of children
and do not allow persons unfamiliar with the
power tool or these instructions to operate the
power tool.Power tools are dangerous in the hands of
untrained users.
SAFETY INSTRUCTIONS
Safety Instructions
TSPS400_Z1MANPRO2.indd 4 18/09/2014 08:44

5
GB
e) Maintain power tools. Check for misalignment or
binding of moving parts, breakage of parts and
any other condition that may affect the power
tool’s operation. If damaged, have the power tool
repaired before use. Many accidents are caused by
poorly maintained power tools.
f) Keep cutting tools sharp and clean. Properly
maintained cutting tools with sharp cutting edges are
less likely to bind and are easier to control.
g) Use the power tool, accessories and tool bits etc.
in accordance with these instructions, taking into
account the working conditions and the work to
be performed. Use of the power tool for operations
different from those intended could result in a
hazardous situation.
5) Service
a) Have your power tool serviced by a qualified repair
person using only identical replacement parts.
This will ensure that the safety of the power tool is
maintained.
ADDITIONAL SAFETY WARNINGS FOR SPINDLE
SANDERS
Even when used as prescribed it is not possible to
eliminate all residual risk factors. Use with caution. If you
are at all unsure of the correct and safe manner in which to
use this tool, do not attempt to use it.
Do not operate the spindle sander until it is fully assembled
and you have read and understood the following
instructions and the warning labels on the spindle sander.
1. Check the condition of the spindle sander. If any part is
missing, bent, or does not operate properly, replace the
part before using the sander.
2. Determine the type of work you are going to be doing
before operating the spindle sander.
3. Secure your work. Support the workpiece securely on
the table, and hold it with both hands.
WARNING: Feed the workpiece gradually, AGAINST
the direction of rotation, onto the sanding sleeve.
Failure to do this could force the workpiece away from
the sanding sleeve with risk of injury. Do not apply
excessive pressure.
5. Always keep your hands out of the path of the sander
and away from the sanding sleeves. Avoid hand
positions where a sudden slip could cause your hand
to move into the spindle. Do not reach underneath
the workpiece or around the sanding sleeve while the
spindle is rotating.
6. On completion of task, turn off the machine and
disconnect from mains power. Wait for the spindle
to stop rotating before performing maintenance. The
sander must be disconnected when not in use or
when changing insert plates, sanding sleeves, rubber
spindles, or other items.
7. Make sure there are no nails or other foreign objects in
the area of the workpiece to be sanded.
8. Never use this sander for wet sanding. Failure to comply
may result in electrical shock, causing serious injury or
worse.
9. Use only identical replacement parts when servicing
this spindle sander.
10. Make sure the spindle has come to a complete
stop before touching the workpiece.
11. Take precautions when sanding painted surfaces.
Sanding lead-based paint is NOT RECOMMENDED. The
contaminated dust is too difficult to control, and could
cause lead poisoning.
When sanding paint:
• Protect your lungs. Wear a dust mask or respirator
• Do not allow children or pregnant women in the work
area until the paint sanding job is finished and the
clean-up is completed
• Do not eat, drink, or smoke in an area where painted
surfaces are being sanded
• Use a dust collection system when possible. Seal the
work area with plastic. Do not track paint dust outside
of the work area
• Thoroughly clean the area when the paint sanding
project is completed
Safety Instructions
TSPS400_Z1MANPRO2.indd 5 18/09/2014 08:44

6
GB
ASSEMBLY
Always ensure that the tool is switched off and
disconnected from the power supply before making
any adjustments or installing or removing spindles.
BENCH MOUNTING
When mounting the spindle sander in a permanent
position ensure that is secured to a rigid work surface.
• Use the holes in the base of the spindle sander as a
template to mark and drill four holes in your intended
mounting surface (ie. workbench). Secure the spindle
sander into position using large bolts, washers and
nuts (not supplied)
• If the spindle sander is intended to be portable, fix a
board to the base which can be easily clamped and
removed from various
mounting surfaces
• Ensure bolts are long
enough to penetrate
the workbench or board
sufficiently for a secure fix
DUST EXTRACTION
It is recommended that the
spindle sander is used with a dust extraction system for a
cleaner and safer work environment.
1. Attach the hose from the dust extraction system to the
Dust Extraction Port (13) and ensure it is secure
2. For greater efficiency, activate the dust extraction
system before turning on the spindle sander
SELECTING A TABLE INSERT
Failure to use the correct table insert with its matching
sanding sleeve could result in pinched fingers or the
workpiece being pulled down between the table insert and
the sanding sleeve.
Use the below chart as a guide to choosing table inserts
and sanding sleeves.
The sanding sleeve should fit snugly into the central
cutout of the table insert.
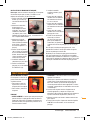
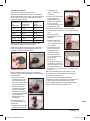
FITTING A SANDING SLEEVE
Note: All of the sanding sleeves, except the smallest
13mm (
1
⁄2") sanding sleeve fit over a matching Rubber
Drum (12).
1. Fit the lower spindle washer (12) over the spindle (4)
with the grooves facing upwards (See image IV)
2. Select the correct Sanding
Sleeve (11) for the
intended job. Select the
corresponding Rubber Drum
(12), (except when using the
13mm sanding sleeve)
Do not use a sanding drum
with the 13mm (
1
⁄2") sanding
sleeve.
3. Select the appropriate
Table Insert (10) in accordance with table above (see
'SELECTING A TABLE
INSERT')
4. Fit the Table Insert (10) over
the Spindle (5) and onto
the lower spindle washer.
Ensure the table insert is
flush with the table
5. Fit the Rubber Drum (12)
over the spindle
6. Slide the Sanding Sleeve (11)
over the Rubber Drum (12)
7. Fit the upper Spindle
Washer (9) over the Spindle
(5)
• Use the large washer with
75mm (3"), 51mm (2"), and
38mm (1
1
⁄2") rubber drums.
• Use the medium washer
with 26mm (1") and 19mm
(
3
⁄4") rubber drums
Sanding Sleeve
Dia
Table Insert
Size
Upper Spindle
Washer Size
13mm /
1
⁄2" 13mm /
1
⁄2" Small
19mm /
3
⁄4" 19mm /
3
⁄4" Medium
26mm / 1" 26mm / 1" Medium
38mm / 1
1
⁄2" 38mm / 1
1
⁄2" Large
51mm / 2" 51mm / 2" Large
76mm / 3" 76mm / 3" Large
Assembly
TSPS400_Z1MANPRO2.indd 6 18/09/2014 08:44

7
GB
OPERATION
• Use the small washer with
13mm (
1
⁄2") sanding sleeve
8. Fit the Spindle Lock Nut (6)
on the Spindle (5). Tighten
the nut just enough to
expand the Rubber Drum
(12) against the Sanding
Sleeve (11). Do not over-
tighten
To maximise the service life
of the sanding sleeve, turn
it upside down to use any
remaining serviceable grit.
Do not use a sanding sleeve
that is too worn. This can lead
to excessive heat build up
and damage the rubber drum.
Damaged rubber drums due to
worn sanding sleeves will not
be covered under warranty.
Assembly / Operation / Service & Maintenance
WARNING! Ensure the tool is switched off and
the plug is removed from the power point before
making any adjustments or carrying out maintenance.
• Any damage to this tool should be repaired and
carefully inspected before use, by qualified repair
technician.
• Have your power tool serviced by a qualified repair
technician using only identical replacement parts.
This will ensure that the safety of the power tool is
maintained.
GENERAL INSPECTION
Regularly check that all the fixing screws are tight. They
may vibrate loose over time.
POWER CORD MAINTENANCE
If the supply cord needs replacing, the task must be
carried out by the manufacturer, the manufacturer’s
agent, or an authorised service centre in order to avoid a
safety hazard.
CLEANING
1. Remove dust and dirt regularly. Frequently blow or
vacuum dust away from all sander parts and the motor
housing.
2. Periodically remove the table insert and lower washer
from the spindle and remove any dust accumulation in
the table insert area.
3. Re-lubricate all moving parts at regular intervals.
4. Never use caustic agents to clean plastic parts.
Do not use cleaning agents to clean the plastic parts
of the tool. A mild detergent on a damp cloth is
recommended. Water must never come into contact with
the tool.
SERVICE & MAINTENANCE
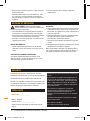
SWITCHING ON AND OFF
The spindle sander is turned on
and off via the power switch (1)
on the front of the machine.
• To turn the spindle sander
on, pull the switch plate up.
• To turn the spindle sander
OFF, push the switch down.
SANDING
• WARNING: Do not sand metal with this sander.
Sanding metal will cause sparks that may ignite wood
and dust particles on the sander or in the workshop
• NOTE: The spindle rotates in an anti-clockwise
direction
1. Check the machine is mounted securely on the
workbench and the Spindle Lock Nut (6) is fastened
correctly with appropriate sanding sleeve and table
insert, in accordance with guidance in ‘Assembly’
2. Wear appropriate safety equipment, including face
mask and safety glasses, then switch on the dust
extraction system (if available)
3. Turn the sander ON and allow the motor to reach full
speed
WARNING: Feed the workpiece gradually, AGAINST the
direction of rotation, onto the sanding sleeve. Failure
to do this could force the workpiece away from the
sanding sleeve with risk of injury. Do not force the
workpiece or apply excessive pressure
4. On completion of task, turn off the machine and
disconnect from mains power.
TSPS400_Z1MANPRO2.indd 7 18/09/2014 08:44

8
GB
Triton Precision Power Tools guarantees to the
purchaser of this product that if any part proves to
be defective due to faulty materials or workmanship
within 3 YEARS from the date of original purchase,
Triton will repair, or at its discretion replace, the faulty
part free of charge.
This guarantee does not apply to commercial use nor
does it extend to normal wear and tear or damage as
a result of accident, abuse or misuse.
* Register online within 30 days.
Terms & conditions apply.
This does not affect your statutory rights oves to be
To register your guarantee visit our web site at
www.tritontools.com* and enter your details.
Your details will be included on our mailing list (unless
indicated otherwise) for information on future releases.
Details provided will not be made available to any third party.
PURCHASE RECORD
Date of Purchase: ___ / ___ / ____
Model: TSPS450
Serial Number: __________________
Retain your receipt as proof of purchase
WARRANTY
Warranty
TSPS400_Z1MANPRO2.indd 8 18/09/2014 08:44

9
NL
INHOUD
Hartelijk dank voor de aanschaf van dit Triton-gereedschap. Deze instructies bevatten informatie die u nodig hebt voor een
veilige en doeltreffende bediening van dit product.
Dit product heeft een aantal unieke eigenschappen. Lees daarom deze handleiding altijd door, ook als u al bekend bent met
bandschuurmachine, zodat u alle voordelen van dit unieke ontwerp kunt benutten
Houd deze handleiding bij de hand en zorg ervoor dat alle gebruikers van dit gereedschap de handleiding hebben gelezen en
volledig hebben begrepen.
Inhoud / Specificaties / Onderdelenlijst
Specificaties 9
Onderdelenlijst 9
Veiligheidsinstructies 10
Symbolen 12
Montage 12
Bediening 13
Service en onderhoud 13
Garantie 14
ONDERDELENLIJST
1. Tafel ring opslag
2. Aan-/uitschakelaar
3. Motor behuizing
4. Tafelblad
5. Rotatie as
6. Rotatie as blokkeringmoer
7. Lage as sluitring
8. Rotatie as opslag
9. Hoge as sluitring (x3)
10. Tafel ring (x6)
11. Schuur koker (x6)
12. Rubberen cilinder (x5)
13. Stofpoort
14. Moersleutel
SPECIFICATIES
Model nr.: TSPS450
Spanning: EU- 220-240V, 50Hz, 450W
SA- 220-240V, 50Hz, 450W
AU- 220-240V, 50Hz, 450W
USA- 120V, 60Hz, 3.5A
JPN- 100V, 50-60Hz, 3.5A
Onbelaste snelheid 2.000 min
-1
Oscillaties: 58/min
Slag lengte: 16 mm
Schuur koker maten: 13, 19, 26, 38, 51 en 76 mm diameter
Stofpoort: 38 mm
Tafel afmetingen: 370 x 295 mm
Rotatie as: 12,7 mm x 1,5 mm draad
Isolatie: Dubbel geïsoleerd
Gewicht: 14,6 kg
Geluid en trilling:
Geluidsdruk L
PA
: 76 dB(A)
Geluidsvermogen L
WA
: 89 dB(A)
Onzekerheid K: 3 dB
TSPS400_Z1MANPRO2.indd 9 18/09/2014 08:44

10
NL
WAARSCHUWING Lees alle bediening- en
veiligheidsvoorschriften. Het niet opvolgen van
alle voorschriften die hieronder vermeld staan,
kan resulteren in een elektrische schok, brand en/of
ernstig letsel.
Bewaar deze voorschriften voor toekomstig
gebruik. De term “elektrisch gereedschap” in alle
hieronder vermelde waarschuwingen heeft betrekking
op uw elektrische gereedschap dat op de stroom is
aangesloten (met een snoer) of met een accu wordt
gevoed (snoerloos).
1) Veiligheid in de werkruimte
a) Houd de werkruimte schoon en zorg voor een
goede verlichting. Rommelige en donkere ruimtes
leiden vaak tot ongelukken.
b) Werk niet met elektrisch gereedschap in
explosieve omgevingen, bijvoorbeeld in de
aanwezigheid van ontvlambare vloeistoffen,
gassen of stof. Elektrisch gereedschap brengt vonken
teweeg die stof of dampen kunnen doen ontbranden.
c) Houd kinderen en omstanders uit de buurt
wanneer u elektrisch gereedschap bedient. Door
afleiding kunt u de controle over het gereedschap
verliezen.
2) Elektrische veiligheid
a) De stekkers van het elektrische gereedschap
moeten passen bij het stopcontact. Pas de
stekker niet aan. Gebruik geen adapterstekkers
bij geaard elektrisch gereedschap. Het gebruik van
ongewijzigde stekkers en passende stopcontacten
vermindert het risico op een elektrische schok.
b) Vermijd lichamelijk contact met geaarde
oppervlakken zoals pijpen, radiatoren, fornuizen
en koelkasten. Het risico op een elektrische schok
neemt toe als uw lichaam geaard wordt.
c) Laat elektrisch gereedschap niet nat worden.
Wanneer elektrisch gereedschap nat wordt, neemt het
risico op een elektrische schok toe.
d) Beschadig het snoer niet. Gebruik het snoer
nooit om het elektrisch gereedschap te dragen,
te trekken of om de stekker uit het stopcontact
te trekken. Houd het snoer uit de buurt van hitte,
olie, scherpe randen of bewegende delen. Een
beschadigd of in de knoop geraakt snoeren verhoogt
het risico op een elektrische schok toe.
e) Wanneer u elektrisch gereedschap buiten
gebruikt, maak dan gebruik van een verlengsnoer
dat geschikt is voor gebruik buitenshuis. Gebruik
een verlengsnoer dat geschikt is voor gebruik
buitenshuis om het risico op een elektrische schok te
verminderen.
f) Indien het onvermijdelijk is elektrisch gereedschap
te gebruiken in een vochtige omgeving, gebruik
dan een energiebron met een aardlek beveiliging
(Residual Currency Device). Het gebruik van een
RCD vermindert het risico op een elektrische schok.
3) Persoonlijke veiligheid
a) Blijf alert en gebruik uw gezonde verstand
wanneer u elektrisch gereedschap bedient.
Gebruik het elektrisch gereedschap niet wanneer
u vermoeid bent of onder invloed van drugs,
alcohol of medicijnen. Onoplettendheid tijdens het
bedienen van elektrisch gereedschap kan leiden tot
ernstig letsel.
b) Maak gebruik van persoonlijke bescherming.
Draag altijd een veiligheidsbril. Passende
bescherming voor de omstandigheden, zoals een
stofmasker, niet-slippende veiligheidsschoenen een
helm of gehoorbescherming, vermindert het risico op
persoonlijk letsel.
c) Zorg ervoor dat het apparaat niet per ongeluk
wordt gestart. Controleer of de schakelaar in
de ‘uit’ stand staat voordat u de stekker in het
stopcontact steekt. Het dragen van elektrisch
gereedschap met uw vinger op de schakelaar of het
aansluiten op de stroom van elektrisch gereedschap
met de schakelaar ingeschakeld kan tot ongelukken
leiden.
d) Verwijder alle stel- of moersleutels voordat u het
elektrische gereedschap inschakelt. Een moer- of
stelsleutel die zich op een draaiend onderdeel van het
elektrische gereedschap bevindt, kan leiden tot letsel.
e) Reik niet te ver. Blijf altijd stevig en in balans
staan. Zo houdt u meer controle over het elektrische
gereedschap in onverwachte situaties.
f) Draag geschikte kleding. Draag geen loshangende
kleding of sieraden. Houd haren, kleding en
handschoenen uit de buurt van bewegende delen.
Loshangende kleding, sieraden en los hangende haren
kunnen vast komen te zitten in bewegende delen.
g) Als er onderdelen voor stofafvoer- en
stofverzameling worden meegeleverd, sluit
deze dan aan en gebruik deze op de juiste wijze.
Het gebruik van deze onderdelen kan het risico op
stofgerelateerde ongelukken verminderen.
4) Gebruik en verzorging van elektrisch gereedschap
a) Forceer elektrisch gereedschap niet. Gebruik
elektrisch gereedschap dat geschikt is voor het
werk dat u wilt uitvoeren. Geschikt elektrisch
gereedschap werkt beter en veiliger op een passende
snelheid.
b) Gebruik het elektrische gereedschap niet als de
schakelaar het apparaat niet in- en uitschakelt.
Elektrisch gereedschap dat niet bediend kan worden
met de schakelaar is gevaarlijk en moet gerepareerd
worden.
ALGEMENE VEILIGHEID
Algemene veiligheid
TSPS400_Z1MANPRO2.indd 10 18/09/2014 08:44

11
NL
c) Haal de stekker uit het stopcontact voordat u
instellingen aanpast, toebehoren verwisselt of
het elektrische gereedschap opbergt. Dergelijke
voorzorgsmaatregelen verminderen het risico op het
per ongeluk starten van het elektrische gereedschap.
d) Berg elektrisch gereedschap dat niet in gebruik is
op buiten bereik van kinderen en laat mensen die
niet bekend zijn met het elektrische gereedschap
of met deze instructies het elektrische
gereedschap niet bedienen. Elektrisch gereedschap
is gevaarlijk in de handen van onervaren gebruikers.
e) Onderhoud uw elektrisch gereedschap. Controleer
op foutieve uitlijning of het vastslaan van
bewegende delen, gebroken onderdelen en
elke andere afwijking die de werking van het
elektrische gereedschap zou kunnen beïnvloeden.
Indien het elektrische gereedschap beschadigd
is, moet u het laten repareren voordat u het weer
gebruikt. Veel ongelukken worden veroorzaakt door
slecht onderhouden elektrisch gereedschap.
f) Houd snijwerktuigen scherp en schoon. Goed
onderhouden snijwerktuigen met scherpe messen
slaan minder snel vast en zijn gemakkelijker te
bedienen.
g) Gebruik het elektrische gereedschap, toebehoren
en onderdelen, etc. volgens deze instructies en
volgens bestemming voor het specifieke type
elektrisch gereedschap, en houd daarbij rekening
met de werkomstandigheden en het uit te voeren
werk. Gebruik van elektrisch gereedschap voor
werkzaamheden die verschillen van die waarvoor
het apparaat bestemd is, kan leiden tot gevaarlijke
situaties.
5) Onderhoud
a) Laat uw elektrische gereedschap onderhouden
door een gekwalificeerde vakman en gebruik
alleen identieke vervangstukken. Zo bent u er zeker
van dat de veiligheid van het elektrische gereedschap
gewaarborgd blijft.
VEILIGHEID VOOR OSCILLERENDE SCHUURMACHINES
De waarschuwingen, voorzorgsmaatregelen en instructies
in deze handleiding dekken niet alle situaties die zich
mogelijk kunnen voordoen bij het gebruik van deze
schuurmachine. Gezond verstand en oplettendheid zijn
factoren die door u toegevoegd worden.
Gebruik deze schuurmachine niet voordat deze volledig
gemonteerd is en u de instructies volledig heeft
doorgelezen en begrijpt.
1. Controleer de onderdelen van de schuurmachine en
vervang missende en beschadigde delen voordat de
machine wordt gebruikt.
2. Stel het type werk vast voor u enig schuurwerk uitvoert.
3. Ondersteun het werkstuk door dit met beide handen
goed vast te houden.
4. Voedt het werkstuk tegen de rotatierichting van de
schuurkoker in.
5. Houdt uw handen uit de buurt van de schuurkoker
tijdens het schuren. Voorkom handposities waarbij uw
handen plotseling weg kunnen slippen wat kan leiden
tot ongelukken. Reik niet onder het werkstuk of om de
schuurkoker heen wanneer deze roteert.
6. Verwijder de stekker uit het stopcontact nadat u de
schuurmachine heet uitgeschakeld. Wacht tot de
schuurkoker tot stilstand is gekomen voordat u enig
onderhoud uitvoert. Bij het vervangen van onderdelen
hoort de stekker niet aangesloten te zijn op een
stopcontact.
7. Zorg ervoor dat u spijkers en andere
bevestigingsmiddelen rondom de machine verwijdert
voordat u begint met schuren.
8. Gebruik deze schuurmachine niet voor natschuren waar
dit kan resulteren in het krijgen van een elektrische
schok en ernstige verwondingen.
9. Gebruik identieke onderdelen voor het vervangen van de
beschadigde onderdelen.
10. Laat de schuurkoker volledig tot stilstand komen voor
het neerleggen van de machine.
11. Neem voorzorgsmaatregelen bij het schuren van
geverfde oppervlakken. Het schuren van geverfde
oppervlakken IS NIET AAN TE RADEN.
Het schuren van verfoppervlakken:
• Bescherm uw longen en draag een stofmasker
• Laat kinderen en zwangere vrouwen het werkgebied
niet betreden tot u klaar bent met schuren, en het
schoonmaken is voltooid
• Eet, drink en rook niet in een omgeving waar
verfoppervlakken worden geschuurd
• Gebruik wanneer mogelijk een stofopvangsysteem en
bedek de werkplaats
• Maak de ruimte goed schoon na het schuren van
verfoppervlakken
Algemene veiligheid
TSPS400_Z1MANPRO2.indd 11 18/09/2014 08:44

12
NL
MONTAGE
Zorg er te allen tijde voor dat het gereedschap is
uitgeschakeld en verwijdert van de stroombron
voor het maken van aanpassingen en het verwijderen of
installeren van accessoires
MONTEREN OP EEN TAFEL
Wanneer u de machine op één en dezelfde positie gebruikt
is het aan te raden deze op een stevige werkbank te
monteren.
• Gebruik de vier gaten in de basisplaat van de
schuurmachine voor het markeren en boren van de
montagegaten in de werkbank. Monteer de machine
op de werkbank met
gebruik van lange bouten,
sluitringen en moeren (niet
inbegrepen)
• Wanneer u de machine op
verschillende plaatsen/
locaties gebruikt is het
aan te raden een houten
blad op de basisplaat te
monteren. Het blad kan
gemakkelijk gemonteerd en verwijderd worden op en
van verschillende oppervlakten
• Zorg ervoor dat de bouten lang genoeg zijn voor het
veilig monteren van de basisplaat of het houten blad
ZAAGSEL/STOF ONTGINNING
Het is aan te raden gebruik te maken van een
stofopvangsysteem voor een schonere werkomgeving en
een veiliger gebruik.
1. Sluit de slang van het opvangsysteem aan op
de stofpoort (13) aan de achterzijde van de
schuurmachine.
2. Voor de grootste efficiëntie schakelt u het
stofopvangsysteem in voordat u de schuurmachine
inschakelt
HET SELECTEREN VAN EEN TAFELRING
Selecteer altijd de juiste tafelring met passende cilinder
en schuurkoker. De schuurkoker hoort in het centrale gat
te passen en minimaal te bewegen.
Gebruik de onderstaande tabel voor het vast stellen van
de juiste tafelring en de juiste boven sluitring bij elke
schuurkoker.
HET PLAATSEN VAN EEN SCHUURKOKER
Let op: Alle kokers, behalve de
kleinste 13 mm koker, passen
op een bijbehorende cilinder
(12)
1. Plaats de lage as sluitring
(12) over de as (4) met de
groeven naar boven wijzend
Schuurkoker
diameter
Tafelring
grootte
Boven sluitring
grootte
13 mm 13 mm Klein
19 mm 19 mm Medium
26 mm 26 mm Medium
38 mm 38 mm Groot
51 mm 51 mm Groot
76 mm 76 mm Groot
Symbolen / Montage
SYMBOLEN
BESCHERMING VAN HET MILIEU
Elektrische producten mogen niet worden
afgevoerd met het normale huisvuil. Indien
de mogelijkheid bestaat, dient u het product
te recyclen. Vraag de plaatselijke autoriteiten
of winkelier om advies betreffende recyclen.
Draag altijd gehoor-, oog- en
luchtwegenbescherming
Voldoet aan de relevante wetgeving en
veiligheidsstandaards
WAARSCHUWING. Verminder het risico op
ongelukken en lees de handleiding voor
gebruik geheel door
Instructie waarschuwing
Dubbel geïsoleerd
TSPS400_Z1MANPRO2.indd 12 18/09/2014 08:44

13
NL
BEDIENING
IN- EN UITSCHAKELEN
De schuurmachine is via de
stroomschakelaar aan de
voorzijde van de machine in en
uit te schakelen
• Om de schuurmachine in
te schakelen, duwt u de
schakelaar plaat omhoog
• Om de schuurmachine uit
te schakelen, duwt u de
schakelaar laat omlaag
SCHUREN
• WAARSCHUWING: Bewerk geen metaal met deze
machine waar de vonken stof en zaagsel op de
machine en in de werkplaats kan ontsteken
• LET OP: De as roteert linksom
1. Controleer dat de machine juist en stevig op het
tafelblad/de werkbank gemonteerd is en dat de
blokkeringmoer (6) met de juiste schuurkoker en
sluitring.
2. Draag de juiste beschermingskleding, inclusief
gezichtsmasker en veiligheidsbril voordat u de machine
aan zet en schakel het stofopvang systeem in (wanneer
nodig).
3. Schakel de schuurmachine in en laat de motor zijn volle
snelheid bereiken
4. Voed het werkstuk langzaam tegen de schuurkoker.
• Forceer het werkstuk niet en oefen geen extreme druk
uit tijdens het voeden
• Voed het werkstuk alleen tegen de rotatierichting in.
De schuurkoker kan het werkstuk van zich afslaan
wanneer u met de richting me voedt.
5. Schakel de machine na gebruik uit en verwijder de
stekker van het stopcontact
SERVICE EN ONDERHOUD
WAARSCHUWING: De schuurmachine hoort te
allen tijde uitgeschakeld te zijn voordat u enige
aanpassingen maakt en/of onderhoud uitvoert
• Beschadigingen aan de schuurmachine horen door een
gekwalificeerd persoon onderzocht en gerepareerd te
worden
• Het vervangen van beschadigde onderdelen door
identieke onderdelen behoud de veiligheid
ALGEMENE INSPECTIE
Controleer de bouten en moeren regelmatig. Deze kunnen
losraken door de vibratie tijdens het gebruik van de
schuurmachine
STROOMKABEL ONDERHOUD
Het vervangen van stroomkabels hoort gedaan te worden
door de fabrikant, de leverancier of een service center, om
gevaar risico’s te vermijden
Montage / Bediening / Service en Onderhoud
2. Selecteer de juiste schuur
koker (11) met de passende
cilinder (12). Gebruik geen
cilinder bij de 13 mm koker
3. Selecteer nu de bijpassende
tafelring (10) met behulp
van de tabel hier boven
4. Plaats de tafelring over de
as op de lage sluitring.
5. Plaats de rubberen cilinder
(12) over de as
6. Schuif de schuurkoker (11)
over de cilinder
7. Plaats de hoge as sluitring
(9) over de as (5)
• Gebruik de grote sluitring
voor de 75 mm, 51 mm en
38 mm cilinders
• Gebruik de medium sluitring voor de 26 mm en de 19
mm cilinders
• Gebruik de kleine sluitring
voor de 13 mm cilinder
8. Schroef de blokkeringmoer
(6) op de as. Draai de moer
strak genoeg vast zodat de
cilinder (12) uitzet tegen de
schuurkoker (11). Draai de
moer niet te strak vast.
Wanneer de schuurkoker aan
één helft versleten is, kunt u
deze omdraaien en de minder
versleten helft gebruiken. Zo
maximaliseert u de levensduur
van de koker.
Gebruik geen totaal versleten
kokers. Dit kan leiden tot een
extreme hitte wat de cilinders
kan beschadigen. Beschadigde
rubberen cilinders, veroorzaakt
door versleten schuurkokers,
valt niet onder de garantie.
TSPS400_Z1MANPRO2.indd 13 18/09/2014 08:44

14
NL
Triton Precision Power Tools garandeert de koper
van dit product dat indien een onderdeel defect is
vanwege fouten in materiaal of uitvoering binnen 3
jaar na de datum van de oorspronkelijke aankoop,
Triton het defecte onderdeel gratis repareert of, naar
eigen inzicht, vervangt.
Deze garantie heeft geen betrekking op
commercieel gebruik en strekt zich niet uit tot
normale slijtage of schade ten gevolge van een
ongeluk, verkeerd gebruik of misbruik.
* Registreer online binnen 30 dagen.
Algemene voorwaarden van toepassing.
Om uw garantie te registreren, gaat u naar onze website op
www.tritontools.com* en voert u uw gegevens in.
Uw gegevens worden opgeslagen in onze mailinglist (tenzij u
anders aangeeft) voor informatie over nieuwe producten. De
ingevulde gegevens worden aan geen enkele andere partij
beschikbaar gesteld.
AANKOOPGEGEVENS
Datum van aankoop: ___ / ___ / ____
Model: TSPS450
Serienummer: __________________
Bewaar uw aankoopbon als aankoopbewijs
GARANTIE
Service en Onderhoud / Garantie
SCHOON MAKEN
1. Verwijder stof en vuil regelmatig van de machine.
Gebruik wanneer mogelijk perslucht
2. Verwijder de tafelring en onder sluitring van de as en
verwijder het stof en vuil
3. Smeer alle bewegende onderdelen goed in
4. Gebruik geen bijtende stoffen voor het schoonmaken
van plastic onderdelen
Gebruik lichte schoonmaakmiddelen en een vochtige
doek. Het gereedschap mag niet in contact komen met
water.
TSPS400_Z1MANPRO2.indd 14 18/09/2014 08:44

15
F
TABLE DES MATIERES
Nous vous remercions d’avoir choisi cet équipement Triton. Ces instructions contiennent les informations nécessaires au
fonctionnement efficace et sûr de ce produit. Veuillez lire attentivement ce manuel pour vous assurer de tirer pleinement
avantage des caractéristiques uniques de votre nouvel équipement.
Gardez ce manuel à portée de main et assurez-vous que tous les utilisateurs l’aient lu et bien compris avant toute utilisation.
Table des matières / Caractéristiques techniques / Nomenclature
Caractéristiques techniques 15
Nomenclature 15
Consignes de sécurité 16
Symboles 18
Assemblage 18
Fonctionnement 19
Révision et entretien 20
Garantie 20
NOMENCLATURE
1. Fentes de rangement
2. Interrupteur
3. Bloc moteur
4. Plateau
5. Arbre
6. Écrou de blocage d’arbre
7. Rondelle inférieure d’arbre
8. Rangement d’arbre
9. Rondelles supérieures d’arbre (x3)
10. Insert de plateau (x6)
11. Manchon de ponçage (x6)
12. Tambour de caoutchouc (x5)
13. Tubulure d’extraction
14. Clé
CARACTÉRISTIQUES TECHNIQUES
Numéro de produit : TSPS450
Tension : Europe - 220-240V, 50Hz, 450W
Afrique du Sud - 220-240V, 50Hz, 450W
Australie - 220-240V, 50Hz, 450W
USA - 120V, 60Hz, 3.5A
Japon - 100V, 50-60Hz, 3.5A
Vitesse à vide : 2.000 min
-1
Fréquence d’oscillation : 58/min
Course d’oscillation : 16 mm
Diamètre des manchons : 13 mm, 19 mm, 26 mm, 38 mm, 51 mm et 76 mm
Tubulure d’extraction poussières : 38 mm
Dimensions du plateau : 370 mm x 295 mm
Cotes de l’arbre : 12,7 mm, filetage 1,5 mm
Isolation : Double isolation
Poids net : 14,6 kg
Informations sur le niveau d’intensité sonore et vibratoire :
Pression acoustique L
PA
: 6 dB(A)
Puissance acoustique L
WA
: 89 dB(A)
Incertitude K : 3 dB
TSPS400_Z1MANPRO2.indd 15 18/09/2014 08:44

16
F
AVERTISSEMENT Veuillez lire l’intégralité des
consignes de sécurité et des instructions. Le
non-respect de ces consignes et instructions peut
entraîner un risque de choc électrique, d’incendie et/
ou se traduire par des blessures graves.
Veuillez conserver ces instructions et consignes
de sécurité pour référence ultérieure. L’expression
« appareil électrique » employée dans les présentes
consignes recouvre aussi bien les appareils filaires
à brancher sur le secteur que les appareils sans fils
fonctionnant sous batterie.
1) Sécurité sur la zone de travail
a) Maintenir une zone de travail propre et bien
éclairée. Des zones encombrées et mal éclairées sont
sources d’accidents.
b) Ne pas utiliser d’outils électriques dans des
environnements explosifs, tels qu’à proximité de
liquides, de gaz ou de poussières inflammables.
Les appareils électriques produisent des étincelles
susceptibles d’enflammer la poussière ou les vapeurs
présentes.
c) Eloigner les enfants et les passants pendant
l’utilisation d’un appareil électrique. Ceux-ci
peuvent provoquer une perte d’attention et faire
perdre la maîtrise de l’appareil.
2) Sécurité électrique
a) La prise d’un appareil électrique doit être adaptée
à la prise du secteur. Ne jamais modifier la prise
en aucune façon. Ne jamais utiliser d’adaptateur
sur la prise électrique d’appareil mis à la terre.
Des prises non modifiées, adaptées aux boîtiers de
prise de courant, réduiront le risque de décharge
électrique.
b) Eviter le contact corporel avec les surfaces mises
à la terre telles que tuyaux, radiateurs, cuisinières
et réfrigérateurs. Le risque de décharge électrique
est plus important si le corps est mis à la terre.
c) Ne pas exposer l’appareil électrique à la pluie ou
à l’humidité. L’infiltration d’eau dans un appareil
électrique accroît le risque de décharge électrique.
d) Ne pas maltraiter le cordon électrique. Ne
jamais utiliser le cordon électrique pour porter,
tirer ou débrancher l’appareil. Protéger le
cordon électrique de la chaleur, du contact
avec l’essence, des bords tranchants et pièces
rotatives. Un cordon électrique endommagé ou
entortillé accroît le risque de décharge électrique.
e) Lors d’une utilisation de l’appareil électrique en
extérieur, se servir d’une rallonge appropriée à
une utilisation en extérieur. Cela réduit le risque de
décharge électrique.
f) Si une utilisation de l’appareil électrique dans un
environnement humide ne peut être évitée, utiliser
une alimentation protégée par un disjoncteur
différentiel. L’utilisation d’un disjoncteur différentiel
réduit le risque de décharge électrique.
3) Sécurité des personnes
a) Rester vigilent et faire preuve de bon sens lors
de la manipulation de l’appareil. Ne pas utiliser
un appareil électrique lorsque l’on se trouve
dans un état de fatigue, ou sous l’influence de
drogues, d’alcool ou de médicaments. Un moment
d’inattention pendant l’utilisation d’un outil électrique
peut se traduire par des blessures graves.
b) Porter un équipement de protection approprié.
Toujours porter une protection oculaire. Le port
de masque à poussières, chaussures de sécurité
antidérapantes, casque de sécurité et protections
antibruit adaptés aux différentes conditions de travail
réduit le risque de blessures corporelles.
c) Eviter tout démarrage accidentel. S’assurer que
l’interrupteur marche-arrêt soit en position d’arrêt
avant de brancher l’appareil sur l’alimentation
secteur ou d’installer la batterie, de prendre
l’appareil ou de le transporter. Porter un appareil
électrique tout en maintenant le doigt posé sur
l’interrupteur ou brancher un appareil électrique dont
l’interrupteur est sur la position de marche est source
d’accidents.
d) Enlever toute clé et tout instrument de réglage
avant de mettre l’appareil électrique en marche.
Une clé ou un instrument de réglage laissé fixé à
un élément en rotation de l’appareil électrique peut
entraîner des blessures physiques.
e) Ne pas essayer d’atteindre une zone hors de
portée. Se tenir toujours en position stable
permettant de conserver l’équilibre. Cela permet
de mieux contrôler l’appareil électrique dans des
situations inattendues.
f) Porter des vêtements appropriés. Ne pas porter
de vêtements amples ou des bijoux pendants.
Eloigner cheveux, vêtements et gants des pièces
en mouvement. Les vêtements amples, les bijoux
pendants et cheveux longs peuvent être happés par
les pièces en rotation
g) Si l’appareil est pourvu de dispositifs destinés
au raccord d’équipements d’extraction et de
récupération de la poussière/sciure, s’assurer
qu’ils soient bien fixés et utilisés correctement.
L’utilisation de ces dispositifs peut réduire les risques
dus à la poussière.
4) Utilisation et entretien des appareils électrique
a) Ne pas forcer sur l’appareil électrique. Utiliser
l’appareil électrique approprié au travail à
effectuer. Un appareil électrique adapté et employé
au rythme pour lequel il a été conçu permettra de
réaliser un travail de meilleure qualité et dans de
CONSIGNES DE SECURITE
Consignes de sécurité
TSPS400_Z1MANPRO2.indd 16 18/09/2014 08:44

17
F
meilleures conditions de sécurité.
b) Ne pas utiliser un appareil électrique dont
l’interrupteur marche-arrêt est hors service. Tout
appareil électrique dont la commande ne s’effectue
plus par l’interrupteur marche-arrêt est dangereux et
doit être réparé.
c) Débrancher l’appareil électrique ou démonter
sa batterie avant d’effectuer tout réglage ou
changement d’accessoire et avant de le ranger.
De telles mesures préventives réduiront les risques de
démarrage accidentel.
d) Ranger les appareils électriques inutilisés
hors de portée des enfants et ne pas permettre
l’utilisation de cet appareil aux personnes non
habituées à son maniement ou n’ayant pas lu les
présentes instructions. Les appareils électriques
sont dangereux dans les mains d’utilisateurs
inexpérimentés.
e) Veiller à l’entretien des appareils électriques.
Vérifier que les éléments rotatifs soient bien
alignés et non grippés. S’assurer de l’absence de
pièces cassées ou endommagées susceptibles
de nuire au bon fonctionnement de l'appareil.
Si l’appareil électrique est endommagé, le faire
réparer avant toute utilisation. De nombreux
accidents sont dus à l’utilisation d’appareils
électriques mal entretenus.
f) Veiller à ce que les outils de coupe soient tenus
affûtés et propres. Des outils de coupe bien
entretenus, aux tranchants bien affûtés, sont moins
susceptibles de se gripper et sont plus faciles à
contrôler.
g) Utiliser l’appareil électrique, les accessoires et
outils à monter conformément à ces instructions,
en tenant compte des conditions de travail et de
la tâche à réaliser. Toute utilisation d’un appareil
électrique autre que celle pour laquelle il a été conçu
peut entraîner des situations à risque.
5) Révision
a) Ne faire réparer votre appareil électrique que
par un réparateur qualifié utilisant uniquement
des pièces de rechange identiques. Cela permet
de maintenir la sécurité d’utilisation de l’appareil
électrique.
CONSIGNES DE SECURITE SUPPLEMENTAIRES
RELATIVES AUX PONCEUSES À CYLINDRE OSCILLANT
Les avertissements, consignes et instructions données
dans le présent manuel ne permettent pas d’aborder
toutes les conditions et les situations à risque susceptible
de survenir à l’utilisation d’une ponceuse à cylindre
oscillant. L’utilisateur doit faire preuve de bon sens et de
prudence lors du ponçage sur ce type d’appareil.
N’utilisez pas la ponceuse à cylindre oscillant tant qu’elle
n’est pas complètement assemblée et tant que vous ne
vous êtes pas familiarisé avec son mode d’emploi et les
étiquettes d’avertissement présentes sur la machine.
1. Assurez-vous du bon état de la ponceuse à cylindre
oscillant. Avant toute utilisation, remplacez toute
pièce manquante, déformée ou ne fonctionnant pas
correctement.
2. Préparez la machine en fonction du type de ponçage
envisagé, avant de la mettre en marche.
3. Tenez la pièce à poncer dans une position sûre sur le
plateau de la machine, et tenez la pièce à deux mains.
4. Tenez compte de la direction d’avancée de la pièce.
Faites progresser la pièce à poncer contre le sens de
rotation du manchon de ponçage.
5. Tenez toujours les mains à l’écart de la trajectoire
de ponçage et des manchons de ponçage. Evitez les
positions susceptibles de voir vos mains entraînées vers
l’arbre. Ne placez pas les doigts sous la pièce à poncer
ni autour du manchon de ponçage tant que l’arbre est
en rotation.
6. Pour plus de sécurité, débranchez l’appareil après
l’avoir éteint. Attendez que l’arbre ait totalement cessé
de tourner avant toute opération d’entretien. La machine
doit être débranchée lorsqu’elle n’est pas utilisée ou lors
du changement des plaques d’insert, des manchons de
ponçage, tambours de caoutchouc ou autres éléments.
7. Assurez-vous de l’absence de tout corps étranger, tel
que clous ou agrafes, dans la pièce à poncer.
8. Cette ponceuse n’est pas conçue pour un ponçage
humide. Un ponçage humide pourrait entraîner un
risque de choc électrique, de blessure grave voire
fatale.
9. N’employez que des pièces de rechange identiques sur
votre ponceuse à cylindre oscillant.
10. Assurez-vous que l’arbre ait totalement cessé de
tourner avant de toucher la pièce à poncer.
11. Prenez des précautions au moment du ponçage
de surfaces peintes. Il n’est PAS RECOMMANDÉ de
poncer des surfaces traitées à la peinture au plomb.
La poussière créée est difficilement maîtrisable et est
source d’intoxication par le plomb.
Précautions lors du ponçage de surfaces peintes :
• Protégez vos poumons : portez un masque anti-
poussière.
• Tenez les enfants et femmes enceintes à l’écart de la
zone de travail tant que la zone n’a pas été nettoyée.
• Ne buvez, ne mangez et ne fumez pas dans la zone
dans laquelle vous procédez au ponçage de surfaces
peintes.
• Dans la mesure du possible, utilisez un dispositif
d’aspiration des poussières. Ne laissez pas la poussière
s’infiltrer dans votre zone de travail. Assurez-vous de
ne pas transporter la poussière vers d’autres zones de
votre environnement.
• Procédez à un nettoyage minutieux de la zone de travail
une fois le ponçage terminé.
Consignes de sécurité
TSPS400_Z1MANPRO2.indd 17 18/09/2014 08:44

18
F
SYMBOLES
PROTECTION DE L’ENVIRONNEMENT
Les produits électriques usagés ne doivent
pas être jetés avec les ordures ménagères.
Veuillez les recycler dans les centres
prévus à cet effet. Consultez les autorités
locales ou votre revendeur pour de plus
amples informations.
Assurez-vous de toujours porter lunettes
de protection, masque respiratoire et
protections antibruit
Conforme à la législation et aux normes de
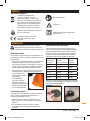
sécurité en vigueur.
ATTENTION. Pour réduire
le risque de lésions, ne pas utiliser avant
d’avoir pris pleinement connaissance des
instructions d’utilisation
Avertissement
Double isolation pour une protection
supplémentaire
ASSEMBLAGE
Assurez-vous toujours d’éteindre et de débrancher
l’appareil avant de procéder à tout réglage, tout
démontage et toute installation d’accessoire.
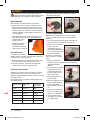
MONTAGE SUR ETABLI
Si la ponceuse à cylindre oscillant est destinée à être
utilisée en un endroit définitif, il est recommandé de la
fixer à un plan de travail rigide.
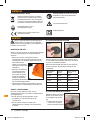
• Le socle de l’appareil présente des trous de fixation
qui peuvent être utilisés comme gabarit en vue du
perçage de trous de fixation sur la surface de montage
envisagée (établi par exemple). Fixez la ponceuse
à l’aide de gros boulons, rondelles et écrous (non
fournis).
• Si la ponceuse à cylindre oscillant est destinée à une
utilisation portative, fixez sur son socle une planche
qui lui permettra d’être facilement retenue en place
à l’aide de presses ou de
serre-joints et retirée en
vue d’une utilisation en un
autre emplacement.
• Si vous utilisez des boulons,
assurez-vous que ceux-ci
soient assez longs pour
pénétrer dans la surface de
l’établi ou dans la planche
de manière à permettre une
fixation sûre.
EXTRACTION DES POUSSIERES
Il est recommandé d’utiliser la ponceuse à cylindre
oscillant conjointement à un système d’extraction des
poussières pour maintenir un environnement de travail
plus propre et plus sain.
1. Installez le tuyau de votre système d’extraction sur
la tubulure d’extraction (13) et vérifiez qu’il soit bien
enfoncé.
2. Pour une plus grande efficacité, allumez votre système
d’extraction avant d’allumer la ponceuse.
SELECTION DE L’INSERT DE PLATEAU
Un mauvais choix d’insert de plateau et de manchon
de ponçage peut favoriser les accidents (doigts qui se
coincent dans l’appareil) et amener la pièce à poncer
à se coincer entre l’insert de plateau et le manchon de
ponçage.
Le manchon de ponçage doit loger intimement dans
l’évidement central de l’insert de plateau.
Le tableau suivant vous aidera à choisir l’insert de plateau
et la rondelle d’arbre supérieure les mieux adaptés à
chaque manchon de ponçage.
Diamètre du
manchon de
ponçage
Alésage central
de l’insert de
plateau
Format de
la rondelle
supérieure
13 mm 13 mm Petite
19 mm 19 mm Moyenne
26 mm 26 mm Moyenne
38 mm 38 mm Grande
51 mm 51 mm Grande
76 mm 76 mm Grande
Symboles / Assemblage
TSPS400_Z1MANPRO2.indd 18 18/09/2014 08:44

19
F
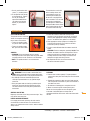
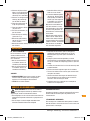
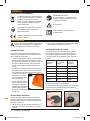
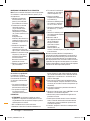
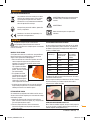
INSTALLATION DU MANCHON DE PONÇAGE
Remarque : tous les manchons de ponçage, à l’exception
du manchon le plus petit (13 mm), s’installent sur un
tambour de caoutchouc (12) de même taille.
1. Enfilez la rondelle inférieure
d’arbre (7) sur l’arbre (5),
face texturée orientée vers
le bas.
2. Choisissez le manchon
de ponçage (11) le
mieux adapté à la tâche
envisagée, ainsi que son
tambour de caoutchouc
(12) adapté, (sauf si vous
employez le manchon de 13 mm). Le manchon de 13
mm s’emploie SANS tambour.
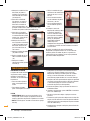
3. Choisissez l’insert de
plateau (10) adapté à la
tâche (consultez le tableau
de la section « Sélection
de l’insert de plateau » ci-
dessus).
4. Enfilez l’insert de plateau
(10) sur l’arbre (5) et placez-
le sur la rondelle inférieure
d’arbre. Assurez-vous que
l’insert de plateau soit de
niveau avec le plateau.
5. Installez le tambour de
caoutchouc (12) sur l’arbre.
6. Enfilez le manchon de
ponçage (11) sur le tambour
de caoutchouc (12).
7. Installez la rondelle
supérieure d’arbre (9) sur
l’arbre (5).
• Servez-vous de la grande
rondelle avec les tambours
de caoutchouc de 76 mm,
51 mm, et 38 mm.
• Servez-vous de la rondelle
moyenne avec les tambours
de caoutchouc de 26 mm et
19 mm.
• Servez-vous de la petite
rondelle avec le manchon de
ponçage de 13 mm.
8. Vissez l’écrou de blocage
d’arbre (6) sur l’arbre
(5). Serrez-le juste assez
pour que le tambour de
caoutchouc (12) épouse bien
la forme du manchon de ponçage (11). Ne serrez pas
trop.
Une fois que le manchon de ponçage est usé, il est
possible de l’installer à l’envers pour utiliser les grains
restants et prolonger sa durée utile.
N’utilisez pas un manchon de ponçage excessivement
usé. Cela contribuerait à un échauffement susceptible
d’endommager le tambour de caoutchouc. La garantie ne
couvre pas les tambours de caoutchouc dont l’usure a été
causée par l’utilisation de manchons de ponçage usés.
FONCTIONNEMENT
MISE EN MARCHE ET ARRET
L’interrupteur est situé sur la
partie frontale de la ponceuse
à cylindre oscillant.
• Pour mettre en marche
la ponceuse, tirez sur la
languette de l’interrupteur.
• Pour l’arrêter, poussez la
languette.
PONCAGE
• AVERTISSEMENT : n’utilisez pas cette ponceuse pour
poncer du métal. Le ponçage du métal entraînera la
production d’étincelles susceptibles d’enflammer les
particules de bois et les poussières présentes sur la
machine ou dans l’atelier.
• REMARQUE : L’arbre tourne dans le sens contraire des
aiguilles d’une montre.
1. Vérifiez que la machine soit solidement installée sur
l’établi et que l’écrou de blocage de l’arbre (6) soit
bien serré. Vérifiez que le manchon de ponçage et
l’insert de plateau utilisés soient appropriés à la tâche
envisagée, conformément aux indications de la section
« Assemblage ».
2. Assurez-vous de porter tous les équipements de
sécurité appropriés, y compris un masque anti-
poussière et des lunettes de protection, puis allumez le
système d’extraction de poussière (selon le cas).
3. Allumez la machine et laissez le moteur atteindre son
plein régime.
4. Faites avancer la pièce à poncer de manière régulière,
CONTRE le sens de rotation, sur le manchon de
ponçage.
Assemblage / Fronctionnement
TSPS400_Z1MANPRO2.indd 19 18/09/2014 08:44

20
F
• Ne forcez pas sur la pièce à poncer et n’exercez pas de
pression excessive.
• Procédez toujours contre le sens de rotation car, dans
le cas contraire, la force de rotation du manchon de
ponçage entraînera la pièce à s’écarter de l’appareil ou
à rebondir.
5. Une fois la tâche terminée, éteignez l’appareil et
débranchez-le.
REVISION ET ENTRETIEN
AVERTISSEMENT ! Assurez-vous de toujours
éteindre et débrancher la machine de l’alimentation
secteur avant toute intervention.
• Toute détérioration de cet appareil doit être réparée et
inspectée par une personne qualifiée avant utilisation.
• Faites réparer votre appareil par une personne qualifiée
en utilisant uniquement des pièces de rechange
identiques. Cela permet de garantir le caractère sûr de
l’appareil dans la durée.
INSPECTION GÉNÉRALE
• Vérifiez régulièrement que toutes les vis de fixation
soient bien serrées. Elles peuvent se desserrer avec le
temps.
ENTRETIEN DU CORDON D’ALIMENTATION
Si le cordon d’alimentation doit être remplacé, faites
appel au fabricant, à l’agent du fabricant ou à un centre
d’entretien agréé, par souci de sécurité.
NETTOYAGE
1. Enlevez régulièrement la poussière et la saleté. Eliminez
la poussière de toutes les parties de la ponceuse et du
bloc moteur en y appliquant un jet d’air comprimé ou à
l’aide d’un aspirateur.
2. Retirez périodiquement l’insert et la rondelle inférieure
de l’arbre pour éliminer toute accumulation de
poussière dans l’évidement du plateau.
3. Lubrifiez les pièces rotatives de l’appareil à intervalles
régulier.
4. N’employez jamais de produits caustiques pour nettoyer
les éléments en plastique de l’appareil.
Nous recommandons l’utilisation d’un détergent doux et
d’un chiffon humide pour nettoyer l’appareil. Veillez à ce
que l’appareil n’entre jamais en contact avec de l’eau.
Veuillez conserver votre ticket de caisse comme preuve
d’achat.
Si toute pièce de ce produit s’avérait défectueuse du
fait d’un vice de fabrication ou de matériau dans les
3 ANS suivant la date d’achat, Triton Precision Power
Tools s’engage auprès de l’acheteur de ce produit à
réparer ou, à sa discrétion, à remplacer gratuitement
la pièce défectueuse.
Cette garantie ne s’applique pas à l’utilisation
commerciale et ne s’étend pas non plus à l’usure
normale ou aux dommages causés par des
accidents, des mauvais traitements ou une utilisation
impropre.
* Enregistrez votre produit en ligne dans les 30 jours
suivant la date d’achat.
Offre soumise à conditions.
Ceci n’affecte pas vos droits statutaires
Pour valider votre garantie, rendez-vous sur notre site
internet www.tritontools.com* et saisissez vos coordonnées.
Vos coordonnées seront introduites dans notre liste de
diffusion (sauf indication contraire) afin de vous informer de
nos prochaines nouveautés. Les informations que vous nous
fournirez ne seront pas communiquées à des tiers.
PENSE-BETE
Date d’achat : ___ / ___ / ____
Modèle : TSPS450
Numéro de série :__________________
Veuillez conserver votre ticket de caisse comme preuve
d’achat.
GARANTIE
Fronctionnement / Revision et Entretien / Garantie
TSPS400_Z1MANPRO2.indd 20 18/09/2014 08:44
La page est en cours de chargement...
La page est en cours de chargement...
La page est en cours de chargement...
La page est en cours de chargement...
La page est en cours de chargement...
La page est en cours de chargement...
La page est en cours de chargement...
La page est en cours de chargement...
La page est en cours de chargement...
La page est en cours de chargement...
La page est en cours de chargement...
La page est en cours de chargement...
La page est en cours de chargement...
La page est en cours de chargement...
La page est en cours de chargement...
La page est en cours de chargement...
La page est en cours de chargement...
La page est en cours de chargement...
La page est en cours de chargement...
La page est en cours de chargement...
-
 1
1
-
 2
2
-
 3
3
-
 4
4
-
 5
5
-
 6
6
-
 7
7
-
 8
8
-
 9
9
-
 10
10
-
 11
11
-
 12
12
-
 13
13
-
 14
14
-
 15
15
-
 16
16
-
 17
17
-
 18
18
-
 19
19
-
 20
20
-
 21
21
-
 22
22
-
 23
23
-
 24
24
-
 25
25
-
 26
26
-
 27
27
-
 28
28
-
 29
29
-
 30
30
-
 31
31
-
 32
32
-
 33
33
-
 34
34
-
 35
35
-
 36
36
-
 37
37
-
 38
38
-
 39
39
-
 40
40


Triton TSPS450 Mode d'emploi
- Catégorie
- Outils électroportatifs
- Taper
- Mode d'emploi
- Ce manuel convient également à
dans d''autres langues
- italiano: Triton TSPS450 Guida utente
- español: Triton TSPS450 Guía del usuario
- Deutsch: Triton TSPS450 Benutzerhandbuch
- Nederlands: Triton TSPS450 Gebruikershandleiding
Documents connexes
-
Triton TSPSP650 Manuel utilisateur
-
Triton TSPST450 Mode d'emploi
-
Triton TPL180 Manuel utilisateur
-
-
Triton Tools TRPUL Mode d'emploi
-
Triton Tools TCROS 4.5 Amps Manuel utilisateur
-
-
Triton Tools TA 1200BS Manuel utilisateur
-
Autres documents
-
Westfalia Spindelschleifer 450 Watt Mode d'emploi
-
Scheppach OSM100 Manuel utilisateur
-
 Shop Series by Rockwell ShopSeries RK9011 Manuel utilisateur
-
Delta 31-483 Manuel utilisateur
-
-
-
Parkside PSR 310 A1 Operation and Safety Notes
-
Hitachi SAT-180 Manuel utilisateur
-
-
Bosch PRR 250 ES Le manuel du propriétaire
