Inseego AT&T Global Modem USB800 Manuel utilisateur
- Catégorie
- Modems
- Taper
- Manuel utilisateur

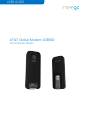
AT&T Global Modem USB800
4G LTE Wireless Modem
USER GUIDE

©2019 AT&T Inc. All rights reserved. The information contained in this document is subject to change without notice and should not
be construed as a commitment by AT&T Inc.
Software License
Proprietary Rights Provisions:
The software drivers provided with this product are copyrighted by Inseego Corp.. and/or Inseego Corp..’ suppliers. Although
copyrighted, the software drivers are unpublished and embody valuable trade secrets proprietary to Inseego Corp.. and/or
Inseego Corp..’ suppliers. The disassembly, decompilation, and/or Reverse Engineering of the software drivers for any purpose
is strictly prohibited by international law. The copying of the software drivers, except for a reasonable number of back-up
copies is strictly prohibited by international law. It is forbidden by international law to provide access to the software drivers
to any person for any purpose other than processing the internal data for the intended use of the software drivers.
U.S. Government Restricted Rights Clause:
The software drivers are classied as “Commercial Computing device Software” and the U.S. Government is acquiring only
“Restricted Rights” in the software drivers and their Documentation.
U.S. Government Export Administration Act Compliance Clause:
It is forbidden by US law to export, license or otherwise transfer the software drivers or Derivative Works to any country where
such transfer is prohibited by the United States Export Administration Act, or any successor legislation, or in violation of the
laws of any other country.
Trademarks and Service Marks
AT&T is a trademark of AT&T Inc., and the other trademarks, logos, and service marks (collectively the “Trademarks”) used in
this user manual are the property of AT&T Inc. or their respective owners. Nothing contained in this user manual should be
construed as granting by implication, estoppel, or otherwise, a license or right of use of AT&T Inc. or any other Trademark
displayed in this user manual without the written permission of AT&T Inc. or its respective owners.
• Inseego, and the Inseego logo are trademarks of Inseego Corp.
• Microsoft® and Windows® are either registered trademarks or trademarks of Microsoft® Corporation in the United States
and/or other countries.
• Apple® and Mac® are registered trademarks of Apple, Inc., registered in the U.S. and other countries.
• LTE™ is a trademark of ETSI.
The names of actual companies and products mentioned in this user manual may be the trademarks of their respective
owners.
Inseego Corp. Revision History
Part Number Revision Description Date
90029507
R2
URL Updates
08/
29/2019
FCC ID: PKRISGMC800
IC ID: 3229A-MC800
PN: 90029507 R2 MASTER UG USB800 01 Aug 2019
Please visit www.att.com for the latest information about your device.

Contents
Getting Started . . . . . . . . . . . . . . . . . . . . . . . . . . . . . . . . . . . . . . . . . . . . . . . . . . . . . . . . . 1
Overview. . . . . . . . . . . . . . . . . . . . . . . . . . . . . . . . . . . . . . . . . . . . . . . . . . . . . . . . . . . . . . . . . . . . . . . . . . . . . . . . . . . . 2
Package Contents ....................................................................... 2
System Requirements. . . . . . . . . . . . . . . . . . . . . . . . . . . . . . . . . . . . . . . . . . . . . . . . . . . . . . . . . . . . . . . . . . . . 2
Components ................................................................................ 3
Status & Data Used Indicators ............................................................ 4
Caring for Your Modem ...................................................................... 5
Using Modem USB800 ................................................... 6
Using USB800 for the First Time .............................................................. 7
Inserting and Connecting Your Modem ...................................................... 8
Properly Insert the Modem into Your Device ............................................. 8
Properly Remove the Modem from your Device. . . . . . . . . . . . . . . . . . . . . . . . . . . . . . . . . . . . . . . . . . . 9
Connecting to the Network and the Internet ............................................. 9
Web User Interface (UI) .....................................................................10
Home ..................................................................................11
Navigation Panel .......................................................................13
Messages. . . . . . . . . . . . . . . . . . . . . . . . . . . . . . . . . . . . . . . . . . . . . . . . . . . . . . . . . . . . . . . . . . . . . . . . . . . . . . . 14
Settings ................................................................................14
Networks. . . . . . . . . . . . . . . . . . . . . . . . . . . . . . . . . . . . . . . . . . . . . . . . . . . . . . . . . . . . . . . . . . . . . . . . . . . 15
SIM. . . . . . . . . . . . . . . . . . . . . . . . . . . . . . . . . . . . . . . . . . . . . . . . . . . . . . . . . . . . . . . . . . . . . . . . . . . . . . . . . 16
GPS ................................................................................17
Preferences. . . . . . . . . . . . . . . . . . . . . . . . . . . . . . . . . . . . . . . . . . . . . . . . . . . . . . . . . . . . . . . . . . . . . . . . . 20
About . . . . . . . . . . . . . . . . . . . . . . . . . . . . . . . . . . . . . . . . . . . . . . . . . . . . . . . . . . . . . . . . . . . . . . . . . . . . . . . . . . 21
Internet Status. . . . . . . . . . . . . . . . . . . . . . . . . . . . . . . . . . . . . . . . . . . . . . . . . . . . . . . . . . . . . . . . . . . . . . 21
Diagnostics. . . . . . . . . . . . . . . . . . . . . . . . . . . . . . . . . . . . . . . . . . . . . . . . . . . . . . . . . . . . . . . . . . . . . . . . . 23
Device Info .........................................................................24
Logs ................................................................................26
Help .......................................................................................27
Install a SIM Card ...........................................................................28
Troubleshooting . . . . . . . . . . . . . . . . . . . . . . . . . . . . . . . . . . . . . . . . . . . . . . . . . . . . . . . 30
Overview. . . . . . . . . . . . . . . . . . . . . . . . . . . . . . . . . . . . . . . . . . . . . . . . . . . . . . . . . . . . . . . . . . . . . . . . . . . . . . . . . . . 31
Common Problems and Solutions . . . . . . . . . . . . . . . . . . . . . . . . . . . . . . . . . . . . . . . . . . . . . . . . . . . . . . . . . . . 32
Technical Support ..........................................................................33
Customer Service . . . . . . . . . . . . . . . . . . . . . . . . . . . . . . . . . . . . . . . . . . . . . . . . . . . . . . . . . . . . . . . . . . . . . . . 33
Data Technical Support .................................................................33
Product Specications and Regulatory Information ...................... 34
Product Specications ......................................................................35
General ................................................................................35

Technology/Bands. . . . . . . . . . . . . . . . . . . . . . . . . . . . . . . . . . . . . . . . . . . . . . . . . . . . . . . . . . . . . . . . . . . . . . 35
Environmental. . . . . . . . . . . . . . . . . . . . . . . . . . . . . . . . . . . . . . . . . . . . . . . . . . . . . . . . . . . . . . . . . . . . . . . . . . 35
Regulatory Statements .....................................................................36
Federal Communications Commission Notice (FCC – United States) ..................36
Wireless Communications. . . . . . . . . . . . . . . . . . . . . . . . . . . . . . . . . . . . . . . . . . . . . . . . . . . . . . . . . . . . . . . . . . . 40
Limited Warranty and Liability ..............................................................40
Glossary. . . . . . . . . . . . . . . . . . . . . . . . . . . . . . . . . . . . . . . . . . . . . . . . . . . . . . . . . . . . . . . 41


2
Overview
Congratulations on purchasing your Modem USB800 from Inseego.
This modem enables you to connect at high speeds to the Internet, your corporate Intranet, and
access your email while you’re away from the oce.
Package Contents
The USB800 package includes:
• USB800
NOTE The USB800 is not a handheld device.
• Literature Kit containing:
• Quick Reference Guide
• Important Customer Safety Information
System Requirements
Supported platforms:
• Windows® 7 or higher
• Mac OS® 10.8 or higher
• Linux OS
• Chrome OS
Compatible browsers:
• Microsoft Internet Explorer 7 or higher
• Mozille Firefox 3.6 or higher
• Google Chrome 9 or higher
• Apple Safari 5 or higher
• Opera 9 or higher
You will also need the following:
• USB Port 2.0 or higher
• Wireless data plan

3
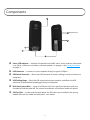
Components
➊ Status LED indicator — indicates the network and trac status; it also indicates when there
is no SIM or a SIM error, and when a software update is in progress. (See Package Contents
on page 2.)
➋ USB Connector — connects to your computer through a type A USB port.
➌ USB Swivel Connector— allows the USB connector to rotate, making it easier to connect to
computers.
➍ USB Folding Hinge — folds the USB connector into your modem, and allows the USB
connector to be extended and plugged into your computer.
➎ Back Panel (removable) — covers the SIM card slot. Press gently on the cover with your
thumb and slide the panel o. The manual reset button can be found under this panel.
➏ SIM Card Slot — inside under the back panel, the SIM card is pre-installed in the spring-
loaded SIM card slot (under the back panel - not shown).
6
7
(inside under cover)
2
4
4
2
(inside under cover)
1
3
5
6
3

4
Status & Data Used Indicators
The LED indicates the modem and data usage status.
Status LED Color Status Description
WHEN NOT CONNECTED
Red
Solid No network available
No SIM,SIM locked,SIM error
Green
Blinking Modem starting up
WHEN CONNECTED
Green
Solid
Blinking
Modem ready to use
Home network
No data being transferred
NOTE While starting up, the Status LED will slowly blink
green
Home network available.
Data being transferred.
Amber
Solid
Blinking
Roaming network available
No data being transferred
Roaming
Data being transferred or Software update in progress
Data Used
LED
OFF
Data Usage information is not available.
Green
Solid Data Usage: < 80%.
Amber
Solid Data Usage: 80-89%.
Red
Solid
Blinking
Data Usage: 90-99%
Data Usage: 100% or greater

5
Caring for Your Modem
Like any electronic device, the modem must be handled with care to ensure reliable operation.
Inseego Wireless recommends the following guidelines:
• Protect the modem from liquids, dust, and excessive temperatures.
• Do not apply adhesive labels to the modem; they might cause the modem to overheat or
alter antenna performance.
• The USB connector should plug easily into your device’s standard type A USB port. Forcing
the modem into a port might damage the connector.
• Remove the modem from your device before transporting it.
• Store the modem in a safe place when not in use.


7
Using USB800 for the First Time
IMPORTANT Do not connect the modem to a USB hub, as it might not provide sufficient
power.
See the Quick Reference Guide included in the box.
To get started, follow these steps.
➊ Conrm your device meets the minimum system requirements. (See System Requirements
on page 2.)
➋ Your modem comes with a SIM card pre-installed. Should you need to swap out your SIM,
follow the instructions for installing an activated SIM Card.
➌ Connect the modem to your device. (See Properly Insert the Modem into Your Device on
page 8.)
IMPORTANT The modem requires an activated SIM to function.
STATUS
LED
COLOR
DESCRIPTION
Red
No network available or No SIM or SIM error or SIM lock
Green
Solid
Quick Blink
Home network
Data connection in use
Amber
Solid
Quick Blink
Roaming network or Software update in progress
Data connection in use

8
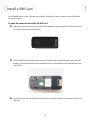
Inserting and Connecting Your Modem
Properly Insert the Modem into Your Device
Open the USB connector
➊ Use your thumb to gently ip open the USB connector on your modem. Be sure to avoid
over-extending the USB connector past its resistance point. Avoid opening the USB
connector with metal objects as this might damage the pins.
To properly insert the modem
➋ Hold the modem along the side edges and gently insert it into your device’s USB port. On
most devices, insert the modem with the label facing up. It should t easily into the port.
Some devices might orient the USB port so the modem label faces down or sideways. Do not
force the modem into the port as this might damage both the modem and the port.
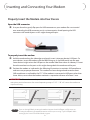
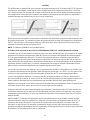
➌ Position the modem as indicated in the following illustrations to maintain SAR compliance
and to ensure proper performance. This modem has been designed and tested to meet
SAR compliance as outlined by the FCC. If the modem is connected to USB ports other than
those shown, ensure that the modem maintains a separation distance of at least 5 mm.
IMPORTANT The modem must be positioned at 120° for optimal functionality. Failure to
maintain a position between the normal operating range of 110° - 130° will cause the modem to
stop functioning.
NOTE If you are having difficulty inserting the modem into your device’s USB port, verify that you are
inserting the modem in the correct orientation and that you are using a Type A USB port. While
starting up, the Status LED will blink slowly in green.

9
Connecting to the Network and the Internet
Getting started with your new wireless USB800 is simple. Insert the modem into the USB Port and
wait for the status LED to turn solid green. You are now connected to the Internet.
Properly Remove the Modem from your Device
IMPORTANT Be sure to disconnect from the network and close the Web UI before you remove
the modem from your device. Disconnecting from the network and closing browser, email,
VPN, and other communication apps avoids potential problems such as automatic shutdown or
screen freezing.
Windows
The USB800 Modem’s USB technology allows you to safely remove the modem at any time when
you are not connected to the network.
➊ End your data session by selecting Disconnect from the Web UI.
➋ Exit and close the Web UI.
➌ Gently grip the modem on both sides and pull straight out to avoid damaging the USB
connectors.
Mac OS X
➊ End your data session by clicking Disconnect in the Web UI. home page
➋ Exit and close the Web UI.
➌ Click the eject icon to the right of the modem icon in the left column of the Finder window
to eject the modem.
➍ Gently grip the modem on both sides and pull straight out to avoid damaging the USB
connectors.

10
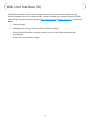
Web User Interface (UI)
The Web User Interface allows you to manage, monitor and customize your wireless network
activity through an easy-to-use web interface. To access the Web User Interface, plug the USB800
into a USB port on your computer and go to http://att.manager/ or http://192.168.1.1. You’ll also be
able to:
• Check messages
• Manage device settings, including GPS and software updates
• Access device information, including Internet status/sessions and modem/network
specications
• Access FAQs and customer support

11
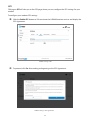
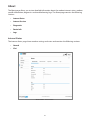
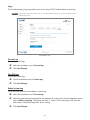
Home
USB800 Home allows you to quickly access commonly used links and all available menu options for
your modem. It contains the following quick link menu options:
• Internet Status
• Diagnostics
• Device Info
• Settings
• Customer Support
USB800 Web UI Home
USB800 Home displays the following session connection information:
• Status — Current modem status.
• Network name — Indicates your current network connection status (Connected, Disconnect).
Click Disconnect if you are currently connected to the network and wish to disconnect.
• Technology — Network type.
• Time connected — The total amount of time connected to the network during the current
session.
• Received — The total amount of data received from, and transmitted to the network during
the current session.
• Transmitted — The total amount of time data has been transmitted during the current
session.

12
• IPv4 address — Address information.
• Mask — Mask information.
• Gateway — Gateway address.
• DNS — DNS information.

13
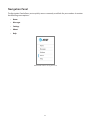
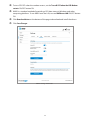
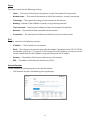
Navigation Panel
The Navigation Panel allows you to quickly access commonly used links for your modem. It contains
the following menu options:
• Home
• Messages
• Settings
• About
• Help
USB800 Web UI Home - Navigation Panel

14
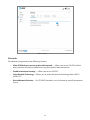
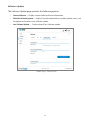
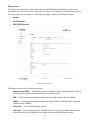
Messages
The Messages page displays all existing system messages, and allows you to delete messages
individually or all messages at one time. To delete existing messages, click the trash can icon for
each message you want to delete.
USB800 Messages
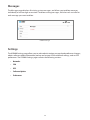
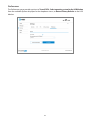
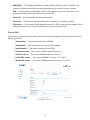
Settings
The USB800 Settings page allows you to make administration password and preference changes;
obtain software update information; backup and restore APN and default settings; and set GPS
preferences. The USB800 Settings page contains the following sections:
• Networks
• SIM
• GPS
• Software Update
• Preferences

15
USB800 Settings
Networks
The Networks page contains the following sections:
• Allow USB Modem to connect to the mobile network — Allows you to turn ON/OFF cellular
data to prevent all internet trac from using the modem’s data connection.
• Enable international roaming — Allows you to turn ON/OFF.
• Select Network Technology — Allows you to select the network technology from: UMTS/
HSPA+/LTE.
• Manual Network Selection — On LTE/UMTS networks, use this feature to specify the network
to use.

16
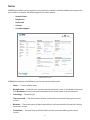
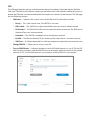
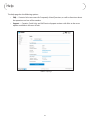
SIM
The SIM page provides settings and information about the modem’s Subscriber Identity Module
(SIM) card. The SIM card inside your modem can be locked with a PIN code for additional security. If
locked, the PIN code must be entered before the modem can connect to the Internet. The SIM page
has the following sections:
• SIM Status — Indicates the current status of the SIM card. Possible values include:
• Ready — This is the normal state. The SIM PIN is not used.
• PIN Locked — The SIM PIN must be entered before you can use the mobile network.
• PUK Locked — The PUK for the SIM must be entered in order to continue. The PUK can be
obtained from your service provider.
• Unlocked — The SIM PIN is needed, but has already been entered.
• No SIM — No SIM was detected. If you do have a SIM, check that it is inserted correctly.
• SIM Error — A SIM was detected, but it did not respond as expected, and cannot be used.
• Change SIM PIN — Allows you to assign a new PIN.
• Turn on SIM PIN Lock — Indicates whether or not the PIN lock feature is in use. If ON, the PIN
lock has been turned on, and the SIM PIN must be entered in order to connect to the mobile
network. If OFF, the PIN lock feature is not turned on, and the SIM PIN is not required.
USB800 Settings - SI
La page est en cours de chargement...
La page est en cours de chargement...
La page est en cours de chargement...
La page est en cours de chargement...
La page est en cours de chargement...
La page est en cours de chargement...
La page est en cours de chargement...
La page est en cours de chargement...
La page est en cours de chargement...
La page est en cours de chargement...
La page est en cours de chargement...
La page est en cours de chargement...
La page est en cours de chargement...
La page est en cours de chargement...
La page est en cours de chargement...
La page est en cours de chargement...
La page est en cours de chargement...
La page est en cours de chargement...
La page est en cours de chargement...
La page est en cours de chargement...
La page est en cours de chargement...
La page est en cours de chargement...
La page est en cours de chargement...
La page est en cours de chargement...
La page est en cours de chargement...
La page est en cours de chargement...
La page est en cours de chargement...
-
 1
1
-
 2
2
-
 3
3
-
 4
4
-
 5
5
-
 6
6
-
 7
7
-
 8
8
-
 9
9
-
 10
10
-
 11
11
-
 12
12
-
 13
13
-
 14
14
-
 15
15
-
 16
16
-
 17
17
-
 18
18
-
 19
19
-
 20
20
-
 21
21
-
 22
22
-
 23
23
-
 24
24
-
 25
25
-
 26
26
-
 27
27
-
 28
28
-
 29
29
-
 30
30
-
 31
31
-
 32
32
-
 33
33
-
 34
34
-
 35
35
-
 36
36
-
 37
37
-
 38
38
-
 39
39
-
 40
40
-
 41
41
-
 42
42
-
 43
43
-
 44
44
-
 45
45
-
 46
46
-
 47
47


Inseego AT&T Global Modem USB800 Manuel utilisateur
- Catégorie
- Modems
- Taper
- Manuel utilisateur
dans d''autres langues
Documents connexes
Autres documents
-
Multitech MT200A2EW-H5-WW Mode d'emploi
-
Sierra Wireless Bell 313U Getting Started Manual
-
Sony Ericsson MD400G Manuel utilisateur
-
Eurotech ReliaCELL 10-20 Le manuel du propriétaire
-
Multitech MTQ-MNA1-B01-SP Mode d'emploi
-
-
Multitech MTQ-H5-B01 Mode d'emploi
-
Netgear MBR1516 Manuel utilisateur
-
-