Support AB CI-5751 Auria iConnect Mode d'emploi
- Taper
- Mode d'emploi

Instructions For Use
CI-5751
Auria™
iConnect
Instructions For Use
Auria™
iConnect
English, Français, Español, Deutsch, Nederlands, Italiano
CI-5751


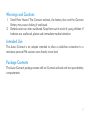
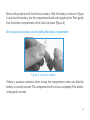
Warnings and Cautions
1. Small Parts Hazard: The iConnect earhook, the battery door and the iConnect
Battery may cause choking if swallowed.
2. Batteries are toxic when swallowed. Keep them out of reach of young children. If
batteries are swallowed, please seek immediate medical attention.
Intended Use
The Auria iConnect is an adapter intended to allow a cable-free connection to a
miniature personal FM receiver worn directly at ear level.
Package Contents
The Auria iConnect package comes with an iConnect earhook and two spare battery
compartments.
1

Device Description
The Auria iConnect (CI-5751-XXX*) is available in two sizes and three colors.
CI-5751-10 0 Auria iConnect Standard Silver Metallic
CI -5751-12 0 Auria iConnect Small Silver Metallic
CI-5751-200 Auria iConnect Standard Dark Sienna Metallic
CI-5751-220 Auria iConnect Small Dark Sienna Metallic
CI-5751-300 Auria iConnect Standard Beige
CI-5751-320 Auria iConnect Small Beige
* The X’s denote model number variants related to product color and size.
2

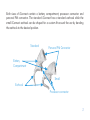
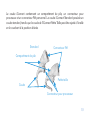
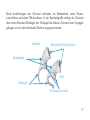
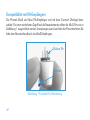
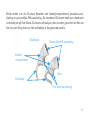
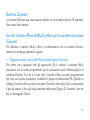
Both sizes of iConnect contain a battery compartment, processor connector and
personal FM connector. The standard iConnect has a standard earhook while the
small iConnect earhook can be shaped for a custom fit around the ear by bending
the earhook to the desired position.
Standard
Processor connector
Earhook
Battery
Compartment
Small
Personal FM Connector
3

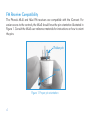
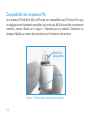
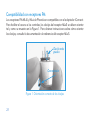
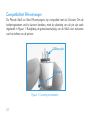
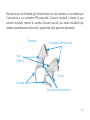
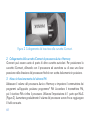
FM Receiver Compatibility
The Phonak MLxS and MLxi FM receivers are compatible with the iConnect. For
easier access to the controls, the MLxS should have the pin orientation illustrated in
Figure 1. Consult the MLxS user reference materials for instructions on how to orient
the pins.
Figure 1. Proper pin orientation
Thicker pin
Switch
4

iConnect Battery
The iConnect can only be used with a standard size 10 Battery. Do not use any
other battery.
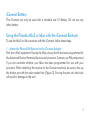
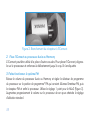
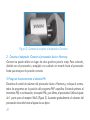
Using the Phonak MLxS or MLxi with the iConnect Earhook
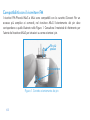
To use the MLxS or MLxi receivers with the iConnect, follow these steps:
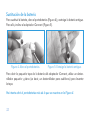
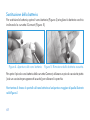
1. Attach the Phonak FM Receiver to the iConnect Adapter
First, turn off all equipment. If using the MLxi, ensure that it has been programmed for
the Advanced Bionics Harmony/Auria sound processor. Contact your FM professional
if you are uncertain whether your MLxi has been programmed for use with your
processor. When attaching the receiver to the iConnect earhook, be sure to line up
the thicker pin with the wider socket hole (Figure 2). Forcing the pins into the holes
will result in damage to the unit.
5

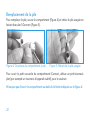
2. Attach the iConnect to the Auria or Harmony Processor
The iConnect can be used in place of other earhooks. To place the iConnect, align
it with the processor and gently push straight on to the processor until it snaps into
place.
3. Operate the FM System
Turn the volume control down on the Auria or Harmony processor and set the
program switch to the dedicated FM program* position. Turn on the FM transmitter,
then the FM receiver, then the processor. Use the 1-dot setting for the MLxS (Figure 3).
Gradually increase the volume on the sound processor to the typical use setting.
Figure 2. Attach the receiver to the iConnect.
6

*In order to use the iConnect, the processor must contain a program set up for
auxiliary input. A 50/50 or 30/70 Mic/Aux mix is recommended for use in the
classroom. Switch to this program when using the processor with the iConnect. Please
contact your center for fitting advice if necessary.
4. Removing the iConnect from the Processor
To remove the iConnect, first turn off the FM receiver. Then, turn the earhook slightly
more than a quarter turn in either direction until it pops off.
Figure 3. Turn on the MLxS.
7

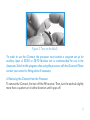
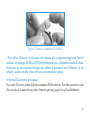
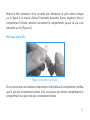
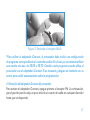
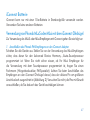
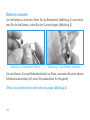
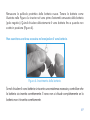
Replacing the Battery
To replace the battery, open the battery compartment (Figure 4) and remove the old
battery by tilting the iConnect (Figure 5).
To open the small iConnect battery door, use a small, flat screwdriver (i.e. a hearing
aid screwdriver) to lift the door.
Do not attempt to open the battery compartment further than shown on Figure 4.
Figure 4. Open the battery compartment. Figure 5. Remove old battery.
8

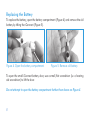
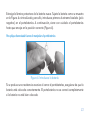
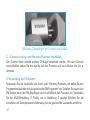
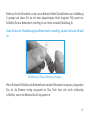
Remove the protective foil from the new battery. Hold the battery as shown in Figure
6 and insert the battery, into the compartment bevel end (negative) first. Then gently
shut the battery compartment until it clicks into place (Figure 6).
Do not use excessive force when handling the battery compartment.
If there is excessive resistance when closing the compartment, make sure that the
battery is correctly inserted. The compartment will not close completely if the battery
is improperly inserted.
Figure 6. Insert the battery.
9

Dispose of depleted batteries appropriately.
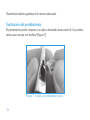
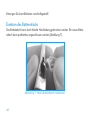
Replacing the Battery Compartment
When the battery compartment is subject to high force, it may fracture. A new battery
compartment snaps on easily (Figure 7).
Figure 7. Install a new battery compartment.
10

Maintenance and Protection
To avoid unnecessary battery depletion* when the iConnect is not in use, remove the
battery from the compartment and store it in a safe place.
* After the protective foil has been removed, Zinc air batteries begin to drain even
when not in use in a device. To confirm battery life, use a hearing aid battery tester.
Consult your hearing professional.
The Auria Carrying Case insert functions as a dri-aid kit. Put the iConnect in the Auria
Carrying Case regularly to help prevent moisture build up.
Avoid the following:
• Exposing the iConnect to extreme temperatures (below 32 °F/ 0 °C or above
122 °F/ 50 °C). For example, do not leave in a closed car on a hot day or near
a heater or radiator.
• Dropping the iConnect on a hard surface.
• Opening the battery compartment further than shown in Figure 4.
11

Cleaning
If necessary, the iConnect can be cleaned with a slightly dampened cloth or tissue.
Do not use soap or solvents.
12

Avertissements et mises en garde
1. Danger provenant des petites pièces : le coude iConnect, le couvercle du com-
partiment de la pile et la pile iConnect peuvent provoquer un étouffement en cas
d'ingestion.
2. Les piles contiennent des produits toxiques et ne doivent pas être avalées.
Maintenez-les hors de la portée des enfants. En cas d’ingestion, consultez immé-
diatement un médecin.
Utilisation prévue
L’Auria iConnect est un coude conçu pour permettre une connexion sans fil avec un
récepteur FM porté directement au niveau de l’oreille.
Contenu de l’emballage
L'iConnect Auria contient un coude iConnect et deux compartiments à pile de
rechange.
13

Description de l’appareil
L’Auria iConnect (CI-5751-XXX*) est disponible en deux tailles et trois couleurs.
CI-5751-10 0 Auria iConnect standard, argent métallisé
CI -5751-12 0 Auria iConnect petite taille, argent métallisé
CI-5751-200 Auria iConnect standard, anthracite métallisé
CI-5751-220 Auria iConnect petite taille, anthracite métallisé
CI-5751-300 Auria iConnect standard, beige
CI-5751-320 Auria iConnect petite taille, beige
* Les lettres X correspondent à des chiffres du numéro de modèle pouvant varier selon la couleur et/ou la taille
du produit.
14

Le coude iConnect contiennent un compartiment de pile, un connecteur pour
processeur et un connecteur FM personnel. Le coude iConnect Standard possède un
coude standard, tandis que le coude de l’iConnect Petite Taille peut être ajusté à l’oreille
en le courbant à la position désirée.
Standard
Connecteur pour processeur
Coude
Compartiment de pile
Petite taille
Connecteur FM
15

Compatibilité des récepteurs FM
Les récepteurs FM MLxS et MLxi de Phonak sont compatibles avec l'iConnect. Pour que
les réglages soient facilement accessibles, les broches du MLxS doivent être correctement
orientées, comme illustré sur la figure 1. Reportez-vous au matériel d’utilisation du
récepteur MLxS pour obtenir des instructions sur l’orientation des broches.
Figure 1. Orientation correcte des broches
Broche la
plus grosse
Sélecteur
16

Batterie iConnect
L'iConnect ne peut être utilisé qu'avec une pile standard de taille 10. N'utilisez aucune
autre pile.
Utilisation du MLxS ou du MLxi de Phonak avec le coude iConnect
Pour utiliser les récepteurs MLxS ou MLxi avec l'iConnect, respectez les étapes
suivantes :
1. Fixez le récepteur FM Phonak à l'adaptateur iConnect
Mettez tout appareil hors tension. Si vous utilisez le MLxi, assurez-vous qu'il a été
programmé pour le processeur de son Harmony/Auria Advanced Bionics. Contactez
votre professionnel FM si vous n'êtes pas sûr que votre MLxi a été programmé pour
une utilisation avec votre processeur. Lorsque vous fixez le récepteur au coude
iConnect, veillez à aligner la broche la plus grosse sur le trou le plus grand (Figure 2).
Ne forcez pas les broches dans les trous, vous pourriez endommager l'unité.
17

2. Fixez l'iConnect au processeur Auria ou Harmony
L'iConnect peut être utilisé à la place d'autres coudes. Pour placer l'iConnect, alignez-
le sur le processeur et enfoncez-le délicatement jusqu'à ce qu'il s'encliquette.
3. Faites fonctionner le système FM
Baissez le volume du processeur Auria ou Harmony et réglez le sélecteur de programme
du processeur sur la position de programme* FM qui convient. Allumez l'émetteur FM, puis
le récepteur FM et enfin le processeur. Utilisez le réglage 1 point pour le MLxS (Figure 3).
Augmentez progressivement le volume sur le processeur de son pour atteindre le réglage
d'utilisation standard.
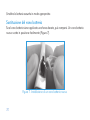
Figure 2. Branchement du récepteur à l’iConnect.
18
La page est en cours de chargement...
La page est en cours de chargement...
La page est en cours de chargement...
La page est en cours de chargement...
La page est en cours de chargement...
La page est en cours de chargement...
La page est en cours de chargement...
La page est en cours de chargement...
La page est en cours de chargement...
La page est en cours de chargement...
La page est en cours de chargement...
La page est en cours de chargement...
La page est en cours de chargement...
La page est en cours de chargement...
La page est en cours de chargement...
La page est en cours de chargement...
La page est en cours de chargement...
La page est en cours de chargement...
La page est en cours de chargement...
La page est en cours de chargement...
La page est en cours de chargement...
La page est en cours de chargement...
La page est en cours de chargement...
La page est en cours de chargement...
La page est en cours de chargement...
La page est en cours de chargement...
La page est en cours de chargement...
La page est en cours de chargement...
La page est en cours de chargement...
La page est en cours de chargement...
La page est en cours de chargement...
La page est en cours de chargement...
La page est en cours de chargement...
La page est en cours de chargement...
La page est en cours de chargement...
La page est en cours de chargement...
La page est en cours de chargement...
La page est en cours de chargement...
La page est en cours de chargement...
La page est en cours de chargement...
La page est en cours de chargement...
La page est en cours de chargement...
La page est en cours de chargement...
La page est en cours de chargement...
La page est en cours de chargement...
La page est en cours de chargement...
La page est en cours de chargement...
La page est en cours de chargement...
La page est en cours de chargement...
La page est en cours de chargement...
La page est en cours de chargement...
La page est en cours de chargement...
La page est en cours de chargement...
La page est en cours de chargement...
La page est en cours de chargement...
La page est en cours de chargement...
-
 1
1
-
 2
2
-
 3
3
-
 4
4
-
 5
5
-
 6
6
-
 7
7
-
 8
8
-
 9
9
-
 10
10
-
 11
11
-
 12
12
-
 13
13
-
 14
14
-
 15
15
-
 16
16
-
 17
17
-
 18
18
-
 19
19
-
 20
20
-
 21
21
-
 22
22
-
 23
23
-
 24
24
-
 25
25
-
 26
26
-
 27
27
-
 28
28
-
 29
29
-
 30
30
-
 31
31
-
 32
32
-
 33
33
-
 34
34
-
 35
35
-
 36
36
-
 37
37
-
 38
38
-
 39
39
-
 40
40
-
 41
41
-
 42
42
-
 43
43
-
 44
44
-
 45
45
-
 46
46
-
 47
47
-
 48
48
-
 49
49
-
 50
50
-
 51
51
-
 52
52
-
 53
53
-
 54
54
-
 55
55
-
 56
56
-
 57
57
-
 58
58
-
 59
59
-
 60
60
-
 61
61
-
 62
62
-
 63
63
-
 64
64
-
 65
65
-
 66
66
-
 67
67
-
 68
68
-
 69
69
-
 70
70
-
 71
71
-
 72
72
-
 73
73
-
 74
74
-
 75
75
-
 76
76


Support AB CI-5751 Auria iConnect Mode d'emploi
- Taper
- Mode d'emploi
dans d''autres langues
Autres documents
-
Iomega iConnect Wireless Data Station Le manuel du propriétaire
-
Timex iConnect by Active Manuel utilisateur
-
Timex iConnect By Round Manuel utilisateur
-
-
Omega UWTC-REC3 Le manuel du propriétaire
-
-
Kenwood KAC-M5014 Manuel utilisateur
-
Labtec MEDIA WIRELESS DESKTOP 800 Le manuel du propriétaire
-