Toro eTimeCutter 42in Riding Mower Manuel utilisateur
- Catégorie
- Tondeuses à gazon
- Taper
- Manuel utilisateur
Ce manuel convient également à

Form No. 3463-573 Rev A
eT imeCutter
®
42in or 54in Riding Mower
75841 , 75851
Cortacésped de asiento eT imeCutter
®
de 107 o 137
cm (42" o 54")
75841 , 75851
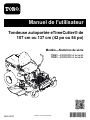
T ondeuse autoportée eT imeCutter
®
de 107 cm ou
137 cm (42 po ou 54 po)
75841 , 75851
www .T oro.com.
*3463-573*


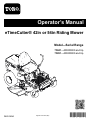
Operator’s Manual
eTimeCutter® 42in or 54in Riding Mower
Model—Serial Range
75841—400000000 and Up
75851—400000000 and Up
3463-565A Original Instructions (EN) *3463-565*A

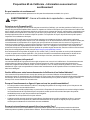
Disclaimers and Regulatory Information
WARNING
CALIFORNIA
Proposition 65
The power cord on this product contains lead, a chemical known to the State of California to
cause birth defects or other reproductive harm. Wash hands after handling.
Use of this product may cause exposure to chemicals known to the State of California to cause
cancer, birth defects, or other reproductive harm.
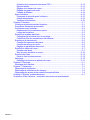
Table of Contents
Chapter 1: Introduction........................................................................................................................ 1–1
Intended Use ..................................................................................................................................... 1–1
Getting Help....................................................................................................................................... 1–1
Chapter 2: Safety.................................................................................................................................. 2–1
General Machine Safety Warnings .............................................................................................. 2–1
Lawn Mower Safety Warnings....................................................................................................... 2–3
Additional Safety Messages .......................................................................................................... 2–5
Safety-Alert Symbol ..................................................................................................................... 2–5
General Safety .............................................................................................................................. 2–5
Slope Indicator .................................................................................................................................. 2–6
Safety and Instructional Decals .................................................................................................... 2–7
Chapter 3: Product Overview ............................................................................................................ 3–1
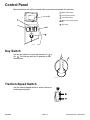
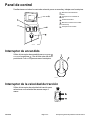
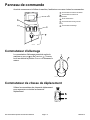
Control Panel..................................................................................................................................... 3–2
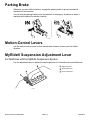
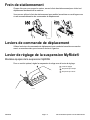
Parking Brake.................................................................................................................................... 3–5
Motion-Control Levers..................................................................................................................... 3–5
MyRide® Suspension Adjustment Lever.................................................................................... 3–5
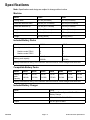
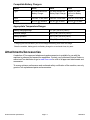
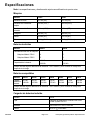
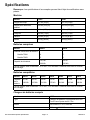
Specifications .................................................................................................................................... 3–6
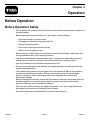
Chapter 4: Operation ........................................................................................................................... 4–1
Before Operation .............................................................................................................................. 4–1
Before Operation Safety ............................................................................................................. 4–1
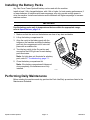
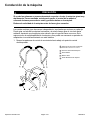
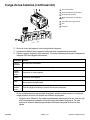
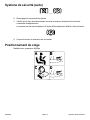
Installing the Battery Packs........................................................................................................ 4–2
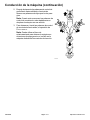
Performing Daily Maintenance .................................................................................................. 4–2
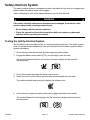
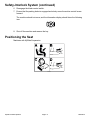
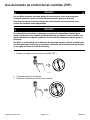
Safety-Interlock System.............................................................................................................. 4–3
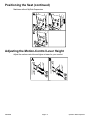
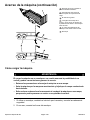
Positioning the Seat ..................................................................................................................... 4–4
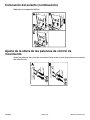
Adjusting the Motion-Control Lever Height ............................................................................ 4–5
Adjusting the Motion-Control Lever Tilt ................................................................................... 4–6
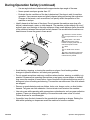
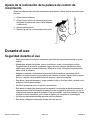
During Operation .............................................................................................................................. 4–6
During Operation Safety ............................................................................................................. 4–6
Starting the Machine.................................................................................................................... 4–8
Shutting Off the Machine ............................................................................................................ 4–8
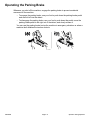
Operating the Parking Brake ..................................................................................................... 4–9
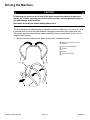
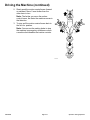
Driving the Machine ................................................................................................................... 4–10
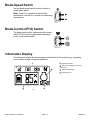
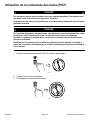
Operating the Mower Blade-Control Switch (PTO) ............................................................ 4–12
Side Discharge............................................................................................................................ 4–13
© 2023—The Toro®Company
8111 Lyndale Ave So
Bloomington, MN 55044
Contact us at www.Toro.com
Printed in the USA
All rights reserved

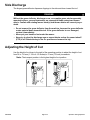
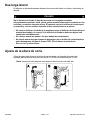
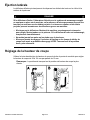
Adjusting the Height of Cut....................................................................................................... 4–13
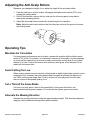
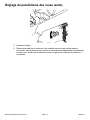
Adjusting the Anti-Scalp Rollers.............................................................................................. 4–14
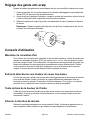
Operating Tips............................................................................................................................. 4–14
After Operation................................................................................................................................ 4–16
After Operation Safety............................................................................................................... 4–16
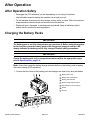
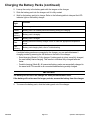
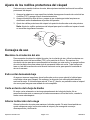
Charging the Battery Packs ..................................................................................................... 4–16
Hauling the Machine .................................................................................................................. 4–18
Chapter 5: Maintenance ..................................................................................................................... 5–1
Maintenance Safety ......................................................................................................................... 5–1
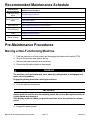
Recommended Maintenance Schedule...................................................................................... 5–2
Pre-Maintenance Procedures ....................................................................................................... 5–2
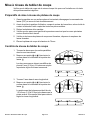
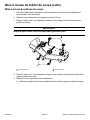
Moving a Non-Functioning Machine ........................................................................................ 5–2
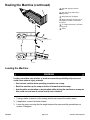
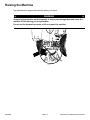
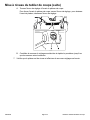
Raising the Machine .................................................................................................................... 5–3
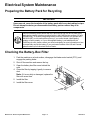
Electrical System Maintenance..................................................................................................... 5–4
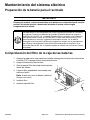
Preparing the Battery Pack for Recycling............................................................................... 5–4
Checking the Battery-Box Filter ................................................................................................ 5–4
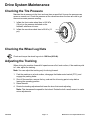
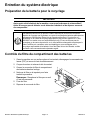
Drive System Maintenance ............................................................................................................ 5–5
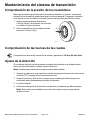
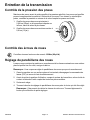
Checking the Tire Pressure........................................................................................................ 5–5
Checking the Wheel Lug Nuts................................................................................................... 5–5
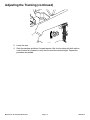
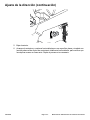
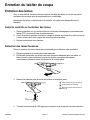
Adjusting the Tracking................................................................................................................. 5–5
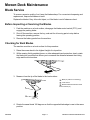
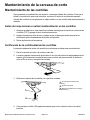
Mower-Deck Maintenance ............................................................................................................. 5–7
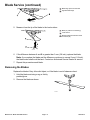
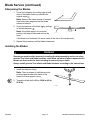
Blade Service ................................................................................................................................ 5–7
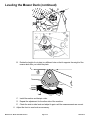
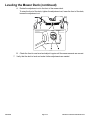
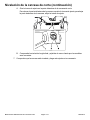
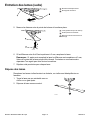
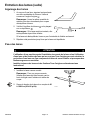
Leveling the Mower Deck ......................................................................................................... 5–10
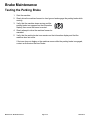
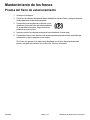
Brake Maintenance ........................................................................................................................ 5–14
Testing the Parking Brake ........................................................................................................ 5–14
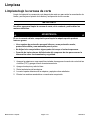
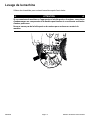
Cleaning............................................................................................................................................ 5–15
Cleaning Under the Mower Deck............................................................................................ 5–15
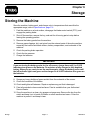
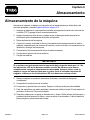
Chapter 6: Storage............................................................................................................................... 6–1
Storing the Machine......................................................................................................................... 6–1
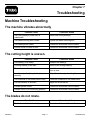
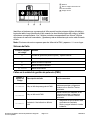
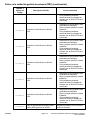
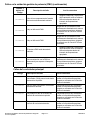
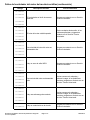
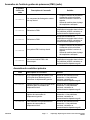
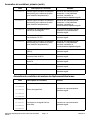
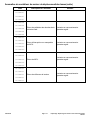
Chapter 7: Troubleshooting ............................................................................................................... 7–1
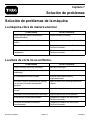
Machine Troubleshooting ............................................................................................................... 7–1
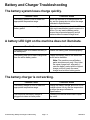
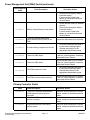
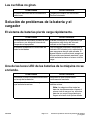
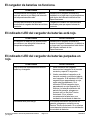
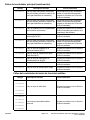
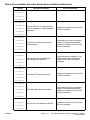
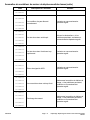
Battery and Charger Troubleshooting ......................................................................................... 7–2
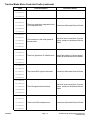
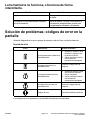
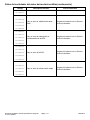
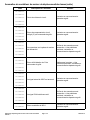
Display Error and Fault Code Troubleshooting ......................................................................... 7–4
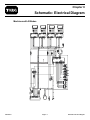
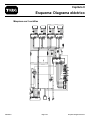
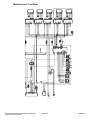
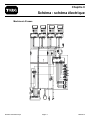
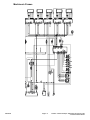
Chapter 8: Schematic: Electrical Diagram...................................................................................... 8–1
California Proposition 65 Warning Information
3463-565 A :

Chapter 1
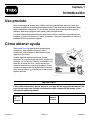
Introduction
Intended Use
This rotary-blade, riding lawn mower is intended to be used by homeowners in residential
applications. It is designed primarily for cutting grass on well-maintained lawns. Using this
product for purposes other than its intended use could prove dangerous to you and
bystanders.
Read this information carefully to learn how to operate and maintain your product properly
and to avoid injury and product damage. You are responsible for operating the product
properly and safely.
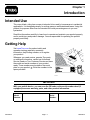
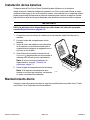
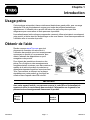
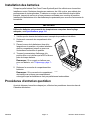
Getting Help
G444734
Visit www.Toro.com for product safety and
operation training materials, accessory
information, help finding a dealer, or to register
your product.
Whenever you need service, genuine Toro parts,
or additional information, contact an Authorized
Service Dealer or Toro Customer Service and have
the model and serial numbers of your product
ready. These numbers are located on the serial
plate on your product . Write the numbers in the
space provided.
IMPORTANT
With your mobile device, you can scan the QR code on the serial number decal (if
equipped) to access warranty, parts, and other product information.
Model
Number:
Serial
Number:
Introduction Page 1–1 3463-565 A

Chapter 2
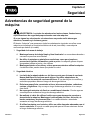
Safety
General Machine Safety Warnings
WARNING—Read all safety warnings, instructions, illustrations and
specifications provided with this machine.
Failure to follow the warnings and instructions may result in electric shock, fire and/
or serious injury.
The term “machine” in all of the warnings listed below refers to your mains-operated
(corded) machine or battery-operated (cordless) machine.
1. Work area safety
A. Keep work area clean and well lit. Cluttered or dark areas invite accidents.
B. Do not operate the machine in explosive atmospheres, such as in the
presence of flammable liquids, gasses, or dust. The machine creates sparks,
which may ignite the dust or fumes.
C. Keep children and bystanders away while operating the machine. Distractions
can cause you to lose control.
2. Electrical safety
A. Machine plugs must match the outlet. Never modify the plug in any way. Do
not use any adapter plugs with an earthed (grounded) machine. Unmodified
plugs and matching outlets will reduce risk of electric shock.
B. Avoid body contact with earthed or grounded surfaces, such as pipes,
radiators, ranges, and refrigerators. There is an increased risk of electric shock if
your body is earthed or grounded.
C. Do not expose the machine to rain or wet conditions. Water entering a machine
will increase the risk of electric shock.
D. Do not abuse the cord. Never use the cord for carrying, pulling or unplugging
the machine. Keep cord away from heat, oil, sharp edges, or moving parts.
Damaged or entangled cords increase the risk of electric shock.
E. When operating the machine outdoors, use an extension cord suitable for
outdoor use. Use of a cord suitable for outdoor use reduces the risk of electric
shock.
F. If operating the machine in a damp location is unavoidable, use a residual
current device (RCD) protected supply. Use of an RCD reduces the risk of
electric shock.
3463-565 A Page 2–1 Safety

3. Personal safety
A. Stay alert, watch what you are doing, and use common sense when operating
the machine. Do not use the machine while you are tired or under the
influence of drugs, alcohol, or medication. A moment of inattention while
operating the machine may result in serious personal injury.
B. Use personal protective equipment. Always wear eye protection. Protective
equipment such as a dust mask, non-skid safety shoes, or hearing protection used
for appropriate conditions will reduce personal injuries.
C. Prevent unintentional starting. Ensure the switch is in the off-position before
connecting to power source and/or battery pack. Energising a machine that has
the switch on invites accidents.
D. Remove any adjusting key or wrench before turning the machine on. A wrench
or a key left attached to a rotating part of the machine may result in personal injury.
E. Do not overreach. Keep proper footing and balance at all times. This enables
better control of the machine in unexpected situations.
F. Dress properly. Do not wear loose clothing or jewelry. Keep your hair and
clothing away from moving parts. Loose clothes, jewelry or long hair can be
caught in moving parts.
G. If devices are provided for the connection of dust extraction and collection
facilities, ensure these are connected and properly used. Use of dust collection
can reduce dust-related hazards.
H. Do not let familiarity gained from frequent use of the machine allow you to
become complacent and ignore machine safety principles. A careless action
can cause severe injury within a fraction of a second.
4. Machine use and care
A. Do not force the machine. Use the correct machine for your application. The
correct machine will do the job better and safer at the rate for which it was designed.
B. Do not use the machine if the switch does not turn it on and off. Any machine
that cannot be controlled with the switch is dangerous and must be repaired.
C. Disconnect the plug from the power source and/or remove the battery pack, if
detachable, from the machine before making any adjustments, changing
accessories, or storing the machine. Such preventive safety measures reduce
the risk of starting the machine accidentally.
D. Store an idle machine out of the reach of children and do not allow persons
unfamiliar with the machine or these instructions to operate the machine. A
machine is dangerous in the hands of untrained users.
E. Maintain the machine and accessories. Check for misalignment or binding of
moving parts, breakage of parts and any other condition that may affect the
operation of the machine. If damaged, have the machine repaired before use.
Many accidents are caused by a poorly maintained machine.
F. Keep cutting tools sharp and clean. Properly maintained cutting tools with sharp
cutting edges are less likely to bind and are easier to control.
G. Use the machine, accessories, and tool bits etc., in accordance with these
instructions, taking into account the working conditions and the work to be
Safety: General Machine Safety Warnings Page 2–2 3463-565 A

performed. Use of the machine for operations different from those intended could
result in a hazardous situation.
H. Keep handles and grasping surfaces dry, clean and free from oil and grease.
Slippery handles and grasping surfaces do not allow for safe handling and control of
the machine in unexpected situations.
5. Battery machine use and care
A. Recharge only with the charger specified by a manufacturer. A charger that is
suitable for one type of battery pack may create a risk of fire when used with another
battery pack.
B. Use the machine only with specifically designated batteries. Use of any other
batteries may create a risk of injury and fire.
C. When battery pack is not in use, keep it away from other metal objects, like
paper clips, coins, keys, nails, screws or other small metal objects, that can
make a connection from one terminal to another. Shorting the battery terminals
together may cause burns or a fire.
D. Under abusive conditions, liquid may be ejected from the battery; avoid
contact. If contact accidentally occurs, flush with water. If liquid contacts
eyes, additionally seek medical help. Liquid ejected from the battery may cause
irritation or burns.
E. Do not use a battery pack or machine that is damaged or modified. Damaged
or modified batteries may exhibit unpredictable behavior resulting in fire, explosion
or risk or injury.
F. Do not expose a battery pack or machine to fire or excessive temperature.
Exposure to fire temperature above 130°C (265°F) may cause an explosion.
G. Follow all charging instructions and do not charge the battery pack or
machine outside the temperature range specified in the instructions. Charging
improperly or at temperatures outside the specified range may damage the battery
and increase the risk of fire.
6. Service
A. Have your machine serviced by a qualified repair person using only identical
replacement parts. This will ensure that the safety of the machine is maintained.
B. Never service damaged battery packs. Service of battery packs should be
performed only by the manufacturer or authorized service providers.
Lawn Mower Safety Warnings
A. Do not use the lawnmower in bad weather conditions, especially when there is a
risk of lightning. This decreases the risk of being struck by lightning.
B. Thoroughly inspect the area for wildlife where the lawnmower is to be used.
Wildlife may be injured by the lawnmower during operation.
C. Thoroughly inspect the area where the lawnmower is to be used and remove all
stones, sticks, wires, bones, and other foreign objects. Thrown objects can cause
personal injury.
3463-565A Page 2–3 Safety: Lawn Mower Safety Warnings

D. Before using the lawnmower, always visually inspect to see that the blade and the
blade assembly are not worn or damaged. Worn or damaged parts increase the risk
of injury.
E. Keep guards in place. Guards must be in working order and be properly mounted.
A guard that is loose, damaged, or is not functioning correctly may result in personal
injury.
F. Keep all cooling air inlets clear of debris. Blocked air inlets and debris may result in
overheating or risk of fire.
G. While operating the lawnmower, always wear non-slip and protective footwear. Do
not operate the lawnmower when barefoot or wearing open sandals. This reduces
the chance of injury to the feet from contact with the moving blade.
H. While operating the lawnmower, always wear long trousers. Exposed skin
increases the likelihood of injury from thrown objects.
I. Do not operate the lawnmower on slopes greater than 15°. This reduces the risk of
loss of control, slipping, and rollover which may result in personal injury.
J. Exercise extreme caution when working on slopes. This reduces the risk of loss of
control, slipping, and rollover which may result in personal injury.
K. Use extreme caution when reversing the lawnmower. Always be aware of your
surroundings.
L. Do not touch blades and other hazardous moving parts while they are still in
motion. This reduces the risk of injury from moving parts.
M. When clearing jammed material or cleaning the lawn mower, make sure all power
switches are off, and remove the key. Unexpected operation of the lawn mower may
result in serious personal injury.
Save all warnings and instructions for future reference.
Safety: Lawn Mower Safety Warnings Page 2–4 3463-565 A

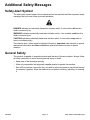
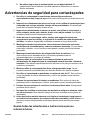
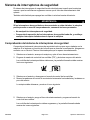
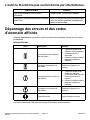
Additional Safety Messages
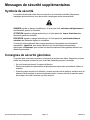
Safety-Alert Symbol
The safety-alert symbol shown in this manual and on the machine identifies important safety
messages that you must follow to prevent accidents.
G405934
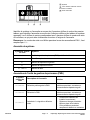
DANGER indicates an imminently hazardous situation which, if not avoided, will result in
death or serious injury.
WARNING indicates a potentially hazardous situation which, if not avoided, could result in
death or serious injury.
CAUTION indicates a potentially hazardous situation which, if not avoided, may result in
minor or moderate injury.
This manual uses 2 other words to highlight information. Important calls attention to special
mechanical information and Note emphasizes general information worthy of special
attention.
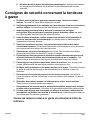
General Safety
This product is capable of amputating hands and feet and of throwing objects. Always follow
all safety instructions to avoid serious personal injury or death.
• Keep clear of the discharge opening.
• Allow only responsible and physically capable people to operate the machine.
• Shut off the machine, remove the key, and wait for all moving parts to stop before leaving
the operator's position. Allow the machine to cool before servicing, adjusting, or cleaning
it.
3463-565A Page 2–5 Safety: Additional Safety Messages

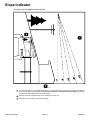
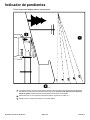
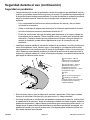
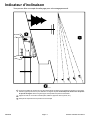
Slope Indicator
You may copy this page for personal use.
G011841s
The maximum slope you can operate the machine on is 15 degrees. Use the slope chart to determine the degree
of slope of hills before operating. Do not operate this machine on a slope greater than 15 degrees. Fold along
the appropriate line to match the recommended slope.
Align this edge with a vertical surface, a tree, building, fence pole, etc.
Example of how to compare slope with folded edge
Safety: Slope Indicator Page 2–6 3463-565 A

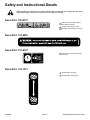
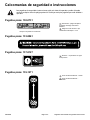
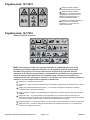
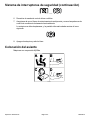
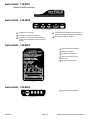
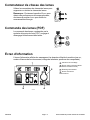
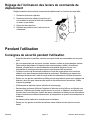
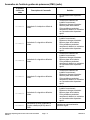
Safety and Instructional Decals
Safety decals and instructions are easily visible to the operator and are located near any area
of potential danger. Replace any decal that is damaged or missing.
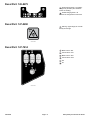
Decal Part: 130-0731
s_decal130-0731
Warning—thrown object hazard;
keep the deflector in place.
Cutting hazard of hand or foot,
mower blade—keep away from moving
parts.
Decal Part: 133-8061
s_decal133-8061
Decal Part: 137-8127
s_decal137-8127
Attention—do not spray with high-
pressure water.
Decal Part: 139-1271
s_decal139-1271
Parking brake—Engage
Parking brake—Disengage
3463-565A Page 2–7 Safety: Safety and Instructional Decals

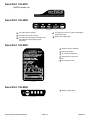
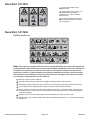
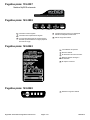
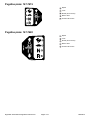
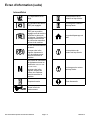
Decal Part: 139-2397
MyRIDE models only
s_decal139-2397
Decal Part: 145-3802
s_decal145-3802
The battery pack is charging.
The battery pack is fully charged.
The battery pack charging is on standby while
other batteries charge (charging mode
dependent).
The battery pack is over or under the appropriate
temperature range.
Battery pack charging fault.
Decal Part: 145-8263
decal145-8263
Read the Operator’s Manual.
Recycle the battery.
Do not dispose improperly.
Keep away from open fire or
flames.
Do not expose to rain.
Decal Part: 145-8265
decal145-8265
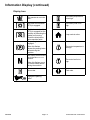
Battery charging status
Safety: Safety and Instructional Decals Page 2–8 3463-565 A

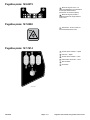
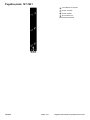
Decal Part: 145-8275
s_decal145-8275
Serial charging mode—one battery
charges fully at a time (other batteries
remain on standby).
Parallel charging mode—all
batteries are charged to the same level.
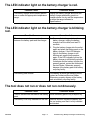
Decal Part: 147-0290
decal147-0290
Warning—light is bright; do not look
directly into the light.
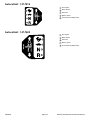
Decal Part: 147-7614
decal147-7614
Blade control—fast
Traction drive—fast
Blade control—slow
Traction drive—slow
Off
On
3463-565A Page 2–9 Safety: Safety and Instructional Decals

Decal Part: 147-7615
decal147-7615
Thrown object hazard—keep
bystanders away.
Thrown object hazard, mower—do
not operate without the deflector,
discharge cover, or grass collection
system in place.
Cutting/dismemberment hazard of
hand or foot, mower blade—keep away
from moving parts.
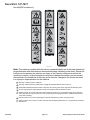
Decal Part: 147-7616
MyRIDE models only
decal147-7616
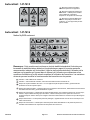
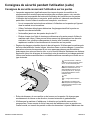
Note: This machine complies with the industry standard stability test in the static lateral and
longitudinal tests with the maximum recommended slope indicated on the decal. Review the
instructions for operating the machine on slopes in the Operator’s Manual as well as the
conditions in which you would operate the machine to determine whether you can operate
the machine in the conditions on that day and at that site. Changes in the terrain can result
in a change in slope operation for the machine.
Warning—read the Operator’s Manual.
Warning—before performing maintenance, engage the parking brake and remove the key.
Cutting/dismemberment hazard of hand—keep away from moving parts; keep all guards and shields in place.
Thrown object hazard—keep bystanders away; pick up debris; keep the deflector in place.
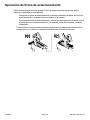
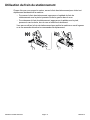
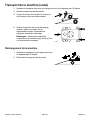
Tipping hazard—do not use dual ramps when loading onto a trailer; use 1 ramp wide enough for the machine;
use a ramp with an incline less than 15°; back up the ramp when loading the machine and drive forward off the
ramp when unloading.
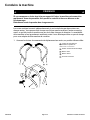
Runover hazard—do not carry passengers; look down and behind you when moving in reverse.
Tipping hazard—do not use the machine near drop-offs with slopes greater than 15°; only operate across slopes
less than 15°.
Safety: Safety and Instructional Decals Page 2–10 3463-565 A

Decal Part: 147-7617
Non-MyRIDE models only
s_decal147-7617
Note: This machine complies with the industry standard stability test in the static lateral and
longitudinal tests with the maximum recommended slope indicated on the decal. Review the
instructions for operating the machine on slopes in the Operator’s Manual as well as the
conditions in which you would operate the machine to determine whether you can operate
the machine in the conditions on that day and at that site. Changes in the terrain can result
in a change in slope operation for the machine.
Warning—read the Operator’s Manual.
Warning—before performing maintenance, engage the parking brake and remove the key.
Cutting/dismemberment hazard of hand—keep away from moving parts; keep all guards and shields in place.
Thrown object hazard—keep bystanders away; pick up debris; keep the deflector in place.
Tipping hazard—do not use dual ramps when loading onto a trailer; use 1 ramp wide enough for the machine;
use a ramp with an incline less than 15°; back up the ramp when loading the machine and drive forward off the
ramp when unloading.
Runover hazard—do not carry passengers; look down and behind you when moving in reverse.
Tipping hazard—do not use the machine near drop-offs with slopes greater than 15°; only operate across slopes
less than 15°.
3463-565A Page 2–11 Safety: Safety and Instructional Decals

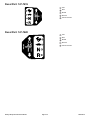
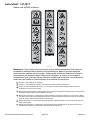
Decal Part: 147-7619
decal147-7619
Fast
Slow
Neutral
Reverse
Traction controls
Decal Part: 147-7620
decal147-7620
Fast
Slow
Neutral
Reverse
Traction controls
Safety: Safety and Instructional Decals Page 2–12 3463-565 A

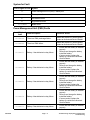
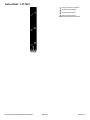
Decal Part: 147-7621
decal147-7621
Read the Operator’s Manual.
Full function
Limited function
No function/extremely limited
function
3463-565A Page 2–13 Safety: Safety and Instructional Decals

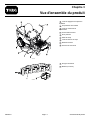
Chapter 3
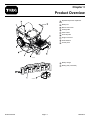
Product Overview
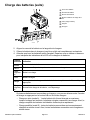
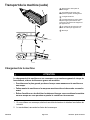
G427499
MyRide® suspension adjustment
lever
Battery box
Motion-control lever
Parking brake
Caster wheel
Anti-scalp roller
Height-of-cut lever
Grass deflector
Control panel
G448680
Battery charger
Battery pack (4 included)
Product Overview Page 3–1 3463-565 A
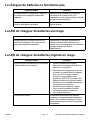
La page est en cours de chargement...
La page est en cours de chargement...
La page est en cours de chargement...
La page est en cours de chargement...
La page est en cours de chargement...
La page est en cours de chargement...
La page est en cours de chargement...
La page est en cours de chargement...
La page est en cours de chargement...
La page est en cours de chargement...
La page est en cours de chargement...
La page est en cours de chargement...
La page est en cours de chargement...
La page est en cours de chargement...
La page est en cours de chargement...
La page est en cours de chargement...
La page est en cours de chargement...
La page est en cours de chargement...
La page est en cours de chargement...
La page est en cours de chargement...
La page est en cours de chargement...
La page est en cours de chargement...
La page est en cours de chargement...
La page est en cours de chargement...
La page est en cours de chargement...
La page est en cours de chargement...
La page est en cours de chargement...
La page est en cours de chargement...
La page est en cours de chargement...
La page est en cours de chargement...
La page est en cours de chargement...
La page est en cours de chargement...
La page est en cours de chargement...
La page est en cours de chargement...
La page est en cours de chargement...
La page est en cours de chargement...
La page est en cours de chargement...
La page est en cours de chargement...
La page est en cours de chargement...
La page est en cours de chargement...
La page est en cours de chargement...
La page est en cours de chargement...
La page est en cours de chargement...
La page est en cours de chargement...
La page est en cours de chargement...
La page est en cours de chargement...
La page est en cours de chargement...
La page est en cours de chargement...
La page est en cours de chargement...
La page est en cours de chargement...
La page est en cours de chargement...
La page est en cours de chargement...
La page est en cours de chargement...
La page est en cours de chargement...
La page est en cours de chargement...
La page est en cours de chargement...
La page est en cours de chargement...
La page est en cours de chargement...
La page est en cours de chargement...
La page est en cours de chargement...
La page est en cours de chargement...
La page est en cours de chargement...
La page est en cours de chargement...
La page est en cours de chargement...
La page est en cours de chargement...
La page est en cours de chargement...
La page est en cours de chargement...
La page est en cours de chargement...
La page est en cours de chargement...
La page est en cours de chargement...
La page est en cours de chargement...
La page est en cours de chargement...
La page est en cours de chargement...
La page est en cours de chargement...
La page est en cours de chargement...
La page est en cours de chargement...
La page est en cours de chargement...
La page est en cours de chargement...
La page est en cours de chargement...
La page est en cours de chargement...
La page est en cours de chargement...
La page est en cours de chargement...
La page est en cours de chargement...
La page est en cours de chargement...
La page est en cours de chargement...
La page est en cours de chargement...
La page est en cours de chargement...
La page est en cours de chargement...
La page est en cours de chargement...
La page est en cours de chargement...
La page est en cours de chargement...
La page est en cours de chargement...
La page est en cours de chargement...
La page est en cours de chargement...
La page est en cours de chargement...
La page est en cours de chargement...
La page est en cours de chargement...
La page est en cours de chargement...
La page est en cours de chargement...
La page est en cours de chargement...
La page est en cours de chargement...
La page est en cours de chargement...
La page est en cours de chargement...
La page est en cours de chargement...
La page est en cours de chargement...
La page est en cours de chargement...
La page est en cours de chargement...
La page est en cours de chargement...
La page est en cours de chargement...
La page est en cours de chargement...
La page est en cours de chargement...
La page est en cours de chargement...
La page est en cours de chargement...
La page est en cours de chargement...
La page est en cours de chargement...
La page est en cours de chargement...
La page est en cours de chargement...
La page est en cours de chargement...
La page est en cours de chargement...
La page est en cours de chargement...
La page est en cours de chargement...
La page est en cours de chargement...
La page est en cours de chargement...
La page est en cours de chargement...
La page est en cours de chargement...
La page est en cours de chargement...
La page est en cours de chargement...
La page est en cours de chargement...
La page est en cours de chargement...
La page est en cours de chargement...
La page est en cours de chargement...
La page est en cours de chargement...
La page est en cours de chargement...
La page est en cours de chargement...
La page est en cours de chargement...
La page est en cours de chargement...
La page est en cours de chargement...
La page est en cours de chargement...
La page est en cours de chargement...
La page est en cours de chargement...
La page est en cours de chargement...
La page est en cours de chargement...
La page est en cours de chargement...
La page est en cours de chargement...
La page est en cours de chargement...
La page est en cours de chargement...
La page est en cours de chargement...
La page est en cours de chargement...
La page est en cours de chargement...
La page est en cours de chargement...
La page est en cours de chargement...
La page est en cours de chargement...
La page est en cours de chargement...
La page est en cours de chargement...
La page est en cours de chargement...
La page est en cours de chargement...
La page est en cours de chargement...
La page est en cours de chargement...
La page est en cours de chargement...
La page est en cours de chargement...
La page est en cours de chargement...
La page est en cours de chargement...
La page est en cours de chargement...
La page est en cours de chargement...
La page est en cours de chargement...
La page est en cours de chargement...
La page est en cours de chargement...
La page est en cours de chargement...
La page est en cours de chargement...
La page est en cours de chargement...
La page est en cours de chargement...
La page est en cours de chargement...
La page est en cours de chargement...
La page est en cours de chargement...
La page est en cours de chargement...
La page est en cours de chargement...
La page est en cours de chargement...
La page est en cours de chargement...
La page est en cours de chargement...
La page est en cours de chargement...
La page est en cours de chargement...
La page est en cours de chargement...
La page est en cours de chargement...
La page est en cours de chargement...
La page est en cours de chargement...
La page est en cours de chargement...
La page est en cours de chargement...
La page est en cours de chargement...
La page est en cours de chargement...
La page est en cours de chargement...
La page est en cours de chargement...
La page est en cours de chargement...
La page est en cours de chargement...
La page est en cours de chargement...
La page est en cours de chargement...
La page est en cours de chargement...
La page est en cours de chargement...
La page est en cours de chargement...
La page est en cours de chargement...
La page est en cours de chargement...
La page est en cours de chargement...
La page est en cours de chargement...
La page est en cours de chargement...
La page est en cours de chargement...
La page est en cours de chargement...
La page est en cours de chargement...
La page est en cours de chargement...
La page est en cours de chargement...
La page est en cours de chargement...
La page est en cours de chargement...
La page est en cours de chargement...
La page est en cours de chargement...
La page est en cours de chargement...
La page est en cours de chargement...
La page est en cours de chargement...
La page est en cours de chargement...
-
 1
1
-
 2
2
-
 3
3
-
 4
4
-
 5
5
-
 6
6
-
 7
7
-
 8
8
-
 9
9
-
 10
10
-
 11
11
-
 12
12
-
 13
13
-
 14
14
-
 15
15
-
 16
16
-
 17
17
-
 18
18
-
 19
19
-
 20
20
-
 21
21
-
 22
22
-
 23
23
-
 24
24
-
 25
25
-
 26
26
-
 27
27
-
 28
28
-
 29
29
-
 30
30
-
 31
31
-
 32
32
-
 33
33
-
 34
34
-
 35
35
-
 36
36
-
 37
37
-
 38
38
-
 39
39
-
 40
40
-
 41
41
-
 42
42
-
 43
43
-
 44
44
-
 45
45
-
 46
46
-
 47
47
-
 48
48
-
 49
49
-
 50
50
-
 51
51
-
 52
52
-
 53
53
-
 54
54
-
 55
55
-
 56
56
-
 57
57
-
 58
58
-
 59
59
-
 60
60
-
 61
61
-
 62
62
-
 63
63
-
 64
64
-
 65
65
-
 66
66
-
 67
67
-
 68
68
-
 69
69
-
 70
70
-
 71
71
-
 72
72
-
 73
73
-
 74
74
-
 75
75
-
 76
76
-
 77
77
-
 78
78
-
 79
79
-
 80
80
-
 81
81
-
 82
82
-
 83
83
-
 84
84
-
 85
85
-
 86
86
-
 87
87
-
 88
88
-
 89
89
-
 90
90
-
 91
91
-
 92
92
-
 93
93
-
 94
94
-
 95
95
-
 96
96
-
 97
97
-
 98
98
-
 99
99
-
 100
100
-
 101
101
-
 102
102
-
 103
103
-
 104
104
-
 105
105
-
 106
106
-
 107
107
-
 108
108
-
 109
109
-
 110
110
-
 111
111
-
 112
112
-
 113
113
-
 114
114
-
 115
115
-
 116
116
-
 117
117
-
 118
118
-
 119
119
-
 120
120
-
 121
121
-
 122
122
-
 123
123
-
 124
124
-
 125
125
-
 126
126
-
 127
127
-
 128
128
-
 129
129
-
 130
130
-
 131
131
-
 132
132
-
 133
133
-
 134
134
-
 135
135
-
 136
136
-
 137
137
-
 138
138
-
 139
139
-
 140
140
-
 141
141
-
 142
142
-
 143
143
-
 144
144
-
 145
145
-
 146
146
-
 147
147
-
 148
148
-
 149
149
-
 150
150
-
 151
151
-
 152
152
-
 153
153
-
 154
154
-
 155
155
-
 156
156
-
 157
157
-
 158
158
-
 159
159
-
 160
160
-
 161
161
-
 162
162
-
 163
163
-
 164
164
-
 165
165
-
 166
166
-
 167
167
-
 168
168
-
 169
169
-
 170
170
-
 171
171
-
 172
172
-
 173
173
-
 174
174
-
 175
175
-
 176
176
-
 177
177
-
 178
178
-
 179
179
-
 180
180
-
 181
181
-
 182
182
-
 183
183
-
 184
184
-
 185
185
-
 186
186
-
 187
187
-
 188
188
-
 189
189
-
 190
190
-
 191
191
-
 192
192
-
 193
193
-
 194
194
-
 195
195
-
 196
196
-
 197
197
-
 198
198
-
 199
199
-
 200
200
-
 201
201
-
 202
202
-
 203
203
-
 204
204
-
 205
205
-
 206
206
-
 207
207
-
 208
208
-
 209
209
-
 210
210
-
 211
211
-
 212
212
-
 213
213
-
 214
214
-
 215
215
-
 216
216
-
 217
217
-
 218
218
-
 219
219
-
 220
220
-
 221
221
-
 222
222
-
 223
223
-
 224
224
-
 225
225
-
 226
226
-
 227
227
-
 228
228
-
 229
229
-
 230
230
-
 231
231
-
 232
232
-
 233
233
-
 234
234
-
 235
235
-
 236
236


Toro eTimeCutter 42in Riding Mower Manuel utilisateur
- Catégorie
- Tondeuses à gazon
- Taper
- Manuel utilisateur
- Ce manuel convient également à
dans d''autres langues
Documents connexes
-
Toro eTimeCutter 42in Riding Mower Manuel utilisateur
-
-
-
Toro ES3000SD 72v 76cm Manuel utilisateur
-
Toro Titan ZXM5475 Zero Turn Riding Mower Manuel utilisateur
-
Toro Titan X4850 Riding Mower Manuel utilisateur
-
-
Toro 127 cm TimeCutter MX 5075T Zero Turn Mower 74695 Manuel utilisateur
-
Toro TimeCutter MX 4275T Riding Mower Manuel utilisateur
-
Toro eS3000SD 72V TORO 76cm Manuel utilisateur