TP-LINK tp-link KS220 Smart Wi-Fi Dimmer Switch Mode d'emploi
- Catégorie
- Gradateurs
- Taper
- Mode d'emploi
Ce manuel convient également à

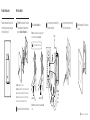
Product Introduction Wire Your Switch
Kasa smart dimmer switch turns on and
dims the lights automatically, saving you
eort and electricity bills.
Connect the wires to the smart dimmer
switch as shown below.
4
Disconnect the wires from the old switch.
Ground: Usually green or copper.
Neutral: Usually white and not connected to a dumb switch.
Line: Usually black and coming from the circuit breaker.
Load: Usually black. One end is connected to the light.
If you are unsure, consult a qualied electrician.
Turn o the circuit breaker. Then remove
the old wallplate of the wall switch and
label the Ground and Neutral wires.
1
2
Identify Line and Load wires.
3Line up the switch with the mounting
holes. Secure it with screws.
5Attach the wallplate. Then the wiring is
nished.
6
Flip the page over to complete setup.
Power
Source
To Light
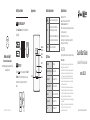
1) Turn on the circuit breaker. Use a voltage detector
to identify the energized wire (Line wire).
2) Turn o the circuit breaker. Label the Line and Load
wires.
Take care to avoid electric shocks.
Load wireLine wire

Button Explanations
LED Status
Smart Wi-Fi Dimmer Switch
Quick Start Guide
7106509677 REV1.0.0 ©2022 TP-Link
Specications
Rating: 120V~ 60Hz
Load: 300W Incandescent, 150W LED
Operation temperature: 0~40℃
Method of mounting included: Independently mounted
(Vertically position only);
Operating control, Type 1 action
Pollution Degree 2, Rated Impulse Voltage 2500 V
Software Class A, NEMA Type 1
Need some help?
?
Visit www.tp-link.com/support
for technical support, user guides, FAQs,
warranty & more
*Images may dier from your actual product.
Restart
Reset
Press and hold for about 5s to reset
Wi-Fi while keeping other settings.
Press to restart your switch.
Decrease or increase the brightness.
Press and hold for about 10s to restore
your switch to factory default settings.
/
Set Up Your Switch Appearance
STEP 2 SET UP
Tap the button in the app and select Smart
Switches. Then follow the step-by-step app
instructions to set up your smart dimmer
switch.
DOWNLOAD APP
Get the Kasa Smart app from the App Store or
Google Play.
STEP 1
OR
Safety Notice
Before installing, servicing or removing the switch, read and follow all
safety precautions including the following:
• CAUTION – Risk of Electric Shock – More than one disconnect switch
may be required to de-energize the equipment before servicing. A
circuit breaker which disconnects the Line and Neutral conductor
simultaneously is suitable. Ensure power is o at the circuit breaker
before removing or installing any switch. Use a non-contact voltage
tester to ensure the power is o.
• The Smart Switch must be installed and used in accordance with the
National Electric Code (NEC) or your local electrical code. If you are
unfamiliar with these codes and requirements, or are uncomfortable
performing the installation, consult a qualied electrician.
• Do not install the Smart Switch with wet hands or when standing on wet
or damp surfaces.
• Install only in a suitable UL Listed outlet box (suitable dimensions: H >
2.95 in./75 mm, W > 1.81 in./46 mm, D > 2 in./51 mm).
• Tighten terminal screws to 13 lbf-in.
High Voltage-Disconnect power supply before servicing
CAUTION
On/O
Button
Dimmer
Buttons
Restart
LED
Reset
Brightness
Indicators
Starting up.Solid amber
Blinking amber
Blinking green
White
Solid red
Stay green for 30s
Blinking amber & green
Connecting to Wi-Fi.
Ready for setup.
Device resetting.
Light fixture is off.
Disconnected from Wi-Fi.
Connected to Wi-Fi.
model :KS220

This equipment has been tested and found to comply with the limits for a Class B digital device, pursuant to part 15 of the FCC Rules.
These limits are designed to provide reasonable protection against harmful interference in a residential installation. This equipment
generates, uses and can radiate radio frequency energy and, if not installed and used in accordance with the instructions, may cause harmful
interference to radio communications.
However, there is no guarantee that interference will not occur in a particular installation. If this equipment does cause harmful interference
to radio or television reception, which can be determined by turning the equipment off and on, the user is encouraged to try to correct the
interference by one or more of the following measures:
—Reorient or relocate the receiving antenna.
—Increase the separation between the equipment and receiver.
—Connect the equipment into an outlet on a circuit different from that to which the receiver is connected.
—Consult the dealer or an experienced radio/TV technician for help.
FCC Radiation Exposure Statement
This device complies with FCC radiation exposure limits set forth for an uncontrolled environment and it also complies with Part 15 of the FCC
RF Rules.
This equipment must be installed and operated in accordance with provided instructions and the antenna(s) used for this transmitter must be
installed to provide a separation distance of at least 20 cm from all persons and must not be co-located or operating in conjunction with any
other antenna or transmitter.
End-users and installers must be provided with antenna installation instructions and consider removing the no-collocation statement.
This device complies with Part 15 of the FCC Rules. Operation is subject to the following two conditions:Th
(1) this device may not cause harmful interference, and
(2) this device must accept any interference received, including interference that may cause undesired operation.
Caution!
Any changes or modifications not expressly approved by the party responsible for compliance could void the user's authority to operate the
equipment.
We, TP-Link USA Corporation, has determined that the equipment shown as above has been shown to comply with the applicable technical
standards, FCC part 15. There is no unauthorized change is made in the equipment and the equipment is properly maintained and operated.
Canadian Compliance Statement
This device contains licence-exempt transmitter(s)/receiver(s) that comply with Innovation, Science and Economic Development Canada’s
licence-exempt RSS(s). Operation is subject to the following two conditions:
(1) This device may not cause interference.
(2) This device must accept any interference, including interference that may cause undesired operation of the device.
L’émetteur/récepteur exempt de licence contenu dans le présent appareil est conforme aux CNR d’Innovation, Sciences et
Développement économique Canada applicables aux appareils radio exempts de licence. L’exploitation est autorisée aux deux
conditions suivantes :
1) L’appareil ne doit pas produire de brouillage;
2) L’appareil doit accepter tout brouillage radioélectrique subi, même si le brouillage est susceptible d’en compromettre le
fonctionnement.
Radiation Exposure Statement:
This equipment complies with IC radiation exposure limits set forth for an uncontrolled environment. This equipment should be installed
and operated with minimum distance 20cm between the radiator & your body.
Déclaration d'exposition aux radiations:
Cet équipement est conforme aux limites d'exposition aux rayonnements IC établies pour un environnement non contrôlé. Cet
équipement doit être installé et utilisé avec un minimum de 20 cm de distance entre la source de rayonnement et votre corps.
Industry Canada Statement
CAN ICES-3 (B)/NMB-3(B
-
 1
1
-
 2
2
-
 3
3


TP-LINK tp-link KS220 Smart Wi-Fi Dimmer Switch Mode d'emploi
- Catégorie
- Gradateurs
- Taper
- Mode d'emploi
- Ce manuel convient également à
dans d''autres langues
Documents connexes
Autres documents
-
 Craftmade WCSD-100 Smart On/Off Dimmer Switch Guide d'installation
-
RP LIGHTING FANS 18042 Mode d'emploi
-
 Craftmade WCS-100 Smart On/Off Switch Guide d'installation
-
Schneider Electric SQR226U1 Mode d'emploi
-
Schneider SQR141U1BKW Energy Monitoring Rocker Switch Manuel utilisateur
-
GE 45857GE Manuel utilisateur
-

