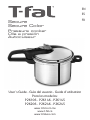
T-Fal P26106 Pressure Cooker Manuel utilisateur
- Catégorie
- Autocuiseurs
- Taper
- Manuel utilisateur

User’s Guide - Guía del usuario - Guide d’utilisation
Para los modelos:
P26106 - P26146 - P26145
P26206 - P26246 - P26245
www.t-fal.com.mx
www.t-fal.ca
www.t-falusa.com
EN
ES
FR
Secure
Secure Color
Pressure cooker
Olla a presión
Autocuiseur

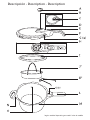
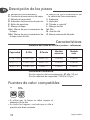
Descripción - Description - Description
*según modelo *depending on model *selon le modèle

fig. 1 fig. 2 fig. 3
CLICK
fig. 4
1/2
fig. 5 fig. 6
fig. 7 fig. 8 fig. 9
fig. 10
fig. 11 fig. 12
fig. 13
fig. 14 fig. 15
*según modelo *depending on model *selon le modèle
cocción
cooking
cuisson
descompresión
pressure release
décompression

1
IMPORTANT SAFEGUARDS
When using pressure cookers, basic safety precautions should always
be followed :
1. Read all instructions.
2. This product has been designed for domestic use only.
3. Do not touch hot surfaces. Use handles or knobs.
4. Close supervision is necessary when the pressure cooker is used
near children.
5. Do not place the pressure cooker in a heated oven.
6. Extreme caution must be used when moving a pressure cooker
containing hot liquids.
7. Regularly check that the handles of the pressure cooker are fitted
correctly. Tighten them if necessary.
8. Regularly check that the pan handles are fixed properly. Tighten
if necessary.
9. Use heat source(s) that are compatible with your pressure cooker,
in line with the instructions for use.
10. Never make a recipe with milk in your pressure cooker.
11. Do not use rock salt in your pressure cooker, but rather add table
salt when the cooking is nearly finished.
12. Never fill your pressure cooker more than two-thirds full
(maximum fill mark).
13. When cooking food with a thick texture (chick peas, rhubarb,
compotes, etc.) the pressure cooker should be shaken slightly
before opening to ensure that the food does not spurt out.
14. Always check that valves are clear before use. Refer to section
“Before cooking”.
15. Use only original T-FAL spare parts suitable for your model. In
particular, use a T-FAL pan and lid.
16. Alcohol vapors are flammable. Bring to a boil for about 2 minutes
before placing the lid. Watch your appliance when preparing
alcohol-based recipes.
17. Do not use your pressure cooker to store acidic or salty food
before and after cooking to avoid damaging your pan.
18. Do not use pressure cooker for other than intended use.
19. This appliance cooks under pressure. Improper use may result in
scalding injury. Make certain unit is properly closed before
operating. See “Operating Instructions.”
EN

2
20. Do not fill the unit over 2/3 full. When cooking foods that expand
during cooking such as rice or dried vegetables, do not fill the unit
over ½ full. Over filling may cause a risk of clogging the vent pipe
and developing excess pressure. See “Food Preparation
Instructions.”
21. Be aware that certain foods, such as applesauce, cranberries, pearl
barley, oatmeal or other cereals, split peas, noodles, macaroni,
rhubarb, or spaghetti can foam, froth, and sputter, and clog the
pressure release device (steam vent). These foods should not be
cooked in a pressure cooker.
22. Always check the pressure release devices for clogging before use.
23. Do not open the pressure cooker until the unit has cooled and all
internal pressure has been released. If the handles are difficult
to push apart, this indicates that the cooker is still pressurized –
do not force it open. Any pressure in the cooker can be hazardous.
See “Operating Instructions”.
24. Do not use this pressure cooker for pressure frying with oil.
25. When the normal operating pressure is reached, turn the heat
down so all the liquid, which creates the steam, does not evaporate.
26. Always pour a minimum amount of a liquid of at least 8.5 oz in
the unit. See "Operating Instructions".
SAVE THESE INSTRUCTIONS.
EN

3
*depending on model
A. Operating valve
B. Steam release outlet
C. Safety valve
D. Pressure indicator
E. Opening button
F. Long lid handle
G(a). Lid positioning mark
G(b). Mark for positioning the lid on
the pan
H. Operating valve positioning mark
I. Lid seal
J. Steam basket*
K. Tripod*
L. Long pan handle
M. Pan
N.Short pan handle
O. Maximum fill mark
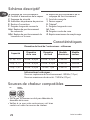
Specifications
Pressure cooker base diameter – references
Technical information: maximum operating pressure: 80 kPa (12 psi) /
Maximum safety pressure: 150 kPa (22 psi).
Compatible heat sources
• On gas, the flame should not extend beyond the
diameter of the pan.
• For all heat sources, make sure that your pressure cooker
is well centered.
T-FAL accessories
• To replace other parts or for repairs, contact a T-FAL
Approved Service Center.
• Use only original T-FAL parts suitable for your model.
Accessory Reference number
Seal X9010602
GAS
ELECTRIC
COIL
Descriptive diagram
Capacity
Pan
diameter
Base
diameter
Aluminum
model
Color model
4,7 qt / 4,5 L 22 cm / 8,6’’ 16 cm / 6,3’’ P26106 P26206
6 qt / 5,7 L 22 cm / 8,6’’ 16 cm / 6,3’’ P26146 P26246
8 qt / 7,6 L 24 cm / 9,4’’ 18 cm / 7’’ P26145 P26245
EN

4
*depending on model
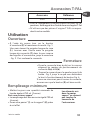
Operating Instructions
• This appliance cooks under pressure. Improper use may result in scalding
injury. Make certain unit is properly closed before operating.
• Always pour a minimum amount of a liquid of at least 8.5 oz in the unit.
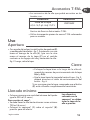
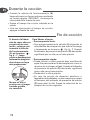
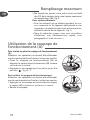
Opening
• Using your thumb, pull on the opening button (E)
and slide it back - fig. 1. Holding the long pan
handle (L) with one hand, turn the long lid handle
(F) counterclockwise with the other hand until it
opens - fig. 2. Then lift the lid off.
• Do not open the pressure cooker until the unit has
cooled and all internal pressure has been released.
If the handles are difficult to push apart, this
indicates that the cooker is still pressurized – do
not force it open. Any pressure in the cooker can
be hazardous.
Closing
• Place the lid down flat on the pressure cooker taking
care to line up the lid positioning marks G(a) and G(b).
• Turn the lid to the left until it stops - fig. 3 . You will
hear it click - fig. 4.
If you are unable to turn the lid, make sure that the
button (E) is fully pulled back.
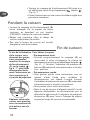
Food Preparation Instructions
• Do not fill the unit over 2/3 full. When cooking foods that expand during
cooking such as rice or dried vegetables, do not fill the unit over ½ full. Over
filling may cause a risk of clogging the vent pipe and developing excess
pressure.
Minimum filling
• Always pour a minimum amount of liquid of at
least 25 cl (2 glasses).
For steaming*:
• You must pour at least 75 cl of water (6 glasses).
• Place the basket* (J) onto the support* (K) provided
for this purpose
.
Maximum filling
• Never fill your pressure cooker more than two-thirds full
(maximum fill mark) (O) - fig. 5.
For some foods:
• For food that expands during cooking, like rice or dried
Food placed in the
steam basket* must
not touch the
pressure cooker lid.
EN

5
*depending on model
vegetables or stewed fruit, etc., never fill your pressure
cooker more than half full - fig. 5.
• For soups, we recommend you carry out a fast
decompression (refer to section "End of cooking").
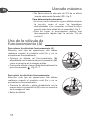
Using the operating valve (A)
To fit the operating valve (A):
Caution: these operations must be carried out when the
appliance is cold and not in use.
• Place the operating valve (A) while lining up the
positioning mark (H) as shown in the diagram on the left.
• Press down on the valve and turn to the required position
- fig. 6 - 7.
To remove the operating valve:
Caution: these operations must be carried out when the ap-
pliance is cold and not in use.
• Press down on the valve and turn it to align its positioning
mark (H) as shown in the diagram on the left.
• Remove the valve.
First use
Dark spots on the aluminum that may appear after using the
product do not compromise its safety. To control the problem,
follow these steps:
• Place the basket support* (K) in the bottom of the pan and
place the basket* (J) on top of it.
• Fill two-thirds of the pan (O) with water (maximum fill mark).
• Add 2 tablespoons of baking soda.
• Close the pressure cooker.
• Move the operating valve (A) to a stop after the pictograms
(mark ) -
fig. 6 - 7.
• Place the pressure cooker on a heat source set to maximum
power.
• When steam starts escaping through the valve, reduce the heat
source and set the timer to 20 minutes.
• After 20 minutes, turn off the heat.
• Gradually turn the valve (A)
- fig. 8 choosing the speed at which
you want to release the pressure until the valve stops after the
pictogram (mark ) - fig. 6 - 7.
• When the pressure indicator (D) drops back, your pressure
cooker is no longer under pressure.
• Open the pressure cooker
- fig. 1 - 2.
• Rinse the pressure cooker with water and dry.
This maintenance can be done periodically.
EN

6
Before cooking
• Before each use of the pressure cooker, remove the
valve (A) (refer to section “Using the operating
valve”) and check visually and in plain daylight
that the steam release outlet (B) is not blocked. If
necessary, clean it with a toothpick - fig. 9.
• Check that the marble in the safety valve (C) can
move freely - fig. 13: refer to section “Cleaning and
maintenance”.
• Close the pressure cooker - fig. 3 and make sure it
is closed properly.
• Move the operating valve (A) to a stop after the
pictograms
(mark ) -
fig. 6 - 7.
• Place the pressure cooker on a heat source set to
maximum power.
During cooking
• When steam escapes through the operating valve
(A) continuously, and a regular hissing
sound
(PSCHHHT) is heard, reduce the heat source.
• Set a timer for the cooking time stated in your recipe.
• Once the cooking time is up, turn off the heat.
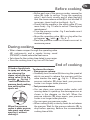
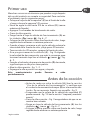
End of cooking
To release the steam:
- Slow pressure release:
• Gradually turn the valve (A) choosing the speed at
which you want to release the pressure until the
valve reaches the mark - fig. 6 - 7. When the
pressure indicator (D) drops back, your pressure
cooker is no longer under pressure.
- Fast pressure release:
• You can place your pressure cooker under cold
running water to speed up the decompression
as
shown in the diagram on the left. When the
pressure indicator (D) drops again, your pressure
cooker is no longer under pressure.
• You can open your pressure cooker.
• When cooking frothy or starchy foods, do not release
the pressure. Wait for the pressure indicator (D) to
drop before opening. Reduce the recommended
cooking time a little.
If food or liquid starts
to spray out while you
are releasing the
steam, return the ope-
rating valve (A) to the
position - fig. 6 et
7
-
and then release the
pressure slowly making
sure nothing else
spurts out.
When the pressure
cooker is under pressure,
take great care when
moving it without
shaking it.
EN

7
*depending on model
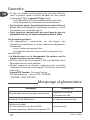
Cleaning and maintenance
Cleaning the pressure cooker
To ensure the correct operation of your pressure
cooker, follow these cleaning and maintenance
recommendations after each use.
• Wash the pressure cooker after each use using
warm, soapy water. Follow the same procedure
for the basket*.
• Never use bleach or products containing chlorine.
• Do not overheat your pan when empty.
To clean the inside of the pan:
• Wash with a scouring pad and dishwashing
liquid.
• The presence of stains on the inside of the
pressure cooker base has no effect on the qua-
lity of the metal. This is simply a scale deposit.
To remove these deposits, you can use a scou-
ring pad and some diluted vinegar.
To clean the outside of the pan:
• Wash using a sponge and dishwashing liquid.
To clean the lid:
• Wash the lid under a gentle stream of running
warm water using a sponge and dishwashing
liquid and rinse well.
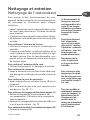
To clean the lid seal:
• After each use, clean the seal (I) and its groove.
• To refit the seal, refer to the drawings
- fig. 10 -
11.
To clean the operating valve (A):
• Remove the operating valve (A): Refer to section
“Using the operating valve”.
• Wash the operating valve (A) under running
tap water
- fig. 12.
To clean the steam release outlet on the lid (B):
• Remove the valve (A).
• Visually inspect the steam release outlet in
daylight to make sure that it is clear and round.
If necessary, clean it with a toothpick
- fig. 9.
The browning and
marks which may
appear following
long use do not
affect the operation
of the pressure
cooker.
To make blackening
of aluminum
disappear from
already used
products : repeat
“first use”
instructions with
baking soda.
Never put the pan,
the lid and the seal
in the dishwasher.
For a longer
pressure cooker life,
do not overheat
your pressure
cooker pan when it
is empty.
For the models
covered outside
(colored tank) the
bleaching or the
change of color in
time does not
present
disadvantage to the
use.
EN

8
To clean the safety valve (C):
• Clean the part of the safety valve located inside
the lid by placing it under running water.
• Check its proper operation by slightly pressing
down on the pin, which must sink without
difficulty - fig. 13.
To change the seal of your pressure cooker:
• Change the seal of your pressure cooker every year
or if it has any cuts.
• Always use an original T-FAL seal suitable for your
model.
To store your pressure cooker:
• Turn the lid over on the pan.
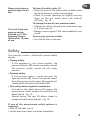
Safety
Your pressure cooker is fitted with several safety
devices:
• Closing safety:
- If the appliance is not closed properly, the
pressure indicator (D) cannot rise and as a result
the pressure cooker cannot be put under
pressure.
• Opening safety:
- If the pressure cooker is under pressure, the
opening button (E) cannot be pressed. Never
force the pressure cooker open. Above all do not
interfere with the pressure indicator (D).
• Two safety devices against overpressure:
- First device: the safety device (C) releases the
pressure and steam escapes horizontally from
above the lid
- fig. 14.
- Second device: the seal (I) allows steam to
escape vertically along the pan - fig. 15.
If one of the overpressure safety systems is
triggered:
• Turn off the heat source.
• Let the pressure cooker cool down completely.
EN
Never use a sharp or
pointed object to do
this.
You must have your
pressure cooker
checked in a T-FAL
Approved Service
Center after 10 years
of use.

9
*depending on model
• Open.
• Check and clean the operating valve (A), the
steam release outlet (B), the safety valve (C) and
the seal (I) - fig. 9 - 12 - 13.
Recommendations for use
1 - Steam is very hot when it leaves the operating
valve.
2 - As soon as the pressure indicator rises, you can
no longer open your pressure cooker.
3 - As with any cooking utensil, ensure close
supervision if you are using the pressure
cooker near children.
4 - Watch out for the jet of steam.
5 - To move the pressure cooker, use the two pan
handles.
6 - Never leave food in your pressure cooker.
7 - Never use bleach or products containing
chlorine, as these will alter the quality of the
material.
8 - Never put the lid, the pan and the basket* in
the dishwasher.
9 - Do not leave the lid soaking in water.
10 - Change the seal every year or if it has any
cuts.
11 - You must only clean your pressure cooker
when it is cold and empty.
12 - It is essential to have your pressure cooker
checked in a T-FAL Approved Service Center
after 10 years of use.
EN

10
*depending on model
Warranty
• When used under the conditions set out in these
instructions, the pan of your new T-FAL pressure cooker
comes with a 10 years-warranty against:
- Any defects relating to the metal structure of your pan
- Any premature deterioration of the metal base
• For other parts, a one year parts and labor warranty is
provided (except where applicable law in your own country
states otherwise). This warranty covers any defects or
manufacturing faults.
• The contractual warranty cover is provided only on
presentation of a valid proof of purchase which shows
the date of purchase.
The warranty cover excludes:
• Any damage consecutive to a failure to follow the major
recommendations made or due to negligent use, especially:
-Knocks, falls, placing in an oven, etc.
-Placing the lid, the pan and/or basket* in the
dishwasher.
• The bleaching or the change of color in time for colored
tanks.
• Only T-FAL Approved Service Centers are authorized to
provide service under warranty.
• Please call the Helpline number for the address of your
nearest T-FAL Approved Service Center:
Groupe SEB Canada - Customer Service
345 Passmore Ave. - Toronto ON - CANADA
- M1V3N8 - 1800.418.3325
Regulatory marking
EN
Marking Location
Identification of manufacturer and
commercial brand
Lid handle and pan handle.
Production year and batch Inside of the lid.
Model reference
Maximum safety pressure (PS)
Maximum operating pressure (PF)
On the lid.

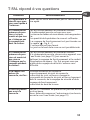
T-FAL answers your questions
Problems Recommendations
If your pressure
cooker has been
heated under pres-
sure without any
liquid in it:
Have your pressure cooker checked by a T-FAL Approved
Service Center.
If the pressure
indicator has not
risen and nothing
is escaping
through the valve
during cooking:
This is normal during the first few minutes.
If the phenomenon persists, check that:
- The heat source is sufficiently high; if not, increase it.
- The quantity of liquid in the pan is sufficient.
- The operating valve is in position - fig. 6 - 7.
- The pressure cooker is properly closed.
- The seal or the edge of the pan is not damaged.
If the pressure
indicator has risen
and nothing is
escaping through
the valve during
cooking:
This is normal during the first few minutes.
If the phenomenon persists, place your appliance
under cold water, (p. 18). Then open.
Clean the operating valve and the steam release outlet
- fig. 9 and check that the safety valve pin sinks wi-
thout difficulty.
If steam leaks
from around the
lid, check:
The correct closure of the lid.
The position of the lid seal.
The condition of the seal; replace it if necessary.
The cleanliness of the lid, seal and its groove in the lid,
the safety valve and the operating valve.
The condition of the edge of the pan.
If you are unable
to open the lid:
Check that the pressure indicator is in the lowered
position.
If not, decompress and if necessary cool down the
pressure cooker under a cold water jet, (p. 18).
If the food is not
cooked or is
burned, check:
The cooking time.
The power of the heat source.
The correct position of the operating valve.
The quantity of liquid.
If food has burned
in the pressure
cooker:
Leave the pan to soak before cleaning it.
Never use bleach or products containing chlorine.
11
EN

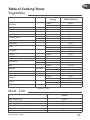
Meat - Fish
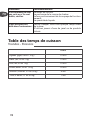
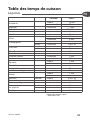
Table of Cooking Times
Vegetables
Cooking FRESH PRODUCE
Artichoke
- steam*
18 min.
- immersion**
15 min.
Asparagus
- immersion
5 min.
Beets
- steam
20 - 30 min.
Broccoli
- steam
3 min.
Brussels sprouts
- steam
7 min.
Cabbage, green
sliced - steam
6 min.
leaves - steam
7 min.
Carrots
sliced - steam
7 min.
Cauliflower
- immersion
3 min.
Celery
- steam
10 min.
- immersion
6 min.
Courgettes
- steam
6 ½ min.
- immersion
2 min.
Endives
- steam
12 min.
Green beans
- steam
8 min.
Leek
sliced - steam
2 ½ min.
Mushrooms
sliced - steam
1 min.
whole - immersion
1 ½ min.
Peas
- steam
1 ½ min.
Potatoes
quartered
- steam
12 min.
- immersion
6 min.
Pumpkin (mashed)
- immersion
8 min.
Rice
- immersion
7 min.
Spinach
- steam
5 min.
- immersion
3 min.
Turnips
- steam
7 min.
- immersion
6 min.
White beans semi-dry
- steam
20 min.
FRESH
Beef (roast 35 oz) 10 min.
Chicken (whole 42 oz) 20 min.
Lamb (leg 46 oz) 25 min.
Pork (roast 35 oz) 25 min.
Salmon (4 steaks 21 oz) 6 min
Tuna (4 steaks 21 oz) 7 min
*steam = in the steam basket*
**immersion = in water
12
*depending on model
EN

13
PRECAUCIONES
IMPORTANTES
Por su seguridad, este aparato se ajusta a las normas y reglamentos
aplicables al producto:
- Directiva de Equipamientos a Presión
- Materiales en contacto con alimentos
- Medio ambiente
• Este aparato ha sido desarrollado para un uso doméstico.
• Tómese el tiempo necesario para leer todas las instrucciones y consulte
siempre la "Guía del usuario".
• Como se hace con todos los aparatos para cocción, mantenga una estricta
vigilancia del producto, en especial si utiliza la olla a presión cerca de los
niños.
• No coloque su olla a presión dentro de un horno caliente.
• Cuando esté utilizando su olla a presión, muévala con el mayor cuidado
posible. No toque las superficies calientes. Utilice las asas y botones. De
ser necesario, póngase guantes.
• Controle habitualmente que las asas de la olla estén fijas en la forma
correcta. Revíselas de ser necesario.
• No utilice su olla a presión para un destino diferente al de su función
específica.
• Su olla cocina a presión. Un uso inadecuado podría ocasionar
quemaduras por hervor o por la acción del vapor. Asegúrese de que la olla
a presión esté bien cerrada antes de exponerla al fuego. Leer la sección
"Cierre".
• Antes de abrir su olla a presión, asegúrese de que la válvula de seguridad
esté en la posición de descompresión.
• Nunca haga fuerza para abrir la olla a presión. Asegúrese de que la
presión interna haya descendido. Leer la sección de "Seguridad".
• Nunca utilice su olla a presión sin líquido, podría causarle un grave daño
al producto. Asegúrese de que siempre haya suficiente líquido durante la
cocción.
• Utilice la(s) fuente(s) de calor compatible(s), conforme se indica en las
instrucciones de uso.
• No realice nunca recetas a base de leche en su olla a presión.
• No utilice sal de grano en su olla a presión, agregue sal fina al finalizar la
cocción.
• No llene la olla a presión más de 2/3 de su altura (marca máxima de
llenado).
ES

14
• En el caso de los alimentos que se dilatan durante la cocción, como el
arroz, las legumbres deshidratadas o las compotas, no llene la olla a
presión más de la mitad de su capacidad. Para algunas sopas a base de
calabaza, calabacín, etc., deje enfriar unos minutos su olla a presión, y
luego refrigere usando agua fría. En el caso de los modelos de 3 y 4 litros,
para los alimentos pastosos o que se dilatan durante la cocción, no llene
la olla más de 1/3 de su altura. Al finalizar la cocción, espere 5 minutos
antes de descomprimir bajo el agua.
• Al cocinar carnes que contengan una piel (por ej. la lengua de buey), que
podría hincharse a causa de la presión, debe evitar pinchar la carne
cuando la piel tenga un aspecto hinchado porque podría quemarse. Le
aconsejamos pincharla antes de empezar con la cocción.
• En el caso de alimentos pastosos (guisantes secos, etc.), se debe sacudir
levemente la olla a presión antes de abrirla para que esos alimentos no
salpiquen hacia afuera.
• Verifique que las válvulas no se encuentren obstruidas antes de cada uso.
Leer la sección "Antes de la cocción".
• No utilice su olla a presión para freír con aceite.
• No toque los dispositivos de seguridad salvo para cumplir con las
instrucciones de limpieza y mantenimiento.
• Utilice únicamente piezas de marca T-FAL adecuadas para su modelo. En
particular, utilice un recipiente (olla) y una tapa T-FAL.
• Los vapores de alcohol son inflamables. Mantenga en ebullición 2 minutos
aproximadamente antes de colocar la tapa. Controle su aparato cuando
realice recetas a base de alcohol.
• No utilice este producto para almacenar alimentos ácidos o salados antes
o después de la cocción ya que podría dañar su olla.
GUARDE ESTAS INSTRUCCIONES
ES

15
*según modelo
A. Válvula de funcionamiento
B. Conducto de evacuación del vapor
C. Válvula de seguridad
D. Indicador de presencia de presión
E. Botón de apertura
F. Mango de tapa
G(a). Marca de posicionamiento de
la tapa.
G(b). Marca de posicionamiento de
la tapa sobre la olla
H. Marca de posicionamiento de
la válvula de funcionamiento
I. Empaque
J. Vaporera*
K. Trípode o soporte*
L. Mango de olla
M. Olla
N. Asa de olla
O. Marca máxima de llenado
Características
Diámetro del fondo de la olla a presión – referencias
Información normativa:
Presión superior de funcionamiento: 80 kPa (12 psi)
Presión máxima de seguridad: 150 kPa (22 psi)
Fuentes de calor compatibles
• Si utiliza gas, la llama no debe superar el
diámetro de la olla.
• En todos los hogares, controle que su olla a
presión esté bien centrada.
GAS
ESPIRAL
ELÉCTRICA
Descripción de las piezas
Capacidad Ø Olla Ø Fondo
Modelo
aluminio
Modelo
color
4,7 qt / 4,5 L 22cm / 8,6’’ 16cm / 6,3’’ P26106 P26206
6 qt / 5,7 L 22cm / 8,6’’ 16cm / 6,3’’ P26146 P26246
8 qt / 7,6 L 24cm / 9,4’’ 18cm / 7’’ P26145 P26245
ES

16
*según modelo
Accesorios T-FAL
• Los accesorios de la olla que podrá encontrar en las
tiendas, son:
• Para el cambio de piezas o reparaciones, diríjase a los
Centros de Servicio Autorizados T-FAL.
• Utilice únicamente piezas de marca T-FAL adecuadas
para su modelo.
Uso
Apertura
• Con ayuda del pulgar tire del botón de apertura (E)
y manténgalo hacia atrás - fig. 1. Sujetando con una
mano el mango de la olla (L), gire con la otra
mano el mango de la tapa (F) en el sentido
contrario a las agujas del reloj, hasta abrir la olla -
fig. 2. Luego, retire la tapa.
Cierre
• Coloque la tapa bien a lo largo de la olla ali-
neando las marcas de posicionamiento de la tapa
G(a) y G(b).
• Gire la tapa hacia la izquierda hasta el tope - fig. 3,
deberá escuchar el ruido de accionamiento del
botón - fig. 4.
Si no consigue girar la tapa, compruebe que el botón
(E) esté colocado completamente hacia atrás.
Llenado mínimo
• Coloque siempre una cantidad mínima de líquido
igual a 250 ml (2 vasos).
Para cocción al vapor*:
• Se debe llenar la olla hasta alcanzar como mínimo
750 ml (6 vasos).
• Coloque la vaporera* (J) sobre el soporte* (K)
previsto para tal efecto.
Los alimentos
colocados en la
vaporera* no deben
tocar la tapa de la
olla a presión.
ES
Accessorio Referencia
Junta de la tapa
4,5 L / 4,7 qt - 6 qt / 5,7 L
X9010602

17
Llenado máximo
• No llene nunca la olla más de 2/3 de su altura
(marca máxima de llenado) (O) - fig. 5.
Para determinados alimentos:
• En el caso de los alimentos que se dilatan durante
la cocción, como el arroz, las legumbres
deshidratadas o las compotas, no llene la olla a
presión más de la mitad de su capacidad - fig. 5.
• Para las sopas, le aconsejamos realizar una
descompresión rápida (leer la sección "Fin de
cocción").
Uso de la válvula de
funcionamiento (A)
Para colocar la válvula de funcionamiento (A):
Atención, este tipo de operaciones sólo deben
realizarse cuando el producto está frío y no se
encuentra en funcionamiento.
• Coloque la válvula de funcionamiento (A)
alineándola con la marca de posicionamiento (H)
como se muestra en la imagen al lado.
• Presione la válvula y luego gírela hasta alcanzar la
posición deseada - fig. 6 - 7.
Para retirar la válvula de funcionamiento:
Atención, este tipo de operaciones sólo deben
realizarse cuando el producto está frío y no se
encuentra en funcionamiento.
• Presione la válvula y gírela alineándola con la
marca de posicionamiento (H) como se muestra
en la imagen al lado.
• Retire la válvula.
ES
La page est en cours de chargement...
La page est en cours de chargement...
La page est en cours de chargement...
La page est en cours de chargement...
La page est en cours de chargement...
La page est en cours de chargement...
La page est en cours de chargement...
La page est en cours de chargement...
La page est en cours de chargement...
La page est en cours de chargement...
La page est en cours de chargement...
La page est en cours de chargement...
La page est en cours de chargement...
La page est en cours de chargement...
La page est en cours de chargement...
La page est en cours de chargement...
La page est en cours de chargement...
La page est en cours de chargement...
La page est en cours de chargement...
La page est en cours de chargement...
La page est en cours de chargement...
La page est en cours de chargement...
La page est en cours de chargement...
La page est en cours de chargement...
-
 1
1
-
 2
2
-
 3
3
-
 4
4
-
 5
5
-
 6
6
-
 7
7
-
 8
8
-
 9
9
-
 10
10
-
 11
11
-
 12
12
-
 13
13
-
 14
14
-
 15
15
-
 16
16
-
 17
17
-
 18
18
-
 19
19
-
 20
20
-
 21
21
-
 22
22
-
 23
23
-
 24
24
-
 25
25
-
 26
26
-
 27
27
-
 28
28
-
 29
29
-
 30
30
-
 31
31
-
 32
32
-
 33
33
-
 34
34
-
 35
35
-
 36
36
-
 37
37
-
 38
38
-
 39
39
-
 40
40
-
 41
41
-
 42
42
-
 43
43
-
 44
44


T-Fal P26106 Pressure Cooker Manuel utilisateur
- Catégorie
- Autocuiseurs
- Taper
- Manuel utilisateur