
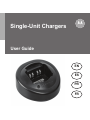
User Guide
Single-Unit Chargers
EN
FR
ES
PR

88C11-G_Cover.fm Page 2 Tuesday, July 25, 2006 10:40 AM

1
English
IMPORTANT
SAFETY INSTRUCTIONS
This document contains important safety
and operating instructions. Please read
these instructions carefully and save them
for future reference.
Before using the battery charger, read all the
instructions and cautionary markings on (1) the
charger, (2) the battery, and (3) on the radio using
the battery.
1. To reduce risk of injury, charge only
the rechargeable Motorola
authorized batteries listed in Table 1.
Other batteries may explode,
causing personal injury and damage.
WARNING
WARNINGS
6881088C11_na.book Page 1 Thursday, April 7, 2016 1:39 PM

2
English
WARNINGS (continued)
2. Use of accessories not recommended
by Motorola may result in risk of fire,
electric shock,or injury.
3. To reduce risk of damage to the
electric plug and cord, pull by the plug
rather than the cord when disconnecting the
charger.
4. An extension cord should not be used unless
absolutely necessary. Use of an improper extension
cord could result in risk of fire and electric shock. If
an extension cord must be used, make sure that the
cord size is 18AWG for lengths up to 100 feet (30.48
m), and 16AWG for lengths up to 150 feet (45.72
m).
5. To reduce risk of fire, electric shock, or injury, do not
operate the charger if it has been broken or
damaged in any way. Take it to a qualified Motorola
service representative.
WARNING
6881088C11_na.book Page 2 Thursday, April 7, 2016 1:39 PM

3
English
WARNINGS (continued)
6. Do not disassemble the charger; it
is not repairable and replacement
parts are not available. Disassembly
of the charger may result in risk of
electrical shock or fire.
7. To reduce risk of electric shock, unplug the
charger from the ac outlet before attempting any
maintenance or cleaning.
8. This is a Class A product. In a domestic
environment, this product may cause radio
interference in which case the user may be
required to take adequate measures.
WARNING
6881088C11_na.book Page 3 Thursday, April 7, 2016 1:39 PM

4
English
OPERATIONAL SAFETY GUIDELINES
• Turn the radio off when charging the battery.
• This equipment is not suitable for outdoor use. Use
only in dry locations/conditions.
• Connect equipment only to an appropriately fused
and wired supply of the correct voltage (as
specified on the product). Disconnect from line
voltage by removing main plug.
• The socket outlet to which this equipment is
connected should be close by and easily
accessible
.
• In equipment using fuses, replacements must
comply with the type and rating specified in the
equipment instructions.
• Maximum ambient temperature around the power
supply equipment must not exceed 40°C (104°F).
• Output power from the power supply unit must not
exceed the ratings stated on the product label
located on the bottom of the charger.
• Make sure the cord is located where it will not be
stepped on, tripped over, or subjected to water,
damage, or stress.
6881088C11_na.book Page 4 Thursday, April 7, 2016 1:39 PM

5
English
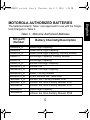
MOTOROLA AUTHORIZED BATTERIES
The batteries listed in Table 1 are approved for use with the Single-
Unit Chargers in Table 2.
Table 1. Motorola Authorized Batteries
Kit (part)
Number
Battery Chemistry/Description
HNN9008_R NiMH/High-Capacity
HNN9009 NiMH/Ultra-High-Capacity
HNN9010_R NiMH/Ultra-High-Capacity, Factory Mutual
HNN9011 NiCd/High-Capacity, Factory Mutual
HNN9012 NiCd/High-Capacity
HNN9013_R Lithium Ion/High-Capacity
JMNN4023_R Lithium Ion
JMNN4024_R Lithium Ion/High-Capacity
JMNN4025_R NiMH, Factory Mutual
NNTN5510_R ATEX Lithium Ion, 1480 mAh
PMNN4073_R Lithium Ion, Factory Mutual, IP67
PMNN4074_R Lithium Ion, Non-Factory Mutual, IP67
PMNN4094 Lithium Ion, Non-Factory Mutual, IP67
PMNN4097
NiMH/High-Capacity
PMNN4440
Lithium Ion, Non-Factory Mutual, IP68
6881088C11_na.book Page 5 Thursday, April 7, 2016 1:39 PM

6
English
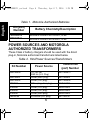
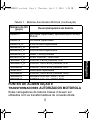
POWER SOURCES AND MOTOROLA
AUTHORIZED TRANSFORMERS
These Class 2 battery chargers should be used with the direct
plug-in, Motorola authorized transformers listed below
PMNN4502
IMPRES Lithium Ion 3000T, IP68
PMNN4511
IMPRES Lithium Ion 2900T, IP68
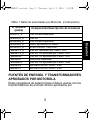
Table 2. Kits/Power Sources/Transformers
Kit Number Power Source
Transformer
(part) Number
AAHTN3000 110–120 Vac
50/60 Hz (U.S. Plug)
2571586S13
AAHTN3001 230Vac (Euro. plug) 2571586S07
AAHTN3002 230Vac (U.K. plug) 2571586S06
HTN3032 230Vac (Argentina plug) 2571586S11
RLN4948 120Vac (U.S. plug) 2580410E01
RLN5255 230Vac (U.K. plug) 2580410E01
RLN5256 230Vac (Euro plug) 2580410E01
PMLN5195 90–264Vac (U.K. plug) 2571886T01
Table 1. Motorola Authorized Batteries
Kit (part)
Number
Battery Chemistry/Description
6881088C11_na.book Page 6 Thursday, April 7, 2016 1:39 PM

7
English
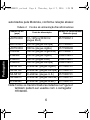
Note: All the transformers listed in Table 2 can also be used with the
HTN9000 charger.
OPERATING INSTRUCTIONS
Single-unit chargers will charge only the Motorola
authorized batteries listed in Table 1 on page 5 Other
batteries may not charge.
The battery charger’s pocket will accommodate
either a radio with a battery attached or a battery
alone. Prior to charging a battery with radio, turn
the radio off. To charge a battery, use the following
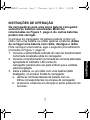
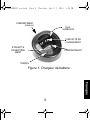
procedure: (Refer to Figure 1, page 8)
1. Plug the round end of the transformer cord into the
socket on the back of the charger.
PMLN5196 90–264Vac (Euro plug) 2571886T01
PMLN5197 90–264Vac (U.S. plug) 2571886T01
PMLN5205 90–264Vac (Aus/NZ plug) 2571886T01
WPLN4282 90–264Vac (Brazil plug) 2571886T01
Table 2. Kits/Power Sources/Transformers
Kit Number Power Source
Transformer
(part) Number
6881088C11_na.book Page 7 Thursday, April 7, 2016 1:39 PM

8
English
2. Plug the transformer into the appropriate ac outlet.
The charger LED will blink green once to indicate
a successful power-up.
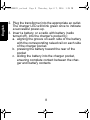
3. Insert a battery, or a radio with battery (radio
turned off), into the charger's pocket by:
a. aligning the groove on each side of the battery
with the corresponding raised rail on each side
of the charger pocket.
b. pressing the battery toward the rear of the
pocket
c. sliding the battery into the charger pocket,
ensuring complete contact between the char-
ger and battery contacts
6881088C11_na.book Page 8 Thursday, April 7, 2016 1:39 PM

9
English
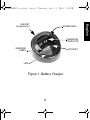
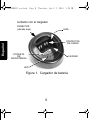
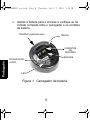
Figure 1. Battery Charger
SOCKET
(located here)
RAISED RAIL
CHARGING
CONTACTS
POCKET
WARNING
LABEL
LED
6881088C11_na.book Page 9 Thursday, April 7, 2016 1:39 PM

10
English
4. When the battery is properly seated in the pocket,
the charger LED will light red to indicate that the
battery is charging rapidly. When the battery is
90% charged, the LED will begin to blink green to
indicate that the battery is trickle charging. When
the battery is fully charged, the LED will change to
a steady green light to indicate that the battery is
fully charged.
Note: Even though new batteries might prematurely
indicate a full charge (steady green LED), charge
the battery for 14 to 16 hours prior to initial use for
best performance.
Batteries will charge best at room temperature.
6881088C11_na.book Page 10 Thursday, April 7, 2016 1:39 PM

11
English
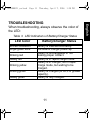
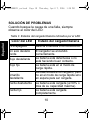
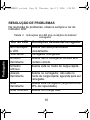
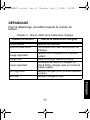
TROUBLESHOOTING
When troubleshooting, always observe the color of
the LED:
Table 3. LED Indications of Battery/Charger Status
LED Color Battery/Charger Status
No LED indication Battery is inserted incorrectly.
Single green blink Successful charger power-up
Blinking red
Battery is unchargeable or not
making proper contact.
Steady red Battery is in rapid-charge mode.
Blinking yellow
Battery is in charger, not in rapid-
charge mode, but waiting to be
charged.
Blinking green Battery is charged (to 90% or greater
capacity).
Steady green Battery is fully charged.
6881088C11_na.book Page 11 Thursday, April 7, 2016 1:39 PM

12
English
No LED Indication?
1. Check that the radio with battery, or the battery
alone, is inserted correctly (refer to step 3 on
pages 7 and 8).
2. Make sure that the transformer is plugged into an
appropriate ac outlet, and that the transformer
cable is plugged securely into the charger socket.
Blinking Red LED Indicator?
1. Remove the battery from the charger, and:
a. make sure that it is a Motorola authorized
battery listed in Table 1 on page 5. Other
batteries may not charge.
b. remove power from the battery charger and,
using a clean dry cloth, clean the gold metal,
charging contacts of the battery and charger.
2. Power up the charger and place the battery back
into the charger pocket. If the LED indicator
continues to blink red, replace the battery.
6881088C11_na.book Page 12 Thursday, April 7, 2016 1:39 PM

13
English
Blinking Yellow LED Indicator?
• the battery temperature may be below 5°C (41°F)
or above 40°C (104°F).
• the voltage may be lower than the predetermined
threshold level for rapid charging.
Note: Rapid charging outside of the stated temperature
and voltage limits can drastically reduce the life
expectancy of the battery.
Note: When the battery charger detects the proper
battery conditions, rapid charging begins
automatically (steady red LED).
SERVICE
The Single-Unit Chargers are not repairable. Order
replacement chargers as necessary.
6881088C11_na.book Page 13 Thursday, April 7, 2016 1:39 PM

14
English
Notes
6881088C11_na.book Page 14 Thursday, April 7, 2016 1:39 PM

1
Español
INSTRUCCIONES DE
SEGURIDAD IMPORTANTES
Este documento contiene instrucciones de
seguridad y de operación importantes. Por favor,
léalas detenidamente y consérvelas para
referencia futura.
Antes de usar el cargador de batería, lea todas las
instrucciones y letreros de precaución ubicadas (1) en el
cargador, (2) en la batería y (3) en el radio con bateria.
ADVERTENCIAS
1.Para reducir el peligro de lesiones,
cargue solamente las baterías
recargables aprobadas por Motorola
que aparecen en la Tabla 1. Otras
baterías podrían explotar y causar
lesiones personales y daños.
2.El uso de accesorios no recomendados
por Motorola podría representar peligro
de incendio, choque eléctrico o lesiones.
ADVERTENCIA
6881088C11_na.book Page 1 Thursday, April 7, 2016 1:39 PM

2
Español
ADVERTENCIAS (continuación)
3.Para reducir el peligro de daños al
enchufe y al cordón eléctrico, tire del
enchufe y no del cordón cuando vaya a
desconectar el cargador.
4.No se debe usar cordones de extensión a
menos que sea absolutamente necesario.
El uso de un cordón de extensión
inadecuado puede representar peligro de incendio y
choque eléctrico. Si es necesario usar un cordón de
extensión, asegúrese de que el calibre del cordón sea
18AWG para longitudes hasta 30,48 m (100 pies), y
16AWG para longitudes hasta 45,72 m (150 pies).
5. Para reducir el peligro de incendio, choque eléctrico o
lesiones, no utilice el cargador si está roto o presenta
señales de algún tipo de daño. Llévelo a un agente de
servizcio autorizado de Motorola.
6. No desarme el cargador; no es reparable y no
conseguirá piezas de repuesto para repararlo.
Desarmar el cargador puede representar peligro de
choque eléctrico e incendio.
7. Para reducir el peligro de choque eléctrico,
desenchufe el cargador del tomacorriente eléctrico
antes de intentar limpiarlo o hacerle mantenimiento.
ADVERTENCIA
6881088C11_na.book Page 2 Thursday, April 7, 2016 1:39 PM

3
Español
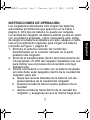
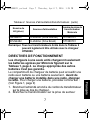
REGLAS DE SEGURIDAD
• Apague el radio cuando esté cargando la batería.
• Este equipo no es adecuado para uso al aire libre. Úselo
únicamente en ambientes secos.
• Conecte el equipo únicamente a una fuente de energía
eléctrica del voltaje adecuado (según se especifica en el
producto) y debidamente protegida con fusible.
Cuando vaya a desconectar el equipo de la fuente de
suministro de energía eléctrica, hágalo desenchufando el
conector del tomacorriente.
• El tomacorriente para conexión del equipo debe estar
ubicado en un sitio cercano y de fácil acceso.
• Los fusibles de reemplazo usados en todo equipo protegido
con fusibles, deberán ser del tipo y capacidad especificados
en las instrucciones que acompañan al equipo.
ADVERTENCIAS (continuación)
8.Este es un producto de clase A. En un
ambiente doméstico este producto puede
causar radio interferencia, en cuyo caso
puede requerirse que el usuario tome
medidas al efecto.
ADVERTENCIA
6881088C11_na.book Page 3 Thursday, April 7, 2016 1:39 PM

4
Español
• La temperatura ambiente alrededor de la fuente de
alimentación no deberá exceder de 40°C (104°F).
• La potencia de salida de la fuente de alimentación no deberá
exceder la capacidad especificada en la etiqueta del producto
localizado en la parte inferior del cargador.
• Al elegir el sitio de instalación del cordón, asegúrese de que
sea un lugar donde no puedan pisarlo o pasarle por encima, y
donde esté resguardado del agua, tensión mecánica y
cualquier otro tipo de daño.
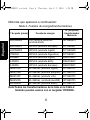
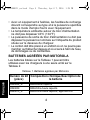
BATERÍAS AUTORIZADAS POR MOTOROLA
Las baterías que aparecen en la Tabla 1 están aprobadas
para uso con los cargadores individuales en la Tabla 2.
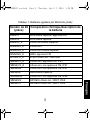
Tabla 1. Baterías autorizadas por Motorola
Nº de parte
(pieza)
Composición/descripción de la batería
HNN9008_R NiMH/alta capacidad
HNN9009 NiMH/ultra alta capacidad
HNN9010_R NiMH/ultra alta capacidad, aprobado por Factory
Mutual Research Corp. (FMRC)
HNN9011 NiCd/alta capacidad, aprobado por FMRC
HNN9012 NiCd/alta capacidad
6881088C11_na.book Page 4 Thursday, April 7, 2016 1:39 PM
La page est en cours de chargement...
La page est en cours de chargement...
La page est en cours de chargement...
La page est en cours de chargement...
La page est en cours de chargement...
La page est en cours de chargement...
La page est en cours de chargement...
La page est en cours de chargement...
La page est en cours de chargement...
La page est en cours de chargement...
La page est en cours de chargement...
La page est en cours de chargement...
La page est en cours de chargement...
La page est en cours de chargement...
La page est en cours de chargement...
La page est en cours de chargement...
La page est en cours de chargement...
La page est en cours de chargement...
La page est en cours de chargement...
La page est en cours de chargement...
La page est en cours de chargement...
La page est en cours de chargement...
La page est en cours de chargement...
La page est en cours de chargement...
La page est en cours de chargement...
La page est en cours de chargement...
La page est en cours de chargement...
La page est en cours de chargement...
La page est en cours de chargement...
La page est en cours de chargement...
La page est en cours de chargement...
La page est en cours de chargement...
La page est en cours de chargement...
La page est en cours de chargement...
La page est en cours de chargement...
La page est en cours de chargement...
-
 1
1
-
 2
2
-
 3
3
-
 4
4
-
 5
5
-
 6
6
-
 7
7
-
 8
8
-
 9
9
-
 10
10
-
 11
11
-
 12
12
-
 13
13
-
 14
14
-
 15
15
-
 16
16
-
 17
17
-
 18
18
-
 19
19
-
 20
20
-
 21
21
-
 22
22
-
 23
23
-
 24
24
-
 25
25
-
 26
26
-
 27
27
-
 28
28
-
 29
29
-
 30
30
-
 31
31
-
 32
32
-
 33
33
-
 34
34
-
 35
35
-
 36
36
-
 37
37
-
 38
38
-
 39
39
-
 40
40
-
 41
41
-
 42
42
-
 43
43
-
 44
44
-
 45
45
-
 46
46
-
 47
47
-
 48
48
-
 49
49
-
 50
50
-
 51
51
-
 52
52
-
 53
53
-
 54
54
-
 55
55
-
 56
56


dans d''autres langues
- English: Motorola HTN9000 User manual
- español: Motorola HTN9000 Manual de usuario
- português: Motorola HTN9000 Manual do usuário
Documents connexes
-
Motorola WPLN4117 Mode d'emploi
-
Motorola WPLN4279 Manuel utilisateur
-
-
-
-
-
Motorola RLN6434 Mode d'emploi
-
Motorola IMPRES NNTN7595 Manuel utilisateur
-
-