Sigma BC 1106L DTS Installation Instructions Manual
- Catégorie
- Accessoires de vélo
- Taper
- Installation Instructions Manual

Contents / Contenu / Contenudo Installation / Montage / Montaje Installation of mounting bracket Montage du support / Montaje del soporte de bicicleta
1 2
Installation of mounting bracket Installation of magnet / Montage de l'aimant / Montaje del imán
5
Installation of speed transmitter Montage de l'émett. Vit. / Montaje del emisor de velocidad
1
Installation of speed transmitter
5
Mode / Reset Pairing / Connection / ApareadoPairing / Connection / Apareado
3 4 6 1
2 1
KMH/MPH entryRéglage KMH/MPH / Introducción KMH/MPH
UF
E
Wheel size entry Circonférence de roue / Dimensiones de la rueda
U F
E
Measure wheel sizeMesurer la roue / Dimensiones de la rueda
UF
E
Time entryRéglage heure / Introducir la hora
UF
E
Total data entryRéglage des valeurs totales / Datos totales
UF
E
Contrast entryRéglage contraste / Introducción contraste
UF
E
Language EntryRéglage langue / Introducir el idioma
UF
E
Wheel size entryCirconférence de roue / Dimensiones de la rueda
UF
E
G E R M A N Y
42 mm
32 mm
Basic settingsRéglages de base / Ajustes básicos
UF
E
Wheel Size Chart (Wheel Size)Wheel Size Chart (Circonférence de roue / Tamaño de rueda)
AC
B
Changing modesChangement d’affichage / Cambio de visualización
UF
E
Installation of speed transmitter Montage de l'émett. Vit. / Montaje del emisor de velocidad
3 4
2x
Left side Right side
Grey, gris
optional Bike 2
Ref. No. 00405
Pairing / Connection / ApareadoPairing / Connection / ApareadoPairing / Connection / Apareado
Installation of Bike Computer
U
F
E
F E
UFE
Pairing / Connection / Apareado
Observaciones generalesE
Cambio de la pila
Solución de problemasE
Remarques générales F Changement de batterie Solution aux problèmes FGeneral remarks U Trouble Shooting UChange batteryTechnical Data / Données techniques / Datos técnicos
U F
E
Technical data / Données techniques / Datos técnicos
Comparison speedComparaison de la vitesse / Comparación velocidad
UF
E
Reset Remise à zéro / Puesta a cero
U F
E
Assembly 2nd wheel Montage 2ème roue / Montaje 2ª rueda
U F
E
optional Bike 2
Ref. No. 00405
Grey, gris
Bike 1
+
2. KMH / MPH
•Press MODE button until KMH / MPH is displayed.
•Press SET button briefly, KMH or MPH is displayed and
flashing.
•Select MPH or KMH with MODE button.
•Confirm by pressing SET button briefly.
2. KMH / MPH
•A l'aide de la touche MODE changer le réglage KMH/MPH.
•Appuyer brièvement sur la touche SET.
•KMH ou MPH apparaît sur l'écran et clignote.
•Régler MPH ou KMH à l'aide de la touche MODE.
•Confirmer par la touche SET.
2. KMH / MPH
•Con la tecla MODE cambiar a la introducción de KMH/MPH
•Pulsar la tecla SET brevemente.
•En la pantalla aparece KMH o MPH y parpadea.
•Con la tecla MODE ajustar MPH o KMH.
•Confirmar con la tecla SET.
3. Wheel size BIKE 1
• Press MODE button to change to WS BIKE 1.
• Press SET button briefly and the first digit flashes.
• Change the number by pressing RESET button, change to
next digit by pressing mode. Repeat with next 3 numbers
until desired wheel size is entered.
• Confirm by pressing SET button briefly.
3. Circonférence de la roue VELO 1
• A l'aide de la touche MODE passer à VELO 1.
• Appuyer brièvement sur la touche SET, le premier chiffre
à entrer clignote.
• Régler la valeur à l'aide de la touche REMISE A ZERO,
passer au prochain chiffre à l'aide de la touche MODE.
• Le vélo 1 est toujours celui avec l'emetteur vélo 1
3. Dimensiones de la rueda BICICLETA 1
• Con la tecla MODE cambiar a BICICLETA 1.
• Pulsar brevemente la tecla SET, la primera cifra de
introducción parpadea.
• Con la tecla RESET ajustar el valor, con la tecla MODE
cambiar a la siguiente cifra.
• La bicicleta 1 es siempre la bicicleta con emisor rueda 1
•A partir de la tabla C "Wheel Size Chart" (véase la página
siguiente) determinar el valor correspondiente al tamaño
de la rueda. Introducir este valor.
•Alternativa: calcular/ determinar el tamaño de la rueda
(tabla A o tabla B)
•Tras la última cifra confirmar con la tecla SET.
•Determine the correct value for your wheel size from
Table C “Wheel Size Chart” (refer to next page).
•Alternative: calculate wheel size using formula Tab A or
Tab B.
•Déterminer la valeur correspondant à votre circonférence
de roue à partir du tableau C "Wheel Size Chart" (voir
page suivante). Entrer cette valeur.
•Alternative: calculer/déterminer WS (Tab. A ou tab. B).
•Après le dernier chiffre, confirmer par la touche SET.
You can enter TOTAL ODO (miles) miles and TOTAL times
from your previous computer.
Note – This step is not necessary if previous data from
another computer is not desired(skip to step 8).
6. Enter TOTAL ODO (miles)
•Press MODE button until TOTAL ODO is displayed.
•Press SET button briefly and the first digit will flash.
•Press RESET button to change each digit.
•Press MODE button to advance to next number.
•Repeat until desired number is entered.
•Confirm by pressing the SET button briefly.
7. Enter TOTAL TIME
•Press MODE button until TOTAL TIME is displayed
•Press SET button briefly and the first digit will flash.
•Press RESET button to change each digit.
•Press MODE button to advance to next number.
•Repeat until desired number is entered
•Confirm by pressing the SET button briefly.
6. KM-VELO 1/2
7. TEMPS VELO 1/2
•Réglage identique à la circonférence de la roue. Ici, vous
pouvez transférer la distance totale en km, par exemple
lors de l'achat de cet appareil, à partir d'un autre
compteur.
6. KM RUEDA 1/2
7. TIEMPO RUEDA 1/2
•Introducción como en las dimensiones de la rueda. Aquí se
puede transferir el número total de km p.ej. en caso de
compra del aparato de otro ordenador de bicicleta.
8. Contrast
•Press MODE button until contrast is displayed.
•Press SET button briefly and the display flashes.
•Set the value by pressing RESET button.
1 = light 3 = dark
•Confirm by pressing the SET button.
When you are finished entering the basic setting, press and
hold SET button for 3 seconds to exit set-up mode.
8. Contraste
•Appuyer sur la touche MODE1 jusqu'à ce que CONTRASTE
apparaisse.
•Appuyer brièvement sur la touche SET, le réglage clignote.
•A l'aide de la touche REMISE A ZERO/MODE2 régler la
valeur (1 = faible, 3 = fort). Confirmer avec la touche SET.
8. Contraste
•Pulsar la tecla MODE1 hasta que aparezca CONTRASTE.
•Pulsar brevemente la tecla SET, la introducción parpadea.
•Con la tecla RESET/MODE2 ajustar el valor (1=débil
3= fuerte). Confirmar con la tecla SET.
1. Set language
•Press MODE button until LANGUAGE is displayed
•Press the SET button briefly, the display flashes. Set the
desired language using the MODE button and confirm by
pressing SET button briefly.
4. Wheel size BIKE 2
This computer can be programmed for two bikes, if you are
only using this computer for one bike, skip this step and go
to step 5.
Changing between WHEEL SIZE 1 and WHEEL SIZE 2
occurs automatically simply by changing from bike 1
transmitter (grey button) to the optional Bike 2 transmitter
(red button).
•Press MODE button to change to WS BIKE 2.
•Press SET button briefly and the first digit flashes.
•Change the number by pressing RESET button.
•Change to next digit by pressing MODE button. Repeat
with next 3 numbers until desired wheel size is entered.
•Confirm by pressing SET button briefly.
4. Circonférence de la roue VELO 2
•A l'aide de la touche MODE passer au VELO 2.
•Appuyer brièvement sur la touche SET, le premier chiffre à
entrer clignote.
•Réglage comme pour le VELO 1 : régler les valeurs à l'aide
de la touche RESET, passer au prochain chiffre à l'aide de la
touche MODE.
•Le vélo 2 est toujours celui avec l'émetteur vélo 2
4. Dimensiones de la rueda BICICLETA 2
•Con la tecla MODE cambiar a BICICLETA 2.
•Pulsar brevemente la tecla SET, la primera cifra de introducción parpadea.
•Introducción como en RUEDA 1: Con las teclas RESET ajustar los valores,
con la tecla MODE cambiar a la cifra siguiente, etc.
•La bicicleta 2 es siempre la bicicleta con emisor rueda 2
SET
BIKE COMPUTER
TOPLINE
B C 1 1 0 6 L D T S
SIGMA BIKE COMPU TE R
BC 1106L DTS
W W W. S I G M A S P O R T. CO M
W W W. S I G M A S P O R T. CO M
SIGMA USA:
North America
1067 Kingsland Drive
Batavia, IL 60510, USA
Tel. +1-630-761-1106
Fax +1-630-761-1107
Toll Free: 888-744-6277
SIGMA EUROPA:
SIGMA Elektro GmbH
Dr.- Julius - Leber - Straße 15
D-67433 Neustadt a.d.W.
Tel. +49-(0)6321-9120-118
Fax +49-(0)6321-9120-34
SIGMA ASIA:
Asia, Australia, South America
7F-1, No. 193, Ta-Tun 6th Street,
Taichung City, Taiwan
Tel. +886-4-2475 3577
Fax +886-4-2475 3563
32-630
28-630
40-622
47-622
40-635
37-622
18-622
20-622
23-622
25-622
28-622
32-622
37-622
40-622
27x1 1/4
27x1 1/4 Fifty
28x1.5
28x1.75
28x1 1/2
28x1 3/8x1 5/8
700x18C
700x20C
700x23C
700x25C
700x28C
700x32C
700x35C
700x40C
2199
2174
2224
2268
2265
2205
2102
2114
2133
2146
2149
2174
2205
2224
kmh
mph
47-305
47-406
37-540
47-507
23-571
40-559
44-559
47-559
50-559
54-559
57-559
37-590
37-584
20-571
16x1.75x2
20x1.75x2
24x1 3/8 A
24x1.75x2
26x1
26x1.5
26x1.6
26x1.75x2
26x1.9
26x2.00
26x2.125
26x1 3/8
26x1 3/8x1 1/2
26x3/4
1272
1590
1948
1907
1973
2026
2051
2070
2089
2114
2133
2105
2086
1954
ETRTO
kmh
mph
ETRTO
km/h:
WS = mm x 3.14
mph:
WS = mm x 3.14
km/h:
WS = mm
mph:
WS = mm
Printed in USA
~20 sec
A
Test: Battery
Max. 20 mm
• MODE: appel des fonctions
• RESET: remise à zéro des fonctions
DISTANCE JOURNALIERE, TEMPS PARCOURU, Ø KMH et MAX. KMH
• MODE: Activar las funciones
• RESET: Restablecimiento de las funcion.
KM DIARIOS, DURACIÓN DEL TRAYECTO, PROMEDIO KMH y KMH MÁX. a cero
• MODE: Change the functions
• RESET: Reset the functions
DAILY KM/M, TRIP TIME, AVERAGE SPEED and MAX SPEED to zero
MODE
>3 sec = RESET
TRIP DIST
TRIP TIME
AVG. SPEED
MAX. SPEED
CLOCK
TOTAL ODO*
TOTAL TIME*
TRIP DIST
TRIP TIME
AVG. SPEED
MAX. SPEED
MODE
>3 sec = RESET
KM JOUR
TEMPS PARC
VIT MOYEN.
VIT MAXI
HEURE
KM TOTAL*
TEMPSTOTAL*
KM JOUR
TEMPS PARC
VIT MOYEN.
VIT MAXI
MODE
>3 sec = RESET
KM DIA
TIEMPO PAR
VEL MEDIA
VEL MAXIMA
HORA
KM TOTAL*
TIEMPO TOT*
KM DIA
TIEMPO PAR
VEL MEDIA
VEL MAXIMA
How to change modes
•Press MODE button until the desired function is displayed
(TRIP DISTANCE, TRIP TIME, AVG. SPEED, MAX. SPEED,
CLOCK, TOTAL ODO, TOTAL TIME)
•While riding the TOTAL ODO and TOTAL TIME functions
are hidden.
Affichage des fonctions
•Appuyer sur la touche MODE jusqu'à ce que la fonction
souhaitée soit affichée (DISTANCE JOURNALIERE, TEMPS
PARCOURU, MOYENNE KMH, MAX.KMH, HEURE,
DISTANCE TOTALE EN KM, TEMPS TOTAL).
•Pendant la conduite, DISTANCE TOTALE et TEMPS TOTAL
ne sont pas affichés (moins de clics de touche lors de la
conduite).
Indicación de las funciones
•Pulsar la tecla MODE hasta que se muestre la función deseada (KM DIARIOS,
DURACIÓN DEL TRAYECTO, PROMEDIO KMH, KMH MÁX., HORA, KM
TOTALES, TIEMPO TOTAL).
•durante la carrera no se muestran KM TOTALES y TIEMPO TOTAL (menos
pulsaciones de teclas durante la carrera).
SET > 3 sec
•Press SET button for 3 sec. to enter set-up mode (SET
will appear in upper right hand corner of display when in
set-up mode, you must be in set-mode to perform steps
1-8).
•Use the set-up mode to change language, KMH/MPH,
wheel size, time, total odo, total time, and contrast.
•After changing the battery, only the time and contrast
have to be entered.
•Appuyer sur la touche SET 3 sec pour effectuer les réglages de base
suivants : langue, changement entre kmh/mph, circonférence de la
roue 1 et 2, heure, distance totale, temps total et contraste de l'écran.
Fin du menu réglage en appuyant 3 sec sur la touche SET. Après le
changement de la pile, seule l'heure et le contraste de l'écran doivent
être à nouveau rentrés.
•Pulsar la tecla Set durante 3 segundos para realizar los siguientes ajustes
básicos: idioma, cambio entre kmh/mph, dimensiones de la rueda 1 y 2,
hora, km totales, hora total y contraste de pantalla. Finalice el menú de
introducción pulsando durante 3 segundos la tecla SET. Tras un cambio de
la pila deben introducirse solo la hora y el contraste de la pantalla.
1. Régler la langue
•Appuyer sur la touche MODE jusqu'à ce que LANGUE
apparaisse sur l'écran.
•Appuyer brièvement sur la touche SET, l'affichage clignote.
Régler la langue souhaitée à l'aide de la touche MODE et
confirmer par la touche SET.
1. Ajustar el idioma
•Pulsar la tecla MODE hasta que aparezca IDIOMA en la
pantalla.
•Pulsar brevemente la tecla SET, la indicación parpadea.
Con la tecla MODE ajustar el idioma seleccionado y
confirmar con la tecla SET.
MODE
MODE
MODE
RESET
RESET
5. Time
(24 hr clock will display when using KMH, 12 hr clock will
display when using MPH)
•Press MODE button until TIME is displayed.
•Press the SET button briefly and the hour digit flashes.
•Change the hour with the RESET button.
•Advance to minutes by pressing MODE button.
•Change the minutes with the RESET button.
•Confirm by pressing the SET button briefly.
5. Heure (kmh = 24 h / mph = 12 h)
•Appuyer sur la touche MODE jusqu'à ce qu'HEURE apparaisse.
•Appuyer brièvement sur la touche SET, l'entrée clignote.
•Régler les heures à l'aide de la touche REMISE A ZERO. A
l'aide de la touche MODE passer au réglage des minutes.
•Régler les minutes à l'aide de la touche REMISE A ZERO.
Confirmer par la touche SET.
5. Hora (kmh = 24 h / mph = 12 h)
•Pulsar la tecla MODE hasta que aparezca HORA.
•Pulsar brevemente la tecla SET, la introducción parpadea.
•Con la tecla RESET ajustar el valor, con la tecla MODE
cambiar a la siguiente cifra.
•Con la tecla RESET ajustar los minutos. Confirmar con la
tecla SET.
MODE
MODE
•After installing the bike computer into mounting bracket, SPEED display will
blink ZERO.
•There are two ways to pair your transmitter and computer.
•1. Ride. After 20 seconds (max 5 min.) the receiver will pair with
transmitter and data will be displayed.
•2. Spin front wheel until speed display stops blinking (A).
•After 5 min. without transmission, BC 1106 DTS will go into sleep mode.
(Time of Day and Model name shown in the display). Press any button to
re-activate the computer. A short pairing will find the transmitter.
•Removing the BC 1106 DTS from the mounting bracket will end the paired
connection.
•If “TOO MANY SIGNALS” message is displayed: lengthen the distance of all
transmitters and press any button to continue. Pairing will begin again.
•Monter le compteur sur son support. Le zéro de la vitesse clignote
•Il y a deux possibilités pour connecter la vitesse et la cadence:
1.Rouler, après env. 20 secondes (max. 5 min.) le récepteur s'est connecté
avec l'émetteur, les données sont affichées.
2.Fiare tourner la roue avant jusqu'à ce que l'affichage de la vitesse ne
clignote plus (A).
ATTENTION:
•Après plus de 5 minutes de pause le BC 1106 DTS se met en mode repos
(affichage de l'heure et du nom du modèle). Pour ré-activer le compteur
appuyer sur une touche quelconque, il s'établit alors une connection courte
pour rechercher le(s) émetteur(s)
•Lorsque l'on sort le BC 1106 DTS de son support, la connection est arrêtée.
•TOO MANY SIGNALS s'affiche: Augmenter la distance par rapport aux
autres vélos et appuyer sur une touche quelconque. La connection
recommence.
•Encajar el BC 1106 DTS sobre el soporte. El cero de las indicaciones de
velocidad parpadea
•Hay dos posibilidades de emparejar la velocidad:
1.Arrancar, después de aprox. 20 segundos (max. 5 min) el receptor se ha
sincronizado con el receptor y se muestran los datos.
2.Girar la rueda delantera hasta que deje de parpadear la indicación de KMH
(A).
ATENCIÓN:
•Después de 5 minutos de pausa, el BC 1106 DTS pasa al modo de
espera (la hora y el nombre del modelo en la pantalla). Al pulsar cualquier
tecla se inicia un apareado corto para encontrar el emisor.
•Al retirar el BC 1106 DTS del soporte se desconecta la desconexión.
•Indicación TOO MANY SIGNALS (demasiadas señales): Aumentar la
distancia con otros emisores y pulsar cualquier tecla. El apareado se inicia
de nuevo.
~20 sec
A
~20 sec
A
mm x 3.14
note: 1 inch = 25.4 mm
Pila:
1 pila de litio tipo botón 2032, 3V
El cambio de pila se muestra en la pantalla.
Cambio de pila
• Si se cambia la pila DIMENSIONES DE LA
RUEDA, IDIOMA, KMH/MPH, KM
TOTALES y TIEMPO TOTAL permanecen
guardadas y no deben ser introducidas
de nuevo.
• Respetar el + y el -. Con el
compartimento de la batería abierto
tiene que verse el + de la pila.
•Si la junta de estanquidad está
desplazada, volver a colocarla.
• Tras el cambio de pila debe introducirse
de nuevo la hora.
Garantía
Nos responsabilizamos de las deficiencias
frente a nuestro socio contractual según
lo dispuesto en los reglamentos legales.
Ordenador:
Abrir la tapa con una moneda.
¡Prestar atención
a la polaridad"
Emisor:
Abrir la tapa con una herramienta.
¡Retirar la pila de la tapa!
¡Prestar atención a la polaridad!
KMH sin indicación
•¿Se utiliza el soporte antiguo del manillar
con la transmisión por radio (RDS)?
•¿Está el ordenador correctamente
encajado sobre el soporte?
•¿Se han comprobado la oxidación /
corrosión de los contactos?
•¿Distancia entre imán y sensor?
(máx. 20 mm)
•¿Se ha comprobado si el imán está
imantado?
•¿2 imanes montados?
•¿Imán posicionado correctamente?
•¿Dimensiones de la rueda (WS) mal
ajustadas?
•¿Se ha montado el emisor correcto en el
cambio de bicicleta?
Los KMH están mal indicados
Indicación en pantalla oscura o lenta
•Temperatura demasiado alta (>60° C) o
demasiado baja (<0° C)
Sin indicación en pantalla
(indicación vacía)
•Comprobar la pila
•Pila bien colocada (+ y -)
•¿Es correcto el contacto de la pila?
(comprobar con cuidado)
Ningún apareado
•Comprobar la distancia emisor/imán
•Pila del emisor vacía
•Activar el ordenador pulsando
•Comprobar alcance
•Modificar la posición del emisor al
emplear un dínamo de cubo
Indicación TOO MANY SIGNALS
(demasiadas señales):
•Aumentar la distancia con otros
emisores y pulsar una tecla
Pile:
1 pile-bouton lithium 2032, 3V
Le changement de pile est affiché est
affiché sur l'écran.
Changement de pile
• En cas de changement de pile,
CIRCONFERENCE DE LA ROUE 1/2,
LANGUE, KMH/MPH, DISTANCE TOTALE
et TEMPS TOTAL restent en mémoire et
ne doivent pas être à nouveau rentrés.
• Faire attention au plus et au moins, lorsque
le compartiment de la pile est ouvert,
vous devez voir le côté PLUS de la pile !
• En cas de déplacement du joint
d'étanchéité, le remettre en place.
• Après le changement de la pile, seul
l'heure et le contraste doivent être
à nouveau rentrés.
Garantie
Nous sommes responsables, vis-à-vis de
notre partenaire contractuel respectif, des
vices conformément aux prescriptions légales.
Les piles sont exclues de la garantie.
Compteur:
Ouvrir le couvercle avec une pièce
Attention à la
polarité!
Emetteur:
Ouvrir le couvercle avec
l'outil prévu à cet effet.
Enlever la pile du couvercle!
Attention à la polarité!
Pas d'affichage kmh
• Ancien système sans fil sur le vélo?
• Compteur bien enclenché sur le support?
• Corrosion/oxidation sur les contacts?
• Distance aimant/émetteur?
(max. 20 mm)
• Aimant magnétisé?
• 2 aimant montés?
• Aimant bien positionné?
• Circonférence de la roue (WS) bien
programmè?
• Montage du bon émetteur lors d'un
changement de vélo?
Mauvais affichage de la vitesse
Affichage noir/lent
• Température trop haute (>60°C)
ou trop basse (<0°C)
Pas d'affichage (écran vide)
• Vérifier l'état de la pile
• Pile bien mise (plus et moins)
• Contacts ok? (tordre en faisant attention)
Pas de connection
• Vérifier la distance aimant/émetteur
• Les piles de l'émetteur sont vides
• Activer le compteur en appuyant sur
une touche
• Vérifier la distance émetteur/récepteur
• Si vous utilisez une dynamo-moyeu,
changer la position de l'émetteur
Affichage TOO MANY SIGNALS
• Augmenter la distance avec les autres
vélos et appuyer sur une touche
quelconque.
Battery:
1 lithium button cell 2032, 3V
Battery change is displayed on screen.
Change batteries:
• WHEEL SIZES 1+2, LANGUAGE,
KMH/MPH, TOTAL KM and TOTAL
TIME remain saved even when the
battery is changed.
• Observe direction of plus and minus
poles; when the compartment is open
you must see the PLUS side of the
battery!
• If sealing ring is loose, re-insert it.
• After changing the battery only the
time and the contrast must be re-
entered.
Warranty
We are liable to our contracting partners
for defects as defined by law. Batteries
are excluded from the guarantee.
No display of MPH
• Using an old RDS mounting bracket?
• Check that the Bike Computer is properly
engaged in the bracket.
• Check contacts for corrosion/oxidation.
• Check distance between magnet and sensor
(max. 20 mm using Sigma's Power Magnet)
• Check if magnet is magnetized
• 2 magnets installed?
• Magnet in the right position?
• Wheel size programmed incorrectly?
• In case of you switched bikes - are you mounting
the correct transmitter?
False display of MPH
Display is black or weaken?
• Temperature too high (>60 °C) or too low (<0°C)
No Display (screen blank)
• Check Battery
• Check plus and minus poles
• Battery contact ok? (bend carefully!)
No Pairing
• Check distance between transmitter /
magnet (20mm or less with power
magnet)
• Press battery check button on
transmitter
• Activate computer by pressing any
button
• Check distance between transmitter
and receiver (max distance 90cm)
• If using a dynamo hub, change location
of transmitter.
TOO MANY SIGNALS is shown:
• Extend the distance between
transmitters and press any button
on computer to continue
Computer:
Open the top cover with a coin
Pay attention to
polarity!
Transmitter:
Open top cover with tool
Take the battery out of the top cover!
Pay attention to polarity!
Speed
TRIP DIST
TRIP TIME
ODO BIKE
TIME BIKE
WS BIKE 1/2
Vitesse
KM JOUR
TEMPS PARC
KM TOTAL
TEMPSTOTAL
CIRCONFERENCE
DE LA ROUE 1/2
Velocidad
KM DIA
TIEMPO PAR
KM TOTAL
TIEMPO TOT
DIMENSIONES
DE LA RUEDA
1/2
0.0
0.00
0:00:00
0
0:00
2,155
Default Max Units
199.5
9,999.9
999:59
99,999
9,999
3,999
kmh/mph
km/mi
h:mm:ss hh:mm hhh:mm
km/mi
h:mm hh:mm hhh:m h.hhh
mm
Speed Comparison (pace arrow)
Comparison of current speed to average speed.
•If your current speed is equal to your average speed is
shown, if lower is shown, and if higher is shown.
Vitesse/vitesse moyenne
•En cas de vitesse à peu près similaire s'affiche, en cas
de vitesse plus faible et plus élevée .
•L'affichage est effectué pour toutes les fonctions sauf
dans les réglages de base.
Velocidad / velocidad media
•En caso de velocidad casi igual se muestra , en caso de
velocidad menor y velocidad mayor .
•La indicación se realiza en todas las funciones excepto en
los ajustes básicos.
Reset
Reset Trip distance, Trip time, Average speed, and
Max speed to zero.
• Press MODE button until the desired function to zero out
displayed.
• Press and hold RESET button. The display will flash and
after 2 seconds the displayed function will clear.
• Holding RESET button longer than 4 seconds will zero out
Trip distance, Trip time, Average speed, and Max speed
functions at the same time.
Remise à zéro de l'affichage
• Appuyer sur la touche MODE jusqu'à ce que la fonction
souhaitée apparaisse. Maintenir appuyée la touche REMISE
A ZERO. L'affichage clignote. Au bout de 2 sec, seule la
fonction affichée est remise à 0.
• Appuyer sur la touche REMISE A ZERO pendant plus de 4
sec remet à zéro les affichages de DISTANCE
JOURNALIERE, TEMPS PARCOURU, Ø KMH, MAX KMH.
Restablecer las indicaciones
• Pulsar la tecla MODE hasta que aparezca la función
deseada.
• Mantener pulsada la tecla RESET. La indicación parpadea.
Tras 2 segundos se restablece la función indicada a 0.
• Pulsar la tecla RESET durante más de 4 segundos
establece las indicaciones de KM DIARIOS, DURACIÓN DEL
TRAYECTO, PROMEDIO KMH, KMH MÁX. en cero.
> 2 sec
> 3,5 sec
Switching between WHEEL 1 and WHEEL 2 is automatic.
You must install (optional) transmitter of Bike 2 (red
button).
• It is no longer possible to change by making an entry.
Le changement entre la ROUE 1 et la ROUE 2 est effectué
automatiquement. Il faut utiliser l'émetteur vélo 2 (en
option) avec la touche rouge.
• Un changement manuel n'est plus possible.
El cambio entre la RUEDA 1 y RUEDA 2 se realiza
automáticamente. Debe emplearse el emisor (opcional)
rueda 2 (tecla roja).
• Ya no es posible un cambio por introducción.
4 x
90°
4 x
Bike 1
Wheel Size Chart
go to
step 3
go to
step 2
The harness comes ready to mount on your handlebars.
To mount on a stem, remove the 4 screws on the back of the harness, turn base 90 degrees.
stem mount
remove yellow tape
the SIGMA logo on the harness must
always face the front of the bike.
Foam pad included for
use with bladed spokes
To reach the required 20mm or less, move magnet
and transmitter towards center of wheel.
Note: 20mm = 3/4 inches
32
42
?
handlebar
or
stem
Red, rouge
2 mm
Red, rouge
* not while riding * pas pendant
la conduite
*no durante
la carrera
12:23
12:23
12:25
00.200
00.000
00.200
3
2
Bike 1
+

Contents / Contenu / Contenudo Installation / Montage / Montaje Installation of mounting bracket Montage du support / Montaje del soporte de bicicleta
1 2
Installation of mounting bracket Installation of magnet / Montage de l'aimant / Montaje del imán
5
Installation of speed transmitter Montage de l'émett. Vit. / Montaje del emisor de velocidad
1
Installation of speed transmitter
5
Mode / Reset Pairing / Connection / Apareado Pairing / Connection / Apareado
3 4 5 2 3 4 6
3 4 6 1
2 1
KMH/MPH entryRéglage KMH/MPH / Introducción KMH/MPH
UF
E
Wheel size entry Circonférence de roue / Dimensiones de la rueda
U F
E
Measure wheel size Mesurer la roue / Dimensiones de la rueda
U F
E
Time entryRéglage heure / Introducir la hora
UF
E
Total data entryRéglage des valeurs totales / Datos totales
UF
E
Contrast entryRéglage contraste / Introducción contraste
UF
E
Language EntryRéglage langue / Introducir el idioma
UF
E
Wheel size entryCirconférence de roue / Dimensiones de la rueda
UF
E
42 mm
32 mm
Basic settingsRéglages de base / Ajustes básicos
UF
E
Wheel Size Chart (Wheel Size)Wheel Size Chart (Circonférence de roue / Tamaño de rueda)
AC
B
Changing modesChangement d’affichage / Cambio de visualización
UF
E
Installation of speed transmitter Montage de l'émett. Vit. / Montaje del emisor de velocidad
3 4
2x
Left side Right side
Grey, gris
optional Bike 2
Ref. No. 00405
Pairing / Connection / ApareadoPairing / Connection / ApareadoPairing / Connection / Apareado
Installation of Bike Computer
U
F
E
F E
UFE
Pairing / Connection / Apareado
Observaciones generalesE
Cambio de la pila
Solución de problemasE
Remarques générales F Changement de batterie Solution aux problèmes FGeneral remarks U Trouble Shooting UChange batteryTechnical Data / Données techniques / Datos técnicos
U F
E
Technical data / Données techniques / Datos técnicos
Comparison speedComparaison de la vitesse / Comparación velocidad
UF
E
Reset Remise à zéro / Puesta a cero
U F
E
Assembly 2nd wheel Montage 2ème roue / Montaje 2ª rueda
U F
E
optional Bike 2
Ref. No. 00405
Grey, gris
Bike 1
+
2. KMH / MPH
•Press MODE button until KMH / MPH is displayed.
•Press SET button briefly, KMH or MPH is displayed and
flashing.
•Select MPH or KMH with MODE button.
•Confirm by pressing SET button briefly.
2. KMH / MPH
•A l'aide de la touche MODE changer le réglage KMH/MPH.
•Appuyer brièvement sur la touche SET.
•KMH ou MPH apparaît sur l'écran et clignote.
•Régler MPH ou KMH à l'aide de la touche MODE.
•Confirmer par la touche SET.
2. KMH / MPH
•Con la tecla MODE cambiar a la introducción de KMH/MPH
•Pulsar la tecla SET brevemente.
•En la pantalla aparece KMH o MPH y parpadea.
•Con la tecla MODE ajustar MPH o KMH.
•Confirmar con la tecla SET.
3. Wheel size BIKE 1
• Press MODE button to change to WS BIKE 1.
• Press SET button briefly and the first digit flashes.
• Change the number by pressing RESET button, change to
next digit by pressing mode. Repeat with next 3 numbers
until desired wheel size is entered.
• Confirm by pressing SET button briefly.
3. Circonférence de la roue VELO 1
• A l'aide de la touche MODE passer à VELO 1.
• Appuyer brièvement sur la touche SET, le premier chiffre
à entrer clignote.
• Régler la valeur à l'aide de la touche REMISE A ZERO,
passer au prochain chiffre à l'aide de la touche MODE.
• Le vélo 1 est toujours celui avec l'emetteur vélo 1
3. Dimensiones de la rueda BICICLETA 1
• Con la tecla MODE cambiar a BICICLETA 1.
• Pulsar brevemente la tecla SET, la primera cifra de
introducción parpadea.
• Con la tecla RESET ajustar el valor, con la tecla MODE
cambiar a la siguiente cifra.
• La bicicleta 1 es siempre la bicicleta con emisor rueda 1
• A partir de la tabla C "Wheel Size Chart" (véase la página
siguiente) determinar el valor correspondiente al tamaño
de la rueda. Introducir este valor.
• Alternativa: calcular/ determinar el tamaño de la rueda
(tabla A o tabla B)
• Tras la última cifra confirmar con la tecla SET.
• Determine the correct value for your wheel size from
Table C “Wheel Size Chart” (refer to next page).
• Alternative: calculate wheel size using formula Tab A or
Tab B.
• Déterminer la valeur correspondant à votre circonférence
de roue à partir du tableau C "Wheel Size Chart" (voir
page suivante). Entrer cette valeur.
• Alternative: calculer/déterminer WS (Tab. A ou tab. B).
• Après le dernier chiffre, confirmer par la touche SET.
You can enter TOTAL ODO (miles) miles and TOTAL times
from your previous computer.
Note – This step is not necessary if previous data from
another computer is not desired(skip to step 8).
6. Enter TOTAL ODO (miles)
•Press MODE button until TOTAL ODO is displayed.
•Press SET button briefly and the first digit will flash.
•Press RESET button to change each digit.
•Press MODE button to advance to next number.
•Repeat until desired number is entered.
•Confirm by pressing the SET button briefly.
7. Enter TOTAL TIME
•Press MODE button until TOTAL TIME is displayed
•Press SET button briefly and the first digit will flash.
•Press RESET button to change each digit.
•Press MODE button to advance to next number.
•Repeat until desired number is entered
•Confirm by pressing the SET button briefly.
6. KM-VELO 1/2
7. TEMPS VELO 1/2
•Réglage identique à la circonférence de la roue. Ici, vous
pouvez transférer la distance totale en km, par exemple
lors de l'achat de cet appareil, à partir d'un autre
compteur.
6. KM RUEDA 1/2
7. TIEMPO RUEDA 1/2
•Introducción como en las dimensiones de la rueda. Aquí se
puede transferir el número total de km p.ej. en caso de
compra del aparato de otro ordenador de bicicleta.
8. Contrast
•Press MODE button until contrast is displayed.
•Press SET button briefly and the display flashes.
•Set the value by pressing RESET button.
1 = light 3 = dark
•Confirm by pressing the SET button.
When you are finished entering the basic setting, press and
hold SET button for 3 seconds to exit set-up mode.
8. Contraste
•Appuyer sur la touche MODE1 jusqu'à ce que CONTRASTE
apparaisse.
•Appuyer brièvement sur la touche SET, le réglage clignote.
•A l'aide de la touche REMISE A ZERO/MODE2 régler la
valeur (1 = faible, 3 = fort). Confirmer avec la touche SET.
8. Contraste
•Pulsar la tecla MODE1 hasta que aparezca CONTRASTE.
•Pulsar brevemente la tecla SET, la introducción parpadea.
•Con la tecla RESET/MODE2 ajustar el valor (1=débil
3= fuerte). Confirmar con la tecla SET.
1. Set language
•Press MODE button until LANGUAGE is displayed
•Press the SET button briefly, the display flashes. Set the
desired language using the MODE button and confirm by
pressing SET button briefly.
4. Wheel size BIKE 2
This computer can be programmed for two bikes, if you are
only using this computer for one bike, skip this step and go
to step 5.
Changing between WHEEL SIZE 1 and WHEEL SIZE 2
occurs automatically simply by changing from bike 1
transmitter (grey button) to the optional Bike 2 transmitter
(red button).
•Press MODE button to change to WS BIKE 2.
•Press SET button briefly and the first digit flashes.
•Change the number by pressing RESET button.
•Change to next digit by pressing MODE button. Repeat
with next 3 numbers until desired wheel size is entered.
•Confirm by pressing SET button briefly.
4. Circonférence de la roue VELO 2
•A l'aide de la touche MODE passer au VELO 2.
•Appuyer brièvement sur la touche SET, le premier chiffre à
entrer clignote.
•Réglage comme pour le VELO 1 : régler les valeurs à l'aide
de la touche RESET, passer au prochain chiffre à l'aide de la
touche MODE.
•Le vélo 2 est toujours celui avec l'émetteur vélo 2
4. Dimensiones de la rueda BICICLETA 2
•Con la tecla MODE cambiar a BICICLETA 2.
•Pulsar brevemente la tecla SET, la primera cifra de introducción parpadea.
•Introducción como en RUEDA 1: Con las teclas RESET ajustar los valores,
con la tecla MODE cambiar a la cifra siguiente, etc.
•La bicicleta 2 es siempre la bicicleta con emisor rueda 2
SET
BI KE CO MPUT ER
TO PLI NE
B C 1 1 0 6 L D T S
SIG MA B IK E COMPU TE R
BC 110 6L DT S
W W W. SI G MA S P O RT. CO M
W W W. SI G MA S P O RT. CO M
SIGMA USA:
North America
1067 Kingsland Drive
Batavia, IL 60510, US A
Tel. +1-630-761-1106
Fax +1-6 30-761-1107
Toll Free: 888-744-6 277
SIGMA EUROPA:
SIGMA Elektro GmbH
Dr.- Juliu s- Leber- Straße 15
D-67433 Neustadt a.d.W.
Tel. +49-(0)63 21-9120-11 8
Fax +49- (0)6321-9120 -34
SIGMA ASIA:
Asia, Australia, South Ame rica
7F-1, No. 193, Ta-Tun 6th Street,
Taichung City, Taiwan
Tel. +886-4-2475 35 77
Fax +886 -4-2475 3563
32-630
28-630
40-622
47-622
40-635
37-622
18-622
20-622
23-622
25-622
28-622
32-622
37-622
40-622
27x1 1/4
27x1 1/4 Fifty
28x1.5
28x1.75
28x1 1/2
28x1 3/8x1 5/8
700x18C
700x20C
700x23C
700x25C
700x28C
700x32C
700x35C
700x40C
2199
2174
2224
2268
2265
2205
2102
2114
2133
2146
2149
2174
2205
2224
kmh
mph
47-305
47-406
37-540
47-507
23-571
40-559
44-559
47-559
50-559
54-559
57-559
37-590
37-584
20-571
16x1.75x2
20x1.75x2
24x1 3/8 A
24x1.75x2
26x1
26x1.5
26x1.6
26x1.75x2
26x1.9
26x2.00
26x2.125
26x1 3/8
26x1 3/8x1 1/2
26x3/4
1272
1590
1948
1907
1973
2026
2051
2070
2089
2114
2133
2105
2086
1954
ETRTO
kmh
mph
ETRTO
km/h:
WS = mm x 3.14
mph:
WS = mm x 3.14
km/h:
WS = mm
mph:
WS = mm
Printed in USA
~20 sec
A
Test: Battery
Max. 20 mm
• MODE: appel des fonctions
• RESET: remise à zéro des fonctions
DISTANCE JOURNALIERE, TEMPS PARCOURU, Ø KMH et MAX. KMH
• MODE: Activar las funciones
• RESET: Restablecimiento de las funcion.
KM DIARIOS, DURACIÓN DEL TRAYECTO, PROMEDIO KMH y KMH MÁX. a cero
• MODE: Change the functions
• RESET: Reset the functions
DAILY KM/M, TRIP TIME, AVERAGE SPEED and MAX SPEED to zero
MODE
>3 sec = RESET
TRIP DIST
TRIP TIME
AVG. SPEED
MAX. SPEED
CLOCK
TOTAL ODO*
TOTAL TIME*
TRIP DIST
TRIP TIME
AVG. SPEED
MAX. SPEED
MODE
>3 sec = RESET
KM JOUR
TEMPS PARC
VIT MOYEN.
VIT MAXI
HEURE
KM TOTAL*
TEMPSTOTAL*
KM JOUR
TEMPS PARC
VIT MOYEN.
VIT MAXI
MODE
>3 sec = RESET
KM DIA
TIEMPO PAR
VEL MEDIA
VEL MAXIMA
HORA
KM TOTAL*
TIEMPO TOT*
KM DIA
TIEMPO PAR
VEL MEDIA
VEL MAXIMA
How to change modes
•Press MODE button until the desired function is displayed
(TRIP DISTANCE, TRIP TIME, AVG. SPEED, MAX. SPEED,
CLOCK, TOTAL ODO, TOTAL TIME)
•While riding the TOTAL ODO and TOTAL TIME functions
are hidden.
Affichage des fonctions
•Appuyer sur la touche MODE jusqu'à ce que la fonction
souhaitée soit affichée (DISTANCE JOURNALIERE, TEMPS
PARCOURU, MOYENNE KMH, MAX.KMH, HEURE,
DISTANCE TOTALE EN KM, TEMPS TOTAL).
•Pendant la conduite, DISTANCE TOTALE et TEMPS TOTAL
ne sont pas affichés (moins de clics de touche lors de la
conduite).
Indicación de las funciones
•Pulsar la tecla MODE hasta que se muestre la función deseada (KM DIARIOS,
DURACIÓN DEL TRAYECTO, PROMEDIO KMH, KMH MÁX., HORA, KM
TOTALES, TIEMPO TOTAL).
•durante la carrera no se muestran KM TOTALES y TIEMPO TOTAL (menos
pulsaciones de teclas durante la carrera).
SET > 3 sec
•Press SET button for 3 sec. to enter set-up mode (SET
will appear in upper right hand corner of display when in
set-up mode, you must be in set-mode to perform steps
1-8).
•Use the set-up mode to change language, KMH/MPH,
wheel size, time, total odo, total time, and contrast.
•After changing the battery, only the time and contrast
have to be entered.
•Appuyer sur la touche SET 3 sec pour effectuer les réglages de base
suivants : langue, changement entre kmh/mph, circonférence de la
roue 1 et 2, heure, distance totale, temps total et contraste de l'écran.
Fin du menu réglage en appuyant 3 sec sur la touche SET. Après le
changement de la pile, seule l'heure et le contraste de l'écran doivent
être à nouveau rentrés.
•Pulsar la tecla Set durante 3 segundos para realizar los siguientes ajustes
básicos: idioma, cambio entre kmh/mph, dimensiones de la rueda 1 y 2,
hora, km totales, hora total y contraste de pantalla. Finalice el menú de
introducción pulsando durante 3 segundos la tecla SET. Tras un cambio de
la pila deben introducirse solo la hora y el contraste de la pantalla.
1. Régler la langue
•Appuyer sur la touche MODE jusqu'à ce que LANGUE
apparaisse sur l'écran.
•Appuyer brièvement sur la touche SET, l'affichage clignote.
Régler la langue souhaitée à l'aide de la touche MODE et
confirmer par la touche SET.
1. Ajustar el idioma
•Pulsar la tecla MODE hasta que aparezca IDIOMA en la
pantalla.
•Pulsar brevemente la tecla SET, la indicación parpadea.
Con la tecla MODE ajustar el idioma seleccionado y
confirmar con la tecla SET.
MODE
MODE
MODE
RESET
RESET
5. Time
(24 hr clock will display when using KMH, 12 hr clock will
display when using MPH)
•Press MODE button until TIME is displayed.
•Press the SET button briefly and the hour digit flashes.
•Change the hour with the RESET button.
•Advance to minutes by pressing MODE button.
•Change the minutes with the RESET button.
•Confirm by pressing the SET button briefly.
5. Heure (kmh = 24 h / mph = 12 h)
•Appuyer sur la touche MODE jusqu'à ce qu'HEURE apparaisse.
•Appuyer brièvement sur la touche SET, l'entrée clignote.
•Régler les heures à l'aide de la touche REMISE A ZERO. A
l'aide de la touche MODE passer au réglage des minutes.
•Régler les minutes à l'aide de la touche REMISE A ZERO.
Confirmer par la touche SET.
5. Hora (kmh = 24 h / mph = 12 h)
•Pulsar la tecla MODE hasta que aparezca HORA.
•Pulsar brevemente la tecla SET, la introducción parpadea.
•Con la tecla RESET ajustar el valor, con la tecla MODE
cambiar a la siguiente cifra.
•Con la tecla RESET ajustar los minutos. Confirmar con la
tecla SET.
MODE
MODE
•After installing the bike computer into mounting bracket, SPEED display will
blink ZERO.
•There are two ways to pair your transmitter and computer.
•1. Ride. After 20 seconds (max 5 min.) the receiver will pair with
transmitter and data will be displayed.
•2. Spin front wheel until speed display stops blinking (A).
•After 5 min. without transmission, BC 1106 DTS will go into sleep mode.
(Time of Day and Model name shown in the display). Press any button to
re-activate the computer. A short pairing will find the transmitter.
•Removing the BC 1106 DTS from the mounting bracket will end the paired
connection.
•If “TOO MANY SIGNALS” message is displayed: lengthen the distance of all
transmitters and press any button to continue. Pairing will begin again.
•Monter le compteur sur son support. Le zéro de la vitesse clignote
•Il y a deux possibilités pour connecter la vitesse et la cadence:
1.Rouler, après env. 20 secondes (max. 5 min.) le récepteur s'est connecté
avec l'émetteur, les données sont affichées.
2.Fiare tourner la roue avant jusqu'à ce que l'affichage de la vitesse ne
clignote plus (A).
ATTENTION:
•Après plus de 5 minutes de pause le BC 1106 DTS se met en mode repos
(affichage de l'heure et du nom du modèle). Pour ré-activer le compteur
appuyer sur une touche quelconque, il s'établit alors une connection courte
pour rechercher le(s) émetteur(s)
•Lorsque l'on sort le BC 1106 DTS de son support, la connection est arrêtée.
•TOO MANY SIGNALS s'affiche: Augmenter la distance par rapport aux
autres vélos et appuyer sur une touche quelconque. La connection
recommence.
•Encajar el BC 1106 DTS sobre el soporte. El cero de las indicaciones de
velocidad parpadea
•Hay dos posibilidades de emparejar la velocidad:
1.Arrancar, después de aprox. 20 segundos (max. 5 min) el receptor se ha
sincronizado con el receptor y se muestran los datos.
2.Girar la rueda delantera hasta que deje de parpadear la indicación de KMH
(A).
ATENCIÓN:
•Después de 5 minutos de pausa, el BC 1106 DTS pasa al modo de
espera (la hora y el nombre del modelo en la pantalla). Al pulsar cualquier
tecla se inicia un apareado corto para encontrar el emisor.
•Al retirar el BC 1106 DTS del soporte se desconecta la desconexión.
•Indicación TOO MANY SIGNALS (demasiadas señales): Aumentar la
distancia con otros emisores y pulsar cualquier tecla. El apareado se inicia
de nuevo.
~20 sec
A
~20 sec
A
mm x 3.14
note: 1 inch = 25.4 mm
Pila:
1 pila de litio tipo botón 2032, 3V
El cambio de pila se muestra en la pantalla.
Cambio de pila
• Si se cambia la pila DIMENSIONES DE LA
RUEDA, IDIOMA, KMH/MPH, KM
TOTALES y TIEMPO TOTAL permanecen
guardadas y no deben ser introducidas
de nuevo.
• Respetar el + y el -. Con el
compartimento de la batería abierto
tiene que verse el + de la pila.
•Si la junta de estanquidad está
desplazada, volver a colocarla.
• Tras el cambio de pila debe introducirse
de nuevo la hora.
Garantía
Nos responsabilizamos de las deficiencias
frente a nuestro socio contractual según
lo dispuesto en los reglamentos legales.
Ordenador:
Abrir la tapa con una moneda.
¡Prestar atención
a la polaridad"
Emisor:
Abrir la tapa con una herramienta.
¡Retirar la pila de la tapa!
¡Prestar atención a la polaridad!
KMH sin indicación
•¿Se utiliza el soporte antiguo del manillar
con la transmisión por radio (RDS)?
•¿Está el ordenador correctamente
encajado sobre el soporte?
•¿Se han comprobado la oxidación /
corrosión de los contactos?
•¿Distancia entre imán y sensor?
(máx. 20 mm)
•¿Se ha comprobado si el imán está
imantado?
•¿2 imanes montados?
•¿Imán posicionado correctamente?
•¿Dimensiones de la rueda (WS) mal
ajustadas?
•¿Se ha montado el emisor correcto en el
cambio de bicicleta?
Los KMH están mal indicados
Indicación en pantalla oscura o lenta
•Temperatura demasiado alta (>60° C) o
demasiado baja (<0° C)
Sin indicación en pantalla
(indicación vacía)
•Comprobar la pila
•Pila bien colocada (+ y -)
•¿Es correcto el contacto de la pila?
(comprobar con cuidado)
Ningún apareado
•Comprobar la distancia emisor/imán
•Pila del emisor vacía
•Activar el ordenador pulsando
•Comprobar alcance
•Modificar la posición del emisor al
emplear un dínamo de cubo
Indicación TOO MANY SIGNALS
(demasiadas señales):
•Aumentar la distancia con otros
emisores y pulsar una tecla
Pile:
1 pile-bouton lithium 2032, 3V
Le changement de pile est affiché est
affiché sur l'écran.
Changement de pile
• En cas de changement de pile,
CIRCONFERENCE DE LA ROUE 1/2,
LANGUE, KMH/MPH, DISTANCE TOTALE
et TEMPS TOTAL restent en mémoire et
ne doivent pas être à nouveau rentrés.
• Faire attention au plus et au moins, lorsque
le compartiment de la pile est ouvert,
vous devez voir le côté PLUS de la pile !
• En cas de déplacement du joint
d'étanchéité, le remettre en place.
• Après le changement de la pile, seul
l'heure et le contraste doivent être
à nouveau rentrés.
Garantie
Nous sommes responsables, vis-à-vis de
notre partenaire contractuel respectif, des
vices conformément aux prescriptions légales.
Les piles sont exclues de la garantie.
Compteur:
Ouvrir le couvercle avec une pièce
Attention à la
polarité!
Emetteur:
Ouvrir le couvercle avec
l'outil prévu à cet effet.
Enlever la pile du couvercle!
Attention à la polarité!
Pas d'affichage kmh
• Ancien système sans fil sur le vélo?
• Compteur bien enclenché sur le support?
• Corrosion/oxidation sur les contacts?
• Distance aimant/émetteur?
(max. 20 mm)
• Aimant magnétisé?
• 2 aimant montés?
• Aimant bien positionné?
• Circonférence de la roue (WS) bien
programmè?
• Montage du bon émetteur lors d'un
changement de vélo?
Mauvais affichage de la vitesse
Affichage noir/lent
• Température trop haute (>60°C)
ou trop basse (<0°C)
Pas d'affichage (écran vide)
• Vérifier l'état de la pile
• Pile bien mise (plus et moins)
• Contacts ok? (tordre en faisant attention)
Pas de connection
• Vérifier la distance aimant/émetteur
• Les piles de l'émetteur sont vides
• Activer le compteur en appuyant sur
une touche
• Vérifier la distance émetteur/récepteur
• Si vous utilisez une dynamo-moyeu,
changer la position de l'émetteur
Affichage TOO MANY SIGNALS
• Augmenter la distance avec les autres
vélos et appuyer sur une touche
quelconque.
Battery:
1 lithium button cell 2032, 3V
Battery change is displayed on screen.
Change batteries:
• WHEEL SIZES 1+2, LANGUAGE,
KMH/MPH, TOTAL KM and TOTAL
TIME remain saved even when the
battery is changed.
• Observe direction of plus and minus
poles; when the compartment is open
you must see the PLUS side of the
battery!
• If sealing ring is loose, re-insert it.
• After changing the battery only the
time and the contrast must be re-
entered.
Warranty
We are liable to our contracting partners
for defects as defined by law. Batteries
are excluded from the guarantee.
No display of MPH
• Using an old RDS mounting bracket?
• Check that the Bike Computer is properly
engaged in the bracket.
• Check contacts for corrosion/oxidation.
• Check distance between magnet and sensor
(max. 20 mm using Sigma's Power Magnet)
• Check if magnet is magnetized
• 2 magnets installed?
• Magnet in the right position?
• Wheel size programmed incorrectly?
• In case of you switched bikes - are you mounting
the correct transmitter?
False display of MPH
Display is black or weaken?
• Temperature too high (>60 °C) or too low (<0°C)
No Display (screen blank)
• Check Battery
• Check plus and minus poles
• Battery contact ok? (bend carefully!)
No Pairing
• Check distance between transmitter /
magnet (20mm or less with power
magnet)
• Press battery check button on
transmitter
• Activate computer by pressing any
button
• Check distance between transmitter
and receiver (max distance 90cm)
• If using a dynamo hub, change location
of transmitter.
TOO MANY SIGNALS is shown:
• Extend the distance between
transmitters and press any button
on computer to continue
Computer:
Open the top cover with a coin
Pay attention to
polarity!
Transmitter:
Open top cover with tool
Take the battery out of the top cover!
Pay attention to polarity!
Speed
TRIP DIST
TRIP TIME
ODO BIKE
TIME BIKE
WS BIKE 1/2
Vitesse
KM JOUR
TEMPS PARC
KM TOTAL
TEMPSTOTAL
CIRCONFERENCE
DE LA ROUE 1/2
Velocidad
KM DIA
TIEMPO PAR
KM TOTAL
TIEMPO TOT
DIMENSIONES
DE LA RUEDA
1/2
0.0
0.00
0:00:00
0
0:00
2,155
Default Max Units
199.5
9,999.9
999:59
99,999
9,999
3,999
kmh/mph
km/mi
h:mm:ss hh:mm hhh:mm
km/mi
h:mm hh:mm hhh:m h.hhh
mm
Speed Comparison (pace arrow)
Comparison of current speed to average speed.
•If your current speed is equal to your average speed is
shown, if lower is shown, and if higher is shown.
Vitesse/vitesse moyenne
•En cas de vitesse à peu près similaire s'affiche, en cas
de vitesse plus faible et plus élevée .
•L'affichage est effectué pour toutes les fonctions sauf
dans les réglages de base.
Velocidad / velocidad media
•En caso de velocidad casi igual se muestra , en caso de
velocidad menor y velocidad mayor .
•La indicación se realiza en todas las funciones excepto en
los ajustes básicos.
Reset
Reset Trip distance, Trip time, Average speed, and
Max speed to zero.
• Press MODE button until the desired function to zero out
displayed.
• Press and hold RESET button. The display will flash and
after 2 seconds the displayed function will clear.
• Holding RESET button longer than 4 seconds will zero out
Trip distance, Trip time, Average speed, and Max speed
functions at the same time.
Remise à zéro de l'affichage
• Appuyer sur la touche MODE jusqu'à ce que la fonction
souhaitée apparaisse. Maintenir appuyée la touche REMISE
A ZERO. L'affichage clignote. Au bout de 2 sec, seule la
fonction affichée est remise à 0.
• Appuyer sur la touche REMISE A ZERO pendant plus de 4
sec remet à zéro les affichages de DISTANCE
JOURNALIERE, TEMPS PARCOURU, Ø KMH, MAX KMH.
Restablecer las indicaciones
• Pulsar la tecla MODE hasta que aparezca la función
deseada.
• Mantener pulsada la tecla RESET. La indicación parpadea.
Tras 2 segundos se restablece la función indicada a 0.
• Pulsar la tecla RESET durante más de 4 segundos
establece las indicaciones de KM DIARIOS, DURACIÓN DEL
TRAYECTO, PROMEDIO KMH, KMH MÁX. en cero.
> 2 sec
> 3,5 sec
Switching between WHEEL 1 and WHEEL 2 is automatic.
You must install (optional) transmitter of Bike 2 (red
button).
• It is no longer possible to change by making an entry.
Le changement entre la ROUE 1 et la ROUE 2 est effectué
automatiquement. Il faut utiliser l'émetteur vélo 2 (en
option) avec la touche rouge.
• Un changement manuel n'est plus possible.
El cambio entre la RUEDA 1 y RUEDA 2 se realiza
automáticamente. Debe emplearse el emisor (opcional)
rueda 2 (tecla roja).
• Ya no es posible un cambio por introducción.
4 x
90°
4 x
Bike 1
Wheel Size Chart
go to
step 3
go to
step 2
The harness comes ready to mount on your handlebars.
To mount on a stem, remove the 4 screws on the back of the harness, turn base 90 degrees.
stem mount
remove yellow tape
the SIGMA logo on the harness must
always face the front of the bike.
Foam pad included for
use with bladed spokes
To reach the required 20mm or less, move magnet
and transmitter towards center of wheel.
Note: 20mm = 3/4 inches
32
42
?
handlebar
or
stem
Red, rouge
2 mm
Red, rouge
* not while riding * pas pendant
la conduite
*no durante
la carrera
12:23
12:23
12:25
00.200
00.000
00.200
3
2
Bike 1
+

Contents / Contenu / Contenudo Installation / Montage / Montaje Installation of mounting bracket Montage du support / Montaje del soporte de bicicleta
1 2
Installation of mounting bracket Installation of magnet / Montage de l'aimant / Montaje del imán
5
Installation of speed transmitter Montage de l'émett. Vit. / Montaje del emisor de velocidad
1
Installation of speed transmitter
5
Mode / Reset Pairing / Connection / Apareado Pairing / Connection / Apareado
3 4 6 1
2 1
KMH/MPH entryRéglage KMH/MPH / Introducción KMH/MPH
UF
E
Wheel size entry Circonférence de roue / Dimensiones de la rueda
U F
E
Measure wheel size Mesurer la roue / Dimensiones de la rueda
U F
E
Time entryRéglage heure / Introducir la hora
UF
E
Total data entryRéglage des valeurs totales / Datos totales
UF
E
Contrast entryRéglage contraste / Introducción contraste
UF
E
Language EntryRéglage langue / Introducir el idioma
UF
E
Wheel size entryCirconférence de roue / Dimensiones de la rueda
UF
E
42 mm
32 mm
Basic settingsRéglages de base / Ajustes básicos
UF
E
Wheel Size Chart (Wheel Size) Wheel Size Chart (Circonférence de roue / Tamaño de rueda)
A C
B
Changing modesChangement d’affichage / Cambio de visualización
UF
E
Installation of speed transmitter Montage de l'émett. Vit. / Montaje del emisor de velocidad
3 4
2x
Left side Right side
Grey, gris
optional Bike 2
Ref. No. 00405
Pairing / Connection / Apareado Pairing / Connection / ApareadoPairing / Connection / Apareado
Installation of Bike Computer
U
F
E
F E
U FE
Pairing / Connection / Apareado
Observaciones generalesE
Cambio de la pila
Solución de problemasE
Remarques générales F Changement de batterie Solution aux problèmes FGeneral remarks U Trouble Shooting UChange batteryTechnical Data / Données techniques / Datos técnicos
U F
E
Technical data / Données techniques / Datos técnicos
Comparison speedComparaison de la vitesse / Comparación velocidad
UF
E
Reset Remise à zéro / Puesta a cero
U F
E
Assembly 2nd wheel Montage 2ème roue / Montaje 2ª rueda
U F
E
optional Bike 2
Ref. No. 00405
Grey, gris
Bike 1
+
2. KMH / MPH
•Press MODE button until KMH / MPH is displayed.
•Press SET button briefly, KMH or MPH is displayed and
flashing.
•Select MPH or KMH with MODE button.
•Confirm by pressing SET button briefly.
2. KMH / MPH
•A l'aide de la touche MODE changer le réglage KMH/MPH.
•Appuyer brièvement sur la touche SET.
•KMH ou MPH apparaît sur l'écran et clignote.
•Régler MPH ou KMH à l'aide de la touche MODE.
•Confirmer par la touche SET.
2. KMH / MPH
•Con la tecla MODE cambiar a la introducción de KMH/MPH
•Pulsar la tecla SET brevemente.
•En la pantalla aparece KMH o MPH y parpadea.
•Con la tecla MODE ajustar MPH o KMH.
•Confirmar con la tecla SET.
3. Wheel size BIKE 1
• Press MODE button to change to WS BIKE 1.
• Press SET button briefly and the first digit flashes.
• Change the number by pressing RESET button, change to
next digit by pressing mode. Repeat with next 3 numbers
until desired wheel size is entered.
• Confirm by pressing SET button briefly.
3. Circonférence de la roue VELO 1
• A l'aide de la touche MODE passer à VELO 1.
• Appuyer brièvement sur la touche SET, le premier chiffre
à entrer clignote.
• Régler la valeur à l'aide de la touche REMISE A ZERO,
passer au prochain chiffre à l'aide de la touche MODE.
• Le vélo 1 est toujours celui avec l'emetteur vélo 1
3. Dimensiones de la rueda BICICLETA 1
• Con la tecla MODE cambiar a BICICLETA 1.
• Pulsar brevemente la tecla SET, la primera cifra de
introducción parpadea.
• Con la tecla RESET ajustar el valor, con la tecla MODE
cambiar a la siguiente cifra.
• La bicicleta 1 es siempre la bicicleta con emisor rueda 1
• A partir de la tabla C "Wheel Size Chart" (véase la página
siguiente) determinar el valor correspondiente al tamaño
de la rueda. Introducir este valor.
• Alternativa: calcular/ determinar el tamaño de la rueda
(tabla A o tabla B)
• Tras la última cifra confirmar con la tecla SET.
• Determine the correct value for your wheel size from
Table C “Wheel Size Chart” (refer to next page).
• Alternative: calculate wheel size using formula Tab A or
Tab B.
• Déterminer la valeur correspondant à votre circonférence
de roue à partir du tableau C "Wheel Size Chart" (voir
page suivante). Entrer cette valeur.
• Alternative: calculer/déterminer WS (Tab. A ou tab. B).
• Après le dernier chiffre, confirmer par la touche SET.
You can enter TOTAL ODO (miles) miles and TOTAL times
from your previous computer.
Note – This step is not necessary if previous data from
another computer is not desired(skip to step 8).
6. Enter TOTAL ODO (miles)
•Press MODE button until TOTAL ODO is displayed.
•Press SET button briefly and the first digit will flash.
•Press RESET button to change each digit.
•Press MODE button to advance to next number.
•Repeat until desired number is entered.
•Confirm by pressing the SET button briefly.
7. Enter TOTAL TIME
•Press MODE button until TOTAL TIME is displayed
•Press SET button briefly and the first digit will flash.
•Press RESET button to change each digit.
•Press MODE button to advance to next number.
•Repeat until desired number is entered
•Confirm by pressing the SET button briefly.
6. KM-VELO 1/2
7. TEMPS VELO 1/2
•Réglage identique à la circonférence de la roue. Ici, vous
pouvez transférer la distance totale en km, par exemple
lors de l'achat de cet appareil, à partir d'un autre
compteur.
6. KM RUEDA 1/2
7. TIEMPO RUEDA 1/2
•Introducción como en las dimensiones de la rueda. Aquí se
puede transferir el número total de km p.ej. en caso de
compra del aparato de otro ordenador de bicicleta.
8. Contrast
•Press MODE button until contrast is displayed.
•Press SET button briefly and the display flashes.
•Set the value by pressing RESET button.
1 = light 3 = dark
•Confirm by pressing the SET button.
When you are finished entering the basic setting, press and
hold SET button for 3 seconds to exit set-up mode.
8. Contraste
•Appuyer sur la touche MODE1 jusqu'à ce que CONTRASTE
apparaisse.
•Appuyer brièvement sur la touche SET, le réglage clignote.
•A l'aide de la touche REMISE A ZERO/MODE2 régler la
valeur (1 = faible, 3 = fort). Confirmer avec la touche SET.
8. Contraste
•Pulsar la tecla MODE1 hasta que aparezca CONTRASTE.
•Pulsar brevemente la tecla SET, la introducción parpadea.
•Con la tecla RESET/MODE2 ajustar el valor (1=débil
3= fuerte). Confirmar con la tecla SET.
1. Set language
•Press MODE button until LANGUAGE is displayed
•Press the SET button briefly, the display flashes. Set the
desired language using the MODE button and confirm by
pressing SET button briefly.
4. Wheel size BIKE 2
This computer can be programmed for two bikes, if you are
only using this computer for one bike, skip this step and go
to step 5.
Changing between WHEEL SIZE 1 and WHEEL SIZE 2
occurs automatically simply by changing from bike 1
transmitter (grey button) to the optional Bike 2 transmitter
(red button).
•Press MODE button to change to WS BIKE 2.
•Press SET button briefly and the first digit flashes.
•Change the number by pressing RESET button.
•Change to next digit by pressing MODE button. Repeat
with next 3 numbers until desired wheel size is entered.
•Confirm by pressing SET button briefly.
4. Circonférence de la roue VELO 2
•A l'aide de la touche MODE passer au VELO 2.
•Appuyer brièvement sur la touche SET, le premier chiffre à
entrer clignote.
•Réglage comme pour le VELO 1 : régler les valeurs à l'aide
de la touche RESET, passer au prochain chiffre à l'aide de la
touche MODE.
•Le vélo 2 est toujours celui avec l'émetteur vélo 2
4. Dimensiones de la rueda BICICLETA 2
•Con la tecla MODE cambiar a BICICLETA 2.
•Pulsar brevemente la tecla SET, la primera cifra de introducción parpadea.
•Introducción como en RUEDA 1: Con las teclas RESET ajustar los valores,
con la tecla MODE cambiar a la cifra siguiente, etc.
•La bicicleta 2 es siempre la bicicleta con emisor rueda 2
SET
BI KE CO MPUT ER
TO PLI NE
B C 1 1 0 6 L D T S
SIG MA B IK E COMPU TE R
BC 110 6L DT S
W W W. SI G MA S P O RT. CO M
W W W. SI G MA S P O RT. CO M
SIGMA USA:
North America
1067 Kingsland Drive
Batavia, IL 60510, US A
Tel. +1-630-761-1106
Fax +1-6 30-761-1107
Toll Free: 888-744-6 277
SIGMA EUROPA:
SIGMA Elektro GmbH
Dr.- Juliu s- Leber- Straße 15
D-67433 Neustadt a.d.W.
Tel. +49-(0)63 21-9120-11 8
Fax +49- (0)6321-9120 -34
SIGMA ASIA:
Asia, Australia, South Ame rica
7F-1, No. 193, Ta-Tun 6th Street,
Taichung City, Taiwan
Tel. +886-4-2475 35 77
Fax +886 -4-2475 3563
32-630
28-630
40-622
47-622
40-635
37-622
18-622
20-622
23-622
25-622
28-622
32-622
37-622
40-622
27x1 1/4
27x1 1/4 Fifty
28x1.5
28x1.75
28x1 1/2
28x1 3/8x1 5/8
700x18C
700x20C
700x23C
700x25C
700x28C
700x32C
700x35C
700x40C
2199
2174
2224
2268
2265
2205
2102
2114
2133
2146
2149
2174
2205
2224
kmh
mph
47-305
47-406
37-540
47-507
23-571
40-559
44-559
47-559
50-559
54-559
57-559
37-590
37-584
20-571
16x1.75x2
20x1.75x2
24x1 3/8 A
24x1.75x2
26x1
26x1.5
26x1.6
26x1.75x2
26x1.9
26x2.00
26x2.125
26x1 3/8
26x1 3/8x1 1/2
26x3/4
1272
1590
1948
1907
1973
2026
2051
2070
2089
2114
2133
2105
2086
1954
ETRTO
kmh
mph
ETRTO
km/h:
WS = mm x 3.14
mph:
WS = mm x 3.14
km/h:
WS = mm
mph:
WS = mm
Printed in USA
~20 sec
A
Test: Battery
Max. 20 mm
• MODE: appel des fonctions
• RESET: remise à zéro des fonctions
DISTANCE JOURNALIERE, TEMPS PARCOURU, Ø KMH et MAX. KMH
• MODE: Activar las funciones
• RESET: Restablecimiento de las funcion.
KM DIARIOS, DURACIÓN DEL TRAYECTO, PROMEDIO KMH y KMH MÁX. a cero
• MODE: Change the functions
• RESET: Reset the functions
DAILY KM/M, TRIP TIME, AVERAGE SPEED and MAX SPEED to zero
MODE
>3 sec = RESET
TRIP DIST
TRIP TIME
AVG. SPEED
MAX. SPEED
CLOCK
TOTAL ODO*
TOTAL TIME*
TRIP DIST
TRIP TIME
AVG. SPEED
MAX. SPEED
MODE
>3 sec = RESET
KM JOUR
TEMPS PARC
VIT MOYEN.
VIT MAXI
HEURE
KM TOTAL*
TEMPSTOTAL*
KM JOUR
TEMPS PARC
VIT MOYEN.
VIT MAXI
MODE
>3 sec = RESET
KM DIA
TIEMPO PAR
VEL MEDIA
VEL MAXIMA
HORA
KM TOTAL*
TIEMPO TOT*
KM DIA
TIEMPO PAR
VEL MEDIA
VEL MAXIMA
How to change modes
•Press MODE button until the desired function is displayed
(TRIP DISTANCE, TRIP TIME, AVG. SPEED, MAX. SPEED,
CLOCK, TOTAL ODO, TOTAL TIME)
•While riding the TOTAL ODO and TOTAL TIME functions
are hidden.
Affichage des fonctions
•Appuyer sur la touche MODE jusqu'à ce que la fonction
souhaitée soit affichée (DISTANCE JOURNALIERE, TEMPS
PARCOURU, MOYENNE KMH, MAX.KMH, HEURE,
DISTANCE TOTALE EN KM, TEMPS TOTAL).
•Pendant la conduite, DISTANCE TOTALE et TEMPS TOTAL
ne sont pas affichés (moins de clics de touche lors de la
conduite).
Indicación de las funciones
•Pulsar la tecla MODE hasta que se muestre la función deseada (KM DIARIOS,
DURACIÓN DEL TRAYECTO, PROMEDIO KMH, KMH MÁX., HORA, KM
TOTALES, TIEMPO TOTAL).
•durante la carrera no se muestran KM TOTALES y TIEMPO TOTAL (menos
pulsaciones de teclas durante la carrera).
SET > 3 sec
•Press SET button for 3 sec. to enter set-up mode (SET
will appear in upper right hand corner of display when in
set-up mode, you must be in set-mode to perform steps
1-8).
•Use the set-up mode to change language, KMH/MPH,
wheel size, time, total odo, total time, and contrast.
•After changing the battery, only the time and contrast
have to be entered.
•Appuyer sur la touche SET 3 sec pour effectuer les réglages de base
suivants : langue, changement entre kmh/mph, circonférence de la
roue 1 et 2, heure, distance totale, temps total et contraste de l'écran.
Fin du menu réglage en appuyant 3 sec sur la touche SET. Après le
changement de la pile, seule l'heure et le contraste de l'écran doivent
être à nouveau rentrés.
•Pulsar la tecla Set durante 3 segundos para realizar los siguientes ajustes
básicos: idioma, cambio entre kmh/mph, dimensiones de la rueda 1 y 2,
hora, km totales, hora total y contraste de pantalla. Finalice el menú de
introducción pulsando durante 3 segundos la tecla SET. Tras un cambio de
la pila deben introducirse solo la hora y el contraste de la pantalla.
1. Régler la langue
•Appuyer sur la touche MODE jusqu'à ce que LANGUE
apparaisse sur l'écran.
•Appuyer brièvement sur la touche SET, l'affichage clignote.
Régler la langue souhaitée à l'aide de la touche MODE et
confirmer par la touche SET.
1. Ajustar el idioma
•Pulsar la tecla MODE hasta que aparezca IDIOMA en la
pantalla.
•Pulsar brevemente la tecla SET, la indicación parpadea.
Con la tecla MODE ajustar el idioma seleccionado y
confirmar con la tecla SET.
MODE
MODE
MODE
RESET
RESET
5. Time
(24 hr clock will display when using KMH, 12 hr clock will
display when using MPH)
•Press MODE button until TIME is displayed.
•Press the SET button briefly and the hour digit flashes.
•Change the hour with the RESET button.
•Advance to minutes by pressing MODE button.
•Change the minutes with the RESET button.
•Confirm by pressing the SET button briefly.
5. Heure (kmh = 24 h / mph = 12 h)
•Appuyer sur la touche MODE jusqu'à ce qu'HEURE apparaisse.
•Appuyer brièvement sur la touche SET, l'entrée clignote.
•Régler les heures à l'aide de la touche REMISE A ZERO. A
l'aide de la touche MODE passer au réglage des minutes.
•Régler les minutes à l'aide de la touche REMISE A ZERO.
Confirmer par la touche SET.
5. Hora (kmh = 24 h / mph = 12 h)
•Pulsar la tecla MODE hasta que aparezca HORA.
•Pulsar brevemente la tecla SET, la introducción parpadea.
•Con la tecla RESET ajustar el valor, con la tecla MODE
cambiar a la siguiente cifra.
•Con la tecla RESET ajustar los minutos. Confirmar con la
tecla SET.
MODE
MODE
• After installing the bike computer into mounting bracket, SPEED display will
blink ZERO.
• There are two ways to pair your transmitter and computer.
• 1. Ride. After 20 seconds (max 5 min.) the receiver will pair with
transmitter and data will be displayed.
• 2. Spin front wheel until speed display stops blinking (A).
• After 5 min. without transmission, BC 1106 DTS will go into sleep mode.
(Time of Day and Model name shown in the display). Press any button to
re-activate the computer. A short pairing will find the transmitter.
• Removing the BC 1106 DTS from the mounting bracket will end the paired
connection.
• If “TOO MANY SIGNALS” message is displayed: lengthen the distance of all
transmitters and press any button to continue. Pairing will begin again.
•Monter le compteur sur son support. Le zéro de la vitesse clignote
•Il y a deux possibilités pour connecter la vitesse et la cadence:
1.Rouler, après env. 20 secondes (max. 5 min.) le récepteur s'est connecté
avec l'émetteur, les données sont affichées.
2.Fiare tourner la roue avant jusqu'à ce que l'affichage de la vitesse ne
clignote plus (A).
ATTENTION:
•Après plus de 5 minutes de pause le BC 1106 DTS se met en mode repos
(affichage de l'heure et du nom du modèle). Pour ré-activer le compteur
appuyer sur une touche quelconque, il s'établit alors une connection courte
pour rechercher le(s) émetteur(s)
•Lorsque l'on sort le BC 1106 DTS de son support, la connection est arrêtée.
•TOO MANY SIGNALS s'affiche: Augmenter la distance par rapport aux
autres vélos et appuyer sur une touche quelconque. La connection
recommence.
•Encajar el BC 1106 DTS sobre el soporte. El cero de las indicaciones de
velocidad parpadea
•Hay dos posibilidades de emparejar la velocidad:
1.Arrancar, después de aprox. 20 segundos (max. 5 min) el receptor se ha
sincronizado con el receptor y se muestran los datos.
2.Girar la rueda delantera hasta que deje de parpadear la indicación de KMH
(A).
ATENCIÓN:
•Después de 5 minutos de pausa, el BC 1106 DTS pasa al modo de
espera (la hora y el nombre del modelo en la pantalla). Al pulsar cualquier
tecla se inicia un apareado corto para encontrar el emisor.
•Al retirar el BC 1106 DTS del soporte se desconecta la desconexión.
•Indicación TOO MANY SIGNALS (demasiadas señales): Aumentar la
distancia con otros emisores y pulsar cualquier tecla. El apareado se inicia
de nuevo.
~20 sec
A
~20 sec
A
mm x 3.14
note: 1 inch = 25.4 mm
Pila:
1 pila de litio tipo botón 2032, 3V
El cambio de pila se muestra en la pantalla.
Cambio de pila
• Si se cambia la pila DIMENSIONES DE LA
RUEDA, IDIOMA, KMH/MPH, KM
TOTALES y TIEMPO TOTAL permanecen
guardadas y no deben ser introducidas
de nuevo.
• Respetar el + y el -. Con el
compartimento de la batería abierto
tiene que verse el + de la pila.
•Si la junta de estanquidad está
desplazada, volver a colocarla.
• Tras el cambio de pila debe introducirse
de nuevo la hora.
Garantía
Nos responsabilizamos de las deficiencias
frente a nuestro socio contractual según
lo dispuesto en los reglamentos legales.
Ordenador:
Abrir la tapa con una moneda.
¡Prestar atención
a la polaridad"
Emisor:
Abrir la tapa con una herramienta.
¡Retirar la pila de la tapa!
¡Prestar atención a la polaridad!
KMH sin indicación
•¿Se utiliza el soporte antiguo del manillar
con la transmisión por radio (RDS)?
•¿Está el ordenador correctamente
encajado sobre el soporte?
•¿Se han comprobado la oxidación /
corrosión de los contactos?
•¿Distancia entre imán y sensor?
(máx. 20 mm)
•¿Se ha comprobado si el imán está
imantado?
•¿2 imanes montados?
•¿Imán posicionado correctamente?
•¿Dimensiones de la rueda (WS) mal
ajustadas?
•¿Se ha montado el emisor correcto en el
cambio de bicicleta?
Los KMH están mal indicados
Indicación en pantalla oscura o lenta
•Temperatura demasiado alta (>60° C) o
demasiado baja (<0° C)
Sin indicación en pantalla
(indicación vacía)
•Comprobar la pila
•Pila bien colocada (+ y -)
•¿Es correcto el contacto de la pila?
(comprobar con cuidado)
Ningún apareado
•Comprobar la distancia emisor/imán
•Pila del emisor vacía
•Activar el ordenador pulsando
•Comprobar alcance
•Modificar la posición del emisor al
emplear un dínamo de cubo
Indicación TOO MANY SIGNALS
(demasiadas señales):
•Aumentar la distancia con otros
emisores y pulsar una tecla
Pile:
1 pile-bouton lithium 2032, 3V
Le changement de pile est affiché est
affiché sur l'écran.
Changement de pile
• En cas de changement de pile,
CIRCONFERENCE DE LA ROUE 1/2,
LANGUE, KMH/MPH, DISTANCE TOTALE
et TEMPS TOTAL restent en mémoire et
ne doivent pas être à nouveau rentrés.
• Faire attention au plus et au moins, lorsque
le compartiment de la pile est ouvert,
vous devez voir le côté PLUS de la pile !
• En cas de déplacement du joint
d'étanchéité, le remettre en place.
• Après le changement de la pile, seul
l'heure et le contraste doivent être
à nouveau rentrés.
Garantie
Nous sommes responsables, vis-à-vis de
notre partenaire contractuel respectif, des
vices conformément aux prescriptions légales.
Les piles sont exclues de la garantie.
Compteur:
Ouvrir le couvercle avec une pièce
Attention à la
polarité!
Emetteur:
Ouvrir le couvercle avec
l'outil prévu à cet effet.
Enlever la pile du couvercle!
Attention à la polarité!
Pas d'affichage kmh
• Ancien système sans fil sur le vélo?
• Compteur bien enclenché sur le support?
• Corrosion/oxidation sur les contacts?
• Distance aimant/émetteur?
(max. 20 mm)
• Aimant magnétisé?
• 2 aimant montés?
• Aimant bien positionné?
• Circonférence de la roue (WS) bien
programmè?
• Montage du bon émetteur lors d'un
changement de vélo?
Mauvais affichage de la vitesse
Affichage noir/lent
• Température trop haute (>60°C)
ou trop basse (<0°C)
Pas d'affichage (écran vide)
• Vérifier l'état de la pile
• Pile bien mise (plus et moins)
• Contacts ok? (tordre en faisant attention)
Pas de connection
• Vérifier la distance aimant/émetteur
• Les piles de l'émetteur sont vides
• Activer le compteur en appuyant sur
une touche
• Vérifier la distance émetteur/récepteur
• Si vous utilisez une dynamo-moyeu,
changer la position de l'émetteur
Affichage TOO MANY SIGNALS
• Augmenter la distance avec les autres
vélos et appuyer sur une touche
quelconque.
Battery:
1 lithium button cell 2032, 3V
Battery change is displayed on screen.
Change batteries:
• WHEEL SIZES 1+2, LANGUAGE,
KMH/MPH, TOTAL KM and TOTAL
TIME remain saved even when the
battery is changed.
• Observe direction of plus and minus
poles; when the compartment is open
you must see the PLUS side of the
battery!
• If sealing ring is loose, re-insert it.
• After changing the battery only the
time and the contrast must be re-
entered.
Warranty
We are liable to our contracting partners
for defects as defined by law. Batteries
are excluded from the guarantee.
No display of MPH
• Using an old RDS mounting bracket?
• Check that the Bike Computer is properly
engaged in the bracket.
• Check contacts for corrosion/oxidation.
• Check distance between magnet and sensor
(max. 20 mm using Sigma's Power Magnet)
• Check if magnet is magnetized
• 2 magnets installed?
• Magnet in the right position?
• Wheel size programmed incorrectly?
• In case of you switched bikes - are you mounting
the correct transmitter?
False display of MPH
Display is black or weaken?
• Temperature too high (>60 °C) or too low (<0°C)
No Display (screen blank)
• Check Battery
• Check plus and minus poles
• Battery contact ok? (bend carefully!)
No Pairing
• Check distance between transmitter /
magnet (20mm or less with power
magnet)
• Press battery check button on
transmitter
• Activate computer by pressing any
button
• Check distance between transmitter
and receiver (max distance 90cm)
• If using a dynamo hub, change location
of transmitter.
TOO MANY SIGNALS is shown:
• Extend the distance between
transmitters and press any button
on computer to continue
Computer:
Open the top cover with a coin
Pay attention to
polarity!
Transmitter:
Open top cover with tool
Take the battery out of the top cover!
Pay attention to polarity!
Speed
TRIP DIST
TRIP TIME
ODO BIKE
TIME BIKE
WS BIKE 1/2
Vitesse
KM JOUR
TEMPS PARC
KM TOTAL
TEMPSTOTAL
CIRCONFERENCE
DE LA ROUE 1/2
Velocidad
KM DIA
TIEMPO PAR
KM TOTAL
TIEMPO TOT
DIMENSIONES
DE LA RUEDA
1/2
0.0
0.00
0:00:00
0
0:00
2,155
Default Max Units
199.5
9,999.9
999:59
99,999
9,999
3,999
kmh/mph
km/mi
h:mm:ss hh:mm hhh:mm
km/mi
h:mm hh:mm hhh:m h.hhh
mm
Speed Comparison (pace arrow)
Comparison of current speed to average speed.
•If your current speed is equal to your average speed is
shown, if lower is shown, and if higher is shown.
Vitesse/vitesse moyenne
•En cas de vitesse à peu près similaire s'affiche, en cas
de vitesse plus faible et plus élevée .
•L'affichage est effectué pour toutes les fonctions sauf
dans les réglages de base.
Velocidad / velocidad media
•En caso de velocidad casi igual se muestra , en caso de
velocidad menor y velocidad mayor .
•La indicación se realiza en todas las funciones excepto en
los ajustes básicos.
Reset
Reset Trip distance, Trip time, Average speed, and
Max speed to zero.
• Press MODE button until the desired function to zero out
displayed.
• Press and hold RESET button. The display will flash and
after 2 seconds the displayed function will clear.
• Holding RESET button longer than 4 seconds will zero out
Trip distance, Trip time, Average speed, and Max speed
functions at the same time.
Remise à zéro de l'affichage
• Appuyer sur la touche MODE jusqu'à ce que la fonction
souhaitée apparaisse. Maintenir appuyée la touche REMISE
A ZERO. L'affichage clignote. Au bout de 2 sec, seule la
fonction affichée est remise à 0.
• Appuyer sur la touche REMISE A ZERO pendant plus de 4
sec remet à zéro les affichages de DISTANCE
JOURNALIERE, TEMPS PARCOURU, Ø KMH, MAX KMH.
Restablecer las indicaciones
• Pulsar la tecla MODE hasta que aparezca la función
deseada.
• Mantener pulsada la tecla RESET. La indicación parpadea.
Tras 2 segundos se restablece la función indicada a 0.
• Pulsar la tecla RESET durante más de 4 segundos
establece las indicaciones de KM DIARIOS, DURACIÓN DEL
TRAYECTO, PROMEDIO KMH, KMH MÁX. en cero.
> 2 sec
> 3,5 sec
Switching between WHEEL 1 and WHEEL 2 is automatic.
You must install (optional) transmitter of Bike 2 (red
button).
• It is no longer possible to change by making an entry.
Le changement entre la ROUE 1 et la ROUE 2 est effectué
automatiquement. Il faut utiliser l'émetteur vélo 2 (en
option) avec la touche rouge.
• Un changement manuel n'est plus possible.
El cambio entre la RUEDA 1 y RUEDA 2 se realiza
automáticamente. Debe emplearse el emisor (opcional)
rueda 2 (tecla roja).
• Ya no es posible un cambio por introducción.
4 x
90°
4 x
Bike 1
Wheel Size Chart
go to
step 3
go to
step 2
The harness comes ready to mount on your handlebars.
To mount on a stem, remove the 4 screws on the back of the harness, turn base 90 degrees.
stem mount
remove yellow tape
the SIGMA logo on the harness must
always face the front of the bike.
Foam pad included for
use with bladed spokes
To reach the required 20mm or less, move magnet
and transmitter towards center of wheel.
Note: 20mm = 3/4 inches
D
B
32
42
A
C
?
handlebar
or
stem
Red, rouge
2 mm
Red, rouge
* not while riding * pas pendant
la conduite
*no durante
la carrera
12:23
12:23
12:25
00.200
00.000
00.200
3
2
Bike 1
+

Contents / Contenu / Contenudo Installation / Montage / Montaje Installation of mounting bracket Montage du support / Montaje del soporte de bicicleta
1 2
Installation of mounting bracket Installation of magnet / Montage de l'aimant / Montaje del imán
5
Installation of speed transmitter Montage de l'émett. Vit. / Montaje del emisor de velocidad
1
Installation of speed transmitter
5
Mode / Reset Pairing / Connection / Apareado Pairing / Connection / Apareado
3 4 6 1
2 1
KMH/MPH entryRéglage KMH/MPH / Introducción KMH/MPH
UF
E
Wheel size entry Circonférence de roue / Dimensiones de la rueda
U F
E
Measure wheel size Mesurer la roue / Dimensiones de la rueda
U F
E
Time entryRéglage heure / Introducir la hora
UF
E
Total data entryRéglage des valeurs totales / Datos totales
UF
E
Contrast entryRéglage contraste / Introducción contraste
UF
E
Language EntryRéglage langue / Introducir el idioma
UF
E
Wheel size entry Circonférence de roue / Dimensiones de la rueda
U F
E
42 mm
32 mm
Basic settingsRéglages de base / Ajustes básicos
UF
E
Wheel Size Chart (Wheel Size) Wheel Size Chart (Circonférence de roue / Tamaño de rueda)
A C
B
Changing modesChangement d’affichage / Cambio de visualización
UF
E
Installation of speed transmitter Montage de l'émett. Vit. / Montaje del emisor de velocidad
3 4
2x
Left side Right side
Grey, gris
optional Bike 2
Ref. No. 00405
Pairing / Connection / Apareado Pairing / Connection / Apareado Pairing / Connection / Apareado
Installation of Bike Computer
U
F
E
F E
U F E
Pairing / Connection / Apareado
Observaciones generalesE
Cambio de la pila
Solución de problemasE
Remarques générales F Changement de batterie Solution aux problèmes FGeneral remarks U Trouble Shooting UChange batteryTechnical Data / Données techniques / Datos técnicos
U F
E
Technical data / Données techniques / Datos técnicos
Comparison speedComparaison de la vitesse / Comparación velocidad
UF
E
Reset Remise à zéro / Puesta a cero
U F
E
Assembly 2nd wheel Montage 2ème roue / Montaje 2ª rueda
U F
E
optional Bike 2
Ref. No. 00405
Grey, gris
Bike 1
+
2. KMH / MPH
•Press MODE button until KMH / MPH is displayed.
•Press SET button briefly, KMH or MPH is displayed and
flashing.
•Select MPH or KMH with MODE button.
•Confirm by pressing SET button briefly.
2. KMH / MPH
•A l'aide de la touche MODE changer le réglage KMH/MPH.
•Appuyer brièvement sur la touche SET.
•KMH ou MPH apparaît sur l'écran et clignote.
•Régler MPH ou KMH à l'aide de la touche MODE.
•Confirmer par la touche SET.
2. KMH / MPH
•Con la tecla MODE cambiar a la introducción de KMH/MPH
•Pulsar la tecla SET brevemente.
•En la pantalla aparece KMH o MPH y parpadea.
•Con la tecla MODE ajustar MPH o KMH.
•Confirmar con la tecla SET.
3. Wheel size BIKE 1
• Press MODE button to change to WS BIKE 1.
• Press SET button briefly and the first digit flashes.
• Change the number by pressing RESET button, change to
next digit by pressing mode. Repeat with next 3 numbers
until desired wheel size is entered.
• Confirm by pressing SET button briefly.
3. Circonférence de la roue VELO 1
• A l'aide de la touche MODE passer à VELO 1.
• Appuyer brièvement sur la touche SET, le premier chiffre
à entrer clignote.
• Régler la valeur à l'aide de la touche REMISE A ZERO,
passer au prochain chiffre à l'aide de la touche MODE.
• Le vélo 1 est toujours celui avec l'emetteur vélo 1
3. Dimensiones de la rueda BICICLETA 1
• Con la tecla MODE cambiar a BICICLETA 1.
• Pulsar brevemente la tecla SET, la primera cifra de
introducción parpadea.
• Con la tecla RESET ajustar el valor, con la tecla MODE
cambiar a la siguiente cifra.
• La bicicleta 1 es siempre la bicicleta con emisor rueda 1
• A partir de la tabla C "Wheel Size Chart" (véase la página
siguiente) determinar el valor correspondiente al tamaño
de la rueda. Introducir este valor.
• Alternativa: calcular/ determinar el tamaño de la rueda
(tabla A o tabla B)
• Tras la última cifra confirmar con la tecla SET.
• Determine the correct value for your wheel size from
Table C “Wheel Size Chart” (refer to next page).
• Alternative: calculate wheel size using formula Tab A or
Tab B.
• Déterminer la valeur correspondant à votre circonférence
de roue à partir du tableau C "Wheel Size Chart" (voir
page suivante). Entrer cette valeur.
• Alternative: calculer/déterminer WS (Tab. A ou tab. B).
• Après le dernier chiffre, confirmer par la touche SET.
You can enter TOTAL ODO (miles) miles and TOTAL times
from your previous computer.
Note – This step is not necessary if previous data from
another computer is not desired(skip to step 8).
6. Enter TOTAL ODO (miles)
•Press MODE button until TOTAL ODO is displayed.
•Press SET button briefly and the first digit will flash.
•Press RESET button to change each digit.
•Press MODE button to advance to next number.
•Repeat until desired number is entered.
•Confirm by pressing the SET button briefly.
7. Enter TOTAL TIME
•Press MODE button until TOTAL TIME is displayed
•Press SET button briefly and the first digit will flash.
•Press RESET button to change each digit.
•Press MODE button to advance to next number.
•Repeat until desired number is entered
•Confirm by pressing the SET button briefly.
6. KM-VELO 1/2
7. TEMPS VELO 1/2
•Réglage identique à la circonférence de la roue. Ici, vous
pouvez transférer la distance totale en km, par exemple
lors de l'achat de cet appareil, à partir d'un autre
compteur.
6. KM RUEDA 1/2
7. TIEMPO RUEDA 1/2
•Introducción como en las dimensiones de la rueda. Aquí se
puede transferir el número total de km p.ej. en caso de
compra del aparato de otro ordenador de bicicleta.
8. Contrast
•Press MODE button until contrast is displayed.
•Press SET button briefly and the display flashes.
•Set the value by pressing RESET button.
1 = light 3 = dark
•Confirm by pressing the SET button.
When you are finished entering the basic setting, press and
hold SET button for 3 seconds to exit set-up mode.
8. Contraste
•Appuyer sur la touche MODE1 jusqu'à ce que CONTRASTE
apparaisse.
•Appuyer brièvement sur la touche SET, le réglage clignote.
•A l'aide de la touche REMISE A ZERO/MODE2 régler la
valeur (1 = faible, 3 = fort). Confirmer avec la touche SET.
8. Contraste
•Pulsar la tecla MODE1 hasta que aparezca CONTRASTE.
•Pulsar brevemente la tecla SET, la introducción parpadea.
•Con la tecla RESET/MODE2 ajustar el valor (1=débil
3= fuerte). Confirmar con la tecla SET.
1. Set language
•Press MODE button until LANGUAGE is displayed
•Press the SET button briefly, the display flashes. Set the
desired language using the MODE button and confirm by
pressing SET button briefly.
4. Wheel size BIKE 2
This computer can be programmed for two bikes, if you are
only using this computer for one bike, skip this step and go
to step 5.
Changing between WHEEL SIZE 1 and WHEEL SIZE 2
occurs automatically simply by changing from bike 1
transmitter (grey button) to the optional Bike 2 transmitter
(red button).
• Press MODE button to change to WS BIKE 2.
• Press SET button briefly and the first digit flashes.
• Change the number by pressing RESET button.
• Change to next digit by pressing MODE button. Repeat
with next 3 numbers until desired wheel size is entered.
• Confirm by pressing SET button briefly.
4. Circonférence de la roue VELO 2
• A l'aide de la touche MODE passer au VELO 2.
• Appuyer brièvement sur la touche SET, le premier chiffre à
entrer clignote.
• Réglage comme pour le VELO 1 : régler les valeurs à l'aide
de la touche RESET, passer au prochain chiffre à l'aide de la
touche MODE.
• Le vélo 2 est toujours celui avec l'émetteur vélo 2
4. Dimensiones de la rueda BICICLETA 2
• Con la tecla MODE cambiar a BICICLETA 2.
• Pulsar brevemente la tecla SET, la primera cifra de introducción parpadea.
• Introducción como en RUEDA 1: Con las teclas RESET ajustar los valores,
con la tecla MODE cambiar a la cifra siguiente, etc.
• La bicicleta 2 es siempre la bicicleta con emisor rueda 2
SET
BI KE CO MPUT ER
TO PLI NE
B C 1 1 0 6 L D T S
SIG MA B IK E COMPU TE R
BC 110 6L DT S
W W W. SI G MA S P O RT. CO M
W W W. SI G MA S P O RT. CO M
SIGMA USA:
North America
1067 Kingsland Drive
Batavia, IL 60510, US A
Tel. +1-630-761-1106
Fax +1-6 30-761-1107
Toll Free: 888-744-6 277
SIGMA EUROPA:
SIGMA Elektro GmbH
Dr.- Juliu s- Leber- Straße 15
D-67433 Neustadt a.d.W.
Tel. +49-(0)63 21-9120-11 8
Fax +49- (0)6321-9120 -34
SIGMA ASIA:
Asia, Australia, South Ame rica
7F-1, No. 193, Ta-Tun 6th Street,
Taichung City, Taiwan
Tel. +886-4-2475 35 77
Fax +886 -4-2475 3563
32-630
28-630
40-622
47-622
40-635
37-622
18-622
20-622
23-622
25-622
28-622
32-622
37-622
40-622
27x1 1/4
27x1 1/4 Fifty
28x1.5
28x1.75
28x1 1/2
28x1 3/8x1 5/8
700x18C
700x20C
700x23C
700x25C
700x28C
700x32C
700x35C
700x40C
2199
2174
2224
2268
2265
2205
2102
2114
2133
2146
2149
2174
2205
2224
kmh
mph
47-305
47-406
37-540
47-507
23-571
40-559
44-559
47-559
50-559
54-559
57-559
37-590
37-584
20-571
16x1.75x2
20x1.75x2
24x1 3/8 A
24x1.75x2
26x1
26x1.5
26x1.6
26x1.75x2
26x1.9
26x2.00
26x2.125
26x1 3/8
26x1 3/8x1 1/2
26x3/4
1272
1590
1948
1907
1973
2026
2051
2070
2089
2114
2133
2105
2086
1954
ETRTO
kmh
mph
ETRTO
km/h:
WS = mm x 3.14
mph:
WS = mm x 3.14
km/h:
WS = mm
mph:
WS = mm
Printed in USA
~20 sec
A
Test: Battery
Max. 20 mm
• MODE: appel des fonctions
• RESET: remise à zéro des fonctions
DISTANCE JOURNALIERE, TEMPS PARCOURU, Ø KMH et MAX. KMH
• MODE: Activar las funciones
• RESET: Restablecimiento de las funcion.
KM DIARIOS, DURACIÓN DEL TRAYECTO, PROMEDIO KMH y KMH MÁX. a cero
• MODE: Change the functions
• RESET: Reset the functions
DAILY KM/M, TRIP TIME, AVERAGE SPEED and MAX SPEED to zero
MODE
>3 sec = RESET
TRIP DIST
TRIP TIME
AVG. SPEED
MAX. SPEED
CLOCK
TOTAL ODO*
TOTAL TIME*
TRIP DIST
TRIP TIME
AVG. SPEED
MAX. SPEED
MODE
>3 sec = RESET
KM JOUR
TEMPS PARC
VIT MOYEN.
VIT MAXI
HEURE
KM TOTAL*
TEMPSTOTAL*
KM JOUR
TEMPS PARC
VIT MOYEN.
VIT MAXI
MODE
>3 sec = RESET
KM DIA
TIEMPO PAR
VEL MEDIA
VEL MAXIMA
HORA
KM TOTAL*
TIEMPO TOT*
KM DIA
TIEMPO PAR
VEL MEDIA
VEL MAXIMA
How to change modes
•Press MODE button until the desired function is displayed
(TRIP DISTANCE, TRIP TIME, AVG. SPEED, MAX. SPEED,
CLOCK, TOTAL ODO, TOTAL TIME)
•While riding the TOTAL ODO and TOTAL TIME functions
are hidden.
Affichage des fonctions
•Appuyer sur la touche MODE jusqu'à ce que la fonction
souhaitée soit affichée (DISTANCE JOURNALIERE, TEMPS
PARCOURU, MOYENNE KMH, MAX.KMH, HEURE,
DISTANCE TOTALE EN KM, TEMPS TOTAL).
•Pendant la conduite, DISTANCE TOTALE et TEMPS TOTAL
ne sont pas affichés (moins de clics de touche lors de la
conduite).
Indicación de las funciones
•Pulsar la tecla MODE hasta que se muestre la función deseada (KM DIARIOS,
DURACIÓN DEL TRAYECTO, PROMEDIO KMH, KMH MÁX., HORA, KM
TOTALES, TIEMPO TOTAL).
•durante la carrera no se muestran KM TOTALES y TIEMPO TOTAL (menos
pulsaciones de teclas durante la carrera).
SET > 3 sec
•Press SET button for 3 sec. to enter set-up mode (SET
will appear in upper right hand corner of display when in
set-up mode, you must be in set-mode to perform steps
1-8).
•Use the set-up mode to change language, KMH/MPH,
wheel size, time, total odo, total time, and contrast.
•After changing the battery, only the time and contrast
have to be entered.
•Appuyer sur la touche SET 3 sec pour effectuer les réglages de base
suivants : langue, changement entre kmh/mph, circonférence de la
roue 1 et 2, heure, distance totale, temps total et contraste de l'écran.
Fin du menu réglage en appuyant 3 sec sur la touche SET. Après le
changement de la pile, seule l'heure et le contraste de l'écran doivent
être à nouveau rentrés.
•Pulsar la tecla Set durante 3 segundos para realizar los siguientes ajustes
básicos: idioma, cambio entre kmh/mph, dimensiones de la rueda 1 y 2,
hora, km totales, hora total y contraste de pantalla. Finalice el menú de
introducción pulsando durante 3 segundos la tecla SET. Tras un cambio de
la pila deben introducirse solo la hora y el contraste de la pantalla.
1. Régler la langue
•Appuyer sur la touche MODE jusqu'à ce que LANGUE
apparaisse sur l'écran.
•Appuyer brièvement sur la touche SET, l'affichage clignote.
Régler la langue souhaitée à l'aide de la touche MODE et
confirmer par la touche SET.
1. Ajustar el idioma
•Pulsar la tecla MODE hasta que aparezca IDIOMA en la
pantalla.
•Pulsar brevemente la tecla SET, la indicación parpadea.
Con la tecla MODE ajustar el idioma seleccionado y
confirmar con la tecla SET.
MODE
MODE
MODE
RESET
RESET
5. Time
(24 hr clock will display when using KMH, 12 hr clock will
display when using MPH)
•Press MODE button until TIME is displayed.
•Press the SET button briefly and the hour digit flashes.
•Change the hour with the RESET button.
•Advance to minutes by pressing MODE button.
•Change the minutes with the RESET button.
•Confirm by pressing the SET button briefly.
5. Heure (kmh = 24 h / mph = 12 h)
•Appuyer sur la touche MODE jusqu'à ce qu'HEURE apparaisse.
•Appuyer brièvement sur la touche SET, l'entrée clignote.
•Régler les heures à l'aide de la touche REMISE A ZERO. A
l'aide de la touche MODE passer au réglage des minutes.
•Régler les minutes à l'aide de la touche REMISE A ZERO.
Confirmer par la touche SET.
5. Hora (kmh = 24 h / mph = 12 h)
•Pulsar la tecla MODE hasta que aparezca HORA.
•Pulsar brevemente la tecla SET, la introducción parpadea.
•Con la tecla RESET ajustar el valor, con la tecla MODE
cambiar a la siguiente cifra.
•Con la tecla RESET ajustar los minutos. Confirmar con la
tecla SET.
MODE
MODE
• After installing the bike computer into mounting bracket, SPEED display will
blink ZERO.
• There are two ways to pair your transmitter and computer.
• 1. Ride. After 20 seconds (max 5 min.) the receiver will pair with
transmitter and data will be displayed.
• 2. Spin front wheel until speed display stops blinking (A).
• After 5 min. without transmission, BC 1106 DTS will go into sleep mode.
(Time of Day and Model name shown in the display). Press any button to
re-activate the computer. A short pairing will find the transmitter.
• Removing the BC 1106 DTS from the mounting bracket will end the paired
connection.
• If “TOO MANY SIGNALS” message is displayed: lengthen the distance of all
transmitters and press any button to continue. Pairing will begin again.
• Monter le compteur sur son support. Le zéro de la vitesse clignote
• Il y a deux possibilités pour connecter la vitesse et la cadence:
1. Rouler, après env. 20 secondes (max. 5 min.) le récepteur s'est connecté
avec l'émetteur, les données sont affichées.
2. Fiare tourner la roue avant jusqu'à ce que l'affichage de la vitesse ne
clignote plus (A).
ATTENTION:
• Après plus de 5 minutes de pause le BC 1106 DTS se met en mode repos
(affichage de l'heure et du nom du modèle). Pour ré-activer le compteur
appuyer sur une touche quelconque, il s'établit alors une connection courte
pour rechercher le(s) émetteur(s)
• Lorsque l'on sort le BC 1106 DTS de son support, la connection est arrêtée.
• TOO MANY SIGNALS s'affiche: Augmenter la distance par rapport aux
autres vélos et appuyer sur une touche quelconque. La connection
recommence.
• Encajar el BC 1106 DTS sobre el soporte. El cero de las indicaciones de
velocidad parpadea
• Hay dos posibilidades de emparejar la velocidad:
1. Arrancar, después de aprox. 20 segundos (max. 5 min) el receptor se ha
sincronizado con el receptor y se muestran los datos.
2. Girar la rueda delantera hasta que deje de parpadear la indicación de KMH
(A).
ATENCIÓN:
• Después de 5 minutos de pausa, el BC 1106 DTS pasa al modo de
espera (la hora y el nombre del modelo en la pantalla). Al pulsar cualquier
tecla se inicia un apareado corto para encontrar el emisor.
• Al retirar el BC 1106 DTS del soporte se desconecta la desconexión.
• Indicación TOO MANY SIGNALS (demasiadas señales): Aumentar la
distancia con otros emisores y pulsar cualquier tecla. El apareado se inicia
de nuevo.
~20 sec
A
~20 sec
A
mm x 3.14
note: 1 inch = 25.4 mm
Pila:
1 pila de litio tipo botón 2032, 3V
El cambio de pila se muestra en la pantalla.
Cambio de pila
• Si se cambia la pila DIMENSIONES DE LA
RUEDA, IDIOMA, KMH/MPH, KM
TOTALES y TIEMPO TOTAL permanecen
guardadas y no deben ser introducidas
de nuevo.
• Respetar el + y el -. Con el
compartimento de la batería abierto
tiene que verse el + de la pila.
•Si la junta de estanquidad está
desplazada, volver a colocarla.
• Tras el cambio de pila debe introducirse
de nuevo la hora.
Garantía
Nos responsabilizamos de las deficiencias
frente a nuestro socio contractual según
lo dispuesto en los reglamentos legales.
Ordenador:
Abrir la tapa con una moneda.
¡Prestar atención
a la polaridad"
Emisor:
Abrir la tapa con una herramienta.
¡Retirar la pila de la tapa!
¡Prestar atención a la polaridad!
KMH sin indicación
•¿Se utiliza el soporte antiguo del manillar
con la transmisión por radio (RDS)?
•¿Está el ordenador correctamente
encajado sobre el soporte?
•¿Se han comprobado la oxidación /
corrosión de los contactos?
•¿Distancia entre imán y sensor?
(máx. 20 mm)
•¿Se ha comprobado si el imán está
imantado?
•¿2 imanes montados?
•¿Imán posicionado correctamente?
•¿Dimensiones de la rueda (WS) mal
ajustadas?
•¿Se ha montado el emisor correcto en el
cambio de bicicleta?
Los KMH están mal indicados
Indicación en pantalla oscura o lenta
•Temperatura demasiado alta (>60° C) o
demasiado baja (<0° C)
Sin indicación en pantalla
(indicación vacía)
•Comprobar la pila
•Pila bien colocada (+ y -)
•¿Es correcto el contacto de la pila?
(comprobar con cuidado)
Ningún apareado
•Comprobar la distancia emisor/imán
•Pila del emisor vacía
•Activar el ordenador pulsando
•Comprobar alcance
•Modificar la posición del emisor al
emplear un dínamo de cubo
Indicación TOO MANY SIGNALS
(demasiadas señales):
•Aumentar la distancia con otros
emisores y pulsar una tecla
Pile:
1 pile-bouton lithium 2032, 3V
Le changement de pile est affiché est
affiché sur l'écran.
Changement de pile
• En cas de changement de pile,
CIRCONFERENCE DE LA ROUE 1/2,
LANGUE, KMH/MPH, DISTANCE TOTALE
et TEMPS TOTAL restent en mémoire et
ne doivent pas être à nouveau rentrés.
• Faire attention au plus et au moins, lorsque
le compartiment de la pile est ouvert,
vous devez voir le côté PLUS de la pile !
• En cas de déplacement du joint
d'étanchéité, le remettre en place.
• Après le changement de la pile, seul
l'heure et le contraste doivent être
à nouveau rentrés.
Garantie
Nous sommes responsables, vis-à-vis de
notre partenaire contractuel respectif, des
vices conformément aux prescriptions légales.
Les piles sont exclues de la garantie.
Compteur:
Ouvrir le couvercle avec une pièce
Attention à la
polarité!
Emetteur:
Ouvrir le couvercle avec
l'outil prévu à cet effet.
Enlever la pile du couvercle!
Attention à la polarité!
Pas d'affichage kmh
• Ancien système sans fil sur le vélo?
• Compteur bien enclenché sur le support?
• Corrosion/oxidation sur les contacts?
• Distance aimant/émetteur?
(max. 20 mm)
• Aimant magnétisé?
• 2 aimant montés?
• Aimant bien positionné?
• Circonférence de la roue (WS) bien
programmè?
• Montage du bon émetteur lors d'un
changement de vélo?
Mauvais affichage de la vitesse
Affichage noir/lent
• Température trop haute (>60°C)
ou trop basse (<0°C)
Pas d'affichage (écran vide)
• Vérifier l'état de la pile
• Pile bien mise (plus et moins)
• Contacts ok? (tordre en faisant attention)
Pas de connection
• Vérifier la distance aimant/émetteur
• Les piles de l'émetteur sont vides
• Activer le compteur en appuyant sur
une touche
• Vérifier la distance émetteur/récepteur
• Si vous utilisez une dynamo-moyeu,
changer la position de l'émetteur
Affichage TOO MANY SIGNALS
• Augmenter la distance avec les autres
vélos et appuyer sur une touche
quelconque.
Battery:
1 lithium button cell 2032, 3V
Battery change is displayed on screen.
Change batteries:
• WHEEL SIZES 1+2, LANGUAGE,
KMH/MPH, TOTAL KM and TOTAL
TIME remain saved even when the
battery is changed.
• Observe direction of plus and minus
poles; when the compartment is open
you must see the PLUS side of the
battery!
• If sealing ring is loose, re-insert it.
• After changing the battery only the
time and the contrast must be re-
entered.
Warranty
We are liable to our contracting partners
for defects as defined by law. Batteries
are excluded from the guarantee.
No display of MPH
• Using an old RDS mounting bracket?
• Check that the Bike Computer is properly
engaged in the bracket.
• Check contacts for corrosion/oxidation.
• Check distance between magnet and sensor
(max. 20 mm using Sigma's Power Magnet)
• Check if magnet is magnetized
• 2 magnets installed?
• Magnet in the right position?
• Wheel size programmed incorrectly?
• In case of you switched bikes - are you mounting
the correct transmitter?
False display of MPH
Display is black or weaken?
• Temperature too high (>60 °C) or too low (<0°C)
No Display (screen blank)
• Check Battery
• Check plus and minus poles
• Battery contact ok? (bend carefully!)
No Pairing
• Check distance between transmitter /
magnet (20mm or less with power
magnet)
• Press battery check button on
transmitter
• Activate computer by pressing any
button
• Check distance between transmitter
and receiver (max distance 90cm)
• If using a dynamo hub, change location
of transmitter.
TOO MANY SIGNALS is shown:
• Extend the distance between
transmitters and press any button
on computer to continue
Computer:
Open the top cover with a coin
Pay attention to
polarity!
Transmitter:
Open top cover with tool
Take the battery out of the top cover!
Pay attention to polarity!
Speed
TRIP DIST
TRIP TIME
ODO BIKE
TIME BIKE
WS BIKE 1/2
Vitesse
KM JOUR
TEMPS PARC
KM TOTAL
TEMPSTOTAL
CIRCONFERENCE
DE LA ROUE 1/2
Velocidad
KM DIA
TIEMPO PAR
KM TOTAL
TIEMPO TOT
DIMENSIONES
DE LA RUEDA
1/2
0.0
0.00
0:00:00
0
0:00
2,155
Default Max Units
199.5
9,999.9
999:59
99,999
9,999
3,999
kmh/mph
km/mi
h:mm:ss hh:mm hhh:mm
km/mi
h:mm hh:mm hhh:m h.hhh
mm
Speed Comparison (pace arrow)
Comparison of current speed to average speed.
•If your current speed is equal to your average speed is
shown, if lower is shown, and if higher is shown.
Vitesse/vitesse moyenne
•En cas de vitesse à peu près similaire s'affiche, en cas
de vitesse plus faible et plus élevée .
•L'affichage est effectué pour toutes les fonctions sauf
dans les réglages de base.
Velocidad / velocidad media
•En caso de velocidad casi igual se muestra , en caso de
velocidad menor y velocidad mayor .
•La indicación se realiza en todas las funciones excepto en
los ajustes básicos.
Reset
Reset Trip distance, Trip time, Average speed, and
Max speed to zero.
• Press MODE button until the desired function to zero out
displayed.
• Press and hold RESET button. The display will flash and
after 2 seconds the displayed function will clear.
• Holding RESET button longer than 4 seconds will zero out
Trip distance, Trip time, Average speed, and Max speed
functions at the same time.
Remise à zéro de l'affichage
• Appuyer sur la touche MODE jusqu'à ce que la fonction
souhaitée apparaisse. Maintenir appuyée la touche REMISE
A ZERO. L'affichage clignote. Au bout de 2 sec, seule la
fonction affichée est remise à 0.
• Appuyer sur la touche REMISE A ZERO pendant plus de 4
sec remet à zéro les affichages de DISTANCE
JOURNALIERE, TEMPS PARCOURU, Ø KMH, MAX KMH.
Restablecer las indicaciones
• Pulsar la tecla MODE hasta que aparezca la función
deseada.
• Mantener pulsada la tecla RESET. La indicación parpadea.
Tras 2 segundos se restablece la función indicada a 0.
• Pulsar la tecla RESET durante más de 4 segundos
establece las indicaciones de KM DIARIOS, DURACIÓN DEL
TRAYECTO, PROMEDIO KMH, KMH MÁX. en cero.
> 2 sec
> 3,5 sec
Switching between WHEEL 1 and WHEEL 2 is automatic.
You must install (optional) transmitter of Bike 2 (red
button).
• It is no longer possible to change by making an entry.
Le changement entre la ROUE 1 et la ROUE 2 est effectué
automatiquement. Il faut utiliser l'émetteur vélo 2 (en
option) avec la touche rouge.
• Un changement manuel n'est plus possible.
El cambio entre la RUEDA 1 y RUEDA 2 se realiza
automáticamente. Debe emplearse el emisor (opcional)
rueda 2 (tecla roja).
• Ya no es posible un cambio por introducción.
4 x
90°
4 x
Bike 1
Wheel Size Chart
go to
step 3
go to
step 2
The harness comes ready to mount on your handlebars.
To mount on a stem, remove the 4 screws on the back of the harness, turn base 90 degrees.
stem mount
remove yellow tape
the SIGMA logo on the harness must
always face the front of the bike.
Foam pad included for
use with bladed spokes
To reach the required 20mm or less, move magnet
and transmitter towards center of wheel.
Note: 20mm = 3/4 inches
32
42
?
?
handlebar
or
stem
Red, rouge
2 mm
Red, rouge
* not while riding * pas pendant
la conduite
*no durante
la carrera
12:23
12:23
12:25
00.200
00.000
00.200
3
2
Bike 1
+

Contents / Contenu / Contenudo Installation / Montage / Montaje Installation of mounting bracket Montage du support / Montaje del soporte de bicicleta
1 2
Installation of mounting bracket Installation of magnet / Montage de l'aimant / Montaje del imán
5
Installation of speed transmitter Montage de l'émett. Vit. / Montaje del emisor de velocidad
1
Installation of speed transmitter
5
Mode / Reset Pairing / Connection / Apareado Pairing / Connection / Apareado
3 4 6 1
2 1
KMH/MPH entryRéglage KMH/MPH / Introducción KMH/MPH
UF
E
Wheel size entry Circonférence de roue / Dimensiones de la rueda
U F
E
Measure wheel size Mesurer la roue / Dimensiones de la rueda
U F
E
Time entry Réglage heure / Introducir la hora
U F
E
Total data entryRéglage des valeurs totales / Datos totales
UF
E
Contrast entry Réglage contraste / Introducción contraste
U F
E
Language EntryRéglage langue / Introducir el idioma
UF
E
Wheel size entry Circonférence de roue / Dimensiones de la rueda
U F
E
42 mm
32 mm
Basic settingsRéglages de base / Ajustes básicos
UF
E
Wheel Size Chart (Wheel Size) Wheel Size Chart (Circonférence de roue / Tamaño de rueda)
A C
B
Changing modesChangement d’affichage / Cambio de visualización
UF
E
Installation of speed transmitter Montage de l'émett. Vit. / Montaje del emisor de velocidad
3 4
2x
Left side Right side
Grey, gris
optional Bike 2
Ref. No. 00405
Pairing / Connection / Apareado Pairing / Connection / Apareado Pairing / Connection / Apareado
Installation of Bike Computer
U
F
E
F E
U F E
Pairing / Connection / Apareado
Observaciones generalesE
Cambio de la pila
Solución de problemasE
Remarques générales F Changement de batterie Solution aux problèmes FGeneral remarks U Trouble Shooting UChange batteryTechnical Data / Données techniques / Datos técnicos
U F
E
Technical data / Données techniques / Datos técnicos
Comparison speedComparaison de la vitesse / Comparación velocidad
UF
E
Reset Remise à zéro / Puesta a cero
U F
E
Assembly 2nd wheel Montage 2ème roue / Montaje 2ª rueda
U F
E
optional Bike 2
Ref. No. 00405
Grey, gris
Bike 1
+
2. KMH / MPH
•Press MODE button until KMH / MPH is displayed.
•Press SET button briefly, KMH or MPH is displayed and
flashing.
•Select MPH or KMH with MODE button.
•Confirm by pressing SET button briefly.
2. KMH / MPH
•A l'aide de la touche MODE changer le réglage KMH/MPH.
•Appuyer brièvement sur la touche SET.
•KMH ou MPH apparaît sur l'écran et clignote.
•Régler MPH ou KMH à l'aide de la touche MODE.
•Confirmer par la touche SET.
2. KMH / MPH
•Con la tecla MODE cambiar a la introducción de KMH/MPH
•Pulsar la tecla SET brevemente.
•En la pantalla aparece KMH o MPH y parpadea.
•Con la tecla MODE ajustar MPH o KMH.
•Confirmar con la tecla SET.
3. Wheel size BIKE 1
• Press MODE button to change to WS BIKE 1.
• Press SET button briefly and the first digit flashes.
• Change the number by pressing RESET button, change to
next digit by pressing mode. Repeat with next 3 numbers
until desired wheel size is entered.
• Confirm by pressing SET button briefly.
3. Circonférence de la roue VELO 1
• A l'aide de la touche MODE passer à VELO 1.
• Appuyer brièvement sur la touche SET, le premier chiffre
à entrer clignote.
• Régler la valeur à l'aide de la touche REMISE A ZERO,
passer au prochain chiffre à l'aide de la touche MODE.
• Le vélo 1 est toujours celui avec l'emetteur vélo 1
3. Dimensiones de la rueda BICICLETA 1
• Con la tecla MODE cambiar a BICICLETA 1.
• Pulsar brevemente la tecla SET, la primera cifra de
introducción parpadea.
• Con la tecla RESET ajustar el valor, con la tecla MODE
cambiar a la siguiente cifra.
• La bicicleta 1 es siempre la bicicleta con emisor rueda 1
• A partir de la tabla C "Wheel Size Chart" (véase la página
siguiente) determinar el valor correspondiente al tamaño
de la rueda. Introducir este valor.
• Alternativa: calcular/ determinar el tamaño de la rueda
(tabla A o tabla B)
• Tras la última cifra confirmar con la tecla SET.
• Determine the correct value for your wheel size from
Table C “Wheel Size Chart” (refer to next page).
• Alternative: calculate wheel size using formula Tab A or
Tab B.
• Déterminer la valeur correspondant à votre circonférence
de roue à partir du tableau C "Wheel Size Chart" (voir
page suivante). Entrer cette valeur.
• Alternative: calculer/déterminer WS (Tab. A ou tab. B).
• Après le dernier chiffre, confirmer par la touche SET.
You can enter TOTAL ODO (miles) miles and TOTAL times
from your previous computer.
Note – This step is not necessary if previous data from
another computer is not desired(skip to step 8).
6. Enter TOTAL ODO (miles)
•Press MODE button until TOTAL ODO is displayed.
•Press SET button briefly and the first digit will flash.
•Press RESET button to change each digit.
•Press MODE button to advance to next number.
•Repeat until desired number is entered.
•Confirm by pressing the SET button briefly.
7. Enter TOTAL TIME
•Press MODE button until TOTAL TIME is displayed
•Press SET button briefly and the first digit will flash.
•Press RESET button to change each digit.
•Press MODE button to advance to next number.
•Repeat until desired number is entered
•Confirm by pressing the SET button briefly.
6. KM-VELO 1/2
7. TEMPS VELO 1/2
•Réglage identique à la circonférence de la roue. Ici, vous
pouvez transférer la distance totale en km, par exemple
lors de l'achat de cet appareil, à partir d'un autre
compteur.
6. KM RUEDA 1/2
7. TIEMPO RUEDA 1/2
•Introducción como en las dimensiones de la rueda. Aquí se
puede transferir el número total de km p.ej. en caso de
compra del aparato de otro ordenador de bicicleta.
8. Contrast
• Press MODE button until contrast is displayed.
• Press SET button briefly and the display flashes.
• Set the value by pressing RESET button.
1 = light 3 = dark
• Confirm by pressing the SET button.
When you are finished entering the basic setting, press and
hold SET button for 3 seconds to exit set-up mode.
8. Contraste
• Appuyer sur la touche MODE1 jusqu'à ce que CONTRASTE
apparaisse.
• Appuyer brièvement sur la touche SET, le réglage clignote.
• A l'aide de la touche REMISE A ZERO/MODE2 régler la
valeur (1 = faible, 3 = fort). Confirmer avec la touche SET.
8. Contraste
• Pulsar la tecla MODE1 hasta que aparezca CONTRASTE.
• Pulsar brevemente la tecla SET, la introducción parpadea.
• Con la tecla RESET/MODE2 ajustar el valor (1=débil
3= fuerte). Confirmar con la tecla SET.
1. Set language
•Press MODE button until LANGUAGE is displayed
•Press the SET button briefly, the display flashes. Set the
desired language using the MODE button and confirm by
pressing SET button briefly.
4. Wheel size BIKE 2
This computer can be programmed for two bikes, if you are
only using this computer for one bike, skip this step and go
to step 5.
Changing between WHEEL SIZE 1 and WHEEL SIZE 2
occurs automatically simply by changing from bike 1
transmitter (grey button) to the optional Bike 2 transmitter
(red button).
• Press MODE button to change to WS BIKE 2.
• Press SET button briefly and the first digit flashes.
• Change the number by pressing RESET button.
• Change to next digit by pressing MODE button. Repeat
with next 3 numbers until desired wheel size is entered.
• Confirm by pressing SET button briefly.
4. Circonférence de la roue VELO 2
• A l'aide de la touche MODE passer au VELO 2.
• Appuyer brièvement sur la touche SET, le premier chiffre à
entrer clignote.
• Réglage comme pour le VELO 1 : régler les valeurs à l'aide
de la touche RESET, passer au prochain chiffre à l'aide de la
touche MODE.
• Le vélo 2 est toujours celui avec l'émetteur vélo 2
4. Dimensiones de la rueda BICICLETA 2
• Con la tecla MODE cambiar a BICICLETA 2.
• Pulsar brevemente la tecla SET, la primera cifra de introducción parpadea.
• Introducción como en RUEDA 1: Con las teclas RESET ajustar los valores,
con la tecla MODE cambiar a la cifra siguiente, etc.
• La bicicleta 2 es siempre la bicicleta con emisor rueda 2
SET
BI KE CO MPUT ER
TO PLI NE
B C 1 1 0 6 L D T S
SIG MA B IK E COMPU TE R
BC 110 6L DT S
W W W. SI G MA S P O RT. CO M
W W W. SI G MA S P O RT. CO M
SIGMA USA:
North America
1067 Kingsland Drive
Batavia, IL 60510, US A
Tel. +1-630-761-1106
Fax +1-6 30-761-1107
Toll Free: 888-744-6 277
SIGMA EUROPA:
SIGMA Elektro GmbH
Dr.- Juliu s- Leber- Straße 15
D-67433 Neustadt a.d.W.
Tel. +49-(0)63 21-9120-11 8
Fax +49- (0)6321-9120 -34
SIGMA ASIA:
Asia, Australia, South Ame rica
7F-1, No. 193, Ta-Tun 6th Street,
Taichung City, Taiwan
Tel. +886-4-2475 35 77
Fax +886 -4-2475 3563
32-630
28-630
40-622
47-622
40-635
37-622
18-622
20-622
23-622
25-622
28-622
32-622
37-622
40-622
27x1 1/4
27x1 1/4 Fifty
28x1.5
28x1.75
28x1 1/2
28x1 3/8x1 5/8
700x18C
700x20C
700x23C
700x25C
700x28C
700x32C
700x35C
700x40C
2199
2174
2224
2268
2265
2205
2102
2114
2133
2146
2149
2174
2205
2224
kmh
mph
47-305
47-406
37-540
47-507
23-571
40-559
44-559
47-559
50-559
54-559
57-559
37-590
37-584
20-571
16x1.75x2
20x1.75x2
24x1 3/8 A
24x1.75x2
26x1
26x1.5
26x1.6
26x1.75x2
26x1.9
26x2.00
26x2.125
26x1 3/8
26x1 3/8x1 1/2
26x3/4
1272
1590
1948
1907
1973
2026
2051
2070
2089
2114
2133
2105
2086
1954
ETRTO
kmh
mph
ETRTO
km/h:
WS = mm x 3.14
mph:
WS = mm x 3.14
km/h:
WS = mm
mph:
WS = mm
Printed in USA
~20 sec
A
42
Test: Battery
Max. 20 mm
• MODE: appel des fonctions
• RESET: remise à zéro des fonctions
DISTANCE JOURNALIERE, TEMPS PARCOURU, Ø KMH et MAX. KMH
• MODE: Activar las funciones
• RESET: Restablecimiento de las funcion.
KM DIARIOS, DURACIÓN DEL TRAYECTO, PROMEDIO KMH y KMH MÁX. a cero
• MODE: Change the functions
• RESET: Reset the functions
DAILY KM/M, TRIP TIME, AVERAGE SPEED and MAX SPEED to zero
MODE
>3 sec = RESET
TRIP DIST
TRIP TIME
AVG. SPEED
MAX. SPEED
CLOCK
TOTAL ODO*
TOTAL TIME*
TRIP DIST
TRIP TIME
AVG. SPEED
MAX. SPEED
MODE
>3 sec = RESET
KM JOUR
TEMPS PARC
VIT MOYEN.
VIT MAXI
HEURE
KM TOTAL*
TEMPSTOTAL*
KM JOUR
TEMPS PARC
VIT MOYEN.
VIT MAXI
MODE
>3 sec = RESET
KM DIA
TIEMPO PAR
VEL MEDIA
VEL MAXIMA
HORA
KM TOTAL*
TIEMPO TOT*
KM DIA
TIEMPO PAR
VEL MEDIA
VEL MAXIMA
How to change modes
•Press MODE button until the desired function is displayed
(TRIP DISTANCE, TRIP TIME, AVG. SPEED, MAX. SPEED,
CLOCK, TOTAL ODO, TOTAL TIME)
•While riding the TOTAL ODO and TOTAL TIME functions
are hidden.
Affichage des fonctions
•Appuyer sur la touche MODE jusqu'à ce que la fonction
souhaitée soit affichée (DISTANCE JOURNALIERE, TEMPS
PARCOURU, MOYENNE KMH, MAX.KMH, HEURE,
DISTANCE TOTALE EN KM, TEMPS TOTAL).
•Pendant la conduite, DISTANCE TOTALE et TEMPS TOTAL
ne sont pas affichés (moins de clics de touche lors de la
conduite).
Indicación de las funciones
•Pulsar la tecla MODE hasta que se muestre la función deseada (KM DIARIOS,
DURACIÓN DEL TRAYECTO, PROMEDIO KMH, KMH MÁX., HORA, KM
TOTALES, TIEMPO TOTAL).
•durante la carrera no se muestran KM TOTALES y TIEMPO TOTAL (menos
pulsaciones de teclas durante la carrera).
SET > 3 sec
•Press SET button for 3 sec. to enter set-up mode (SET
will appear in upper right hand corner of display when in
set-up mode, you must be in set-mode to perform steps
1-8).
•Use the set-up mode to change language, KMH/MPH,
wheel size, time, total odo, total time, and contrast.
•After changing the battery, only the time and contrast
have to be entered.
•Appuyer sur la touche SET 3 sec pour effectuer les réglages de base
suivants : langue, changement entre kmh/mph, circonférence de la
roue 1 et 2, heure, distance totale, temps total et contraste de l'écran.
Fin du menu réglage en appuyant 3 sec sur la touche SET. Après le
changement de la pile, seule l'heure et le contraste de l'écran doivent
être à nouveau rentrés.
•Pulsar la tecla Set durante 3 segundos para realizar los siguientes ajustes
básicos: idioma, cambio entre kmh/mph, dimensiones de la rueda 1 y 2,
hora, km totales, hora total y contraste de pantalla. Finalice el menú de
introducción pulsando durante 3 segundos la tecla SET. Tras un cambio de
la pila deben introducirse solo la hora y el contraste de la pantalla.
1. Régler la langue
•Appuyer sur la touche MODE jusqu'à ce que LANGUE
apparaisse sur l'écran.
•Appuyer brièvement sur la touche SET, l'affichage clignote.
Régler la langue souhaitée à l'aide de la touche MODE et
confirmer par la touche SET.
1. Ajustar el idioma
•Pulsar la tecla MODE hasta que aparezca IDIOMA en la
pantalla.
•Pulsar brevemente la tecla SET, la indicación parpadea.
Con la tecla MODE ajustar el idioma seleccionado y
confirmar con la tecla SET.
MODE
MODE
MODE
RESET
RESET
5. Time
(24 hr clock will display when using KMH, 12 hr clock will
display when using MPH)
• Press MODE button until TIME is displayed.
• Press the SET button briefly and the hour digit flashes.
• Change the hour with the RESET button.
• Advance to minutes by pressing MODE button.
• Change the minutes with the RESET button.
• Confirm by pressing the SET button briefly.
5. Heure (kmh = 24 h / mph = 12 h)
• Appuyer sur la touche MODE jusqu'à ce qu'HEURE apparaisse.
• Appuyer brièvement sur la touche SET, l'entrée clignote.
• Régler les heures à l'aide de la touche REMISE A ZERO. A
l'aide de la touche MODE passer au réglage des minutes.
• Régler les minutes à l'aide de la touche REMISE A ZERO.
Confirmer par la touche SET.
5. Hora (kmh = 24 h / mph = 12 h)
• Pulsar la tecla MODE hasta que aparezca HORA.
• Pulsar brevemente la tecla SET, la introducción parpadea.
• Con la tecla RESET ajustar el valor, con la tecla MODE
cambiar a la siguiente cifra.
• Con la tecla RESET ajustar los minutos. Confirmar con la
tecla SET.
MODE
MODE
• After installing the bike computer into mounting bracket, SPEED display will
blink ZERO.
• There are two ways to pair your transmitter and computer.
• 1. Ride. After 20 seconds (max 5 min.) the receiver will pair with
transmitter and data will be displayed.
• 2. Spin front wheel until speed display stops blinking (A).
• After 5 min. without transmission, BC 1106 DTS will go into sleep mode.
(Time of Day and Model name shown in the display). Press any button to
re-activate the computer. A short pairing will find the transmitter.
• Removing the BC 1106 DTS from the mounting bracket will end the paired
connection.
• If “TOO MANY SIGNALS” message is displayed: lengthen the distance of all
transmitters and press any button to continue. Pairing will begin again.
• Monter le compteur sur son support. Le zéro de la vitesse clignote
• Il y a deux possibilités pour connecter la vitesse et la cadence:
1. Rouler, après env. 20 secondes (max. 5 min.) le récepteur s'est connecté
avec l'émetteur, les données sont affichées.
2. Fiare tourner la roue avant jusqu'à ce que l'affichage de la vitesse ne
clignote plus (A).
ATTENTION:
• Après plus de 5 minutes de pause le BC 1106 DTS se met en mode repos
(affichage de l'heure et du nom du modèle). Pour ré-activer le compteur
appuyer sur une touche quelconque, il s'établit alors une connection courte
pour rechercher le(s) émetteur(s)
• Lorsque l'on sort le BC 1106 DTS de son support, la connection est arrêtée.
• TOO MANY SIGNALS s'affiche: Augmenter la distance par rapport aux
autres vélos et appuyer sur une touche quelconque. La connection
recommence.
• Encajar el BC 1106 DTS sobre el soporte. El cero de las indicaciones de
velocidad parpadea
• Hay dos posibilidades de emparejar la velocidad:
1. Arrancar, después de aprox. 20 segundos (max. 5 min) el receptor se ha
sincronizado con el receptor y se muestran los datos.
2. Girar la rueda delantera hasta que deje de parpadear la indicación de KMH
(A).
ATENCIÓN:
• Después de 5 minutos de pausa, el BC 1106 DTS pasa al modo de
espera (la hora y el nombre del modelo en la pantalla). Al pulsar cualquier
tecla se inicia un apareado corto para encontrar el emisor.
• Al retirar el BC 1106 DTS del soporte se desconecta la desconexión.
• Indicación TOO MANY SIGNALS (demasiadas señales): Aumentar la
distancia con otros emisores y pulsar cualquier tecla. El apareado se inicia
de nuevo.
~20 sec
A
~20 sec
A
mm x 3.14
note: 1 inch = 25.4 mm
Pila:
1 pila de litio tipo botón 2032, 3V
El cambio de pila se muestra en la pantalla.
Cambio de pila
• Si se cambia la pila DIMENSIONES DE LA
RUEDA, IDIOMA, KMH/MPH, KM
TOTALES y TIEMPO TOTAL permanecen
guardadas y no deben ser introducidas
de nuevo.
• Respetar el + y el -. Con el
compartimento de la batería abierto
tiene que verse el + de la pila.
•Si la junta de estanquidad está
desplazada, volver a colocarla.
• Tras el cambio de pila debe introducirse
de nuevo la hora.
Garantía
Nos responsabilizamos de las deficiencias
frente a nuestro socio contractual según
lo dispuesto en los reglamentos legales.
Ordenador:
Abrir la tapa con una moneda.
¡Prestar atención
a la polaridad"
Emisor:
Abrir la tapa con una herramienta.
¡Retirar la pila de la tapa!
¡Prestar atención a la polaridad!
KMH sin indicación
•¿Se utiliza el soporte antiguo del manillar
con la transmisión por radio (RDS)?
•¿Está el ordenador correctamente
encajado sobre el soporte?
•¿Se han comprobado la oxidación /
corrosión de los contactos?
•¿Distancia entre imán y sensor?
(máx. 20 mm)
•¿Se ha comprobado si el imán está
imantado?
•¿2 imanes montados?
•¿Imán posicionado correctamente?
•¿Dimensiones de la rueda (WS) mal
ajustadas?
•¿Se ha montado el emisor correcto en el
cambio de bicicleta?
Los KMH están mal indicados
Indicación en pantalla oscura o lenta
•Temperatura demasiado alta (>60° C) o
demasiado baja (<0° C)
Sin indicación en pantalla
(indicación vacía)
•Comprobar la pila
•Pila bien colocada (+ y -)
•¿Es correcto el contacto de la pila?
(comprobar con cuidado)
Ningún apareado
•Comprobar la distancia emisor/imán
•Pila del emisor vacía
•Activar el ordenador pulsando
•Comprobar alcance
•Modificar la posición del emisor al
emplear un dínamo de cubo
Indicación TOO MANY SIGNALS
(demasiadas señales):
•Aumentar la distancia con otros
emisores y pulsar una tecla
Pile:
1 pile-bouton lithium 2032, 3V
Le changement de pile est affiché est
affiché sur l'écran.
Changement de pile
• En cas de changement de pile,
CIRCONFERENCE DE LA ROUE 1/2,
LANGUE, KMH/MPH, DISTANCE TOTALE
et TEMPS TOTAL restent en mémoire et
ne doivent pas être à nouveau rentrés.
• Faire attention au plus et au moins, lorsque
le compartiment de la pile est ouvert,
vous devez voir le côté PLUS de la pile !
• En cas de déplacement du joint
d'étanchéité, le remettre en place.
• Après le changement de la pile, seul
l'heure et le contraste doivent être
à nouveau rentrés.
Garantie
Nous sommes responsables, vis-à-vis de
notre partenaire contractuel respectif, des
vices conformément aux prescriptions légales.
Les piles sont exclues de la garantie.
Compteur:
Ouvrir le couvercle avec une pièce
Attention à la
polarité!
Emetteur:
Ouvrir le couvercle avec
l'outil prévu à cet effet.
Enlever la pile du couvercle!
Attention à la polarité!
Pas d'affichage kmh
• Ancien système sans fil sur le vélo?
• Compteur bien enclenché sur le support?
• Corrosion/oxidation sur les contacts?
• Distance aimant/émetteur?
(max. 20 mm)
• Aimant magnétisé?
• 2 aimant montés?
• Aimant bien positionné?
• Circonférence de la roue (WS) bien
programmè?
• Montage du bon émetteur lors d'un
changement de vélo?
Mauvais affichage de la vitesse
Affichage noir/lent
• Température trop haute (>60°C)
ou trop basse (<0°C)
Pas d'affichage (écran vide)
• Vérifier l'état de la pile
• Pile bien mise (plus et moins)
• Contacts ok? (tordre en faisant attention)
Pas de connection
• Vérifier la distance aimant/émetteur
• Les piles de l'émetteur sont vides
• Activer le compteur en appuyant sur
une touche
• Vérifier la distance émetteur/récepteur
• Si vous utilisez une dynamo-moyeu,
changer la position de l'émetteur
Affichage TOO MANY SIGNALS
• Augmenter la distance avec les autres
vélos et appuyer sur une touche
quelconque.
Battery:
1 lithium button cell 2032, 3V
Battery change is displayed on screen.
Change batteries:
• WHEEL SIZES 1+2, LANGUAGE,
KMH/MPH, TOTAL KM and TOTAL
TIME remain saved even when the
battery is changed.
• Observe direction of plus and minus
poles; when the compartment is open
you must see the PLUS side of the
battery!
• If sealing ring is loose, re-insert it.
• After changing the battery only the
time and the contrast must be re-
entered.
Warranty
We are liable to our contracting partners
for defects as defined by law. Batteries
are excluded from the guarantee.
No display of MPH
• Using an old RDS mounting bracket?
• Check that the Bike Computer is properly
engaged in the bracket.
• Check contacts for corrosion/oxidation.
• Check distance between magnet and sensor
(max. 20 mm using Sigma's Power Magnet)
• Check if magnet is magnetized
• 2 magnets installed?
• Magnet in the right position?
• Wheel size programmed incorrectly?
• In case of you switched bikes - are you mounting
the correct transmitter?
False display of MPH
Display is black or weaken?
• Temperature too high (>60 °C) or too low (<0°C)
No Display (screen blank)
• Check Battery
• Check plus and minus poles
• Battery contact ok? (bend carefully!)
No Pairing
• Check distance between transmitter /
magnet (20mm or less with power
magnet)
• Press battery check button on
transmitter
• Activate computer by pressing any
button
• Check distance between transmitter
and receiver (max distance 90cm)
• If using a dynamo hub, change location
of transmitter.
TOO MANY SIGNALS is shown:
• Extend the distance between
transmitters and press any button
on computer to continue
Computer:
Open the top cover with a coin
Pay attention to
polarity!
Transmitter:
Open top cover with tool
Take the battery out of the top cover!
Pay attention to polarity!
Speed
TRIP DIST
TRIP TIME
ODO BIKE
TIME BIKE
WS BIKE 1/2
Vitesse
KM JOUR
TEMPS PARC
KM TOTAL
TEMPSTOTAL
CIRCONFERENCE
DE LA ROUE 1/2
Velocidad
KM DIA
TIEMPO PAR
KM TOTAL
TIEMPO TOT
DIMENSIONES
DE LA RUEDA
1/2
0.0
0.00
0:00:00
0
0:00
2,155
Default Max Units
199.5
9,999.9
999:59
99,999
9,999
3,999
kmh/mph
km/mi
h:mm:ss hh:mm hhh:mm
km/mi
h:mm hh:mm hhh:m h.hhh
mm
Speed Comparison (pace arrow)
Comparison of current speed to average speed.
•If your current speed is equal to your average speed is
shown, if lower is shown, and if higher is shown.
Vitesse/vitesse moyenne
•En cas de vitesse à peu près similaire s'affiche, en cas
de vitesse plus faible et plus élevée .
•L'affichage est effectué pour toutes les fonctions sauf
dans les réglages de base.
Velocidad / velocidad media
•En caso de velocidad casi igual se muestra , en caso de
velocidad menor y velocidad mayor .
•La indicación se realiza en todas las funciones excepto en
los ajustes básicos.
Reset
Reset Trip distance, Trip time, Average speed, and
Max speed to zero.
• Press MODE button until the desired function to zero out
displayed.
• Press and hold RESET button. The display will flash and
after 2 seconds the displayed function will clear.
• Holding RESET button longer than 4 seconds will zero out
Trip distance, Trip time, Average speed, and Max speed
functions at the same time.
Remise à zéro de l'affichage
• Appuyer sur la touche MODE jusqu'à ce que la fonction
souhaitée apparaisse. Maintenir appuyée la touche REMISE
A ZERO. L'affichage clignote. Au bout de 2 sec, seule la
fonction affichée est remise à 0.
• Appuyer sur la touche REMISE A ZERO pendant plus de 4
sec remet à zéro les affichages de DISTANCE
JOURNALIERE, TEMPS PARCOURU, Ø KMH, MAX KMH.
Restablecer las indicaciones
• Pulsar la tecla MODE hasta que aparezca la función
deseada.
• Mantener pulsada la tecla RESET. La indicación parpadea.
Tras 2 segundos se restablece la función indicada a 0.
• Pulsar la tecla RESET durante más de 4 segundos
establece las indicaciones de KM DIARIOS, DURACIÓN DEL
TRAYECTO, PROMEDIO KMH, KMH MÁX. en cero.
> 2 sec
> 3,5 sec
Switching between WHEEL 1 and WHEEL 2 is automatic.
You must install (optional) transmitter of Bike 2 (red
button).
• It is no longer possible to change by making an entry.
Le changement entre la ROUE 1 et la ROUE 2 est effectué
automatiquement. Il faut utiliser l'émetteur vélo 2 (en
option) avec la touche rouge.
• Un changement manuel n'est plus possible.
El cambio entre la RUEDA 1 y RUEDA 2 se realiza
automáticamente. Debe emplearse el emisor (opcional)
rueda 2 (tecla roja).
• Ya no es posible un cambio por introducción.
4 x
90°
4 x
Bike 1
Wheel Size Chart
go to
step 3
go to
step 2
The harness comes ready to mount on your handlebars.
To mount on a stem, remove the 4 screws on the back of the harness, turn base 90 degrees.
stem mount
remove yellow tape
the SIGMA logo on the harness must
always face the front of the bike.
Foam pad included for
use with bladed spokes
To reach the required 20mm or less, move magnet
and transmitter towards center of wheel.
Note: 20mm = 3/4 inches
32
42
?
handlebar
or
stem
Red, rouge
2 m m
Red, rouge
* not while riding * pas pendant
la conduite
*no durante
la carrera
12:23
12:23
12:25
00.200
00.000
00.200
3
2
Bike 1
+

Contents / Contenu / Contenudo Installation / Montage / Montaje Installation of mounting bracket Montage du support / Montaje del soporte de bicicleta
1 2
Installation of mounting bracket Installation of magnet / Montage de l'aimant / Montaje del imán
5
Installation of speed transmitter Montage de l'émett. Vit. / Montaje del emisor de velocidad
1
Installation of speed transmitter
5
Mode / Reset Pairing / Connection / Apareado Pairing / Connection / Apareado
3 4 6 1
2 1
KMH/MPH entryRéglage KMH/MPH / Introducción KMH/MPH
UF
E
Wheel size entry Circonférence de roue / Dimensiones de la rueda
U F
E
Measure wheel size Mesurer la roue / Dimensiones de la rueda
U F
E
Time entry Réglage heure / Introducir la hora
U F
E
Total data entryRéglage des valeurs totales / Datos totales
UF
E
Contrast entry Réglage contraste / Introducción contraste
U F
E
Language EntryRéglage langue / Introducir el idioma
UF
E
Wheel size entry Circonférence de roue / Dimensiones de la rueda
U F
E
42 mm
32 mm
Basic settingsRéglages de base / Ajustes básicos
UF
E
Wheel Size Chart (Wheel Size) Wheel Size Chart (Circonférence de roue / Tamaño de rueda)
A C
B
Changing modes Changement d’affichage / Cambio de visualización
U F
E
Installation of speed transmitter Montage de l'émett. Vit. / Montaje del emisor de velocidad
3 4
max. 90 cm
max. 30˚
2x
Left side Right side
Grey, gris
optional Bike 2
Ref. No. 00405
Pairing / Connection / Apareado Pairing / Connection / Apareado Pairing / Connection / Apareado
Installation of Bike Computer
U
F
E
F E
U F E
Pairing / Connection / Apareado
Observaciones generales E
Cambio de la pila
Solución de problemasE
Remarques générales F Changement de batterie Solution aux problèmes FGeneral remarks U Trouble Shooting UChange batteryTechnical Data / Données techniques / Datos técnicos
U F
E
Technical data / Données techniques / Datos técnicos
Comparison speedComparaison de la vitesse / Comparación velocidad
UF
E
Reset Remise à zéro / Puesta a cero
U F
E
Assembly 2nd wheel Montage 2ème roue / Montaje 2ª rueda
U F
E
optional Bike 2
Ref. No. 00405
Grey, gris
Bike 1
+
2. KMH / MPH
•Press MODE button until KMH / MPH is displayed.
•Press SET button briefly, KMH or MPH is displayed and
flashing.
•Select MPH or KMH with MODE button.
•Confirm by pressing SET button briefly.
2. KMH / MPH
•A l'aide de la touche MODE changer le réglage KMH/MPH.
•Appuyer brièvement sur la touche SET.
•KMH ou MPH apparaît sur l'écran et clignote.
•Régler MPH ou KMH à l'aide de la touche MODE.
•Confirmer par la touche SET.
2. KMH / MPH
•Con la tecla MODE cambiar a la introducción de KMH/MPH
•Pulsar la tecla SET brevemente.
•En la pantalla aparece KMH o MPH y parpadea.
•Con la tecla MODE ajustar MPH o KMH.
•Confirmar con la tecla SET.
3. Wheel size BIKE 1
• Press MODE button to change to WS BIKE 1.
• Press SET button briefly and the first digit flashes.
• Change the number by pressing RESET button, change to
next digit by pressing mode. Repeat with next 3 numbers
until desired wheel size is entered.
• Confirm by pressing SET button briefly.
3. Circonférence de la roue VELO 1
• A l'aide de la touche MODE passer à VELO 1.
• Appuyer brièvement sur la touche SET, le premier chiffre
à entrer clignote.
• Régler la valeur à l'aide de la touche REMISE A ZERO,
passer au prochain chiffre à l'aide de la touche MODE.
• Le vélo 1 est toujours celui avec l'emetteur vélo 1
3. Dimensiones de la rueda BICICLETA 1
• Con la tecla MODE cambiar a BICICLETA 1.
• Pulsar brevemente la tecla SET, la primera cifra de
introducción parpadea.
• Con la tecla RESET ajustar el valor, con la tecla MODE
cambiar a la siguiente cifra.
• La bicicleta 1 es siempre la bicicleta con emisor rueda 1
• A partir de la tabla C "Wheel Size Chart" (véase la página
siguiente) determinar el valor correspondiente al tamaño
de la rueda. Introducir este valor.
• Alternativa: calcular/ determinar el tamaño de la rueda
(tabla A o tabla B)
• Tras la última cifra confirmar con la tecla SET.
• Determine the correct value for your wheel size from
Table C “Wheel Size Chart” (refer to next page).
• Alternative: calculate wheel size using formula Tab A or
Tab B.
• Déterminer la valeur correspondant à votre circonférence
de roue à partir du tableau C "Wheel Size Chart" (voir
page suivante). Entrer cette valeur.
• Alternative: calculer/déterminer WS (Tab. A ou tab. B).
• Après le dernier chiffre, confirmer par la touche SET.
You can enter TOTAL ODO (miles) miles and TOTAL times
from your previous computer.
Note – This step is not necessary if previous data from
another computer is not desired(skip to step 8).
6. Enter TOTAL ODO (miles)
•Press MODE button until TOTAL ODO is displayed.
•Press SET button briefly and the first digit will flash.
•Press RESET button to change each digit.
•Press MODE button to advance to next number.
•Repeat until desired number is entered.
•Confirm by pressing the SET button briefly.
7. Enter TOTAL TIME
•Press MODE button until TOTAL TIME is displayed
•Press SET button briefly and the first digit will flash.
•Press RESET button to change each digit.
•Press MODE button to advance to next number.
•Repeat until desired number is entered
•Confirm by pressing the SET button briefly.
6. KM-VELO 1/2
7. TEMPS VELO 1/2
•Réglage identique à la circonférence de la roue. Ici, vous
pouvez transférer la distance totale en km, par exemple
lors de l'achat de cet appareil, à partir d'un autre
compteur.
6. KM RUEDA 1/2
7. TIEMPO RUEDA 1/2
•Introducción como en las dimensiones de la rueda. Aquí se
puede transferir el número total de km p.ej. en caso de
compra del aparato de otro ordenador de bicicleta.
8. Contrast
• Press MODE button until contrast is displayed.
• Press SET button briefly and the display flashes.
• Set the value by pressing RESET button.
1 = light 3 = dark
• Confirm by pressing the SET button.
When you are finished entering the basic setting, press and
hold SET button for 3 seconds to exit set-up mode.
8. Contraste
• Appuyer sur la touche MODE1 jusqu'à ce que CONTRASTE
apparaisse.
• Appuyer brièvement sur la touche SET, le réglage clignote.
• A l'aide de la touche REMISE A ZERO/MODE2 régler la
valeur (1 = faible, 3 = fort). Confirmer avec la touche SET.
8. Contraste
• Pulsar la tecla MODE1 hasta que aparezca CONTRASTE.
• Pulsar brevemente la tecla SET, la introducción parpadea.
• Con la tecla RESET/MODE2 ajustar el valor (1=débil
3= fuerte). Confirmar con la tecla SET.
1. Set language
•Press MODE button until LANGUAGE is displayed
•Press the SET button briefly, the display flashes. Set the
desired language using the MODE button and confirm by
pressing SET button briefly.
4. Wheel size BIKE 2
This computer can be programmed for two bikes, if you are
only using this computer for one bike, skip this step and go
to step 5.
Changing between WHEEL SIZE 1 and WHEEL SIZE 2
occurs automatically simply by changing from bike 1
transmitter (grey button) to the optional Bike 2 transmitter
(red button).
• Press MODE button to change to WS BIKE 2.
• Press SET button briefly and the first digit flashes.
• Change the number by pressing RESET button.
• Change to next digit by pressing MODE button. Repeat
with next 3 numbers until desired wheel size is entered.
• Confirm by pressing SET button briefly.
4. Circonférence de la roue VELO 2
• A l'aide de la touche MODE passer au VELO 2.
• Appuyer brièvement sur la touche SET, le premier chiffre à
entrer clignote.
• Réglage comme pour le VELO 1 : régler les valeurs à l'aide
de la touche RESET, passer au prochain chiffre à l'aide de la
touche MODE.
• Le vélo 2 est toujours celui avec l'émetteur vélo 2
4. Dimensiones de la rueda BICICLETA 2
• Con la tecla MODE cambiar a BICICLETA 2.
• Pulsar brevemente la tecla SET, la primera cifra de introducción parpadea.
• Introducción como en RUEDA 1: Con las teclas RESET ajustar los valores,
con la tecla MODE cambiar a la cifra siguiente, etc.
• La bicicleta 2 es siempre la bicicleta con emisor rueda 2
SET
BI KE CO MPUT ER
TO PLI NE
B C 1 1 0 6 L D T S
SIG MA B IK E COMPU TE R
BC 110 6L DT S
W W W. SI G MA S P O RT. CO M
W W W. SI G MA S P O RT. CO M
SIGMA USA:
North America
1067 Kingsland Drive
Batavia, IL 60510, US A
Tel. +1-630-761-1106
Fax +1-6 30-761-1107
Toll Free: 888-744-6 277
SIGMA EUROPA:
SIGMA Elektro GmbH
Dr.- Juliu s- Leber- Straße 15
D-67433 Neustadt a.d.W.
Tel. +49-(0)63 21-9120-11 8
Fax +49- (0)6321-9120 -34
SIGMA ASIA:
Asia, Australia, South Ame rica
7F-1, No. 193, Ta-Tun 6th Street,
Taichung City, Taiwan
Tel. +886-4-2475 35 77
Fax +886 -4-2475 3563
32-630
28-630
40-622
47-622
40-635
37-622
18-622
20-622
23-622
25-622
28-622
32-622
37-622
40-622
27x1 1/4
27x1 1/4 Fifty
28x1.5
28x1.75
28x1 1/2
28x1 3/8x1 5/8
700x18C
700x20C
700x23C
700x25C
700x28C
700x32C
700x35C
700x40C
2199
2174
2224
2268
2265
2205
2102
2114
2133
2146
2149
2174
2205
2224
kmh
mph
47-305
47-406
37-540
47-507
23-571
40-559
44-559
47-559
50-559
54-559
57-559
37-590
37-584
20-571
16x1.75x2
20x1.75x2
24x1 3/8 A
24x1.75x2
26x1
26x1.5
26x1.6
26x1.75x2
26x1.9
26x2.00
26x2.125
26x1 3/8
26x1 3/8x1 1/2
26x3/4
1272
1590
1948
1907
1973
2026
2051
2070
2089
2114
2133
2105
2086
1954
ETRTO
kmh
mph
ETRTO
km/h:
WS = mm x 3.14
mph:
WS = mm x 3.14
km/h:
WS = mm
mph:
WS = mm
Printed in USA
~20 sec
A
Test: Battery
Max. 20 mm
• MODE: appel des fonctions
• RESET: remise à zéro des fonctions
DISTANCE JOURNALIERE, TEMPS PARCOURU, Ø KMH et MAX. KMH
• MODE: Activar las funciones
• RESET: Restablecimiento de las funcion.
KM DIARIOS, DURACIÓN DEL TRAYECTO, PROMEDIO KMH y KMH MÁX. a cero
• MODE: Change the functions
• RESET: Reset the functions
DAILY KM/M, TRIP TIME, AVERAGE SPEED and MAX SPEED to zero
MODE
>3 sec = RESET
TRIP DIST
TRIP TIME
AVG. SPEED
MAX. SPEED
CLOCK
TOTAL ODO*
TOTAL TIME*
TRIP DIST
TRIP TIME
AVG. SPEED
MAX. SPEED
MODE
>3 sec = RESET
KM JOUR
TEMPS PARC
VIT MOYEN.
VIT MAXI
HEURE
KM TOTAL*
TEMPSTOTAL*
KM JOUR
TEMPS PARC
VIT MOYEN.
VIT MAXI
MODE
>3 sec = RESET
KM DIA
TIEMPO PAR
VEL MEDIA
VEL MAXIMA
HORA
KM TOTAL*
TIEMPO TOT*
KM DIA
TIEMPO PAR
VEL MEDIA
VEL MAXIMA
How to change modes
•Press MODE button until the desired function is displayed
(TRIP DISTANCE, TRIP TIME, AVG. SPEED, MAX. SPEED,
CLOCK, TOTAL ODO, TOTAL TIME)
•While riding the TOTAL ODO and TOTAL TIME functions
are hidden.
Affichage des fonctions
•Appuyer sur la touche MODE jusqu'à ce que la fonction
souhaitée soit affichée (DISTANCE JOURNALIERE, TEMPS
PARCOURU, MOYENNE KMH, MAX.KMH, HEURE,
DISTANCE TOTALE EN KM, TEMPS TOTAL).
•Pendant la conduite, DISTANCE TOTALE et TEMPS TOTAL
ne sont pas affichés (moins de clics de touche lors de la
conduite).
Indicación de las funciones
•Pulsar la tecla MODE hasta que se muestre la función deseada (KM DIARIOS,
DURACIÓN DEL TRAYECTO, PROMEDIO KMH, KMH MÁX., HORA, KM
TOTALES, TIEMPO TOTAL).
•durante la carrera no se muestran KM TOTALES y TIEMPO TOTAL (menos
pulsaciones de teclas durante la carrera).
SET > 3 sec
•Press SET button for 3 sec. to enter set-up mode (SET
will appear in upper right hand corner of display when in
set-up mode, you must be in set-mode to perform steps
1-8).
•Use the set-up mode to change language, KMH/MPH,
wheel size, time, total odo, total time, and contrast.
•After changing the battery, only the time and contrast
have to be entered.
•Appuyer sur la touche SET 3 sec pour effectuer les réglages de base
suivants : langue, changement entre kmh/mph, circonférence de la
roue 1 et 2, heure, distance totale, temps total et contraste de l'écran.
Fin du menu réglage en appuyant 3 sec sur la touche SET. Après le
changement de la pile, seule l'heure et le contraste de l'écran doivent
être à nouveau rentrés.
•Pulsar la tecla Set durante 3 segundos para realizar los siguientes ajustes
básicos: idioma, cambio entre kmh/mph, dimensiones de la rueda 1 y 2,
hora, km totales, hora total y contraste de pantalla. Finalice el menú de
introducción pulsando durante 3 segundos la tecla SET. Tras un cambio de
la pila deben introducirse solo la hora y el contraste de la pantalla.
1. Régler la langue
•Appuyer sur la touche MODE jusqu'à ce que LANGUE
apparaisse sur l'écran.
•Appuyer brièvement sur la touche SET, l'affichage clignote.
Régler la langue souhaitée à l'aide de la touche MODE et
confirmer par la touche SET.
1. Ajustar el idioma
•Pulsar la tecla MODE hasta que aparezca IDIOMA en la
pantalla.
•Pulsar brevemente la tecla SET, la indicación parpadea.
Con la tecla MODE ajustar el idioma seleccionado y
confirmar con la tecla SET.
MODE
MODE
MODE
RESET
RESET
5. Time
(24 hr clock will display when using KMH, 12 hr clock will
display when using MPH)
• Press MODE button until TIME is displayed.
• Press the SET button briefly and the hour digit flashes.
• Change the hour with the RESET button.
• Advance to minutes by pressing MODE button.
• Change the minutes with the RESET button.
• Confirm by pressing the SET button briefly.
5. Heure (kmh = 24 h / mph = 12 h)
• Appuyer sur la touche MODE jusqu'à ce qu'HEURE apparaisse.
• Appuyer brièvement sur la touche SET, l'entrée clignote.
• Régler les heures à l'aide de la touche REMISE A ZERO. A
l'aide de la touche MODE passer au réglage des minutes.
• Régler les minutes à l'aide de la touche REMISE A ZERO.
Confirmer par la touche SET.
5. Hora (kmh = 24 h / mph = 12 h)
• Pulsar la tecla MODE hasta que aparezca HORA.
• Pulsar brevemente la tecla SET, la introducción parpadea.
• Con la tecla RESET ajustar el valor, con la tecla MODE
cambiar a la siguiente cifra.
• Con la tecla RESET ajustar los minutos. Confirmar con la
tecla SET.
MODE
MODE
• After installing the bike computer into mounting bracket, SPEED display will
blink ZERO.
• There are two ways to pair your transmitter and computer.
• 1. Ride. After 20 seconds (max 5 min.) the receiver will pair with
transmitter and data will be displayed.
• 2. Spin front wheel until speed display stops blinking (A).
• After 5 min. without transmission, BC 1106 DTS will go into sleep mode.
(Time of Day and Model name shown in the display). Press any button to
re-activate the computer. A short pairing will find the transmitter.
• Removing the BC 1106 DTS from the mounting bracket will end the paired
connection.
• If “TOO MANY SIGNALS” message is displayed: lengthen the distance of all
transmitters and press any button to continue. Pairing will begin again.
• Monter le compteur sur son support. Le zéro de la vitesse clignote
• Il y a deux possibilités pour connecter la vitesse et la cadence:
1. Rouler, après env. 20 secondes (max. 5 min.) le récepteur s'est connecté
avec l'émetteur, les données sont affichées.
2. Fiare tourner la roue avant jusqu'à ce que l'affichage de la vitesse ne
clignote plus (A).
ATTENTION:
• Après plus de 5 minutes de pause le BC 1106 DTS se met en mode repos
(affichage de l'heure et du nom du modèle). Pour ré-activer le compteur
appuyer sur une touche quelconque, il s'établit alors une connection courte
pour rechercher le(s) émetteur(s)
• Lorsque l'on sort le BC 1106 DTS de son support, la connection est arrêtée.
• TOO MANY SIGNALS s'affiche: Augmenter la distance par rapport aux
autres vélos et appuyer sur une touche quelconque. La connection
recommence.
• Encajar el BC 1106 DTS sobre el soporte. El cero de las indicaciones de
velocidad parpadea
• Hay dos posibilidades de emparejar la velocidad:
1. Arrancar, después de aprox. 20 segundos (max. 5 min) el receptor se ha
sincronizado con el receptor y se muestran los datos.
2. Girar la rueda delantera hasta que deje de parpadear la indicación de KMH
(A).
ATENCIÓN:
• Después de 5 minutos de pausa, el BC 1106 DTS pasa al modo de
espera (la hora y el nombre del modelo en la pantalla). Al pulsar cualquier
tecla se inicia un apareado corto para encontrar el emisor.
• Al retirar el BC 1106 DTS del soporte se desconecta la desconexión.
• Indicación TOO MANY SIGNALS (demasiadas señales): Aumentar la
distancia con otros emisores y pulsar cualquier tecla. El apareado se inicia
de nuevo.
~20 sec
A
~20 sec
A
mm x 3.14
note: 1 inch = 25.4 mm
Pila:
1 pila de litio tipo botón 2032, 3V
El cambio de pila se muestra en la pantalla.
Cambio de pila
• Si se cambia la pila DIMENSIONES DE LA
RUEDA, IDIOMA, KMH/MPH, KM
TOTALES y TIEMPO TOTAL permanecen
guardadas y no deben ser introducidas
de nuevo.
• Respetar el + y el -. Con el
compartimento de la batería abierto
tiene que verse el + de la pila.
• Si la junta de estanquidad está
desplazada, volver a colocarla.
• Tras el cambio de pila debe introducirse
de nuevo la hora.
Garantía
Nos responsabilizamos de las deficiencias
frente a nuestro socio contractual según
lo dispuesto en los reglamentos legales.
Ordenador:
Abrir la tapa con una moneda.
¡Prestar atención
a la polaridad"
Emisor:
Abrir la tapa con una herramienta.
¡Retirar la pila de la tapa!
¡Prestar atención a la polaridad!
KMH sin indicación
•¿Se utiliza el soporte antiguo del manillar
con la transmisión por radio (RDS)?
•¿Está el ordenador correctamente
encajado sobre el soporte?
•¿Se han comprobado la oxidación /
corrosión de los contactos?
•¿Distancia entre imán y sensor?
(máx. 20 mm)
•¿Se ha comprobado si el imán está
imantado?
•¿2 imanes montados?
•¿Imán posicionado correctamente?
•¿Dimensiones de la rueda (WS) mal
ajustadas?
•¿Se ha montado el emisor correcto en el
cambio de bicicleta?
Los KMH están mal indicados
Indicación en pantalla oscura o lenta
•Temperatura demasiado alta (>60° C) o
demasiado baja (<0° C)
Sin indicación en pantalla
(indicación vacía)
•Comprobar la pila
•Pila bien colocada (+ y -)
•¿Es correcto el contacto de la pila?
(comprobar con cuidado)
Ningún apareado
•Comprobar la distancia emisor/imán
•Pila del emisor vacía
•Activar el ordenador pulsando
•Comprobar alcance
•Modificar la posición del emisor al
emplear un dínamo de cubo
Indicación TOO MANY SIGNALS
(demasiadas señales):
•Aumentar la distancia con otros
emisores y pulsar una tecla
Pile:
1 pile-bouton lithium 2032, 3V
Le changement de pile est affiché est
affiché sur l'écran.
Changement de pile
• En cas de changement de pile,
CIRCONFERENCE DE LA ROUE 1/2,
LANGUE, KMH/MPH, DISTANCE TOTALE
et TEMPS TOTAL restent en mémoire et
ne doivent pas être à nouveau rentrés.
• Faire attention au plus et au moins, lorsque
le compartiment de la pile est ouvert,
vous devez voir le côté PLUS de la pile !
• En cas de déplacement du joint
d'étanchéité, le remettre en place.
• Après le changement de la pile, seul
l'heure et le contraste doivent être
à nouveau rentrés.
Garantie
Nous sommes responsables, vis-à-vis de
notre partenaire contractuel respectif, des
vices conformément aux prescriptions légales.
Les piles sont exclues de la garantie.
Compteur:
Ouvrir le couvercle avec une pièce
Attention à la
polarité!
Emetteur:
Ouvrir le couvercle avec
l'outil prévu à cet effet.
Enlever la pile du couvercle!
Attention à la polarité!
Pas d'affichage kmh
• Ancien système sans fil sur le vélo?
• Compteur bien enclenché sur le support?
• Corrosion/oxidation sur les contacts?
• Distance aimant/émetteur?
(max. 20 mm)
• Aimant magnétisé?
• 2 aimant montés?
• Aimant bien positionné?
• Circonférence de la roue (WS) bien
programmè?
• Montage du bon émetteur lors d'un
changement de vélo?
Mauvais affichage de la vitesse
Affichage noir/lent
• Température trop haute (>60°C)
ou trop basse (<0°C)
Pas d'affichage (écran vide)
• Vérifier l'état de la pile
• Pile bien mise (plus et moins)
• Contacts ok? (tordre en faisant attention)
Pas de connection
• Vérifier la distance aimant/émetteur
• Les piles de l'émetteur sont vides
• Activer le compteur en appuyant sur
une touche
• Vérifier la distance émetteur/récepteur
• Si vous utilisez une dynamo-moyeu,
changer la position de l'émetteur
Affichage TOO MANY SIGNALS
• Augmenter la distance avec les autres
vélos et appuyer sur une touche
quelconque.
Battery:
1 lithium button cell 2032, 3V
Battery change is displayed on screen.
Change batteries:
• WHEEL SIZES 1+2, LANGUAGE,
KMH/MPH, TOTAL KM and TOTAL
TIME remain saved even when the
battery is changed.
• Observe direction of plus and minus
poles; when the compartment is open
you must see the PLUS side of the
battery!
• If sealing ring is loose, re-insert it.
• After changing the battery only the
time and the contrast must be re-
entered.
Warranty
We are liable to our contracting partners
for defects as defined by law. Batteries
are excluded from the guarantee.
No display of MPH
• Using an old RDS mounting bracket?
• Check that the Bike Computer is properly
engaged in the bracket.
• Check contacts for corrosion/oxidation.
• Check distance between magnet and sensor
(max. 20 mm using Sigma's Power Magnet)
• Check if magnet is magnetized
• 2 magnets installed?
• Magnet in the right position?
• Wheel size programmed incorrectly?
• In case of you switched bikes - are you mounting
the correct transmitter?
False display of MPH
Display is black or weaken?
• Temperature too high (>60 °C) or too low (<0°C)
No Display (screen blank)
• Check Battery
• Check plus and minus poles
• Battery contact ok? (bend carefully!)
No Pairing
• Check distance between transmitter /
magnet (20mm or less with power
magnet)
• Press battery check button on
transmitter
• Activate computer by pressing any
button
• Check distance between transmitter
and receiver (max distance 90cm)
• If using a dynamo hub, change location
of transmitter.
TOO MANY SIGNALS is shown:
• Extend the distance between
transmitters and press any button
on computer to continue
Computer:
Open the top cover with a coin
Pay attention to
polarity!
Transmitter:
Open top cover with tool
Take the battery out of the top cover!
Pay attention to polarity!
Speed
TRIP DIST
TRIP TIME
ODO BIKE
TIME BIKE
WS BIKE 1/2
Vitesse
KM JOUR
TEMPS PARC
KM TOTAL
TEMPSTOTAL
CIRCONFERENCE
DE LA ROUE 1/2
Velocidad
KM DIA
TIEMPO PAR
KM TOTAL
TIEMPO TOT
DIMENSIONES
DE LA RUEDA
1/2
0.0
0.00
0:00:00
0
0:00
2,155
Default Max Units
199.5
9,999.9
999:59
99,999
9,999
3,999
kmh/mph
km/mi
h:mm:ss hh:mm hhh:mm
km/mi
h:mm hh:mm hhh:m h.hhh
mm
Speed Comparison (pace arrow)
Comparison of current speed to average speed.
•If your current speed is equal to your average speed is
shown, if lower is shown, and if higher is shown.
Vitesse/vitesse moyenne
•En cas de vitesse à peu près similaire s'affiche, en cas
de vitesse plus faible et plus élevée .
•L'affichage est effectué pour toutes les fonctions sauf
dans les réglages de base.
Velocidad / velocidad media
•En caso de velocidad casi igual se muestra , en caso de
velocidad menor y velocidad mayor .
•La indicación se realiza en todas las funciones excepto en
los ajustes básicos.
Reset
Reset Trip distance, Trip time, Average speed, and
Max speed to zero.
• Press MODE button until the desired function to zero out
displayed.
• Press and hold RESET button. The display will flash and
after 2 seconds the displayed function will clear.
• Holding RESET button longer than 4 seconds will zero out
Trip distance, Trip time, Average speed, and Max speed
functions at the same time.
Remise à zéro de l'affichage
• Appuyer sur la touche MODE jusqu'à ce que la fonction
souhaitée apparaisse. Maintenir appuyée la touche REMISE
A ZERO. L'affichage clignote. Au bout de 2 sec, seule la
fonction affichée est remise à 0.
• Appuyer sur la touche REMISE A ZERO pendant plus de 4
sec remet à zéro les affichages de DISTANCE
JOURNALIERE, TEMPS PARCOURU, Ø KMH, MAX KMH.
Restablecer las indicaciones
• Pulsar la tecla MODE hasta que aparezca la función
deseada.
• Mantener pulsada la tecla RESET. La indicación parpadea.
Tras 2 segundos se restablece la función indicada a 0.
• Pulsar la tecla RESET durante más de 4 segundos
establece las indicaciones de KM DIARIOS, DURACIÓN DEL
TRAYECTO, PROMEDIO KMH, KMH MÁX. en cero.
> 2 sec
> 3,5 sec
Switching between WHEEL 1 and WHEEL 2 is automatic.
You must install (optional) transmitter of Bike 2 (red
button).
• It is no longer possible to change by making an entry.
Le changement entre la ROUE 1 et la ROUE 2 est effectué
automatiquement. Il faut utiliser l'émetteur vélo 2 (en
option) avec la touche rouge.
• Un changement manuel n'est plus possible.
El cambio entre la RUEDA 1 y RUEDA 2 se realiza
automáticamente. Debe emplearse el emisor (opcional)
rueda 2 (tecla roja).
• Ya no es posible un cambio por introducción.
4 x
90°
4 x
Bike 1
Wheel Size Chart
go to
step 3
go to
step 2
The harness comes ready to mount on your handlebars.
To mount on a stem, remove the 4 screws on the back of the harness, turn base 90 degrees.
stem mount
remove yellow tape
the SIGMA logo on the harness must
always face the front of the bike.
Foam pad included for
use with bladed spokes
To reach the required 20mm or less, move magnet
and transmitter towards center of wheel.
Note: 20mm = 3/4 inches
32
42
?
handlebar
or
stem
Red, rouge
2 m m
Red, rouge
* not while riding * pas pendant
la conduite
*no durante
la carrera
12:23
12:23
12:25
00.200
00.000
00.200
3
2
Bike 1
+

Contents / Contenu / Contenudo Installation / Montage / Montaje Installation of mounting bracket Montage du support / Montaje del soporte de bicicleta
1 2
Installation of mounting bracket Installation of magnet / Montage de l'aimant / Montaje del imán
5
Installation of speed transmitter Montage de l'émett. Vit. / Montaje del emisor de velocidad
1
Installation of speed transmitter
5
Mode / Reset Pairing / Connection / Apareado Pairing / Connection / Apareado
3 4 6 1
2 1
KMH/MPH entryRéglage KMH/MPH / Introducción KMH/MPH
UF
E
Wheel size entry Circonférence de roue / Dimensiones de la rueda
U F
E
Measure wheel size Mesurer la roue / Dimensiones de la rueda
U F
E
Time entry Réglage heure / Introducir la hora
U F
E
Total data entryRéglage des valeurs totales / Datos totales
UF
E
Contrast entry Réglage contraste / Introducción contraste
U F
E
Language EntryRéglage langue / Introducir el idioma
UF
E
Wheel size entry Circonférence de roue / Dimensiones de la rueda
U F
E
42 mm
32 mm
Basic settingsRéglages de base / Ajustes básicos
UF
E
Wheel Size Chart (Wheel Size) Wheel Size Chart (Circonférence de roue / Tamaño de rueda)
A C
B
Changing modes Changement d’affichage / Cambio de visualización
U F
E
Installation of speed transmitter Montage de l'émett. Vit. / Montaje del emisor de velocidad
3 4
2x
Left side Right side
Grey, gris
optional Bike 2
Ref. No. 00405
Pairing / Connection / Apareado Pairing / Connection / Apareado Pairing / Connection / Apareado
Installation of Bike Computer
U
F
E
F E
U F E
Pairing / Connection / Apareado
Observaciones generales E
Cambio de la pila
Solución de problemas E
Remarques générales F Changement de batterie Solution aux problèmes FGeneral remarks U Trouble Shooting UChange batteryTechnical Data / Données techniques / Datos técnicos
U F
E
Technical data / Données techniques / Datos técnicos
Comparison speedComparaison de la vitesse / Comparación velocidad
UF
E
Reset Remise à zéro / Puesta a cero
U F
E
Assembly 2nd wheel Montage 2ème roue / Montaje 2ª rueda
U F
E
optional Bike 2
Ref. No. 00405
Grey, gris
Bike 1
+
2. KMH / MPH
•Press MODE button until KMH / MPH is displayed.
•Press SET button briefly, KMH or MPH is displayed and
flashing.
•Select MPH or KMH with MODE button.
•Confirm by pressing SET button briefly.
2. KMH / MPH
•A l'aide de la touche MODE changer le réglage KMH/MPH.
•Appuyer brièvement sur la touche SET.
•KMH ou MPH apparaît sur l'écran et clignote.
•Régler MPH ou KMH à l'aide de la touche MODE.
•Confirmer par la touche SET.
2. KMH / MPH
•Con la tecla MODE cambiar a la introducción de KMH/MPH
•Pulsar la tecla SET brevemente.
•En la pantalla aparece KMH o MPH y parpadea.
•Con la tecla MODE ajustar MPH o KMH.
•Confirmar con la tecla SET.
3. Wheel size BIKE 1
• Press MODE button to change to WS BIKE 1.
• Press SET button briefly and the first digit flashes.
• Change the number by pressing RESET button, change to
next digit by pressing mode. Repeat with next 3 numbers
until desired wheel size is entered.
• Confirm by pressing SET button briefly.
3. Circonférence de la roue VELO 1
• A l'aide de la touche MODE passer à VELO 1.
• Appuyer brièvement sur la touche SET, le premier chiffre
à entrer clignote.
• Régler la valeur à l'aide de la touche REMISE A ZERO,
passer au prochain chiffre à l'aide de la touche MODE.
• Le vélo 1 est toujours celui avec l'emetteur vélo 1
3. Dimensiones de la rueda BICICLETA 1
• Con la tecla MODE cambiar a BICICLETA 1.
• Pulsar brevemente la tecla SET, la primera cifra de
introducción parpadea.
• Con la tecla RESET ajustar el valor, con la tecla MODE
cambiar a la siguiente cifra.
• La bicicleta 1 es siempre la bicicleta con emisor rueda 1
• A partir de la tabla C "Wheel Size Chart" (véase la página
siguiente) determinar el valor correspondiente al tamaño
de la rueda. Introducir este valor.
• Alternativa: calcular/ determinar el tamaño de la rueda
(tabla A o tabla B)
• Tras la última cifra confirmar con la tecla SET.
• Determine the correct value for your wheel size from
Table C “Wheel Size Chart” (refer to next page).
• Alternative: calculate wheel size using formula Tab A or
Tab B.
• Déterminer la valeur correspondant à votre circonférence
de roue à partir du tableau C "Wheel Size Chart" (voir
page suivante). Entrer cette valeur.
• Alternative: calculer/déterminer WS (Tab. A ou tab. B).
• Après le dernier chiffre, confirmer par la touche SET.
You can enter TOTAL ODO (miles) miles and TOTAL times
from your previous computer.
Note – This step is not necessary if previous data from
another computer is not desired(skip to step 8).
6. Enter TOTAL ODO (miles)
•Press MODE button until TOTAL ODO is displayed.
•Press SET button briefly and the first digit will flash.
•Press RESET button to change each digit.
•Press MODE button to advance to next number.
•Repeat until desired number is entered.
•Confirm by pressing the SET button briefly.
7. Enter TOTAL TIME
•Press MODE button until TOTAL TIME is displayed
•Press SET button briefly and the first digit will flash.
•Press RESET button to change each digit.
•Press MODE button to advance to next number.
•Repeat until desired number is entered
•Confirm by pressing the SET button briefly.
6. KM-VELO 1/2
7. TEMPS VELO 1/2
•Réglage identique à la circonférence de la roue. Ici, vous
pouvez transférer la distance totale en km, par exemple
lors de l'achat de cet appareil, à partir d'un autre
compteur.
6. KM RUEDA 1/2
7. TIEMPO RUEDA 1/2
•Introducción como en las dimensiones de la rueda. Aquí se
puede transferir el número total de km p.ej. en caso de
compra del aparato de otro ordenador de bicicleta.
8. Contrast
• Press MODE button until contrast is displayed.
• Press SET button briefly and the display flashes.
• Set the value by pressing RESET button.
1 = light 3 = dark
• Confirm by pressing the SET button.
When you are finished entering the basic setting, press and
hold SET button for 3 seconds to exit set-up mode.
8. Contraste
• Appuyer sur la touche MODE1 jusqu'à ce que CONTRASTE
apparaisse.
• Appuyer brièvement sur la touche SET, le réglage clignote.
• A l'aide de la touche REMISE A ZERO/MODE2 régler la
valeur (1 = faible, 3 = fort). Confirmer avec la touche SET.
8. Contraste
• Pulsar la tecla MODE1 hasta que aparezca CONTRASTE.
• Pulsar brevemente la tecla SET, la introducción parpadea.
• Con la tecla RESET/MODE2 ajustar el valor (1=débil
3= fuerte). Confirmar con la tecla SET.
1. Set language
•Press MODE button until LANGUAGE is displayed
•Press the SET button briefly, the display flashes. Set the
desired language using the MODE button and confirm by
pressing SET button briefly.
4. Wheel size BIKE 2
This computer can be programmed for two bikes, if you are
only using this computer for one bike, skip this step and go
to step 5.
Changing between WHEEL SIZE 1 and WHEEL SIZE 2
occurs automatically simply by changing from bike 1
transmitter (grey button) to the optional Bike 2 transmitter
(red button).
• Press MODE button to change to WS BIKE 2.
• Press SET button briefly and the first digit flashes.
• Change the number by pressing RESET button.
• Change to next digit by pressing MODE button. Repeat
with next 3 numbers until desired wheel size is entered.
• Confirm by pressing SET button briefly.
4. Circonférence de la roue VELO 2
• A l'aide de la touche MODE passer au VELO 2.
• Appuyer brièvement sur la touche SET, le premier chiffre à
entrer clignote.
• Réglage comme pour le VELO 1 : régler les valeurs à l'aide
de la touche RESET, passer au prochain chiffre à l'aide de la
touche MODE.
• Le vélo 2 est toujours celui avec l'émetteur vélo 2
4. Dimensiones de la rueda BICICLETA 2
• Con la tecla MODE cambiar a BICICLETA 2.
• Pulsar brevemente la tecla SET, la primera cifra de introducción parpadea.
• Introducción como en RUEDA 1: Con las teclas RESET ajustar los valores,
con la tecla MODE cambiar a la cifra siguiente, etc.
• La bicicleta 2 es siempre la bicicleta con emisor rueda 2
SET
BI KE CO MPUT ER
TO PLI NE
B C 1 1 0 6 L D T S
SIG MA B IK E COMPU TE R
BC 110 6L DT S
W W W. SI G MA S P O RT. CO M
W W W. SI G MA S P O RT. CO M
SIGMA USA:
North America
1067 Kingsland Drive
Batavia, IL 60510, US A
Tel. +1-630-761-1106
Fax +1-6 30-761-1107
Toll Fr ee: 888-744-6 277
SIGMA EUROPA:
SIGMA Elektro GmbH
Dr.- Juliu s- Leber- Straße 15
D-67433 Ne ustadt a.d.W.
Tel. +49-(0)63 21-9120-11 8
Fax +49- (0)6321-9120 -34
SIGMA ASIA:
Asia, Australia, South Ame rica
7F-1, No. 193, Ta-Tun 6th Street,
Taichung City, Taiwan
Tel. +886-4-2475 35 77
Fax +886 -4-2475 3563
32-630
28-630
40-622
47-622
40-635
37-622
18-622
20-622
23-622
25-622
28-622
32-622
37-622
40-622
27x1 1/4
27x1 1/4 Fifty
28x1.5
28x1.75
28x1 1/2
28x1 3/8x1 5/8
700x18C
700x20C
700x23C
700x25C
700x28C
700x32C
700x35C
700x40C
2199
2174
2224
2268
2265
2205
2102
2114
2133
2146
2149
2174
2205
2224
kmh
mph
47-305
47-406
37-540
47-507
23-571
40-559
44-559
47-559
50-559
54-559
57-559
37-590
37-584
20-571
16x1.75x2
20x1.75x2
24x1 3/8 A
24x1.75x2
26x1
26x1.5
26x1.6
26x1.75x2
26x1.9
26x2.00
26x2.125
26x1 3/8
26x1 3/8x1 1/2
26x3/4
1272
1590
1948
1907
1973
2026
2051
2070
2089
2114
2133
2105
2086
1954
ETRTO
kmh
mph
ETRTO
km/h:
WS = mm x 3.14
mph:
WS = mm x 3.14
km/h:
WS = mm
mph:
WS = mm
Printed in USA
~20 sec
A
Test: Battery
Max. 20 mm
• MODE: appel des fonctions
• RESET: remise à zéro des fonctions
DISTANCE JOURNALIERE, TEMPS PARCOURU, Ø KMH et MAX. KMH
• MODE: Activar las funciones
• RESET: Restablecimiento de las funcion.
KM DIARIOS, DURACIÓN DEL TRAYECTO, PROMEDIO KMH y KMH MÁX. a cero
• MODE: Change the functions
• RESET: Reset the functions
DAILY KM/M, TRIP TIME, AVERAGE SPEED and MAX SPEED to zero
MODE
>3 sec = RESET
TRIP DIST
TRIP TIME
AVG. SPEED
MAX. SPEED
CLOCK
TOTAL ODO*
TOTAL TIME*
TRIP DIST
TRIP TIME
AVG. SPEED
MAX. SPEED
MODE
>3 sec = RESET
KM JOUR
TEMPS PARC
VIT MOYEN.
VIT MAXI
HEURE
KM TOTAL*
TEMPSTOTAL*
KM JOUR
TEMPS PARC
VIT MOYEN.
VIT MAXI
MODE
>3 sec = RESET
KM DIA
TIEMPO PAR
VEL MEDIA
VEL MAXIMA
HORA
KM TOTAL*
TIEMPO TOT*
KM DIA
TIEMPO PAR
VEL MEDIA
VEL MAXIMA
How to change modes
• Press MODE button until the desired function is displayed
(TRIP DISTANCE, TRIP TIME, AVG. SPEED, MAX. SPEED,
CLOCK, TOTAL ODO, TOTAL TIME)
• While riding the TOTAL ODO and TOTAL TIME functions
are hidden.
Affichage des fonctions
• Appuyer sur la touche MODE jusqu'à ce que la fonction
souhaitée soit affichée (DISTANCE JOURNALIERE, TEMPS
PARCOURU, MOYENNE KMH, MAX.KMH, HEURE,
DISTANCE TOTALE EN KM, TEMPS TOTAL).
• Pendant la conduite, DISTANCE TOTALE et TEMPS TOTAL
ne sont pas affichés (moins de clics de touche lors de la
conduite).
Indicación de las funciones
• Pulsar la tecla MODE hasta que se muestre la función deseada (KM DIARIOS,
DURACIÓN DEL TRAYECTO, PROMEDIO KMH, KMH MÁX., HORA, KM
TOTALES, TIEMPO TOTAL).
• durante la carrera no se muestran KM TOTALES y TIEMPO TOTAL (menos
pulsaciones de teclas durante la carrera).
SET > 3 sec
•Press SET button for 3 sec. to enter set-up mode (SET
will appear in upper right hand corner of display when in
set-up mode, you must be in set-mode to perform steps
1-8).
•Use the set-up mode to change language, KMH/MPH,
wheel size, time, total odo, total time, and contrast.
•After changing the battery, only the time and contrast
have to be entered.
•Appuyer sur la touche SET 3 sec pour effectuer les réglages de base
suivants : langue, changement entre kmh/mph, circonférence de la
roue 1 et 2, heure, distance totale, temps total et contraste de l'écran.
Fin du menu réglage en appuyant 3 sec sur la touche SET. Après le
changement de la pile, seule l'heure et le contraste de l'écran doivent
être à nouveau rentrés.
•Pulsar la tecla Set durante 3 segundos para realizar los siguientes ajustes
básicos: idioma, cambio entre kmh/mph, dimensiones de la rueda 1 y 2,
hora, km totales, hora total y contraste de pantalla. Finalice el menú de
introducción pulsando durante 3 segundos la tecla SET. Tras un cambio de
la pila deben introducirse solo la hora y el contraste de la pantalla.
1. Régler la langue
•Appuyer sur la touche MODE jusqu'à ce que LANGUE
apparaisse sur l'écran.
•Appuyer brièvement sur la touche SET, l'affichage clignote.
Régler la langue souhaitée à l'aide de la touche MODE et
confirmer par la touche SET.
1. Ajustar el idioma
•Pulsar la tecla MODE hasta que aparezca IDIOMA en la
pantalla.
•Pulsar brevemente la tecla SET, la indicación parpadea.
Con la tecla MODE ajustar el idioma seleccionado y
confirmar con la tecla SET.
MODE
MODE
MODE
RESET
RESET
5. Time
(24 hr clock will display when using KMH, 12 hr clock will
display when using MPH)
• Press MODE button until TIME is displayed.
• Press the SET button briefly and the hour digit flashes.
• Change the hour with the RESET button.
• Advance to minutes by pressing MODE button.
• Change the minutes with the RESET button.
• Confirm by pressing the SET button briefly.
5. Heure (kmh = 24 h / mph = 12 h)
• Appuyer sur la touche MODE jusqu'à ce qu'HEURE apparaisse.
• Appuyer brièvement sur la touche SET, l'entrée clignote.
• Régler les heures à l'aide de la touche REMISE A ZERO. A
l'aide de la touche MODE passer au réglage des minutes.
• Régler les minutes à l'aide de la touche REMISE A ZERO.
Confirmer par la touche SET.
5. Hora (kmh = 24 h / mph = 12 h)
• Pulsar la tecla MODE hasta que aparezca HORA.
• Pulsar brevemente la tecla SET, la introducción parpadea.
• Con la tecla RESET ajustar el valor, con la tecla MODE
cambiar a la siguiente cifra.
• Con la tecla RESET ajustar los minutos. Confirmar con la
tecla SET.
MODE
MODE
• After installing the bike computer into mounting bracket, SPEED display will
blink ZERO.
• There are two ways to pair your transmitter and computer.
• 1. Ride. After 20 seconds (max 5 min.) the receiver will pair with
transmitter and data will be displayed.
• 2. Spin front wheel until speed display stops blinking (A).
• After 5 min. without transmission, BC 1106 DTS will go into sleep mode.
(Time of Day and Model name shown in the display). Press any button to
re-activate the computer. A short pairing will find the transmitter.
• Removing the BC 1106 DTS from the mounting bracket will end the paired
connection.
• If “TOO MANY SIGNALS” message is displayed: lengthen the distance of all
transmitters and press any button to continue. Pairing will begin again.
• Monter le compteur sur son support. Le zéro de la vitesse clignote
• Il y a deux possibilités pour connecter la vitesse et la cadence:
1. Rouler, après env. 20 secondes (max. 5 min.) le récepteur s'est connecté
avec l'émetteur, les données sont affichées.
2. Fiare tourner la roue avant jusqu'à ce que l'affichage de la vitesse ne
clignote plus (A).
ATTENTION:
• Après plus de 5 minutes de pause le BC 1106 DTS se met en mode repos
(affichage de l'heure et du nom du modèle). Pour ré-activer le compteur
appuyer sur une touche quelconque, il s'établit alors une connection courte
pour rechercher le(s) émetteur(s)
• Lorsque l'on sort le BC 1106 DTS de son support, la connection est arrêtée.
• TOO MANY SIGNALS s'affiche: Augmenter la distance par rapport aux
autres vélos et appuyer sur une touche quelconque. La connection
recommence.
• Encajar el BC 1106 DTS sobre el soporte. El cero de las indicaciones de
velocidad parpadea
• Hay dos posibilidades de emparejar la velocidad:
1. Arrancar, después de aprox. 20 segundos (max. 5 min) el receptor se ha
sincronizado con el receptor y se muestran los datos.
2. Girar la rueda delantera hasta que deje de parpadear la indicación de KMH
(A).
ATENCIÓN:
• Después de 5 minutos de pausa, el BC 1106 DTS pasa al modo de
espera (la hora y el nombre del modelo en la pantalla). Al pulsar cualquier
tecla se inicia un apareado corto para encontrar el emisor.
• Al retirar el BC 1106 DTS del soporte se desconecta la desconexión.
• Indicación TOO MANY SIGNALS (demasiadas señales): Aumentar la
distancia con otros emisores y pulsar cualquier tecla. El apareado se inicia
de nuevo.
~20 sec
A
~20 sec
A
mm x 3.14
note: 1 inch = 25.4 mm
Pila:
1 pila de litio tipo botón 2032, 3V
El cambio de pila se muestra en la pantalla.
Cambio de pila
• Si se cambia la pila DIMENSIONES DE LA
RUEDA, IDIOMA, KMH/MPH, KM
TOTALES y TIEMPO TOTAL permanecen
guardadas y no deben ser introducidas
de nuevo.
• Respetar el + y el -. Con el
compartimento de la batería abierto
tiene que verse el + de la pila.
• Si la junta de estanquidad está
desplazada, volver a colocarla.
• Tras el cambio de pila debe introducirse
de nuevo la hora.
Garantía
Nos responsabilizamos de las deficiencias
frente a nuestro socio contractual según
lo dispuesto en los reglamentos legales.
Ordenador:
Abrir la tapa con una moneda.
¡Prestar atención
a la polaridad"
Emisor:
Abrir la tapa con una herramienta.
¡Retirar la pila de la tapa!
¡Prestar atención a la polaridad!
KMH sin indicación
• ¿Se utiliza el soporte antiguo del manillar
con la transmisión por radio (RDS)?
• ¿Está el ordenador correctamente
encajado sobre el soporte?
• ¿Se han comprobado la oxidación /
corrosión de los contactos?
• ¿Distancia entre imán y sensor?
(máx. 20 mm)
• ¿Se ha comprobado si el imán está
imantado?
• ¿2 imanes montados?
• ¿Imán posicionado correctamente?
• ¿Dimensiones de la rueda (WS) mal
ajustadas?
• ¿Se ha montado el emisor correcto en el
cambio de bicicleta?
Los KMH están mal indicados
Indicación en pantalla oscura o lenta
• Temperatura demasiado alta (>60° C) o
demasiado baja (<0° C)
Sin indicación en pantalla
(indicación vacía)
• Comprobar la pila
• Pila bien colocada (+ y -)
• ¿Es correcto el contacto de la pila?
(comprobar con cuidado)
Ningún apareado
• Comprobar la distancia emisor/imán
• Pila del emisor vacía
• Activar el ordenador pulsando
• Comprobar alcance
• Modificar la posición del emisor al
emplear un dínamo de cubo
Indicación TOO MANY SIGNALS
(demasiadas señales):
• Aumentar la distancia con otros
emisores y pulsar una tecla
Pile:
1 pile-bouton lithium 2032, 3V
Le changement de pile est affiché est
affiché sur l'écran.
Changement de pile
• En cas de changement de pile,
CIRCONFERENCE DE LA ROUE 1/2,
LANGUE, KMH/MPH, DISTANCE TOTALE
et TEMPS TOTAL restent en mémoire et
ne doivent pas être à nouveau rentrés.
• Faire attention au plus et au moins, lorsque
le compartiment de la pile est ouvert,
vous devez voir le côté PLUS de la pile !
• En cas de déplacement du joint
d'étanchéité, le remettre en place.
• Après le changement de la pile, seul
l'heure et le contraste doivent être
à nouveau rentrés.
Garantie
Nous sommes responsables, vis-à-vis de
notre partenaire contractuel respectif, des
vices conformément aux prescriptions légales.
Les piles sont exclues de la garantie.
Compteur:
Ouvrir le couvercle avec une pièce
Attention à la
polarité!
Emetteur:
Ouvrir le couvercle avec
l'outil prévu à cet effet.
Enlever la pile du couvercle!
Attention à la polarité!
Pas d'affichage kmh
• Ancien système sans fil sur le vélo?
• Compteur bien enclenché sur le support?
• Corrosion/oxidation sur les contacts?
• Distance aimant/émetteur?
(max. 20 mm)
• Aimant magnétisé?
• 2 aimant montés?
• Aimant bien positionné?
• Circonférence de la roue (WS) bien
programmè?
• Montage du bon émetteur lors d'un
changement de vélo?
Mauvais affichage de la vitesse
Affichage noir/lent
• Température trop haute (>60°C)
ou trop basse (<0°C)
Pas d'affichage (écran vide)
• Vérifier l'état de la pile
• Pile bien mise (plus et moins)
• Contacts ok? (tordre en faisant attention)
Pas de connection
• Vérifier la distance aimant/émetteur
• Les piles de l'émetteur sont vides
• Activer le compteur en appuyant sur
une touche
• Vérifier la distance émetteur/récepteur
• Si vous utilisez une dynamo-moyeu,
changer la position de l'émetteur
Affichage TOO MANY SIGNALS
• Augmenter la distance avec les autres
vélos et appuyer sur une touche
quelconque.
Battery:
1 lithium button cell 2032, 3V
Battery change is displayed on screen.
Change batteries:
• WHEEL SIZES 1+2, LANGUAGE,
KMH/MPH, TOTAL KM and TOTAL
TIME remain saved even when the
battery is changed.
• Observe direction of plus and minus
poles; when the compartment is open
you must see the PLUS side of the
battery!
• If sealing ring is loose, re-insert it.
• After changing the battery only the
time and the contrast must be re-
entered.
Warranty
We are liable to our contracting partners
for defects as defined by law. Batteries
are excluded from the guarantee.
No display of MPH
• Using an old RDS mounting bracket?
• Check that the Bike Computer is properly
engaged in the bracket.
• Check contacts for corrosion/oxidation.
• Check distance between magnet and sensor
(max. 20 mm using Sigma's Power Magnet)
• Check if magnet is magnetized
• 2 magnets installed?
• Magnet in the right position?
• Wheel size programmed incorrectly?
• In case of you switched bikes - are you mounting
the correct transmitter?
False display of MPH
Display is black or weaken?
• Temperature too high (>60 °C) or too low (<0°C)
No Display (screen blank)
• Check Battery
• Check plus and minus poles
• Battery contact ok? (bend carefully!)
No Pairing
• Check distance between transmitter /
magnet (20mm or less with power
magnet)
• Press battery check button on
transmitter
• Activate computer by pressing any
button
• Check distance between transmitter
and receiver (max distance 90cm)
• If using a dynamo hub, change location
of transmitter.
TOO MANY SIGNALS is shown:
• Extend the distance between
transmitters and press any button
on computer to continue
Computer:
Open the top cover with a coin
Pay attention to
polarity!
Transmitter:
Open top cover with tool
Take the battery out of the top cover!
Pay attention to polarity!
Speed
TRIP DIST
TRIP TIME
ODO BIKE
TIME BIKE
WS BIKE 1/2
Vitesse
KM JOUR
TEMPS PARC
KM TOTAL
TEMPSTOTAL
CIRCONFERENCE
DE LA ROUE 1/2
Velocidad
KM DIA
TIEMPO PAR
KM TOTAL
TIEMPO TOT
DIMENSIONES
DE LA RUEDA
1/2
0.0
0.00
0:00:00
0
0:00
2,155
Default Max Units
199.5
9,999.9
999:59
99,999
9,999
3,999
kmh/mph
km/mi
h:mm:ss hh:mm hhh:mm
km/mi
h:mm hh:mm hhh:m h.hhh
mm
Speed Comparison (pace arrow)
Comparison of current speed to average speed.
•If your current speed is equal to your average speed is
shown, if lower is shown, and if higher is shown.
Vitesse/vitesse moyenne
•En cas de vitesse à peu près similaire s'affiche, en cas
de vitesse plus faible et plus élevée .
•L'affichage est effectué pour toutes les fonctions sauf
dans les réglages de base.
Velocidad / velocidad media
•En caso de velocidad casi igual se muestra , en caso de
velocidad menor y velocidad mayor .
•La indicación se realiza en todas las funciones excepto en
los ajustes básicos.
Reset
Reset Trip distance, Trip time, Average speed, and
Max speed to zero.
• Press MODE button until the desired function to zero out
displayed.
• Press and hold RESET button. The display will flash and
after 2 seconds the displayed function will clear.
• Holding RESET button longer than 4 seconds will zero out
Trip distance, Trip time, Average speed, and Max speed
functions at the same time.
Remise à zéro de l'affichage
• Appuyer sur la touche MODE jusqu'à ce que la fonction
souhaitée apparaisse. Maintenir appuyée la touche REMISE
A ZERO. L'affichage clignote. Au bout de 2 sec, seule la
fonction affichée est remise à 0.
• Appuyer sur la touche REMISE A ZERO pendant plus de 4
sec remet à zéro les affichages de DISTANCE
JOURNALIERE, TEMPS PARCOURU, Ø KMH, MAX KMH.
Restablecer las indicaciones
• Pulsar la tecla MODE hasta que aparezca la función
deseada.
• Mantener pulsada la tecla RESET. La indicación parpadea.
Tras 2 segundos se restablece la función indicada a 0.
• Pulsar la tecla RESET durante más de 4 segundos
establece las indicaciones de KM DIARIOS, DURACIÓN DEL
TRAYECTO, PROMEDIO KMH, KMH MÁX. en cero.
> 2 sec
> 3,5 sec
Switching between WHEEL 1 and WHEEL 2 is automatic.
You must install (optional) transmitter of Bike 2 (red
button).
• It is no longer possible to change by making an entry.
Le changement entre la ROUE 1 et la ROUE 2 est effectué
automatiquement. Il faut utiliser l'émetteur vélo 2 (en
option) avec la touche rouge.
• Un changement manuel n'est plus possible.
El cambio entre la RUEDA 1 y RUEDA 2 se realiza
automáticamente. Debe emplearse el emisor (opcional)
rueda 2 (tecla roja).
• Ya no es posible un cambio por introducción.
4 x
90°
4 x
Bike 1
Wheel Size Chart
go to
step 3
go to
step 2
The harness comes ready to mount on your handlebars.
To mount on a stem, remove the 4 screws on the back of the harness, turn base 90 degrees.
stem mount
remove yellow tape
the SIGMA logo on the harness must
always face the front of the bike.
Foam pad included for
use with bladed spokes
To reach the required 20mm or less, move magnet
and transmitter towards center of wheel.
Note: 20mm = 3/4 inches
32
42
?
handlebar
or
stem
Red, rouge
2 m m
Red, rouge
* not while riding * pas pendant
la conduite
*no durante
la carrera
12:23
12:23
12:25
00.200
00.000
00.200
3
2
Bike 1
1_5:23
+

Contents / Contenu / Contenudo Installation / Montage / Montaje Installation of mounting bracket Montage du support / Montaje del soporte de bicicleta
1 2
Installation of mounting bracket Installation of magnet / Montage de l'aimant / Montaje del imán
5
Installation of speed transmitter Montage de l'émett. Vit. / Montaje del emisor de velocidad
1
Installation of speed transmitter
5
Mode / Reset Pairing / Connection / Apareado Pairing / Connection / Apareado
3 4 6 1
2 1
KMH/MPH entryRéglage KMH/MPH / Introducción KMH/MPH
UF
E
Wheel size entry Circonférence de roue / Dimensiones de la rueda
U F
E
Measure wheel size Mesurer la roue / Dimensiones de la rueda
U F
E
Time entry Réglage heure / Introducir la hora
U F
E
Total data entry Réglage des valeurs totales / Datos totales
U F
E
Contrast entry Réglage contraste / Introducción contraste
U F
E
Language Entry Réglage langue / Introducir el idioma
U F
E
Wheel size entry Circonférence de roue / Dimensiones de la rueda
U F
E
42 mm
32 mm
Basic settings Réglages de base / Ajustes básicos
U F
E
Wheel Size Chart (Wheel Size) Wheel Size Chart (Circonférence de roue / Tamaño de rueda)
A C
B
Changing modes Changement d’affichage / Cambio de visualización
U F
E
Installation of speed transmitter Montage de l'émett. Vit. / Montaje del emisor de velocidad
3 4
2x
Left side Right side
Grey, gris
optional Bike 2
Ref. No. 00405
Pairing / Connection / Apareado Pairing / Connection / Apareado Pairing / Connection / Apareado
Installation of Bike Computer
U
F
E
F E
U F E
Pairing / Connection / Apareado
Observaciones generales E
Cambio de la pila
Solución de problemas E
Remarques générales F Changement de batterie Solution aux problèmes FGeneral remarks U Trouble Shooting UChange batteryTechnical Data / Données techniques / Datos técnicos
U F
E
Technical data / Données techniques / Datos técnicos
Comparison speed Comparaison de la vitesse / Comparación velocidad
U F
E
Reset Remise à zéro / Puesta a cero
U F
E
Assembly 2nd wheel Montage 2ème roue / Montaje 2ª rueda
U F
E
optional Bike 2
Ref. No. 00405
Grey, gris
Bike 1
+
2. KMH / MPH
•Press MODE button until KMH / MPH is displayed.
•Press SET button briefly, KMH or MPH is displayed and
flashing.
•Select MPH or KMH with MODE button.
•Confirm by pressing SET button briefly.
2. KMH / MPH
•A l'aide de la touche MODE changer le réglage KMH/MPH.
•Appuyer brièvement sur la touche SET.
•KMH ou MPH apparaît sur l'écran et clignote.
•Régler MPH ou KMH à l'aide de la touche MODE.
•Confirmer par la touche SET.
2. KMH / MPH
•Con la tecla MODE cambiar a la introducción de KMH/MPH
•Pulsar la tecla SET brevemente.
•En la pantalla aparece KMH o MPH y parpadea.
•Con la tecla MODE ajustar MPH o KMH.
•Confirmar con la tecla SET.
3. Wheel size BIKE 1
• Press MODE button to change to WS BIKE 1.
• Press SET button briefly and the first digit flashes.
• Change the number by pressing RESET button, change to
next digit by pressing mode. Repeat with next 3 numbers
until desired wheel size is entered.
• Confirm by pressing SET button briefly.
3. Circonférence de la roue VELO 1
• A l'aide de la touche MODE passer à VELO 1.
• Appuyer brièvement sur la touche SET, le premier chiffre
à entrer clignote.
• Régler la valeur à l'aide de la touche REMISE A ZERO,
passer au prochain chiffre à l'aide de la touche MODE.
• Le vélo 1 est toujours celui avec l'emetteur vélo 1
3. Dimensiones de la rueda BICICLETA 1
• Con la tecla MODE cambiar a BICICLETA 1.
• Pulsar brevemente la tecla SET, la primera cifra de
introducción parpadea.
• Con la tecla RESET ajustar el valor, con la tecla MODE
cambiar a la siguiente cifra.
• La bicicleta 1 es siempre la bicicleta con emisor rueda 1
• A partir de la tabla C "Wheel Size Chart" (véase la página
siguiente) determinar el valor correspondiente al tamaño
de la rueda. Introducir este valor.
• Alternativa: calcular/ determinar el tamaño de la rueda
(tabla A o tabla B)
• Tras la última cifra confirmar con la tecla SET.
• Determine the correct value for your wheel size from
Table C “Wheel Size Chart” (refer to next page).
• Alternative: calculate wheel size using formula Tab A or
Tab B.
• Déterminer la valeur correspondant à votre circonférence
de roue à partir du tableau C "Wheel Size Chart" (voir
page suivante). Entrer cette valeur.
• Alternative: calculer/déterminer WS (Tab. A ou tab. B).
• Après le dernier chiffre, confirmer par la touche SET.
You can enter TOTAL ODO (miles) miles and TOTAL times
from your previous computer.
Note – This step is not necessary if previous data from
another computer is not desired(skip to step 8).
6. Enter TOTAL ODO (miles)
• Press MODE button until TOTAL ODO is displayed.
• Press SET button briefly and the first digit will flash.
• Press RESET button to change each digit.
• Press MODE button to advance to next number.
• Repeat until desired number is entered.
• Confirm by pressing the SET button briefly.
7. Enter TOTAL TIME
• Press MODE button until TOTAL TIME is displayed
• Press SET button briefly and the first digit will flash.
• Press RESET button to change each digit.
• Press MODE button to advance to next number.
• Repeat until desired number is entered
• Confirm by pressing the SET button briefly.
6. KM-VELO 1/2
7. TEMPS VELO 1/2
• Réglage identique à la circonférence de la roue. Ici, vous
pouvez transférer la distance totale en km, par exemple
lors de l'achat de cet appareil, à partir d'un autre
compteur.
6. KM RUEDA 1/2
7. TIEMPO RUEDA 1/2
• Introducción como en las dimensiones de la rueda. Aquí se
puede transferir el número total de km p.ej. en caso de
compra del aparato de otro ordenador de bicicleta.
8. Contrast
• Press MODE button until contrast is displayed.
• Press SET button briefly and the display flashes.
• Set the value by pressing RESET button.
1 = light 3 = dark
• Confirm by pressing the SET button.
When you are finished entering the basic setting, press and
hold SET button for 3 seconds to exit set-up mode.
8. Contraste
• Appuyer sur la touche MODE1 jusqu'à ce que CONTRASTE
apparaisse.
• Appuyer brièvement sur la touche SET, le réglage clignote.
• A l'aide de la touche REMISE A ZERO/MODE2 régler la
valeur (1 = faible, 3 = fort). Confirmer avec la touche SET.
8. Contraste
• Pulsar la tecla MODE1 hasta que aparezca CONTRASTE.
• Pulsar brevemente la tecla SET, la introducción parpadea.
• Con la tecla RESET/MODE2 ajustar el valor (1=débil
3= fuerte). Confirmar con la tecla SET.
1. Set language
• Press MODE button until LANGUAGE is displayed
• Press the SET button briefly, the display flashes. Set the
desired language using the MODE button and confirm by
pressing SET button briefly.
4. Wheel size BIKE 2
This computer can be programmed for two bikes, if you are
only using this computer for one bike, skip this step and go
to step 5.
Changing between WHEEL SIZE 1 and WHEEL SIZE 2
occurs automatically simply by changing from bike 1
transmitter (grey button) to the optional Bike 2 transmitter
(red button).
• Press MODE button to change to WS BIKE 2.
• Press SET button briefly and the first digit flashes.
• Change the number by pressing RESET button.
• Change to next digit by pressing MODE button. Repeat
with next 3 numbers until desired wheel size is entered.
• Confirm by pressing SET button briefly.
4. Circonférence de la roue VELO 2
• A l'aide de la touche MODE passer au VELO 2.
• Appuyer brièvement sur la touche SET, le premier chiffre à
entrer clignote.
• Réglage comme pour le VELO 1 : régler les valeurs à l'aide
de la touche RESET, passer au prochain chiffre à l'aide de la
touche MODE.
• Le vélo 2 est toujours celui avec l'émetteur vélo 2
4. Dimensiones de la rueda BICICLETA 2
• Con la tecla MODE cambiar a BICICLETA 2.
• Pulsar brevemente la tecla SET, la primera cifra de introducción parpadea.
• Introducción como en RUEDA 1: Con las teclas RESET ajustar los valores,
con la tecla MODE cambiar a la cifra siguiente, etc.
• La bicicleta 2 es siempre la bicicleta con emisor rueda 2
SET
BI KE CO MPUT ER
TO PLI NE
B C 1 1 0 6 L D T S
SIG MA B IK E COMPUTE R
BC 110 6L DT S
W W W. S I G M A S P O R T. C O M
W W W. S I G M A S P O R T. C O M
SIGMA USA:
North America
1067 Kingsland Drive
Batavia, IL 60510, US A
Tel. +1-630-761-1106
Fax +1-6 30-761-1107
Toll Free: 888-744-6 277
SIGMA EUROPA:
SIGMA Elektro GmbH
Dr.- Juliu s- Leber- Straße 15
D-67433 Neustadt a.d.W.
Tel. +49-(0)63 21-9120-11 8
Fax +49- (0)6321-9120 -34
SIGMA ASIA:
Asia, Australia, South Ame rica
7F-1, No. 193, Ta-Tun 6th Street,
Taichung City, Taiwan
Tel. +886-4-2475 35 77
Fax +886 -4-2475 3563
32-630
28-630
40-622
47-622
40-635
37-622
18-622
20-622
23-622
25-622
28-622
32-622
37-622
40-622
27x1 1/4
27x1 1/4 Fifty
28x1.5
28x1.75
28x1 1/2
28x1 3/8x1 5/8
700x18C
700x20C
700x23C
700x25C
700x28C
700x32C
700x35C
700x40C
2199
2174
2224
2268
2265
2205
2102
2114
2133
2146
2149
2174
2205
2224
kmh
mph
47-305
47-406
37-540
47-507
23-571
40-559
44-559
47-559
50-559
54-559
57-559
37-590
37-584
20-571
16x1.75x2
20x1.75x2
24x1 3/8 A
24x1.75x2
26x1
26x1.5
26x1.6
26x1.75x2
26x1.9
26x2.00
26x2.125
26x1 3/8
26x1 3/8x1 1/2
26x3/4
1272
1590
1948
1907
1973
2026
2051
2070
2089
2114
2133
2105
2086
1954
ETRTO
kmh
mph
ETRTO
km/h:
WS = mm x 3.14
mph:
WS = mm x 3.14
km/h:
WS = mm
mph:
WS = mm
Printed in USA
~20 sec
A
Test: Battery
Max. 20 mm
• MODE: appel des fonctions
• RESET: remise à zéro des fonctions
DISTANCE JOURNALIERE, TEMPS PARCOURU, Ø KMH et MAX. KMH
• MODE: Activar las funciones
• RESET: Restablecimiento de las funcion.
KM DIARIOS, DURACIÓN DEL TRAYECTO, PROMEDIO KMH y KMH MÁX. a cero
• MODE: Change the functions
• RESET: Reset the functions
DAILY KM/M, TRIP TIME, AVERAGE SPEED and MAX SPEED to zero
MODE
>3 sec = RESET
TRIP DIST
TRIP TIME
AVG. SPEED
MAX. SPEED
CLOCK
TOTAL ODO*
TOTAL TIME*
TRIP DIST
TRIP TIME
AVG. SPEED
MAX. SPEED
MODE
>3 sec = RESET
KM JOUR
TEMPS PARC
VIT MOYEN.
VIT MAXI
HEURE
KM TOTAL*
TEMPSTOTAL*
KM JOUR
TEMPS PARC
VIT MOYEN.
VIT MAXI
MODE
>3 sec = RESET
KM DIA
TIEMPO PAR
VEL MEDIA
VEL MAXIMA
HORA
KM TOTAL*
TIEMPO TOT*
KM DIA
TIEMPO PAR
VEL MEDIA
VEL MAXIMA
How to change modes
• Press MODE button until the desired function is displayed
(TRIP DISTANCE, TRIP TIME, AVG. SPEED, MAX. SPEED,
CLOCK, TOTAL ODO, TOTAL TIME)
• While riding the TOTAL ODO and TOTAL TIME functions
are hidden.
Affichage des fonctions
• Appuyer sur la touche MODE jusqu'à ce que la fonction
souhaitée soit affichée (DISTANCE JOURNALIERE, TEMPS
PARCOURU, MOYENNE KMH, MAX.KMH, HEURE,
DISTANCE TOTALE EN KM, TEMPS TOTAL).
• Pendant la conduite, DISTANCE TOTALE et TEMPS TOTAL
ne sont pas affichés (moins de clics de touche lors de la
conduite).
Indicación de las funciones
• Pulsar la tecla MODE hasta que se muestre la función deseada (KM DIARIOS,
DURACIÓN DEL TRAYECTO, PROMEDIO KMH, KMH MÁX., HORA, KM
TOTALES, TIEMPO TOTAL).
• durante la carrera no se muestran KM TOTALES y TIEMPO TOTAL (menos
pulsaciones de teclas durante la carrera).
SET > 3 sec
• Press SET button for 3 sec. to enter set-up mode (SET
will appear in upper right hand corner of display when in
set-up mode, you must be in set-mode to perform steps
1-8).
• Use the set-up mode to change language, KMH/MPH,
wheel size, time, total odo, total time, and contrast.
• After changing the battery, only the time and contrast
have to be entered.
• Appuyer sur la touche SET 3 sec pour effectuer les réglages de base
suivants : langue, changement entre kmh/mph, circonférence de la
roue 1 et 2, heure, distance totale, temps total et contraste de l'écran.
Fin du menu réglage en appuyant 3 sec sur la touche SET. Après le
changement de la pile, seule l'heure et le contraste de l'écran doivent
être à nouveau rentrés.
• Pulsar la tecla Set durante 3 segundos para realizar los siguientes ajustes
básicos: idioma, cambio entre kmh/mph, dimensiones de la rueda 1 y 2,
hora, km totales, hora total y contraste de pantalla. Finalice el menú de
introducción pulsando durante 3 segundos la tecla SET. Tras un cambio de
la pila deben introducirse solo la hora y el contraste de la pantalla.
1. Régler la langue
•Appuyer sur la touche MODE jusqu'à ce que LANGUE
apparaisse sur l'écran.
•Appuyer brièvement sur la touche SET, l'affichage clignote.
Régler la langue souhaitée à l'aide de la touche MODE et
confirmer par la touche SET.
1. Ajustar el idioma
•Pulsar la tecla MODE hasta que aparezca IDIOMA en la
pantalla.
•Pulsar brevemente la tecla SET, la indicación parpadea.
Con la tecla MODE ajustar el idioma seleccionado y
confirmar con la tecla SET.
MODE
MODE
MODE
RESET
RESET
5. Time
(24 hr clock will display when using KMH, 12 hr clock will
display when using MPH)
• Press MODE button until TIME is displayed.
• Press the SET button briefly and the hour digit flashes.
• Change the hour with the RESET button.
• Advance to minutes by pressing MODE button.
• Change the minutes with the RESET button.
• Confirm by pressing the SET button briefly.
5. Heure (kmh = 24 h / mph = 12 h)
• Appuyer sur la touche MODE jusqu'à ce qu'HEURE apparaisse.
• Appuyer brièvement sur la touche SET, l'entrée clignote.
• Régler les heures à l'aide de la touche REMISE A ZERO. A
l'aide de la touche MODE passer au réglage des minutes.
• Régler les minutes à l'aide de la touche REMISE A ZERO.
Confirmer par la touche SET.
5. Hora (kmh = 24 h / mph = 12 h)
• Pulsar la tecla MODE hasta que aparezca HORA.
• Pulsar brevemente la tecla SET, la introducción parpadea.
• Con la tecla RESET ajustar el valor, con la tecla MODE
cambiar a la siguiente cifra.
• Con la tecla RESET ajustar los minutos. Confirmar con la
tecla SET.
MODE
MODE
• After installing the bike computer into mounting bracket, SPEED display will
blink ZERO.
• There are two ways to pair your transmitter and computer.
• 1. Ride. After 20 seconds (max 5 min.) the receiver will pair with
transmitter and data will be displayed.
• 2. Spin front wheel until speed display stops blinking (A).
• After 5 min. without transmission, BC 1106 DTS will go into sleep mode.
(Time of Day and Model name shown in the display). Press any button to
re-activate the computer. A short pairing will find the transmitter.
• Removing the BC 1106 DTS from the mounting bracket will end the paired
connection.
• If “TOO MANY SIGNALS” message is displayed: lengthen the distance of all
transmitters and press any button to continue. Pairing will begin again.
• Monter le compteur sur son support. Le zéro de la vitesse clignote
• Il y a deux possibilités pour connecter la vitesse et la cadence:
1. Rouler, après env. 20 secondes (max. 5 min.) le récepteur s'est connecté
avec l'émetteur, les données sont affichées.
2. Fiare tourner la roue avant jusqu'à ce que l'affichage de la vitesse ne
clignote plus (A).
ATTENTION:
• Après plus de 5 minutes de pause le BC 1106 DTS se met en mode repos
(affichage de l'heure et du nom du modèle). Pour ré-activer le compteur
appuyer sur une touche quelconque, il s'établit alors une connection courte
pour rechercher le(s) émetteur(s)
• Lorsque l'on sort le BC 1106 DTS de son support, la connection est arrêtée.
• TOO MANY SIGNALS s'affiche: Augmenter la distance par rapport aux
autres vélos et appuyer sur une touche quelconque. La connection
recommence.
• Encajar el BC 1106 DTS sobre el soporte. El cero de las indicaciones de
velocidad parpadea
• Hay dos posibilidades de emparejar la velocidad:
1. Arrancar, después de aprox. 20 segundos (max. 5 min) el receptor se ha
sincronizado con el receptor y se muestran los datos.
2. Girar la rueda delantera hasta que deje de parpadear la indicación de KMH
(A).
ATENCIÓN:
• Después de 5 minutos de pausa, el BC 1106 DTS pasa al modo de
espera (la hora y el nombre del modelo en la pantalla). Al pulsar cualquier
tecla se inicia un apareado corto para encontrar el emisor.
• Al retirar el BC 1106 DTS del soporte se desconecta la desconexión.
• Indicación TOO MANY SIGNALS (demasiadas señales): Aumentar la
distancia con otros emisores y pulsar cualquier tecla. El apareado se inicia
de nuevo.
~20 sec
A
~20 sec
A
mm x 3.14
note: 1 inch = 25.4 mm
Pila:
1 pila de litio tipo botón 2032, 3V
El cambio de pila se muestra en la pantalla.
Cambio de pila
• Si se cambia la pila DIMENSIONES DE LA
RUEDA, IDIOMA, KMH/MPH, KM
TOTALES y TIEMPO TOTAL permanecen
guardadas y no deben ser introducidas
de nuevo.
• Respetar el + y el -. Con el
compartimento de la batería abierto
tiene que verse el + de la pila.
• Si la junta de estanquidad está
desplazada, volver a colocarla.
• Tras el cambio de pila debe introducirse
de nuevo la hora.
Garantía
Nos responsabilizamos de las deficiencias
frente a nuestro socio contractual según
lo dispuesto en los reglamentos legales.
Ordenador:
Abrir la tapa con una moneda.
¡Prestar atención
a la polaridad"
Emisor:
Abrir la tapa con una herramienta.
¡Retirar la pila de la tapa!
¡Prestar atención a la polaridad!
KMH sin indicación
• ¿Se utiliza el soporte antiguo del manillar
con la transmisión por radio (RDS)?
• ¿Está el ordenador correctamente
encajado sobre el soporte?
• ¿Se han comprobado la oxidación /
corrosión de los contactos?
• ¿Distancia entre imán y sensor?
(máx. 20 mm)
• ¿Se ha comprobado si el imán está
imantado?
• ¿2 imanes montados?
• ¿Imán posicionado correctamente?
• ¿Dimensiones de la rueda (WS) mal
ajustadas?
• ¿Se ha montado el emisor correcto en el
cambio de bicicleta?
Los KMH están mal indicados
Indicación en pantalla oscura o lenta
• Temperatura demasiado alta (>60° C) o
demasiado baja (<0° C)
Sin indicación en pantalla
(indicación vacía)
• Comprobar la pila
• Pila bien colocada (+ y -)
• ¿Es correcto el contacto de la pila?
(comprobar con cuidado)
Ningún apareado
• Comprobar la distancia emisor/imán
• Pila del emisor vacía
• Activar el ordenador pulsando
• Comprobar alcance
• Modificar la posición del emisor al
emplear un dínamo de cubo
Indicación TOO MANY SIGNALS
(demasiadas señales):
• Aumentar la distancia con otros
emisores y pulsar una tecla
Pile:
1 pile-bouton lithium 2032, 3V
Le changement de pile est affiché est
affiché sur l'écran.
Changement de pile
• En cas de changement de pile,
CIRCONFERENCE DE LA ROUE 1/2,
LANGUE, KMH/MPH, DISTANCE TOTALE
et TEMPS TOTAL restent en mémoire et
ne doivent pas être à nouveau rentrés.
• Faire attention au plus et au moins, lorsque
le compartiment de la pile est ouvert,
vous devez voir le côté PLUS de la pile !
• En cas de déplacement du joint
d'étanchéité, le remettre en place.
• Après le changement de la pile, seul
l'heure et le contraste doivent être
à nouveau rentrés.
Garantie
Nous sommes responsables, vis-à-vis de
notre partenaire contractuel respectif, des
vices conformément aux prescriptions légales.
Les piles sont exclues de la garantie.
Compteur:
Ouvrir le couvercle avec une pièce
Attention à la
polarité!
Emetteur:
Ouvrir le couvercle avec
l'outil prévu à cet effet.
Enlever la pile du couvercle!
Attention à la polarité!
Pas d'affichage kmh
• Ancien système sans fil sur le vélo?
• Compteur bien enclenché sur le support?
• Corrosion/oxidation sur les contacts?
• Distance aimant/émetteur?
(max. 20 mm)
• Aimant magnétisé?
• 2 aimant montés?
• Aimant bien positionné?
• Circonférence de la roue (WS) bien
programmè?
• Montage du bon émetteur lors d'un
changement de vélo?
Mauvais affichage de la vitesse
Affichage noir/lent
• Température trop haute (>60°C)
ou trop basse (<0°C)
Pas d'affichage (écran vide)
• Vérifier l'état de la pile
• Pile bien mise (plus et moins)
• Contacts ok? (tordre en faisant attention)
Pas de connection
• Vérifier la distance aimant/émetteur
• Les piles de l'émetteur sont vides
• Activer le compteur en appuyant sur
une touche
• Vérifier la distance émetteur/récepteur
• Si vous utilisez une dynamo-moyeu,
changer la position de l'émetteur
Affichage TOO MANY SIGNALS
• Augmenter la distance avec les autres
vélos et appuyer sur une touche
quelconque.
Battery:
1 lithium button cell 2032, 3V
Battery change is displayed on screen.
Change batteries:
• WHEEL SIZES 1+2, LANGUAGE,
KMH/MPH, TOTAL KM and TOTAL
TIME remain saved even when the
battery is changed.
• Observe direction of plus and minus
poles; when the compartment is open
you must see the PLUS side of the
battery!
• If sealing ring is loose, re-insert it.
• After changing the battery only the
time and the contrast must be re-
entered.
Warranty
We are liable to our contracting partners
for defects as defined by law. Batteries
are excluded from the guarantee.
No display of MPH
• Using an old RDS mounting bracket?
• Check that the Bike Computer is properly
engaged in the bracket.
• Check contacts for corrosion/oxidation.
• Check distance between magnet and sensor
(max. 20 mm using Sigma's Power Magnet)
• Check if magnet is magnetized
• 2 magnets installed?
• Magnet in the right position?
• Wheel size programmed incorrectly?
• In case of you switched bikes - are you mounting
the correct transmitter?
False display of MPH
Display is black or weaken?
• Temperature too high (>60 °C) or too low (<0°C)
No Display (screen blank)
• Check Battery
• Check plus and minus poles
• Battery contact ok? (bend carefully!)
No Pairing
• Check distance between transmitter /
magnet (20mm or less with power
magnet)
• Press battery check button on
transmitter
• Activate computer by pressing any
button
• Check distance between transmitter
and receiver (max distance 90cm)
• If using a dynamo hub, change location
of transmitter.
TOO MANY SIGNALS is shown:
• Extend the distance between
transmitters and press any button
on computer to continue
Computer:
Open the top cover with a coin
Pay attention to
polarity!
Transmitter:
Open top cover with tool
Take the battery out of the top cover!
Pay attention to polarity!
Speed
TRIP DIST
TRIP TIME
ODO BIKE
TIME BIKE
WS BIKE 1/2
Vitesse
KM JOUR
TEMPS PARC
KM TOTAL
TEMPSTOTAL
CIRCONFERENCE
DE LA ROUE 1/2
Velocidad
KM DIA
TIEMPO PAR
KM TOTAL
TIEMPO TOT
DIMENSIONES
DE LA RUEDA
1/2
0.0
0.00
0:00:00
0
0:00
2,155
Default Max Units
199.5
9,999.9
999:59
99,999
9,999
3,999
kmh/mph
km/mi
h:mm:ss hh:mm hhh:mm
km/mi
h:mm hh:mm hhh:m h.hhh
mm
Speed Comparison (pace arrow)
Comparison of current speed to average speed.
• If your current speed is equal to your average speed is
shown, if lower is shown, and if higher is shown.
Vitesse/vitesse moyenne
• En cas de vitesse à peu près similaire s'affiche, en cas
de vitesse plus faible et plus élevée .
• L'affichage est effectué pour toutes les fonctions sauf
dans les réglages de base.
Velocidad / velocidad media
• En caso de velocidad casi igual se muestra , en caso de
velocidad menor y velocidad mayor .
• La indicación se realiza en todas las funciones excepto en
los ajustes básicos.
Reset
Reset Trip distance, Trip time, Average speed, and
Max speed to zero.
• Press MODE button until the desired function to zero out
displayed.
• Press and hold RESET button. The display will flash and
after 2 seconds the displayed function will clear.
• Holding RESET button longer than 4 seconds will zero out
Trip distance, Trip time, Average speed, and Max speed
functions at the same time.
Remise à zéro de l'affichage
• Appuyer sur la touche MODE jusqu'à ce que la fonction
souhaitée apparaisse. Maintenir appuyée la touche REMISE
A ZERO. L'affichage clignote. Au bout de 2 sec, seule la
fonction affichée est remise à 0.
• Appuyer sur la touche REMISE A ZERO pendant plus de 4
sec remet à zéro les affichages de DISTANCE
JOURNALIERE, TEMPS PARCOURU, Ø KMH, MAX KMH.
Restablecer las indicaciones
• Pulsar la tecla MODE hasta que aparezca la función
deseada.
• Mantener pulsada la tecla RESET. La indicación parpadea.
Tras 2 segundos se restablece la función indicada a 0.
• Pulsar la tecla RESET durante más de 4 segundos
establece las indicaciones de KM DIARIOS, DURACIÓN DEL
TRAYECTO, PROMEDIO KMH, KMH MÁX. en cero.
> 2 sec
> 3,5 sec
Switching between WHEEL 1 and WHEEL 2 is automatic.
You must install (optional) transmitter of Bike 2 (red
button).
• It is no longer possible to change by making an entry.
Le changement entre la ROUE 1 et la ROUE 2 est effectué
automatiquement. Il faut utiliser l'émetteur vélo 2 (en
option) avec la touche rouge.
• Un changement manuel n'est plus possible.
El cambio entre la RUEDA 1 y RUEDA 2 se realiza
automáticamente. Debe emplearse el emisor (opcional)
rueda 2 (tecla roja).
• Ya no es posible un cambio por introducción.
4 x
90°
4 x
Bike 1
Wheel Size Chart
go to
step 3
go to
step 2
The harness comes ready to mount on your handlebars.
To mount on a stem, remove the 4 screws on the back of the harness, turn base 90 degrees.
stem mount
remove yellow tape
the SIGMA logo on the harness must
always face the front of the bike.
Foam pad included for
use with bladed spokes
To reach the required 20mm or less, move magnet
and transmitter towards center of wheel.
Note: 20mm = 3/4 inches
32
42
?
handlebar
or
stem
Red, rouge
2 m m
Red, rouge
0,0
MPH
CLOCK
15:23
* not while riding
0,0
MPH
HEURE
15:23
* pas pendant
la conduite
0,0
MPH
HORA
15:23
*no durante
la carrera
12:23
12:23
12:25
00.200
00.000
00.200
3
2
Bike 1
+

Contents / Contenu / Contenudo Installation / Montage / Montaje Installation of mounting bracket Montage du support / Montaje del soporte de bicicleta
1 2
Installation of mounting bracket Installation of magnet / Montage de l'aimant / Montaje del imán
5
Installation of speed transmitter Montage de l'émett. Vit. / Montaje del emisor de velocidad
1
Installation of speed transmitter
5
Mode / Reset Pairing / Connection / Apareado Pairing / Connection / Apareado
3 4 6 1
2 1
KMH/MPH entry Réglage KMH/MPH / Introducción KMH/MPH
U F
E
Wheel size entry Circonférence de roue / Dimensiones de la rueda
U F
E
Measure wheel size Mesurer la roue / Dimensiones de la rueda
U F
E
Time entry Réglage heure / Introducir la hora
U F
E
Total data entry Réglage des valeurs totales / Datos totales
U F
E
Contrast entry Réglage contraste / Introducción contraste
U F
E
Language Entry Réglage langue / Introducir el idioma
U F
E
Wheel size entry Circonférence de roue / Dimensiones de la rueda
U F
E
42 mm
32 mm
Basic settings Réglages de base / Ajustes básicos
U F
E
Wheel Size Chart (Wheel Size) Wheel Size Chart (Circonférence de roue / Tamaño de rueda)
A C
B
Changing modes Changement d’affichage / Cambio de visualización
U F
E
Installation of speed transmitter Montage de l'émett. Vit. / Montaje del emisor de velocidad
3 4
2x
Left side Right side
Grey, gris
optional Bike 2
Ref. No. 00405
Pairing / Connection / Apareado Pairing / Connection / Apareado Pairing / Connection / Apareado
Installation of Bike Computer
U
F
E
F E
U F E
Pairing / Connection / Apareado
Observaciones generales E
Cambio de la pila
Solución de problemas E
Remarques générales F Changement de batterie Solution aux problèmes FGeneral remarks U Trouble Shooting UChange batteryTechnical Data / Données techniques / Datos técnicos
U F
E
Technical data / Données techniques / Datos técnicos
Comparison speed Comparaison de la vitesse / Comparación velocidad
U F
E
Reset Remise à zéro / Puesta a cero
U F
E
Assembly 2nd wheel Montage 2ème roue / Montaje 2ª rueda
U F
E
optional Bike 2
Ref. No. 00405
Grey, gris
Bike 1
+
2. KMH / MPH
• Press MODE button until KMH / MPH is displayed.
• Press SET button briefly, KMH or MPH is displayed and
flashing.
• Select MPH or KMH with MODE button.
• Confirm by pressing SET button briefly.
2. KMH / MPH
• A l'aide de la touche MODE changer le réglage KMH/MPH.
• Appuyer brièvement sur la touche SET.
• KMH ou MPH apparaît sur l'écran et clignote.
• Régler MPH ou KMH à l'aide de la touche MODE.
• Confirmer par la touche SET.
2. KMH / MPH
• Con la tecla MODE cambiar a la introducción de KMH/MPH
• Pulsar la tecla SET brevemente.
• En la pantalla aparece KMH o MPH y parpadea.
• Con la tecla MODE ajustar MPH o KMH.
• Confirmar con la tecla SET.
3. Wheel size BIKE 1
• Press MODE button to change to WS BIKE 1.
• Press SET button briefly and the first digit flashes.
• Change the number by pressing RESET button, change to
next digit by pressing mode. Repeat with next 3 numbers
until desired wheel size is entered.
• Confirm by pressing SET button briefly.
3. Circonférence de la roue VELO 1
• A l'aide de la touche MODE passer à VELO 1.
• Appuyer brièvement sur la touche SET, le premier chiffre
à entrer clignote.
• Régler la valeur à l'aide de la touche REMISE A ZERO,
passer au prochain chiffre à l'aide de la touche MODE.
• Le vélo 1 est toujours celui avec l'emetteur vélo 1
3. Dimensiones de la rueda BICICLETA 1
• Con la tecla MODE cambiar a BICICLETA 1.
• Pulsar brevemente la tecla SET, la primera cifra de
introducción parpadea.
• Con la tecla RESET ajustar el valor, con la tecla MODE
cambiar a la siguiente cifra.
• La bicicleta 1 es siempre la bicicleta con emisor rueda 1
• A partir de la tabla C "Wheel Size Chart" (véase la página
siguiente) determinar el valor correspondiente al tamaño
de la rueda. Introducir este valor.
• Alternativa: calcular/ determinar el tamaño de la rueda
(tabla A o tabla B)
• Tras la última cifra confirmar con la tecla SET.
• Determine the correct value for your wheel size from
Table C “Wheel Size Chart” (refer to next page).
• Alternative: calculate wheel size using formula Tab A or
Tab B.
• Déterminer la valeur correspondant à votre circonférence
de roue à partir du tableau C "Wheel Size Chart" (voir
page suivante). Entrer cette valeur.
• Alternative: calculer/déterminer WS (Tab. A ou tab. B).
• Après le dernier chiffre, confirmer par la touche SET.
You can enter TOTAL ODO (miles) miles and TOTAL times
from your previous computer.
Note – This step is not necessary if previous data from
another computer is not desired(skip to step 8).
6. Enter TOTAL ODO (miles)
• Press MODE button until TOTAL ODO is displayed.
• Press SET button briefly and the first digit will flash.
• Press RESET button to change each digit.
• Press MODE button to advance to next number.
• Repeat until desired number is entered.
• Confirm by pressing the SET button briefly.
7. Enter TOTAL TIME
• Press MODE button until TOTAL TIME is displayed
• Press SET button briefly and the first digit will flash.
• Press RESET button to change each digit.
• Press MODE button to advance to next number.
• Repeat until desired number is entered
• Confirm by pressing the SET button briefly.
6. KM-VELO 1/2
7. TEMPS VELO 1/2
• Réglage identique à la circonférence de la roue. Ici, vous
pouvez transférer la distance totale en km, par exemple
lors de l'achat de cet appareil, à partir d'un autre
compteur.
6. KM RUEDA 1/2
7. TIEMPO RUEDA 1/2
• Introducción como en las dimensiones de la rueda. Aquí se
puede transferir el número total de km p.ej. en caso de
compra del aparato de otro ordenador de bicicleta.
8. Contrast
• Press MODE button until contrast is displayed.
• Press SET button briefly and the display flashes.
• Set the value by pressing RESET button.
1 = light 3 = dark
• Confirm by pressing the SET button.
When you are finished entering the basic setting, press and
hold SET button for 3 seconds to exit set-up mode.
8. Contraste
• Appuyer sur la touche MODE1 jusqu'à ce que CONTRASTE
apparaisse.
• Appuyer brièvement sur la touche SET, le réglage clignote.
• A l'aide de la touche REMISE A ZERO/MODE2 régler la
valeur (1 = faible, 3 = fort). Confirmer avec la touche SET.
8. Contraste
• Pulsar la tecla MODE1 hasta que aparezca CONTRASTE.
• Pulsar brevemente la tecla SET, la introducción parpadea.
• Con la tecla RESET/MODE2 ajustar el valor (1=débil
3= fuerte). Confirmar con la tecla SET.
1. Set language
• Press MODE button until LANGUAGE is displayed
• Press the SET button briefly, the display flashes. Set the
desired language using the MODE button and confirm by
pressing SET button briefly.
4. Wheel size BIKE 2
This computer can be programmed for two bikes, if you are
only using this computer for one bike, skip this step and go
to step 5.
Changing between WHEEL SIZE 1 and WHEEL SIZE 2
occurs automatically simply by changing from bike 1
transmitter (grey button) to the optional Bike 2 transmitter
(red button).
• Press MODE button to change to WS BIKE 2.
• Press SET button briefly and the first digit flashes.
• Change the number by pressing RESET button.
• Change to next digit by pressing MODE button. Repeat
with next 3 numbers until desired wheel size is entered.
• Confirm by pressing SET button briefly.
4. Circonférence de la roue VELO 2
• A l'aide de la touche MODE passer au VELO 2.
• Appuyer brièvement sur la touche SET, le premier chiffre à
entrer clignote.
• Réglage comme pour le VELO 1 : régler les valeurs à l'aide
de la touche RESET, passer au prochain chiffre à l'aide de la
touche MODE.
• Le vélo 2 est toujours celui avec l'émetteur vélo 2
4. Dimensiones de la rueda BICICLETA 2
• Con la tecla MODE cambiar a BICICLETA 2.
• Pulsar brevemente la tecla SET, la primera cifra de introducción parpadea.
• Introducción como en RUEDA 1: Con las teclas RESET ajustar los valores,
con la tecla MODE cambiar a la cifra siguiente, etc.
• La bicicleta 2 es siempre la bicicleta con emisor rueda 2
SET
BI KE CO MPUT ER
TO PLI NE
B C 1 1 0 6 L D T S
SIGMA B IK E CO MPU TER
BC 110 6 L DT S
W W W. S I G M A S P O R T. C O M
W W W. S I G MA S P O R T. C O M
SIGMA USA:
North America
1067 Kingsland Drive
Batavia, IL 60510, US A
Tel. +1-630-761-1106
Fax +1-6 30-761-1107
Toll Free: 888-744-6 277
SIGMA EUROPA:
SIGMA Elektro GmbH
Dr.- Julius-Leber-Straße 15
D-67433 Neustadt a.d.W.
Tel. +49-(0)63 21-9120-11 8
Fax +49- (0)6321-9120 -34
SIGMA ASIA:
Asia, Australia, South Ame rica
7F-1, No. 193, Ta-Tun 6th Street,
Taichung City, Taiwan
Tel. +886-4-2475 35 77
Fax +886 -4-2475 3563
32-630
28-630
40-622
47-622
40-635
37-622
18-622
20-622
23-622
25-622
28-622
32-622
37-622
40-622
27x1 1/4
27x1 1/4 Fifty
28x1.5
28x1.75
28x1 1/2
28x1 3/8x1 5/8
700x18C
700x20C
700x23C
700x25C
700x28C
700x32C
700x35C
700x40C
2199
2174
2224
2268
2265
2205
2102
2114
2133
2146
2149
2174
2205
2224
kmh
mph
47-305
47-406
37-540
47-507
23-571
40-559
44-559
47-559
50-559
54-559
57-559
37-590
37-584
20-571
16x1.75x2
20x1.75x2
24x1 3/8 A
24x1.75x2
26x1
26x1.5
26x1.6
26x1.75x2
26x1.9
26x2.00
26x2.125
26x1 3/8
26x1 3/8x1 1/2
26x3/4
1272
1590
1948
1907
1973
2026
2051
2070
2089
2114
2133
2105
2086
1954
ETRTO
kmh
mph
ETRTO
km/h:
WS = mm x 3.14
mph:
WS = mm x 3.14
km/h:
WS = mm
mph:
WS = mm
Printed in USA
~20 sec
A
Test: Battery
Max. 20 mm
• MODE: appel des fonctions
• RESET: remise à zéro des fonctions
DISTANCE JOURNALIERE, TEMPS PARCOURU, Ø KMH et MAX. KMH
• MODE: Activar las funciones
• RESET: Restablecimiento de las funcion.
KM DIARIOS, DURACIÓN DEL TRAYECTO, PROMEDIO KMH y KMH MÁX. a cero
• MODE: Change the functions
• RESET: Reset the functions
DAILY KM/M, TRIP TIME, AVERAGE SPEED and MAX SPEED to zero
MODE
>3 sec = RESET
TRIP DIST
TRIP TIME
AVG. SPEED
MAX. SPEED
CLOCK
TOTAL ODO*
TOTAL TIME*
TRIP DIST
TRIP TIME
AVG. SPEED
MAX. SPEED
MODE
>3 sec = RESET
KM JOUR
TEMPS PARC
VIT MOYEN.
VIT MAXI
HEURE
KM TOTAL*
TEMPSTOTAL*
KM JOUR
TEMPS PARC
VIT MOYEN.
VIT MAXI
MODE
>3 sec = RESET
KM DIA
TIEMPO PAR
VEL MEDIA
VEL MAXIMA
HORA
KM TOTAL*
TIEMPO TOT*
KM DIA
TIEMPO PAR
VEL MEDIA
VEL MAXIMA
How to change modes
• Press MODE button until the desired function is displayed
(TRIP DISTANCE, TRIP TIME, AVG. SPEED, MAX. SPEED,
CLOCK, TOTAL ODO, TOTAL TIME)
• While riding the TOTAL ODO and TOTAL TIME functions
are hidden.
Affichage des fonctions
• Appuyer sur la touche MODE jusqu'à ce que la fonction
souhaitée soit affichée (DISTANCE JOURNALIERE, TEMPS
PARCOURU, MOYENNE KMH, MAX.KMH, HEURE,
DISTANCE TOTALE EN KM, TEMPS TOTAL).
• Pendant la conduite, DISTANCE TOTALE et TEMPS TOTAL
ne sont pas affichés (moins de clics de touche lors de la
conduite).
Indicación de las funciones
• Pulsar la tecla MODE hasta que se muestre la función deseada (KM DIARIOS,
DURACIÓN DEL TRAYECTO, PROMEDIO KMH, KMH MÁX., HORA, KM
TOTALES, TIEMPO TOTAL).
• durante la carrera no se muestran KM TOTALES y TIEMPO TOTAL (menos
pulsaciones de teclas durante la carrera).
SET > 3 sec
• Press SET button for 3 sec. to enter set-up mode (SET
will appear in upper right hand corner of display when in
set-up mode, you must be in set-mode to perform steps
1-8).
• Use the set-up mode to change language, KMH/MPH,
wheel size, time, total odo, total time, and contrast.
• After changing the battery, only the time and contrast
have to be entered.
• Appuyer sur la touche SET 3 sec pour effectuer les réglages de base
suivants : langue, changement entre kmh/mph, circonférence de la
roue 1 et 2, heure, distance totale, temps total et contraste de l'écran.
Fin du menu réglage en appuyant 3 sec sur la touche SET. Après le
changement de la pile, seule l'heure et le contraste de l'écran doivent
être à nouveau rentrés.
• Pulsar la tecla Set durante 3 segundos para realizar los siguientes ajustes
básicos: idioma, cambio entre kmh/mph, dimensiones de la rueda 1 y 2,
hora, km totales, hora total y contraste de pantalla. Finalice el menú de
introducción pulsando durante 3 segundos la tecla SET. Tras un cambio de
la pila deben introducirse solo la hora y el contraste de la pantalla.
1. Régler la langue
• Appuyer sur la touche MODE jusqu'à ce que LANGUE
apparaisse sur l'écran.
• Appuyer brièvement sur la touche SET, l'affichage clignote.
Régler la langue souhaitée à l'aide de la touche MODE et
confirmer par la touche SET.
1. Ajustar el idioma
• Pulsar la tecla MODE hasta que aparezca IDIOMA en la
pantalla.
• Pulsar brevemente la tecla SET, la indicación parpadea.
Con la tecla MODE ajustar el idioma seleccionado y
confirmar con la tecla SET.
MODE
MODE
MODE
RESET
RESET
5. Time
(24 hr clock will display when using KMH, 12 hr clock will
display when using MPH)
• Press MODE button until TIME is displayed.
• Press the SET button briefly and the hour digit flashes.
• Change the hour with the RESET button.
• Advance to minutes by pressing MODE button.
• Change the minutes with the RESET button.
• Confirm by pressing the SET button briefly.
5. Heure (kmh = 24 h / mph = 12 h)
• Appuyer sur la touche MODE jusqu'à ce qu'HEURE apparaisse.
• Appuyer brièvement sur la touche SET, l'entrée clignote.
• Régler les heures à l'aide de la touche REMISE A ZERO. A
l'aide de la touche MODE passer au réglage des minutes.
• Régler les minutes à l'aide de la touche REMISE A ZERO.
Confirmer par la touche SET.
5. Hora (kmh = 24 h / mph = 12 h)
• Pulsar la tecla MODE hasta que aparezca HORA.
• Pulsar brevemente la tecla SET, la introducción parpadea.
• Con la tecla RESET ajustar el valor, con la tecla MODE
cambiar a la siguiente cifra.
• Con la tecla RESET ajustar los minutos. Confirmar con la
tecla SET.
MODE
MODE
• After installing the bike computer into mounting bracket, SPEED display will
blink ZERO.
• There are two ways to pair your transmitter and computer.
• 1. Ride. After 20 seconds (max 5 min.) the receiver will pair with
transmitter and data will be displayed.
• 2. Spin front wheel until speed display stops blinking (A).
• After 5 min. without transmission, BC 1106 DTS will go into sleep mode.
(Time of Day and Model name shown in the display). Press any button to
re-activate the computer. A short pairing will find the transmitter.
• Removing the BC 1106 DTS from the mounting bracket will end the paired
connection.
• If “TOO MANY SIGNALS” message is displayed: lengthen the distance of all
transmitters and press any button to continue. Pairing will begin again.
• Monter le compteur sur son support. Le zéro de la vitesse clignote
• Il y a deux possibilités pour connecter la vitesse et la cadence:
1. Rouler, après env. 20 secondes (max. 5 min.) le récepteur s'est connecté
avec l'émetteur, les données sont affichées.
2. Fiare tourner la roue avant jusqu'à ce que l'affichage de la vitesse ne
clignote plus (A).
ATTENTION:
• Après plus de 5 minutes de pause le BC 1106 DTS se met en mode repos
(affichage de l'heure et du nom du modèle). Pour ré-activer le compteur
appuyer sur une touche quelconque, il s'établit alors une connection courte
pour rechercher le(s) émetteur(s)
• Lorsque l'on sort le BC 1106 DTS de son support, la connection est arrêtée.
• TOO MANY SIGNALS s'affiche: Augmenter la distance par rapport aux
autres vélos et appuyer sur une touche quelconque. La connection
recommence.
• Encajar el BC 1106 DTS sobre el soporte. El cero de las indicaciones de
velocidad parpadea
• Hay dos posibilidades de emparejar la velocidad:
1. Arrancar, después de aprox. 20 segundos (max. 5 min) el receptor se ha
sincronizado con el receptor y se muestran los datos.
2. Girar la rueda delantera hasta que deje de parpadear la indicación de KMH
(A).
ATENCIÓN:
• Después de 5 minutos de pausa, el BC 1106 DTS pasa al modo de
espera (la hora y el nombre del modelo en la pantalla). Al pulsar cualquier
tecla se inicia un apareado corto para encontrar el emisor.
• Al retirar el BC 1106 DTS del soporte se desconecta la desconexión.
• Indicación TOO MANY SIGNALS (demasiadas señales): Aumentar la
distancia con otros emisores y pulsar cualquier tecla. El apareado se inicia
de nuevo.
~20 sec
A
~20 sec
A
mm x 3.14
note: 1 inch = 25.4 mm
Pila:
1 pila de litio tipo botón 2032, 3V
El cambio de pila se muestra en la pantalla.
Cambio de pila
• Si se cambia la pila DIMENSIONES DE LA
RUEDA, IDIOMA, KMH/MPH, KM
TOTALES y TIEMPO TOTAL permanecen
guardadas y no deben ser introducidas
de nuevo.
• Respetar el + y el -. Con el
compartimento de la batería abierto
tiene que verse el + de la pila.
• Si la junta de estanquidad está
desplazada, volver a colocarla.
• Tras el cambio de pila debe introducirse
de nuevo la hora.
Garantía
Nos responsabilizamos de las deficiencias
frente a nuestro socio contractual según
lo dispuesto en los reglamentos legales.
Ordenador:
Abrir la tapa con una moneda.
¡Prestar atención
a la polaridad"
Emisor:
Abrir la tapa con una herramienta.
¡Retirar la pila de la tapa!
¡Prestar atención a la polaridad!
KMH sin indicación
• ¿Se utiliza el soporte antiguo del manillar
con la transmisión por radio (RDS)?
• ¿Está el ordenador correctamente
encajado sobre el soporte?
• ¿Se han comprobado la oxidación /
corrosión de los contactos?
• ¿Distancia entre imán y sensor?
(máx. 20 mm)
• ¿Se ha comprobado si el imán está
imantado?
• ¿2 imanes montados?
• ¿Imán posicionado correctamente?
• ¿Dimensiones de la rueda (WS) mal
ajustadas?
• ¿Se ha montado el emisor correcto en el
cambio de bicicleta?
Los KMH están mal indicados
Indicación en pantalla oscura o lenta
• Temperatura demasiado alta (>60° C) o
demasiado baja (<0° C)
Sin indicación en pantalla
(indicación vacía)
• Comprobar la pila
• Pila bien colocada (+ y -)
• ¿Es correcto el contacto de la pila?
(comprobar con cuidado)
Ningún apareado
• Comprobar la distancia emisor/imán
• Pila del emisor vacía
• Activar el ordenador pulsando
• Comprobar alcance
• Modificar la posición del emisor al
emplear un dínamo de cubo
Indicación TOO MANY SIGNALS
(demasiadas señales):
• Aumentar la distancia con otros
emisores y pulsar una tecla
Pile:
1 pile-bouton lithium 2032, 3V
Le changement de pile est affiché est
affiché sur l'écran.
Changement de pile
• En cas de changement de pile,
CIRCONFERENCE DE LA ROUE 1/2,
LANGUE, KMH/MPH, DISTANCE TOTALE
et TEMPS TOTAL restent en mémoire et
ne doivent pas être à nouveau rentrés.
• Faire attention au plus et au moins, lorsque
le compartiment de la pile est ouvert,
vous devez voir le côté PLUS de la pile !
• En cas de déplacement du joint
d'étanchéité, le remettre en place.
• Après le changement de la pile, seul
l'heure et le contraste doivent être
à nouveau rentrés.
Garantie
Nous sommes responsables, vis-à-vis de
notre partenaire contractuel respectif, des
vices conformément aux prescriptions légales.
Les piles sont exclues de la garantie.
Compteur:
Ouvrir le couvercle avec une pièce
Attention à la
polarité!
Emetteur:
Ouvrir le couvercle avec
l'outil prévu à cet effet.
Enlever la pile du couvercle!
Attention à la polarité!
Pas d'affichage kmh
• Ancien système sans fil sur le vélo?
• Compteur bien enclenché sur le support?
• Corrosion/oxidation sur les contacts?
• Distance aimant/émetteur?
(max. 20 mm)
• Aimant magnétisé?
• 2 aimant montés?
• Aimant bien positionné?
• Circonférence de la roue (WS) bien
programmè?
• Montage du bon émetteur lors d'un
changement de vélo?
Mauvais affichage de la vitesse
Affichage noir/lent
• Température trop haute (>60°C)
ou trop basse (<0°C)
Pas d'affichage (écran vide)
• Vérifier l'état de la pile
• Pile bien mise (plus et moins)
• Contacts ok? (tordre en faisant attention)
Pas de connection
• Vérifier la distance aimant/émetteur
• Les piles de l'émetteur sont vides
• Activer le compteur en appuyant sur
une touche
• Vérifier la distance émetteur/récepteur
• Si vous utilisez une dynamo-moyeu,
changer la position de l'émetteur
Affichage TOO MANY SIGNALS
• Augmenter la distance avec les autres
vélos et appuyer sur une touche
quelconque.
Battery:
1 lithium button cell 2032, 3V
Battery change is displayed on screen.
Change batteries:
• WHEEL SIZES 1+2, LANGUAGE,
KMH/MPH, TOTAL KM and TOTAL
TIME remain saved even when the
battery is changed.
• Observe direction of plus and minus
poles; when the compartment is open
you must see the PLUS side of the
battery!
• If sealing ring is loose, re-insert it.
• After changing the battery only the
time and the contrast must be re-
entered.
Warranty
We are liable to our contracting partners
for defects as defined by law. Batteries
are excluded from the guarantee.
No display of MPH
• Using an old RDS mounting bracket?
• Check that the Bike Computer is properly
engaged in the bracket.
• Check contacts for corrosion/oxidation.
• Check distance between magnet and sensor
(max. 20 mm using Sigma's Power Magnet)
• Check if magnet is magnetized
• 2 magnets installed?
• Magnet in the right position?
• Wheel size programmed incorrectly?
• In case of you switched bikes - are you mounting
the correct transmitter?
False display of MPH
Display is black or weaken?
• Temperature too high (>60 °C) or too low (<0°C)
No Display (screen blank)
• Check Battery
• Check plus and minus poles
• Battery contact ok? (bend carefully!)
No Pairing
• Check distance between transmitter /
magnet (20mm or less with power
magnet)
• Press battery check button on
transmitter
• Activate computer by pressing any
button
• Check distance between transmitter
and receiver (max distance 90cm)
• If using a dynamo hub, change location
of transmitter.
TOO MANY SIGNALS is shown:
• Extend the distance between
transmitters and press any button
on computer to continue
Computer:
Open the top cover with a coin
Pay attention to
polarity!
Transmitter:
Open top cover with tool
Take the battery out of the top cover!
Pay attention to polarity!
Speed
TRIP DIST
TRIP TIME
ODO BIKE
TIME BIKE
WS BIKE 1/2
Vitesse
KM JOUR
TEMPS PARC
KM TOTAL
TEMPSTOTAL
CIRCONFERENCE
DE LA ROUE 1/2
Velocidad
KM DIA
TIEMPO PAR
KM TOTAL
TIEMPO TOT
DIMENSIONES
DE LA RUEDA
1/2
0.0
0.00
0:00:00
0
0:00
2,155
Default Max Units
199.5
9,999.9
999:59
99,999
9,999
3,999
kmh/mph
km/mi
h:mm:ss hh:mm hhh:mm
km/mi
h:mm hh:mm hhh:m h.hhh
mm
Speed Comparison (pace arrow)
Comparison of current speed to average speed.
• If your current speed is equal to your average speed is
shown, if lower is shown, and if higher is shown.
Vitesse/vitesse moyenne
• En cas de vitesse à peu près similaire s'affiche, en cas
de vitesse plus faible et plus élevée .
• L'affichage est effectué pour toutes les fonctions sauf
dans les réglages de base.
Velocidad / velocidad media
• En caso de velocidad casi igual se muestra , en caso de
velocidad menor y velocidad mayor .
• La indicación se realiza en todas las funciones excepto en
los ajustes básicos.
Reset
Reset Trip distance, Trip time, Average speed, and
Max speed to zero.
• Press MODE button until the desired function to zero out
displayed.
• Press and hold RESET button. The display will flash and
after 2 seconds the displayed function will clear.
• Holding RESET button longer than 4 seconds will zero out
Trip distance, Trip time, Average speed, and Max speed
functions at the same time.
Remise à zéro de l'affichage
• Appuyer sur la touche MODE jusqu'à ce que la fonction
souhaitée apparaisse. Maintenir appuyée la touche REMISE
A ZERO. L'affichage clignote. Au bout de 2 sec, seule la
fonction affichée est remise à 0.
• Appuyer sur la touche REMISE A ZERO pendant plus de 4
sec remet à zéro les affichages de DISTANCE
JOURNALIERE, TEMPS PARCOURU, Ø KMH, MAX KMH.
Restablecer las indicaciones
• Pulsar la tecla MODE hasta que aparezca la función
deseada.
• Mantener pulsada la tecla RESET. La indicación parpadea.
Tras 2 segundos se restablece la función indicada a 0.
• Pulsar la tecla RESET durante más de 4 segundos
establece las indicaciones de KM DIARIOS, DURACIÓN DEL
TRAYECTO, PROMEDIO KMH, KMH MÁX. en cero.
> 2 sec
> 3,5 sec
Switching between WHEEL 1 and WHEEL 2 is automatic.
You must install (optional) transmitter of Bike 2 (red
button).
• It is no longer possible to change by making an entry.
Le changement entre la ROUE 1 et la ROUE 2 est effectué
automatiquement. Il faut utiliser l'émetteur vélo 2 (en
option) avec la touche rouge.
• Un changement manuel n'est plus possible.
El cambio entre la RUEDA 1 y RUEDA 2 se realiza
automáticamente. Debe emplearse el emisor (opcional)
rueda 2 (tecla roja).
• Ya no es posible un cambio por introducción.
4 x
90°
4 x
Bike 1
Wheel Size Chart
go to
step 3
go to
step 2
The harness comes ready to mount on your handlebars.
To mount on a stem, remove the 4 screws on the back of the harness, turn base 90 degrees.
stem mount
remove yellow tape
the SIGMA logo on the harness must
always face the front of the bike.
Foam pad included for
use with bladed spokes
To reach the required 20mm or less, move magnet
and transmitter towards center of wheel.
Note: 20mm = 3/4 inches
32
42
?
handlebar
or
stem
Red, rouge
2 m m
Red, rouge
* not while riding * pas pendant
la conduite
*no durante
la carrera
0,0
MPH
TRIP DIST
0
15,
0
MPH
TRIP DIST
0
0,0
MPH
TRIP DIST
0
0,0
MPH
TRIP DIST
0
0,0
KMH
BC1106 DTS
15:23
0,
0
MPH
TRIP DIST
0
12:23
12:23
12:25
00.200
00.000
00.200
3
2
Bike 1
+

Contents / Contenu / ContenudoInstallation / Montage / Montaje Installation of mounting bracket Montage du support / Montaje del soporte de bicicleta
1 2
Installation of mounting bracket Installation of magnet / Montage de l'aimant / Montaje del imán
5
Installation of speed transmitter Montage de l'émett. Vit. / Montaje del emisor de velocidad
1
Installation of speed transmitter
5
Mode / Reset Pairing / Connection / Apareado Pairing / Connection / Apareado
3 4 6 1
2 1
KMH/MPH entry Réglage KMH/MPH / Introducción KMH/MPH
U F
E
Wheel size entry Circonférence de roue / Dimensiones de la rueda
U F
E
Measure wheel size Mesurer la roue / Dimensiones de la rueda
U F
E
Time entry Réglage heure / Introducir la hora
U F
E
Total data entry Réglage des valeurs totales / Datos totales
U F
E
Contrast entry Réglage contraste / Introducción contraste
U F
E
Language Entry Réglage langue / Introducir el idioma
U F
E
Wheel size entry Circonférence de roue / Dimensiones de la rueda
U F
E
42 mm
32 mm
Basic settings Réglages de base / Ajustes básicos
U F
E
Wheel Size Chart (Wheel Size) Wheel Size Chart (Circonférence de roue / Tamaño de rueda)
A C
B
Changing modes Changement d’affichage / Cambio de visualización
U F
E
Installation of speed transmitter Montage de l'émett. Vit. / Montaje del emisor de velocidad
3 4
2x
Left side Right side
Grey, gris
optional Bike 2
Ref. No. 00405
Pairing / Connection / Apareado Pairing / Connection / Apareado Pairing / Connection / Apareado
Installation of Bike Computer
U
F
E
F E
U F E
Pairing / Connection / Apareado
Observaciones generales E
Cambio de la pila
Solución de problemas E
Remarques générales F Changement de batterie Solution aux problèmes FGeneral remarks U Trouble Shooting UChange batteryTechnical Data / Données techniques / Datos técnicos
U F
E
Technical data / Données techniques / Datos técnicos
Comparison speed Comparaison de la vitesse / Comparación velocidad
U F
E
Reset Remise à zéro / Puesta a cero
U F
E
Assembly 2nd wheel Montage 2ème roue / Montaje 2ª rueda
U F
E
optional Bike 2
Ref. No. 00405
Grey, gris
Bike 1
+
2. KMH / MPH
• Press MODE button until KMH / MPH is displayed.
• Press SET button briefly, KMH or MPH is displayed and
flashing.
• Select MPH or KMH with MODE button.
• Confirm by pressing SET button briefly.
2. KMH / MPH
• A l'aide de la touche MODE changer le réglage KMH/MPH.
• Appuyer brièvement sur la touche SET.
• KMH ou MPH apparaît sur l'écran et clignote.
• Régler MPH ou KMH à l'aide de la touche MODE.
• Confirmer par la touche SET.
2. KMH / MPH
• Con la tecla MODE cambiar a la introducción de KMH/MPH
• Pulsar la tecla SET brevemente.
• En la pantalla aparece KMH o MPH y parpadea.
• Con la tecla MODE ajustar MPH o KMH.
• Confirmar con la tecla SET.
3. Wheel size BIKE 1
• Press MODE button to change to WS BIKE 1.
• Press SET button briefly and the first digit flashes.
• Change the number by pressing RESET button, change to
next digit by pressing mode. Repeat with next 3 numbers
until desired wheel size is entered.
• Confirm by pressing SET button briefly.
3. Circonférence de la roue VELO 1
• A l'aide de la touche MODE passer à VELO 1.
• Appuyer brièvement sur la touche SET, le premier chiffre
à entrer clignote.
• Régler la valeur à l'aide de la touche REMISE A ZERO,
passer au prochain chiffre à l'aide de la touche MODE.
• Le vélo 1 est toujours celui avec l'emetteur vélo 1
3. Dimensiones de la rueda BICICLETA 1
• Con la tecla MODE cambiar a BICICLETA 1.
• Pulsar brevemente la tecla SET, la primera cifra de
introducción parpadea.
• Con la tecla RESET ajustar el valor, con la tecla MODE
cambiar a la siguiente cifra.
• La bicicleta 1 es siempre la bicicleta con emisor rueda 1
• A partir de la tabla C "Wheel Size Chart" (véase la página
siguiente) determinar el valor correspondiente al tamaño
de la rueda. Introducir este valor.
• Alternativa: calcular/ determinar el tamaño de la rueda
(tabla A o tabla B)
• Tras la última cifra confirmar con la tecla SET.
• Determine the correct value for your wheel size from
Table C “Wheel Size Chart” (refer to next page).
• Alternative: calculate wheel size using formula Tab A or
Tab B.
• Déterminer la valeur correspondant à votre circonférence
de roue à partir du tableau C "Wheel Size Chart" (voir
page suivante). Entrer cette valeur.
• Alternative: calculer/déterminer WS (Tab. A ou tab. B).
• Après le dernier chiffre, confirmer par la touche SET.
You can enter TOTAL ODO (miles) miles and TOTAL times
from your previous computer.
Note – This step is not necessary if previous data from
another computer is not desired(skip to step 8).
6. Enter TOTAL ODO (miles)
• Press MODE button until TOTAL ODO is displayed.
• Press SET button briefly and the first digit will flash.
• Press RESET button to change each digit.
• Press MODE button to advance to next number.
• Repeat until desired number is entered.
• Confirm by pressing the SET button briefly.
7. Enter TOTAL TIME
• Press MODE button until TOTAL TIME is displayed
• Press SET button briefly and the first digit will flash.
• Press RESET button to change each digit.
• Press MODE button to advance to next number.
• Repeat until desired number is entered
• Confirm by pressing the SET button briefly.
6. KM-VELO 1/2
7. TEMPS VELO 1/2
• Réglage identique à la circonférence de la roue. Ici, vous
pouvez transférer la distance totale en km, par exemple
lors de l'achat de cet appareil, à partir d'un autre
compteur.
6. KM RUEDA 1/2
7. TIEMPO RUEDA 1/2
• Introducción como en las dimensiones de la rueda. Aquí se
puede transferir el número total de km p.ej. en caso de
compra del aparato de otro ordenador de bicicleta.
8. Contrast
• Press MODE button until contrast is displayed.
• Press SET button briefly and the display flashes.
• Set the value by pressing RESET button.
1 = light 3 = dark
• Confirm by pressing the SET button.
When you are finished entering the basic setting, press and
hold SET button for 3 seconds to exit set-up mode.
8. Contraste
• Appuyer sur la touche MODE1 jusqu'à ce que CONTRASTE
apparaisse.
• Appuyer brièvement sur la touche SET, le réglage clignote.
• A l'aide de la touche REMISE A ZERO/MODE2 régler la
valeur (1 = faible, 3 = fort). Confirmer avec la touche SET.
8. Contraste
• Pulsar la tecla MODE1 hasta que aparezca CONTRASTE.
• Pulsar brevemente la tecla SET, la introducción parpadea.
• Con la tecla RESET/MODE2 ajustar el valor (1=débil
3= fuerte). Confirmar con la tecla SET.
1. Set language
• Press MODE button until LANGUAGE is displayed
• Press the SET button briefly, the display flashes. Set the
desired language using the MODE button and confirm by
pressing SET button briefly.
4. Wheel size BIKE 2
This computer can be programmed for two bikes, if you are
only using this computer for one bike, skip this step and go
to step 5.
Changing between WHEEL SIZE 1 and WHEEL SIZE 2
occurs automatically simply by changing from bike 1
transmitter (grey button) to the optional Bike 2 transmitter
(red button).
• Press MODE button to change to WS BIKE 2.
• Press SET button briefly and the first digit flashes.
• Change the number by pressing RESET button.
• Change to next digit by pressing MODE button. Repeat
with next 3 numbers until desired wheel size is entered.
• Confirm by pressing SET button briefly.
4. Circonférence de la roue VELO 2
• A l'aide de la touche MODE passer au VELO 2.
• Appuyer brièvement sur la touche SET, le premier chiffre à
entrer clignote.
• Réglage comme pour le VELO 1 : régler les valeurs à l'aide
de la touche RESET, passer au prochain chiffre à l'aide de la
touche MODE.
• Le vélo 2 est toujours celui avec l'émetteur vélo 2
4. Dimensiones de la rueda BICICLETA 2
• Con la tecla MODE cambiar a BICICLETA 2.
• Pulsar brevemente la tecla SET, la primera cifra de introducción parpadea.
• Introducción como en RUEDA 1: Con las teclas RESET ajustar los valores,
con la tecla MODE cambiar a la cifra siguiente, etc.
• La bicicleta 2 es siempre la bicicleta con emisor rueda 2
SET
BI KE CO MPUT ER
TO PLINE
B C 1 1 0 6 L D T S
SIGMA B IK E CO MPU TER
BC 110 6 L DT S
W W W. S I G MA S P O R T. C O M
W W W. S I G MA S P O R T. C O M
SIGMA USA:
North America
1067 Kingsland Drive
Batavia, IL 60510, US A
Tel. +1-630-761-1106
Fax +1-6 30-761-1107
Toll Free: 888-744-6 277
SIGMA EUROPA:
SIGMA Elektro GmbH
Dr.- Julius-Leber-Straße 15
D-67433 Neustadt a.d.W.
Tel. +49-(0)63 21-9120-11 8
Fax +49- (0)6321-9120 -34
SIGMA ASIA:
Asia, Australia, South Ame rica
7F-1, No. 193, Ta-Tun 6th Street,
Taichung City, Taiwan
Tel. +886-4-2475 35 77
Fax +886 -4-2475 3563
32-630
28-630
40-622
47-622
40-635
37-622
18-622
20-622
23-622
25-622
28-622
32-622
37-622
40-622
27x1 1/4
27x1 1/4 Fifty
28x1.5
28x1.75
28x1 1/2
28x1 3/8x1 5/8
700x18C
700x20C
700x23C
700x25C
700x28C
700x32C
700x35C
700x40C
2199
2174
2224
2268
2265
2205
2102
2114
2133
2146
2149
2174
2205
2224
kmh
mph
47-305
47-406
37-540
47-507
23-571
40-559
44-559
47-559
50-559
54-559
57-559
37-590
37-584
20-571
16x1.75x2
20x1.75x2
24x1 3/8 A
24x1.75x2
26x1
26x1.5
26x1.6
26x1.75x2
26x1.9
26x2.00
26x2.125
26x1 3/8
26x1 3/8x1 1/2
26x3/4
1272
1590
1948
1907
1973
2026
2051
2070
2089
2114
2133
2105
2086
1954
ETRTO
kmh
mph
ETRTO
km/h:
WS = mm x 3.14
mph:
WS = mm x 3.14
km/h:
WS = mm
mph:
WS = mm
Printed in USA
~20 sec
A
Test: Battery
Max. 20 mm
• MODE: appel des fonctions
• RESET: remise à zéro des fonctions
DISTANCE JOURNALIERE, TEMPS PARCOURU, Ø KMH et MAX. KMH
• MODE: Activar las funciones
• RESET: Restablecimiento de las funcion.
KM DIARIOS, DURACIÓN DEL TRAYECTO, PROMEDIO KMH y KMH MÁX. a cero
• MODE: Change the functions
• RESET: Reset the functions
DAILY KM/M, TRIP TIME, AVERAGE SPEED and MAX SPEED to zero
MODE
>3 sec = RESET
TRIP DIST
TRIP TIME
AVG. SPEED
MAX. SPEED
CLOCK
TOTAL ODO*
TOTAL TIME*
TRIP DIST
TRIP TIME
AVG. SPEED
MAX. SPEED
MODE
>3 sec = RESET
KM JOUR
TEMPS PARC
VIT MOYEN.
VIT MAXI
HEURE
KM TOTAL*
TEMPSTOTAL*
KM JOUR
TEMPS PARC
VIT MOYEN.
VIT MAXI
MODE
>3 sec = RESET
KM DIA
TIEMPO PAR
VEL MEDIA
VEL MAXIMA
HORA
KM TOTAL*
TIEMPO TOT*
KM DIA
TIEMPO PAR
VEL MEDIA
VEL MAXIMA
How to change modes
• Press MODE button until the desired function is displayed
(TRIP DISTANCE, TRIP TIME, AVG. SPEED, MAX. SPEED,
CLOCK, TOTAL ODO, TOTAL TIME)
• While riding the TOTAL ODO and TOTAL TIME functions
are hidden.
Affichage des fonctions
• Appuyer sur la touche MODE jusqu'à ce que la fonction
souhaitée soit affichée (DISTANCE JOURNALIERE, TEMPS
PARCOURU, MOYENNE KMH, MAX.KMH, HEURE,
DISTANCE TOTALE EN KM, TEMPS TOTAL).
• Pendant la conduite, DISTANCE TOTALE et TEMPS TOTAL
ne sont pas affichés (moins de clics de touche lors de la
conduite).
Indicación de las funciones
• Pulsar la tecla MODE hasta que se muestre la función deseada (KM DIARIOS,
DURACIÓN DEL TRAYECTO, PROMEDIO KMH, KMH MÁX., HORA, KM
TOTALES, TIEMPO TOTAL).
• durante la carrera no se muestran KM TOTALES y TIEMPO TOTAL (menos
pulsaciones de teclas durante la carrera).
SET > 3 sec
• Press SET button for 3 sec. to enter set-up mode (SET
will appear in upper right hand corner of display when in
set-up mode, you must be in set-mode to perform steps
1-8).
• Use the set-up mode to change language, KMH/MPH,
wheel size, time, total odo, total time, and contrast.
• After changing the battery, only the time and contrast
have to be entered.
• Appuyer sur la touche SET 3 sec pour effectuer les réglages de base
suivants : langue, changement entre kmh/mph, circonférence de la
roue 1 et 2, heure, distance totale, temps total et contraste de l'écran.
Fin du menu réglage en appuyant 3 sec sur la touche SET. Après le
changement de la pile, seule l'heure et le contraste de l'écran doivent
être à nouveau rentrés.
• Pulsar la tecla Set durante 3 segundos para realizar los siguientes ajustes
básicos: idioma, cambio entre kmh/mph, dimensiones de la rueda 1 y 2,
hora, km totales, hora total y contraste de pantalla. Finalice el menú de
introducción pulsando durante 3 segundos la tecla SET. Tras un cambio de
la pila deben introducirse solo la hora y el contraste de la pantalla.
1. Régler la langue
• Appuyer sur la touche MODE jusqu'à ce que LANGUE
apparaisse sur l'écran.
• Appuyer brièvement sur la touche SET, l'affichage clignote.
Régler la langue souhaitée à l'aide de la touche MODE et
confirmer par la touche SET.
1. Ajustar el idioma
• Pulsar la tecla MODE hasta que aparezca IDIOMA en la
pantalla.
• Pulsar brevemente la tecla SET, la indicación parpadea.
Con la tecla MODE ajustar el idioma seleccionado y
confirmar con la tecla SET.
MODE
MODE
MODE
RESET
RESET
5. Time
(24 hr clock will display when using KMH, 12 hr clock will
display when using MPH)
• Press MODE button until TIME is displayed.
• Press the SET button briefly and the hour digit flashes.
• Change the hour with the RESET button.
• Advance to minutes by pressing MODE button.
• Change the minutes with the RESET button.
• Confirm by pressing the SET button briefly.
5. Heure (kmh = 24 h / mph = 12 h)
• Appuyer sur la touche MODE jusqu'à ce qu'HEURE apparaisse.
• Appuyer brièvement sur la touche SET, l'entrée clignote.
• Régler les heures à l'aide de la touche REMISE A ZERO. A
l'aide de la touche MODE passer au réglage des minutes.
• Régler les minutes à l'aide de la touche REMISE A ZERO.
Confirmer par la touche SET.
5. Hora (kmh = 24 h / mph = 12 h)
• Pulsar la tecla MODE hasta que aparezca HORA.
• Pulsar brevemente la tecla SET, la introducción parpadea.
• Con la tecla RESET ajustar el valor, con la tecla MODE
cambiar a la siguiente cifra.
• Con la tecla RESET ajustar los minutos. Confirmar con la
tecla SET.
MODE
MODE
• After installing the bike computer into mounting bracket, SPEED display will
blink ZERO.
• There are two ways to pair your transmitter and computer.
• 1. Ride. After 20 seconds (max 5 min.) the receiver will pair with
transmitter and data will be displayed.
• 2. Spin front wheel until speed display stops blinking (A).
• After 5 min. without transmission, BC 1106 DTS will go into sleep mode.
(Time of Day and Model name shown in the display). Press any button to
re-activate the computer. A short pairing will find the transmitter.
• Removing the BC 1106 DTS from the mounting bracket will end the paired
connection.
• If “TOO MANY SIGNALS” message is displayed: lengthen the distance of all
transmitters and press any button to continue. Pairing will begin again.
• Monter le compteur sur son support. Le zéro de la vitesse clignote
• Il y a deux possibilités pour connecter la vitesse et la cadence:
1. Rouler, après env. 20 secondes (max. 5 min.) le récepteur s'est connecté
avec l'émetteur, les données sont affichées.
2. Fiare tourner la roue avant jusqu'à ce que l'affichage de la vitesse ne
clignote plus (A).
ATTENTION:
• Après plus de 5 minutes de pause le BC 1106 DTS se met en mode repos
(affichage de l'heure et du nom du modèle). Pour ré-activer le compteur
appuyer sur une touche quelconque, il s'établit alors une connection courte
pour rechercher le(s) émetteur(s)
• Lorsque l'on sort le BC 1106 DTS de son support, la connection est arrêtée.
• TOO MANY SIGNALS s'affiche: Augmenter la distance par rapport aux
autres vélos et appuyer sur une touche quelconque. La connection
recommence.
• Encajar el BC 1106 DTS sobre el soporte. El cero de las indicaciones de
velocidad parpadea
• Hay dos posibilidades de emparejar la velocidad:
1. Arrancar, después de aprox. 20 segundos (max. 5 min) el receptor se ha
sincronizado con el receptor y se muestran los datos.
2. Girar la rueda delantera hasta que deje de parpadear la indicación de KMH
(A).
ATENCIÓN:
• Después de 5 minutos de pausa, el BC 1106 DTS pasa al modo de
espera (la hora y el nombre del modelo en la pantalla). Al pulsar cualquier
tecla se inicia un apareado corto para encontrar el emisor.
• Al retirar el BC 1106 DTS del soporte se desconecta la desconexión.
• Indicación TOO MANY SIGNALS (demasiadas señales): Aumentar la
distancia con otros emisores y pulsar cualquier tecla. El apareado se inicia
de nuevo.
~20 sec
A
~20 sec
A
mm x 3.14
note: 1 inch = 25.4 mm
Pila:
1 pila de litio tipo botón 2032, 3V
El cambio de pila se muestra en la pantalla.
Cambio de pila
• Si se cambia la pila DIMENSIONES DE LA
RUEDA, IDIOMA, KMH/MPH, KM
TOTALES y TIEMPO TOTAL permanecen
guardadas y no deben ser introducidas
de nuevo.
• Respetar el + y el -. Con el
compartimento de la batería abierto
tiene que verse el + de la pila.
• Si la junta de estanquidad está
desplazada, volver a colocarla.
• Tras el cambio de pila debe introducirse
de nuevo la hora.
Garantía
Nos responsabilizamos de las deficiencias
frente a nuestro socio contractual según
lo dispuesto en los reglamentos legales.
Ordenador:
Abrir la tapa con una moneda.
¡Prestar atención
a la polaridad"
Emisor:
Abrir la tapa con una herramienta.
¡Retirar la pila de la tapa!
¡Prestar atención a la polaridad!
KMH sin indicación
• ¿Se utiliza el soporte antiguo del manillar
con la transmisión por radio (RDS)?
• ¿Está el ordenador correctamente
encajado sobre el soporte?
• ¿Se han comprobado la oxidación /
corrosión de los contactos?
• ¿Distancia entre imán y sensor?
(máx. 20 mm)
• ¿Se ha comprobado si el imán está
imantado?
• ¿2 imanes montados?
• ¿Imán posicionado correctamente?
• ¿Dimensiones de la rueda (WS) mal
ajustadas?
• ¿Se ha montado el emisor correcto en el
cambio de bicicleta?
Los KMH están mal indicados
Indicación en pantalla oscura o lenta
• Temperatura demasiado alta (>60° C) o
demasiado baja (<0° C)
Sin indicación en pantalla
(indicación vacía)
• Comprobar la pila
• Pila bien colocada (+ y -)
• ¿Es correcto el contacto de la pila?
(comprobar con cuidado)
Ningún apareado
• Comprobar la distancia emisor/imán
• Pila del emisor vacía
• Activar el ordenador pulsando
• Comprobar alcance
• Modificar la posición del emisor al
emplear un dínamo de cubo
Indicación TOO MANY SIGNALS
(demasiadas señales):
• Aumentar la distancia con otros
emisores y pulsar una tecla
Pile:
1 pile-bouton lithium 2032, 3V
Le changement de pile est affiché est
affiché sur l'écran.
Changement de pile
• En cas de changement de pile,
CIRCONFERENCE DE LA ROUE 1/2,
LANGUE, KMH/MPH, DISTANCE TOTALE
et TEMPS TOTAL restent en mémoire et
ne doivent pas être à nouveau rentrés.
• Faire attention au plus et au moins, lorsque
le compartiment de la pile est ouvert,
vous devez voir le côté PLUS de la pile !
• En cas de déplacement du joint
d'étanchéité, le remettre en place.
• Après le changement de la pile, seul
l'heure et le contraste doivent être
à nouveau rentrés.
Garantie
Nous sommes responsables, vis-à-vis de
notre partenaire contractuel respectif, des
vices conformément aux prescriptions légales.
Les piles sont exclues de la garantie.
Compteur:
Ouvrir le couvercle avec une pièce
Attention à la
polarité!
Emetteur:
Ouvrir le couvercle avec
l'outil prévu à cet effet.
Enlever la pile du couvercle!
Attention à la polarité!
Pas d'affichage kmh
• Ancien système sans fil sur le vélo?
• Compteur bien enclenché sur le support?
• Corrosion/oxidation sur les contacts?
• Distance aimant/émetteur?
(max. 20 mm)
• Aimant magnétisé?
• 2 aimant montés?
• Aimant bien positionné?
• Circonférence de la roue (WS) bien
programmè?
• Montage du bon émetteur lors d'un
changement de vélo?
Mauvais affichage de la vitesse
Affichage noir/lent
• Température trop haute (>60°C)
ou trop basse (<0°C)
Pas d'affichage (écran vide)
• Vérifier l'état de la pile
• Pile bien mise (plus et moins)
• Contacts ok? (tordre en faisant attention)
Pas de connection
• Vérifier la distance aimant/émetteur
• Les piles de l'émetteur sont vides
• Activer le compteur en appuyant sur
une touche
• Vérifier la distance émetteur/récepteur
• Si vous utilisez une dynamo-moyeu,
changer la position de l'émetteur
Affichage TOO MANY SIGNALS
• Augmenter la distance avec les autres
vélos et appuyer sur une touche
quelconque.
Battery:
1 lithium button cell 2032, 3V
Battery change is displayed on screen.
Change batteries:
• WHEEL SIZES 1+2, LANGUAGE,
KMH/MPH, TOTAL KM and TOTAL
TIME remain saved even when the
battery is changed.
• Observe direction of plus and minus
poles; when the compartment is open
you must see the PLUS side of the
battery!
• If sealing ring is loose, re-insert it.
• After changing the battery only the
time and the contrast must be re-
entered.
Warranty
We are liable to our contracting partners
for defects as defined by law. Batteries
are excluded from the guarantee.
No display of MPH
• Using an old RDS mounting bracket?
• Check that the Bike Computer is properly
engaged in the bracket.
• Check contacts for corrosion/oxidation.
• Check distance between magnet and sensor
(max. 20 mm using Sigma's Power Magnet)
• Check if magnet is magnetized
• 2 magnets installed?
• Magnet in the right position?
• Wheel size programmed incorrectly?
• In case of you switched bikes - are you mounting
the correct transmitter?
False display of MPH
Display is black or weaken?
• Temperature too high (>60 °C) or too low (<0°C)
No Display (screen blank)
• Check Battery
• Check plus and minus poles
• Battery contact ok? (bend carefully!)
No Pairing
• Check distance between transmitter /
magnet (20mm or less with power
magnet)
• Press battery check button on
transmitter
• Activate computer by pressing any
button
• Check distance between transmitter
and receiver (max distance 90cm)
• If using a dynamo hub, change location
of transmitter.
TOO MANY SIGNALS is shown:
• Extend the distance between
transmitters and press any button
on computer to continue
Computer:
Open the top cover with a coin
Pay attention to
polarity!
Transmitter:
Open top cover with tool
Take the battery out of the top cover!
Pay attention to polarity!
Speed
TRIP DIST
TRIP TIME
ODO BIKE
TIME BIKE
WS BIKE 1/2
Vitesse
KM JOUR
TEMPS PARC
KM TOTAL
TEMPSTOTAL
CIRCONFERENCE
DE LA ROUE 1/2
Velocidad
KM DIA
TIEMPO PAR
KM TOTAL
TIEMPO TOT
DIMENSIONES
DE LA RUEDA
1/2
0.0
0.00
0:00:00
0
0:00
2,155
Default Max Units
199.5
9,999.9
999:59
99,999
9,999
3,999
kmh/mph
km/mi
h:mm:ss hh:mm hhh:mm
km/mi
h:mm hh:mm hhh:m h.hhh
mm
Speed Comparison (pace arrow)
Comparison of current speed to average speed.
• If your current speed is equal to your average speed is
shown, if lower is shown, and if higher is shown.
Vitesse/vitesse moyenne
• En cas de vitesse à peu près similaire s'affiche, en cas
de vitesse plus faible et plus élevée .
• L'affichage est effectué pour toutes les fonctions sauf
dans les réglages de base.
Velocidad / velocidad media
• En caso de velocidad casi igual se muestra , en caso de
velocidad menor y velocidad mayor .
• La indicación se realiza en todas las funciones excepto en
los ajustes básicos.
Reset
Reset Trip distance, Trip time, Average speed, and
Max speed to zero.
• Press MODE button until the desired function to zero out
displayed.
• Press and hold RESET button. The display will flash and
after 2 seconds the displayed function will clear.
• Holding RESET button longer than 4 seconds will zero out
Trip distance, Trip time, Average speed, and Max speed
functions at the same time.
Remise à zéro de l'affichage
• Appuyer sur la touche MODE jusqu'à ce que la fonction
souhaitée apparaisse. Maintenir appuyée la touche REMISE
A ZERO. L'affichage clignote. Au bout de 2 sec, seule la
fonction affichée est remise à 0.
• Appuyer sur la touche REMISE A ZERO pendant plus de 4
sec remet à zéro les affichages de DISTANCE
JOURNALIERE, TEMPS PARCOURU, Ø KMH, MAX KMH.
Restablecer las indicaciones
• Pulsar la tecla MODE hasta que aparezca la función
deseada.
• Mantener pulsada la tecla RESET. La indicación parpadea.
Tras 2 segundos se restablece la función indicada a 0.
• Pulsar la tecla RESET durante más de 4 segundos
establece las indicaciones de KM DIARIOS, DURACIÓN DEL
TRAYECTO, PROMEDIO KMH, KMH MÁX. en cero.
> 2 sec
> 3,5 sec
Switching between WHEEL 1 and WHEEL 2 is automatic.
You must install (optional) transmitter of Bike 2 (red
button).
• It is no longer possible to change by making an entry.
Le changement entre la ROUE 1 et la ROUE 2 est effectué
automatiquement. Il faut utiliser l'émetteur vélo 2 (en
option) avec la touche rouge.
• Un changement manuel n'est plus possible.
El cambio entre la RUEDA 1 y RUEDA 2 se realiza
automáticamente. Debe emplearse el emisor (opcional)
rueda 2 (tecla roja).
• Ya no es posible un cambio por introducción.
4 x
90°
4 x
Bike 1
Wheel Size Chart
go to
step 3
go to
step 2
The harness comes ready to mount on your handlebars.
To mount on a stem, remove the 4 screws on the back of the harness, turn base 90 degrees.
stem mount
remove yellow tape
the SIGMA logo on the harness must
always face the front of the bike.
Foam pad included for
use with bladed spokes
To reach the required 20mm or less, move magnet
and transmitter towards center of wheel.
Note: 20mm = 3/4 inches
32
42
?
handlebar
or
stem
Red, rouge
2 m m
Red, rouge
* not while riding * pas pendant
la conduite
*no durante
la carrera
12:23
12:23
12:25
00.200
00.000
00.200
3
2
0,0
MPH
TRIP DIST
0
15,
0
MPH
TRIP DIST
0
0,0
MPH
TRIP DIST
0
0,0
MPH
TRIP DIST
0
0,0
KMH
BC1106 DTS
15:23
0,
0
MPH
TRIP DIST
0
Bike 1
+

Contents / Contenu / ContenudoInstallation / Montage / MontajeInstallation of mounting bracket Montage du support / Montaje del soporte de bicicleta
12
Installation of mounting bracket Installation of magnet / Montage de l'aimant / Montaje del imán
5
Installation of speed transmitter Montage de l'émett. Vit. / Montaje del emisor de velocidad
1
Installation of speed transmitter
5
Mode / Reset Pairing / Connection / Apareado Pairing / Connection / Apareado
3 4 6 1
2 1
KMH/MPH entry Réglage KMH/MPH / Introducción KMH/MPH
U F
E
Wheel size entry Circonférence de roue / Dimensiones de la rueda
U F
E
Measure wheel size Mesurer la roue / Dimensiones de la rueda
U F
E
Time entry Réglage heure / Introducir la hora
U F
E
Total data entry Réglage des valeurs totales / Datos totales
U F
E
Contrast entry Réglage contraste / Introducción contraste
U F
E
Language Entry Réglage langue / Introducir el idioma
U F
E
Wheel size entry Circonférence de roue / Dimensiones de la rueda
U F
E
42 mm
32 mm
Basic settings Réglages de base / Ajustes básicos
U F
E
Wheel Size Chart (Wheel Size) Wheel Size Chart (Circonférence de roue / Tamaño de rueda)
A C
B
Changing modes Changement d’affichage / Cambio de visualización
U F
E
Installation of speed transmitter Montage de l'émett. Vit. / Montaje del emisor de velocidad
3 4
2x
Left side Right side
Grey, gris
optional Bike 2
Ref. No. 00405
Pairing / Connection / Apareado Pairing / Connection / Apareado Pairing / Connection / Apareado
Installation of Bike Computer
U
F
E
F E
U F E
Pairing / Connection / Apareado
Observaciones generales E
Cambio de la pila
Solución de problemas E
Remarques générales F Changement de batterie Solution aux problèmes FGeneral remarks U Trouble Shooting UChange batteryTechnical Data / Données techniques / Datos técnicos
U F
E
Technical data / Données techniques / Datos técnicos
Comparison speed Comparaison de la vitesse / Comparación velocidad
U F
E
ResetRemise à zéro / Puesta a cero
UF
E
Assembly 2nd wheel Montage 2ème roue / Montaje 2ª rueda
U F
E
optional Bike 2
Ref. No. 00405
Grey, gris
Bike 1
+
2. KMH / MPH
• Press MODE button until KMH / MPH is displayed.
• Press SET button briefly, KMH or MPH is displayed and
flashing.
• Select MPH or KMH with MODE button.
• Confirm by pressing SET button briefly.
2. KMH / MPH
• A l'aide de la touche MODE changer le réglage KMH/MPH.
• Appuyer brièvement sur la touche SET.
• KMH ou MPH apparaît sur l'écran et clignote.
• Régler MPH ou KMH à l'aide de la touche MODE.
• Confirmer par la touche SET.
2. KMH / MPH
• Con la tecla MODE cambiar a la introducción de KMH/MPH
• Pulsar la tecla SET brevemente.
• En la pantalla aparece KMH o MPH y parpadea.
• Con la tecla MODE ajustar MPH o KMH.
• Confirmar con la tecla SET.
3. Wheel size BIKE 1
• Press MODE button to change to WS BIKE 1.
• Press SET button briefly and the first digit flashes.
• Change the number by pressing RESET button, change to
next digit by pressing mode. Repeat with next 3 numbers
until desired wheel size is entered.
• Confirm by pressing SET button briefly.
3. Circonférence de la roue VELO 1
• A l'aide de la touche MODE passer à VELO 1.
• Appuyer brièvement sur la touche SET, le premier chiffre
à entrer clignote.
• Régler la valeur à l'aide de la touche REMISE A ZERO,
passer au prochain chiffre à l'aide de la touche MODE.
• Le vélo 1 est toujours celui avec l'emetteur vélo 1
3. Dimensiones de la rueda BICICLETA 1
• Con la tecla MODE cambiar a BICICLETA 1.
• Pulsar brevemente la tecla SET, la primera cifra de
introducción parpadea.
• Con la tecla RESET ajustar el valor, con la tecla MODE
cambiar a la siguiente cifra.
• La bicicleta 1 es siempre la bicicleta con emisor rueda 1
• A partir de la tabla C "Wheel Size Chart" (véase la página
siguiente) determinar el valor correspondiente al tamaño
de la rueda. Introducir este valor.
• Alternativa: calcular/ determinar el tamaño de la rueda
(tabla A o tabla B)
• Tras la última cifra confirmar con la tecla SET.
• Determine the correct value for your wheel size from
Table C “Wheel Size Chart” (refer to next page).
• Alternative: calculate wheel size using formula Tab A or
Tab B.
• Déterminer la valeur correspondant à votre circonférence
de roue à partir du tableau C "Wheel Size Chart" (voir
page suivante). Entrer cette valeur.
• Alternative: calculer/déterminer WS (Tab. A ou tab. B).
• Après le dernier chiffre, confirmer par la touche SET.
You can enter TOTAL ODO (miles) miles and TOTAL times
from your previous computer.
Note – This step is not necessary if previous data from
another computer is not desired(skip to step 8).
6. Enter TOTAL ODO (miles)
• Press MODE button until TOTAL ODO is displayed.
• Press SET button briefly and the first digit will flash.
• Press RESET button to change each digit.
• Press MODE button to advance to next number.
• Repeat until desired number is entered.
• Confirm by pressing the SET button briefly.
7. Enter TOTAL TIME
• Press MODE button until TOTAL TIME is displayed
• Press SET button briefly and the first digit will flash.
• Press RESET button to change each digit.
• Press MODE button to advance to next number.
• Repeat until desired number is entered
• Confirm by pressing the SET button briefly.
6. KM-VELO 1/2
7. TEMPS VELO 1/2
• Réglage identique à la circonférence de la roue. Ici, vous
pouvez transférer la distance totale en km, par exemple
lors de l'achat de cet appareil, à partir d'un autre
compteur.
6. KM RUEDA 1/2
7. TIEMPO RUEDA 1/2
• Introducción como en las dimensiones de la rueda. Aquí se
puede transferir el número total de km p.ej. en caso de
compra del aparato de otro ordenador de bicicleta.
8. Contrast
• Press MODE button until contrast is displayed.
• Press SET button briefly and the display flashes.
• Set the value by pressing RESET button.
1 = light 3 = dark
• Confirm by pressing the SET button.
When you are finished entering the basic setting, press and
hold SET button for 3 seconds to exit set-up mode.
8. Contraste
• Appuyer sur la touche MODE1 jusqu'à ce que CONTRASTE
apparaisse.
• Appuyer brièvement sur la touche SET, le réglage clignote.
• A l'aide de la touche REMISE A ZERO/MODE2 régler la
valeur (1 = faible, 3 = fort). Confirmer avec la touche SET.
8. Contraste
• Pulsar la tecla MODE1 hasta que aparezca CONTRASTE.
• Pulsar brevemente la tecla SET, la introducción parpadea.
• Con la tecla RESET/MODE2 ajustar el valor (1=débil
3= fuerte). Confirmar con la tecla SET.
1. Set language
• Press MODE button until LANGUAGE is displayed
• Press the SET button briefly, the display flashes. Set the
desired language using the MODE button and confirm by
pressing SET button briefly.
4. Wheel size BIKE 2
This computer can be programmed for two bikes, if you are
only using this computer for one bike, skip this step and go
to step 5.
Changing between WHEEL SIZE 1 and WHEEL SIZE 2
occurs automatically simply by changing from bike 1
transmitter (grey button) to the optional Bike 2 transmitter
(red button).
• Press MODE button to change to WS BIKE 2.
• Press SET button briefly and the first digit flashes.
• Change the number by pressing RESET button.
• Change to next digit by pressing MODE button. Repeat
with next 3 numbers until desired wheel size is entered.
• Confirm by pressing SET button briefly.
4. Circonférence de la roue VELO 2
• A l'aide de la touche MODE passer au VELO 2.
• Appuyer brièvement sur la touche SET, le premier chiffre à
entrer clignote.
• Réglage comme pour le VELO 1 : régler les valeurs à l'aide
de la touche RESET, passer au prochain chiffre à l'aide de la
touche MODE.
• Le vélo 2 est toujours celui avec l'émetteur vélo 2
4. Dimensiones de la rueda BICICLETA 2
• Con la tecla MODE cambiar a BICICLETA 2.
• Pulsar brevemente la tecla SET, la primera cifra de introducción parpadea.
• Introducción como en RUEDA 1: Con las teclas RESET ajustar los valores,
con la tecla MODE cambiar a la cifra siguiente, etc.
• La bicicleta 2 es siempre la bicicleta con emisor rueda 2
SET
BI KE CO MPUT ER
TO PLINE
B C 1 1 0 6 L D T S
SIGMA B IK E CO MPU TER
BC 110 6 L DT S
W W W. S I G MA S P O R T. C O M
W W W. S I G MA S P O R T. C O M
SIGMA USA:
North America
1067 Kingsland Drive
Batavia, IL 60510, US A
Tel. +1-630-761-1106
Fax +1-6 30-761-1107
Toll Free: 888-744-6 277
SIGMA EUROPA:
SIGMA Elektro GmbH
Dr.- Julius-Leber-Straße 15
D-67433 Neustadt a.d.W.
Tel. +49-(0)63 21-9120-11 8
Fax +49- (0)6321-9120 -34
SIGMA ASIA:
Asia, Australia, South Ame rica
7F-1, No. 193, Ta-Tun 6th Street,
Taichung City, Taiwan
Tel. +886-4-2475 35 77
Fax +886 -4-2475 3563
32-630
28-630
40-622
47-622
40-635
37-622
18-622
20-622
23-622
25-622
28-622
32-622
37-622
40-622
27x1 1/4
27x1 1/4 Fifty
28x1.5
28x1.75
28x1 1/2
28x1 3/8x1 5/8
700x18C
700x20C
700x23C
700x25C
700x28C
700x32C
700x35C
700x40C
2199
2174
2224
2268
2265
2205
2102
2114
2133
2146
2149
2174
2205
2224
kmh
mph
47-305
47-406
37-540
47-507
23-571
40-559
44-559
47-559
50-559
54-559
57-559
37-590
37-584
20-571
16x1.75x2
20x1.75x2
24x1 3/8 A
24x1.75x2
26x1
26x1.5
26x1.6
26x1.75x2
26x1.9
26x2.00
26x2.125
26x1 3/8
26x1 3/8x1 1/2
26x3/4
1272
1590
1948
1907
1973
2026
2051
2070
2089
2114
2133
2105
2086
1954
ETRTO
kmh
mph
ETRTO
km/h:
WS = mm x 3.14
mph:
WS = mm x 3.14
km/h:
WS = mm
mph:
WS = mm
Printed in USA
~20 sec
A
Test: Battery
Max. 20 mm
• MODE: appel des fonctions
• RESET: remise à zéro des fonctions
DISTANCE JOURNALIERE, TEMPS PARCOURU, Ø KMH et MAX. KMH
• MODE: Activar las funciones
• RESET: Restablecimiento de las funcion.
KM DIARIOS, DURACIÓN DEL TRAYECTO, PROMEDIO KMH y KMH MÁX. a cero
• MODE: Change the functions
• RESET: Reset the functions
DAILY KM/M, TRIP TIME, AVERAGE SPEED and MAX SPEED to zero
MODE
>3 sec = RESET
TRIP DIST
TRIP TIME
AVG. SPEED
MAX. SPEED
CLOCK
TOTAL ODO*
TOTAL TIME*
TRIP DIST
TRIP TIME
AVG. SPEED
MAX. SPEED
MODE
>3 sec = RESET
KM JOUR
TEMPS PARC
VIT MOYEN.
VIT MAXI
HEURE
KM TOTAL*
TEMPSTOTAL*
KM JOUR
TEMPS PARC
VIT MOYEN.
VIT MAXI
MODE
>3 sec = RESET
KM DIA
TIEMPO PAR
VEL MEDIA
VEL MAXIMA
HORA
KM TOTAL*
TIEMPO TOT*
KM DIA
TIEMPO PAR
VEL MEDIA
VEL MAXIMA
How to change modes
• Press MODE button until the desired function is displayed
(TRIP DISTANCE, TRIP TIME, AVG. SPEED, MAX. SPEED,
CLOCK, TOTAL ODO, TOTAL TIME)
• While riding the TOTAL ODO and TOTAL TIME functions
are hidden.
Affichage des fonctions
• Appuyer sur la touche MODE jusqu'à ce que la fonction
souhaitée soit affichée (DISTANCE JOURNALIERE, TEMPS
PARCOURU, MOYENNE KMH, MAX.KMH, HEURE,
DISTANCE TOTALE EN KM, TEMPS TOTAL).
• Pendant la conduite, DISTANCE TOTALE et TEMPS TOTAL
ne sont pas affichés (moins de clics de touche lors de la
conduite).
Indicación de las funciones
• Pulsar la tecla MODE hasta que se muestre la función deseada (KM DIARIOS,
DURACIÓN DEL TRAYECTO, PROMEDIO KMH, KMH MÁX., HORA, KM
TOTALES, TIEMPO TOTAL).
• durante la carrera no se muestran KM TOTALES y TIEMPO TOTAL (menos
pulsaciones de teclas durante la carrera).
SET > 3 sec
• Press SET button for 3 sec. to enter set-up mode (SET
will appear in upper right hand corner of display when in
set-up mode, you must be in set-mode to perform steps
1-8).
• Use the set-up mode to change language, KMH/MPH,
wheel size, time, total odo, total time, and contrast.
• After changing the battery, only the time and contrast
have to be entered.
• Appuyer sur la touche SET 3 sec pour effectuer les réglages de base
suivants : langue, changement entre kmh/mph, circonférence de la
roue 1 et 2, heure, distance totale, temps total et contraste de l'écran.
Fin du menu réglage en appuyant 3 sec sur la touche SET. Après le
changement de la pile, seule l'heure et le contraste de l'écran doivent
être à nouveau rentrés.
• Pulsar la tecla Set durante 3 segundos para realizar los siguientes ajustes
básicos: idioma, cambio entre kmh/mph, dimensiones de la rueda 1 y 2,
hora, km totales, hora total y contraste de pantalla. Finalice el menú de
introducción pulsando durante 3 segundos la tecla SET. Tras un cambio de
la pila deben introducirse solo la hora y el contraste de la pantalla.
1. Régler la langue
• Appuyer sur la touche MODE jusqu'à ce que LANGUE
apparaisse sur l'écran.
• Appuyer brièvement sur la touche SET, l'affichage clignote.
Régler la langue souhaitée à l'aide de la touche MODE et
confirmer par la touche SET.
1. Ajustar el idioma
• Pulsar la tecla MODE hasta que aparezca IDIOMA en la
pantalla.
• Pulsar brevemente la tecla SET, la indicación parpadea.
Con la tecla MODE ajustar el idioma seleccionado y
confirmar con la tecla SET.
MODE
MODE
MODE
RESET
RESET
5. Time
(24 hr clock will display when using KMH, 12 hr clock will
display when using MPH)
• Press MODE button until TIME is displayed.
• Press the SET button briefly and the hour digit flashes.
• Change the hour with the RESET button.
• Advance to minutes by pressing MODE button.
• Change the minutes with the RESET button.
• Confirm by pressing the SET button briefly.
5. Heure (kmh = 24 h / mph = 12 h)
• Appuyer sur la touche MODE jusqu'à ce qu'HEURE apparaisse.
• Appuyer brièvement sur la touche SET, l'entrée clignote.
• Régler les heures à l'aide de la touche REMISE A ZERO. A
l'aide de la touche MODE passer au réglage des minutes.
• Régler les minutes à l'aide de la touche REMISE A ZERO.
Confirmer par la touche SET.
5. Hora (kmh = 24 h / mph = 12 h)
• Pulsar la tecla MODE hasta que aparezca HORA.
• Pulsar brevemente la tecla SET, la introducción parpadea.
• Con la tecla RESET ajustar el valor, con la tecla MODE
cambiar a la siguiente cifra.
• Con la tecla RESET ajustar los minutos. Confirmar con la
tecla SET.
MODE
MODE
• After installing the bike computer into mounting bracket, SPEED display will
blink ZERO.
• There are two ways to pair your transmitter and computer.
• 1. Ride. After 20 seconds (max 5 min.) the receiver will pair with
transmitter and data will be displayed.
• 2. Spin front wheel until speed display stops blinking (A).
• After 5 min. without transmission, BC 1106 DTS will go into sleep mode.
(Time of Day and Model name shown in the display). Press any button to
re-activate the computer. A short pairing will find the transmitter.
• Removing the BC 1106 DTS from the mounting bracket will end the paired
connection.
• If “TOO MANY SIGNALS” message is displayed: lengthen the distance of all
transmitters and press any button to continue. Pairing will begin again.
• Monter le compteur sur son support. Le zéro de la vitesse clignote
• Il y a deux possibilités pour connecter la vitesse et la cadence:
1. Rouler, après env. 20 secondes (max. 5 min.) le récepteur s'est connecté
avec l'émetteur, les données sont affichées.
2. Fiare tourner la roue avant jusqu'à ce que l'affichage de la vitesse ne
clignote plus (A).
ATTENTION:
• Après plus de 5 minutes de pause le BC 1106 DTS se met en mode repos
(affichage de l'heure et du nom du modèle). Pour ré-activer le compteur
appuyer sur une touche quelconque, il s'établit alors une connection courte
pour rechercher le(s) émetteur(s)
• Lorsque l'on sort le BC 1106 DTS de son support, la connection est arrêtée.
• TOO MANY SIGNALS s'affiche: Augmenter la distance par rapport aux
autres vélos et appuyer sur une touche quelconque. La connection
recommence.
• Encajar el BC 1106 DTS sobre el soporte. El cero de las indicaciones de
velocidad parpadea
• Hay dos posibilidades de emparejar la velocidad:
1. Arrancar, después de aprox. 20 segundos (max. 5 min) el receptor se ha
sincronizado con el receptor y se muestran los datos.
2. Girar la rueda delantera hasta que deje de parpadear la indicación de KMH
(A).
ATENCIÓN:
• Después de 5 minutos de pausa, el BC 1106 DTS pasa al modo de
espera (la hora y el nombre del modelo en la pantalla). Al pulsar cualquier
tecla se inicia un apareado corto para encontrar el emisor.
• Al retirar el BC 1106 DTS del soporte se desconecta la desconexión.
• Indicación TOO MANY SIGNALS (demasiadas señales): Aumentar la
distancia con otros emisores y pulsar cualquier tecla. El apareado se inicia
de nuevo.
~20 sec
A
~20 sec
A
mm x 3.14
note: 1 inch = 25.4 mm
Pila:
1 pila de litio tipo botón 2032, 3V
El cambio de pila se muestra en la pantalla.
Cambio de pila
• Si se cambia la pila DIMENSIONES DE LA
RUEDA, IDIOMA, KMH/MPH, KM
TOTALES y TIEMPO TOTAL permanecen
guardadas y no deben ser introducidas
de nuevo.
• Respetar el + y el -. Con el
compartimento de la batería abierto
tiene que verse el + de la pila.
• Si la junta de estanquidad está
desplazada, volver a colocarla.
• Tras el cambio de pila debe introducirse
de nuevo la hora.
Garantía
Nos responsabilizamos de las deficiencias
frente a nuestro socio contractual según
lo dispuesto en los reglamentos legales.
Ordenador:
Abrir la tapa con una moneda.
¡Prestar atención
a la polaridad"
Emisor:
Abrir la tapa con una herramienta.
¡Retirar la pila de la tapa!
¡Prestar atención a la polaridad!
KMH sin indicación
• ¿Se utiliza el soporte antiguo del manillar
con la transmisión por radio (RDS)?
• ¿Está el ordenador correctamente
encajado sobre el soporte?
• ¿Se han comprobado la oxidación /
corrosión de los contactos?
• ¿Distancia entre imán y sensor?
(máx. 20 mm)
• ¿Se ha comprobado si el imán está
imantado?
• ¿2 imanes montados?
• ¿Imán posicionado correctamente?
• ¿Dimensiones de la rueda (WS) mal
ajustadas?
• ¿Se ha montado el emisor correcto en el
cambio de bicicleta?
Los KMH están mal indicados
Indicación en pantalla oscura o lenta
• Temperatura demasiado alta (>60° C) o
demasiado baja (<0° C)
Sin indicación en pantalla
(indicación vacía)
• Comprobar la pila
• Pila bien colocada (+ y -)
• ¿Es correcto el contacto de la pila?
(comprobar con cuidado)
Ningún apareado
• Comprobar la distancia emisor/imán
• Pila del emisor vacía
• Activar el ordenador pulsando
• Comprobar alcance
• Modificar la posición del emisor al
emplear un dínamo de cubo
Indicación TOO MANY SIGNALS
(demasiadas señales):
• Aumentar la distancia con otros
emisores y pulsar una tecla
Pile:
1 pile-bouton lithium 2032, 3V
Le changement de pile est affiché est
affiché sur l'écran.
Changement de pile
• En cas de changement de pile,
CIRCONFERENCE DE LA ROUE 1/2,
LANGUE, KMH/MPH, DISTANCE TOTALE
et TEMPS TOTAL restent en mémoire et
ne doivent pas être à nouveau rentrés.
• Faire attention au plus et au moins, lorsque
le compartiment de la pile est ouvert,
vous devez voir le côté PLUS de la pile !
• En cas de déplacement du joint
d'étanchéité, le remettre en place.
• Après le changement de la pile, seul
l'heure et le contraste doivent être
à nouveau rentrés.
Garantie
Nous sommes responsables, vis-à-vis de
notre partenaire contractuel respectif, des
vices conformément aux prescriptions légales.
Les piles sont exclues de la garantie.
Compteur:
Ouvrir le couvercle avec une pièce
Attention à la
polarité!
Emetteur:
Ouvrir le couvercle avec
l'outil prévu à cet effet.
Enlever la pile du couvercle!
Attention à la polarité!
Pas d'affichage kmh
• Ancien système sans fil sur le vélo?
• Compteur bien enclenché sur le support?
• Corrosion/oxidation sur les contacts?
• Distance aimant/émetteur?
(max. 20 mm)
• Aimant magnétisé?
• 2 aimant montés?
• Aimant bien positionné?
• Circonférence de la roue (WS) bien
programmè?
• Montage du bon émetteur lors d'un
changement de vélo?
Mauvais affichage de la vitesse
Affichage noir/lent
• Température trop haute (>60°C)
ou trop basse (<0°C)
Pas d'affichage (écran vide)
• Vérifier l'état de la pile
• Pile bien mise (plus et moins)
• Contacts ok? (tordre en faisant attention)
Pas de connection
• Vérifier la distance aimant/émetteur
• Les piles de l'émetteur sont vides
• Activer le compteur en appuyant sur
une touche
• Vérifier la distance émetteur/récepteur
• Si vous utilisez une dynamo-moyeu,
changer la position de l'émetteur
Affichage TOO MANY SIGNALS
• Augmenter la distance avec les autres
vélos et appuyer sur une touche
quelconque.
Battery:
1 lithium button cell 2032, 3V
Battery change is displayed on screen.
Change batteries:
• WHEEL SIZES 1+2, LANGUAGE,
KMH/MPH, TOTAL KM and TOTAL
TIME remain saved even when the
battery is changed.
• Observe direction of plus and minus
poles; when the compartment is open
you must see the PLUS side of the
battery!
• If sealing ring is loose, re-insert it.
• After changing the battery only the
time and the contrast must be re-
entered.
Warranty
We are liable to our contracting partners
for defects as defined by law. Batteries
are excluded from the guarantee.
No display of MPH
• Using an old RDS mounting bracket?
• Check that the Bike Computer is properly
engaged in the bracket.
• Check contacts for corrosion/oxidation.
• Check distance between magnet and sensor
(max. 20 mm using Sigma's Power Magnet)
• Check if magnet is magnetized
• 2 magnets installed?
• Magnet in the right position?
• Wheel size programmed incorrectly?
• In case of you switched bikes - are you mounting
the correct transmitter?
False display of MPH
Display is black or weaken?
• Temperature too high (>60 °C) or too low (<0°C)
No Display (screen blank)
• Check Battery
• Check plus and minus poles
• Battery contact ok? (bend carefully!)
No Pairing
• Check distance between transmitter /
magnet (20mm or less with power
magnet)
• Press battery check button on
transmitter
• Activate computer by pressing any
button
• Check distance between transmitter
and receiver (max distance 90cm)
• If using a dynamo hub, change location
of transmitter.
TOO MANY SIGNALS is shown:
• Extend the distance between
transmitters and press any button
on computer to continue
Computer:
Open the top cover with a coin
Pay attention to
polarity!
Transmitter:
Open top cover with tool
Take the battery out of the top cover!
Pay attention to polarity!
Speed
TRIP DIST
TRIP TIME
ODO BIKE
TIME BIKE
WS BIKE 1/2
Vitesse
KM JOUR
TEMPS PARC
KM TOTAL
TEMPSTOTAL
CIRCONFERENCE
DE LA ROUE 1/2
Velocidad
KM DIA
TIEMPO PAR
KM TOTAL
TIEMPO TOT
DIMENSIONES
DE LA RUEDA
1/2
0.0
0.00
0:00:00
0
0:00
2,155
Default Max Units
199.5
9,999.9
999:59
99,999
9,999
3,999
kmh/mph
km/mi
h:mm:ss hh:mm hhh:mm
km/mi
h:mm hh:mm hhh:m h.hhh
mm
Speed Comparison (pace arrow)
Comparison of current speed to average speed.
• If your current speed is equal to your average speed is
shown, if lower is shown, and if higher is shown.
Vitesse/vitesse moyenne
• En cas de vitesse à peu près similaire s'affiche, en cas
de vitesse plus faible et plus élevée .
• L'affichage est effectué pour toutes les fonctions sauf
dans les réglages de base.
Velocidad / velocidad media
• En caso de velocidad casi igual se muestra , en caso de
velocidad menor y velocidad mayor .
• La indicación se realiza en todas las funciones excepto en
los ajustes básicos.
Reset
Reset Trip distance, Trip time, Average speed, and
Max speed to zero.
•Press MODE button until the desired function to zero out
displayed.
•Press and hold RESET button. The display will flash and
after 2 seconds the displayed function will clear.
•Holding RESET button longer than 4 seconds will zero out
Trip distance, Trip time, Average speed, and Max speed
functions at the same time.
Remise à zéro de l'affichage
•Appuyer sur la touche MODE jusqu'à ce que la fonction
souhaitée apparaisse. Maintenir appuyée la touche REMISE
A ZERO. L'affichage clignote. Au bout de 2 sec, seule la
fonction affichée est remise à 0.
•Appuyer sur la touche REMISE A ZERO pendant plus de 4
sec remet à zéro les affichages de DISTANCE
JOURNALIERE, TEMPS PARCOURU, Ø KMH, MAX KMH.
Restablecer las indicaciones
•Pulsar la tecla MODE hasta que aparezca la función
deseada.
•Mantener pulsada la tecla RESET. La indicación parpadea.
Tras 2 segundos se restablece la función indicada a 0.
•Pulsar la tecla RESET durante más de 4 segundos
establece las indicaciones de KM DIARIOS, DURACIÓN DEL
TRAYECTO, PROMEDIO KMH, KMH MÁX. en cero.
> 2 sec
> 3,5 sec
Switching between WHEEL 1 and WHEEL 2 is automatic.
You must install (optional) transmitter of Bike 2 (red
button).
• It is no longer possible to change by making an entry.
Le changement entre la ROUE 1 et la ROUE 2 est effectué
automatiquement. Il faut utiliser l'émetteur vélo 2 (en
option) avec la touche rouge.
• Un changement manuel n'est plus possible.
El cambio entre la RUEDA 1 y RUEDA 2 se realiza
automáticamente. Debe emplearse el emisor (opcional)
rueda 2 (tecla roja).
• Ya no es posible un cambio por introducción.
4 x
90°
4 x
Bike 1
Wheel Size Chart
go to
step 3
go to
step 2
The harness comes ready to mount on your handlebars.
To mount on a stem, remove the 4 screws on the back of the harness, turn base 90 degrees.
stem mount
remove yellow tape
the SIGMA logo on the harness must
always face the front of the bike.
Foam pad included for
use with bladed spokes
To reach the required 20mm or less, move magnet
and transmitter towards center of wheel.
Note: 20mm = 3/4 inches
32
42
?
handlebar
or
stem
Red, rouge
2 m m
Red, rouge
* not while riding * pas pendant
la conduite
*no durante
la carrera
12:23
12:23
12:25
00.200
00.000
00.200
3
2
0,0
MPH
TRIP DIST
0
15,
0
MPH
TRIP DIST
0
0,0
MPH
TRIP DIST
0
0,0
MPH
TRIP DIST
0
0,0
KMH
BC1106 DTS
15:23
0,
0
MPH
TRIP DIST
0
Bike 1
+

Contents / Contenu / ContenudoInstallation / Montage / MontajeInstallation of mounting bracketMontage du support / Montaje del soporte de bicicleta
12
Installation of mounting bracketInstallation of magnet / Montage de l'aimant / Montaje del imán
5
Installation of speed transmitterMontage de l'émett. Vit. / Montaje del emisor de velocidad
1
Installation of speed transmitter
5
Mode / Reset Pairing / Connection / Apareado Pairing / Connection / Apareado
3461
2 1
KMH/MPH entry Réglage KMH/MPH / Introducción KMH/MPH
U F
E
Wheel size entry Circonférence de roue / Dimensiones de la rueda
U F
E
Measure wheel size Mesurer la roue / Dimensiones de la rueda
U F
E
Time entry Réglage heure / Introducir la hora
U F
E
Total data entry Réglage des valeurs totales / Datos totales
U F
E
Contrast entry Réglage contraste / Introducción contraste
U F
E
Language Entry Réglage langue / Introducir el idioma
U F
E
Wheel size entry Circonférence de roue / Dimensiones de la rueda
U F
E
42 mm
32 mm
Basic settings Réglages de base / Ajustes básicos
U F
E
Wheel Size Chart (Wheel Size) Wheel Size Chart (Circonférence de roue / Tamaño de rueda)
A C
B
Changing modes Changement d’affichage / Cambio de visualización
U F
E
Installation of speed transmitter Montage de l'émett. Vit. / Montaje del emisor de velocidad
3 4
2x
Left side Right side
Grey, gris
optional Bike 2
Ref. No. 00405
Pairing / Connection / Apareado Pairing / Connection / Apareado Pairing / Connection / Apareado
Installation of Bike Computer
U
F
E
F E
U F E
Pairing / Connection / Apareado
Observaciones generales E
Cambio de la pila
Solución de problemas E
Remarques générales F Changement de batterie Solution aux problèmes FGeneral remarks U Trouble Shooting UChange batteryTechnical Data / Données techniques / Datos técnicos
UF
E
Technical data / Données techniques / Datos técnicos
Comparison speed Comparaison de la vitesse / Comparación velocidad
U F
E
ResetRemise à zéro / Puesta a cero
UF
E
Assembly 2nd wheelMontage 2ème roue / Montaje 2ª rueda
UF
E
optional Bike 2
Ref. No. 00405
Grey, gris
Bike 1
+
2. KMH / MPH
• Press MODE button until KMH / MPH is displayed.
• Press SET button briefly, KMH or MPH is displayed and
flashing.
• Select MPH or KMH with MODE button.
• Confirm by pressing SET button briefly.
2. KMH / MPH
• A l'aide de la touche MODE changer le réglage KMH/MPH.
• Appuyer brièvement sur la touche SET.
• KMH ou MPH apparaît sur l'écran et clignote.
• Régler MPH ou KMH à l'aide de la touche MODE.
• Confirmer par la touche SET.
2. KMH / MPH
• Con la tecla MODE cambiar a la introducción de KMH/MPH
• Pulsar la tecla SET brevemente.
• En la pantalla aparece KMH o MPH y parpadea.
• Con la tecla MODE ajustar MPH o KMH.
• Confirmar con la tecla SET.
3. Wheel size BIKE 1
• Press MODE button to change to WS BIKE 1.
• Press SET button briefly and the first digit flashes.
• Change the number by pressing RESET button, change to
next digit by pressing mode. Repeat with next 3 numbers
until desired wheel size is entered.
• Confirm by pressing SET button briefly.
3. Circonférence de la roue VELO 1
• A l'aide de la touche MODE passer à VELO 1.
• Appuyer brièvement sur la touche SET, le premier chiffre
à entrer clignote.
• Régler la valeur à l'aide de la touche REMISE A ZERO,
passer au prochain chiffre à l'aide de la touche MODE.
• Le vélo 1 est toujours celui avec l'emetteur vélo 1
3. Dimensiones de la rueda BICICLETA 1
• Con la tecla MODE cambiar a BICICLETA 1.
• Pulsar brevemente la tecla SET, la primera cifra de
introducción parpadea.
• Con la tecla RESET ajustar el valor, con la tecla MODE
cambiar a la siguiente cifra.
• La bicicleta 1 es siempre la bicicleta con emisor rueda 1
• A partir de la tabla C "Wheel Size Chart" (véase la página
siguiente) determinar el valor correspondiente al tamaño
de la rueda. Introducir este valor.
• Alternativa: calcular/ determinar el tamaño de la rueda
(tabla A o tabla B)
• Tras la última cifra confirmar con la tecla SET.
• Determine the correct value for your wheel size from
Table C “Wheel Size Chart” (refer to next page).
• Alternative: calculate wheel size using formula Tab A or
Tab B.
• Déterminer la valeur correspondant à votre circonférence
de roue à partir du tableau C "Wheel Size Chart" (voir
page suivante). Entrer cette valeur.
• Alternative: calculer/déterminer WS (Tab. A ou tab. B).
• Après le dernier chiffre, confirmer par la touche SET.
You can enter TOTAL ODO (miles) miles and TOTAL times
from your previous computer.
Note – This step is not necessary if previous data from
another computer is not desired(skip to step 8).
6. Enter TOTAL ODO (miles)
• Press MODE button until TOTAL ODO is displayed.
• Press SET button briefly and the first digit will flash.
• Press RESET button to change each digit.
• Press MODE button to advance to next number.
• Repeat until desired number is entered.
• Confirm by pressing the SET button briefly.
7. Enter TOTAL TIME
• Press MODE button until TOTAL TIME is displayed
• Press SET button briefly and the first digit will flash.
• Press RESET button to change each digit.
• Press MODE button to advance to next number.
• Repeat until desired number is entered
• Confirm by pressing the SET button briefly.
6. KM-VELO 1/2
7. TEMPS VELO 1/2
• Réglage identique à la circonférence de la roue. Ici, vous
pouvez transférer la distance totale en km, par exemple
lors de l'achat de cet appareil, à partir d'un autre
compteur.
6. KM RUEDA 1/2
7. TIEMPO RUEDA 1/2
• Introducción como en las dimensiones de la rueda. Aquí se
puede transferir el número total de km p.ej. en caso de
compra del aparato de otro ordenador de bicicleta.
8. Contrast
• Press MODE button until contrast is displayed.
• Press SET button briefly and the display flashes.
• Set the value by pressing RESET button.
1 = light 3 = dark
• Confirm by pressing the SET button.
When you are finished entering the basic setting, press and
hold SET button for 3 seconds to exit set-up mode.
8. Contraste
• Appuyer sur la touche MODE1 jusqu'à ce que CONTRASTE
apparaisse.
• Appuyer brièvement sur la touche SET, le réglage clignote.
• A l'aide de la touche REMISE A ZERO/MODE2 régler la
valeur (1 = faible, 3 = fort). Confirmer avec la touche SET.
8. Contraste
• Pulsar la tecla MODE1 hasta que aparezca CONTRASTE.
• Pulsar brevemente la tecla SET, la introducción parpadea.
• Con la tecla RESET/MODE2 ajustar el valor (1=débil
3= fuerte). Confirmar con la tecla SET.
1. Set language
• Press MODE button until LANGUAGE is displayed
• Press the SET button briefly, the display flashes. Set the
desired language using the MODE button and confirm by
pressing SET button briefly.
4. Wheel size BIKE 2
This computer can be programmed for two bikes, if you are
only using this computer for one bike, skip this step and go
to step 5.
Changing between WHEEL SIZE 1 and WHEEL SIZE 2
occurs automatically simply by changing from bike 1
transmitter (grey button) to the optional Bike 2 transmitter
(red button).
• Press MODE button to change to WS BIKE 2.
• Press SET button briefly and the first digit flashes.
• Change the number by pressing RESET button.
• Change to next digit by pressing MODE button. Repeat
with next 3 numbers until desired wheel size is entered.
• Confirm by pressing SET button briefly.
4. Circonférence de la roue VELO 2
• A l'aide de la touche MODE passer au VELO 2.
• Appuyer brièvement sur la touche SET, le premier chiffre à
entrer clignote.
• Réglage comme pour le VELO 1 : régler les valeurs à l'aide
de la touche RESET, passer au prochain chiffre à l'aide de la
touche MODE.
• Le vélo 2 est toujours celui avec l'émetteur vélo 2
4. Dimensiones de la rueda BICICLETA 2
• Con la tecla MODE cambiar a BICICLETA 2.
• Pulsar brevemente la tecla SET, la primera cifra de introducción parpadea.
• Introducción como en RUEDA 1: Con las teclas RESET ajustar los valores,
con la tecla MODE cambiar a la cifra siguiente, etc.
• La bicicleta 2 es siempre la bicicleta con emisor rueda 2
SET
BI KE CO MPUT ER
TO PLINE
B C 1 1 0 6 L D T S
SIGMA B IK E CO MPU TER
BC 110 6 L DT S
W W W. S I G MA S P O R T. C O M
W W W. S I G MA S P O R T. C O M
SIGMA USA:
North America
1067 Kingsland Drive
Batavia, IL 60510, US A
Tel. +1-630-761-1106
Fax +1-6 30-761-1107
Toll Free: 888-744-6 277
SIGMA EUROPA:
SIGMA Elektro GmbH
Dr.- Julius-Leber-Straße 15
D-67433 Neustadt a.d.W.
Tel. +49-(0)63 21-9120-11 8
Fax +49- (0)6321-9120 -34
SIGMA ASIA:
Asia, Australia, South Ame rica
7F-1, No. 193, Ta-Tun 6th Street,
Taichung City, Taiwan
Tel. +886-4-2475 35 77
Fax +886 -4-2475 3563
32-630
28-630
40-622
47-622
40-635
37-622
18-622
20-622
23-622
25-622
28-622
32-622
37-622
40-622
27x1 1/4
27x1 1/4 Fifty
28x1.5
28x1.75
28x1 1/2
28x1 3/8x1 5/8
700x18C
700x20C
700x23C
700x25C
700x28C
700x32C
700x35C
700x40C
2199
2174
2224
2268
2265
2205
2102
2114
2133
2146
2149
2174
2205
2224
kmh
mph
47-305
47-406
37-540
47-507
23-571
40-559
44-559
47-559
50-559
54-559
57-559
37-590
37-584
20-571
16x1.75x2
20x1.75x2
24x1 3/8 A
24x1.75x2
26x1
26x1.5
26x1.6
26x1.75x2
26x1.9
26x2.00
26x2.125
26x1 3/8
26x1 3/8x1 1/2
26x3/4
1272
1590
1948
1907
1973
2026
2051
2070
2089
2114
2133
2105
2086
1954
ETRTO
kmh
mph
ETRTO
km/h:
WS = mm x 3.14
mph:
WS = mm x 3.14
km/h:
WS = mm
mph:
WS = mm
Printed in USA
~20 sec
A
Test: Battery
Max. 20 mm
• MODE: appel des fonctions
• RESET: remise à zéro des fonctions
DISTANCE JOURNALIERE, TEMPS PARCOURU, Ø KMH et MAX. KMH
• MODE: Activar las funciones
• RESET: Restablecimiento de las funcion.
KM DIARIOS, DURACIÓN DEL TRAYECTO, PROMEDIO KMH y KMH MÁX. a cero
• MODE: Change the functions
• RESET: Reset the functions
DAILY KM/M, TRIP TIME, AVERAGE SPEED and MAX SPEED to zero
MODE
>3 sec = RESET
TRIP DIST
TRIP TIME
AVG. SPEED
MAX. SPEED
CLOCK
TOTAL ODO*
TOTAL TIME*
TRIP DIST
TRIP TIME
AVG. SPEED
MAX. SPEED
MODE
>3 sec = RESET
KM JOUR
TEMPS PARC
VIT MOYEN.
VIT MAXI
HEURE
KM TOTAL*
TEMPSTOTAL*
KM JOUR
TEMPS PARC
VIT MOYEN.
VIT MAXI
MODE
>3 sec = RESET
KM DIA
TIEMPO PAR
VEL MEDIA
VEL MAXIMA
HORA
KM TOTAL*
TIEMPO TOT*
KM DIA
TIEMPO PAR
VEL MEDIA
VEL MAXIMA
How to change modes
• Press MODE button until the desired function is displayed
(TRIP DISTANCE, TRIP TIME, AVG. SPEED, MAX. SPEED,
CLOCK, TOTAL ODO, TOTAL TIME)
• While riding the TOTAL ODO and TOTAL TIME functions
are hidden.
Affichage des fonctions
• Appuyer sur la touche MODE jusqu'à ce que la fonction
souhaitée soit affichée (DISTANCE JOURNALIERE, TEMPS
PARCOURU, MOYENNE KMH, MAX.KMH, HEURE,
DISTANCE TOTALE EN KM, TEMPS TOTAL).
• Pendant la conduite, DISTANCE TOTALE et TEMPS TOTAL
ne sont pas affichés (moins de clics de touche lors de la
conduite).
Indicación de las funciones
• Pulsar la tecla MODE hasta que se muestre la función deseada (KM DIARIOS,
DURACIÓN DEL TRAYECTO, PROMEDIO KMH, KMH MÁX., HORA, KM
TOTALES, TIEMPO TOTAL).
• durante la carrera no se muestran KM TOTALES y TIEMPO TOTAL (menos
pulsaciones de teclas durante la carrera).
SET > 3 sec
• Press SET button for 3 sec. to enter set-up mode (SET
will appear in upper right hand corner of display when in
set-up mode, you must be in set-mode to perform steps
1-8).
• Use the set-up mode to change language, KMH/MPH,
wheel size, time, total odo, total time, and contrast.
• After changing the battery, only the time and contrast
have to be entered.
• Appuyer sur la touche SET 3 sec pour effectuer les réglages de base
suivants : langue, changement entre kmh/mph, circonférence de la
roue 1 et 2, heure, distance totale, temps total et contraste de l'écran.
Fin du menu réglage en appuyant 3 sec sur la touche SET. Après le
changement de la pile, seule l'heure et le contraste de l'écran doivent
être à nouveau rentrés.
• Pulsar la tecla Set durante 3 segundos para realizar los siguientes ajustes
básicos: idioma, cambio entre kmh/mph, dimensiones de la rueda 1 y 2,
hora, km totales, hora total y contraste de pantalla. Finalice el menú de
introducción pulsando durante 3 segundos la tecla SET. Tras un cambio de
la pila deben introducirse solo la hora y el contraste de la pantalla.
1. Régler la langue
• Appuyer sur la touche MODE jusqu'à ce que LANGUE
apparaisse sur l'écran.
• Appuyer brièvement sur la touche SET, l'affichage clignote.
Régler la langue souhaitée à l'aide de la touche MODE et
confirmer par la touche SET.
1. Ajustar el idioma
• Pulsar la tecla MODE hasta que aparezca IDIOMA en la
pantalla.
• Pulsar brevemente la tecla SET, la indicación parpadea.
Con la tecla MODE ajustar el idioma seleccionado y
confirmar con la tecla SET.
MODE
MODE
MODE
RESET
RESET
5. Time
(24 hr clock will display when using KMH, 12 hr clock will
display when using MPH)
• Press MODE button until TIME is displayed.
• Press the SET button briefly and the hour digit flashes.
• Change the hour with the RESET button.
• Advance to minutes by pressing MODE button.
• Change the minutes with the RESET button.
• Confirm by pressing the SET button briefly.
5. Heure (kmh = 24 h / mph = 12 h)
• Appuyer sur la touche MODE jusqu'à ce qu'HEURE apparaisse.
• Appuyer brièvement sur la touche SET, l'entrée clignote.
• Régler les heures à l'aide de la touche REMISE A ZERO. A
l'aide de la touche MODE passer au réglage des minutes.
• Régler les minutes à l'aide de la touche REMISE A ZERO.
Confirmer par la touche SET.
5. Hora (kmh = 24 h / mph = 12 h)
• Pulsar la tecla MODE hasta que aparezca HORA.
• Pulsar brevemente la tecla SET, la introducción parpadea.
• Con la tecla RESET ajustar el valor, con la tecla MODE
cambiar a la siguiente cifra.
• Con la tecla RESET ajustar los minutos. Confirmar con la
tecla SET.
MODE
MODE
• After installing the bike computer into mounting bracket, SPEED display will
blink ZERO.
• There are two ways to pair your transmitter and computer.
• 1. Ride. After 20 seconds (max 5 min.) the receiver will pair with
transmitter and data will be displayed.
• 2. Spin front wheel until speed display stops blinking (A).
• After 5 min. without transmission, BC 1106 DTS will go into sleep mode.
(Time of Day and Model name shown in the display). Press any button to
re-activate the computer. A short pairing will find the transmitter.
• Removing the BC 1106 DTS from the mounting bracket will end the paired
connection.
• If “TOO MANY SIGNALS” message is displayed: lengthen the distance of all
transmitters and press any button to continue. Pairing will begin again.
• Monter le compteur sur son support. Le zéro de la vitesse clignote
• Il y a deux possibilités pour connecter la vitesse et la cadence:
1. Rouler, après env. 20 secondes (max. 5 min.) le récepteur s'est connecté
avec l'émetteur, les données sont affichées.
2. Fiare tourner la roue avant jusqu'à ce que l'affichage de la vitesse ne
clignote plus (A).
ATTENTION:
• Après plus de 5 minutes de pause le BC 1106 DTS se met en mode repos
(affichage de l'heure et du nom du modèle). Pour ré-activer le compteur
appuyer sur une touche quelconque, il s'établit alors une connection courte
pour rechercher le(s) émetteur(s)
• Lorsque l'on sort le BC 1106 DTS de son support, la connection est arrêtée.
• TOO MANY SIGNALS s'affiche: Augmenter la distance par rapport aux
autres vélos et appuyer sur une touche quelconque. La connection
recommence.
• Encajar el BC 1106 DTS sobre el soporte. El cero de las indicaciones de
velocidad parpadea
• Hay dos posibilidades de emparejar la velocidad:
1. Arrancar, después de aprox. 20 segundos (max. 5 min) el receptor se ha
sincronizado con el receptor y se muestran los datos.
2. Girar la rueda delantera hasta que deje de parpadear la indicación de KMH
(A).
ATENCIÓN:
• Después de 5 minutos de pausa, el BC 1106 DTS pasa al modo de
espera (la hora y el nombre del modelo en la pantalla). Al pulsar cualquier
tecla se inicia un apareado corto para encontrar el emisor.
• Al retirar el BC 1106 DTS del soporte se desconecta la desconexión.
• Indicación TOO MANY SIGNALS (demasiadas señales): Aumentar la
distancia con otros emisores y pulsar cualquier tecla. El apareado se inicia
de nuevo.
~20 sec
A
~20 sec
A
mm x 3.14
note: 1 inch = 25.4 mm
Pila:
1 pila de litio tipo botón 2032, 3V
El cambio de pila se muestra en la pantalla.
Cambio de pila
• Si se cambia la pila DIMENSIONES DE LA
RUEDA, IDIOMA, KMH/MPH, KM
TOTALES y TIEMPO TOTAL permanecen
guardadas y no deben ser introducidas
de nuevo.
• Respetar el + y el -. Con el
compartimento de la batería abierto
tiene que verse el + de la pila.
• Si la junta de estanquidad está
desplazada, volver a colocarla.
• Tras el cambio de pila debe introducirse
de nuevo la hora.
Garantía
Nos responsabilizamos de las deficiencias
frente a nuestro socio contractual según
lo dispuesto en los reglamentos legales.
Ordenador:
Abrir la tapa con una moneda.
¡Prestar atención
a la polaridad"
Emisor:
Abrir la tapa con una herramienta.
¡Retirar la pila de la tapa!
¡Prestar atención a la polaridad!
KMH sin indicación
• ¿Se utiliza el soporte antiguo del manillar
con la transmisión por radio (RDS)?
• ¿Está el ordenador correctamente
encajado sobre el soporte?
• ¿Se han comprobado la oxidación /
corrosión de los contactos?
• ¿Distancia entre imán y sensor?
(máx. 20 mm)
• ¿Se ha comprobado si el imán está
imantado?
• ¿2 imanes montados?
• ¿Imán posicionado correctamente?
• ¿Dimensiones de la rueda (WS) mal
ajustadas?
• ¿Se ha montado el emisor correcto en el
cambio de bicicleta?
Los KMH están mal indicados
Indicación en pantalla oscura o lenta
• Temperatura demasiado alta (>60° C) o
demasiado baja (<0° C)
Sin indicación en pantalla
(indicación vacía)
• Comprobar la pila
• Pila bien colocada (+ y -)
• ¿Es correcto el contacto de la pila?
(comprobar con cuidado)
Ningún apareado
• Comprobar la distancia emisor/imán
• Pila del emisor vacía
• Activar el ordenador pulsando
• Comprobar alcance
• Modificar la posición del emisor al
emplear un dínamo de cubo
Indicación TOO MANY SIGNALS
(demasiadas señales):
• Aumentar la distancia con otros
emisores y pulsar una tecla
Pile:
1 pile-bouton lithium 2032, 3V
Le changement de pile est affiché est
affiché sur l'écran.
Changement de pile
• En cas de changement de pile,
CIRCONFERENCE DE LA ROUE 1/2,
LANGUE, KMH/MPH, DISTANCE TOTALE
et TEMPS TOTAL restent en mémoire et
ne doivent pas être à nouveau rentrés.
• Faire attention au plus et au moins, lorsque
le compartiment de la pile est ouvert,
vous devez voir le côté PLUS de la pile !
• En cas de déplacement du joint
d'étanchéité, le remettre en place.
• Après le changement de la pile, seul
l'heure et le contraste doivent être
à nouveau rentrés.
Garantie
Nous sommes responsables, vis-à-vis de
notre partenaire contractuel respectif, des
vices conformément aux prescriptions légales.
Les piles sont exclues de la garantie.
Compteur:
Ouvrir le couvercle avec une pièce
Attention à la
polarité!
Emetteur:
Ouvrir le couvercle avec
l'outil prévu à cet effet.
Enlever la pile du couvercle!
Attention à la polarité!
Pas d'affichage kmh
• Ancien système sans fil sur le vélo?
• Compteur bien enclenché sur le support?
• Corrosion/oxidation sur les contacts?
• Distance aimant/émetteur?
(max. 20 mm)
• Aimant magnétisé?
• 2 aimant montés?
• Aimant bien positionné?
• Circonférence de la roue (WS) bien
programmè?
• Montage du bon émetteur lors d'un
changement de vélo?
Mauvais affichage de la vitesse
Affichage noir/lent
• Température trop haute (>60°C)
ou trop basse (<0°C)
Pas d'affichage (écran vide)
• Vérifier l'état de la pile
• Pile bien mise (plus et moins)
• Contacts ok? (tordre en faisant attention)
Pas de connection
• Vérifier la distance aimant/émetteur
• Les piles de l'émetteur sont vides
• Activer le compteur en appuyant sur
une touche
• Vérifier la distance émetteur/récepteur
• Si vous utilisez une dynamo-moyeu,
changer la position de l'émetteur
Affichage TOO MANY SIGNALS
• Augmenter la distance avec les autres
vélos et appuyer sur une touche
quelconque.
Battery:
1 lithium button cell 2032, 3V
Battery change is displayed on screen.
Change batteries:
• WHEEL SIZES 1+2, LANGUAGE,
KMH/MPH, TOTAL KM and TOTAL
TIME remain saved even when the
battery is changed.
• Observe direction of plus and minus
poles; when the compartment is open
you must see the PLUS side of the
battery!
• If sealing ring is loose, re-insert it.
• After changing the battery only the
time and the contrast must be re-
entered.
Warranty
We are liable to our contracting partners
for defects as defined by law. Batteries
are excluded from the guarantee.
No display of MPH
• Using an old RDS mounting bracket?
• Check that the Bike Computer is properly
engaged in the bracket.
• Check contacts for corrosion/oxidation.
• Check distance between magnet and sensor
(max. 20 mm using Sigma's Power Magnet)
• Check if magnet is magnetized
• 2 magnets installed?
• Magnet in the right position?
• Wheel size programmed incorrectly?
• In case of you switched bikes - are you mounting
the correct transmitter?
False display of MPH
Display is black or weaken?
• Temperature too high (>60 °C) or too low (<0°C)
No Display (screen blank)
• Check Battery
• Check plus and minus poles
• Battery contact ok? (bend carefully!)
No Pairing
• Check distance between transmitter /
magnet (20mm or less with power
magnet)
• Press battery check button on
transmitter
• Activate computer by pressing any
button
• Check distance between transmitter
and receiver (max distance 90cm)
• If using a dynamo hub, change location
of transmitter.
TOO MANY SIGNALS is shown:
• Extend the distance between
transmitters and press any button
on computer to continue
Computer:
Open the top cover with a coin
Pay attention to
polarity!
Transmitter:
Open top cover with tool
Take the battery out of the top cover!
Pay attention to polarity!
Speed
TRIP DIST
TRIP TIME
ODO BIKE
TIME BIKE
WS BIKE 1/2
Vitesse
KM JOUR
TEMPS PARC
KM TOTAL
TEMPSTOTAL
CIRCONFERENCE
DE LA ROUE 1/2
Velocidad
KM DIA
TIEMPO PAR
KM TOTAL
TIEMPO TOT
DIMENSIONES
DE LA RUEDA
1/2
0.0
0.00
0:00:00
0
0:00
2,155
Default Max Units
199.5
9,999.9
999:59
99,999
9,999
3,999
kmh/mph
km/mi
h:mm:ss hh:mm hhh:mm
km/mi
h:mm hh:mm hhh:m h.hhh
mm
Speed Comparison (pace arrow)
Comparison of current speed to average speed.
• If your current speed is equal to your average speed is
shown, if lower is shown, and if higher is shown.
Vitesse/vitesse moyenne
• En cas de vitesse à peu près similaire s'affiche, en cas
de vitesse plus faible et plus élevée .
• L'affichage est effectué pour toutes les fonctions sauf
dans les réglages de base.
Velocidad / velocidad media
• En caso de velocidad casi igual se muestra , en caso de
velocidad menor y velocidad mayor .
• La indicación se realiza en todas las funciones excepto en
los ajustes básicos.
Reset
Reset Trip distance, Trip time, Average speed, and
Max speed to zero.
•Press MODE button until the desired function to zero out
displayed.
•Press and hold RESET button. The display will flash and
after 2 seconds the displayed function will clear.
•Holding RESET button longer than 4 seconds will zero out
Trip distance, Trip time, Average speed, and Max speed
functions at the same time.
Remise à zéro de l'affichage
•Appuyer sur la touche MODE jusqu'à ce que la fonction
souhaitée apparaisse. Maintenir appuyée la touche REMISE
A ZERO. L'affichage clignote. Au bout de 2 sec, seule la
fonction affichée est remise à 0.
•Appuyer sur la touche REMISE A ZERO pendant plus de 4
sec remet à zéro les affichages de DISTANCE
JOURNALIERE, TEMPS PARCOURU, Ø KMH, MAX KMH.
Restablecer las indicaciones
•Pulsar la tecla MODE hasta que aparezca la función
deseada.
•Mantener pulsada la tecla RESET. La indicación parpadea.
Tras 2 segundos se restablece la función indicada a 0.
•Pulsar la tecla RESET durante más de 4 segundos
establece las indicaciones de KM DIARIOS, DURACIÓN DEL
TRAYECTO, PROMEDIO KMH, KMH MÁX. en cero.
> 2 sec
> 3,5 sec
Switching between WHEEL 1 and WHEEL 2 is automatic.
You must install (optional) transmitter of Bike 2 (red
button).
•It is no longer possible to change by making an entry.
Le changement entre la ROUE 1 et la ROUE 2 est effectué
automatiquement. Il faut utiliser l'émetteur vélo 2 (en
option) avec la touche rouge.
•Un changement manuel n'est plus possible.
El cambio entre la RUEDA 1 y RUEDA 2 se realiza
automáticamente. Debe emplearse el emisor (opcional)
rueda 2 (tecla roja).
•Ya no es posible un cambio por introducción.
4 x
90°
4 x
Bike 1
Wheel Size Chart
go to
step 3
go to
step 2
The harness comes ready to mount on your handlebars.
To mount on a stem, remove the 4 screws on the back of the harness, turn base 90 degrees.
stem mount
remove yellow tape
the SIGMA logo on the harness must
always face the front of the bike.
Foam pad included for
use with bladed spokes
To reach the required 20mm or less, move magnet
and transmitter towards center of wheel.
Note: 20mm = 3/4 inches
32
42
?
handlebar
or
stem
Red, rouge
2 m m
Red, rouge
* not while riding * pas pendant
la conduite
*no durante
la carrera
0,0
MPH
CLOCK
15:23
0,0
MPH
TRIP DIST
30.10
12:23
12:23
12:25
00.200
00.000
00.200
3
2
Bike 1
+
-
 1
1
-
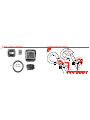 2
2
-
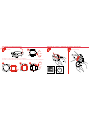 3
3
-
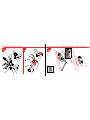 4
4
-
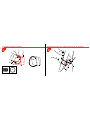 5
5
-
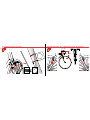 6
6
-
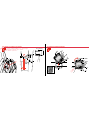 7
7
-
 8
8
-
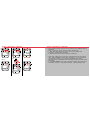 9
9
-
 10
10
-
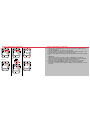 11
11
-
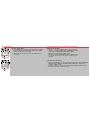 12
12


Sigma BC 1106L DTS Installation Instructions Manual
- Catégorie
- Accessoires de vélo
- Taper
- Installation Instructions Manual
dans d''autres langues
- English: Sigma BC 1106L DTS
- español: Sigma BC 1106L DTS
Documents connexes
-
Sigma BC 1606L DTS cadence Installation Instructions Manual
-
-
-
-
-
-
Sigma BC 1009 STS Manuel utilisateur
-
