Philips GC2510/02 Manuel utilisateur
- Catégorie
- Fers
- Taper
- Manuel utilisateur

GC2652, GC2650, GC2640, GC2620,
GC2560, GC2530, GC2528, GC2522,
GC2520, GC2510
L J
A D F GECB
I
H
K
1
2 3 4 5
6
7 8 9
10 11 12 13
14 15 16 17

ENGLISH
Introduction
Congratulations on your purchase and welcome to
Philips! To fully benet from the support that Philips offers,
register your product at www.philips.com/welcome.
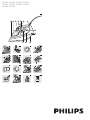
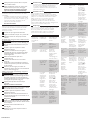
General description (Fig. 1)
A Spray nozzle
B Cap of lling opening
C Steam control
O = no steam
l = minimum steam
; = maximum steam
1 = Calc-Clean function
D Shot-of-steam button 9 (all types except GC2510)
E Spray button T
F Automatic shut-off light (GC2560 only)
G Mains cord
H Anti-Calc tablet (all types except GC2522/GC2510)
I Temperature light
J Type plate
K Water tank
L Temperature dial
Important
Read this user manual carefully before you use the
appliance and save it for future reference.
Danger
Never immerse the iron in water.
Warning
Check if the voltage indicated on the appliance
corresponds to the local mains voltage before you
connect the appliance.
Do not use the appliance if the plug, the mains cord
or the appliance itself shows visible damage, or if the
appliance has been dropped or leaks.
If the mains cord is damaged, you must have it
replaced by Philips, a service centre authorised by
Philips or similarly qualied persons in order to avoid
a hazard.
Never leave the appliance unattended when it is
connected to the mains.
This appliance is not intended for use by persons
(including children) with reduced physical, sensory
or mental capabilities, or lack of experience and
knowledge, unless they have been given supervision
or instruction concerning use of the appliance by a
person responsible for their safety.
Children should be supervised to ensure that they
do not play with the appliance.
Do not let the mains cord come into contact with
the hot soleplate of the iron.
Caution
Only connect the appliance to an earthed wall
socket.
Check the mains cord regularly for possible damage.
The soleplate of the iron can become extremely hot
and may cause burns if touched.
When you have nished ironing, when you clean the
appliance, when you ll or empty the water tank and
also when you leave the iron even for a short while:
set the steam control to position O, put the iron on
its heel and remove the mains plug from the wall
socket.
Always place and use the iron on a stable, level and
horizontal surface.
Do not put perfume, vinegar, starch, descaling agents,
ironing aids or other chemicals in the water tank.
This appliance is intended for household use only.
Electromagnetic elds (EMF)
This Philips appliance complies with all standards
regarding electromagnetic elds (EMF). If handled
properly and according to the instructions in this user
manual, the appliance is safe to use based on scientic
evidence available today.
Before first use
1 Remove any sticker or protective foil from the
soleplate.
2 Let the iron heat up to maximum temperature and
pass the iron over a piece of damp cloth for several
minutes to remove any residues from the soleplate.
-
-
-
-
-
-
-
-
-
-
-
-
-
-
-
-
-
-
-
Preparing for use
Filling the water tank
Do not put perfume, vinegar, starch, descaling agents,
ironing aids, chemically descaled water or other
chemicals in the water tank.
1 Switch off the appliance and unplug it.
2 Set the steam control to position O (= no
steam) (Fig. 2).
3 Openthecapofthellingopening.
4 Tilttheironandllthewatertankuptomaximum
level under the tap (Fig. 3).
Note: Do not ll the water tank beyond the MAX indication.
Note: If the tap water in your area is very hard, we advise
you to use distilled water. Do not use chemically descaled
water.
5 Closethecapofthellingopening(‘click’).
Setting the temperature
1 Put the iron on its heel (Fig. 4).
2 To set the required ironing temperature, turn the
temperature dial to the appropriate position.
Check the laundry care label for the required ironing
temperature.
1 Synthetic fabrics (e.g. acrylic, viscose, polyamide,
polyester)
1 Silk
2 Wool
3 Cotton, linen
If you do not know what kind or kinds of fabric an article
is made of, determine the right ironing temperature by
ironing a part that is not visible when you wear or use
the article.
Silk, woollen and synthetic materials: iron the reverse side
of the fabric to prevent shiny patches. Avoid using the
spray function to prevent stains. Start ironing the articles
that require the lowest ironing temperature, such as those
made of synthetic bres.
3 Put the mains plug in an earthed wall socket.
The temperature light goes on.
4 When the temperature light goes out, wait a while
before you start ironing.
During ironing, the temperature light goes on from
time to time. This indicates that the iron is heating
up to the set temperature.
Using the appliance
Note: The iron may give off some smoke when you use it for
the rst time. This stops after a short while.
Steam ironing
1 Make sure that there is enough water in the water
tank.
2 Set the recommended ironing temperature (see
chapter‘Preparingforuse’,section‘Settingthe
temperature’).
3 Set the appropriate steam setting. Make sure
that the steam setting is suitable for the ironing
temperature selected: (Fig. 2)
ç for minimum steam (temperature settings 2 and
3).
é for maximum steam (temperature settings 3
to MAX).
Note: The iron starts to produce steam as soon as it has
reached the set temperature.
GC2640/GC2620/GC2530/GC2528/
GC2520/GC2510 only:
Water may leak from the soleplate if the set temperature
is too low (MIN to 2).
Ironing without steam
1 Set the steam control to position O (= no steam).
2 Set the recommended ironing temperature (see
chapter‘Preparingforuse’,section‘Settingthe
temperature’).
-
-
-
-
,
,
-
-
Features
Spray function
You can use the spray function at any temperature
to moisten the article to be ironed. This helps
remove stubborn creases.
1 Make sure that there is enough water in the water
tank.
2 Press the spray button several times to moisten the
article to be ironed (Fig. 5).
Shot of steam (all types except GC2510)
A powerful shot of steam helps to remove very stubborn
creases.
The shot-of-steam function only works at temperature
settings between 2 and MAX.
1 Press and release the shot-of-steam button (Fig. 6).
Vertical shot of steam (all types except
GC2510)
You can also use the shot-of-steam function when
you hold the iron in vertical position. This is useful for
removing creases from hanging clothes, curtains etc.
1 Hold the iron in vertical position and press and
release the shot-of-steam button (Fig. 7).
Never direct the steam at people.
Drip stop (GC2652/GC2650/GC2560/
GC2522 only)
This iron is equipped with a drip-stop function: the
iron automatically stops producing steam when the
temperature is too low to prevent water from dripping
out of the soleplate. When this happens you hear a click.
Automatic shut-off function (GC2560 only)
The automatic shut-off function automatically switches off
the iron if it has not been moved for a while.
Theautomaticshut-offlightashestoindicatethat
the iron has been switched off by the automatic
shut-off function. (Fig. 8)
To let the iron heat up again:
1 Pick up the iron or move it slightly.
The automatic shut-off light goes out.
If the temperature of the soleplate has dropped
below the set ironing temperature, the temperature
light goes on.
2 If the temperature light goes on after you have
moved the iron, wait for it to go out before you
start ironing.
Note: If the temperature light does not go on after you move
the iron, the soleplate still has the right temperature and the
iron is ready for use.
Cleaning and maintenance
Cleaning
1 Set the steam control to position O, remove the
plug from the wall socket and let the iron cool
down.
2 Wipeakesandanyotherdepositsoffthe
soleplate with a damp cloth and a non-abrasive
(liquid) cleaning agent.
To keep the soleplate smooth, avoid hard contact with
metal objects. Never use a scouring pad, vinegar or
other chemicals to clean the soleplate.
3 Clean the upper part of the iron with a damp cloth.
4 Regularly rinse the water tank with water. Empty
the water tank after you have rinsed it (Fig. 9).
Double-Active Calc System (all types except
GC2522/GC2510)
The Double-Active Calc System consists of an Anti-Calc
tablet inside the water tank combined with the Calc-
Clean function.
The Anti-Calc tablet prevents scale from clogging the
steam vents. The tablet is constantly active and does
not need to be replaced (Fig. 10).
The Calc-Clean function removes scale particles
from the iron.
,
,
,
-
-
4239.000.6139.2

Calc-Clean function
Use the Calc-Clean function once every two weeks. If
the water in your area is very hard (i.e. when akes come
out of the soleplate during ironing), use the Calc-Clean
function more frequently.
1 Make sure the appliance is unplugged.
2 Set the steam control to position O.
3 Fill the water tank to the maximum level.
Do not pour vinegar or other descaling agents into the
water tank.
4 Set the temperature dial to MAX (Fig. 11).
5 Put the mains plug in an earthed wall socket.
6 Unplug the iron when the temperature light goes
out.
7 Hold the iron over the sink and set the steam
control to the Calc-Clean position ( 1). The steam
control springs up slightly.
8 Pull the steam control upwards and remove
it (Fig. 12).
9 Hold the iron over the sink and move it to and
fro (Fig. 13).
Steam and boiling water come out of the soleplate.
Impuritiesandakes(ifany)areushedout.
10 Use vinegar to remove scale, if any, from the steam
control needle (Fig. 14).
Do not bend or damage the steam control needle.
11 Put the steam control back into the iron. Insert
the point of the needle exactly in the centre of the
holeandtthesmallprojectiononthesideofthe
needle into the slot. Press down the steam control
while you turn it to position O (Fig. 15).
12 Repeat the Calc-Clean process if the iron still
contains a lot of impurities.
After the Calc-Clean process
1 Put the plug back into the wall socket and let the
iron heat up to let the soleplate dry.
2 Unplug the iron when the temperature light goes
out.
3 Move the iron gently over a piece of used cloth to
remove any water stains that may have formed on
the soleplate.
Storage
1 Set the steam control to position O, remove the
plug from the wall socket and let the iron cool
down.
2 Wind the mains cord round the cord storage
facility (Fig. 16).
3 Store the iron on its heel in a safe and dry place.
Environment
Do not throw away the appliance with the normal
household waste at the end of its life, but hand it in
at an ofcial collection point for recycling. By doing
this, you help to preserve the environment (Fig. 17).
Guarantee & service
If you need service or information or if you have a
problem, please visit the Philips website at www.philips.
com or contact the Philips Consumer Care Centre
in your country (you nd its phone number in the
worldwide guarantee leaet). If there is no Consumer
Care Centre in your country, go to your local Philips
dealer.
Troubleshooting
This chapter summarises the most common problems
you could encounter with the appliance. If you are unable
to solve the problem with the information below, contact
the Consumer Care Centre in your country.
Problem Cause Solution
The iron is
plugged in, but
the soleplate
is cold.
There is a
connection
problem.
Check the mains
cord, the plug and the
wall socket.
,
-
Problem Cause Solution
The
temperature
dial is set to
MIN.
Set the temperature
dial to the required
position.
The iron does
not produce
any steam.
There is not
enough water
in the water
tank.
Fill the water
tank (see chapter
‘Preparing for use’,
section ‘Filling the
water tank’).
The steam
control is set
to position
O.
Set the steam
position to ç or é
(see chapter ‘Using
the appliance’, section
‘Steam ironing’).
The soleplate
is not hot
enough and/
or the drip-
stop function
has been
activated
(GC2652/
GC2650/
GC2560/
GC2522
only).
Set an ironing
temperature that is
suitable for steam
ironing ( 2 to
MAX). Put the iron
on its heel and wait
until the temperature
light goes out before
you start ironing.
The shot-
of- steam
function does
not work (all
types except
GC2510).
You have
used the
shot-of-steam
function too
often within
a very short
period.
Continue ironing in
horizontal position
and wait a while
before you use the
shot-of-steam
function again.
The iron
is not hot
enough.
Set an ironing
temperature that is
suitable for steam
ironing ( 2 to
MAX). Put the iron
on its heel and wait
until the temperature
light goes out before
you start ironing.
Flakes and
impurities
come out of
the soleplate
during ironing.
Hard water
forms akes
inside the
soleplate.
Use the Calc-Clean
function one or
more times (see
chapter ‘Cleaning and
maintenance’, section
‘Calc-Clean function’).
The light on
the handle
ashes
(GC2560
only).
The
automatic
shut-off
function
has been
activated
(see chapter
‘Features’,
section
‘Automatic
shut-off’).
Pick the iron up
or move it slightly
to deactivate the
automatic shut-
off function. The
automatic shut-off
light goes out.
There
are water
droplets on
the fabric.
You have not
closed the
cap of the
lling opening
properly.
Press the cap until
you hear a click.
There
are water
droplets on
the fabric
(GC2640/
C2620/
GC2530/
GC2528/
GC2520/
GC2510
only).
The set
temperature
is too low for
steam ironing.
Set an ironing
temperature that is
suitable for steam
ironing ( 2 to
MAX). Put the iron
on its heel and wait
until the temperature
light goes out before
you start ironing.
Problem Cause Solution
Water drips
from the
soleplate
after the iron
has cooled
down or has
been stored
(GC2640/
C2620/
GC2530/
GC2528/
GC2520/
GC2510
only).
You have put
the iron in
horizontal
position while
there was still
water in the
water tank.
Empty the water tank
and set the steam
control to position O
after use. Store the
iron on its heel.
4239.000.6139.2

FRANÇAIS
Introduction
Félicitations pour votre achat et bienvenue dans l’univers
Philips ! Pour proter pleinement de l’assistance Philips,
enregistrez vos produits sur le site à l’adresse suivante :
www.philips.com/welcome.
Description générale (fig. 1)
A Spray
B Bouchon de l’orice de remplissage
C Commande de vapeur
O = pas de vapeur
l = vapeur minimale
; = vapeur maximale
1 = fonction Calc-Clean (anticalcaire)
D Bouton jet de vapeur 9 (tout type à l’exception de
GC2510)
E Bouton spray T
F Voyant d’arrêt automatique (GC2560 uniquement)
G Cordon d’alimentation
H Tablette anticalcaire (tout type à l’exception de
GC2522/GC2510)
I Voyant de température
J Plaque signalétique
K Réservoir d’eau
L Thermostat
Important
Lisez attentivement ce mode d’emploi avant d’utiliser
l’appareil et conservez-le pour un usage ultérieur.
Danger
Ne plongez jamais le fer dans l’eau.
Avertissement
Avant de brancher l’appareil, vériez que la tension
indiquée sur l’appareil correspond à la tension
secteur locale.
N’utilisez pas l’appareil si la che, le cordon
d’alimentation ou l’appareil lui-même est endommagé
ou s’il est tombé et/ou si de l’eau s’en écoule.
Si le cordon d’alimentation est endommagé, il doit
être remplacé par Philips, un Centre Service Agréé
ou un technicien qualié an d’éviter tout accident.
Ne laissez jamais le fer à repasser sans surveillance
pendant qu’il est branché.
Cet appareil n’est pas destiné à être utilisé par
des personnes (notamment des enfants) dont les
capacités physiques, sensorielles ou intellectuelles
sont réduites, ou par des personnes manquant
d’expérience ou de connaissances, à moins que
celles-ci ne soient sous surveillance ou qu’elles aient
reçu des instructions quant à l’utilisation de l’appareil
par une personne responsable de leur sécurité.
Veillez à ce que les enfants ne puissent pas jouer avec
l’appareil.
Évitez tout contact entre le cordon d’alimentation et
la semelle du fer à repasser lorsqu’elle est chaude.
Attention
Branchez l’appareil uniquement sur une prise murale
mise à la terre.
Vériez régulièrement l’état du cordon
d’alimentation.
La semelle du fer à repasser peut devenir très chaude
et peut par conséquent provoquer des brûlures si
vous la touchez.
Lorsque vous avez ni de repasser, pendant que vous
nettoyez l’appareil, que vous remplissez ou videz
le réservoir d’eau, ou même si vous laissez le fer
sans surveillance pendant un bref instant, réglez la
commande de vapeur sur la position O, placez le fer
à repasser sur le talon et débranchez-le du secteur.
Placez et utilisez toujours le fer à repasser sur une
surface stable, plane et horizontale.
Ne mettez pas de parfum, de vinaigre, d’amidon, de
détartrants ou d’autres agents chimiques dans le
réservoir d’eau.
Cet appareil est destiné à un usage domestique
uniquement.
Champs électromagnétiques (CEM)
Cet appareil Philips est conforme à toutes les normes
relatives aux champs électromagnétiques (CEM). Il
répond aux règles de sécurité établies sur la base des
connaissances scientiques actuelles s’il est manipulé
correctement et conformément aux instructions de ce
mode d’emploi.
-
-
-
-
-
-
-
-
-
-
-
-
-
-
-
-
-
-
-
Avant la première utilisation
1 Ôteztoutautocollantoulmdeprotectiondela
semelle.
2 Laissezchaufferleferjusqu’àlatempérature
maximale et repassez un chiffon humide pendant
quelquesminutesand’enlevertoutrésidudela
semelle.
Avant utilisation
Remplissage du réservoir
Nemettezjamaisdeparfum,devinaigre,d’amidon,de
détartrants,deproduitsd’aideaurepassageouautres
agentschimiquesdansleréservoird’eau.
1 Arrêtezl’appareiletdébranchez-le.
2 RéglezlacommandedevapeursurlapositionO
(pasdevapeur)(g.2).
3 Ouvrezlebouchondel’oricederemplissage.
4 Inclinez le fer en arrière, placez-le sous le robinet
etremplissezleréservoird’eaujusqu’auniveau
maximal(g.3).
Remarque : Ne remplissez pas le réservoir au-delà de
l’indication MAX.
Remarque : Si l’eau du robinet de votre région est très
calcaire, il est conseillé d’utiliser de l’eau déminéralisée.
N’utilisez pas de produits détartrants.
5 Fermezlebouchondel’oricederemplissage(clic).
Réglage de la température
1 Posezleferàrepassersursontalon(g.4).
2 Réglezlatempératurederepassagerecommandée
entournantlethermostatsurlapositionadéquate.
Consultez l’étiquette de lavage pour vérier la
température de repassage recommandée :
1 Fibres synthétiques (par ex. acrylique, viscose,
polyamide, polyester)
1 Soie
2 Laine
3 Coton, lin
Si vous ne connaissez pas la composition du tissu,
repassez en commençant par la température la plus basse
sur une partie interne de l’article et invisible de l’extérieur.
Soie, laine et autres bres synthétiques : repassez sur
l’envers pour éviter de les lustrer. Évitez d’utiliser la
fonction Spray pour ne pas faire de taches. Commencez
toujours le repassage par les articles en bres
synthétiques nécessitant la température la plus basse.
3 Branchezlecordond’alimentationsuruneprise
secteur.
Levoyantdetempératures’allume.
4 Unefoislevoyantdetempératureéteint,patientez
uncourtinstantavantdecommenceràrepasser.
Pendantlerepassage,levoyantdetempérature
s’allumedetempsentempspourindiquerquele
ferestentraindechaufferandesemainteniràla
températuresélectionnée.
Utilisation de l’appareil
Remarque : Le fer peut fumer légèrement lors de la
première utilisation. Ce phénomène est normal et cesse
après un bref instant.
Repassage à la vapeur
1 Assurez-vousqu’ilyasufsammentd’eaudansle
réservoir.
2 Sélectionnezlatempératurederepassage
recommandée(voirlechapitre«Avantutilisation»,
section«Réglagedelatempérature»).
3 Sélectionnezleréglagevapeurdevotrechoix.
Assurez-vousqueceréglageestappropriéàla
températurederepassagechoisie:(g.2)
ç pour une vapeur minimale (réglages de
température 2 et 3).
é pour une vapeur maximale (réglages de
température 3 à MAX).
Remarque : Le fer commence à dégager de la vapeur dès
que la température réglée est atteinte.
-
-
-
-
,
,
-
-
GC2640/GC2620/GC2530/GC2528/
GC2520/GC2510 uniquement :
De l’eau peut s’écouler de la semelle si la température
sélectionnée est trop basse (MIN à 2).
Repassage sans vapeur
1 RéglezlacommandedevapeursurlapositionO
(= pas de vapeur).
2 Sélectionnezlatempératurederepassage
recommandée(voirlechapitre«Avantutilisation»,
section«Réglagedelatempérature»).
Caractéristiques
Fonction Spray
Vous pouvez utiliser la fonction Spray quelle que soit
la température an d’humidier l’article à repasser.
L’élimination des faux plis est ainsi favorisée.
1 Assurez-vousqu’ilyasufsammentd’eaudansle
réservoir.
2 Appuyezàplusieursreprisessurleboutonduspray
and’humidierl’articleàrepasser(g.5).
Jet de vapeur (tout type à l’exception de
GC2510)
Un jet de vapeur puissant est utile pour enlever les faux
plis les plus tenaces.
La fonction Jet de vapeur peut être utilisée uniquement à
des températures situées entre 2 et MAX.
1 Appuyez sur le bouton de jet de vapeur, puis
relâchez-le(g.6).
Jet de vapeur vertical (tout type à
l’exception de GC2510)
Vous pouvez également utiliser la fonction Jet de vapeur
lorsque vous tenez le fer en position verticale. Cela peut
s’avérer utile pour enlever les faux plis des vêtements sur
cintre, des rideaux, etc.
1 Tenez le fer en position verticale et appuyez sur le
boutonJetdevapeur,puisrelâchez-le(g.7).
Ne dirigez en aucun cas le jet de vapeur sur des
personnes.
Système antigoutte (GC2652/GC2650/
GC2560/GC2522 uniquement)
Ce fer à repasser est doté d’un système antigoutte : en
cas de température trop basse, la production de vapeur
est interrompue an d’éviter tout écoulement d’eau de la
semelle. Le cas échéant, vous entendez un clic.
Fonction d’arrêt automatique (GC3360
uniquement)
Cette fonction éteint automatiquement le fer s’il reste
immobile pendant un certain temps.
Levoyantd’arrêtautomatiqueclignotepour
indiquerqueleferaétééteintparlafonction
d’arrêtautomatique.(g.8)
Pour que le fer se réchauffe, procédez comme suit :
1 Prenezleferenmainetdéplacez-lelégèrement.
Levoyantd’arrêtautomatiques’éteint.
Lorsquelatempératuredelasemelleestinférieure
àlatempératurederepassageréglée,levoyantde
températures’allume.
2 Silevoyantdetempératures’allumelorsquevous
reprenezlefer,attendezquecelui-cis’éteigneavant
decommenceràrepasser.
Remarque : S’il reste éteint, la semelle est à bonne
température. Vous pouvez commencer le repassage.
Nettoyage et entretien
Nettoyage
1 RéglezlacommandedevapeursurlapositionO,
retirezlachedelaprisemuraleetlaissezrefroidir
leferàrepasser.
2 Ôtezlesparticulesdecalcaireetautresimpuretés
delasemelleaumoyend’unchiffonhumideetd’un
détergent(liquide)non-abrasif.
Évitez le contact de la semelle avec tout objet
métalliqueandenepasl’endommager.N’utilisez
jamaisdetamponsàrécurer,vinaigreouautresproduits
chimiques pour nettoyer la semelle.
,
,
,
4239.000.6139.2

3 Nettoyezlapartiesupérieureduferàrepasser
avec un chiffon humide.
4 Rincezrégulièrementleréservoiravecdel’eau.
Videzleréservoiraprèsl’avoirrincé(g.9).
Système anticalcaire double action (tout
type à l’exception de GC2522/GC2510)
Ce système est constitué d’une tablette anticalcaire
située dans le réservoir et de la fonction Calc-Clean
(anticalcaire).
La tablette anticalcaire empêche l’accumulation de
dépôts sur les évents à vapeur. Elle agit de manière
permanente et ne doit pas être remplacée (g. 10).
La fonction Calc-Clean (anticalcaire) permet
d’éliminer les particules de calcaire.
Fonction anticalcaire
Utilisez la fonction Calc-Clean toutes les deux semaines.
Si l’eau de votre région est très calcaire (par exemple
si des particules de calcaire s’écoulent de la semelle
pendant le repassage), n’hésitez pas à utiliser cette
fonction plus souvent.
1 Assurez-vousquel’appareilestdébranché.
2 RéglezlacommandedevapeursurlapositionO.
3 Remplissezleréservoird’eaujusqu’auniveau
maximal.
Neversezpasdevinaigreoud’autresdétartrantsdans
leréservoird’eau.
4 RéglezlethermostatsurlapositionMAX(g.11).
5 Branchezlecordond’alimentationsuruneprise
secteur.
6 Lorsquelevoyantdetempératures’éteint,
débranchezl’appareil.
7 Tenezleferau-dessusdel’évieretréglezla
commande de vapeur sur la position Calc-Clean
(anticalcaire) ( 1). La commande de vapeur se
soulèvelégèrement.
8 Retirez la commande de vapeur en la
soulevant(g.12).
9 Tenezleferau-dessusdel’évieretsecouez-
le(g.13).
Delavapeuretdel’eaubouillantesortentdela
semelle.Lesimpuretésetparticulessontévacuées
en même temps.
10 Utilisez un peu de vinaigre pour enlever les
particules de calcaire de la tige de la commande de
vapeur,sinécessaire(g.14).
Veillezànepascourberniendommagerlatigedela
commande de vapeur.
11 Pour remettre la commande de vapeur en place,
placezavecprécisionlapointedelatigeaucentre
del’oriceetinsérez-lacorrectementdansson
emplacement. Appuyez sur la commande de vapeur
enlaréglantsurlapositionO(g.15).
12 Répétezcetteopérationaussisouventque
nécessaire.
Après le traitement anticalcaire
1 Rebranchezl’appareilsurlaprisesecteuretlaissez
leferchaufferandesécherlasemelle.
2 Lorsquelevoyantdetempératures’éteint,
débranchezl’appareil.
3 Repassezunmorceaudetissuand’éliminerles
dernièresgouttesd’eauquisesontforméessurla
semelle,lecaséchéant.
Rangement
1 RéglezlacommandedevapeursurlapositionO,
retirezlachedelaprisemuraleetlaissezrefroidir
leferàrepasser.
2 Enroulezlecordond’alimentationsurle
talon(g.16).
3 Posez le fer sur son talon et placez-le dans un
endroit sûr et sec.
-
-
,
Environnement
Lorsqu’il ne fonctionnera plus, ne jetez pas l’appareil
avec les ordures ménagères, mais déposez-le à
un endroit assigné à cet effet, où il pourra être
recyclé. Vous contribuerez ainsi à la protection de
l’environnement (g. 17).
Garantie et service
Si vous souhaitez obtenir des informations
supplémentaires ou si vous rencontrez un problème,
rendez-vous sur le site Web de Philips à l’adresse www.
philips.com ou contactez le Service Consommateurs
Philips de votre pays (vous trouverez le numéro
de téléphone correspondant sur le dépliant de
garantie internationale). S’il n’existe pas de Service
Consommateurs Philips dans votre pays, renseignez-vous
auprès de votre revendeur Philips local.
Dépannage
Cette rubrique présente les problèmes les plus courants
que vous pouvez rencontrer avec votre appareil.
Si vous ne parvenez pas à résoudre le problème
à l’aide des informations ci-dessous, contactez le
Service Consommateurs Philips de votre pays.
Problème Cause Solution
Le fer à
repasser est
branché, mais
la semelle est
froide.
Il s’agit d’un
problème de
branchement.
Vériez le cordon
d’alimentation, la
che et la prise
secteur.
Le thermostat
est réglé sur
MIN.
Réglez le
thermostat sur
la température
requise.
L’appareil ne
produit pas
de vapeur.
Il n’y a pas assez
d’eau dans le
réservoir d’eau.
Remplissez
le réservoir
d’eau (voir le
chapitre « Avant
utilisation »,
section
« Remplissage du
réservoir d’eau »).
La commande
de vapeur est
réglée sur la
position O.
Réglez la
commande de
vapeur sur la
position ç ou é
(voir le chapitre
« Utilisation de
l’appareil », section
« Repassage à la
vapeur »).
La semelle
n’est pas
sufsamment
chaude et/ou
la fonction
antigoutte a
été activée
(GC2652/
GC2650/
GC2560/
GC2522
uniquement).
Sélectionnez une
température
de repassage
appropriée au
repassage à la
vapeur ( 2 à
MAX). Placez
le fer sur son
talon et attendez
que le voyant
de température
s’éteigne avant
de commencer le
repassage.
La fonction
Jet de vapeur
ne fonctionne
pas (tout type
à l’exception
de GC2510).
Vous avez utilisé
la fonction Jet
de vapeur trop
souvent pendant
une courte
période.
Continuez à
utiliser le fer
en position
horizontale
et patientez
quelques instants
avant d’utiliser
de nouveau la
fonction Jet de
vapeur.
-
Problème Cause Solution
Le fer n’est pas
sufsamment
chaud.
Sélectionnez une
température
de repassage
appropriée au
repassage à la
vapeur ( 2 à
MAX). Placez
le fer sur son
talon et attendez
que le voyant
de température
s’éteigne avant
de commencer le
repassage.
Des particules
de calcaire et
des impuretés
s’écoulent
de la semelle
pendant le
repassage.
L’eau trop
calcaire favorise
la formation de
dépôts calcaires
à l’intérieur de la
semelle.
Utilisez la fonction
Calc-Clean
(anticalcaire) une
ou plusieurs fois
(voir le chapitre
« Nettoyage
et entretien »,
section « Fonction
Calc-Clean
(anticalcaire) »).
Le voyant
situé sur
la poignée
clignote
(GC2560
uniquement).
La fonction
d’arrêt
automatique
a été activée
(voir le chapitre
« Carac-
téristiques »,
section « Arrêt
automatique »).
Prenez le fer en
main et déplacez-
le légèrement
pour désactiver la
fonction d’arrêt
automatique. Le
voyant d’arrêt
automatique
s’éteint.
Des gouttes
d’eau
tombent sur
le tissu.
Vous n’avez pas
correctement
fermé le
bouchon de
l’orice de
remplissage.
Appuyez sur le
bouchon jusqu’à
ce que vous
entendiez un clic.
Des gouttes
d’eau
tombent
sur le tissu
(GC2640/
C2620/
GC2530/
GC2528/
GC2520/
GC2510
uniquement).
La température
sélectionnée est
trop basse pour
le repassage à la
vapeur.
Sélectionnez une
température
de repassage
appropriée au
repassage à la
vapeur ( 2 à
MAX). Placez
le fer sur son
talon et attendez
que le voyant
de température
s’éteigne avant
de commencer le
repassage.
Des gouttes
d’eau
s’écoulent
de la semelle
après que le
fer a refroidi
ou qu’il a
été rangé
(GC2640/
C2620/
GC2530/
GC2528/
GC2520/
GC2510
uniquement).
Vous avez mis le
fer en position
horizontale alors
que le réservoir
d’eau n’était pas
vide.
Videz le réservoir
d’eau et réglez
la commande
de vapeur sur la
position O après
utilisation. Rangez
le fer en l’ayant
préalablement
posé sur son talon.
4239.000.6139.2

DEUTSCH
Einführung
Herzlichen Glückwunsch zu Ihrem Kauf und willkommen
bei Philips! Um den Support von Philips optimal zu
nutzen, registrieren Sie Ihr Produkt bitte unter www.
philips.com/welcome.
Allgemeine Beschreibung (Abb. 1)
A Spraydüse
B Verschlusskappe der Einfüllöffnung
C Dampfregler
O = kein Dampf
l = wenig Dampf
; = starker Dampf
1 = Calc-Clean-Funktion
D Dampfstoßtaste 9 (alle Typen außer GC2510)
E Sprühtaste T
F Kontrollanzeige für Abschaltautomatik (nur GC2560)
G Netzkabel
H Anti-Kalk-Tablette (alle Typen außer GC2522/
GC2510)
I Temperaturanzeige
J Typenschild
K Wasserbehälter
L Temperaturregler
Wichtig
Lesen Sie diese Bedienungsanleitung vor dem Gebrauch
des Geräts aufmerksam durch und bewahren Sie sie für
eine spätere Verwendung auf.
Gefahr
Tauchen Sie das Bügeleisen nicht in Wasser.
Warnhinweis
Prüfen Sie, bevor Sie das Gerät in Betrieb nehmen,
ob die Spannungsangabe auf dem Gerät mit der
örtlichen Netzspannung übereinstimmt.
Benutzen Sie das Gerät nicht, wenn der Netzstecker,
das Netzkabel oder das Gerät selbst beschädigt ist
oder wenn das Gerät heruntergefallen ist bzw. wenn
Flüssigkeit aus dem Gerät austritt.
Ist das Netzkabel defekt, darf es nur von einem
Philips Service-Center oder einer von Philips
autorisierten Werkstatt durch ein Original-
Ersatzkabel ausgetauscht werden, um Gefährdungen
zu vermeiden.
Lassen Sie das Gerät nicht unbeaufsichtigt, solange es
mit dem Stromnetz verbunden ist.
Dieses Gerät ist für Benutzer (einschl. Kinder) mit
eingeschränkten physischen, sensorischen oder
psychischen Fähigkeiten bzw. ohne jegliche Erfahrung
oder Vorwissen nur dann geeignet, wenn eine
angemessene Aufsicht oder ausführliche Anleitung
zur Benutzung des Geräts durch eine verantwortliche
Person sichergestellt ist.
Achten Sie darauf, dass Kinder nicht mit dem Gerät
spielen.
Lassen Sie das Netzkabel nicht mit der heißen
Bügelsohle in Kontakt kommen.
Achtung
Schließen Sie das Gerät nur an eine geerdete
Steckdose an.
Überprüfen Sie das Netzkabel regelmäßig auf
mögliche Beschädigungen.
Achten Sie darauf, dass Sie die heiße Bügelsohle nicht
berühren, um Verbrennungen zu vermeiden.
Wenn Sie das Bügeln beenden, das Gerät reinigen,
den Wasserbehälter füllen oder leeren oder den
Raum nur kurz verlassen, stellen Sie stets den
Dampfregler auf Position 0, stellen Sie das Bügeleisen
aufrecht und ziehen Sie den Netzstecker aus der
Steckdose.
Verwenden Sie das Bügeleisen immer auf einer
stabilen, ebenen und waagerechten Unterlage.
Geben Sie weder Duftstoffe, Essig, Wäschesteife,
Entkalkungsmittel, Bügelzusätze noch andere
Chemikalien in den Wasserbehälter.
Dieses Gerät ist nur für den Gebrauch im Haushalt
bestimmt.
Elektromagnetische Felder (EMF;
Electro Magnetic Fields)
Dieses Philips Gerät erfüllt sämtliche Normen bezüglich
elektromagnetischer Felder (EMF). Nach aktuellen
wissenschaftlichen Erkenntnissen ist das Gerät sicher im
-
-
-
-
-
-
-
-
-
-
-
-
-
-
-
-
-
-
-
Gebrauch, sofern es ordnungsgemäß und entsprechend
den Anweisungen in dieser Bedienungsanleitung
gehandhabt wird.
Vor dem ersten Gebrauch
1 Entfernen Sie Aufkleber bzw. Schutzfolie von der
Bügelsohle.
2 Lassen Sie das Bügeleisen auf Maximaltemperatur
aufheizen und bügeln Sie einige Minuten lang auf
einem feuchten Tuch, um eventuell verbliebene
Rückstände von der Bügelsohle zu entfernen.
Für den Gebrauch vorbereiten
Den Wasserbehälter füllen
Geben Sie weder Duftstoffe, Essig, Wäschesteife,
Entkalkungsmittel, Bügelzusätze, chemisch
entkalktes Wasser noch andere Chemikalien in den
Wasserbehälter.
1 Schalten Sie das Gerät aus, und ziehen Sie den
Netzstecker aus der Steckdose.
2 Stellen Sie den Dampfregler auf Position 0 (= kein
Dampf) (Abb. 2).
3 Öffnen Sie die Verschlusskappe der Einfüllöffnung.
4 Neigen Sie das Bügeleisen leicht nach hinten, und
füllen Sie den Wasserbehälter bis zur oberen
Markierung mit Leitungswasser (Abb. 3).
Hinweis: Füllen Sie den Wasserbehälter nicht über die
Markierung MAX hinaus.
Hinweis: Wenn das Leitungswasser an Ihrem Wohnort sehr
hart ist, empfehlen wir die Verwendung von destilliertem
Wasser. Verwenden Sie kein chemisch entkalktes Wasser.
5 Schließen Sie die Verschlusskappe der Einfüllöffnung,
bis sie hörbar einrastet.
Die Temperatur einstellen
1 Stellen Sie das Bügeleisen aufrecht ab (Abb. 4).
2 Stellen Sie die gewünschte Bügeltemperatur durch
Drehen des Temperaturreglers ein.
Prüfen Sie das Etikett im Wäsche-/Kleidungsstück auf die
erforderliche Bügeltemperatur:
1 Synthetikfasern ( z. B. Acryl, Viskose, Polyamid,
Polyester)
1 Seide
2 Wolle
3 Baumwolle, Leinen
Wenn Sie nicht wissen, um welche Art von Gewebe es
sich handelt, ermitteln Sie die richtige Temperatur durch
Bügeln einer Stelle, die normalerweise nicht sichtbar ist.
Seide, Wolle und Kunstfasern: Bügeln Sie den Stoff
von links, um glänzende Stellen zu vermeiden. Die
Sprühfunktion sollte nicht verwendet werden, um
Wasserecken zu vermeiden. Beginnen Sie stets mit
den Textilien, die eine niedrige Temperatureinstellung
erfordern, z. B. mit synthetischen Stoffen.
3 Stecken Sie den Netzstecker in eine geerdete
Steckdose.
Die Temperaturanzeige leuchtet auf.
4 WenndieTemperaturanzeigeerlischt,empehlt
es sich, noch kurze Zeit zu warten, bevor mit dem
Bügeln begonnen wird.
Die Temperaturanzeige leuchtet während des
Betriebs gelegentlich auf und zeigt an, dass das
Gerät auf die erforderliche Temperatur aufgeheizt
wird.
Das Gerät benutzen
Hinweis: Beim ersten Gebrauch gibt das Gerät
möglicherweise etwas Rauch ab. Dies geht nach kurzer Zeit
vorüber.
Dampfbügeln
1 Überprüfen Sie, ob sich genügend Wasser im
Wasserbehälterbendet.
2 Stellen Sie die empfohlene Bügeltemperatur ein
(siehe Kapitel “Für den Gebrauch vorbereiten”,
Abschnitt “Die Temperatur einstellen”).
-
-
-
-
,
,
3 Wählen Sie die gewünschte Dampfeinstellung.
Vergewissern Sie sich, dass diese Einstellung zur
gewählten Temperatur passt: (Abb. 2)
ç für wenig Dampf (Temperatureinstellungen 2
und 3).
é für starken Dampf (Temperatureinstellungen
3 bis MAX).
Hinweis: Das Gerät gibt Dampf aus, sobald die eingestellte
Temperatur erreicht ist.
Nur GC2640/GC2620/GC2530/GC2528/
GC2520/GC2510:
Wenn die eingestellte Temperatur zu niedrig eingestellt ist,
kann Wasser aus der Bügelsohle tropfen (MIN bis 2).
Trockenbügeln
1 Stellen Sie den Dampfregler auf O (= kein Dampf).
2 Stellen Sie die empfohlene Bügeltemperatur ein
(siehe Kapitel “Für den Gebrauch vorbereiten”,
Abschnitt “Die Temperatur einstellen”).
Produktmerkmale
Sprühfunktion
Sie können die Sprühfunktion bei jeder Temperatur
verwenden, um das Wäschestück anzufeuchten.
1 Überprüfen Sie, ob sich genügend Wasser im
Wasserbehälterbendet.
2 Betätigen Sie die Sprühtaste mehrmals, um das
Wäsche-/Kleidungsstück anzufeuchten (Abb. 5).
Dampfstoß (alle Typen außer GC2510)
Ein kräftiger Dampfstoß hilft bei der Entfernung äußerst
hartnäckiger Falten.
Die Dampfstoßfunktion wirkt nur bei Temperaturen
zwischen 2 und MAX.
1 Drücken Sie die Dampfstoßtaste und lassen Sie sie
wieder los (Abb. 6).
Vertikaler Dampfstoß (alle Typen außer
GC2510)
Die Dampfstoß-Funktion kann auch bei senkrecht
gehaltenem Bügeleisen eingesetzt werden. Diese
Funktion eignet sich besonders zum Glätten hängender
Kleidungsstücke, Vorhänge usw.
1 Halten Sie das Bügeleisen in senkrechter Position,
drücken Sie die Dampfstoß-Taste, und lassen Sie sie
wieder los (Abb. 7).
Richten Sie den Dampfstoß niemals auf Personen!
Tropf-Stopp (nur GC2652/GC2650/GC2560/
GC2522)
Dieses Bügeleisen verfügt über eine Tropf-Stopp-Funktion:
Bei zu niedrigen Temperaturen wird die Dampfproduktion
automatisch gestoppt, damit kein Wasser aus der
Bügelsohle tropft. Möglicherweise hören Sie dabei ein
Klicken.
Automatische Endabschaltung (nur GC2560)
Die Abschaltautomatik schaltet das Bügeleisen
automatisch aus, wenn es eine Zeit lang nicht bewegt
wurde.
Die Kontrollanzeige für Abschaltautomatik
blinkt, um anzuzeigen, dass sich das Bügeleisen
automatisch ausgeschaltet hat. (Abb. 8)
So heizt sich das Bügeleisen wieder auf:
1 Heben Sie das Bügeleisen an, und bewegen Sie es
leicht.
Die Kontrollanzeige für Abschaltautomatik erlischt.
Wenn die Temperatur der Bügelsohle unter die
eingestellte Bügeltemperatur abgesunken ist,
leuchtet die Temperaturanzeige auf.
2 Wenn die gelbe Kontrollanzeige nach dem Bewegen
desBügeleisensaueuchtet,wartenSie,bissie
wieder erlischt, bevor Sie mit dem Bügeln beginnen.
Hinweis: Wenn die Temperaturanzeige nach dem Bewegen
des Bügeleisens nicht aueuchtet, hat die Bügelsohle
noch die erforderliche Temperatur, und das Bügeleisen ist
einsatzbereit.
-
-
,
,
,
4239.000.6139.2

Reinigung und Wartung
Reinigung
1 Stellen Sie den Dampfregler auf Position O,
trennen Sie den Netzstecker von der Steckdose
und lassen Sie das Bügeleisen abkühlen.
2 Wischen Sie Kalkpartikel und andere Ablagerungen
mit einem feuchten Tuch und etwas Spülmittel von
der Bügelsohle.
Damit die Bügelsohle glatt bleibt, sollte sie nicht
in Berührung mit Metallgegenständen kommen.
Verwenden Sie zum Reinigen der Bügelsohle
weder Scheuerschwämme noch Essig oder andere
Chemikalien.
3 Reinigen Sie den oberen Teil des Bügeleisens mit
einem feuchten Tuch.
4 Spülen Sie den Wasserbehälter regelmäßig
mit klarem Wasser aus, und leeren Sie ihn
anschließend (Abb. 9).
Double Active-Kalksystem (alle Typen außer
GC2522/GC2510)
Das Double Active-Kalksystem besteht aus einer Anti-
Kalk-Tablette im Wasserbehälter in Kombination mit der
Calc-Clean-Funktion.
Die Anti-Kalk-Tablette verhindert, dass
Kalkablagerungen die Dampfaustrittsdüsen
verstopfen. Die Tablette ist dauerhaft aktiv und muss
nicht ausgetauscht werden (Abb. 10).
Mit der Calc-Clean-Funktion können die Kalkpartikel
aus dem Bügeleisen entfernt werden.
Calc-Clean-Funktion
Aktivieren Sie diese Funktion alle zwei Wochen, um das
Bügeleisen zu entkalken. Wenn das Wasser an Ihrem
Wohnort sehr hart ist (d. h. es treten beim Bügeln
Kalkpartikel aus der Bügelsohle aus), sollten Sie die Calc-
Clean-Funktion häuger anwenden.
1 Ziehen Sie den Netzstecker aus der Steckdose.
2 Stellen Sie den Dampfregler auf Position O.
3 Füllen Sie den Wasserbehälter bis zur Markierung
MAX.
Geben Sie keinen Essig oder andere Entkalkungsmittel
in den Wasserbehälter.
4 Stellen Sie den Temperaturregler auf
MAX (Abb. 11).
5 Stecken Sie den Netzstecker in eine geerdete
Steckdose.
6 Trennen Sie den Netzstecker von der Steckdose,
sobald die Temperaturanzeige erlischt.
7 Halten Sie das Bügeleisen über ein Spülbecken.
Stellen Sie den Dampfregler auf die Calc-Clean-
Position ( 1). Der Dampfregler springt etwas
hervor.
8 Ziehen Sie den Dampfregler nach oben, und
nehmen Sie ihn ab (Abb. 12).
9 Halten Sie das Bügeleisen über ein Spülbecken, und
schwenken Sie es hin und her (Abb. 13).
Es treten Dampf und kochendes Wasser aus der
Bügelsohle aus. Verunreinigungen und Kalkpartikel
werden, sofern vorhanden, herausgespült.
10 Falls sich an der Nadel des Dampfreglers Kalk
festgesetzt hat, entfernen Sie ihn mit Essig (Abb. 14).
Achten Sie darauf, die Nadel des Dampfreglers nicht zu
verbiegen oder zu beschädigen.
11 Setzen Sie den Dampfregler wieder in das Gerät
ein. Führen Sie die Spitze der Nadel genau in
die Mitte des Loches ein, und passen Sie die
kleine seitliche Ausbuchtung an der Nadel in die
Aussparung ein. Stellen Sie den Dampfregler auf
Position 0 (Abb. 15).
12 Wiederholen Sie das Entkalken, wenn sich noch
KalkablagerungenimBügeleisenbenden.
Nach dem Entkalken
1 Stecken Sie den Netzstecker in die Steckdose,
lassen Sie das Bügeleisen aufheizen und die
Bügelsohle trocknen.
-
-
,
2 Trennen Sie den Netzstecker von der Steckdose,
sobald die Temperaturanzeige erlischt.
3 Führen Sie die Bügelsohle einige Male leicht
übereinaltesTuch,umWassereckenvonder
Bügelsohle zu entfernen.
Aufbewahrung
1 Stellen Sie den Dampfregler auf Position O,
trennen Sie den Netzstecker von der Steckdose
und lassen Sie das Bügeleisen abkühlen.
2 Legen Sie das Netzkabel um die
Kabelaufwicklung (Abb. 16).
3 Bewahren Sie das Gerät aufrecht gestellt an einem
sicheren und trockenen Ort auf.
Umweltschutz
Werfen Sie das Gerät am Ende der Lebensdauer
nicht in den normalen Hausmüll. Bringen Sie es zum
Recycling zu einer ofziellen Sammelstelle. Auf diese
Weise tragen Sie zum Umweltschutz bei (Abb. 17).
Garantie und Kundendienst
Benötigen Sie weitere Informationen oder treten
Probleme auf, wenden Sie sich bitte an Ihren Philips-
Händler, oder setzen Sie sich mit einem Philips Service-
Center in Ihrem Land in Verbindung (Telefonnummer
siehe Garantieschrift). Besuchen Sie auch die Philips
Website (www.philips.com). Sollte es in Ihrem Land kein
Service-Center geben, wenden Sie sich bitte an Ihren
Philips-Händler.
Fehlerbehebung
In diesem Kapitel sind die häugsten Probleme aufgeführt,
die beim Gebrauch Ihres Geräts auftreten können.
Sollten Sie ein Problem mithilfe der nachstehenden
Informationen nicht beheben können, wenden Sie sich
bitte an das Philips Service-Center in Ihrem Land.
Problem Ursache Lösung
Der
Netzstecker
ist mit der
Steckdose
verbunden,
aber die
Bügelsohle
bleibt kalt.
Es gibt ein
Problem mit
der Strom-
versorgung.
Überprüfen Sie
das Netzkabel, den
Netzstecker und die
Steckdose.
Der
Temperatur-
regler ist auf
MIN gestellt.
Stellen Sie den
Temperaturregler
auf die erforderliche
Position.
Das
Bügeleisen
erzeugt
keinen
Dampf.
Der
Wassertank
ist leer.
Füllen Sie den
Wasserbehälter
(siehe Kapitel “Für
den Gebrauch
vorbereiten”,
Abschnitt “Den
Wasserbehälter
füllen”).
Der
Dampfregler
steht auf
Position “O”.
Stellen Sie den
Dampfregler auf
Position ç oder
é (siehe Kapitel
“Das Gerät
benutzen”, Abschnitt
“Dampfbügeln”).
Die Bügelsohle
ist nicht
heiß genug
und/oder die
Tropf-Stopp-
Funktion
wurde aktiviert
(nur GC2652/
GC2650/
GC2560/
GC2522).
Wählen Sie eine
Bügeltemperatur, die
für das Dampfbügeln
geeignet ist ( 2
bis MAX). Stellen
Sie das Bügeleisen
aufrecht, und
warten Sie, bis die
Temperaturanzeige
erlischt, bevor Sie
mit dem Bügeln
beginnen.
-
Problem Ursache Lösung
Die
Dampfstoß-
funktion
funktioniert
nicht (alle
Typen außer
GC2510).
Sie haben die
Dampfstoß-
funktion zu
oft innerhalb
zu kurzer Zeit
aktiviert.
Bügeln Sie eine Zeit
lang mit waagerecht
gehaltenem
Bügeleisen weiter,
bevor Sie die
Dampfstoßfunktion
erneut betätigen.
Das Bügeleisen
ist nicht heiß
genug.
Wählen Sie eine
Bügeltemperatur, die
für das Dampfbügeln
geeignet ist ( 2
bis MAX). Stellen
Sie das Bügeleisen
aufrecht, und
warten Sie, bis die
Temperaturanzeige
erlischt, bevor Sie
mit dem Bügeln
beginnen.
Kalkpartikel
und Verun-
reinigungen
treten beim
Bügeln
aus der
Bügelsohle
aus.
Durch hartes
Wasser
bilden sich
Kalkpartikel in
der Bügelsohle.
Verwenden Sie
einmal oder
mehrmals die
Calc-Clean-Funktion
(siehe Kapitel
“Reinigung und
Wartung”, Abschnitt
“Calc-Clean-
Funktion”).
Die
Anzeige am
Handstück
blinkt (nur
GC2560).
Die Abschalt-
automatik
wurde aktiviert
(siehe Kapitel
“Ausstattung”,
Abschnitt
“Abschalt-
automatik”).
Heben Sie das
Bügeleisen an,
und bewegen Sie
es leicht, um die
Abschaltautomatik
zu deaktivieren.
Die Kontrollanzeige
erlischt.
Auf dem
Bügelgut
benden sich
Wasser-
tropfen.
Sie haben die
Verschluss-
kappe der
Einfüllöffnung
nicht richtig
geschlossen.
Drücken Sie auf die
Verschlusskappe, bis
sie hörbar einrastet.
Auf dem
Bügelgut
benden sich
Wasser-
tropfen (nur
GC2640/
C2620/
GC2530/
GC2528/
GC2520/
GC2510).
Die
eingestellte
Temperatur
ist zum
Dampfbügeln
zu niedrig.
Wählen Sie eine
Bügeltemperatur, die
für das Dampfbügeln
geeignet ist ( 2
bis MAX). Stellen
Sie das Bügeleisen
aufrecht, und
warten Sie, bis die
Temperaturanzeige
erlischt, bevor Sie
mit dem Bügeln
beginnen.
Wasser tropft
von der
Bügelsohle,
nachdem das
Bügeleisen
abgekühlt
ist oder
weggestellt
wurde (nur
GC2640/
C2620/
GC2530/
GC2528/
GC2520/
GC2510).
Das Bügeleisen
wurde
horizontal
aufgestellt,
während sich
noch Wasser
im Wasser-
behälter
befand.
Leeren Sie den
Wasserbehälter,
und stellen Sie
nach dem Bügeln
den Dampfregler
auf Position O.
Bewahren Sie
das Bügeleisen in
senkrechter Position
auf.
4239.000.6139.2

ITALIANO
Introduzione
Congratulazioni per l’acquisto e benvenuti in Philips! Per
trarre il massimo vantaggio dall’assistenza Philips, registrate
il vostro prodotto su www.philips.com/welcome.
Descrizione generale (fig. 1)
A Ugello spray
B Tappo del foro di riempimento
C Regolatore di vapore
O = assenza di vapore
l = vapore minimo
; = vapore massimo
1 = funzione Calc-Clean
D Pulsante del colpo di vapore 9 (per tutti i modelli
eccetto GC2510)
E Pulsante spray T
F Spia di spegnimento automatico (solo GC2560)
G Cavo di alimentazione
H Pastiglia anticalcare (per tutti i modelli eccetto
GC2522/GC2510)
I Spia della temperatura
J Targhetta modello
K Serbatoio d’acqua
L Termostato
Importante
Prima di utilizzare l’apparecchio, leggete attentamente il
presente manuale e conservatelo per eventuali riferimenti
futuri.
Pericolo
Non immergete mai il ferro nell’acqua.
Avviso
Prima di collegare l’apparecchio, vericate che
la tensione riportata sulla spina corrisponda alla
tensione disponibile.
Non utilizzate l’apparecchio nel caso in cui la spina,
il cavo di alimentazione o l’apparecchio stesso
siano danneggiati o in presenza di rotture o perdite
dall’apparecchio.
Nel caso in cui il cavo di alimentazione fosse
danneggiato, dovrà essere sostituito presso i centri
autorizzati Philips, i rivenditori specializzati oppure
da personale debitamente qualicato, per evitare
situazioni pericolose.
Non lasciate mai l’apparecchio incustodito quando è
collegato alla presa di corrente.
L’apparecchio non è destinato a persone (inclusi
bambini) con capacità mentali, siche o sensoriali
ridotte, fatti salvi i casi in cui tali persone abbiano
ricevuto assistenza o formazione per l’uso
dell’apparecchio da una persona responsabile della
loro sicurezza.
Adottate le dovute precauzioni per evitare che i
bambini giochino con l’apparecchio.
Evitate che il cavo di alimentazione venga a contatto
con la piastra del ferro calda.
Attenzione
Collegate l’apparecchio esclusivamente a una presa di
messa a terra.
Vericate periodicamente le condizioni del cavo di
alimentazione.
La piastra del ferro può surriscaldarsi eccessivamente
e provocare scottature se a contatto con la pelle.
Dopo aver utilizzato l’apparecchio, durante le
operazioni di pulizia, riempimento o svuotamento
del serbatoio dell’acqua o nel caso in cui lasciate
l’apparecchio incustodito anche per un breve
periodo, impostate il regolatore di vapore in
posizione O e il ferro in posizione verticale, quindi
scollegate la spina dalla presa.
Posizionate e utilizzate sempre il ferro su una
supercie piana, stabile e orizzontale.
non aggiungete mai profumo, aceto, amido, agenti
disincrostanti, prodotti per la stiratura o altre
sostanze chimiche nel serbatoio dell’acqua.
Questo apparecchio è destinato esclusivamente a
uso domestico.
Campi elettromagnetici (EMF)
Questo apparecchio Philips è conforme a tutti gli
standard relativi ai campi elettromagnetici (EMF). Se
utilizzato in modo appropriato seguendo le istruzioni
contenute nel presente manuale utente, l’apparecchio
-
-
-
-
-
-
-
-
-
-
-
-
-
-
-
-
-
-
-
consente un utilizzo sicuro come confermato dai risultati
scientici attualmente disponibili.
Prima di utilizzare l’apparecchio per la
prima volta
1 Rimuovete gli eventuali adesivi o il foglio di
protezione dalla piastra.
2 Riscaldate il ferro alla massima temperatura e
passatelo su uno straccio umido per vari minuti, per
eliminare eventuali residui dalla piastra.
Predisposizione dell’apparecchio
Riempimento del serbatoio dell’acqua
Non aggiungete mai profumo, aceto, amido, agenti
disincrostanti, prodotti per la stiratura, acqua
decalcicatachimicamenteoaltresostanzechimichenel
serbatoiodell’acqua.
1 Spegnetel’apparecchioestaccatelaspina.
2 Impostate il regolatore di vapore in posizione O (=
assenzadivapore)(g.2).
3 Aprite il tappo del foro di riempimento.
4 Inclinate il ferro e riempite sotto il rubinetto il
serbatoiodell’acquanoallivellomassimo(g.3).
Nota Non superate il livello massimo di riempimento del
serbatoio.
Nota In caso di acqua particolarmente dura, si consiglia di
utilizzare acqua distillata. Non utilizzare acqua diluita con
prodotti anticalcare.
5 Chiudete il tappo del foro di riempimento
facendolo scattare in posizione.
Impostazione della temperatura
1 Poneteilferroinposizioneverticale(g.4).
2 Impostate la temperatura di stiratura desiderata
ruotando il termostato sulla posizione appropriata.
Vericate sull’etichetta del capo la temperatura di
stiratura richiesta.
1 Tessuti sintetici (ad esempio acrilico, viscosa,
poliammide, poliestere)
1 Seta
2 Lana
3 Cotone, lino
Se non si conosce il tessuto del capo da stirare, si
consiglia di stirare un angolo nascosto per determinare la
temperatura più indicata.
Seta, lana e tessuti sintetici: stirate il capo a rovescio
per evitare gli aloni bianchi. Non utilizzate la funzione
spray, onde evitare macchie. Iniziate a stirare i capi che
richiedono una temperatura di stiratura più bassa, ad
esempio i tessuti sintetici.
3 Inserite la spina in una presa di messa a terra.
La spia della temperatura si illumina.
4 Quando la spia della temperatura si spegne,
aspettate qualche minuto prima di iniziare a stirare.
Durante la stiratura la spia della temperatura si
accende, di quando in quando, per indicare che
il ferro si sta riscaldando per mantenersi alla
temperatura impostata.
Modalità d’uso dell’apparecchio
Nota La prima volta che si utilizza il ferro, si potrebbe
notare la fuoriuscita di vapore; tuttavia scompare dopo poco
tempo.
Stiratura a vapore
1 Vericateillivellodiriempimentodelserbatoio
dell’acqua.
2 Selezionate la temperatura di stiratura consigliata
(vedere“Predisposizionedell’apparecchio”,sezione
“Impostazione della temperatura”).
3 Selezionatel’impostazionedivaporedesiderata.
Assicuratevichel’impostazionesceltasiaindicata
perlatemperaturadistiraturaselezionata:(g.2)
ç per vapore minimo (temperatura compresa tra
2 e 3).
é per il vapore massimo (temperatura compresa tra
3 a MAX).
-
-
-
-
,
,
-
-
Nota Il ferro inizia a produrre vapore non appena raggiunge
la temperatura impostata.
Solo GC2640/GC2620/GC2530/GC2528/
GC2520/GC2510:
L’acqua potrebbe fuoriuscire dalla piastra in caso di
temperatura troppo bassa (da MIN a 2).
Stiratura senza vapore
1 Impostate il regolatore in posizione O (= assenza
di vapore).
2 Selezionate la temperatura di stiratura consigliata
(vedere“Predisposizionedell’apparecchio”,sezione
“Impostazione della temperatura”).
Caratteristiche
Funzione spray
Potete usare la funzione spray a qualsiasi temperatura per
inumidire il capo da stirare. In questo modo è più facile
rimuovere le pieghe più difcili.
1 Vericateillivellodiriempimentodelserbatoio
dell’acqua.
2 Premete più volte il pulsante spray per inumidire il
capodastirare(g.5).
Colpo di vapore (per tutti i modelli eccetto
GC2510)
Il potente colpo di vapore consente di eliminare le pieghe
più ostinate.
Il colpo di vapore può essere utilizzato solo con
temperature comprese fra 2 e MAX.
1 Premete e rilasciate il pulsante del colpo di
vapore(g.6).
Colpo di vapore verticale (per tutti i tipi
eccetto GC2510)
Il colpo di vapore può essere utilizzato anche tenendo il
ferro in posizione verticale per eliminare le pieghe da capi
appesi, tende, ecc.
1 Tenete il ferro in posizione verticale, quindi
premete e rilasciate il pulsante del colpo di
vapore(g.7).
Non puntate mai il colpo di vapore verso le persone.
Antisgocciolamento (solo GC2652/GC2650/
GC2560/GC2522)
Questo apparecchio è dotato di una funzione
antisgocciolamento, per cui il ferro interrompe
automaticamente l’erogazione di vapore quando la
temperatura è troppo bassa per evitare la fuoriuscita di
gocce d’acqua dalla piastra. Se ciò si dovesse vericare,
viene emesso un segnale sonoro.
Funzione di spegnimento automatico (solo
GC2560)
La funzione di spegnimento automatico consente di
spegnere automaticamente il ferro se non viene mosso
per alcuni minuti.
La spia di spegnimento automatico lampeggia per
indicare che il ferro è stato spento dalla relativa
funzione.(g.8)
Per riaccendere il ferro:
1 Sollevate il ferro o muovetelo leggermente.
La spia dello spegnimento automatico si spegne.
Se la temperatura della piastra è scesa sotto la
temperatura impostata per il ferro, si accende la
spia della temperatura.
2 Se la spia arancione si accende dopo aver mosso
il ferro, attendete che si spenga prima di iniziare a
stirare.
Nota Se la spia arancione non si accende dopo aver mosso
il ferro, signica che la piastra ha mantenuto la temperatura
e che quindi il ferro è pronto per l’uso.
Pulizia e manutenzione
Pulizia
1 Impostate il regolatore di vapore in posizione O,
scollegate la spina dalla presa e lasciate raffreddare
il ferro.
,
,
,
4239.000.6139.2

2 Per eliminare macchie o altri residui depositati sulla
piastra, utilizzate un panno umido e un detergente
liquido non abrasivo.
Per mantenere la piastra perfettamente liscia, evitate il
contatto con oggetti metallici. Per pulire la piastra, non
utilizzate pagliette, aceto o altre sostanze chimiche.
3 Per pulire la parte superiore del ferro utilizzate un
panno umido.
4 Risciacquate regolarmente il serbatoio con acqua
pulita. Dopo la pulizia, svuotate sempre il serbatoio
dell’acqua(g.9).
Doppio sistema anticalcare (per tutti i
modelli eccetto GC2522/GC2510)
Il doppio sistema anticalcare è composto da una pastiglia
anticalcare posta all’interno del serbatoio dell’acqua e
dalla funzione Calc-Clean.
Le pastiglie anticalcare evitano che il calcare si
depositi nei fori. Le pastiglie sono costantemente
attive e non devono essere sostituite (g. 10).
La funzione Calc-Clean rimuove le particelle di
calcare dal ferro da stiro.
Funzione Calc-Clean
Usate la funzione Calc-Clean ogni due settimane. Nel
caso l’acqua nella vostra zona fosse particolarmente dura
(ad esempio nel caso di fuoriuscita di pezzi di calcare
dalla piastra quando stirate), ricordate di usare la funzione
Calc-Clean con maggior frequenza.
1 Vericatechel’apparecchiosiascollegatodalla
presa di corrente.
2 Impostate il regolatore di vapore in posizione O.
3 Riempitecompletamenteilserbatoiodell’acqua.
Non aggiungete aceto o altri agenti disincrostanti nel
serbatoiodell’acqua.
4 ImpostateiltermostatosuMAX(g.11).
5 Inserite la spina in una presa di messa a terra.
6 Scollegatel’apparecchiodallapresadicorrentenon
appena la spia della temperatura si spegne.
7 Impostate il regolatore di vapore in posizione
Calc-Clean ( 1) tenendo il ferro sopra il lavandino.
Ilregolatoresisolleveràleggermente.
8 Tirateilregolatoredivaporeversol’altoe
rimuovetelo(g.12).
9 Tenete il ferro sopra il lavandino e scuotetelo avanti
eindietro(g.13).
In questo modo dalla piastra fuoriescono vapore
e acqua bollente contenenti eventuali residui di
calcareealtreimpurità.
10 Utilizzateunpo’diacetopereliminareglieventuali
residuidicalcarepresentisull’astina(g.14).
Nonpiegateodanneggiatel’astina.
11 Riposizionatel’astinanelferroinserendolapunta
esattamente nel centro del foro e la piccola
sporgenzapostasullatodell’astinanell’apposita
fessura. Impostate il regolatore di vapore in
posizioneO(g.15).
12 Ripetete la procedura Calc-Clean nel caso in cui il
ferrocontengaancoramolteimpurità.
Al termine della procedura Calc-Clean
1 Inserite la spina nella presa e fate riscaldare il ferro
in modo che la piastra si asciughi perfettamente.
2 Scollegatel’apparecchiodallapresadicorrentenon
appena la spia della temperatura si spegne.
3 Fate scorrere delicatamente il ferro su un panno
per eliminare eventuali macchie formatesi sulla
piastra.
Come riporre l’apparecchio
1 Impostate il regolatore di vapore in posizione O,
scollegate la spina dalla presa e lasciate raffreddare
il ferro.
2 Avvolgeteilcavoattornoall’apposito
supporto(g.16).
3 Riponete il ferro in posizione verticale, in un
ambiente sicuro e asciutto.
-
-
,
Tutela dell’ambiente
Per contribuire alla tutela dell’ambiente, non smaltite
l’apparecchio tra i riuti domestici ma consegnatelo a
un centro di raccolta autorizzato (g. 17).
Garanzia e assistenza
Per assistenza o informazioni e in caso di problemi, visitate
il sito Web Philips all’indirizzo www.philips.com oppure
contattate il Centro Assistenza Clienti Philips del vostro
paese (per conoscere il numero di telefono consultate
l’opuscolo della garanzia). Se nel vostro paese non
esiste un Centro Assistenza Clienti, rivolgetevi al vostro
rivenditore Philips.
Risoluzione dei guasti
In questo capitolo vengono riportati i problemi più
ricorrenti legati all’uso dell’apparecchio. Se non riuscite
a risolvere i problemi con le informazioni seguenti, vi
preghiamo di contattare il Centro Assistenza Clienti
Philips del vostro paese.
Problema Causa Soluzione
Il ferro è
collegato
alla presa di
corrente ma
la piastra è
fredda.
Si è vericato
un problema di
alimentazione.
Vericate il cavo di
alimentazione, lo
spinotto e la presa
a muro.
Il termostato è
impostato su
MIN.
Impostate il
termostato sulla
posizione richiesta.
Il ferro non
emette
vapore.
Non c’è
abbastanza
acqua nel
serbatoio.
Riempite il
serbatoio dell’acqua
(si veda il capitolo
“Predisposizione
dell’apparecchio”,
sezione
“Riempimento
del serbatoio
dell’acqua”).
Il regolatore
di vapore è in
posizione O.
Impostate il
regolatore di
vapore in posizione
ç oppure
é (si veda il
capitolo vedere
“Modalità d’uso
dell’apparecchio”,
sezione “Stiratura a
vapore”).
Il ferro non
è abbastanza
caldo e/o è
stata attivata
la funzione
antisgocciola-
mento (per
tutti i modelli
eccetto
GC2652/
GC2650/
GC2560/
GC2522).
Selezionate una
temperatura
indicata per la
stiratura a vapore
(da 2 a MAX).
Riponete il ferro
in posizione
verticale e aspettate
che la spia della
temperatura si
spenga prima di
iniziare a stirare.
La funzione
colpo di
vapore non
funziona
(per tutti i
tipi eccetto
GC2510).
La funzione
colpo di
vapore è stata
usata troppo
frequente-
mente in un
breve lasso di
tempo.
Continuate a
stirare in posizione
orizzontale e
attendete qualche
minuto prima
di utilizzare
nuovamente il
colpo di vapore.
Il ferro non
è abbastanza
caldo.
Selezionate una
temperatura
indicata per la
stiratura a vapore
(da 2 a MAX).
Riponete il ferro
in posizione
verticale e aspettate
che la spia della
temperatura si
spenga prima di
iniziare a stirare.
-
Problema Causa Soluzione
Durante
la stiratura
fuoriescono
impurità e
residui di
calcare dalla
piastra.
L’acqua dura
comporta la
formazione
di calcare
all’interno della
piastra.
Utilizzate la
funzione Calc-
Clean una o più
volte (vedere il
capitolo “Pulizia
e manutenzione”,
sezione “Funzione
Calc-Clean”).
La spia
sull’impugna-
tura
lampeggia
(solo
GC2560).
La funzione di
spegnimento
automatico è
stata disattivata
(si veda il capit
olo”Caratteris
tiche”, sezione
“Spegnimento
automatico”).
Sollevare il ferro
o muoverlo
leggermente
per disattivare
la funzione di
spegnimento
automatico. La spia
si spegne.
Sui tessuti
sono presenti
goccioline
d’acqua.
Non avete
chiuso
accuratamente
l’imboccatura di
riempimento.
Premete il tappo
no a sentire un
clic.
Sui tessuti
sono presenti
goccioline
d’acqua (solo
GC2640/
C2620/
GC2530/
GC2528/
GC2520/
GC2510).
La temperatura
selezionata è
troppo bassa
per la stiratura
a vapore.
Selezionate una
temperatura
indicata per la
stiratura a vapore
(da 2 a MAX).
Riponete il ferro
in posizione
verticale e aspettate
che la spia della
temperatura si
spenga prima di
iniziare a stirare.
Anche dopo
aver lasciato
raffreddare il
ferro o dopo
averlo riposto,
fuoriescono
delle gocce
d’acqua dalla
piastra (solo
GC2640/
C2620/
GC2530/
GC2528/
GC2520/
GC2510).
Il ferro è
stato riposto
in posizione
orizzontale
mentre c’era
ancora acqua
nel serbatoio.
Svuotate il
serbatoio dell’acqua
e impostate il
regolatore di
vapore in posizione
O dopo l’uso.
Riponete il ferro in
posizione verticale.
4239.000.6139.2
-
 1
1
-
 2
2
-
 3
3
-
 4
4
-
 5
5
-
 6
6
-
 7
7
-
 8
8
-
 9
9


Philips GC2510/02 Manuel utilisateur
- Catégorie
- Fers
- Taper
- Manuel utilisateur
dans d''autres langues
- italiano: Philips GC2510/02 Manuale utente
- English: Philips GC2510/02 User manual
- Deutsch: Philips GC2510/02 Benutzerhandbuch
Documents connexes
-
Walita gc 2528 02 power life Manuel utilisateur
-
Philips GC1421/02 Manuel utilisateur
-
-
Philips GC 4250 Manuel utilisateur
-
-
Philips GC4320 Manuel utilisateur
-
Philips GC3221 Manuel utilisateur
-
Philips GC3220 Manuel utilisateur
-
Walita GC2510 Manuel utilisateur
-
Philips GC1010/01 Manuel utilisateur
Autres documents
-
 Russell Hobbs 18616-56 Manuel utilisateur
-
Russell Hobbs Steam Glide Ultra Manuel utilisateur
-
 Russell Hobbs 26731-56 Manuel utilisateur
-
Rowenta ECO INTELLIGENCE DW6010 Le manuel du propriétaire
-
 Russell Hobbs 18618-56 Manuel utilisateur
-
Hotpoint SI C40 DLBL H Mode d'emploi
-
Hotpoint-Ariston SI С55 DEW Manuel utilisateur
-
Emerio SI-110298.4 Manuel utilisateur
-
-
 Russell Hobbs 23300-56 Manuel utilisateur


