
43Moonachie Rd.
Hac kensa ck, NJ 07601

ErrorAla rm
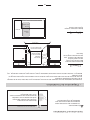
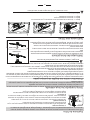
6 Dishwashing Programs
Depending on yourcleaning n eeds, youcanchoose
any o f t he 6 cy cl es t o bet t er c l ean
you rdishes .Choose fromHeavy, Normal, Eco,
Rinse,GlassandSpeed.
pre-programmed
St ainl ess St eelTub
The StainlessSteeltubof the dishwasheris made
ofto u gh and dura ble steel t hat i sre sist ant t o
staining.
RinseAidWarningIndicator
Th is allo w s t h e s tar t o f t h e p r o gra m t o be dela y e d
24h . The Ti meDelay feature a llowsyou t opro gra m
the dish washer a tyo urconve nie nce, sav ingyo u
t i m e and money.
PROGRAMS
6
1
Themanufacturermaymakemodificationswithout giving
priornotice.
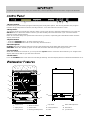
The FagorModel LFA-75IT has seve ralcharacteristics whic hseparateit from thecompetition.
TheseA re:
Error c odes on thedisplay w ill inf orm you of
problemswiththedishwasher.
Whent herinse ai ds inthe machineb egin tor un
low, an aler t on the pane l will b eclea rl yd ispl ayed
info rmi ngyou to ref ill them. This w ill ensure t he
uni t wil l ope ra te at o ptim um perf orma nce.
Time Delay feature

2
This appliance must be grounded. In the event
of a malfunction or breakdown, grounding will
reduce the risk of electric shock by providing a
path of less resistance
This appliance is equipped withan
equipment-grounding conductor and a grounding
plug. The plug must be plug ged into an appropriate
outlet that is installed and grounded in accordance
with all local codes and ordinances.
to the electrical currents.
Improper connection of the equipment-
grounding conductor can result in a risk
of electric shock. Check with a qualified
electrician or service representative
the appliance is properly grounded.
Do not modify the plug provided with the
appliance.
to ensure
that
If the plug does not fit the outlet,
contact a qualified electrician to install a proper
outlet.
Keep child away from
child away from the open door of the dishwasher,
there could still be some detergent left inside.
detergents and rinse aids. Keep
Do not abuse, sit on, or stand on the door or dish
rackof the dishwasher.
Do not touch the heating element during or
imme diately after use.
Do not wash plastic items unless they are marked
dishwasher safe. For plastic
check the manufactur recommendations.
items not marked,
er's
Useo nlydetergen t and r in seadditi ves des igned
for an automati cd ishw ash er. N ever use soap,
laund ry deterge nt orh and washing d et ergent
in your dis hwasher. Ke ept hese prod uc ts out of
re ach of chil d r en.
Dur in g inst alla tion , t he pow er s upp ly m ust n ot
beexcessively or dangerously bentorflattened.
Th ed oor sh ouldnot be le ft i n th eo pen pos ition
since th is could prese nt a t ripping ha zard.
Do not tamper with internal controls.
Do not operate your dishwasher unless all
enclosure p anels are properly in place. Open the
door very carefully if the dishwasher is operating,
there is a risk of water squirting out.
Do not place any he avy objects or stand on the door
when it is open as this could damage the door and
cause the appliance to tip forward.
When l oading it em s to be washed:
1) L ocat e sharp it ems so that they are not l ikely to
damagethe doorseal.
2) L oad sharp kni ves with t hehan dles up t ored uce
therisk ofinjuries.
When using yo ur di shw asher,
heatin gele ment.
make sure no pl astic
it ems com ein cont act wi tht he
I f the c or d is d a m a ged, i t m ust be
replacedby serviceagentorasimilarly
quali fie d perso n.
powersupply
a qualif ied
Pleasedispose ofpackingmaterials properly.
Use the dishwasher only for its intended function.
When disposing of a n old dishwasher, be sure to
remove thedoor be fore discarding.
Theapplianceis notintended foruseby young
childrenorinfirmpersons withoutsupervision.
Dishwash erd etergen ts ar estrong lya lkal ine,they
c an b eex tremely da ngerous i fswallow ed.Avoi d
c on ta ct w ith s kin and ey es and ke ep c hil dren away
fro m the dis hwasher when th edo or is ope n.
Be s ure to keep children away from the dishwasher.
Check th at the detergent re ceptable is empty aft er
completio nof th ewash cycle.

To get t he bes tp erf orma nce from yourd ishwashe r, read a ll op er atingi nstr uctio nsb eforeus ing for t he fi rst t ime.
3
1
2
3
4
5
6
7
8
9
10
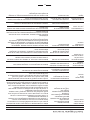
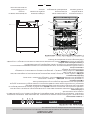
UpperRack
Spra yArms
Lower R ack
Wate rSo ftener
Det erg entD ispense r
Cutlery Bas ket
MainFilter
Cup She lf
5
6
7
8
RinseAidDispenser
Filt er
Inlet Valve
Junct i o n Bo x
9
10
12
11
3
2
14
11
12
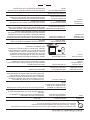
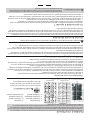
1. D isplay win d ow
2.Delay button
Th is opt iona llows yo uto delay th estart ofa wash cycl eby up to 24 ho urs. When the dishwa sher is o n, pr ess the
DELAY
button toc hoose the number of ho urs you wantt o delay the start of the wash cycle.Th eh our swi ll
in the displaywindow.
be
di splayed
Note:To cancel t he delayh our op tion before th ew ash cycle sta rts, repeate dl yp re sst heDE LAY butt on until t he
display r eads“0:00”.
3.
OP T IO N S
OP T IO N S
About theoptions:
HI T EMP
DRY
Options button
Pr ess the button ,“H i temp” w ill be sel ected.
Pr ess the button twic e, th e“ Dr y”w il l be s elec ted.
When t he “ HiTemp” opt ioni sse lected,t he t emperature o fth ewa terw il lr each m ax.
Whe nthe “ Dry” optio ni s selected ,th ehe ater wil l work dur ing thed ry p roce sses.
①
②
14 0°F (60° C)
Heat
Hea t
HEAT
1 2 3 4 5
4.
Cyc les
Cycl es button
When th edishwa sher is t urn ed on, yo uca npr es st he b ut to nto sele ct wa sh cycle.Ali gh ton the
di splay will i ndicate whi chcycle has b een sele ct ed.
thedesired
5.
POWE R
Power but ton
Press the button to turn . The LED when the dishwas heri son.theunit o nan dbe ginwashing display will turn on
Int hissc reen, yo uw ill se ethe program re mai ning time ,de lay time opt ion s, the ru nning ind ic ator,t he pro gram
indicato r,High , hea t , ri nse aidsi nd icator and er ror c odes.te mper aturei ndicator dry ind icator

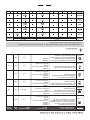
4
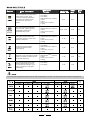
For loads,
such as , plates,glasses
andl ightly soil ed p ans.
daily cycle.
pots
normal household
Standard
For lightly soiledloads such
as and
lightly soiled pans.
plates, glasses, bowls
For t he
loads such as pots, pans,
casseroled ishesand plates
thathavebeen sittin gw it h
driedfo odon themfo ra
whi le.
heavies tor mostsoiled
Ashorter wash for lightly
soiledloadsth at donot
need drying.
Delicatecycleonlytobeusedfor
dishesand gla ss es that need to
ber insed and dr ied.
For rinsingparti allo ads tha t
willbe washed later.Do not
use detergentwith this cycle.
This cycledoesnotinclude
heated dry.
(AHAM)
Pr e-W as h
Pr e-W as h
Pr e-W as h
MainWash (60 )
Rinse
Rinse
Rinse (60 )
Drying
140
140
℃
℃
°F
°F
Pr e-W as h
MainWash (50 )
Rinse
Rinse (55 )
Drying
122
131
℃
℃
°F
°F
Pr e-W as h
MainWash (50 )
Rinse
Rinse (50 )
Drying
122
122
℃
℃
°F
°F
Pr e-W as h
MainWash (50 )
Rinse
Rinse (50 )
Drying
122
122
℃
℃
°F
°F
Pr e-W as h
Pr e-W as h
MainWash (55 )
Rinse
Rinse (55 )
Drying
131
131
℃
℃
°F
°F
Pr e-W as h
Pr e-W as h
2:1 0 6 .42
2:10 - 2:20
3.65
1:30
3.70
1:3 0 3.65
1:2 0 4.57
0:25 1.93
The inlet water temperat ure must be120 . If thi s temperatur e is not met, the wash perfor mance will be compromised .°F
Yes
Yes

5
To r em ove ha rdw ater try th efo llowi ng s tep si n this order:
Ru nd ishe sth rough a normal wash pro gram.
Removeallmetaldishware,such ascutlery,pans,etc.,
fr o m th e di shwasher.
Donotadddetergent.
Po ur twoc ups of v inegar in to a bow land se tthe bowl fa ce
up on the l owe rrac kof the di shwasher.
stains,
U se o nlydete rge ntspecifi callym adef or u se indis hwa sher s.
K e e p your deter g ent f resh and d r y. Pl eas e do not stor e deter g ent
indispenser until readytouse.
The rinse aid is released during the fina l rinse to p reve nt
wa ter from for ming dr ople ts on your dish es that c an leave
spots and streaks. It also improves dryin g by al lo wing
wa ter to " sheet" off t h e dishe s.
Your dishwa sher s are d es igned to use liqui d rinse aids.
The rinse aid dispens er i s loca ted inside the door nex t to
the dete rgent dis penser. To fi ll the dispense r, open th e
cap and pour the rinse a id into the dispen ser unti l the leve l
ind icator turns complete ly blac k. The dispens er holds
about 3 .4 o z (100 ml) ml of liqui d r inse aid.
Be careful not to overfill the di spense r, as this can
cause over sudsing of the Wipe away
any spil ls w i th a da mp cloth . Don't f org e t to r eplace the
dis penser cap before
you close the dis hwa sher door.
If your household wat er i s soft, you may not need add itional
rinse agentsinyour water as it maycause a whitefilm
around you r dish es.
dete rgen t in t he unit.
To open the dispens er, turn the c ap t o the "open" (left)
arrow and lift cap up until op en.
Pourtherinse aid into thedispenser, being careful
not to overfill.
Re turn thec apbyin serting it alig ned with "op en"
arrow and turning it to the (right) arrow position."closed"
Button
Indicator
Dispenser cap
Adj ustable setting
Adjustable setting
Note: Pleas e use on ly th erec ommenced amo unt of di shwashing li quid whe nw ashingy our di shes.
The d ete rgent d ispe nser mu stbe refi lled befor eth es tarto f ea chw ash cycle. Pleas e fol low the manua lin str uctions
provided inthe" Was h C ycle Tabl e" on page4 .
Asa rule of thumb, you gene rally o nly nee d o ne tables poo n of d ish washing detergent fo r a no rm al
more h eavily so il ed items p leas er eferto the ony our d ete rg ent packagi ng . Please make sure
toa dd the deterg ent just befo re s tart ing t he dis hwa sher.
h ousehold wa sh
l o ad. F or in str u ctions
Detergent Usage
Please f ollo w the on t he back of t hed eter gent pack aging th e pro peram ou nt ofd eter gen tto u sef or
t h e ty p e of l o ad you h a ve. The amo u nt of deterg ent can var y d epending on t he h a rdn ess of y o ur water.To de ter mine
you r wa terc ons istency, please c onta ct y our l ocal wat er company. Gener al ly,th e har de rthe water,t hem ore
deterge ntyou w ill ne edt o us e.
instructions for
Pleasekeep dishwashingliquidoutofthe
reachof children as it is v erydangerou s
f or t hem to cons ume.
Am e asured amount o f rinse aid is rel eased durin g t h e fi nal rin se to ass ist in r insing dis h es properly,
k eep i ng them residue and str ea k f re e.As with detergent, t he a mou nt of rins e ai d ne eded fo r your
dishe s depends o n the hardnes s of the wa ter in your area . If you h ave very soft househ old wa ter,
y ou m ay need to di lute or o mit the rinse aid.
The rinse ai d dispense r i s designed with four beg i n y our wash cycles w ith the
dispenserset on . If spots a nd streaks are evident, increase theamountof rinse aid
dispe nsed i n the machi neby re mov ing t he dispenser lid and rotat ing the dial to . If th e
dishe s stilla re not drying properly or a re spotted, incr ease th e di al to .
sett ings . Ple ase
setting2
setting 3
setting4

6
As the rinse ai dd iminis hes, the siz e of th eb lack dot on the r inse
aid leve l indica to r changes, as il lustratedb elow.
Ful l
3/4full
1/2full
1 / 4ful l- Shoul d ref ill t o elim in atespott ing
Empty
Indicator
When th e dishwasher begins to r un out o f rinse ai d,t her ins eai d dispense rin dicato r wil l show a decr ease in th es ize
of the black dot.As t heri nse aid in the dispe nserd iminishes the si ze of t he black do tdimi nishes. You should neve r
let t he rinse aidg etb elow 1 /4 f ull.
Th eu pper r ack is des igned to hold mo red elica te a ndli ght er dis hware such as gl asses, small pl ates, smallb owls a nd
s ha ll owp ans( asl ong ast hey aren ott ood irty).
Po sit ion the d ishe s an d co okw are so t hat t hey do n ot g et m ove dby the spray of wa te r.
Th eh eig htof the upp erra ckc anb e chang edb y changing t heh eight of the whee lsin the rail .
Pots , ser vin g bowls, e tc., must al ways b ep lac ed
Deep potss h ould bes lanted t o allo wwa tert o flo wout.
The b ottom ra ckf eatures
fac i ng do wn.
9
6
8
Breadandbutterplates
Cu tl ery b ask e t
4
Dinn er plat es
Ser ving pla t e
1
Cups
2
Smal l bo wls
3
4
Brea da nd bu tter plat es
Glasses
5
Saucers
7
Ser v ing bow l
5
Sau cer s
Use of the Upper Rack
UseoftheLower Rack
We re com mendt haty oup lace lar geitems whi ch ar em ost d iffic ultto cl ean o nthe low err ack: pot s,pa ns,l ids, serv ing
dishesandbowls;as shownin thefigure
servin gd ishes and lids on the s ide oft he ra cks i nor dert oav oid b loc kin g the rot ation of th e
t ops pray arm.
below.
Were commendplacing
fold ov er tine r owst hat c an be us ed o nla rger pot san dpa ns.
4

7
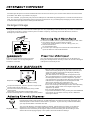
Yo ucan eas ilyad da dish to the was hin gc ycle any time b efo re the deter gen tcup ope nst o relea se the de terge nt .
Please followthe directionsbelow:
Slightlyopenthedishwasher door tostopthe
washing c ycle.
Once the washing spray armsstop moving, yo ucan
open t he dis hw ashe rdoo r comple tely.
Add a ddi tiona l dish es,glass esor cook ware onto
thedishwashingrack.
Close t he di shwasher door, the washer w il l con ti nue
its cycl ea fter1 0se conds.
4
3
2
1
1. Make sure the p lug is inserted intothe
2. Make surewater supply is turned onto full pressure.
3.
4.
5. P ress th e he wi ll tu r non.
6. Press button toselecta (
select or pro gram.
7 . C lose t h e doo r, t h e m ac h ine wi ll af ter 10 s ec ond s .
of th e d is hwa sher prope r wal l out le t.
Loaddishes, bo wls,glasses and/orpots intothe dishwasher.Pleasesee the "Lo ading Dishwasher"
s ec tio n i n t he ma nua l f or l oad in g a nd a r r a ngem e nt det a il s.
Pour insuggested amountofdetergent( seeDetergenta ndRinseAidsections forsuggestions).
button.T
the Cycles washingprogram. If you are using anall-in-onedishwashing pod,
please Heavy, Normal Eco
beginworking
Po w er Pow e rindicat or li ght
the ma chi newi ll workin ga ft er1 0 seconds.conti nue
If you ope nthe door , the ma chine wi llpa use.W hen you closet he doo r,during aw ash cycle
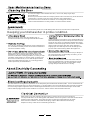
1 Once the dishwasher has begun its cycle, it canonlybe changed if the dishwashingdetergenthasnot
yet been released. If ithasbeenreleased, follow thebelow instructions.
2 Pres s button 3 seconds toSlightly open thedoor to stop the wash cy cle. and hold the "Cyc le" for
cancel the running c ycle. Once the curren t wash cycle has been fully dep rogrammed , refill y our
detergent dispenser andselect yournewwash cycle (See the sectionentitled "Startinga WashCycle" ).
Operat in g t he Di shwas her
Changinga Washing Program
Once the wash i ng c y cle is c omp l ete and the dis h washer h as s t op pe d, an a la rm w ill g o off f o r about 8se con d s in formi ng
youof cyclecompletion. Atthatmoment, thedishwasherwillgointo stand-by mode,in whichtheunitis still on with no
pr ogr am running. We recommend that youm an ually shut the un it off and wait about1 5 minute sbe fore unlo adi ngyou r
dishes,givingtimefor thedishestocooloff and fullydry.
Pl ea se take caution wh en open ingth e dis hwasher w hile i nwashin g mode, the w ater is ext remely
hot and mayburn you.Plea sekeepkidsaway fromthedishwasherwhileinwashingmode.
WARNING!

8
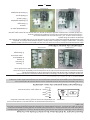
Coarse filter
Large ri tem s,s uch as p iec eso f bone or glass, t hatc ould clog thedra in aret rapped
in the coarse f ilter. To remove a nit emcau ght in this filter,gen tly squee ze the t abs
on t op of this filter and lift it out.
F or your c on ve nie nc e, we ha ve p la ced t he drain p ump a nd fil t er i ng s yst e m wit hi n e as y r e ach in si de t h e t ub.
Th er e are thr eec ompone ntso f the fil ter in g system: the main fi lter, the coar sefi lter, and the fine fil ter.
2
2
Fine filter
This filter holds foo dr esi due in t he sump ar ea pr eve nting itf rom bein g
redeposited onto the d ishe sdu ring a cycl e.
Mainfilter
Food particles t rapped bythi sfi lter are broken d own by a special jet on
the low ers pray a rm and wa shed down the drain.
1
3
3
1
S tep Tur n the fil t e r a nd l i ft it up.
:
1
count erclockwise
Step L iftthe Mainfilterup:
2
Step Liftt he Finefilter up:
3
2
1
3
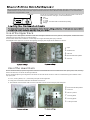
ProtectingAg ainst Frozen Pump Damage
1. Cut of f t he ele ctric al powe r t o the d ishwashe r.
2. Turn o ff th ewa ters upply and d isconnect the wa ter i nle t pipe fr omt hewater v alve.
3. Drai n the w ater f r om the i n let pipe and water valve. (Us e a pan to c a tch t h e water)
4.Reconnectthewaterinletpipetothewatervalve.
5.Remove thefilteratthebottom of thetubanduseaspongetosoak upwaterinthesump.
Cleaning the SprayArms
If your dishwa sherd oes not w orkb ecaus eof ice,
please contact prof ess iona l service perso ns.
I t is n ece s sar y to clea nthe spr ay arm s reg ul a rl y in order t o pr event
th e c logg ing of th e je t sa ndb e ari ngs from ha r d wat er che mic als.
To rem ov e the up pers pray arm ,tu rnt he nu tclo ckw ise and
removeth ea rm.
To r emove th elo wer spray ar m,pull it upw ard.
Washthearmsin soapywarmwaterandusea softbrushto
clean th ej et s.Re pl ace th emaf ter rinsing them tho rou ghly.
Please follo w steps 1 thro ugh 3 in order to remove the filter s ystem . In o rd er t o reinstal l,
please the steps in reverse or der.perform
Itis impo rtan tto protect your pum ps fr om frozen w ater dam ag e cau sed by the d ropo fin ter na lho me temp er ature .
Ifyour home temperaturegoes below 34 foralong periodoftime,youcan have icebuild inthelinesand around
the moto rs. Haveyou rplu mber f ollow th e belo wst eps if you w aterp ipes
°F
fre eze.

9
Ne ver u sea spray c leaner to cl eanthe door pane las itco ulddama get he door lockand elec trical compo nen ts.
To c l ean the use a s of t, dam p r ag
prevent
edgesofthe dishwasher door, towipe
around the unit.
Be sure to the waterfromseeping intothe doorandontoanyof theelectrical
c omp on ent s . I t is bes t n ot to u se spr ay cl ean er s on t he d ish was h er.
It is also be st not t o use abra si ve c le ane rs or s co uri ng pads on the oute r
surfaceof thedishwasherastheytend to scratch and leave mark s.
Af ter ev ery wash, l eav e the doo r sli ghtl y ajar so
moistureandodors are not trapped insidethewasher.
Prior t o any cle aning o rmai nte nance to th edi shwasher,
it is recommence dthat you disc onnect the u nit from the
electr ical for saf ety.outlet
When cleaning
werecommendthatyoudo not use
the exterior and rubber partsof the
di shw ashe r, use
solv ents o r abra si ve c le aning pr odu cts , use on lya c l oth
an dwarm soa pyw ater. To r emove spot s or stai ns fr o m
thesurfaceof theinterior, use aclothdampenedwith
w ater and a lit tlew hite vine gar,ora cle aning pr oduct
m ade spe c ifically for d ishw as h ers.
If you should go o n vaca ti on,w e re com mend th at you
follow the below procedur e to kee pthe uni t i ni ts be st
shape. Run
outlet.
a w ash cycle with the dishwasher e mpty
andthen removethep lug from the Turn offthe
water supply and leave th e door o f the a ppliance
slightly a jar. This will help the se als last l on ger and
preve ntodor s fro mfo rmin g wit hin the appl iance.
If the be mov ed, try to kee p in
th e ve rtical p o sit io n. If ab s olutely necessa r y, i t can
be position ed on i t s ba c k .
dishwasher needsto it
One ofthe manyfactorswhich can
seal s
of the dishwashe r.
cau seo dors to
forminthe dishwasher isfood trapped in the
Periodic cleaningwitha damp
sponge w illp revent thi sfr omo ccur ring .
Th is dis hwa sher is designed for oper atio non an adeq ua tely w ire d indi vidu al 1 20VAC,6 0Hz . Use
copper wireonly.Timedelayfusesor circuit provide
circ uit s erving only this app liance.
recommend ed 15
amp fus es and bre akers are reco mmended as t he y as epa ra t e
W hen installin gt he dis hwashe r,be sure no t to in sta ll it d ire ctly in fro ntof t he
outletit will beplugged into asthiswillblockaccessto it.Pleaserefer totheinstallation manual.
Aftermakingsure thevoltageandthe frequencyvaluesforthe currentin thehome
cor respo nd to t hose on the rating pl ate and that the electr ical syst emi ssized tor the ma ximum
vol tage on the r at ingp late, inse rt the pl ug into
If the e lec tr ical the pl ug, r eplac e t he usi ng
ada ptor s as the y co uld caus eov erh eat in gan d b urns.
a prope rlyg rounde delectr ical outl et.
outletis notsuitedfor outletinstead of
Keepingyourdishwasher inprimecondition

10
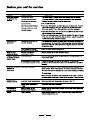
Before you call for service
Problem Possib le Causes What To Do
Noise Some o f the so unds you’ ll
Detergent cup opening.
he ar are normal
The motor starting during the drying period.
Water draining out of the tub immediately after y ou
start the dishwasher.
Utensils are not secure in the
Make sure everything is secured in dishwasher.
rack or something small has
dropped into the rack
Motor hums
Detergentleftin
Dishes block the
Reposition the dishes.
dispenser cups
Detergen t
d ispense r
Water will not pump Drain is clogged
outofthetub
Suds in the tub
Rinse agent was spill ed Always wipe u p rinse age nt spills imm edi at e ly.
Sta in e d dishw asher
parts
Detergent wit h
Some detergents contain colorant (pigment or dyes) that
sma ll colorant was used
willdiscolorthe with extendeduse.interior of the tub
C heck the detergent cup for s igns of an y d isc olo ra tion.
If cup is discolored, change to a detergent without any
colorant.
Some to mat o-base d
U se of th eRINSE ONLY
cycleafteraddingthedishtothe
foods can stain
load can decr ease the of s taining.chances
Dishes and flat ware Low inlet water temperature
Make sure inlet water temperature is correct
(120 F).
not clean
Wat er pressure is tempor ar il y
low
Check your water pressure by turning on yourfaucet,
if the wat er runsout slowly, please wait for the water to
return to a norma l pressure before d ish washer u se.
Air gap is cl ogged
Clean the air gap.
Improper rack l oading
Make sure large dishware does notblock the detergent
dispenser or the wash arms.
Belowaresome troubleshootingtipswhichcansaveyoutimeand money. Pleasereviewthe
chartson thefollowing pages.
You mayn ot nee d toc allforservice.
Correct detergent was not used
Dishwasher has not been us ed on a basis.
If you do not use your dishwasher fo r
run th e shortest wash
program once every week . This will help keep t he seal
moist
consistent
long perio ds of time,
we r ecommended that y ou at least
and help avoid t h e motor fr om m aking nois e s.
Check if your kitchensink is draining .If not,
please
properly
ca ll a p lumbe r.
Use only thespecial dishwasher detergentt o
suds.
If this occurs, open th e dishwasher and letsuds
evaporate. Add 1 gallon of cold water to the tub.
Close t he dish washer cycle to
drain out the water. Repeat if necessary.
avoid
an overaccum ulati on and ov e rflo wing of s oap
and start the wash
Checkthe filter
(See section titled )"Cleaning The Filter"
Checkdrain hose.

11
•

The installati on of t he pipes
and el ectrica lequi pments
should be do ne b y
a pr ofe ssio n al.
Electrical Shoc kHazard
Disconnect electrical power
before installing dishwash er.
Failuretodoso resultinmay
electricshock orpossibledeath.
Theinstallation ofthedishwashershould benear theexisting hosesandpowercord.
O ne sid e of th eca bin etsi nks houldb e cho sen tof acilita te t he conne ct io no f drai nho ses oft he dis hwa sher.
location inlet, drain
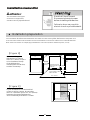
Installationpreparation
Note :Please check t he accompanyi ng insta llat ion ac cessories (ho ok for aest hetic pa nel , screw )
●
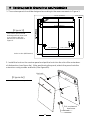
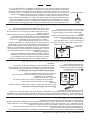
【】Figure 2
【】Figure 1
Top of Counter
Top of
Dishwasher
Opened
dishwasher
door
Minimum s pace of 1.97 " (50mm).
Wheninstalling your
dishwasher,be sure to
l ea ve 0 .2 " (5m m) of sp ace
o r le ss be t wee n th e to p
of thedishwasher,
including thecloseddoor,
and the countertop.
90 °
90 °
(825-850mm)
22.83"
(580mm)
Space between c abinet
bottom and floor
Electrical, drain and
water supply line
entrances
12
32.48" - 33.46"
If y our dis hw as her is to be i ns tal l ed
nextto a wall orcounter, besurethat
th er e is a mi n im um s pa ce o f 1.97" ( 50 mm )
betweenthe opened dish washer
doorand the adjacent wa llorcounter.
3.94" (100mm)
3.15" (80mm)
23.62" (600mm)

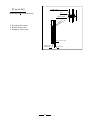
1. T he panel be acc ording to Fig ure 3.cust om s hou ld des ign ed the measure men ts in
The panel should
be
inaccordancewith the
cu stom
des ig ned an d me asured
dimensions illustratedin
Figure 3.
【】Figure 3
Units: Inches (Millimeters)
23. 38"( 594mm)
22.36" (568mm)
10"(254mm)
21.25"( 540mm)
0.59"(15mm)
9.84"(250mm)
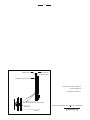
Insta llation of custom panel
【】Figure 4a
2.Install the hook on the custompanel and put thehook into the slot oftheouterdoor
ofdishwasher(see figure 4a). After positioningthe panel,attach thepanelontothe
outer doorusing screws and bolts (See figure4b).
Hop hook
St4 countersunk
head screw
Lower hook
13
1.5" (38mm)

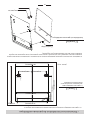
Installationof custom panel
【】Figure 4b
1. thecover
2. the screw
3. thecover
Remove
Attach
Replace
Custom
door
Hook for doorcustom
Outerdoorof
dishwasher
Spacer for door
Cover
4X18 screw
14

【Figure4b】
14
Installation du panneau esthétique en bois
1.Otez le capuchon
2.Plantez la vis
3.Retournez le capuchon
vis 4x18
Couvercle
Espacement pour porte du meuble
Crochet pour porte esthétique
Porte extérieure
du lave-vaisselle
Porte de meubles

【
Figure3】
【Figure4a】
13
·Dimensions et installation de panneau esthétique
1.Le panneau esthétique en bois pourrait être traité conformément à la figure 3.
Le panneau esthétique doit
être traité en conformité avec
les dimensions illustrées
(Unité : mm)
2.Installez le crochet sur le panneau esthétique en bois et de mettre le crochet dans la fente de la porte
extérieure du lave-vaisselle (voir la Figure 4a). Après l'avoir positionné, fixez le panneau sur la porte
extérieure avec des vis et des boulons (voir Figure 4b).
Installation du panneau esthétique
Crochet Hop
Vis à tête fraisée plate St4
Crochet inférieur
12- φ
2
Hole deep 10
23.38"(594mm)
22.36"(568mm )
10"(254mm)
1.5"(38mm)
1.18"(30mm)
21.25"(540mm)
0.59"(15mm)
26.77"(680mm)
19.65"(499mm)
9.84"(250mm )
2.56"(65mm)
6.8"(172.5mm)

【Figure2】
【Figure1】
12
Instructions d'installation
À l'attention de:
L'installation des conduites et des
équipements électriques doit être
effectuée par un professionnel.
MISE EN GARDE
Risque de choc électrique
Coupez l'alimentation électrique
avant d'installer le lave-vaisselle.
Ne pas le faire peut entraîner la mort
ou un choc électrique.
· Préparation de l'installation
La position d'installation du lave-vaisselle doit se trouver près des tuyaux d'arrivée d'eau et de vidange
et du cordon d'alimentation existants.
Un côté de l'évier de l'armoire doit être choisi pour faciliter le raccordement des tuyaux de vidange du
lave-vaisselle.
Remarque : Veuillez vérifier les accessoires d'installation joints (crochet pour panneau esthétique, vis)
Dimensions de l'armoire
Moins de 0,2 po (5 mm)
entre le haut du lave-
vaisselle et l'armoire, et la
porte extérieure alignée su
l'armoire.
Espace minimum lorsque
la porte est ouverte
Lave-
vaisselle
Porte du
lave-vaisselle
Espace minimum de 50 mm (1,97 po)
Enceinte
90 °
90 °
23.62"( )600mm
(825-850mm)
(
22.83"
580mm)
32.48" - 33.46"
Arrivée des
conduites
électriques, de
vidange et d'eau
Espace entre le bas
de l'armoire et le sol
3.15"(80mm)
3.94"(100mm)

11
Avant d'appeler le service
Problème
Causes possibles
Que faire
Traces et films
sur les verres
et les couverts
Eau très calcaire
Basse température de
l'arrivée d'eau
Surcharge du lave-vaisselle
Mauvais chargement
Détergent en poudre vieux
ou humide
Distributeur de produit de
rinçage vide
Trop peu de détergent
Utiliser un produit d'aide au rinçage pour enlever les taches et
prévenir une nouvelle accumulation de film. Pour enlever les
taches tenaces et un film pré- existante de la verrerie :
1. Enlevez tous les ustensiles métalliques du lave-vaisselle.
2. N'ajoutez pas de détergent.
3. Lancez votre lave-vaisselle et commencez le cycle de
lavage. Le cycle prend environ 30 minutes pour arriver à sa
portion de lavage fort (le lavage principal). C'est le meilleur
moment pour ajouter le détergent.
4. Ouvrez la porte du lave-vaisselle et versez 2 tasses (500
ml) de vinaigre blanc dans le fond du lave-vaisselle.
Fermez la porte et laissez le lave-vaisselle terminer le cycle.
Si le rinçage au vinaigre n'a pas d'effet : Répéter la séquence
ci-dessus, mais utilisez ¼ de tasse (60 ml) de cristaux d'acide
citrique au lieu du vinaigre
Des nuages
sur la
verrerie
Combinaisons d'eau douce
et de trop de détergent
Lorsque cela se produit, les taches seront gravées à jamais
dans votre verrerie. Pour éviter cela, utiliser moins de
détergent si votre eau est adoucie. Lavez la verrerie dans le
cycle de lavage le plus court.
La température d'arrivée
d'eaudu lave-vaisselle est
supérieure à 150 °F
Baissez la température du chauffe-eau.
Marques noires
ou grises sur la
vaisselle
Des ustensiles en aluminium
se sont frottés à la vaisselle
Enlever les marques avec un nettoyant abrasif doux.
Pellicule jaune ou
brune sur les
surfaces internes
ou vos tasses
Taches de thé ou de café
Un film jaune ou brun global
peut provenir de dépôts
de fer dans l'eau
Retirez la tache à la main, en utilisant une solution contenant
½ tasse d'eau de Javel et 3 tasses d'eau chaude.
Un filtre spécial dans la conduite d'arrivée d'eau est la seule
façon de résoudre ce problème. Contactez une entreprise
d'adoucisseur d'eau.
Un film blanc sur
les surfaces
internes
La vaisselle n'est
pas bien sèche
Le lave-vaisselle
ne fonctionne pas
Vapeur
Des minéraux provenant
d'une eau dure
Basse température de
l'arrivée d'eau
Le distributeur du produit
de rinçage est vide
Le fusible est grillé ou le
disjoncteur s'est déclenché
Ceci est normal
Pour nettoyer l'intérieur du lave-vaisselle, appliquez un
détergent pour lave-vaisselle avec une éponge humide.
Enfilez des gants en caoutchouc. N'utilisez pas un nettoyant
quelconque autre que du détergent pour lave-vaisselle car
cela pourrait provoquer une mousse excessive.
ATTENTION
Avant de nettoyer l'intérieur, attendez au moins 20 minutes
après un cycle que la température baisse. Ne pas le faire peut
entraîner brûlures.
Assurez-vous que la température d'arrivée d'eau est correcte
(voir page 4).
Vérifiez le distributeur de produit d'aide au rinçage.
Remplacer le fusible ou ré-enclencher le disjoncteur. Retirez
tous les autres appareils du circuit.
De la vapeur sort par l'évent pendant le lavage, le séchage
et lorsque l'eau est pompée.

10
Avant d'appeler le service
Voici quelques conseils de dépannage qui peuvent vous faire économiser du temps et de
l'argent. Veuillez examiner les tableaux des pages suivantes.
Vous pouvez ne pas avoir besoin d'appeler le service.
Problème Causes possibles
Que faire
Bruit
Certains bruits que vous
entendrez sont normaux
Les ustensiles se déplacent
dans les paniers ou un petit
quelque chose a chuté dans le
panier
Le moteur ronronne
Ouverture du réservoir à détergent.
Le démarrage du moteur au cours de la période de
séchage.
L'eau qui s'écoule de la cuve immédiatement après le
démarrage du lave-vaisselle.
Assurez-vous que tout est arrimé dans le lave-vaisselle.
Lave-vaisselle n'a pas été utilisé régulièrement.
Si vous n'utilisez pas votre lave-vaisselle pendant de
longtemps, il est recommandé de lancer le programme
de lavage le plus court une fois par semaine. Cela
permet aux joints de rester humide et d'éviter des bruits
de moteur du lave-vaisselle.
Reste de détergent
dans le distributeur
Des plats bloquent le
couvercle du détergent
Repositionnez les plats.
L'eau n'est pas
pompée hors de
la cuve
Le drain est bouché
Vérifier le tuyau de vidange.
Vérifiez le filtre (voir la section intitulée « Nettoyage du filtre »)
Vérifiez si votre évier de cuisine se vide correctement.
Si non, appelez un plombier.
Savonnée dans
la cuve
Le bon détergent n'a
pas été utilisé
Utilisez uniquement le détergent spécial pour lave-
vaisselle pour éviter un débordement de mousse de
savon. Si cela se produit, ouvrez le lave-vaisselle et
laissez la mousse retomber. Ajouter 1 gallon (4 litres)
d'eau froide dans la cuve. Fermez et verrouillez le lave-
vaisselle, puis Lancez le cycle de lavage pour évacuer
l'eau. Répétez si nécessaire.
Du produit de rinçage
s'est renversé
Toujours essuyer immédiatement l'agent de rinçage
renversé.
Des parties du
lave- vaisselle
sont tachées
Un détergent contenant
un colorant a été utilisé
Certains aliments à base de
tomates peuvent tacher
Certains détergents contiennent des colorants (pigments
ou teintures) qui décolore l'intérieur de la cuve lors d'une
utilisation prolongée. Vérifiez si le réservoir à détergent
présente des signes de décoloration. Si le réservoir est
décoloré, utilisez un détergent sans colorant.
Utilisation du cycle RINSE ONLY (rinçage seulement)
après l'ajout de plat à la charge peut diminuer le niveau
de coloration.
Assiettes et
couverts pas
propres
Basse température de
l'arrivée d'eau
La pression d'eau est
temporairement basse
L'arrivée d'air est bouchée
Mauvaise chargement du
panier
Assurez-vous que la température d'arrivée d'eau est
correcte (voir page 4).
Vérifiez la pression de l'eau en ouvrant le robinet,
si l'eau s'écoule lentement, attendez qu'une pression
normale de l'eau revienne avant d'utiliser le lave-vaisselle.
Nettoyez l'arrivée d'air.
Assurez-vous que les grand ustensiles ne bloquent pas
le distributeur de détergent ou les bras gicleurs.
La page charge ...
La page charge ...
La page charge ...
La page charge ...
La page charge ...
La page charge ...
La page charge ...
La page charge ...
La page charge ...
La page charge ...
-
 1
1
-
 2
2
-
 3
3
-
 4
4
-
 5
5
-
 6
6
-
 7
7
-
 8
8
-
 9
9
-
 10
10
-
 11
11
-
 12
12
-
 13
13
-
 14
14
-
 15
15
-
 16
16
-
 17
17
-
 18
18
-
 19
19
-
 20
20
-
 21
21
-
 22
22
-
 23
23
-
 24
24
-
 25
25
-
 26
26
-
 27
27
-
 28
28
-
 29
29
-
 30
30


Fagor LFA-75IT Manuel utilisateur
- Catégorie
- Lave-vaisselle
- Taper
- Manuel utilisateur
dans d''autres langues
- English: Fagor LFA-75IT User manual
Documents connexes
Autres documents
-
Fagor America LFA-45X Manuel utilisateur
-
Proline DWIP 12 SS Operating Instructions Manual
-
Haier DWL7075MBSS Manuel utilisateur
-
Crosley CDB350NW5A Le manuel du propriétaire
-
Crosley CDB900NS5A Mode d'emploi
-
-
Haier DWL3525DBBB Manuel utilisateur
-
Jenn-Air JDB1255AWR0 Le manuel du propriétaire
-
Far LVC518DW Le manuel du propriétaire
-
Whirlpool ADG 195 Mode d'emploi